Our Design Plan for our DIY Bathroom Reno!
So I’ve been talking about this for months and teasing this project for maybe a year, and the time has finally come for me to share our DIY bathroom renovation design plan! I’m equally nervous and excited about this, for so many reasons. More excited than nervous now that I have done so much planning and it’s coming down to the actual work! It is high time that I shared our plans with you!
Figuring out the Floor Plan
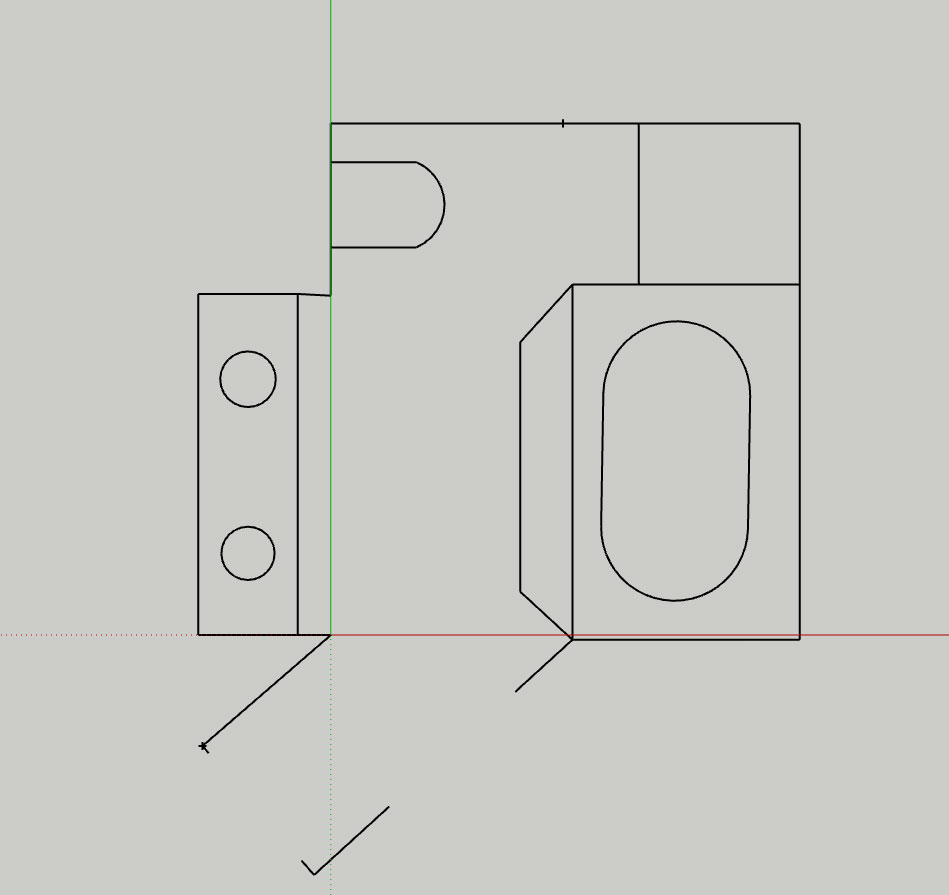
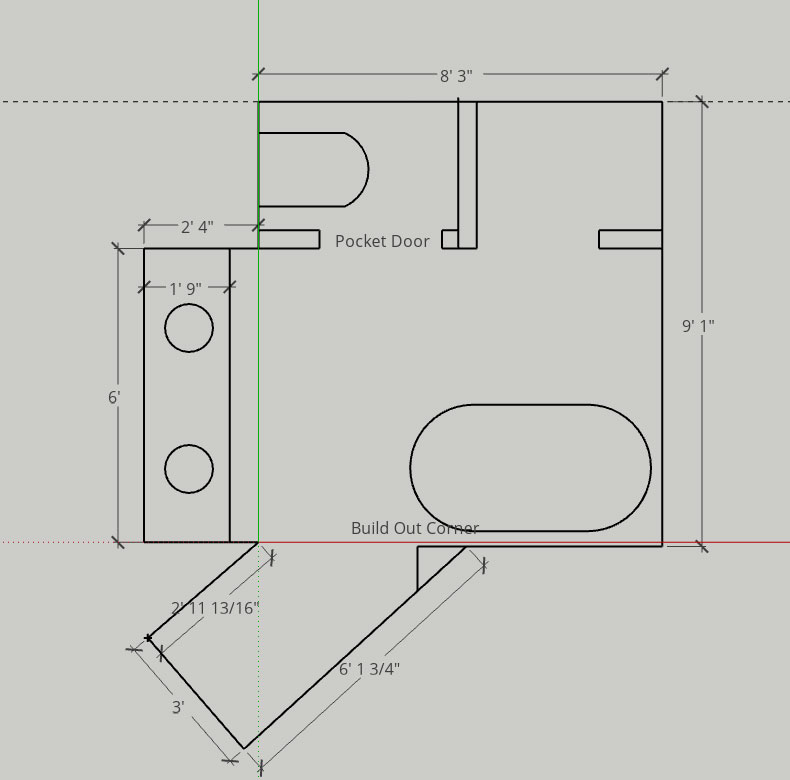
The first part of figuring out what to do with our bathroom remodel was to figure out if we wanted to leave everything the way it was or go with a new bathroom layout. There were a couple of things we really wanted and this large bathroom had so much floor space. We thought there must be a way to incorporate what we wanted into this footprint!
The two things we really wanted in this space was a bigger shower (even just a little bigger!) and a separate toilet room. However, there is a really big skylight and window in this room. They bring in a ton of gorgeous natural light but that also made placement of any new walls difficult. We talked a lot about stealing space from an adjacent room or closet too, but at the end of the day, we didn’t feel like sacrificing space in other rooms was worth it.
In the end, we did figure out how to add a small toilet room and a slightly larger shower by turning the bathtub 90 degrees and building out a wall that our closet door is on just a little. I feel like we talked about this bathroom layout for hours and hours before we finally settled on that floor plan, and I’m still nervous about it now! I think I am going to be a little nervous until the drywall goes up and we can really get a sense of the room!
I realize that we are in the age of open concepts for most people and we are putting up walls. But here is my biggest bathroom design tip – design the room for how you want to use it, not what other people want or are doing.
For us, having some privacy in the toilet area means that the other person can access the sink or the closet at the same time. That meant for our dream space we were going to need some new walls!
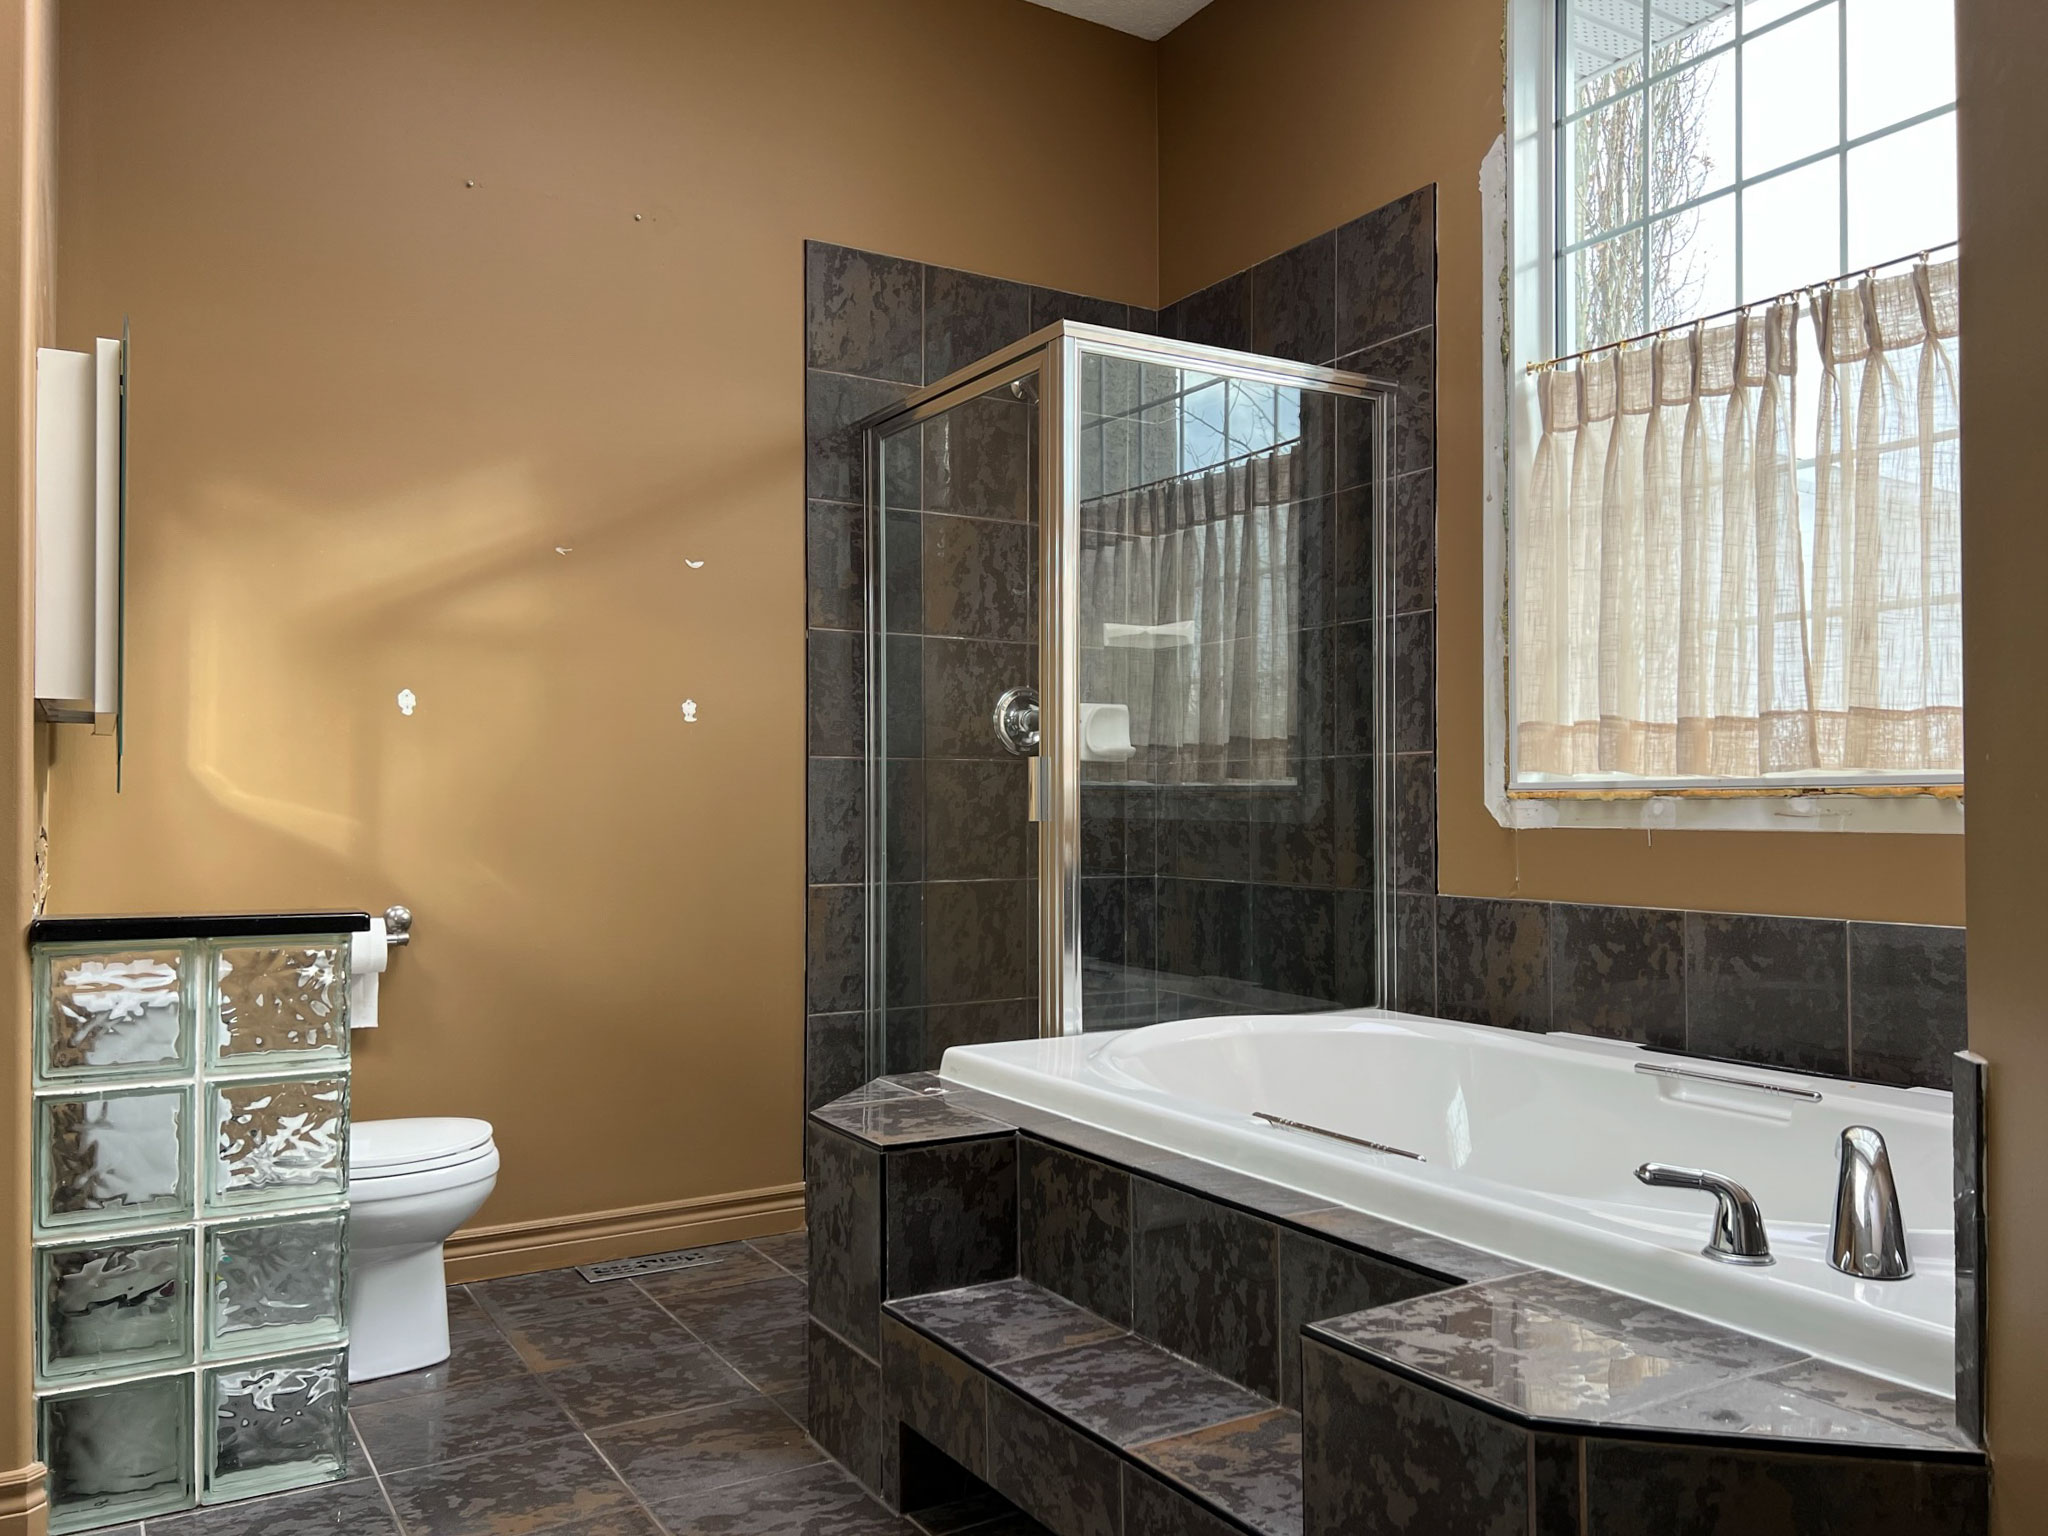
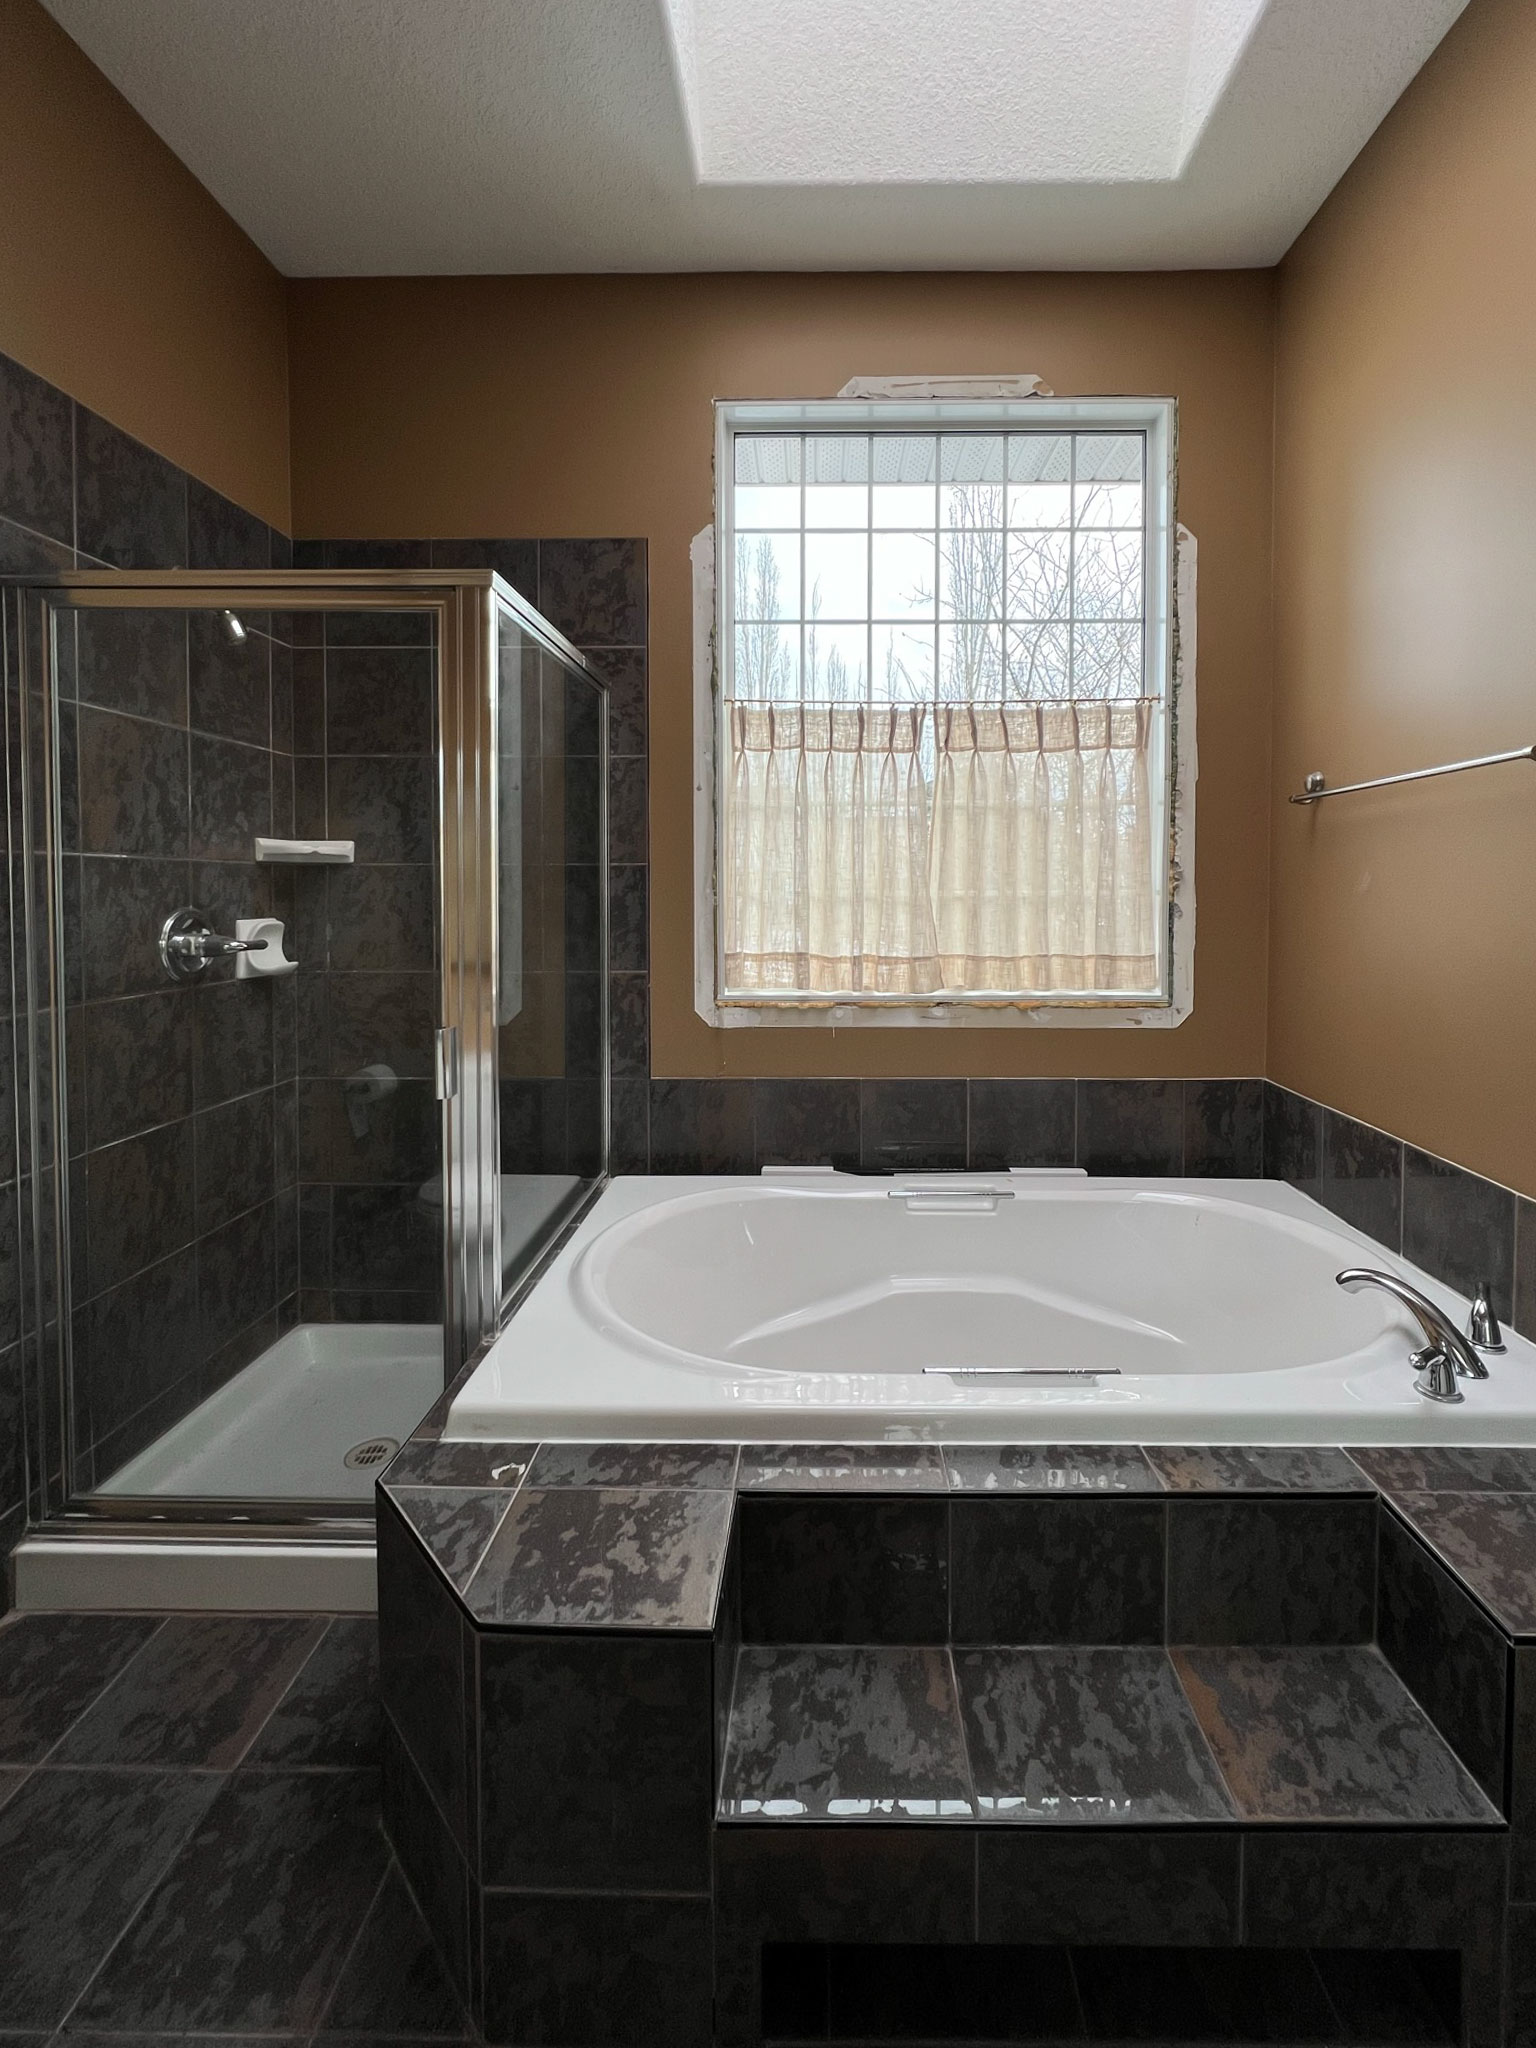
Here is a before and after of our bathroom layout:
The Design Inspo
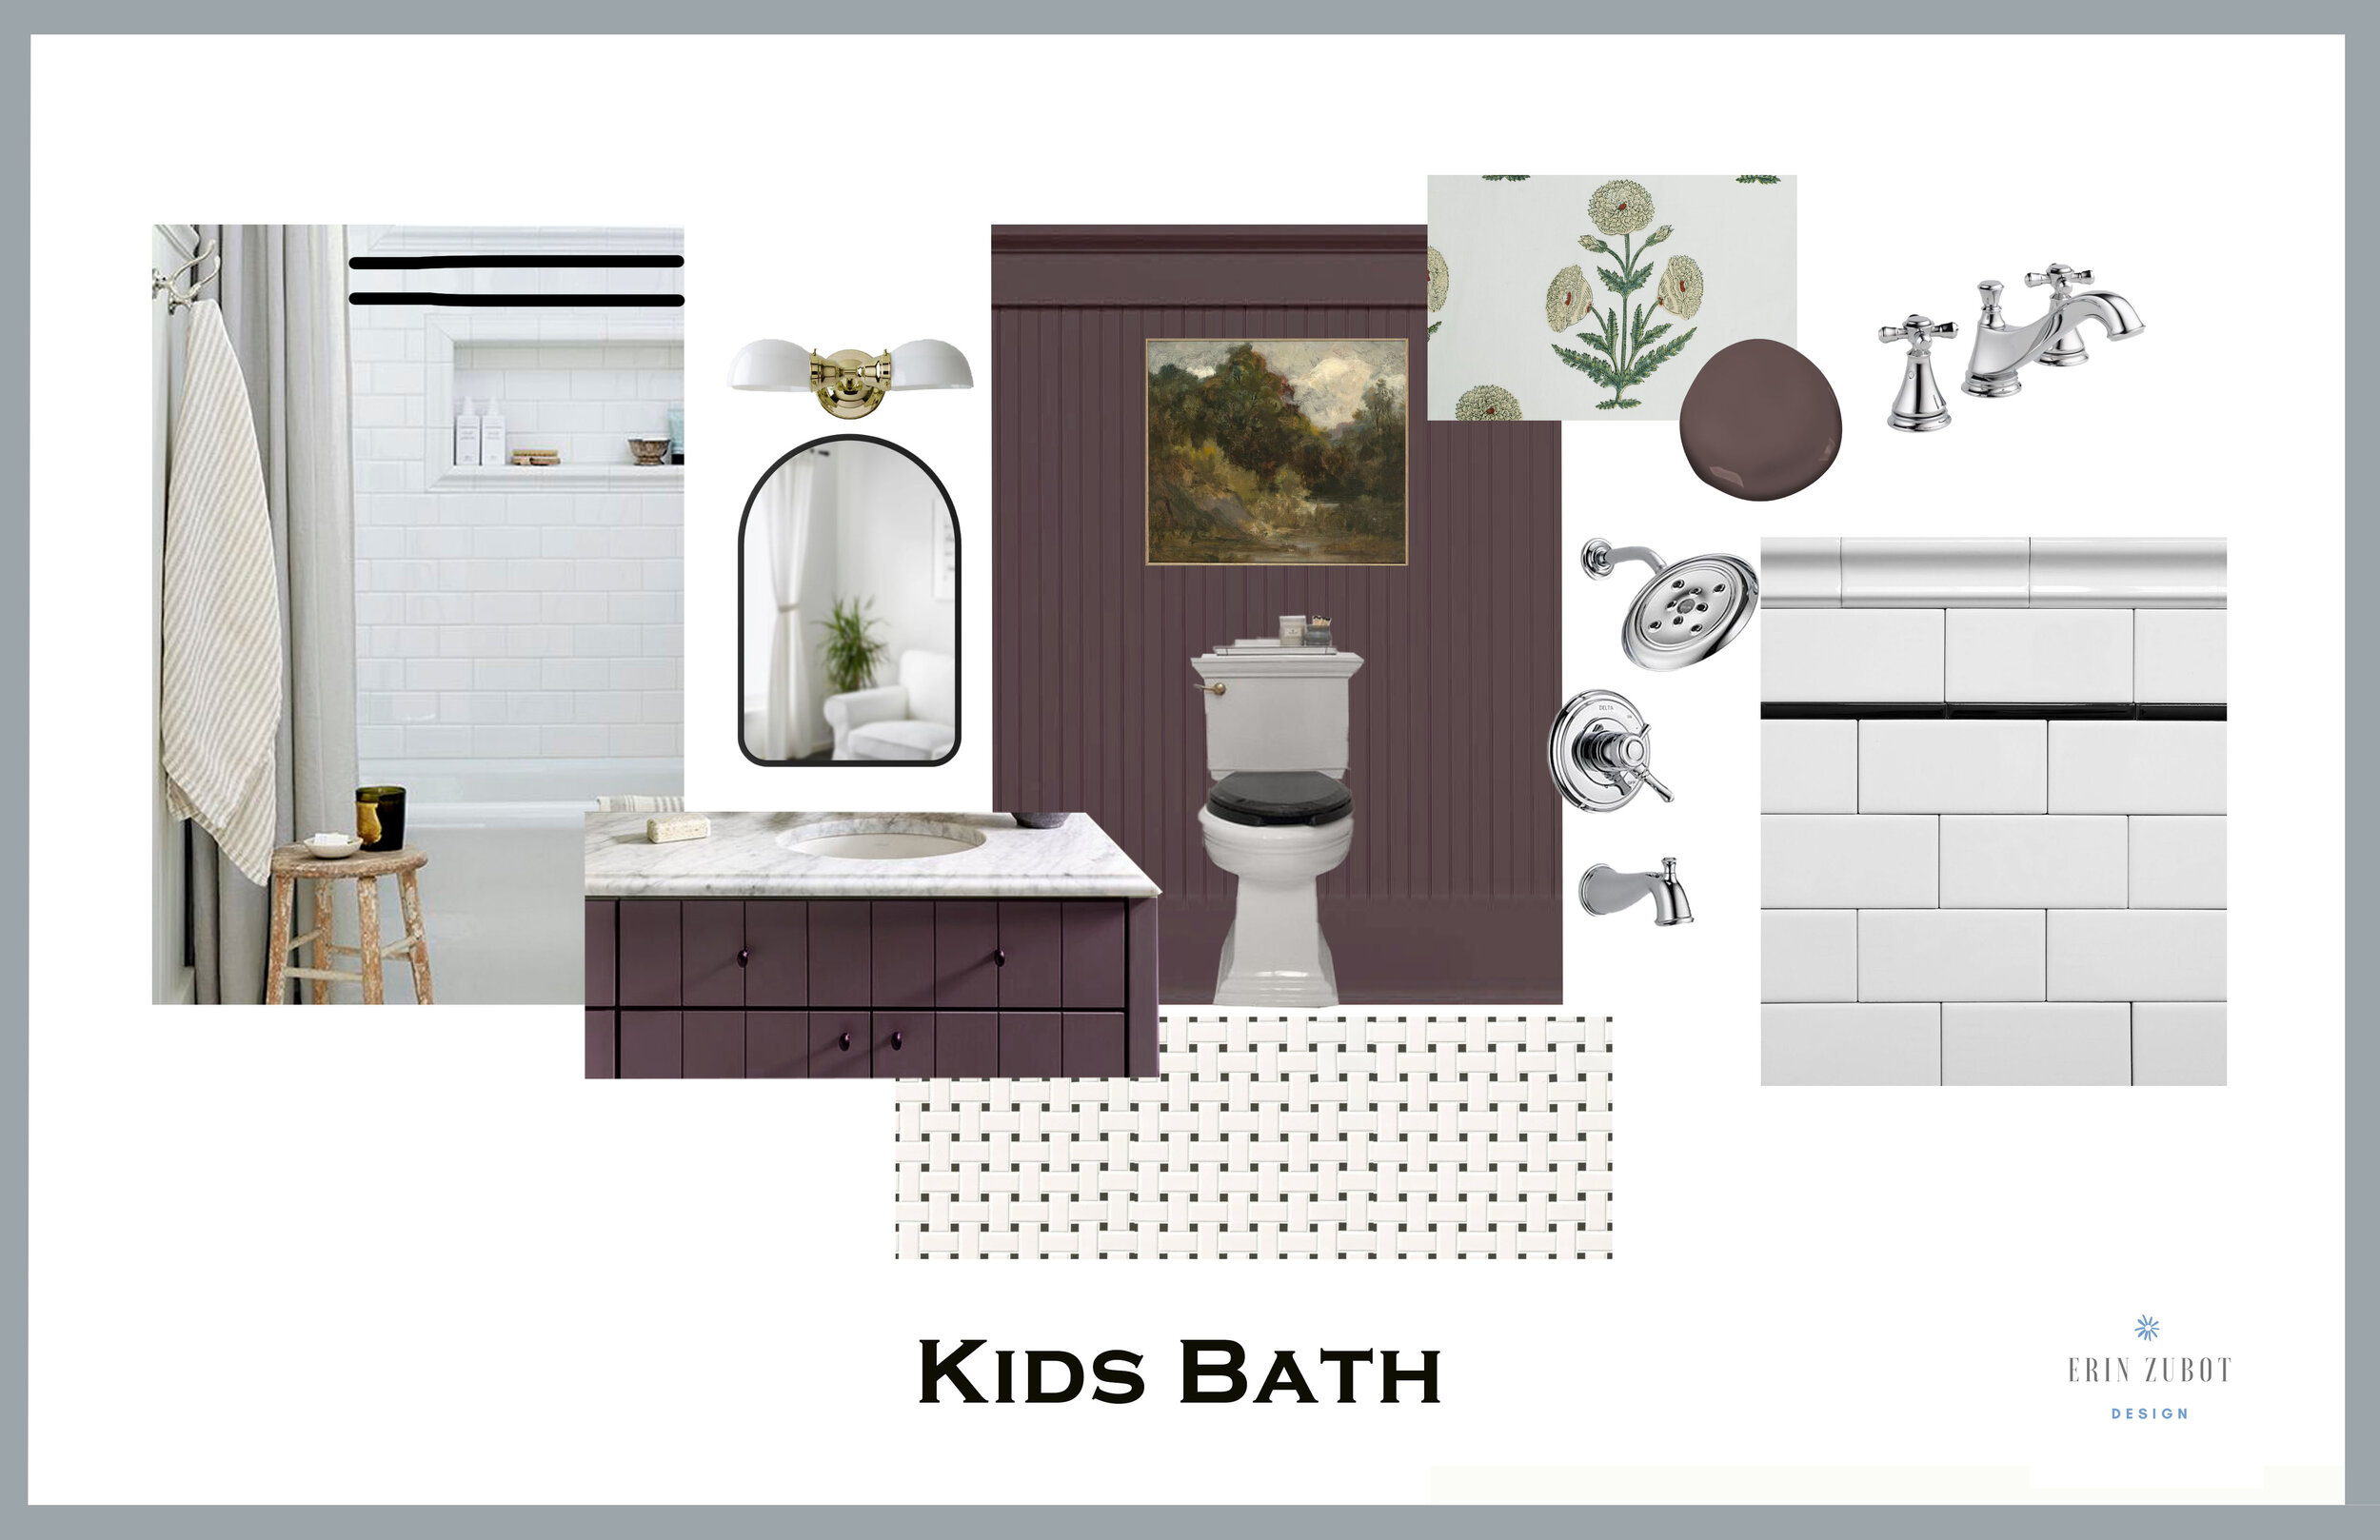
I always start out a design by searching for inspirational design ideas on Pinterest, Instagram, or magazines, show homes, my surroundings, TV and movie sets, really anywhere I go I am looking for inspiration. However, this time I just want not feeling it or having that moment when the design starts to fall together. Our shower had actually been leaking for almost a year and we haven’t been using it, so the motivation to get this renovation going was there. I just was not feeling inspired and so I put it on the back burner and we actually tackled our small bathrooms first, the kid’s bathroom and the guest bathroom.
For me, when I am stuck on a design it is always best for me to just take a step back and wait for something to strike. And strike it did! During the very first day of our European vacation in Paris.
We visited the Musee Nissim de Comondo in Paris the very first day we arrived and I loved that house so very much! We saw a lot of beautiful things in Europe but none of them inspired me more than that house.
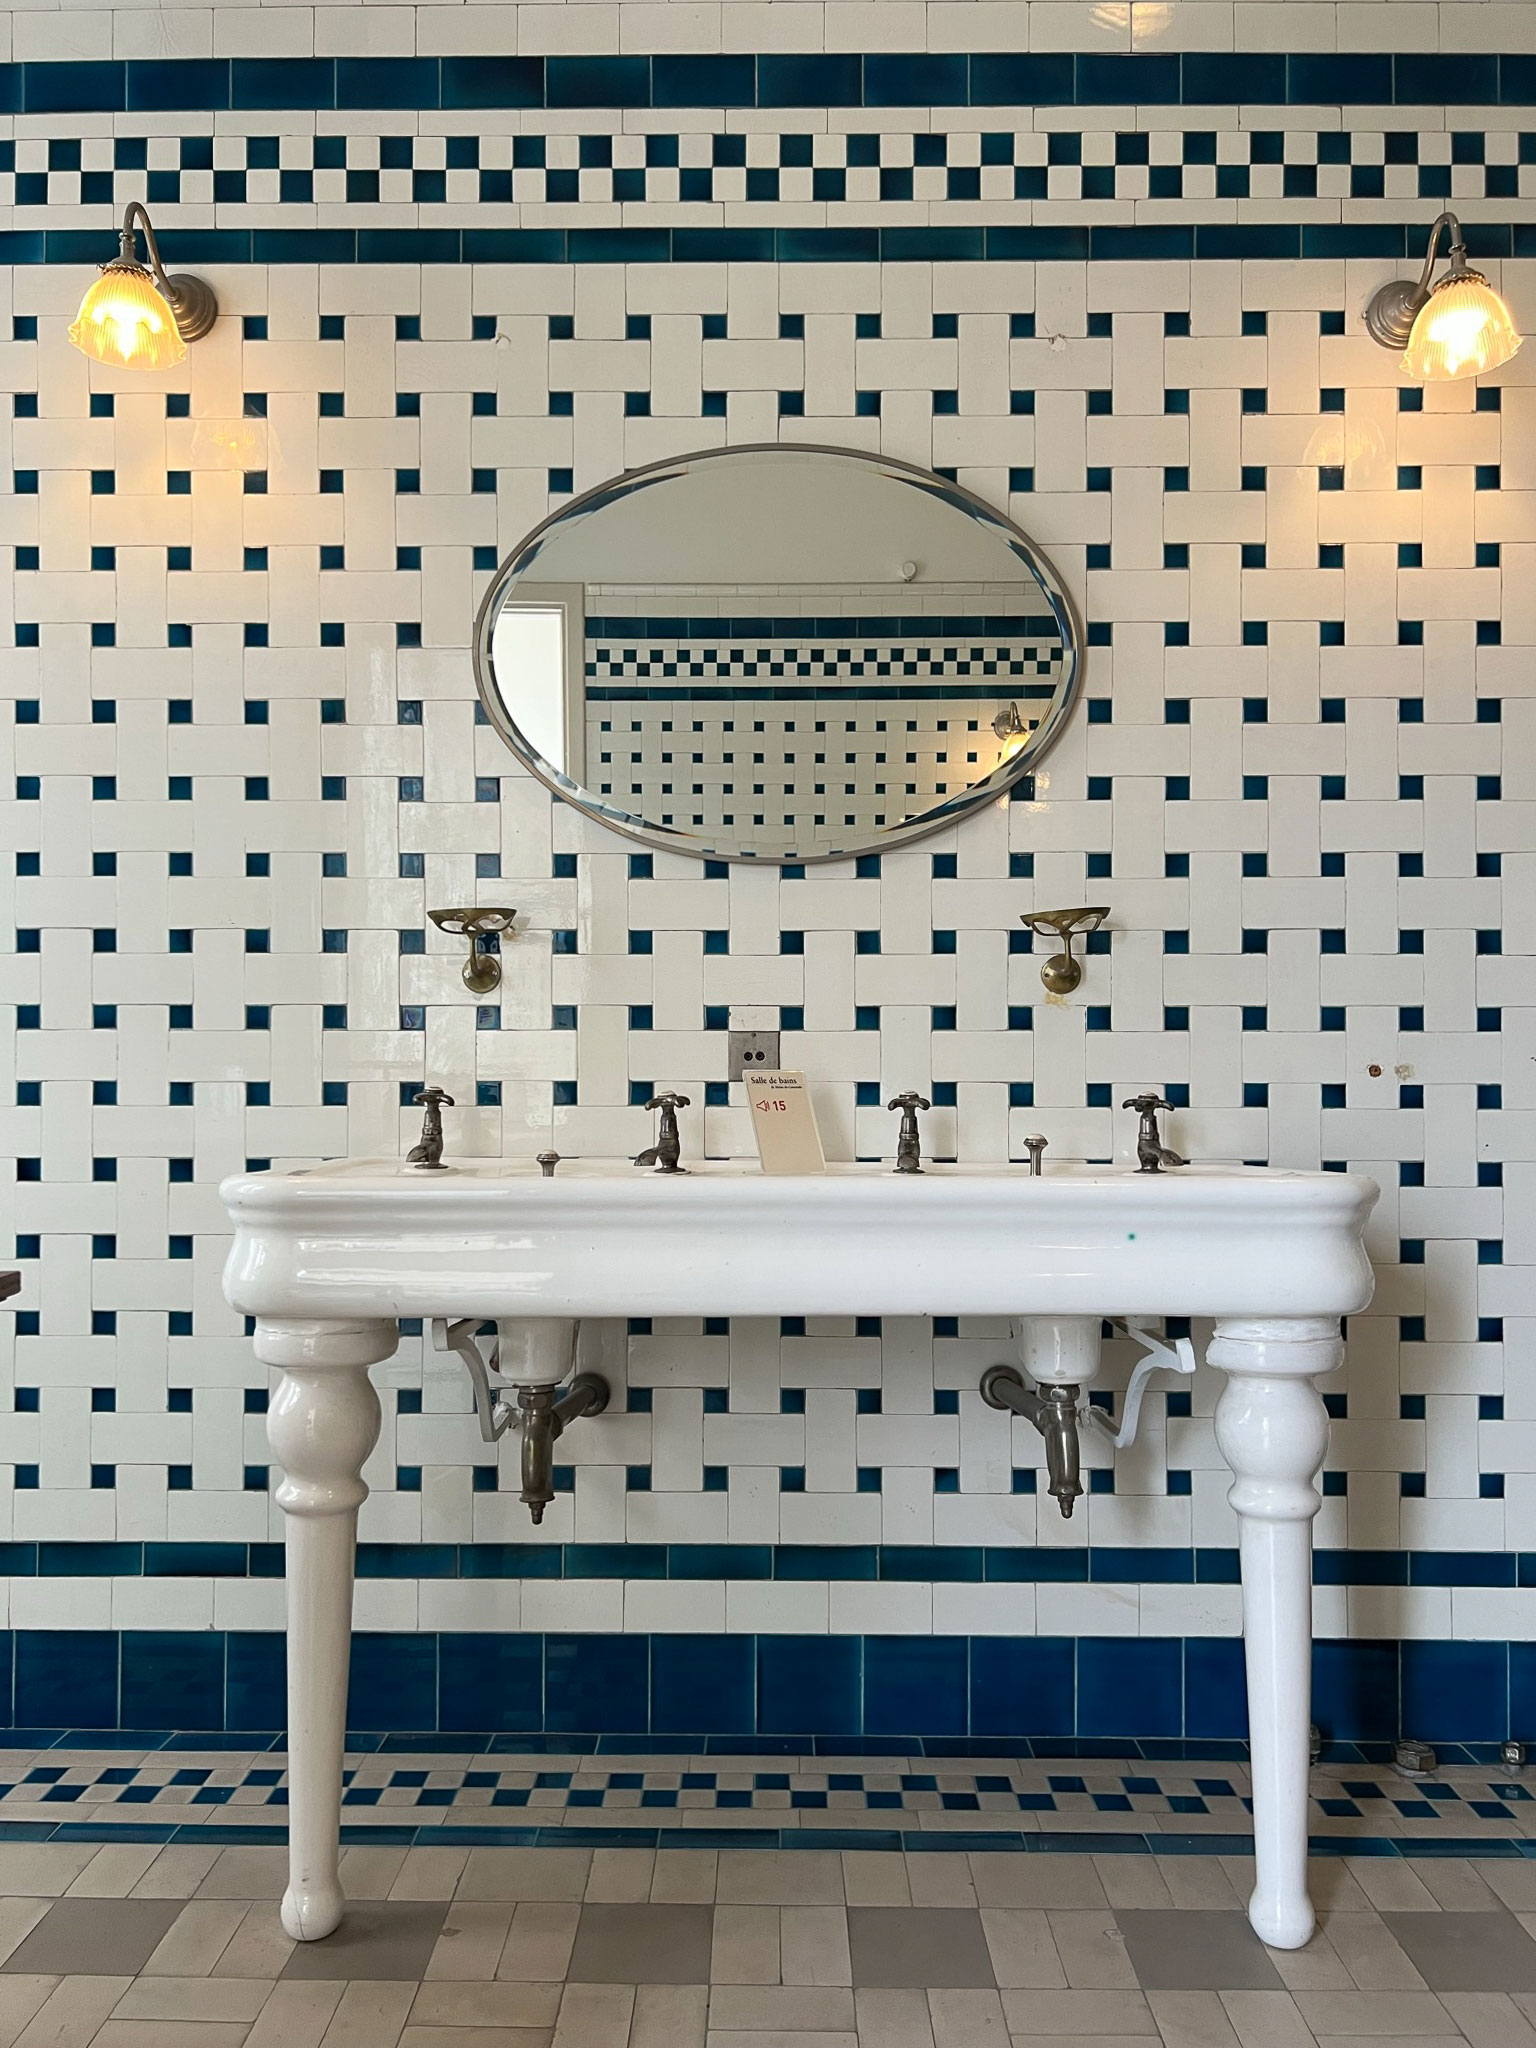
There were two bathrooms that both used basic ceramic tile in such interesting ways, creating patterns from basic shapes, and different colours. THAT was what I had been waiting for! I love historical tile and traditional design and I knew that some of the trendy tile choices that were going around just weren’t speaking to me. I knew that something trendy would not last the test of time for me, I have made trendy tile choices in the past and lived to regret them.
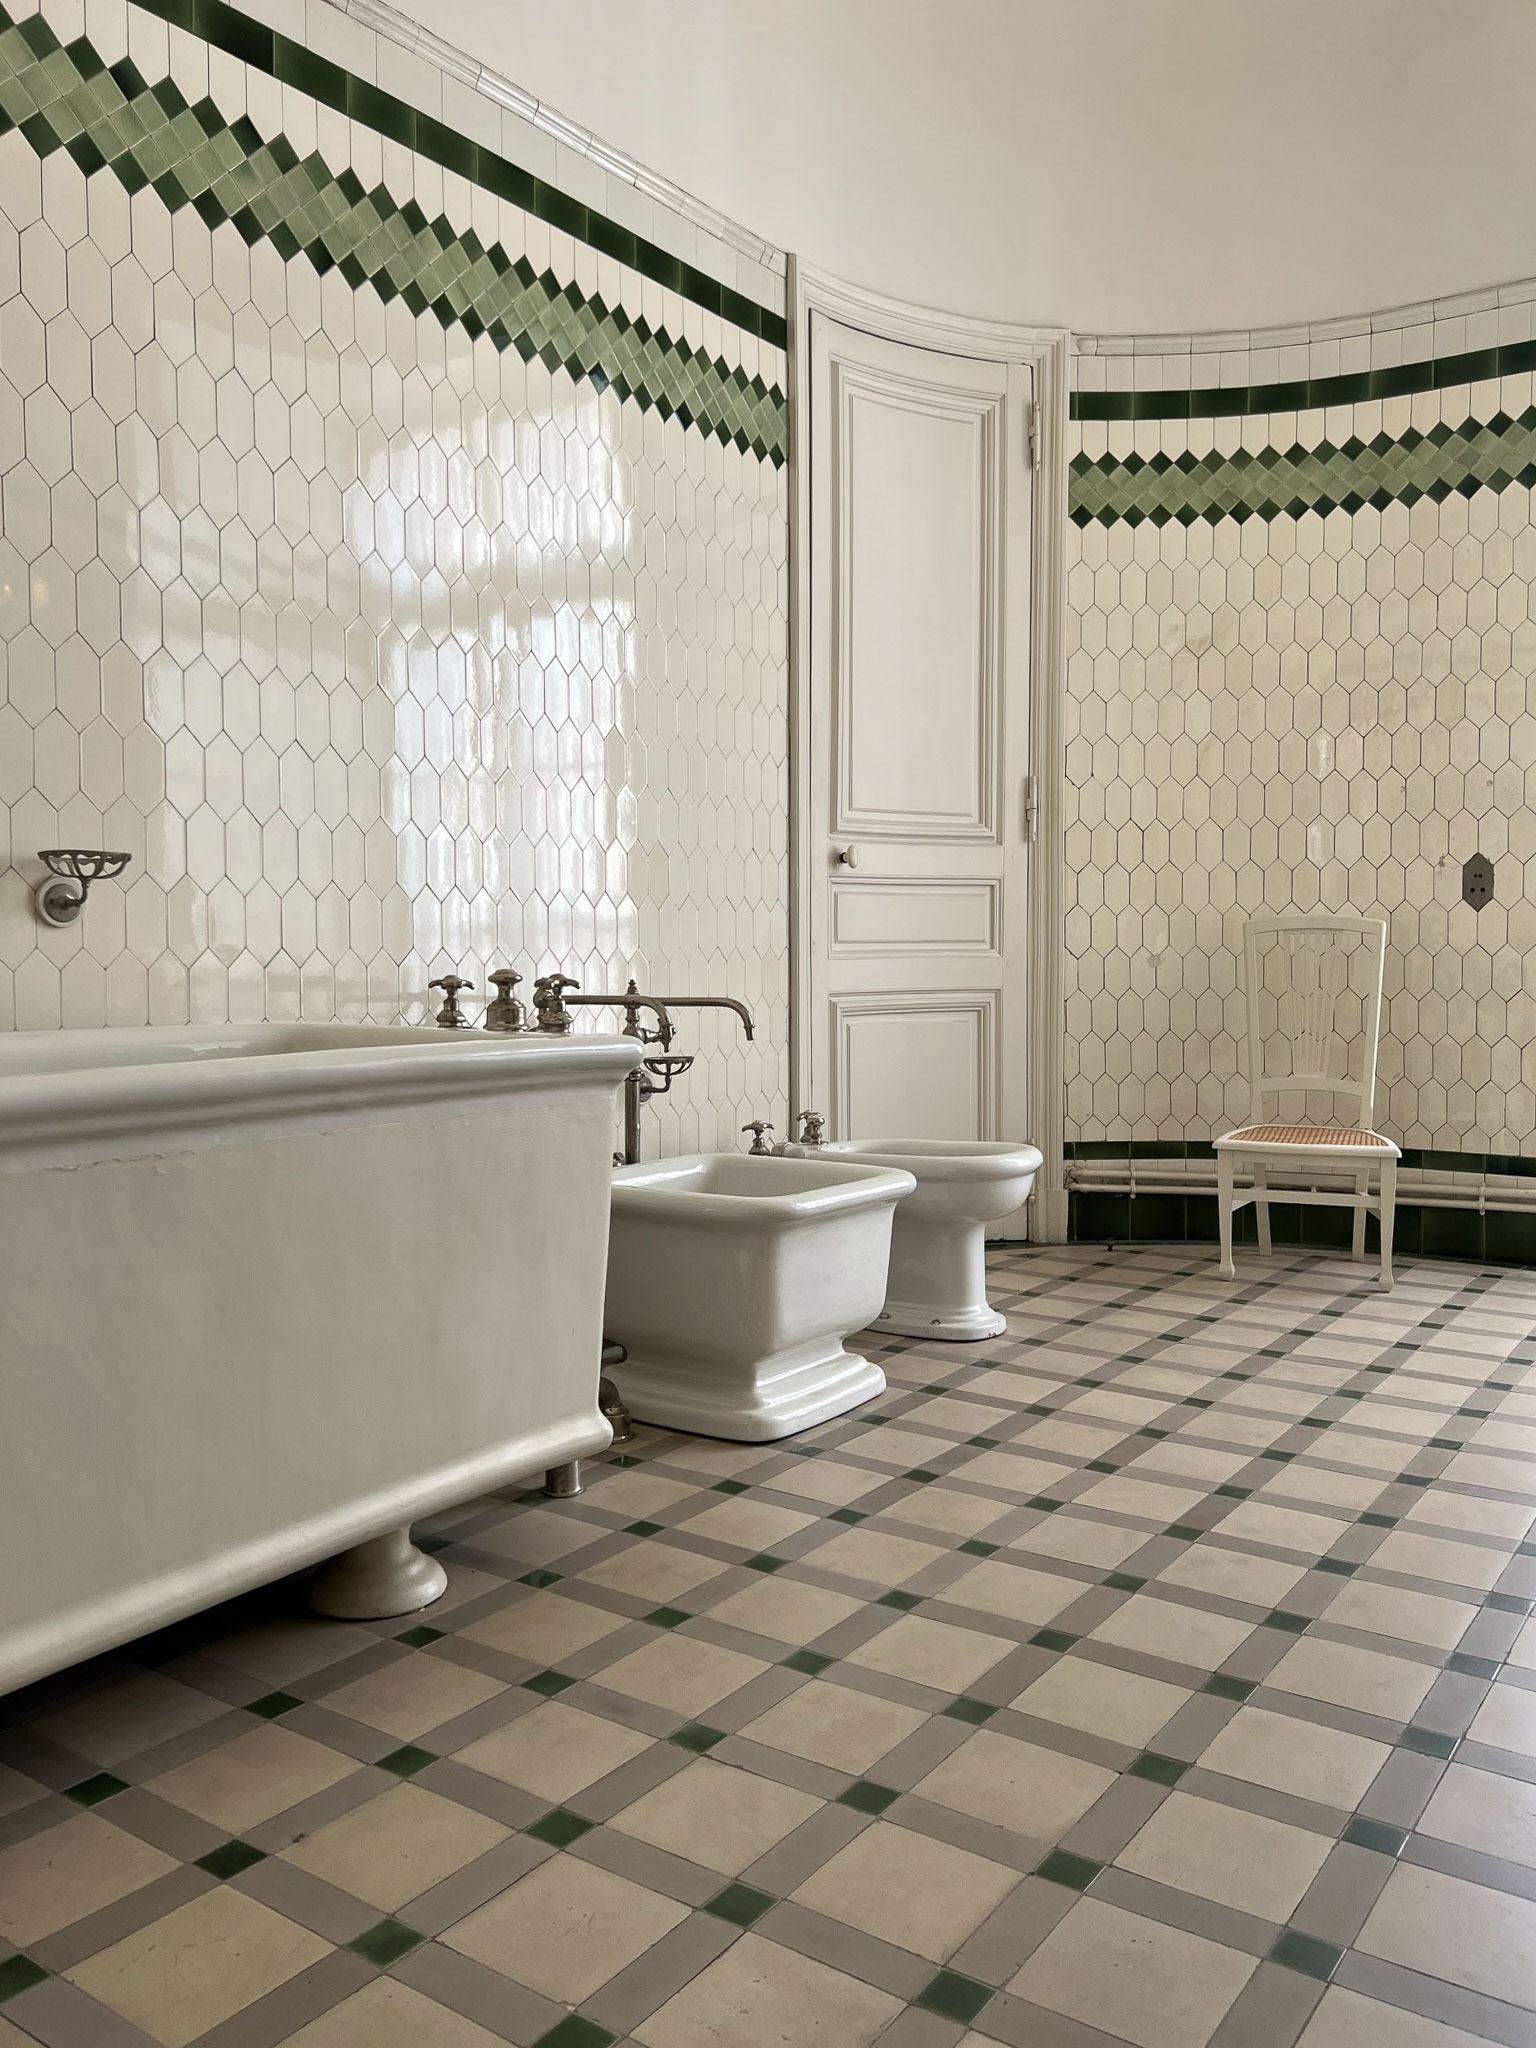
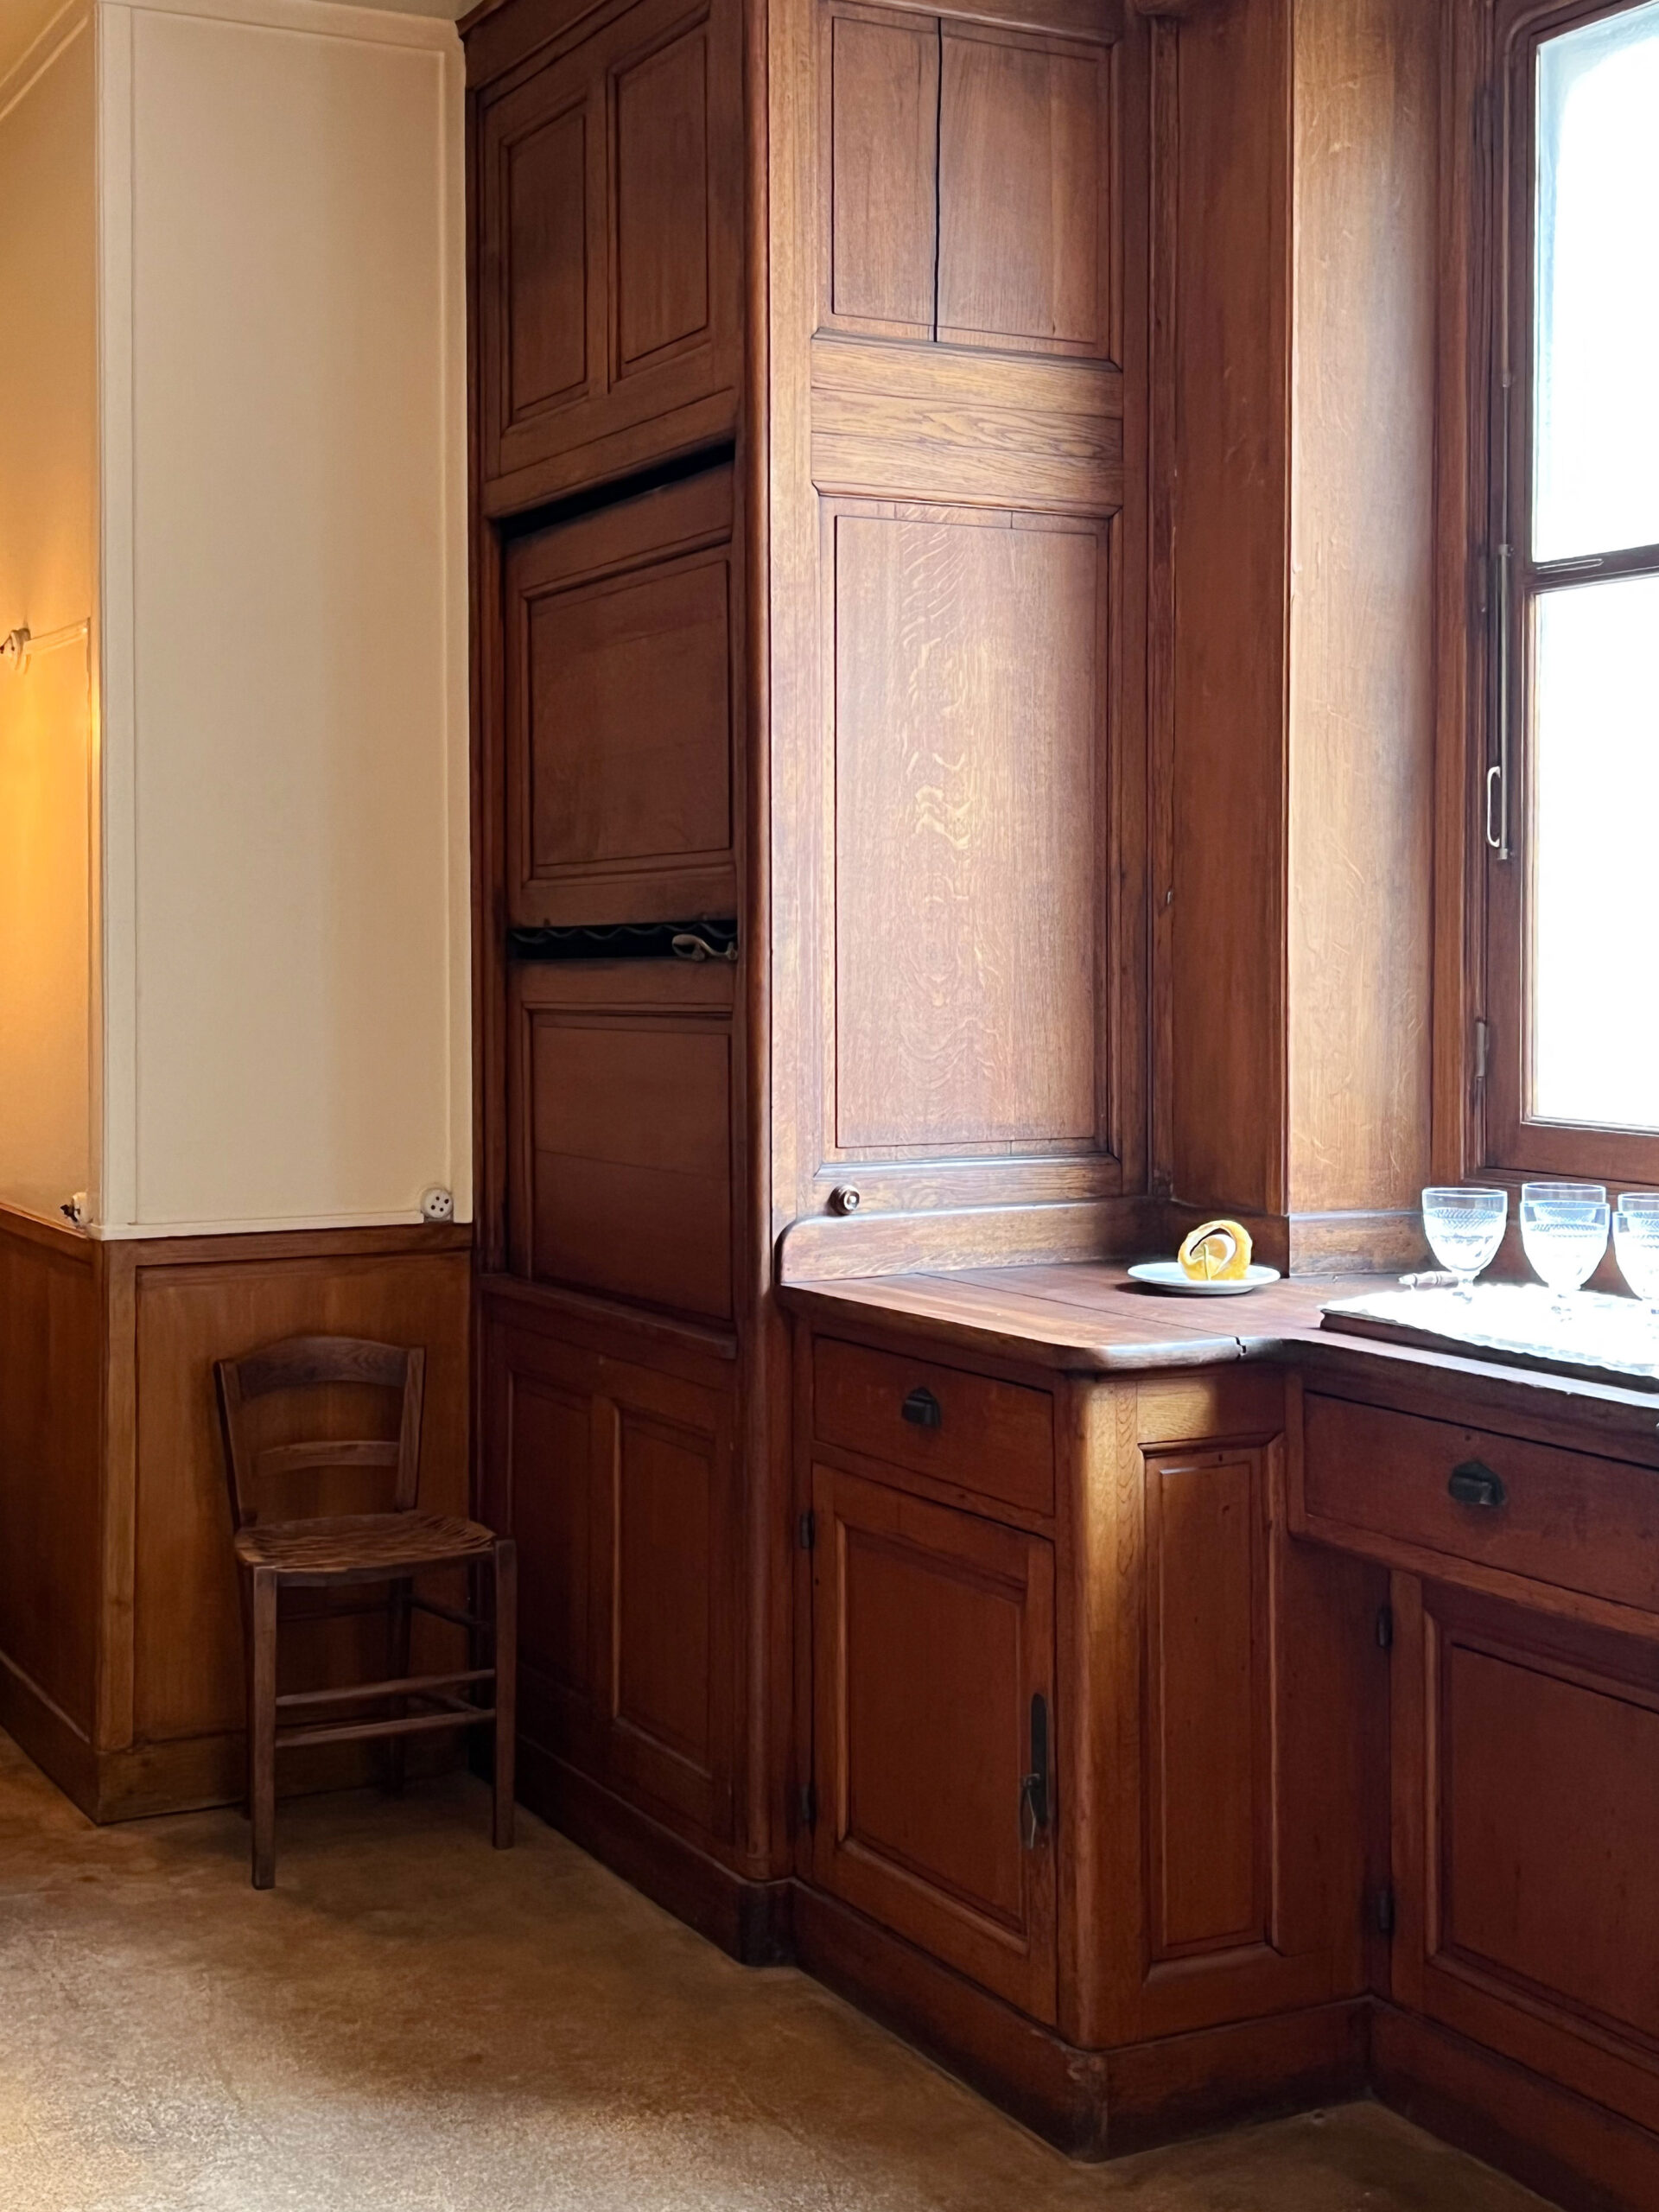
These bathrooms each had a pedestal sink in them and I knew that wasn’t something we could do (we needed storage! The bathroom of your dreams needs to be practical, too!). However, there was so much warm wood everywhere in Europe that I knew that warm wood + historical tile patterns would be a winning combination!!
Once I had the layout sorted, the tile idea in mind, and the idea for a wood vanity, everything else just fell into place!
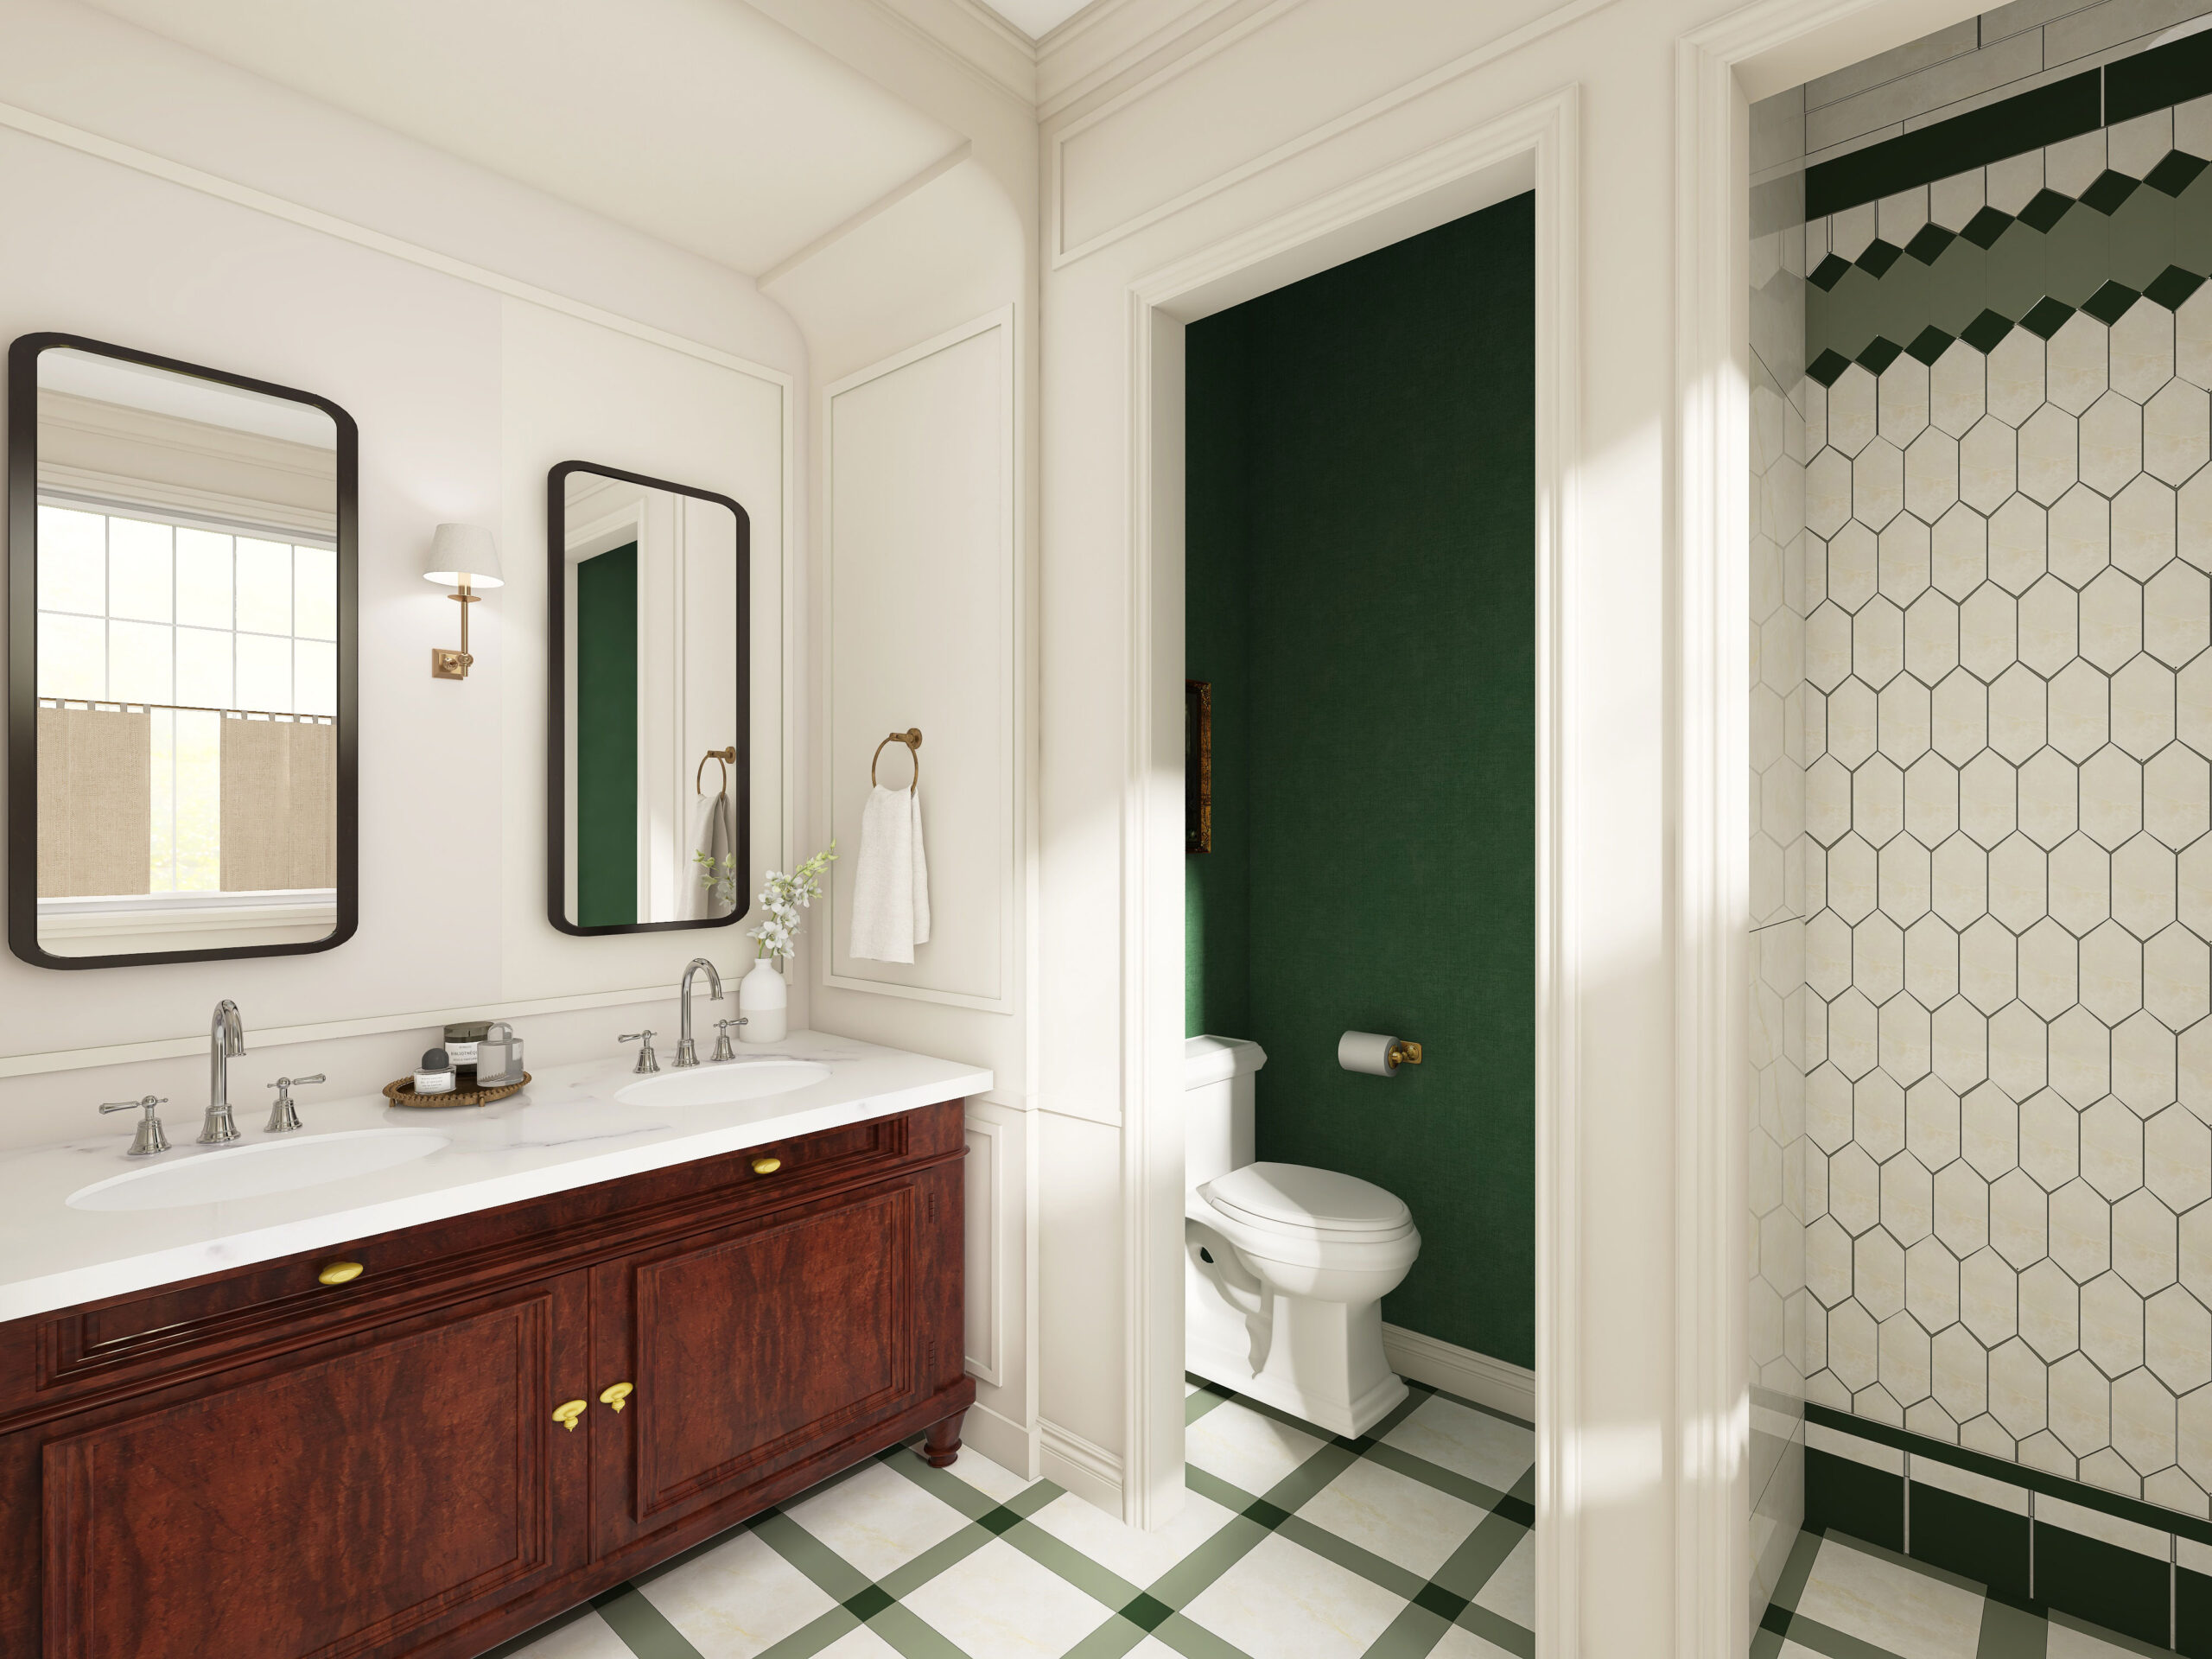
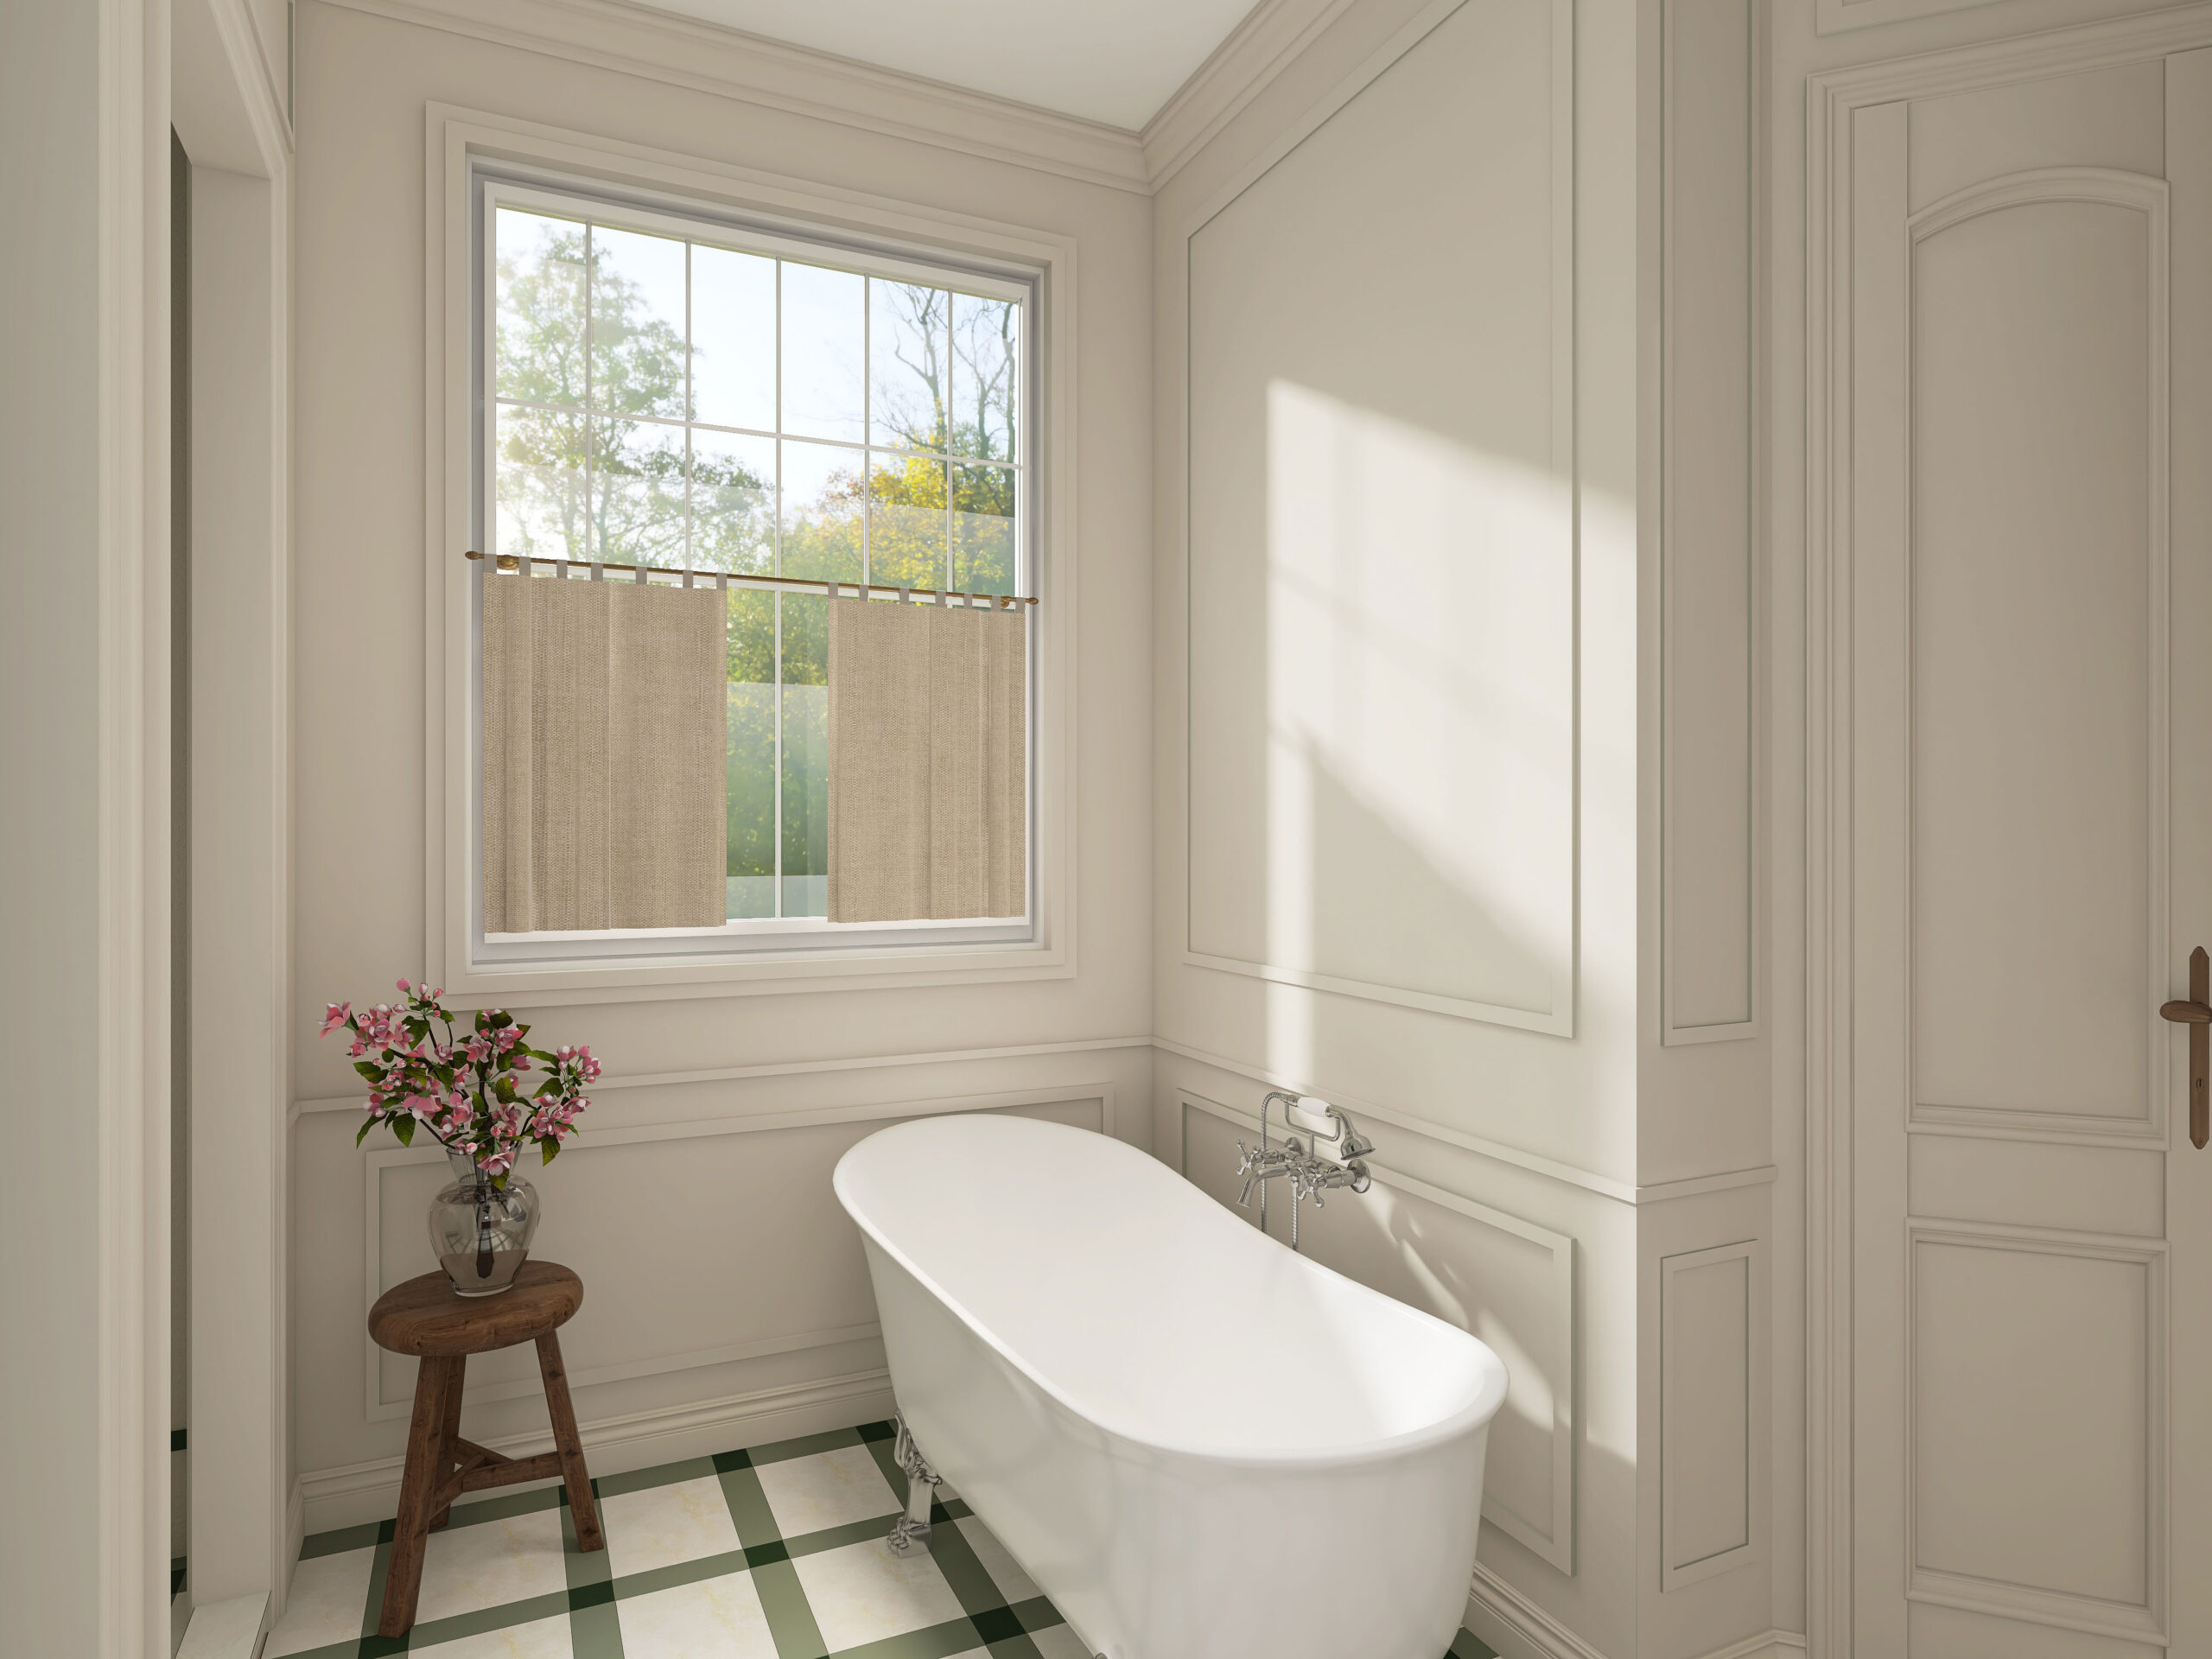
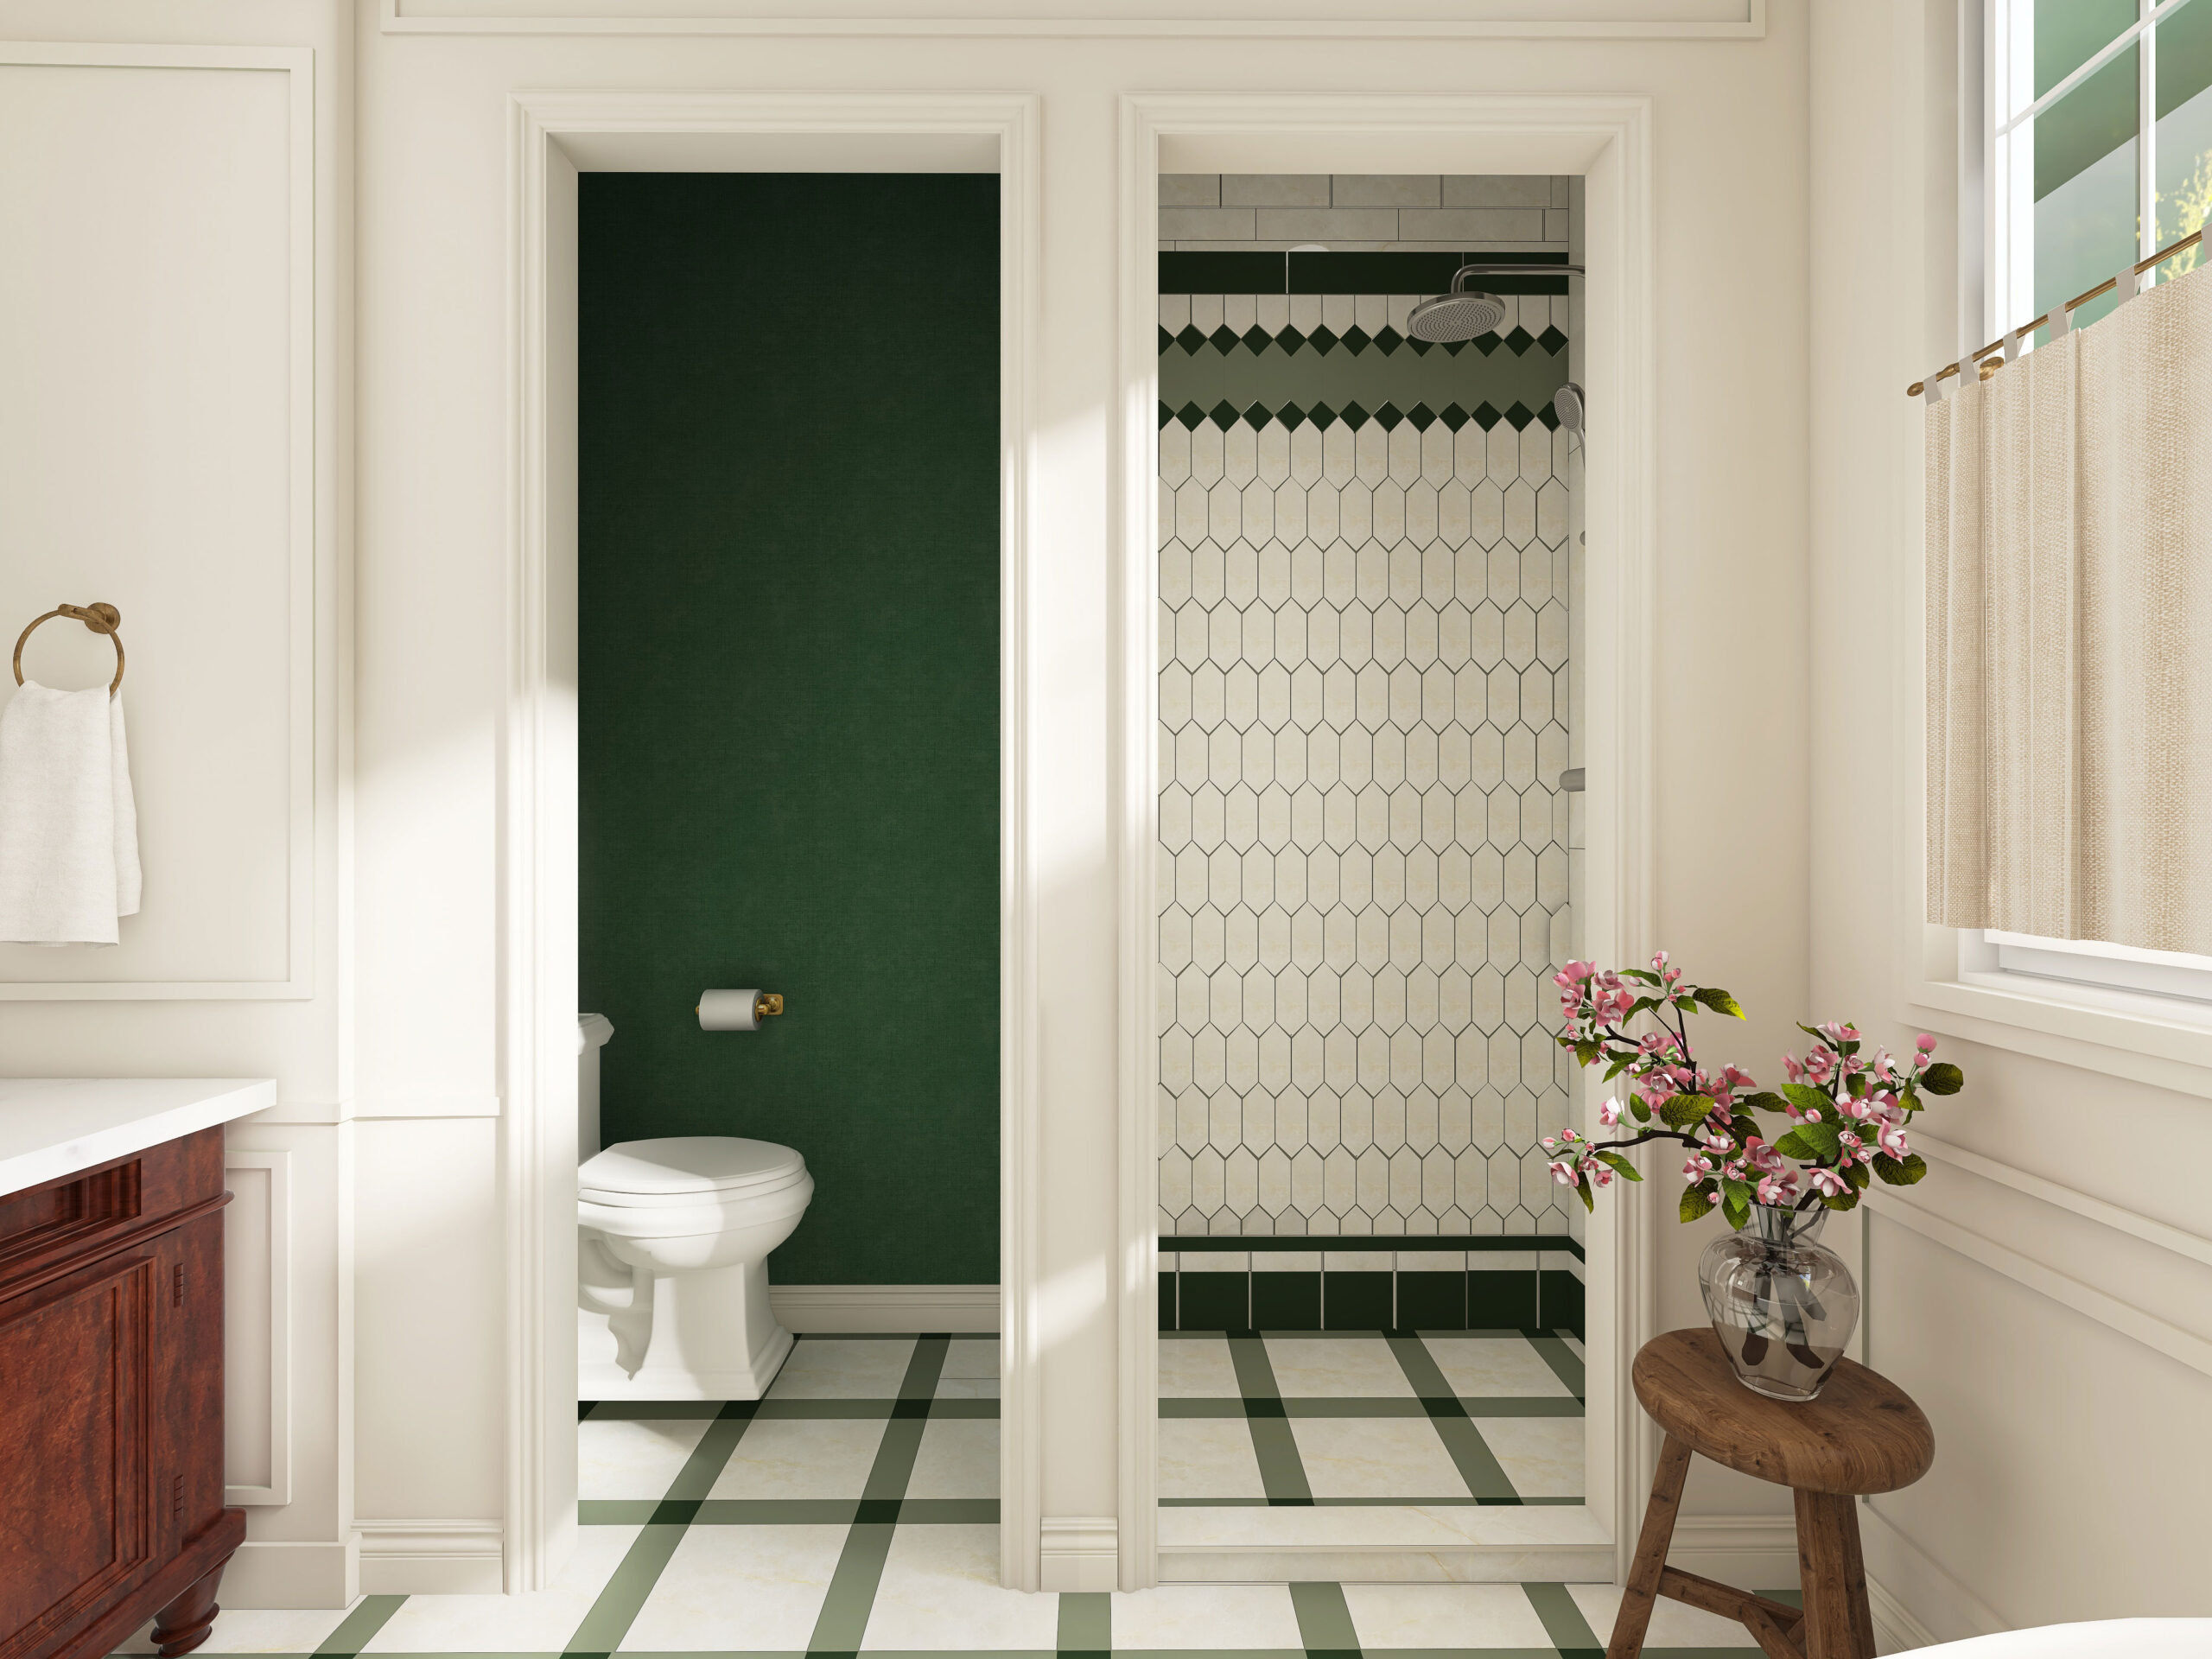
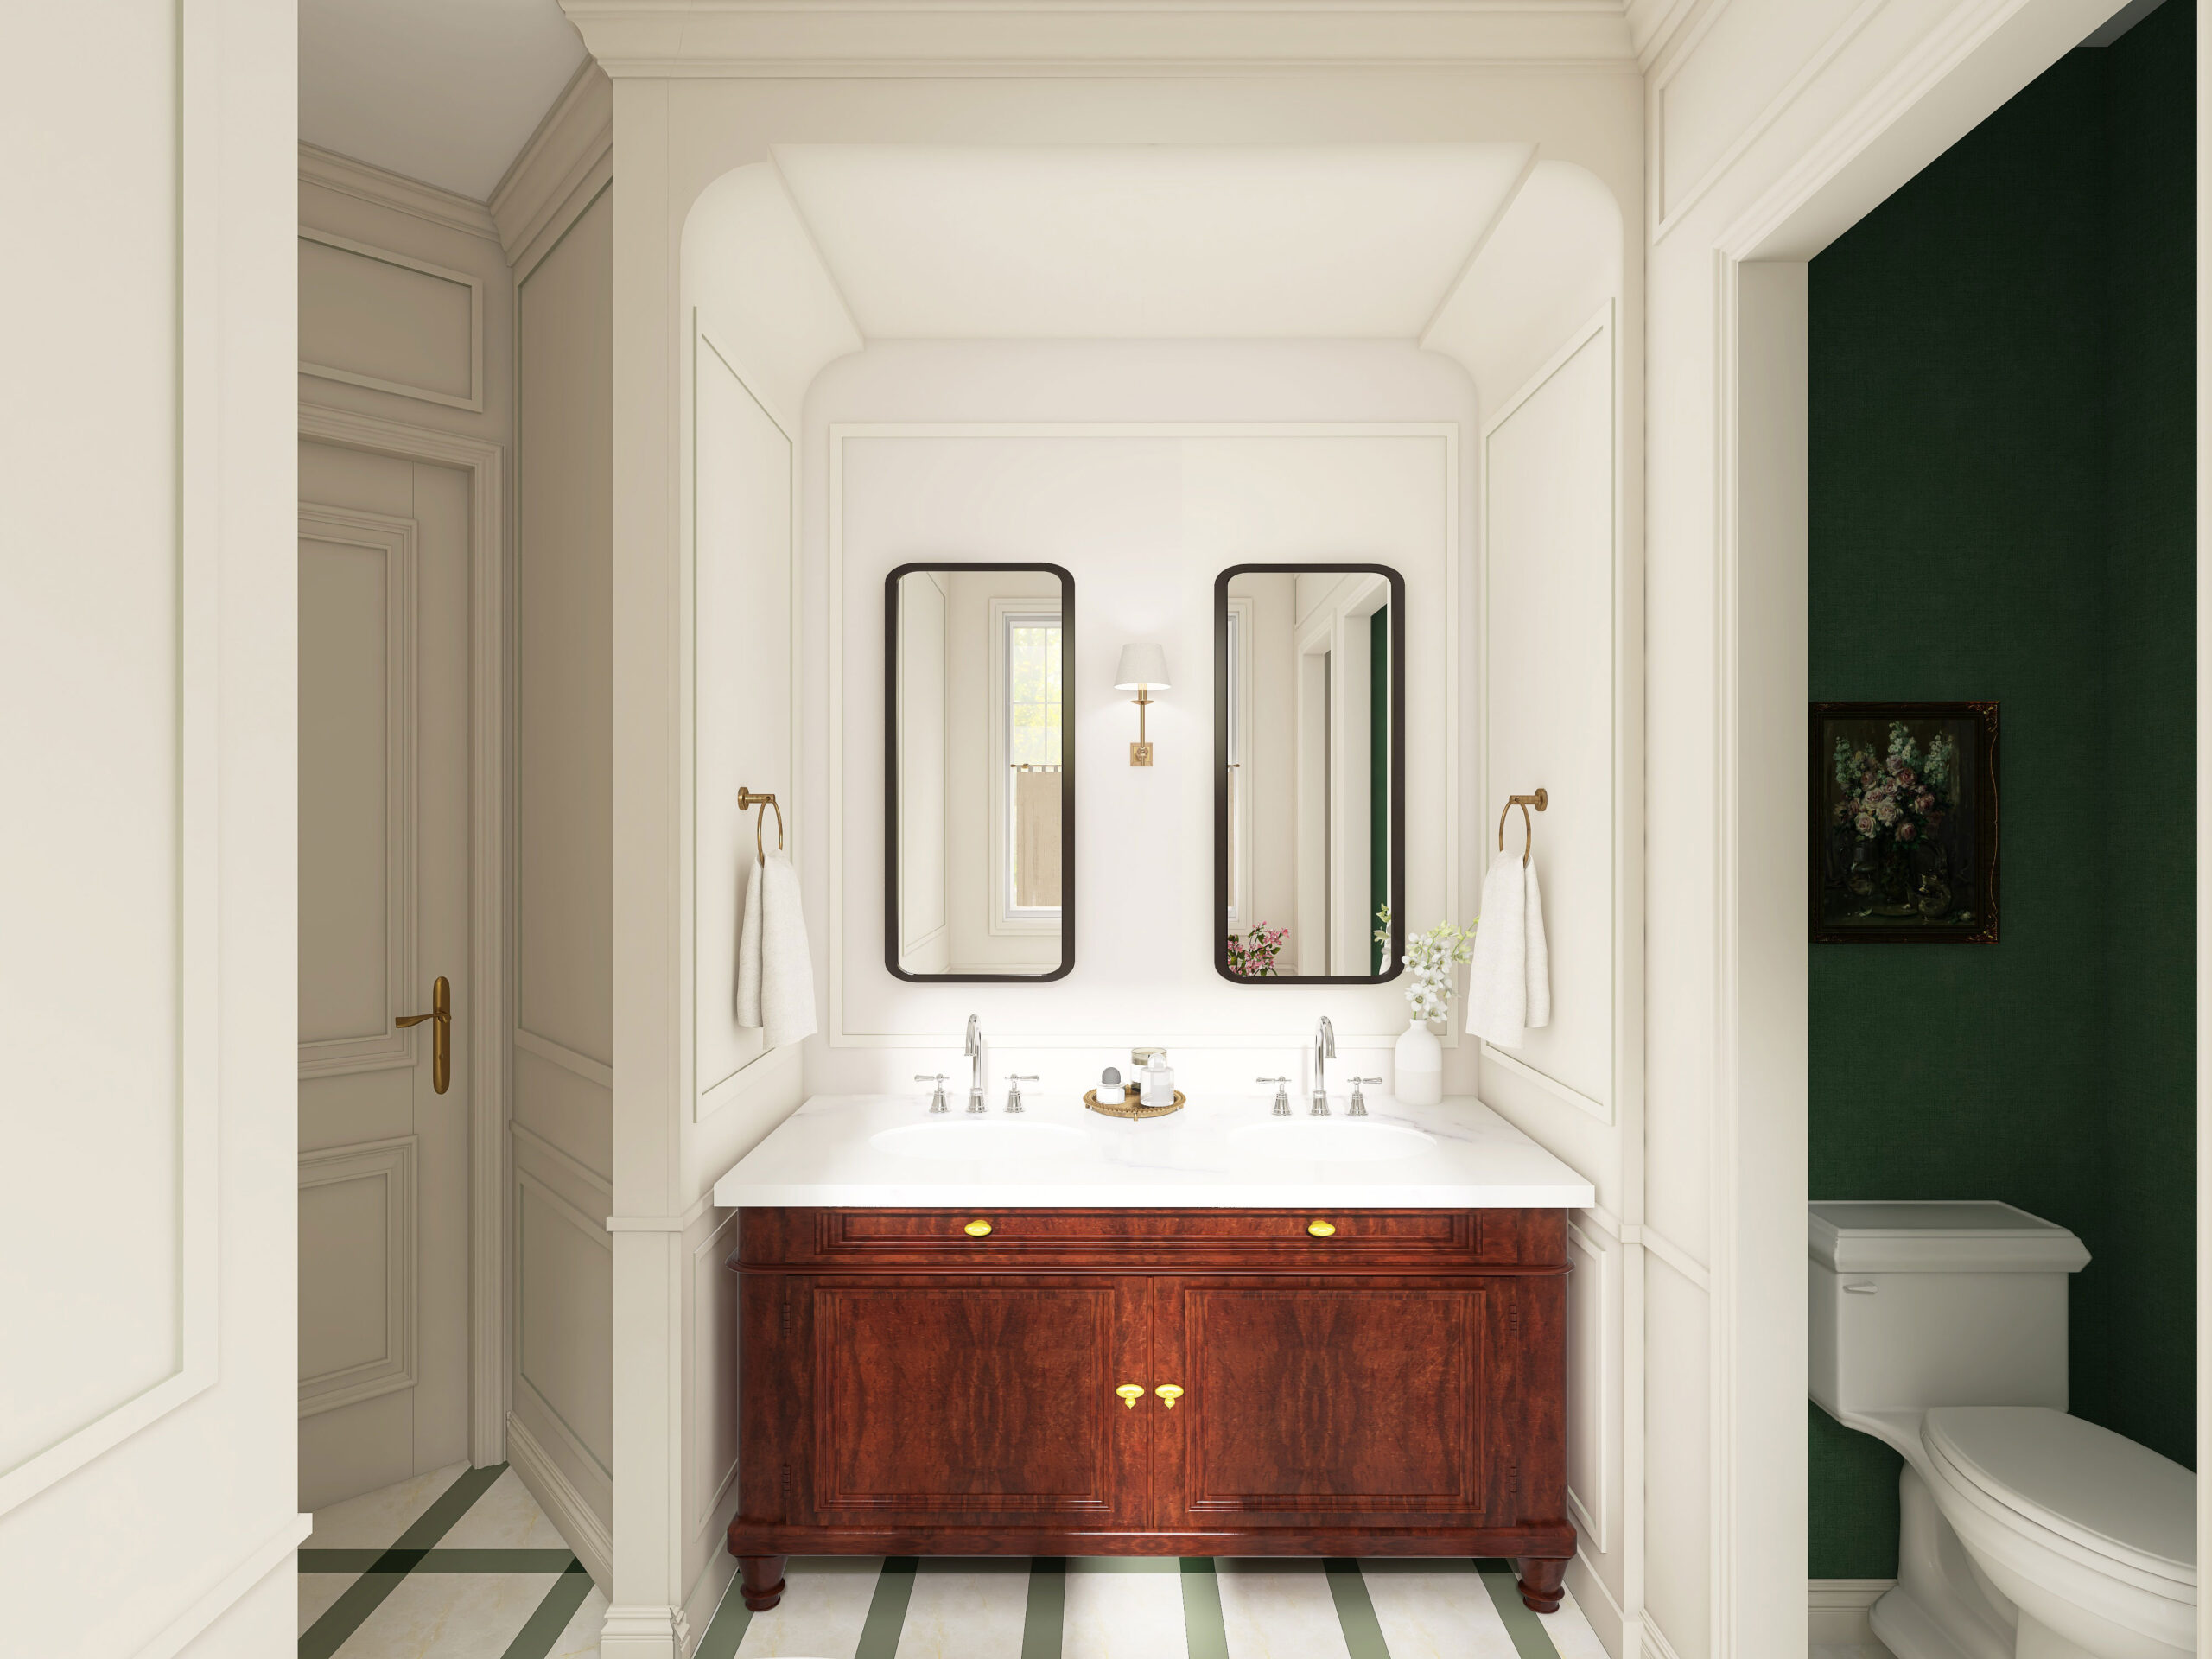
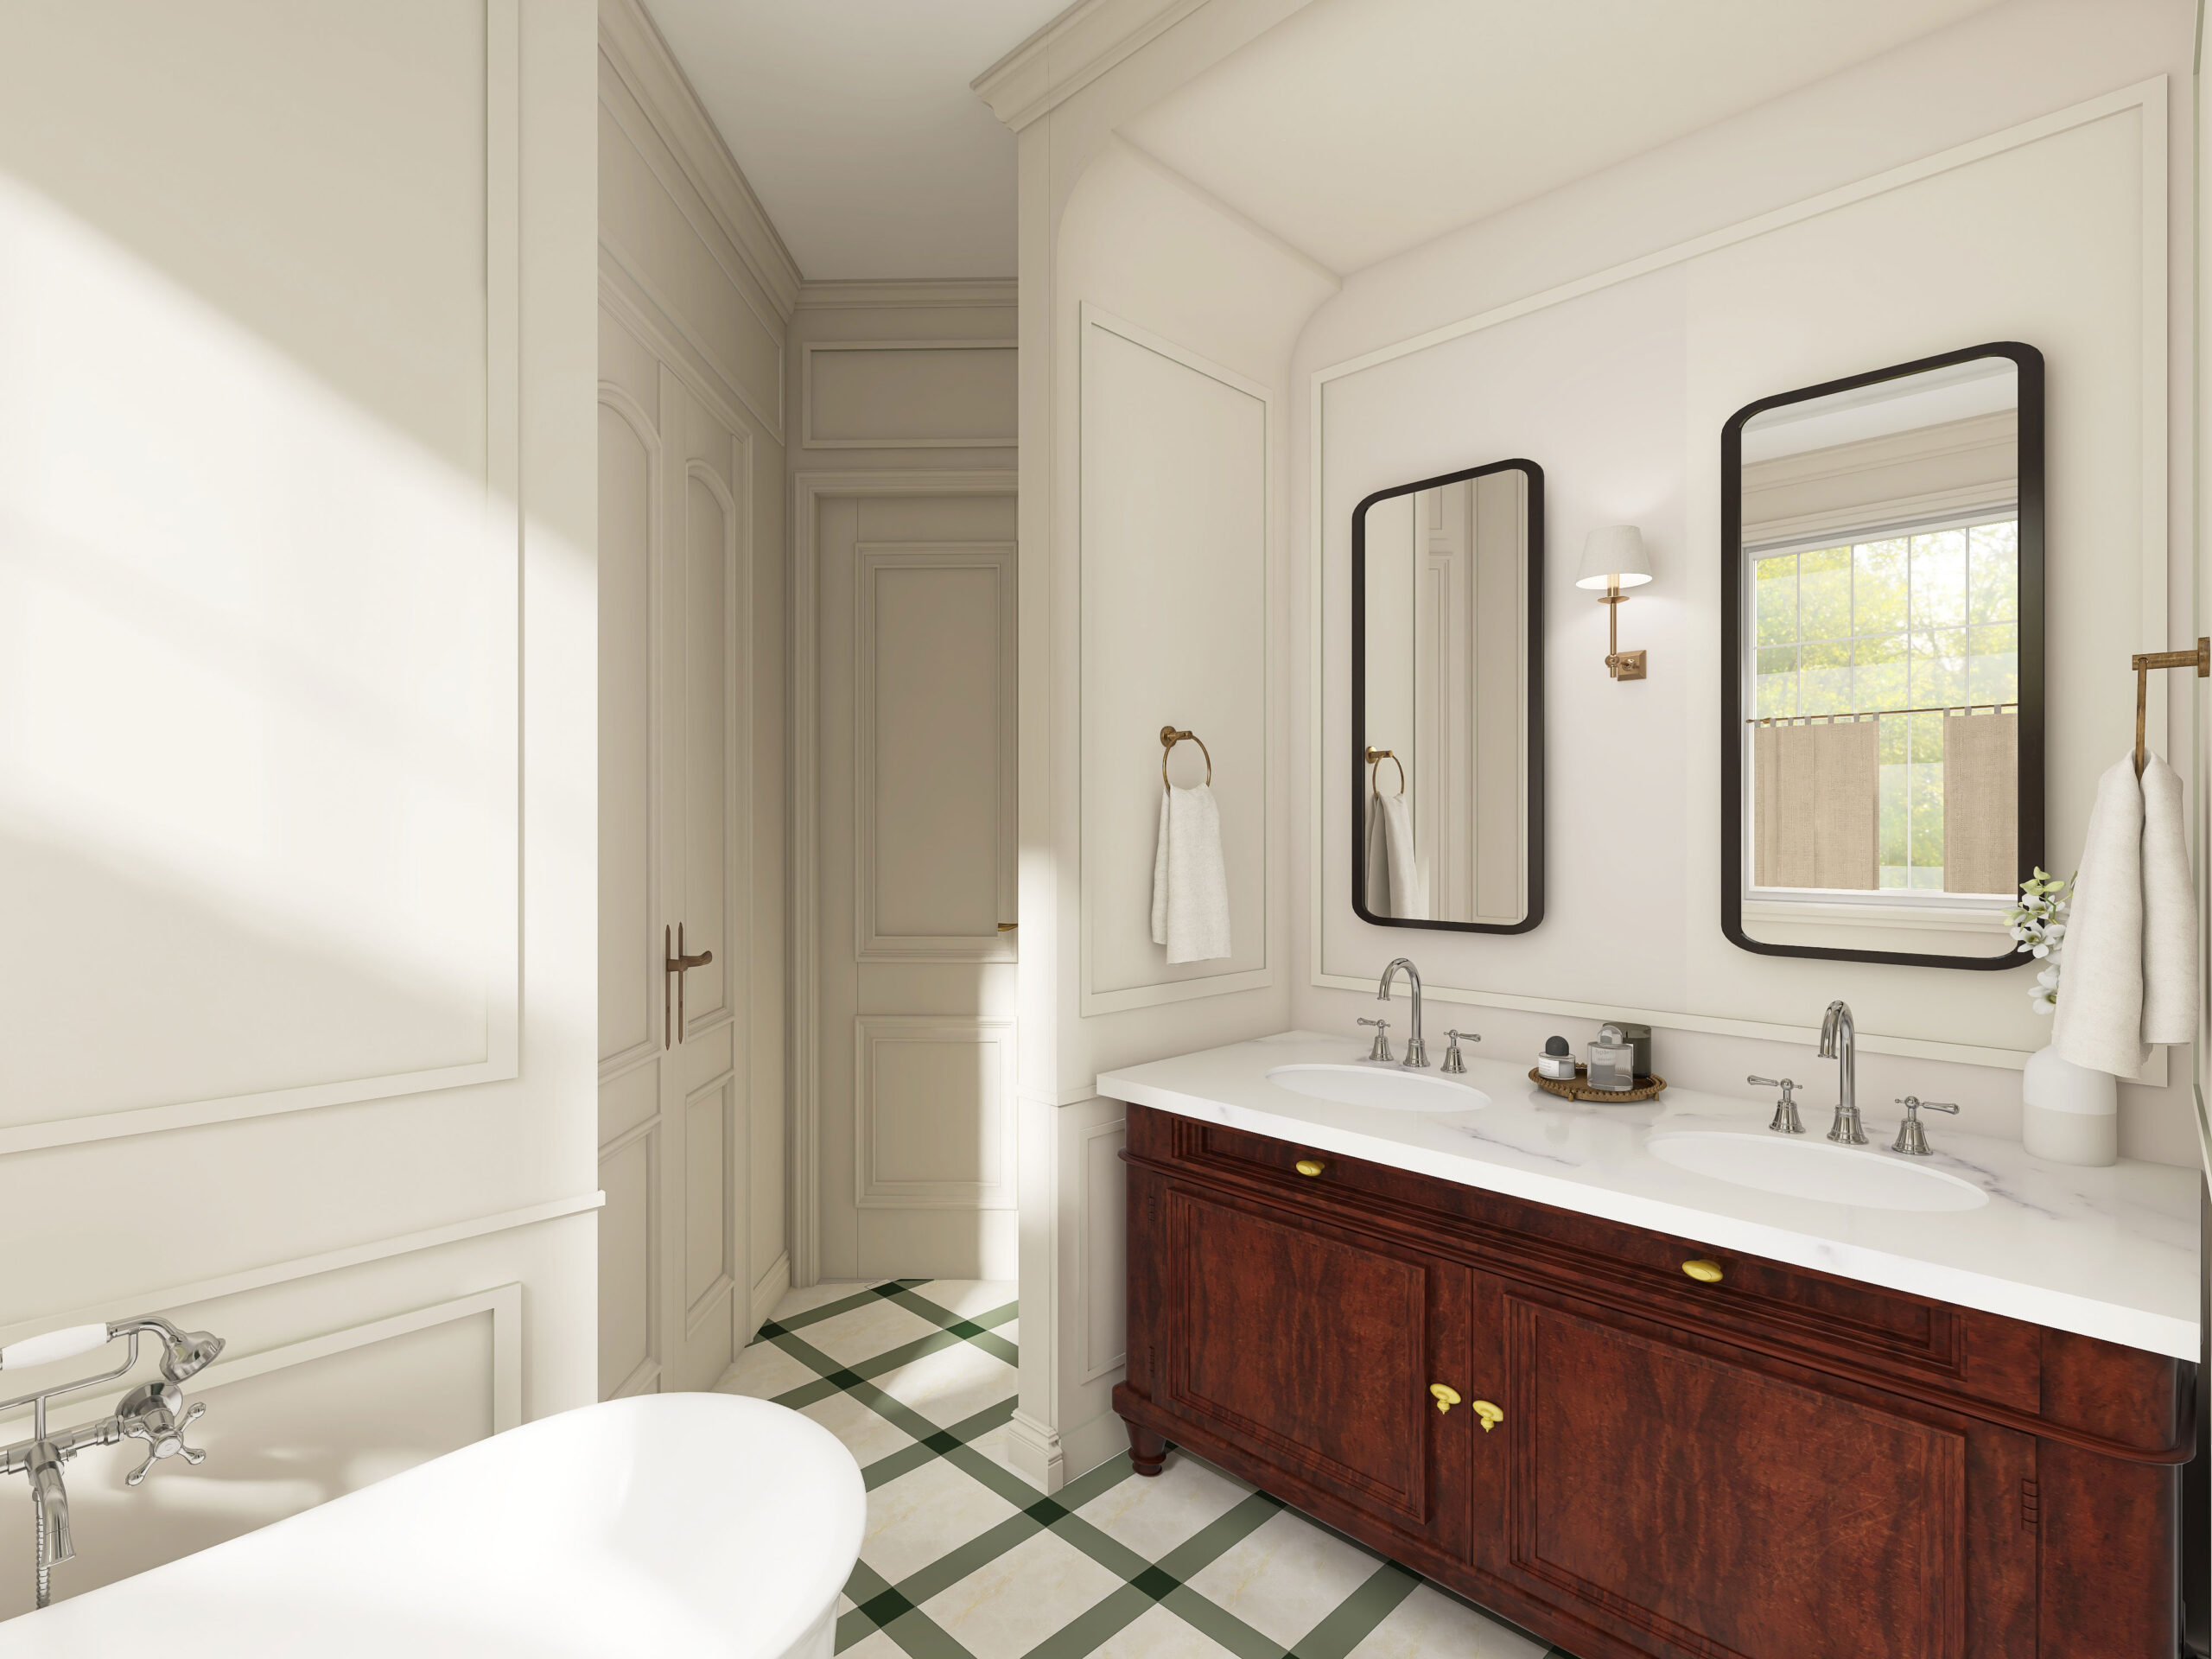
I asked my friend LeeAnn (at @homewithknives on Instagram) to do a rendering for me about what I was thinking. This was before I had done any real tile selections or come up with any solid mood boards. The reason I wanted a rendering was that I wanted to be able to see my new layout in 3D and confirm in my own head that it was a good idea. I also used the rendering to help communicate my vision, especially for the tile, to the companies I’m working with.
Here are the renderings that LeeAnn did for me and WOW seriously I just got so excited looking at them again!
The Mood Board and Selections
I found out that prefabricated double vanity units would be just a little too big to fit into our alcove and so custom it would have to be. In the past, I have not been able to find local cabinet companies that would do inset cabinets. Since the rendering, I have worked with Cabinet Joint to design a custom vanity and I’m so excited to share more of that process with you! I can get the look, customized, just exactly how I want it!
When it comes to wood finishes, I can be a *tad* picky and so having the ability to choose the exact wood grain, colour, finish, right down to the percent of sheen on the top coat is unbelievable! I can’t wait to see it, it should be delivered later this month! Eeek!
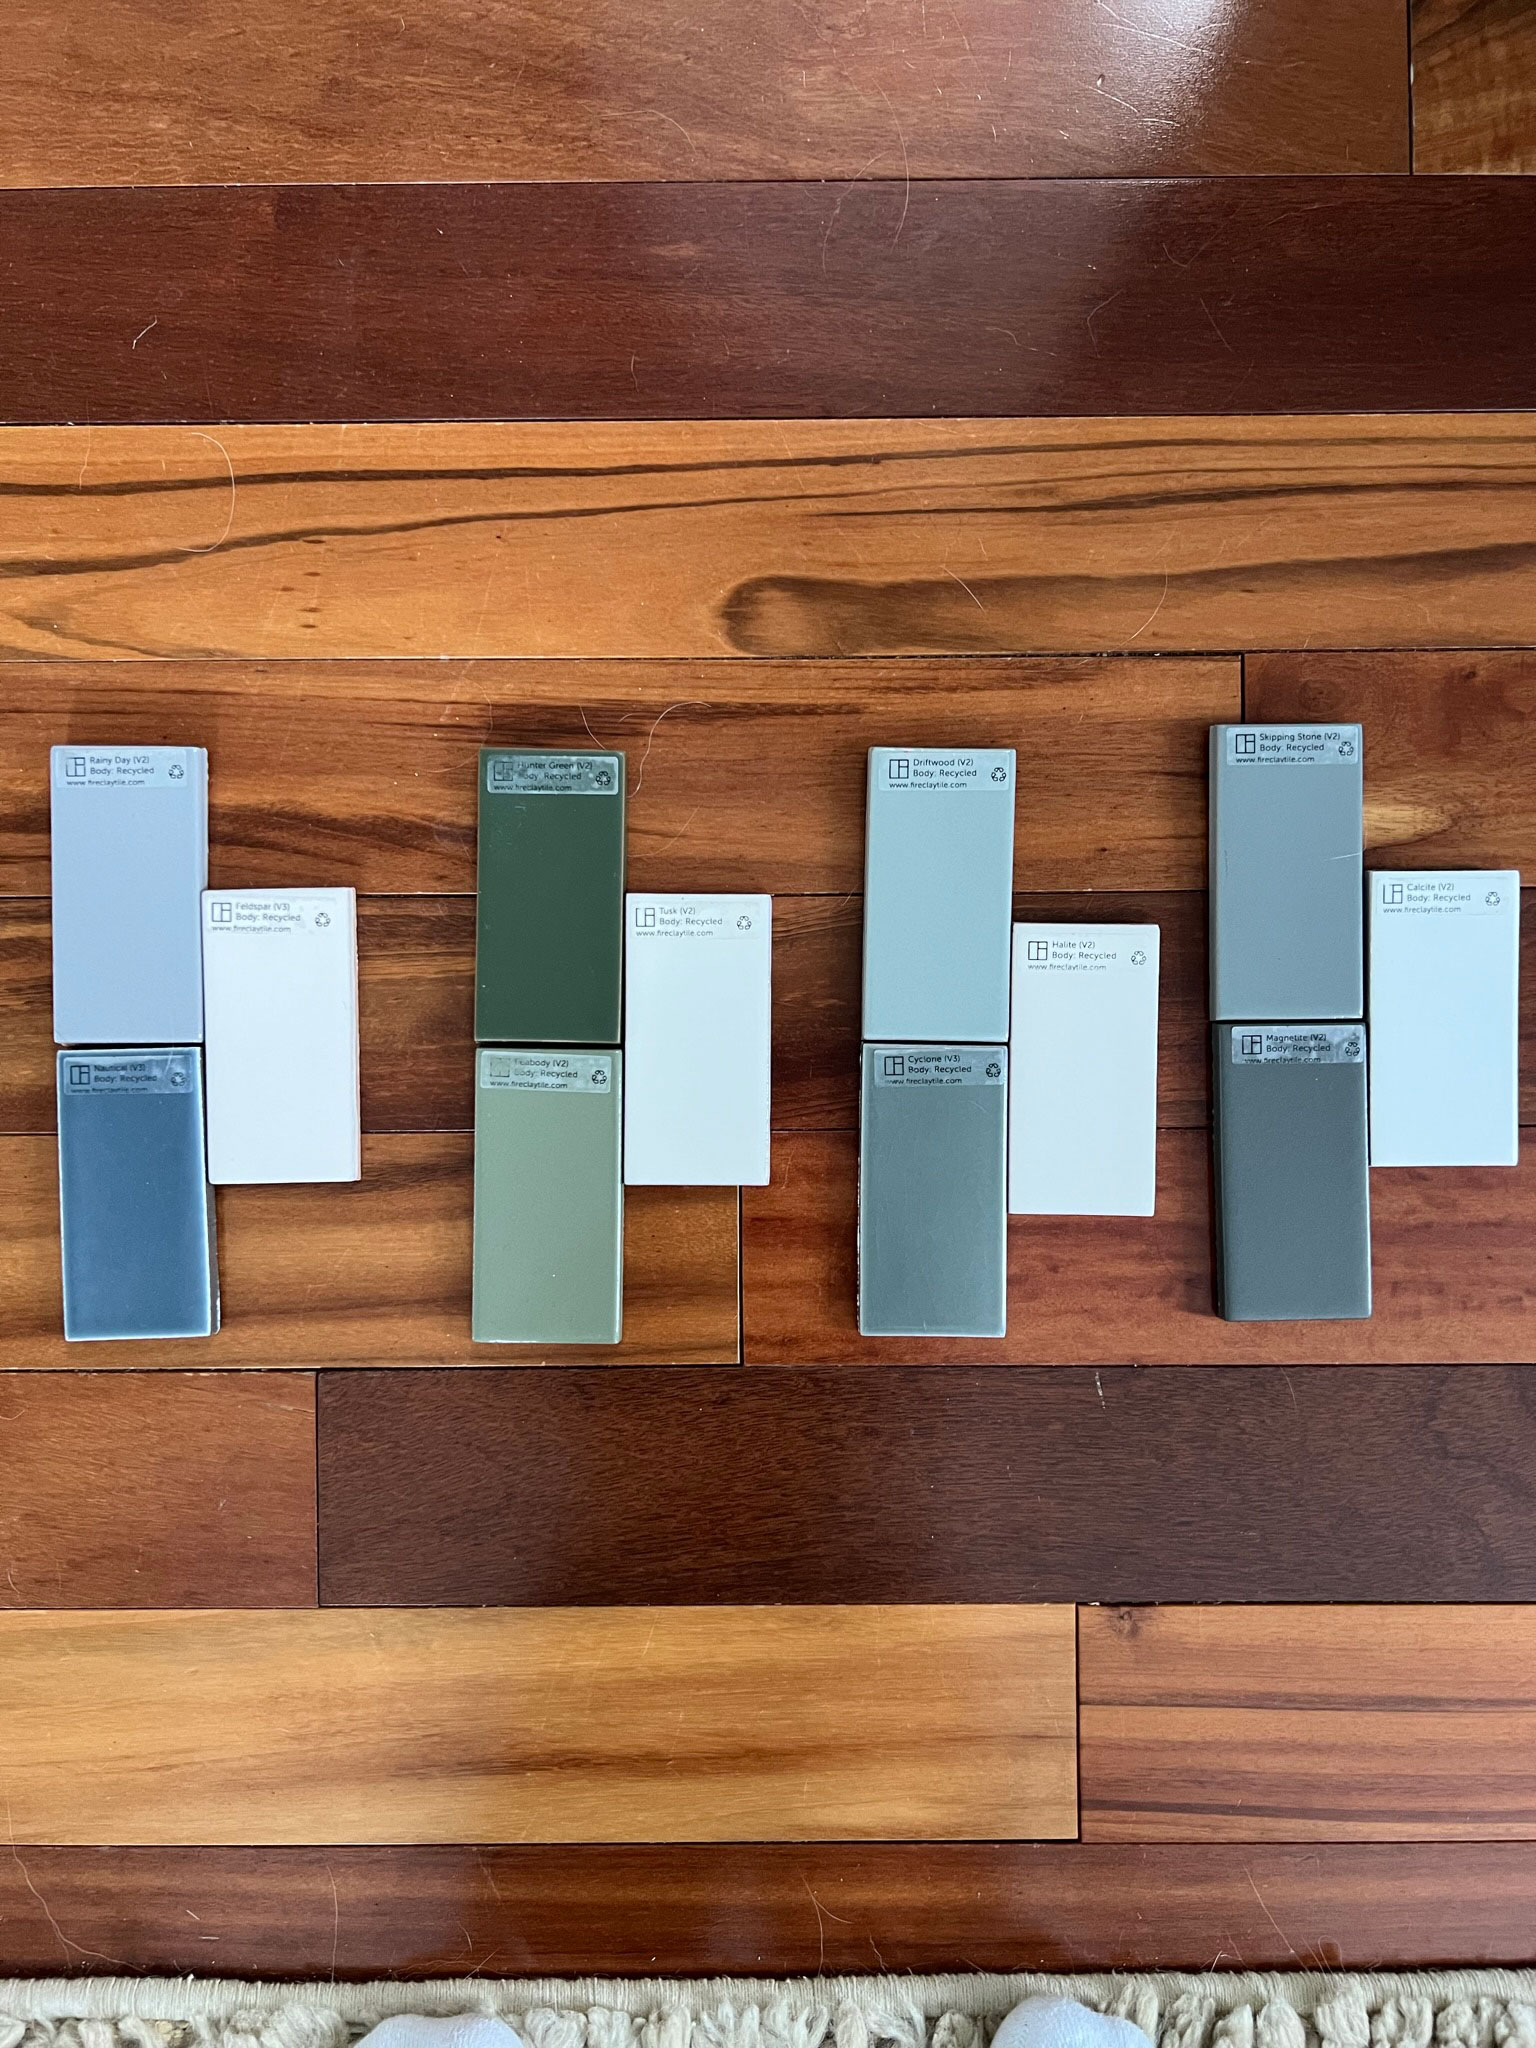
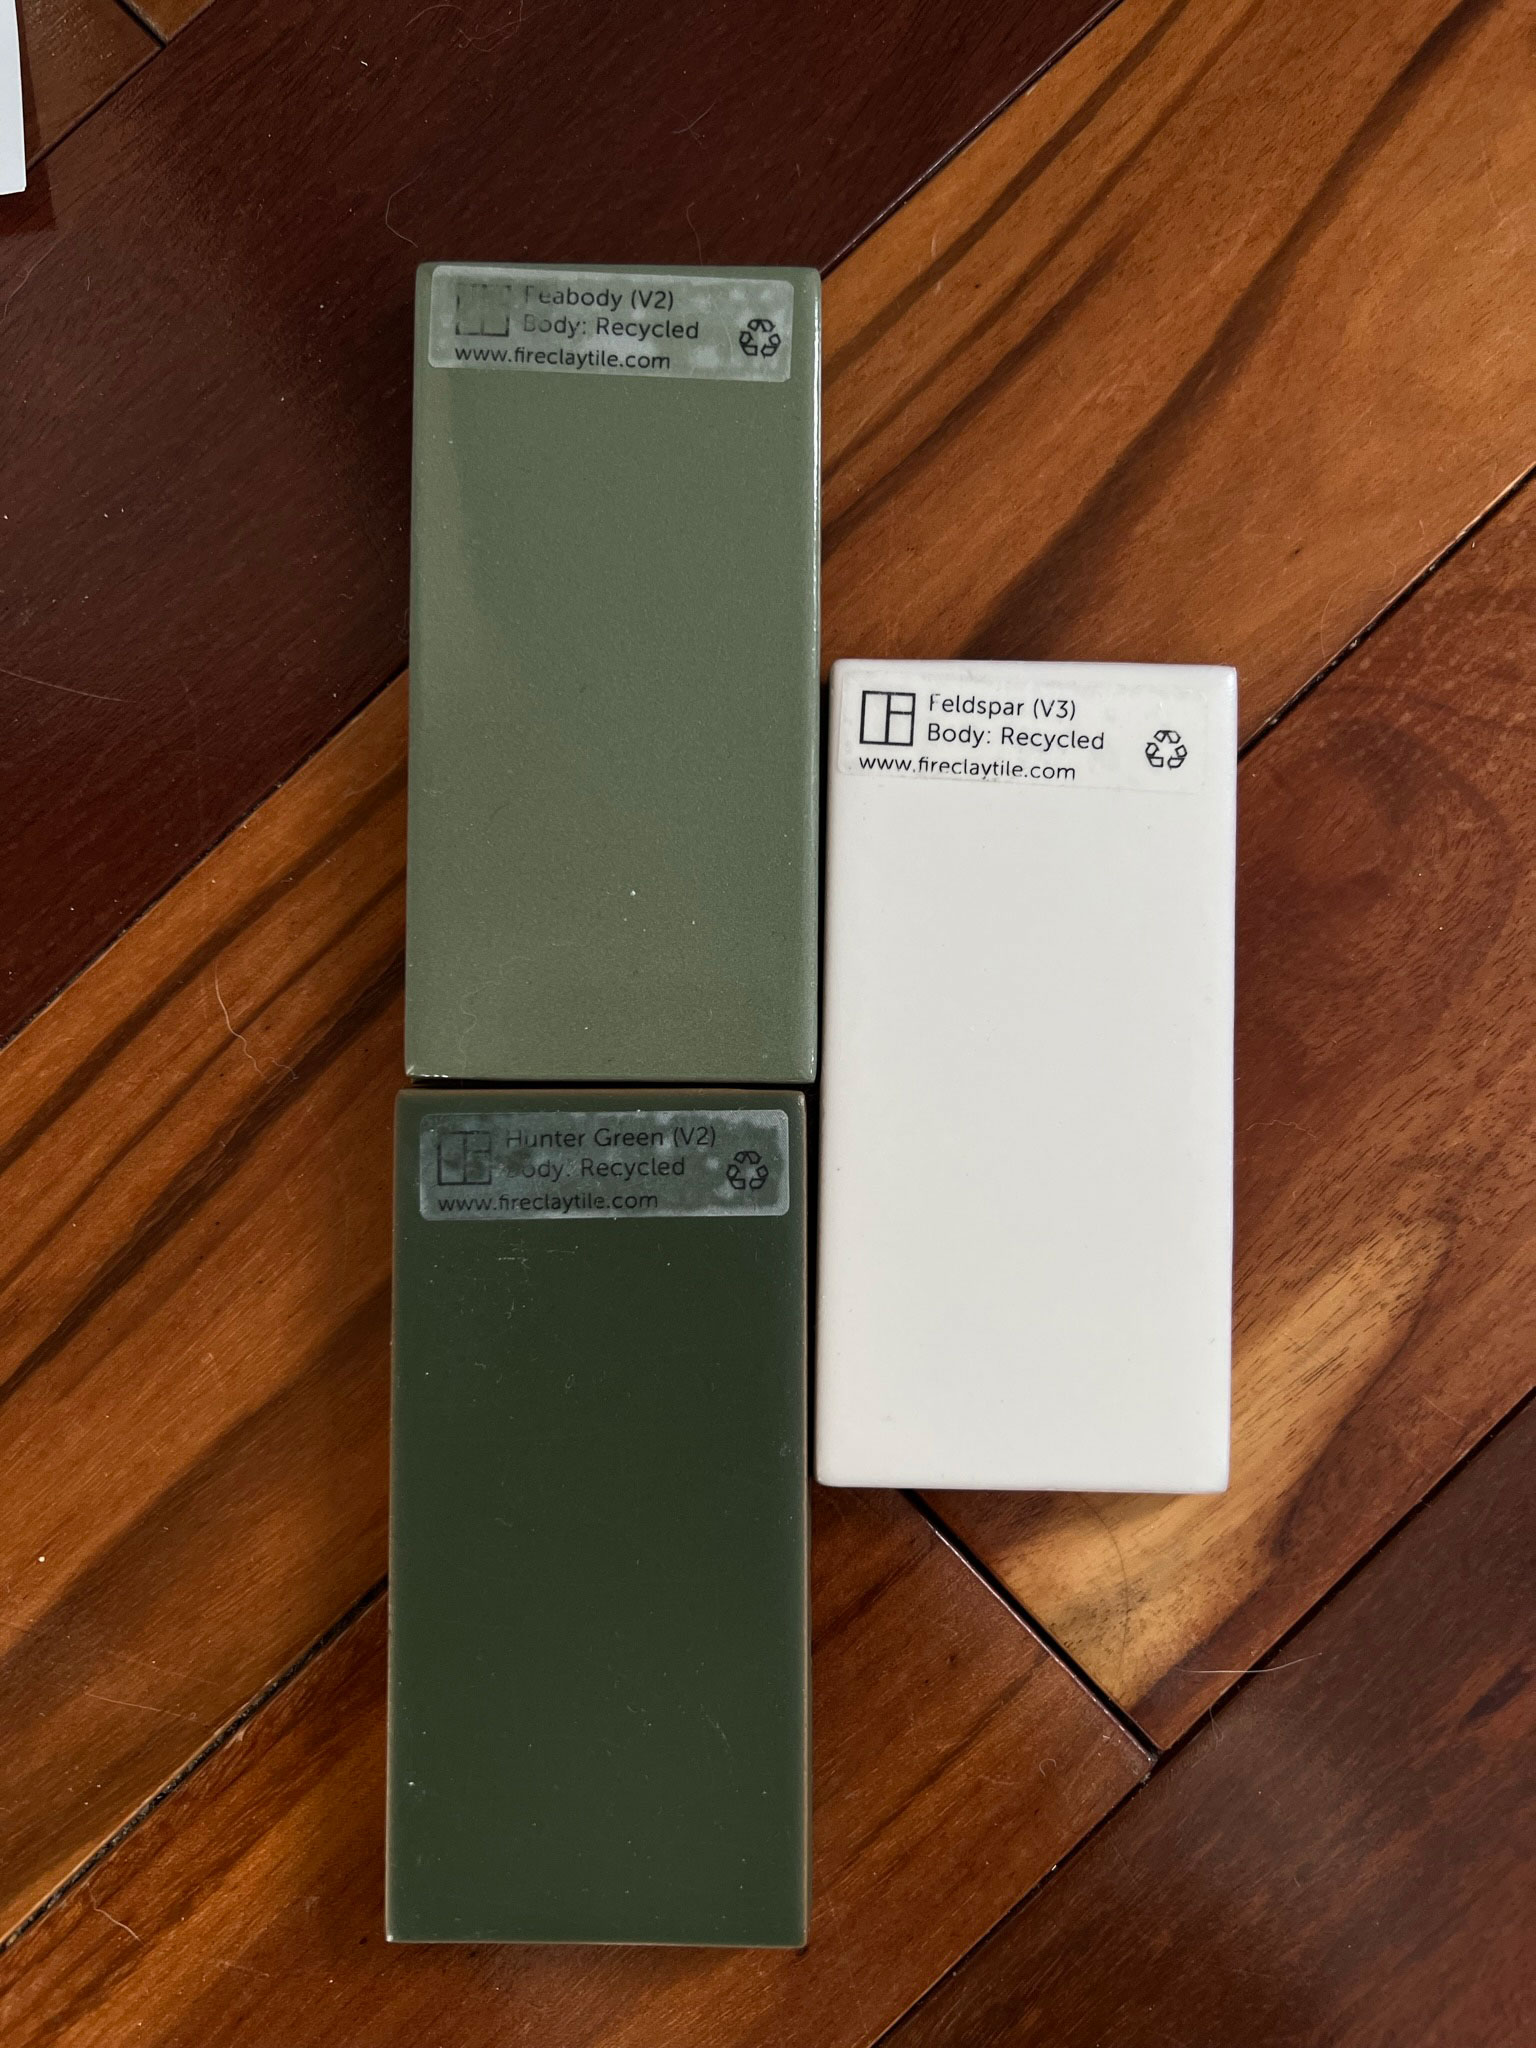
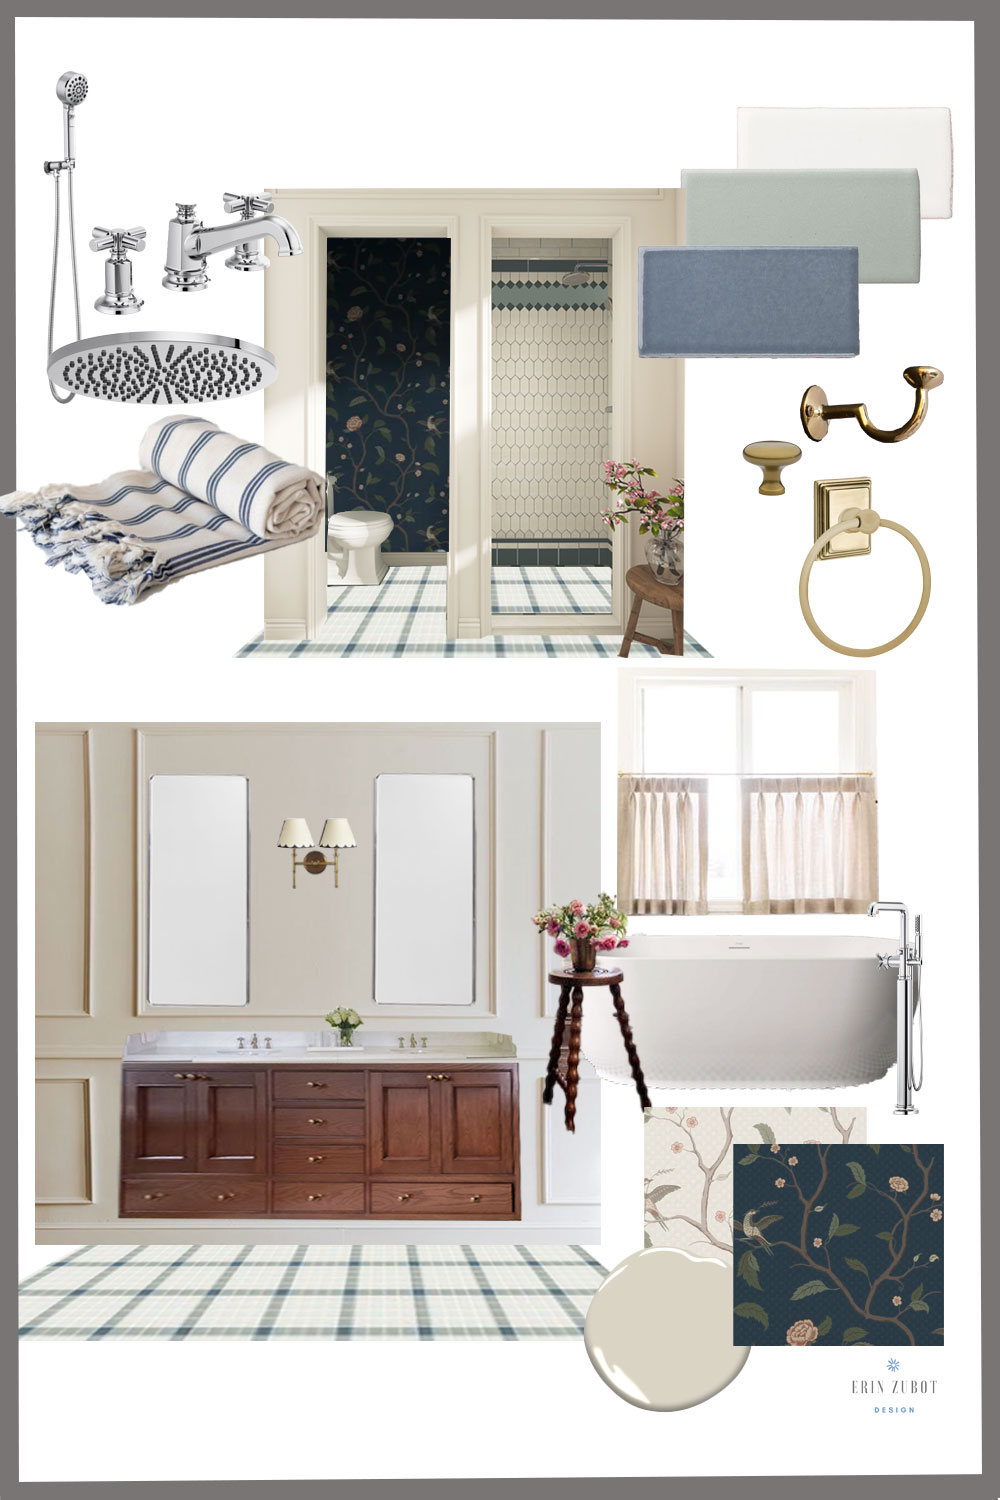
The other very custom design feature is obviously the tile. I am working with Fireclay Tile on this project, which is honestly a dream come true! To be using their handmade tile on a project where I am replicating a traditional tile pattern just seems so fitting and special.
The tile in this room is so ambitious and complicated; it involved a spreadsheet, a sketch, and colour coding! Fireclay is doing custom mosaic floor tile sheets for me and that is going to make the floor so much easier, Thank goodness for that, as I am going to have my hands full in the shower!
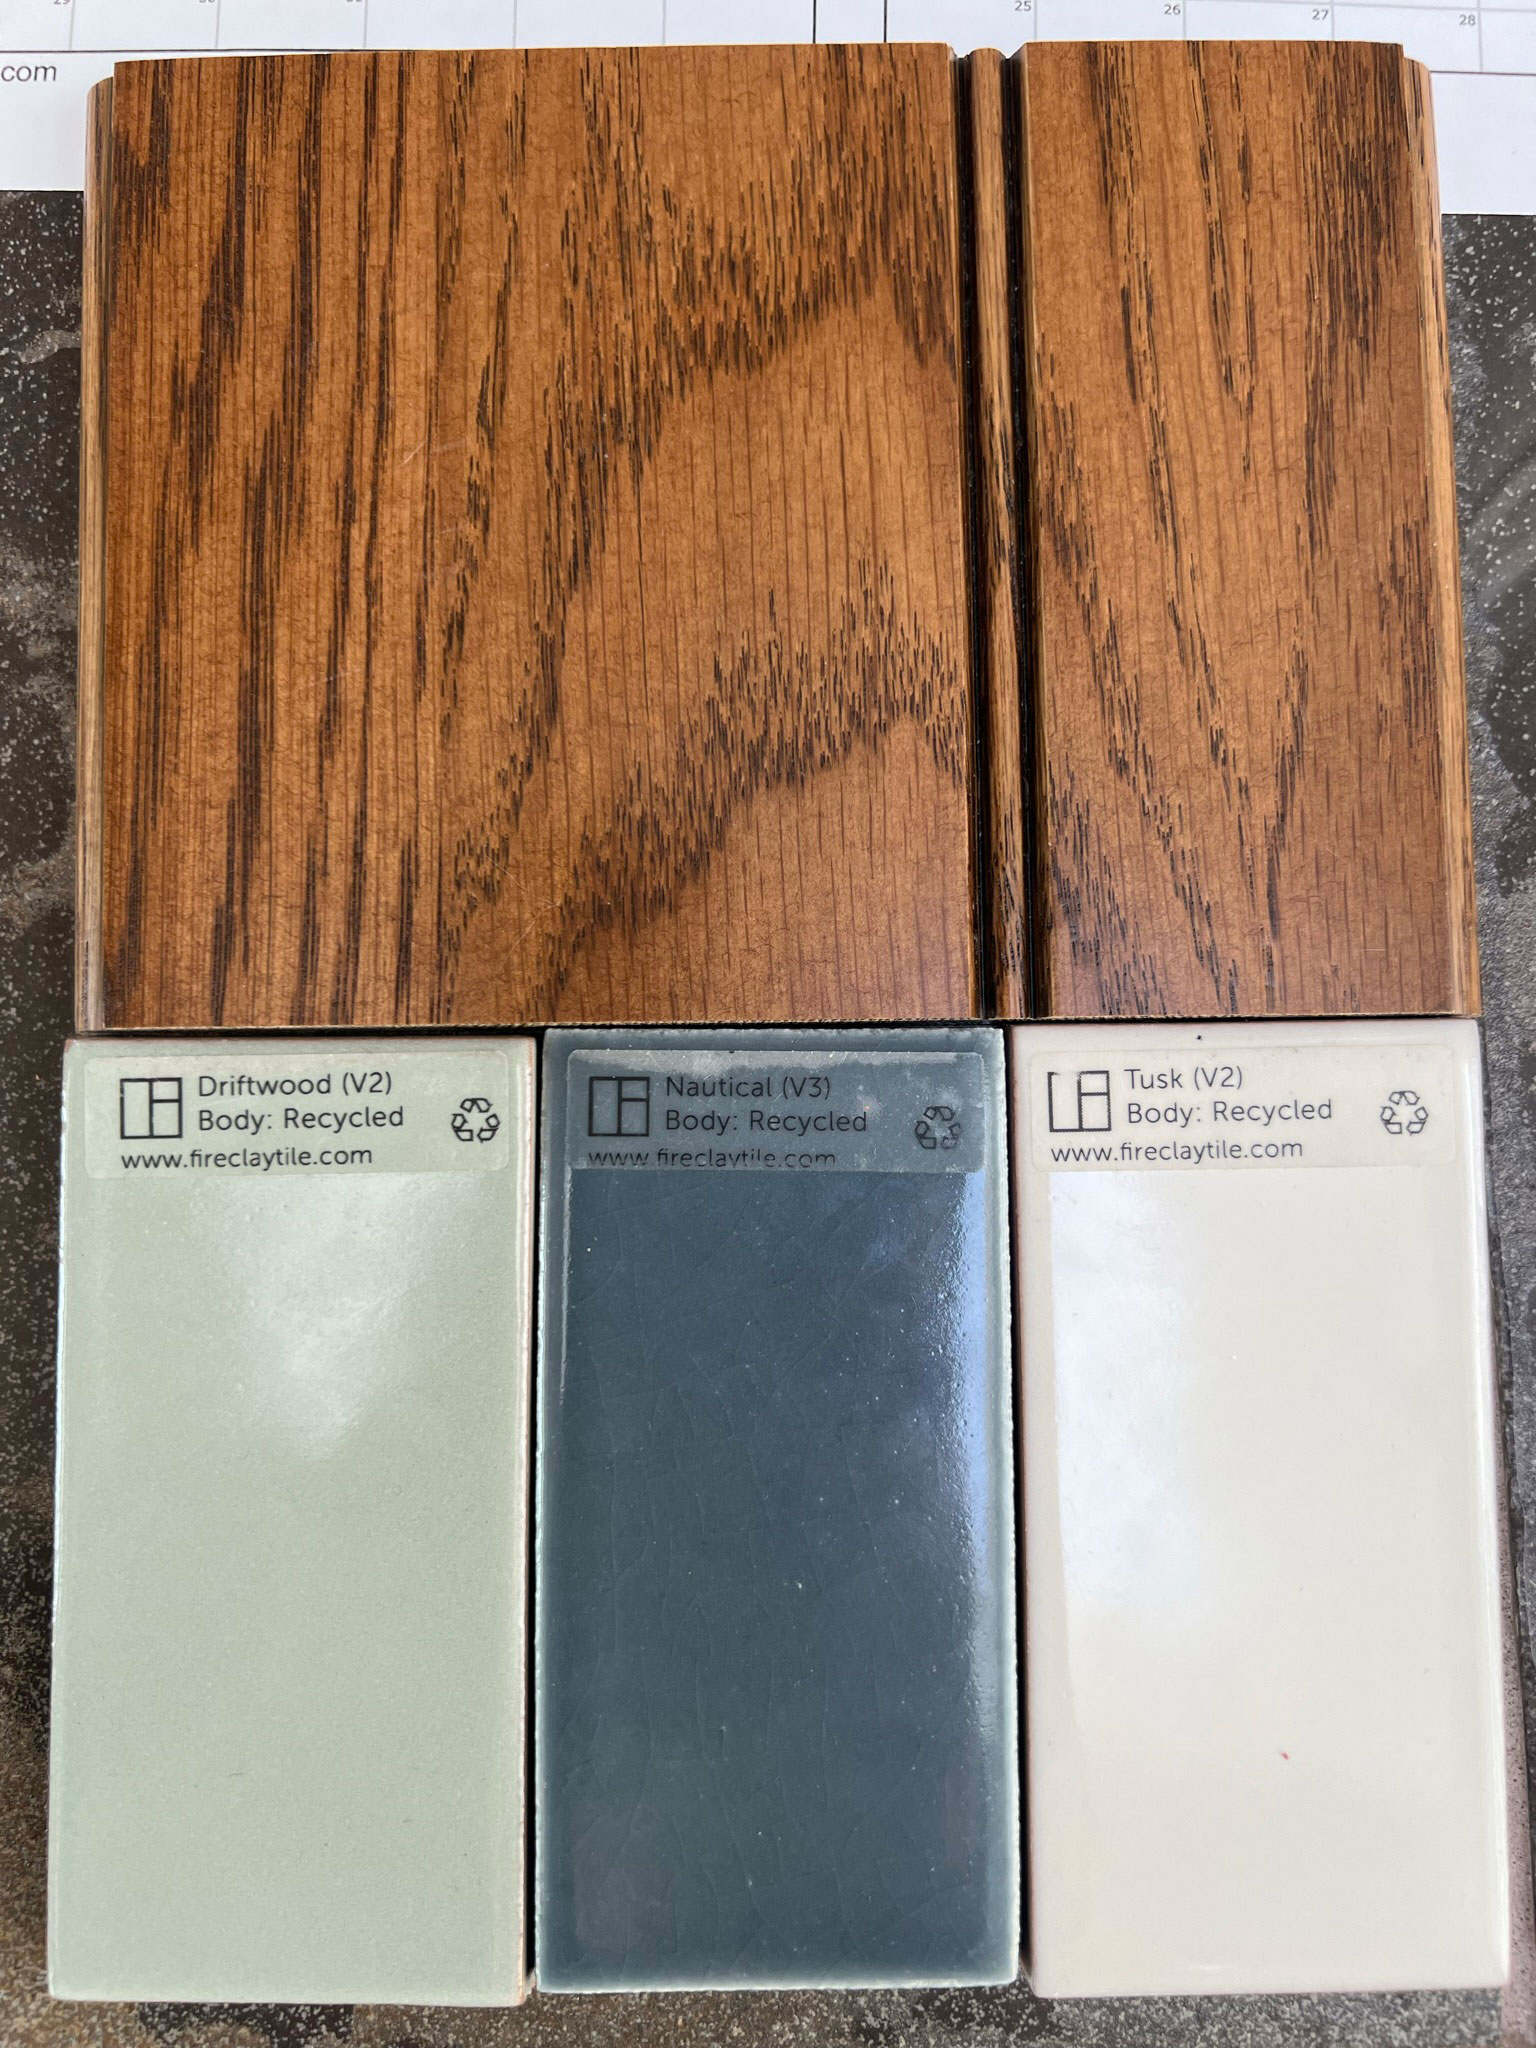
Coming up with a colour scheme was so hard as I loved so so many of the samples that Fireclay sent over. I originally was going to go with something pretty similar to the Paris bathroom but after thinking about that a bit, I decided that having something that fit into the rest of the house a bit better and my own personal style made more sense. So I chose some colours that were a bit more muted and they are in production as we speak! Eeeeek!
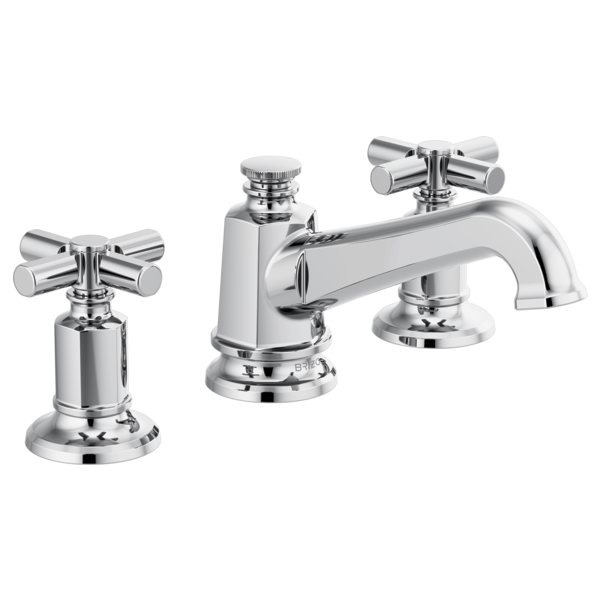
The next thing to decide on was the bathroom fixtures! I’ve used Delta products throughout my house and I’m always happy with the dependability of that brand. For the ensuite, I decided to work with Delta’s luxurious big sister brand, Brizo! The line I chose is the Invari line which is honestly the perfect combination of modern and classic and I could not love the entire collection more!
I chose chrome for the finish, there is something about chrome that just feels so timeless and classic to me and I have gone with either chrome or polished nickel for all the rest of our plumbing in the house so I like to keep that consistent. We are also doing a huge rain-head shower head and I can not wait for the first shower in there!
I love to mix metals so I’m also going to bring in a bit of brass for warmth, in the vanity hardware and things like towel bars, the toilet paper holder, and other bathroom accessories and bathroom decor.
At the last minute when we were looking for mirrors I came across this medicine cabinet and decided that adding that would be awesome for some additional storage space, so we will be reframing the wall over the vanity too. I went with chrome again to tie in the fixtures.
Once the tile and vanity and some of the fixtures were chosen, the rest of the design fell into place. I decided to go with white or beige walls to make sure the tile really was the star of the show! I intend to do something fun in the toilet area (maybe wallpaper?) because I like the idea of peeking through into a little jewelbox of a room.
There are a few details I’m still working out right now. I have not yet chosen light fixture. The ones I want the most are sold out until April! Do I wait for them? I mean if this is going to be my dream bathroom, it just doesn’t feel right to settle for anything else!
I also am still looking for a nice natural stone (or quartz) remnant to use for the sink top. We actually considered keeping our black granite countertop but black is just such a terrible countertop colour in the bathroom. It shows dust and toothpaste and it just always looked dingy so we will be sourcing a new top. (Tip: Using a remnant from a countertop fabricator is a great way to save a little money on a stone top!)
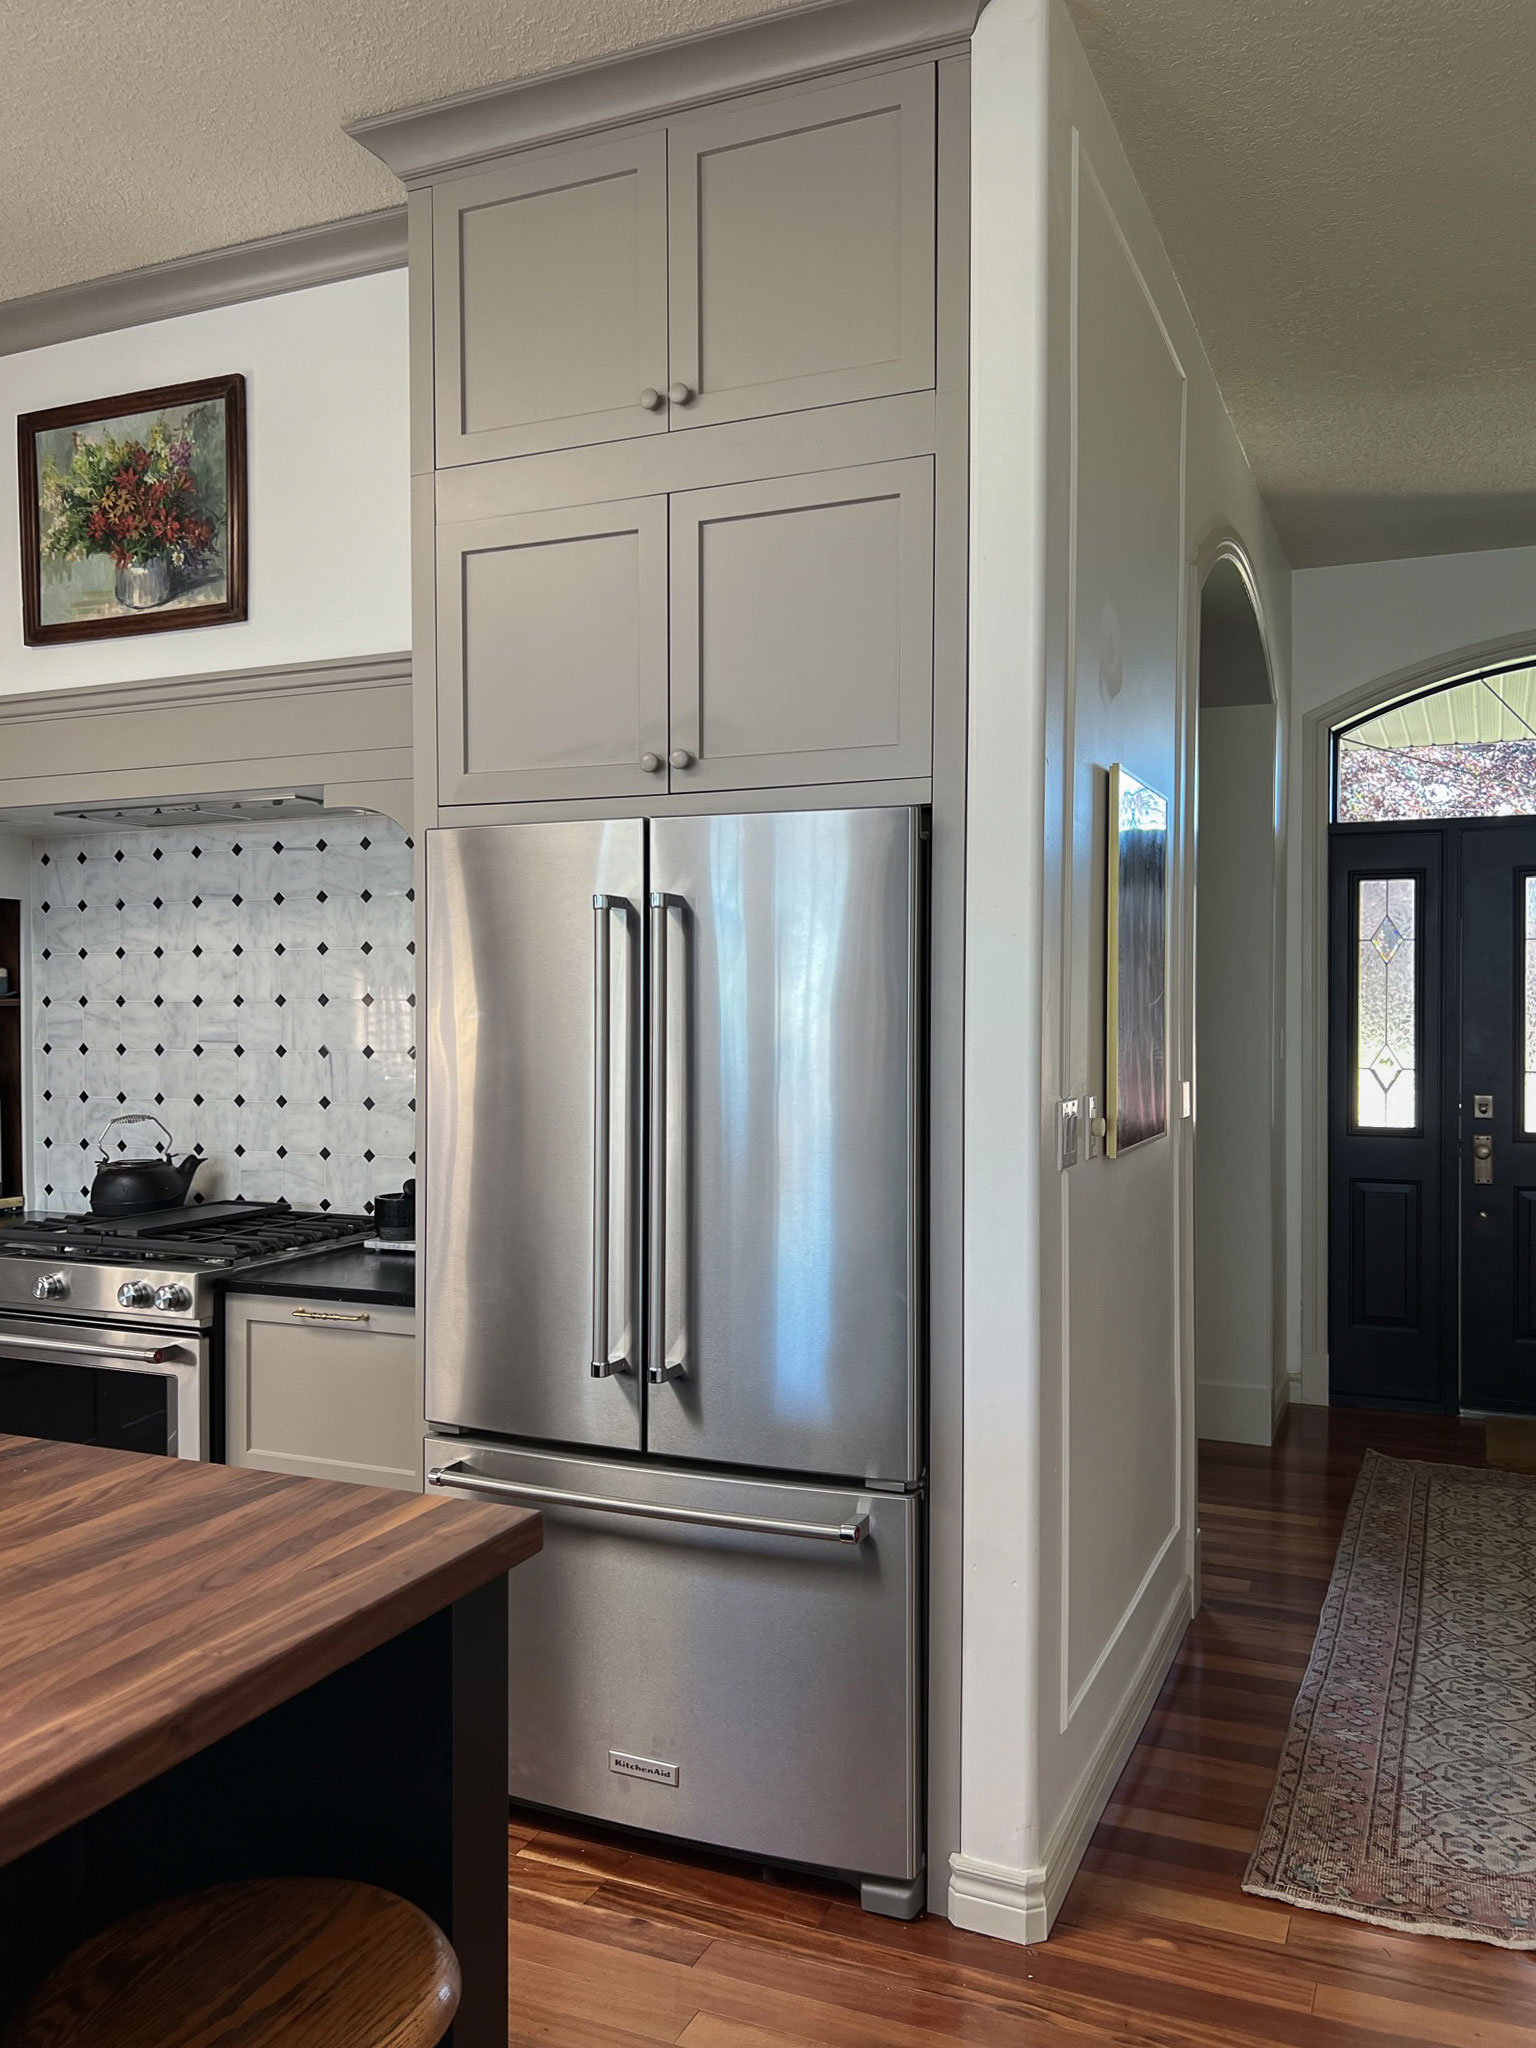
So that is the plan! What do you think? It’s going to be a big change from the 90’s style bathroom it was before. This bathroom is the ensuite to the primary bedroom which really I thought needed a level of luxury that the other two small bathroom designs didn’t have. (If you are looking for more information on how to save money on a small bathroom renovation, I have a ton of posts on budget bathroom ideas like this post on how to redo your vanity cabinet doors for a fraction of the cost of a new vanity, or this post on how to make a floor to ceiling shower curtain!)
How Much Will we DIY?
We have already started and I can’t wait to bring you all along with us on this DIY journey! We are taking it a little slower this time, I’m going to share as much information as I can with you all about each step from the design choices, to ordering custom and planning the renovation, to demolition and all the steps along the way! We have an extra bathroom or two in this house so we are not in a huge rush to have it finished, and we want to take our time in planning and execution so it really does end up being the bathroom of our dreams!
We are hiring out a few things because we do know our limitations (and we both have day jobs, too!) We are hiring a plumber and an electrician. There are quite a few plumbing and electrical changes and while we can handle a few basic things ourselves, this is more than we want to take on.
The third thing that I think we might hire out is drywall, and that’s simply because we hate doing it so much.
Once the walls are closed up we will work on the rest ourselves! I will be doing the waterproofing the same way I did the kid’s bathroom shower, tiling the floor with mosiac tile, tiling the walls, adding box trim moulding, installing the vanity, painting, and the list goes on!
Get the Look
Here is a round-up of all my finishes if you are looking for links. I will have more details on the custom items as we go along with this project but in the meantime, if you have any questions you can comment here and I will be sure to answer! I’m also updating our progress daily over on Instagram if you want to stay up to the minute with our progress!
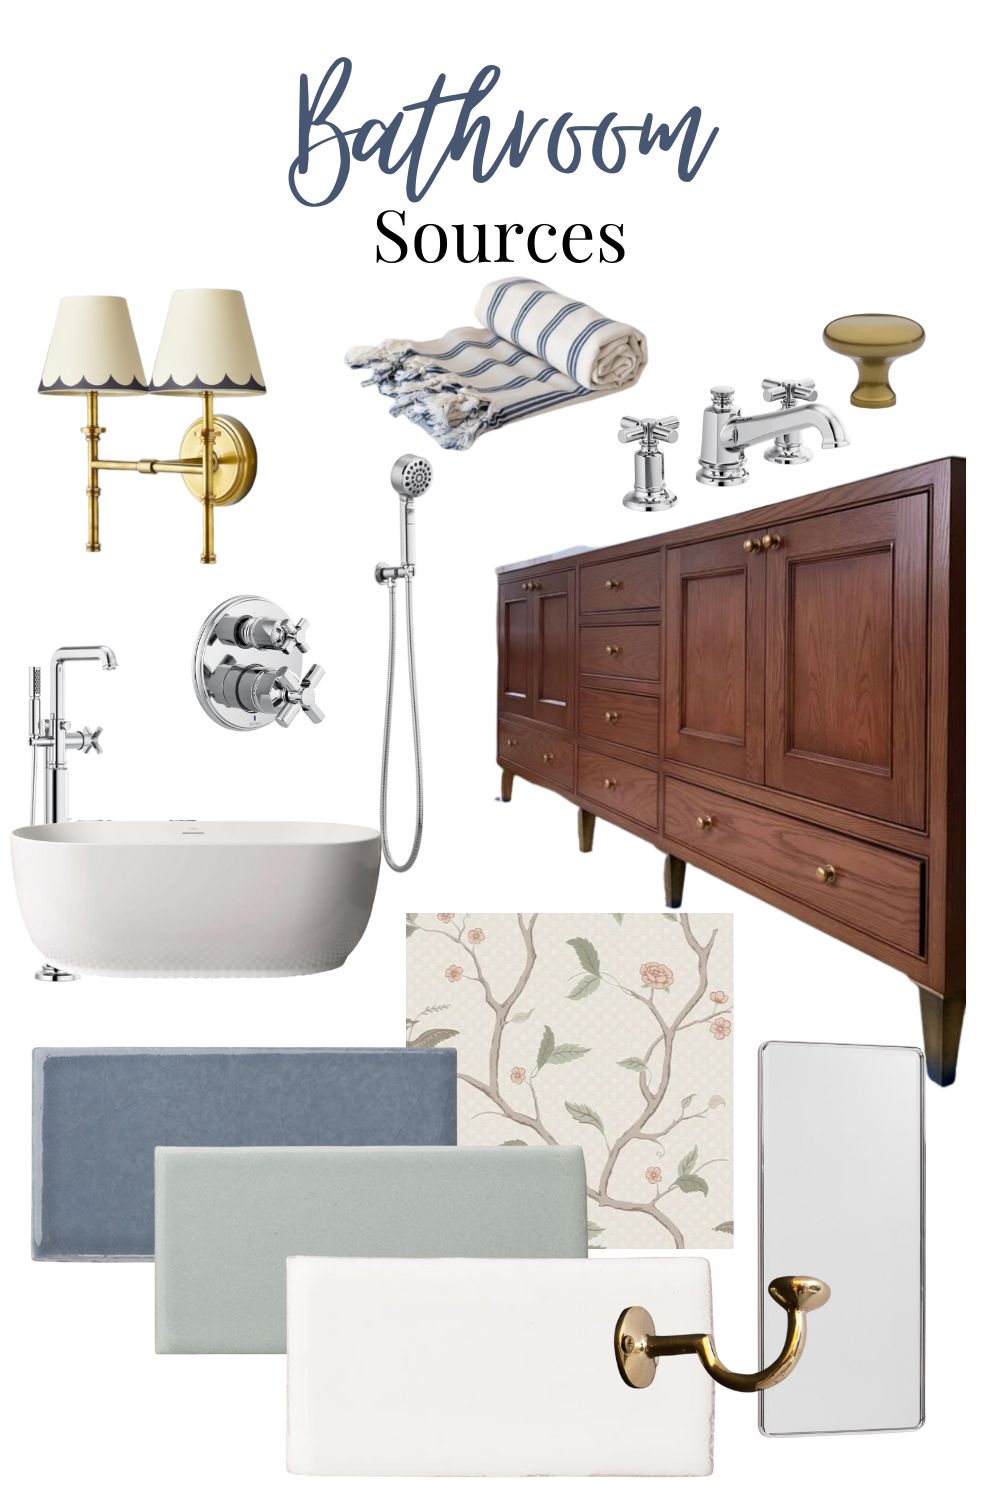
- Sconce (or considering this one too)
- Towel
- Brass Knobs
- Faucet
- Showerhead
- Shower Sprayer
- Shower Valve
- Oak Vanity
- Tub Filler
- Tub
- Blue Tile
- Green Tile
- White Tile
- Wallpaper
- Medicine Cabinet
- Hook
It’s gorgeous!! Love everything!
Hi Erin,
I love your plan. Getting the rendering for it had to have been so helpful. Being able to see the things you’re envisioning all together had to cinch your decisions.
Also, I think you need to go with your first choice of light fixture. April isn’t really that far away. And in my past experience I have regretted settling.
Wow- this is such a beautiful design and what a big change from the existing bathroom – I mean, it won’t even be recognizable from the original! So excited to see it progress
This is so exciting, Erin.
This bathroom is going to be beyond gorgeous! Cant wait to see the final product. Also would love to know more about how you worked with Cabinet Joint to create your custom vanity.
I love the direction you are going!!! I can not wait to see how it unveils itself as you go through the motions of this renovation!!
This is going to be beautiful. I’m not surprised you found your tile inspiration in Paris. Even the grungy subways there have beautiful tile!
It’s gonna be sooooo good! Love all your choices, and am excited to follow along.
Thank you!!
I think you are right Mary – I’m going to wait for the light I love!
Thank you so much Leslie!! We are excited for it!
Thanks Allyson!
Thank you so much Mary Ann! I’m going to be doing a whole blog post about our vanity and cabinet joint, stay tuned!
Thank you so much!
You are right about that, the deepest corners of the subway were still beautiful!
Thank you so much Arli!