How to Paint Wicker to Look Natural (A Before and After!)
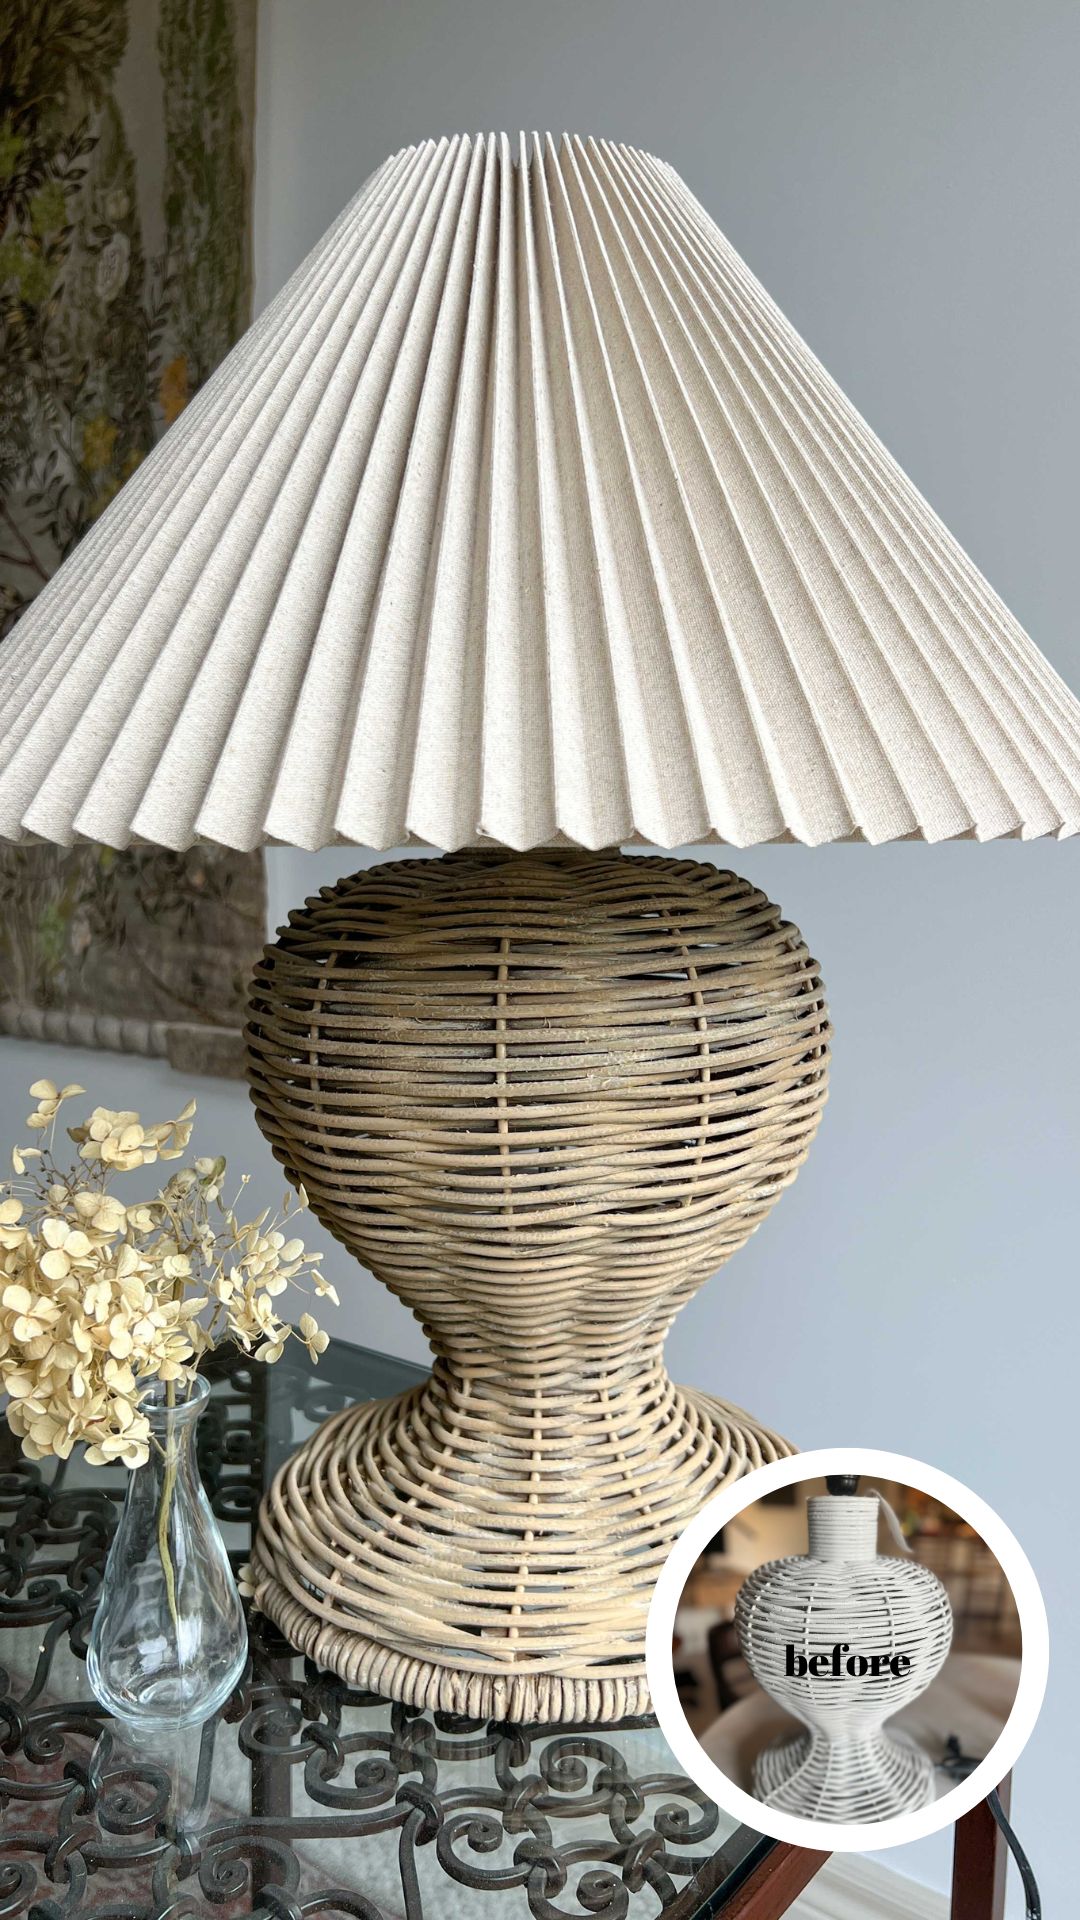
I found this wicker lamp at the thrift store and although I loved the shape and size, I did not love its white paint job, so I decided to see if I could give it a makeover! I did a little experimenting and spray painting and figured out how to paint wicker to look natural again! Here is a before and after of the spray-painted wicker furniture below!
Wicker is a natural material like wood, usually left in a natural wood-coloured state or stained. Old wicker furniture is often worn out with a peeling finish so a lot of people slap on a fresh coat of paint to give them new life.
When I found this white lamp, I thought that was exactly what someone did at some point. I could see that the inside was the original colour. It was only $5 at the thrift store so I figured I would give a makeover a shot! It was a little trial and error, but I loved how it came out!

This post may contain affiliate links. That means if you purchase anything from these links I earn a small commission, at no extra cost to you! This helps support my blog, so thank you!
Wicker lamps are hot right now, I found a few to serve as inspiration for my thrifted find (linked below if you can’t find one at the thrift store!)


There are a lot of old tired pieces at the thrift store or on Facebook Marketplace, just begging to be brought back to life with new paint! This is an easy DIY project that anyone can do, you can’t mess this up.
Table of Contents
- Step 1: Spray Paint
- Step 2 – Gel Stain
- Step 3 – Dry Brushing Paint
- Step 4 – More Dry Brushing
- Step 5 – Sealer
- The Finished Lamp
- You Might Also Like:
Step 1: Spray Paint
The first thing I did was buy a can of spray paint that was a light tone brown. The spray paint color I bought was Rustoleum Nutmeg. I wish I had been able to find a matte finish, but I could only find satin in that type of spray paint.

First, give your piece a good cleaning. You can wipe it down with a little soapy water if your piece is very dirty or has a lot of dust build-up. Mine was not too dirty so I just gave it a quick rub down to remove any loose dust. If you do wash your wicker piece with warm water, be sure to let it dry completely before painting it.
I started by taking it outside (or just being sure to use a well-ventilated area on a plastic drop cloth) and spraying it down. I used painter’s tape to tape off areas that I didn’t want to be painted, like the cord and the lamp base. As with any spray painting, very light coats a few minutes apart works best to avoid drips. I did a single coat, let it dry for a few minutes, and then hit it with a second coat.
I think that using cans of spray paint or a paint sprayer is essential to paint wicker furniture, as it would be almost impossible to get paint in all the nooks and crannies.

Note: My piece has been previously painted so I didn’t worry about a primer. If your piece is very shiny or is plastic wicker, I would be sure to use a coat of primer (just a can of spray primer would do!) before painting.
Make sure you look at your piece from different angles so you don’t miss any spots for the best results.
I could have stopped here because the nutmeg colour was pretty good! The only thing I didn’t like about it was that it was a tad shiny because my paint was a satin finish. One option would have been to spray it with a matte sealer at this point.
I didn’t do that, however, I proceeded it to make it look worse with my next step, instead!!

Step 2 – Gel Stain
Now in full disclosure, this is not what I would recommend, it is just what I tried. I decided to cover the lamp with a little gel stain to give it more dimension.
Since I am cheap and I have an excess of leftover stains and paints in my garage, I decided to just use what I had on hand, which was a dark colour.

The gel stain worked… but it was really not the overall look I was going for. I thought I would like the dark wicker but it really just looked like a bad remnant from the 80’s! I think this would have worked pretty well if I had used a mid or light-tone gel stain.

Anyway, I applied the gel stain with a stiff brush to get it in all the nooks and crannies of the wicker, and rubbed it off after a few seconds. I started working on it and knew almost right away that I didn’t like it, but yet I still proceeded to do the whole thing. Don’t ask me why, ha!

I lived with it for a few days to see what I really thought about it, and decided to go back to the beginning and spray it again with the Nutmeg spray paint.
Although I didn’t end up liking the dark gel stain, some of it did peek through in the final lamp base and gave it a bit more dimension, so I don’t think it was a total loss! However, also it was probably not totally necessary.
If I ever do this again, next time I will try a lighter gel stain for this step or just skip it.
Step 3 – Dry Brushing Paint
I decided I needed a bit of a muse or inspiration for the final colour of my wicker lamp so I grabbed a basket that I liked to look at while I worked on the lamp. When I looked at the basket, I realized that it had quite a bit more variation in colour than my rather flat-looking single colour spray painted lamp.

I raided my daughter’s craft paints (I used light brown, dark brown, white and yellow) and started brushing on some paint
I started with a light brown and added a little clean water to make the paint a bit more runny. Then I dabbed a brush in the paint and tapped it on a paper towel before applying it to the wicker.

I used sweeping broad strokes and tried not to get it everywhere, I just wanted to highlight a slightly different colour.
Step 4 – More Dry Brushing
After that, I used the craft paint to mix different colours and just kept layering it on. I looked at my basket often, mixed yellows and browns and whites to get different shades, and sporadically did very light coats of paint for a more uneven finish.

I found that the best way to do it was just by trial and error. If I mixed up a colour and started to apply it and it looked off, i just wiped it off and mixed the colour again. Adding the different layers of colours really helped this look a lot more authentic and less like a piece of painted wicker furniture!


The acrylic craft paint dried a lot more matte, so using a few layers of that type of paint to add some dimension eliminated the shiny feeling it had at the beginning.
You could use this method to spray paint wicker furniture of any shape or scale!
Step 5 – Sealer
Depending on your piece and how often it might be handled, I would consider adding a matte spray sealer on top to protect your paint finish. Since mine was a lamp, and no one really touches it, I didn’t bother to seal. However, if it was something like a nightstand or desk top, I think sealing would be a good idea.
The Finished Lamp
The lamp I bought didn’t have a lampshade, but I found this one on clearance and it is just the perfect size and shape.

In order to determine the right size for a lampshade, I often make one out of paper that is the dimensions of the one I am considering and hold it on the lamp to see if the scale seems right. That helps you get the right size shade, the first time.
I’m pretty happy with this little lamp and its new look, not too bad for $5 and some fresh paint! What do you think, would you try this?

Rug – Floral Lumbar – Curtains – Sofa – Lampshade


Perfect timing! I love wicker but 9 times out of 10 it’s white ….this was so helpful and it looks great! Erin scores again ! 👊🏻
Thanks Lara I’m glad this was helpful!