DIY Coffee Bar and Appliance Garage from a TV Cabinet
I have been deep into the planning of our kitchen renovation for the cabin, and one thing about me, I really like to hide away small appliances! I built a sliding corner shelf in our current kitchen as a countertop appliance garage, and I really wanted to do something like that again. I was looking into how to make something with slide away pocket hinges or pocket doors, when I came across the perfect thing on Facebook Marketplace! And the idea struck, why not turn a TV armoire into a DIY coffee bar hutch!
This post may contain affiliate links. That means if you purchase anything from these links I earn a small commission, at no extra cost to you! This helps support my blog, so thank you!
Table of Contents
The TV Armoire I Found
Why is a TV armoire perfect for a coffee bar or an appliance garage cabinet? It is nice and deep, most of them are similar to the depth bottom cabinets. They often have tuck away pocket doors as well, which is a really nice thing to have so you can leave the doors open when you are using the coffee station or the appliances inside for easy access, without running into the open doors all the time.
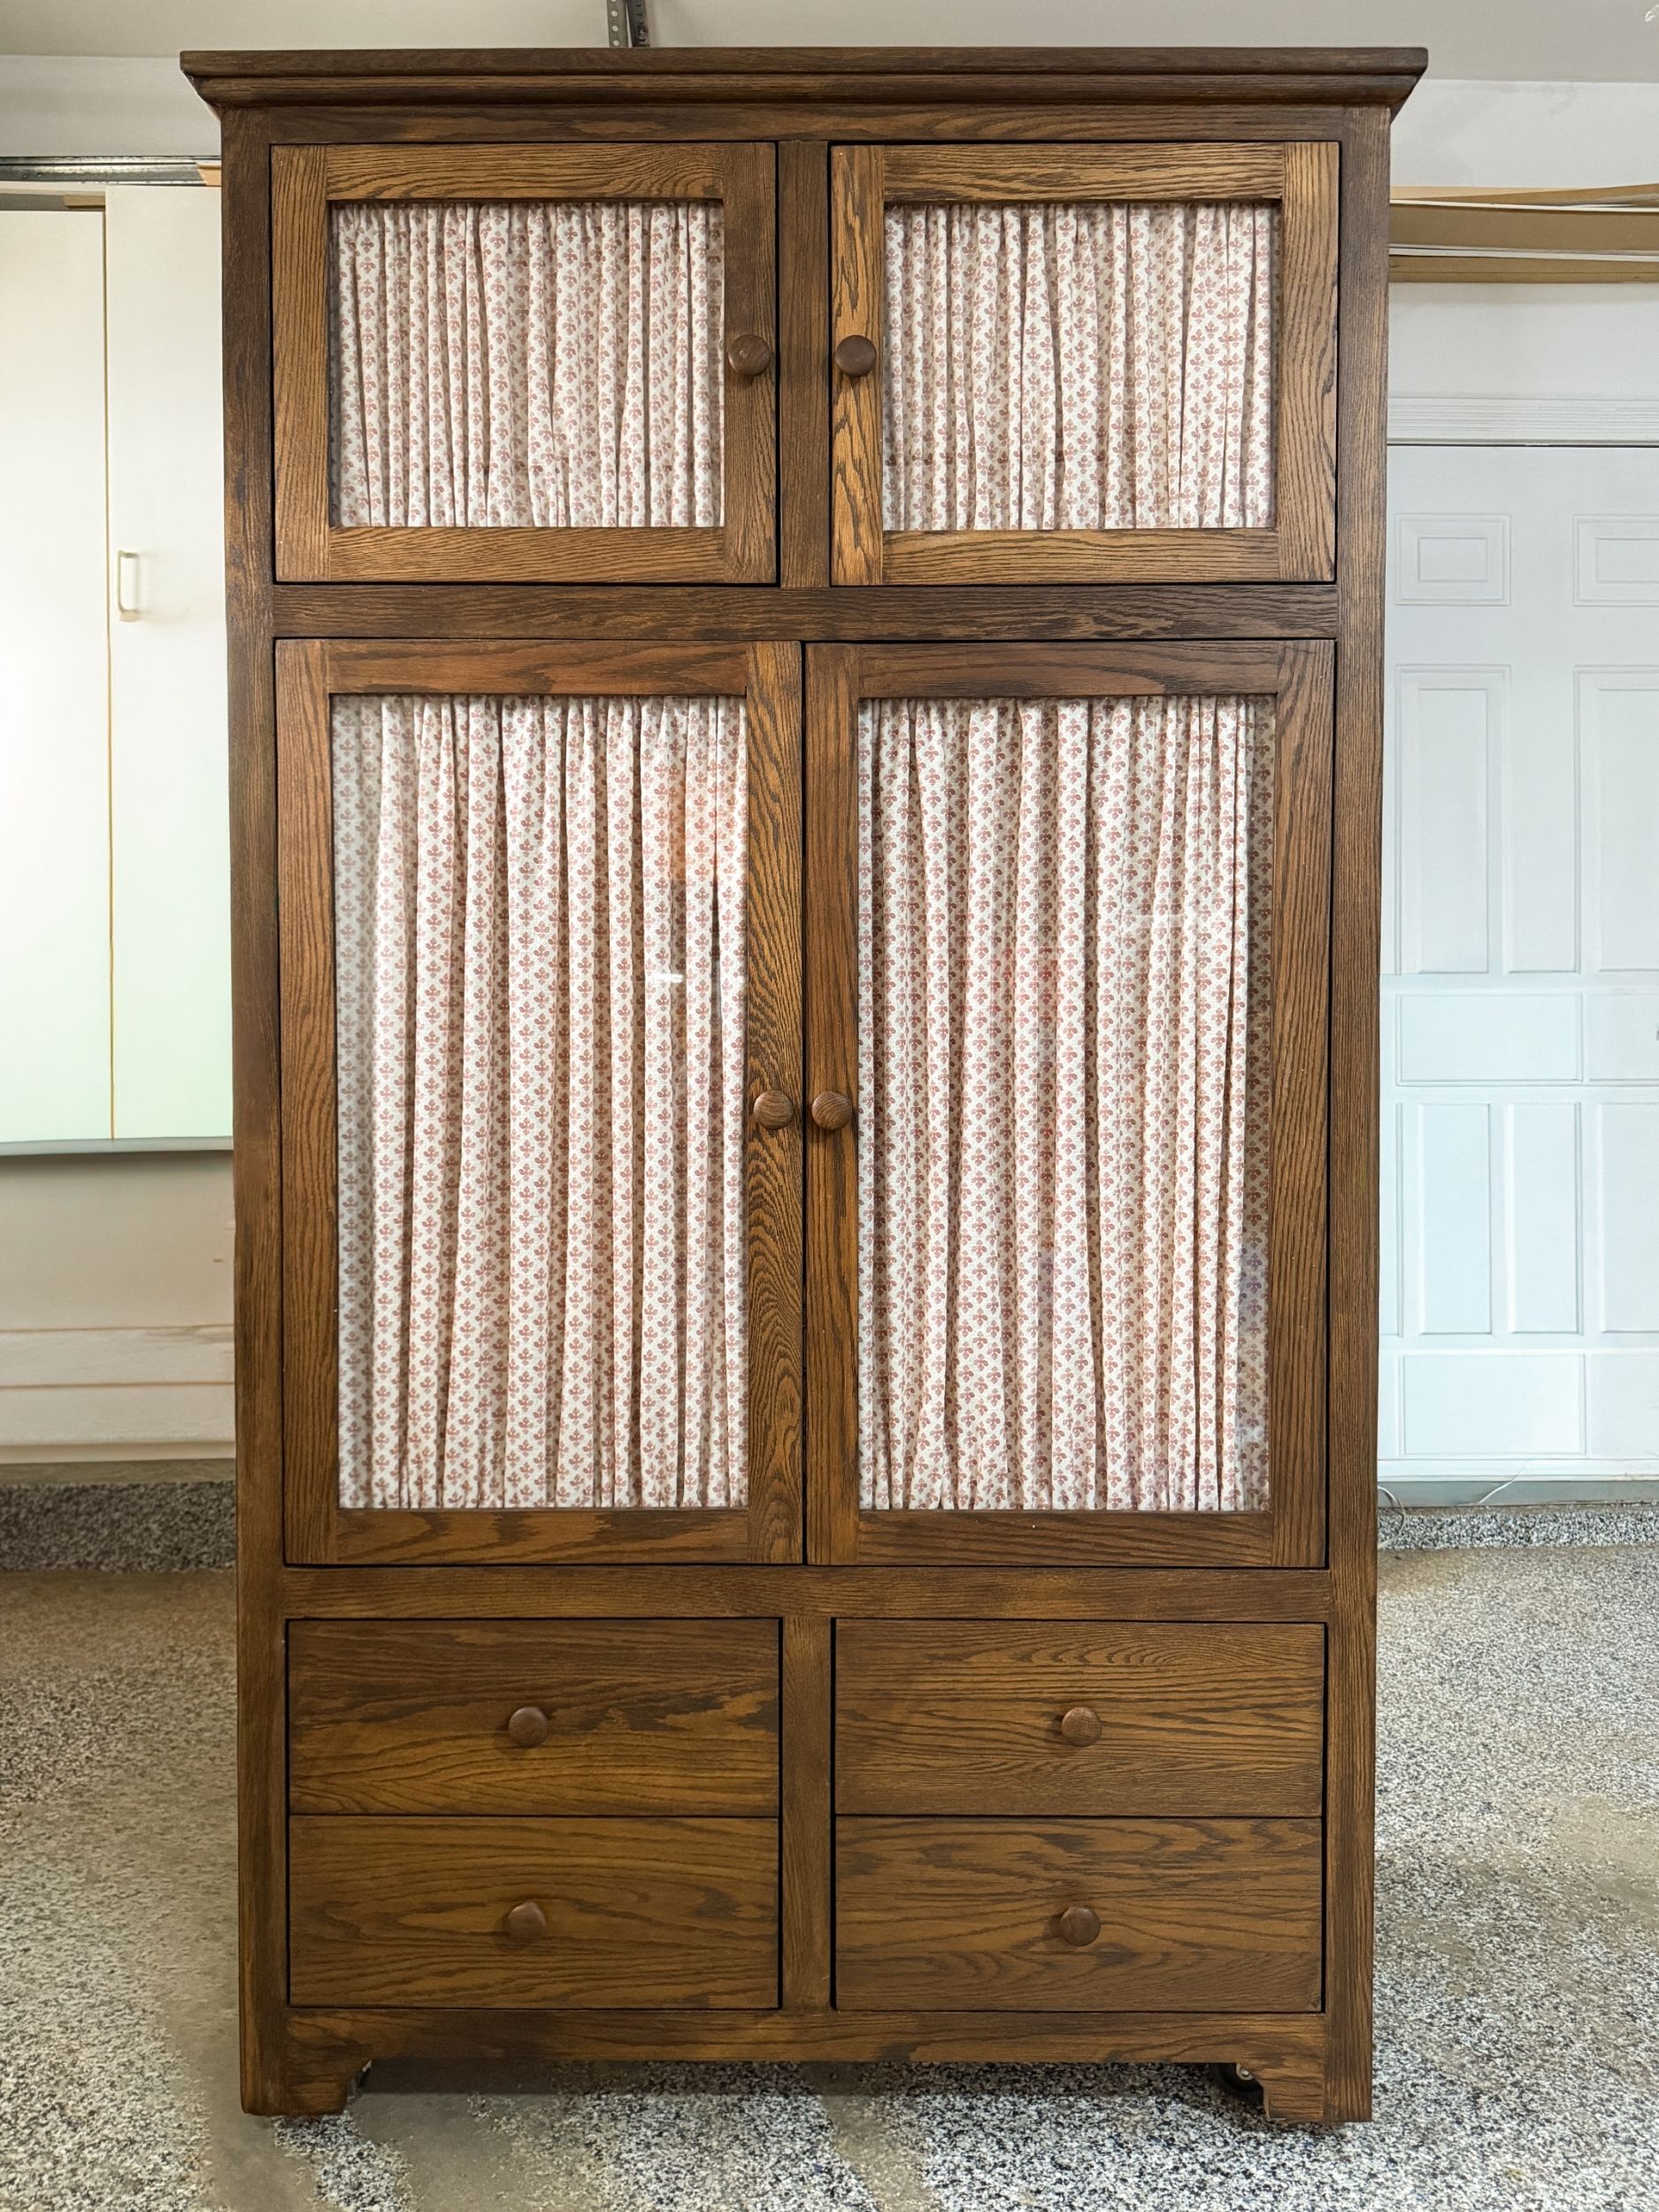
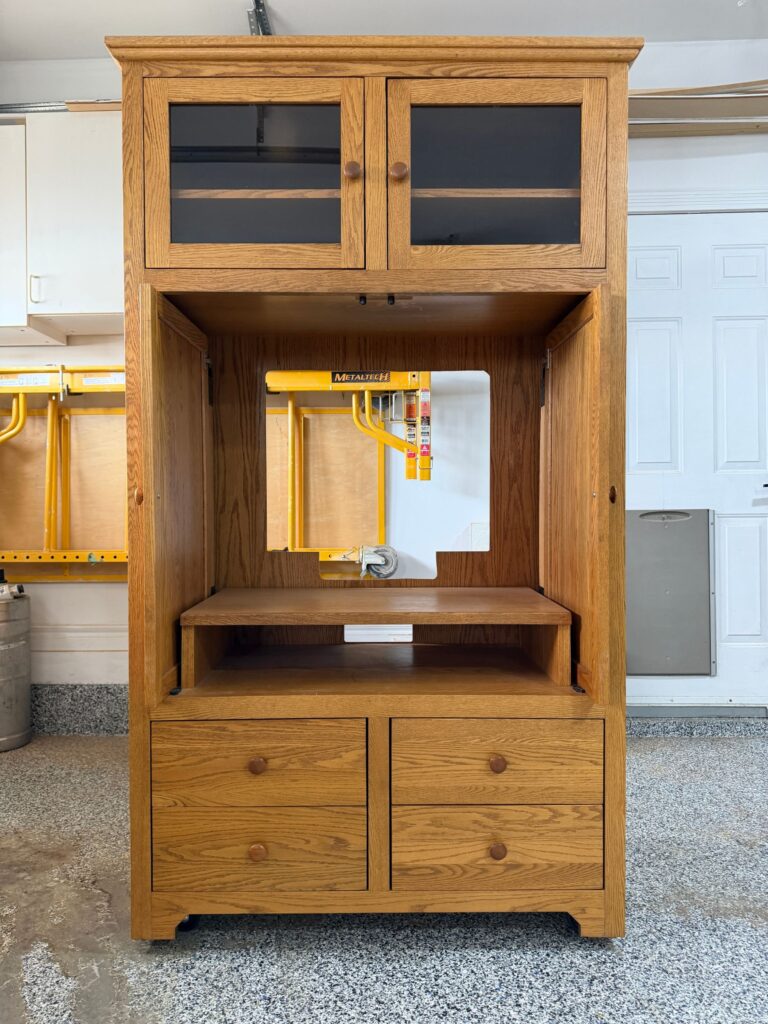
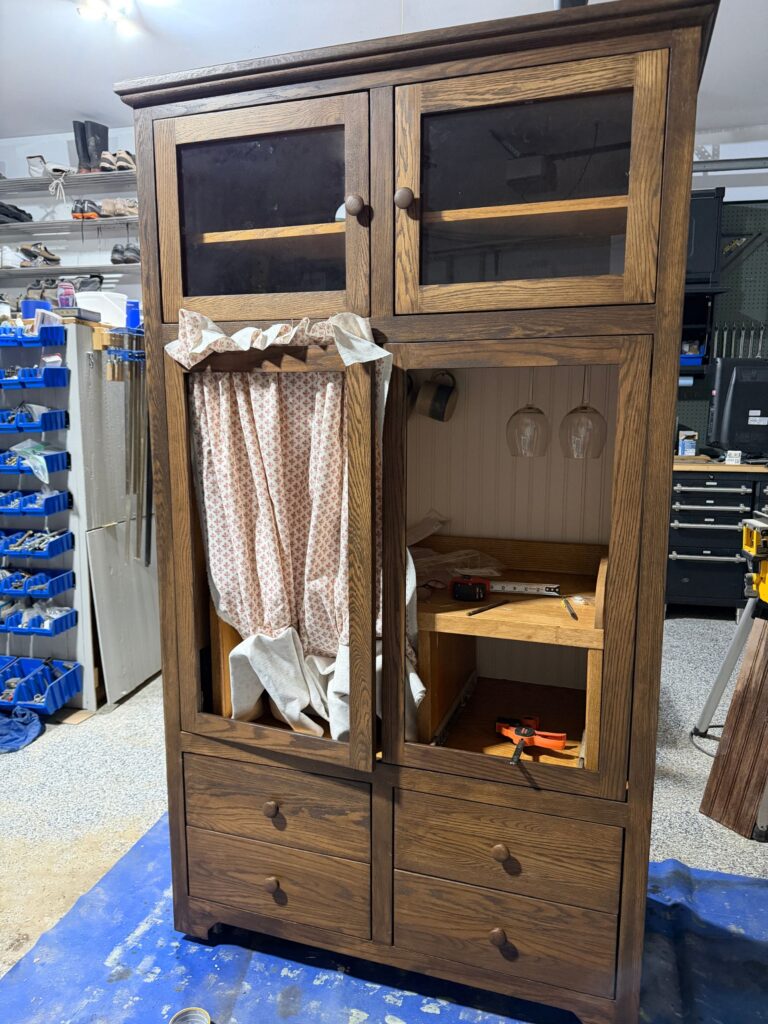
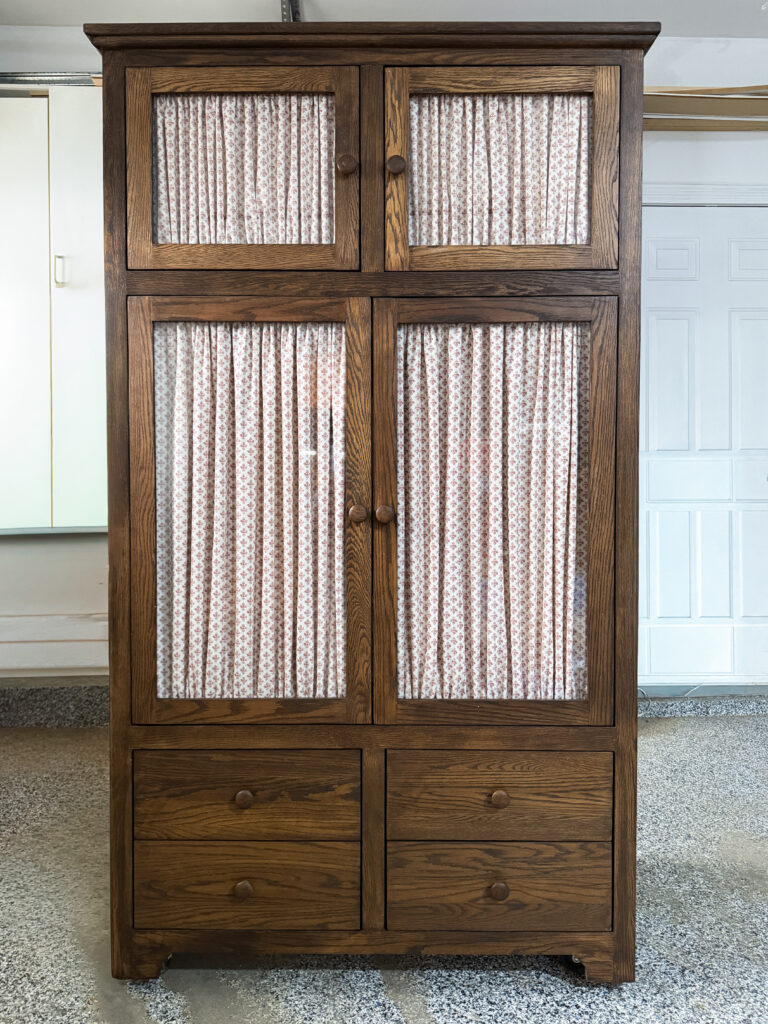
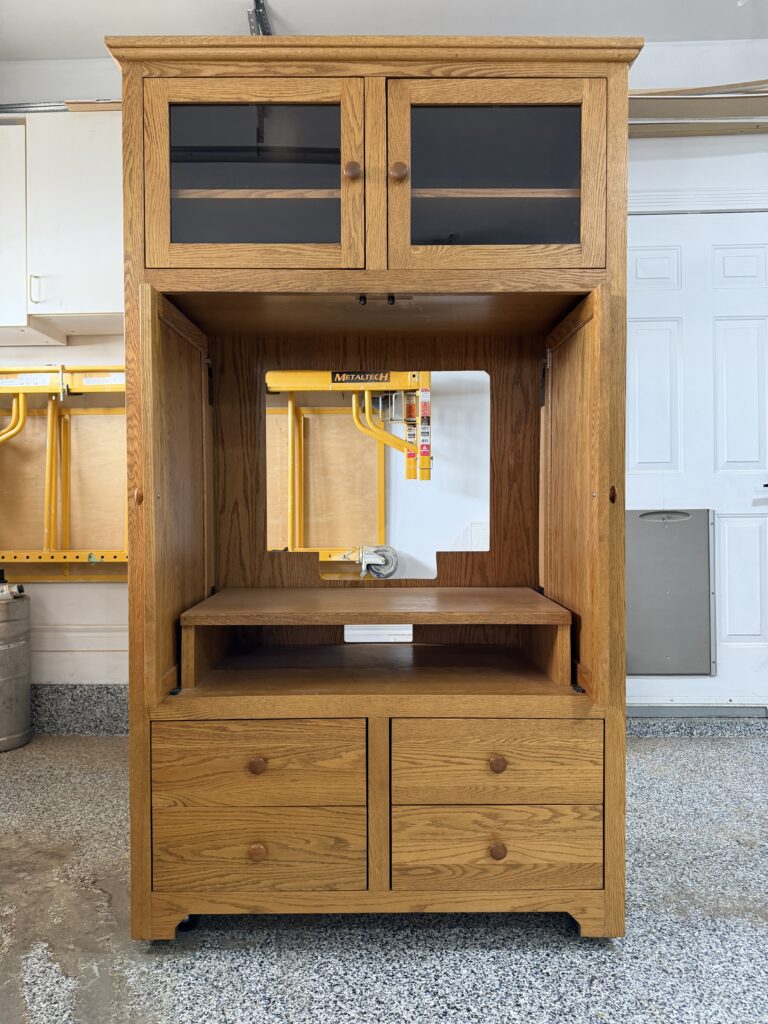
The TV armoire I found had a big hole in the back to accommodate the back of those big old TVs. It also had those awesome slide away doors!
The inside did not have much for shelving, to accommodate the big TV, beyond a little shelf where I assume one would put their VCR, back in the day.
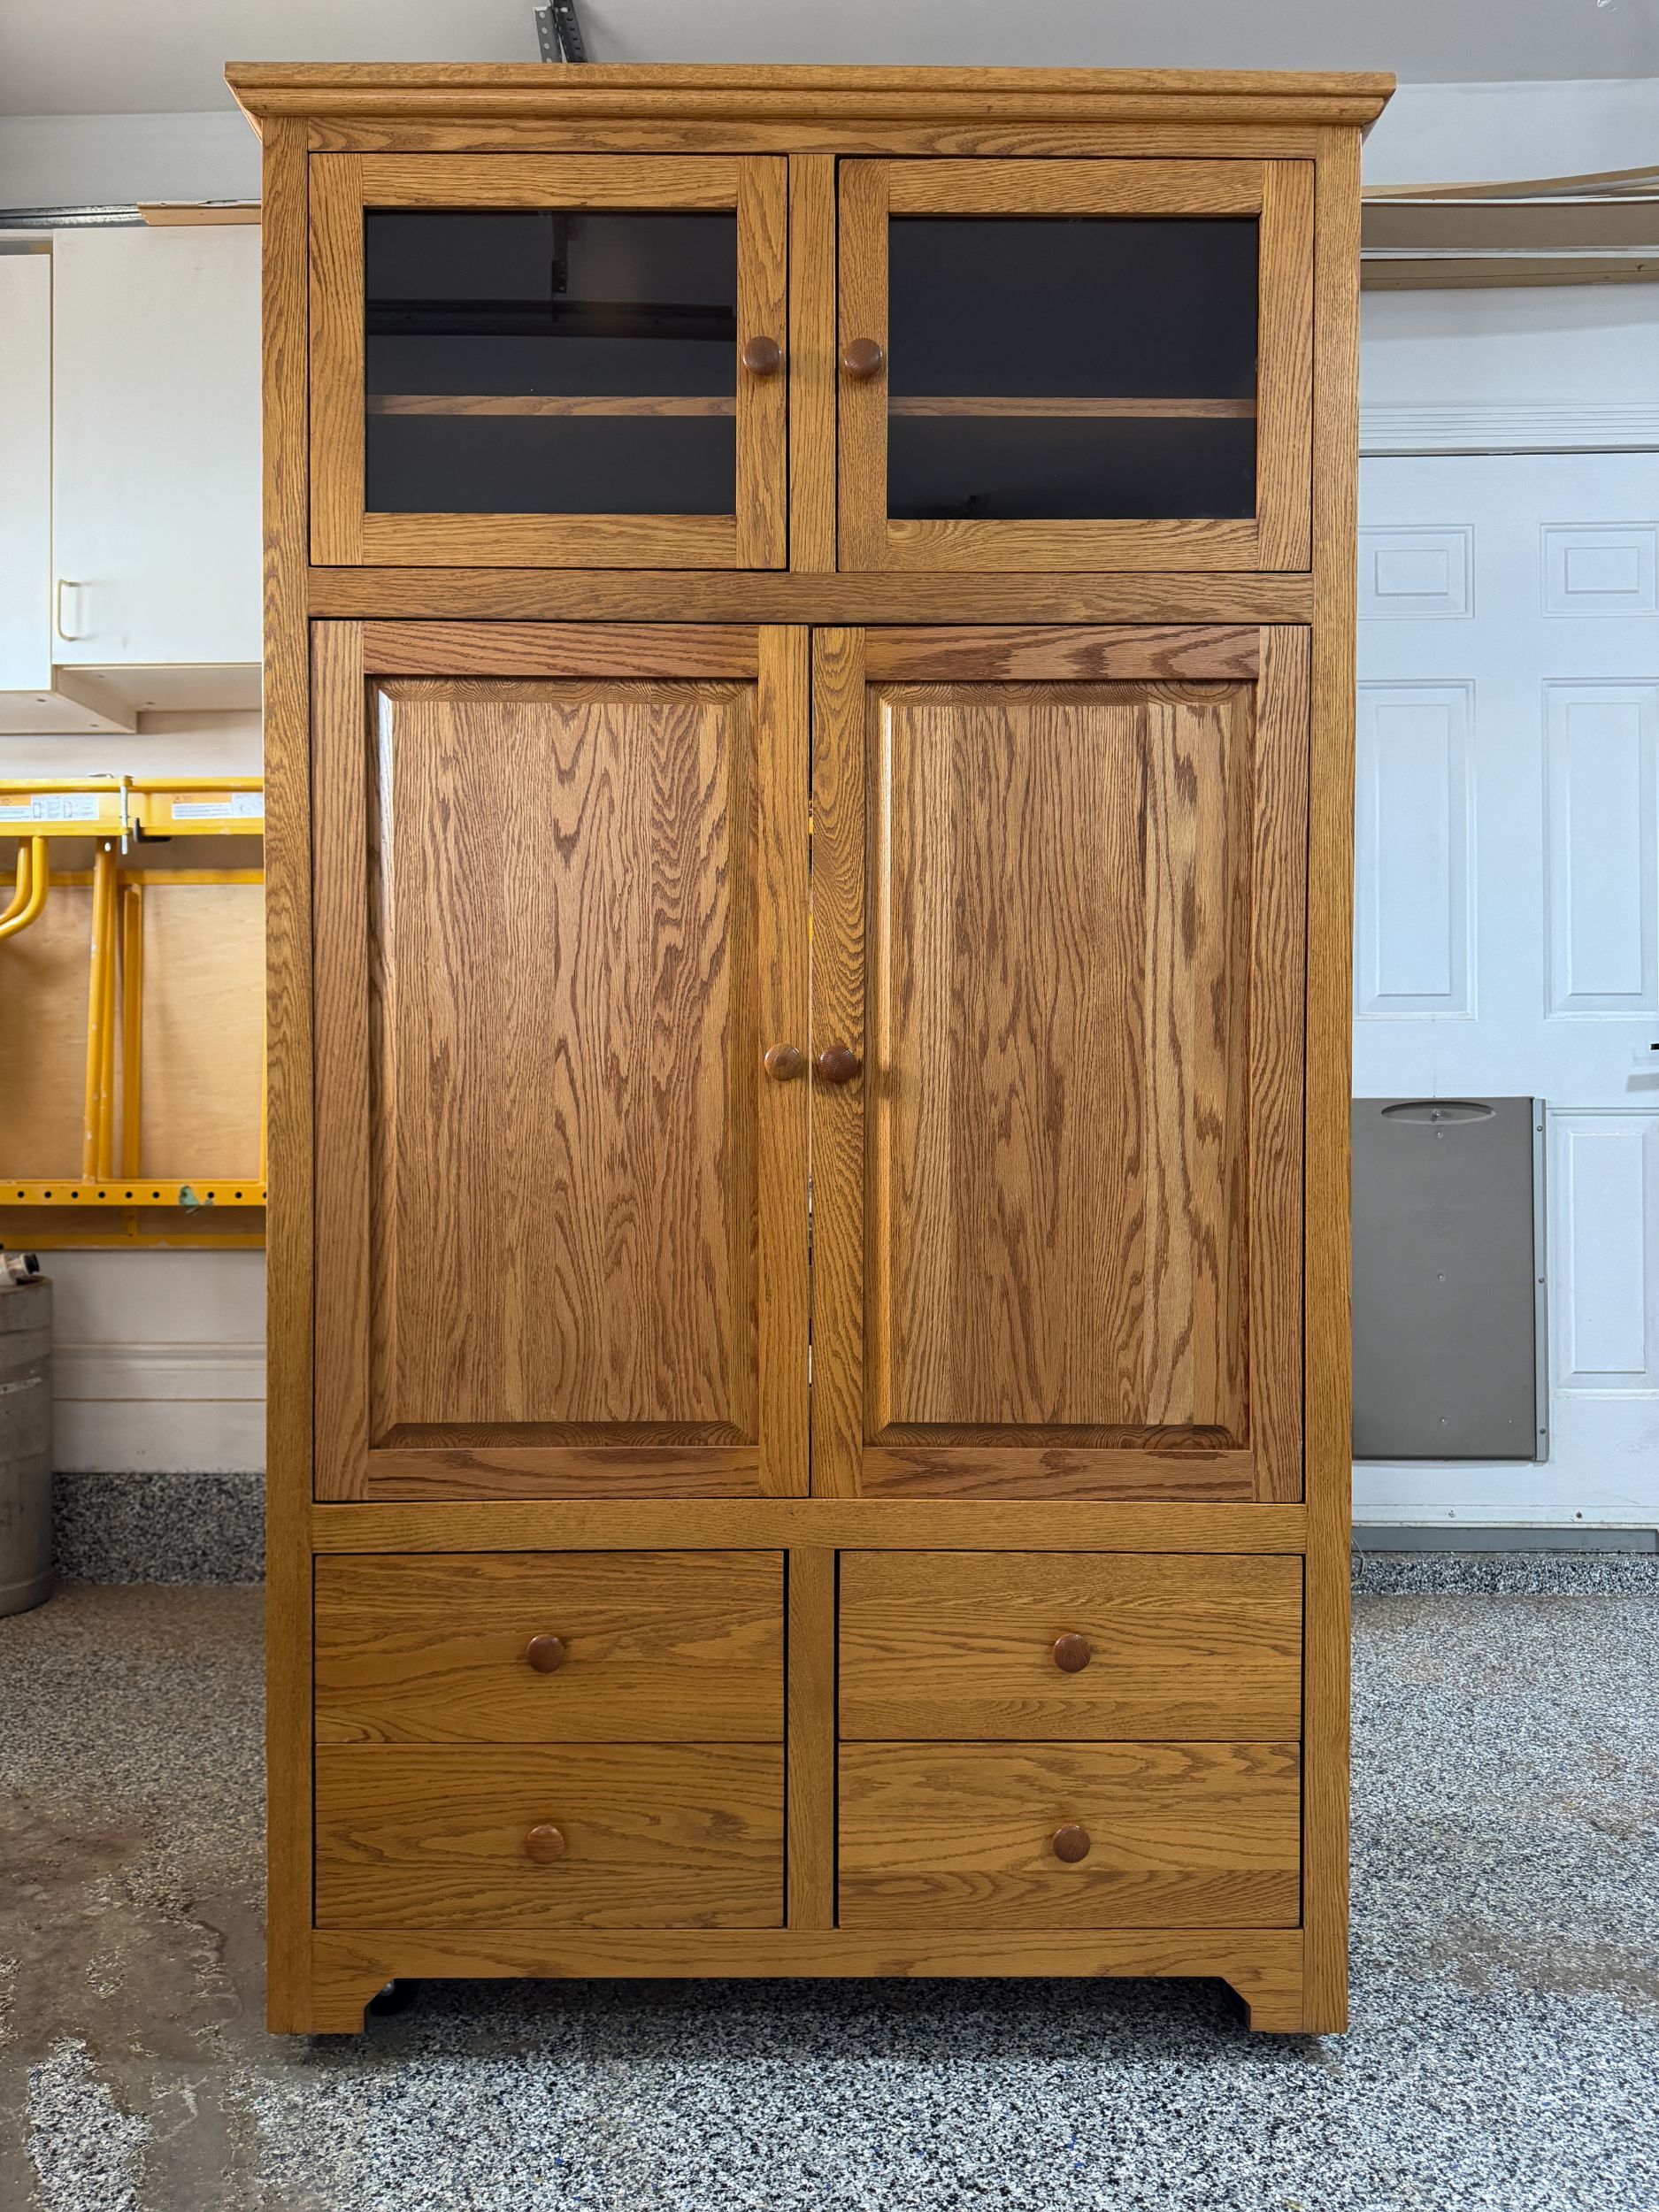
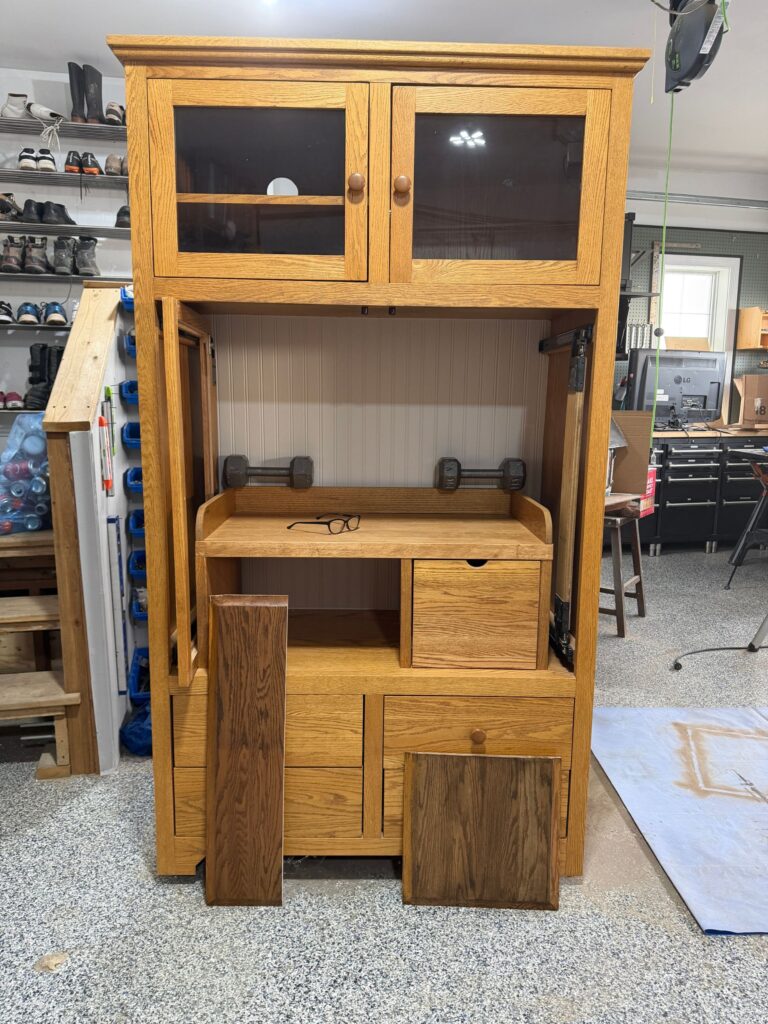
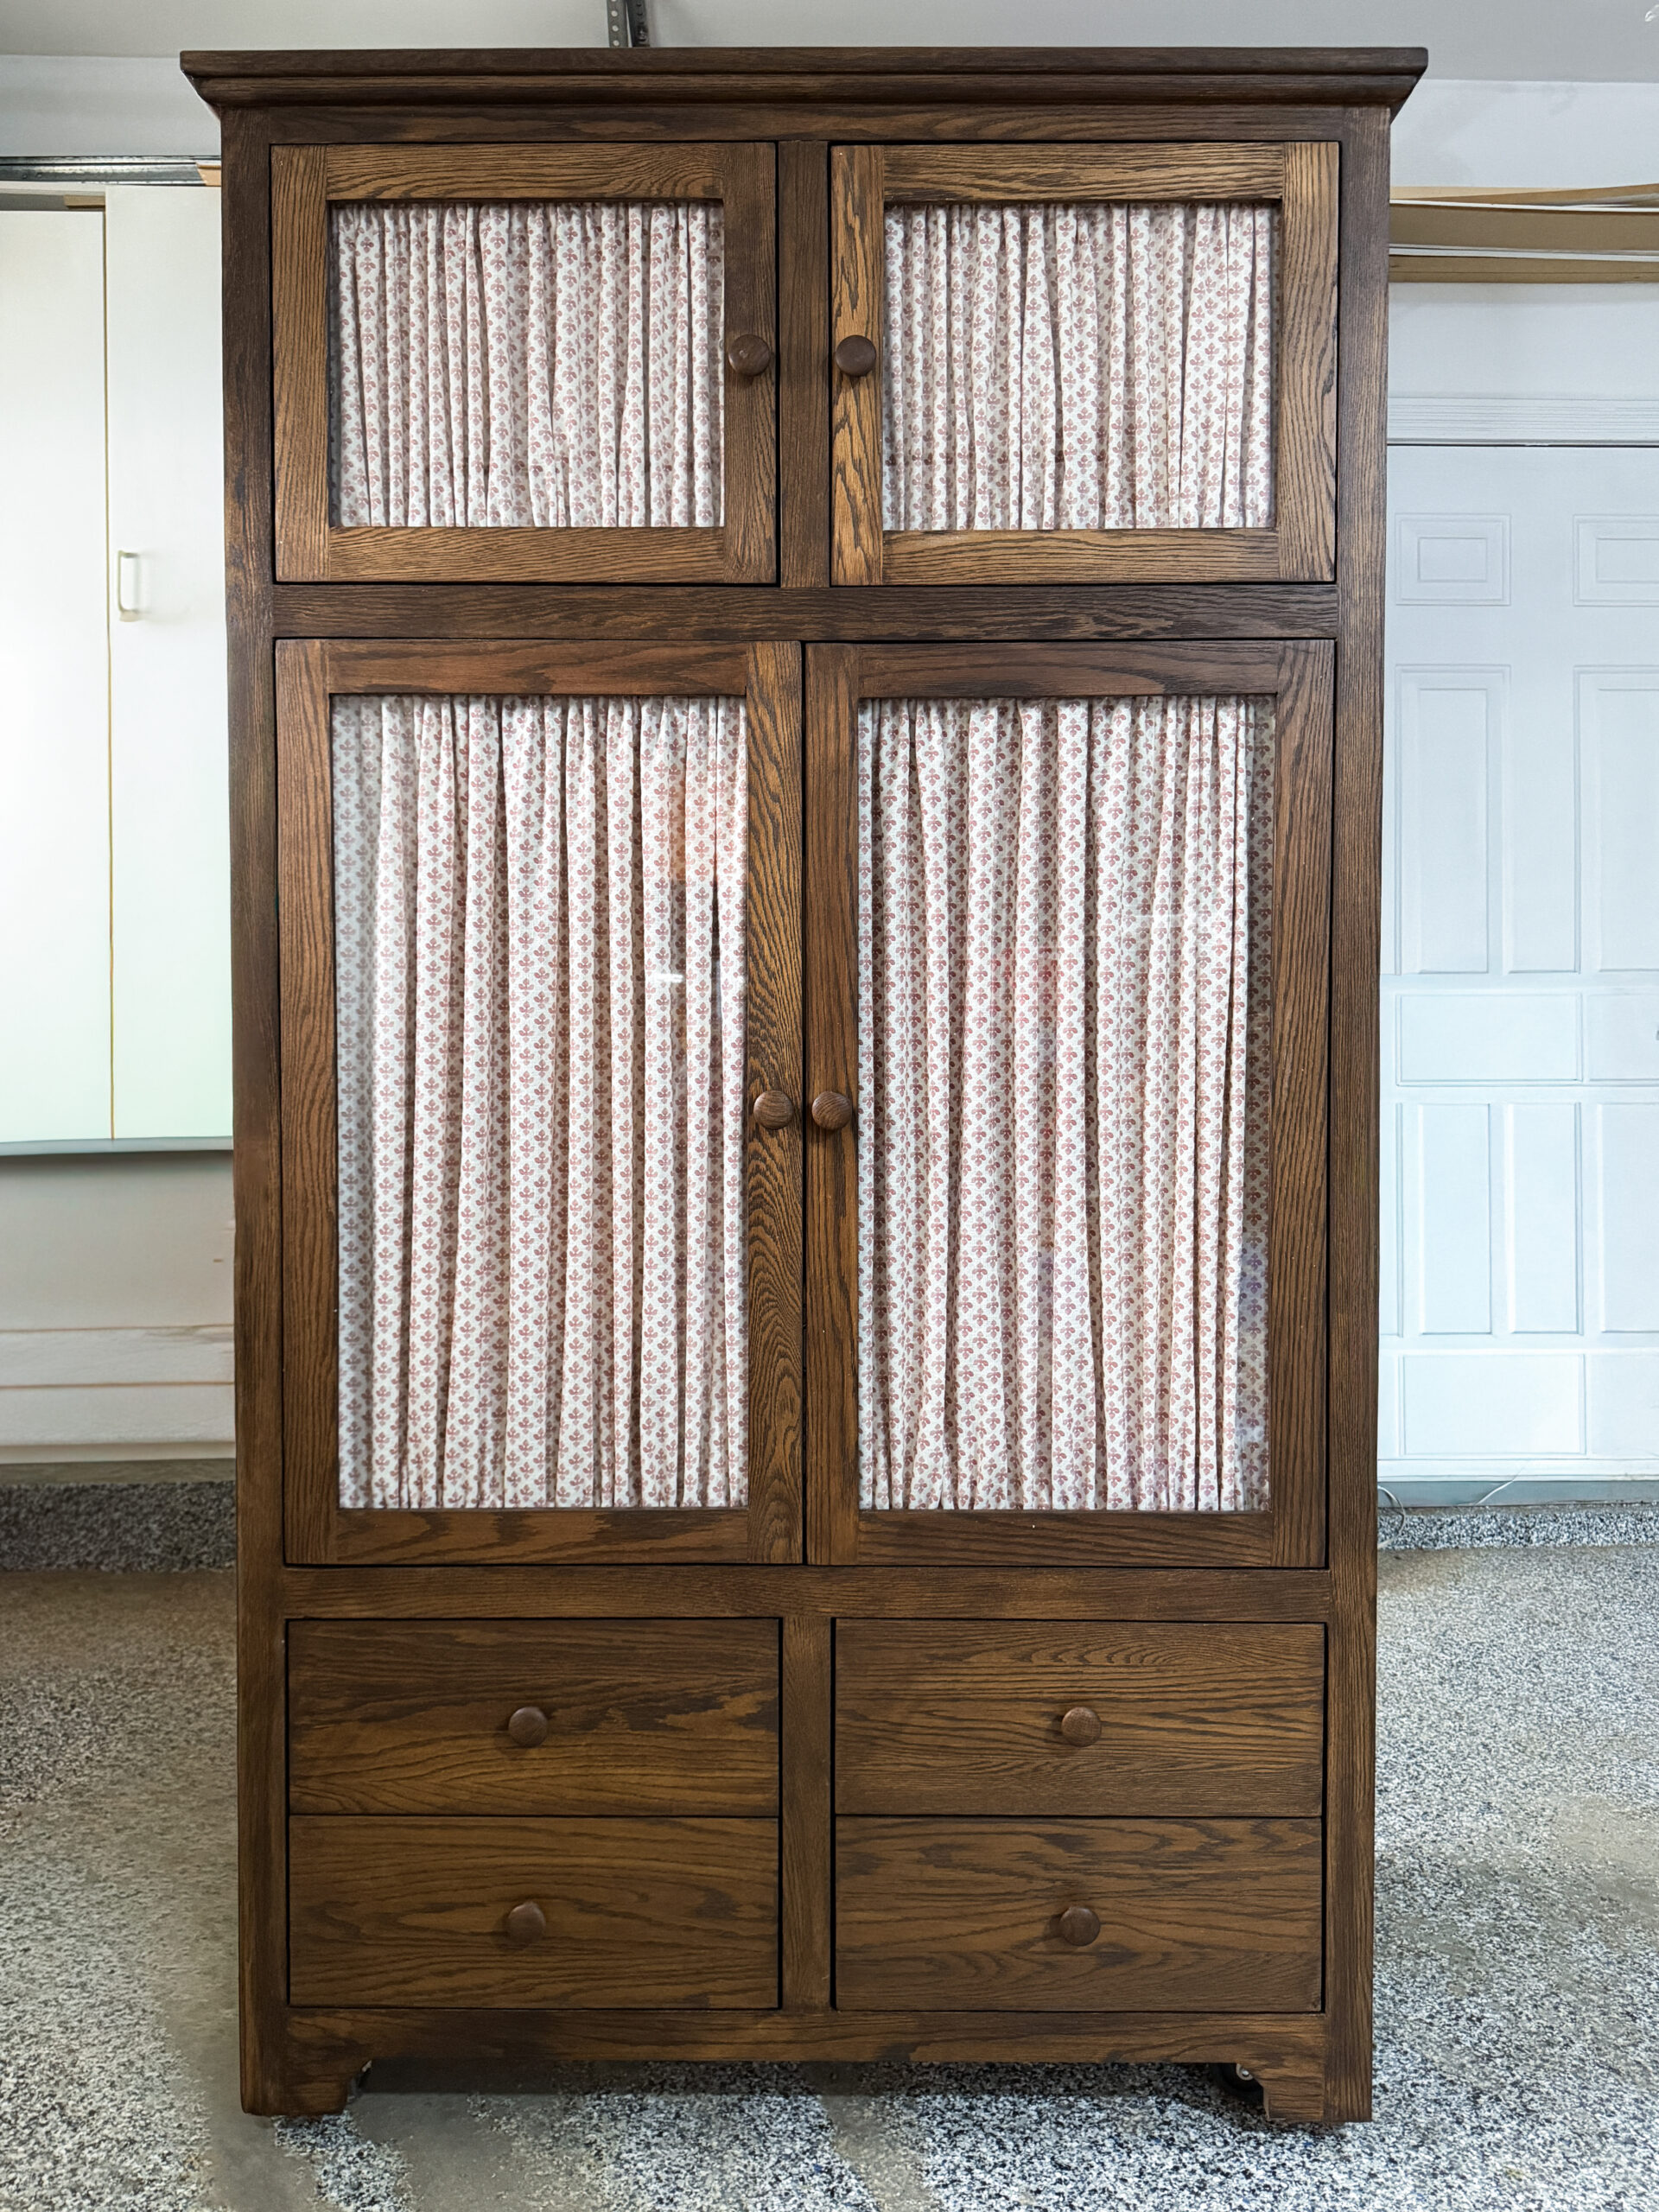
My armoire was solid oak, so it was great quality. It had glass cabinet doors on the top, and the middle doors were raised panel. It also had four drawers in the bottom, and I knew I could make it perfect for my needs.
Here is everything I did to upcycle my armoire into an appliance pantry!
Modifications to the Armoire
Removing the Panels in the Cabinet Doors
I decided to make the two sets of doors that were different sizes look more similar by replacing the raised panel on the large door with glass. The upper cabinet was a shaker style with a glass panel, and the lower cabinet door was a raised oak panel, and I thought the whole piece would look better if the doors were the same. Since the style of the cabinet was very flat and shaker, the only thing that really didn’t belong was the raised panel on the big doors.
This was the part I was the most nervous about, but it turned out to be not that difficult.
The first thing I did was to use my plunge saw to cut the panel out nice and straight, and the jigsaw in the corner.
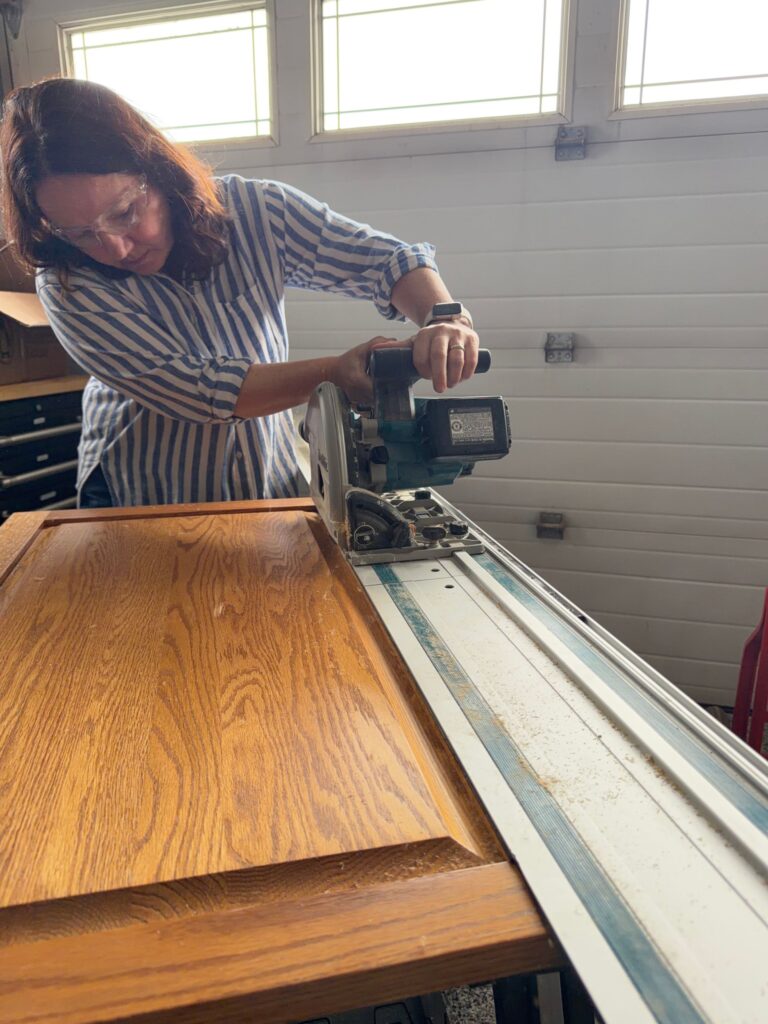
My original plan was to router out an edge on the back of the door to hold the glass. However, once I took the panel out of the middle, I found out that I would not need to do that.
Once that was cut out, I could see that the outside frame of the door was built with a little groove in it that held the panel in place. All I had to do was to cut the back “lip” off and there would be a perfect recessed ledge to hold my glass.
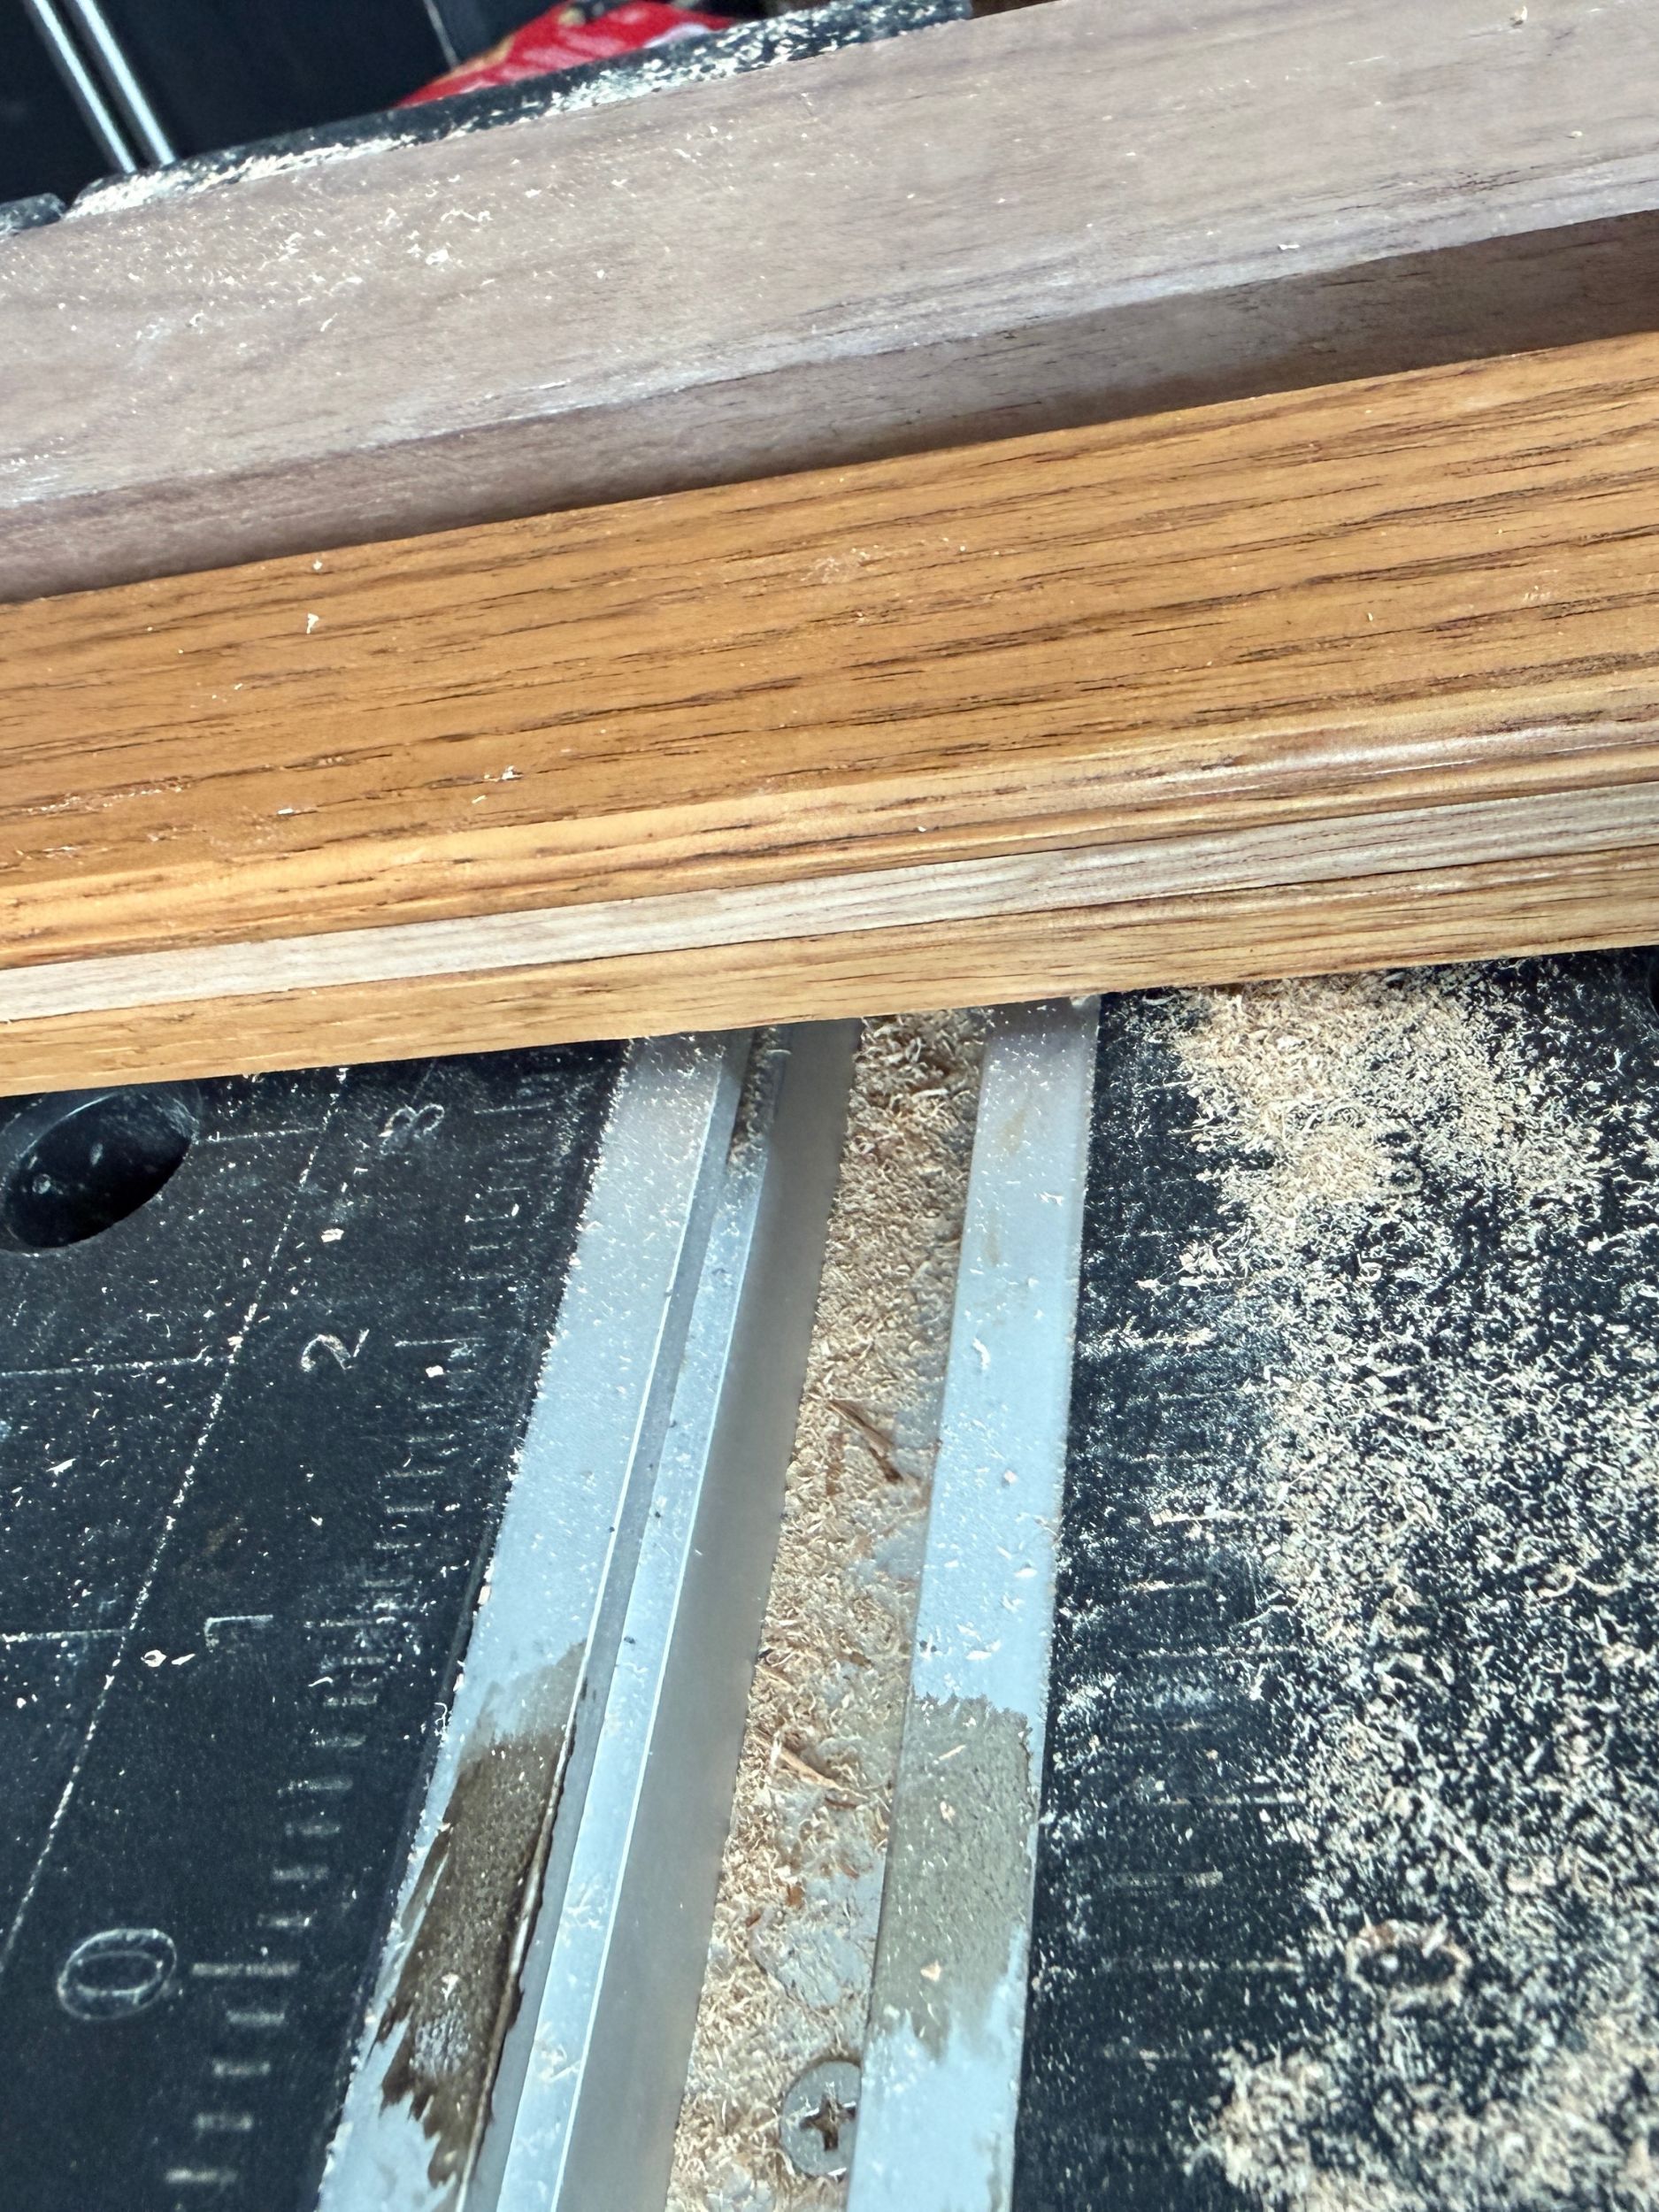
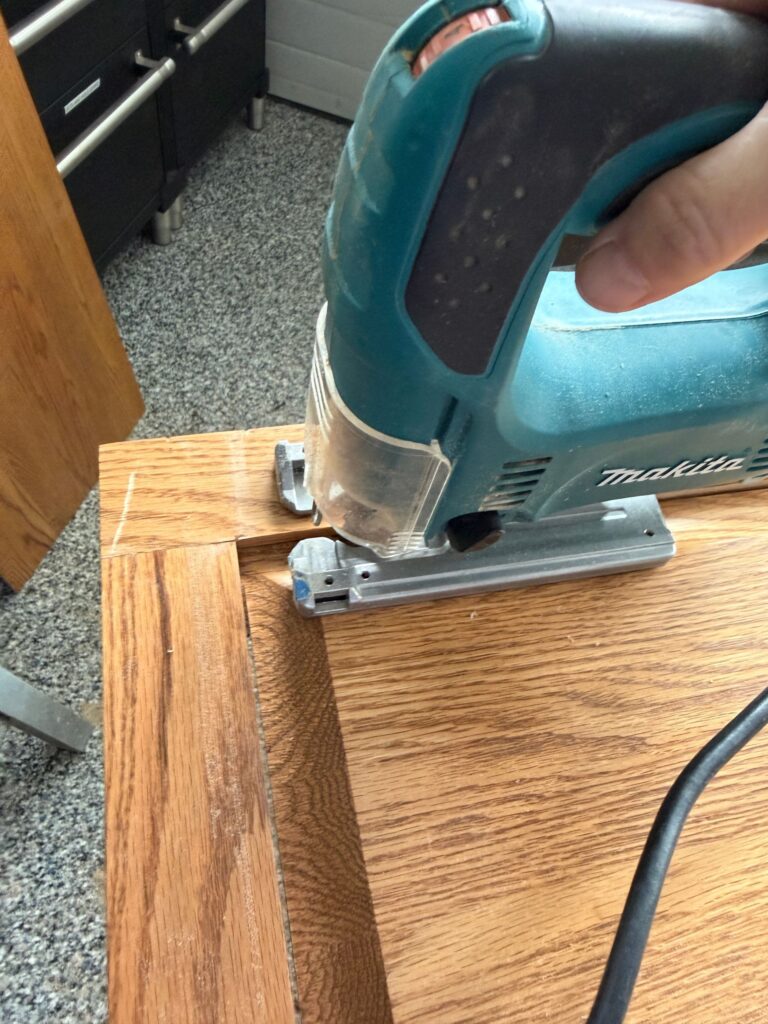
I used my plunge saw again with the depth set low so it would cut through the one lip only, and not all the way through. At the corners, I was not able to use my jig saw (because that would cut all the way through the door) so I used a chisel.

That worked, but some of the corners actually came apart when I did that with the force of my hammering. That was not a big deal though, as I was able to add some wood glue and put them back together. After clamping and setting up they were as solid as ever.
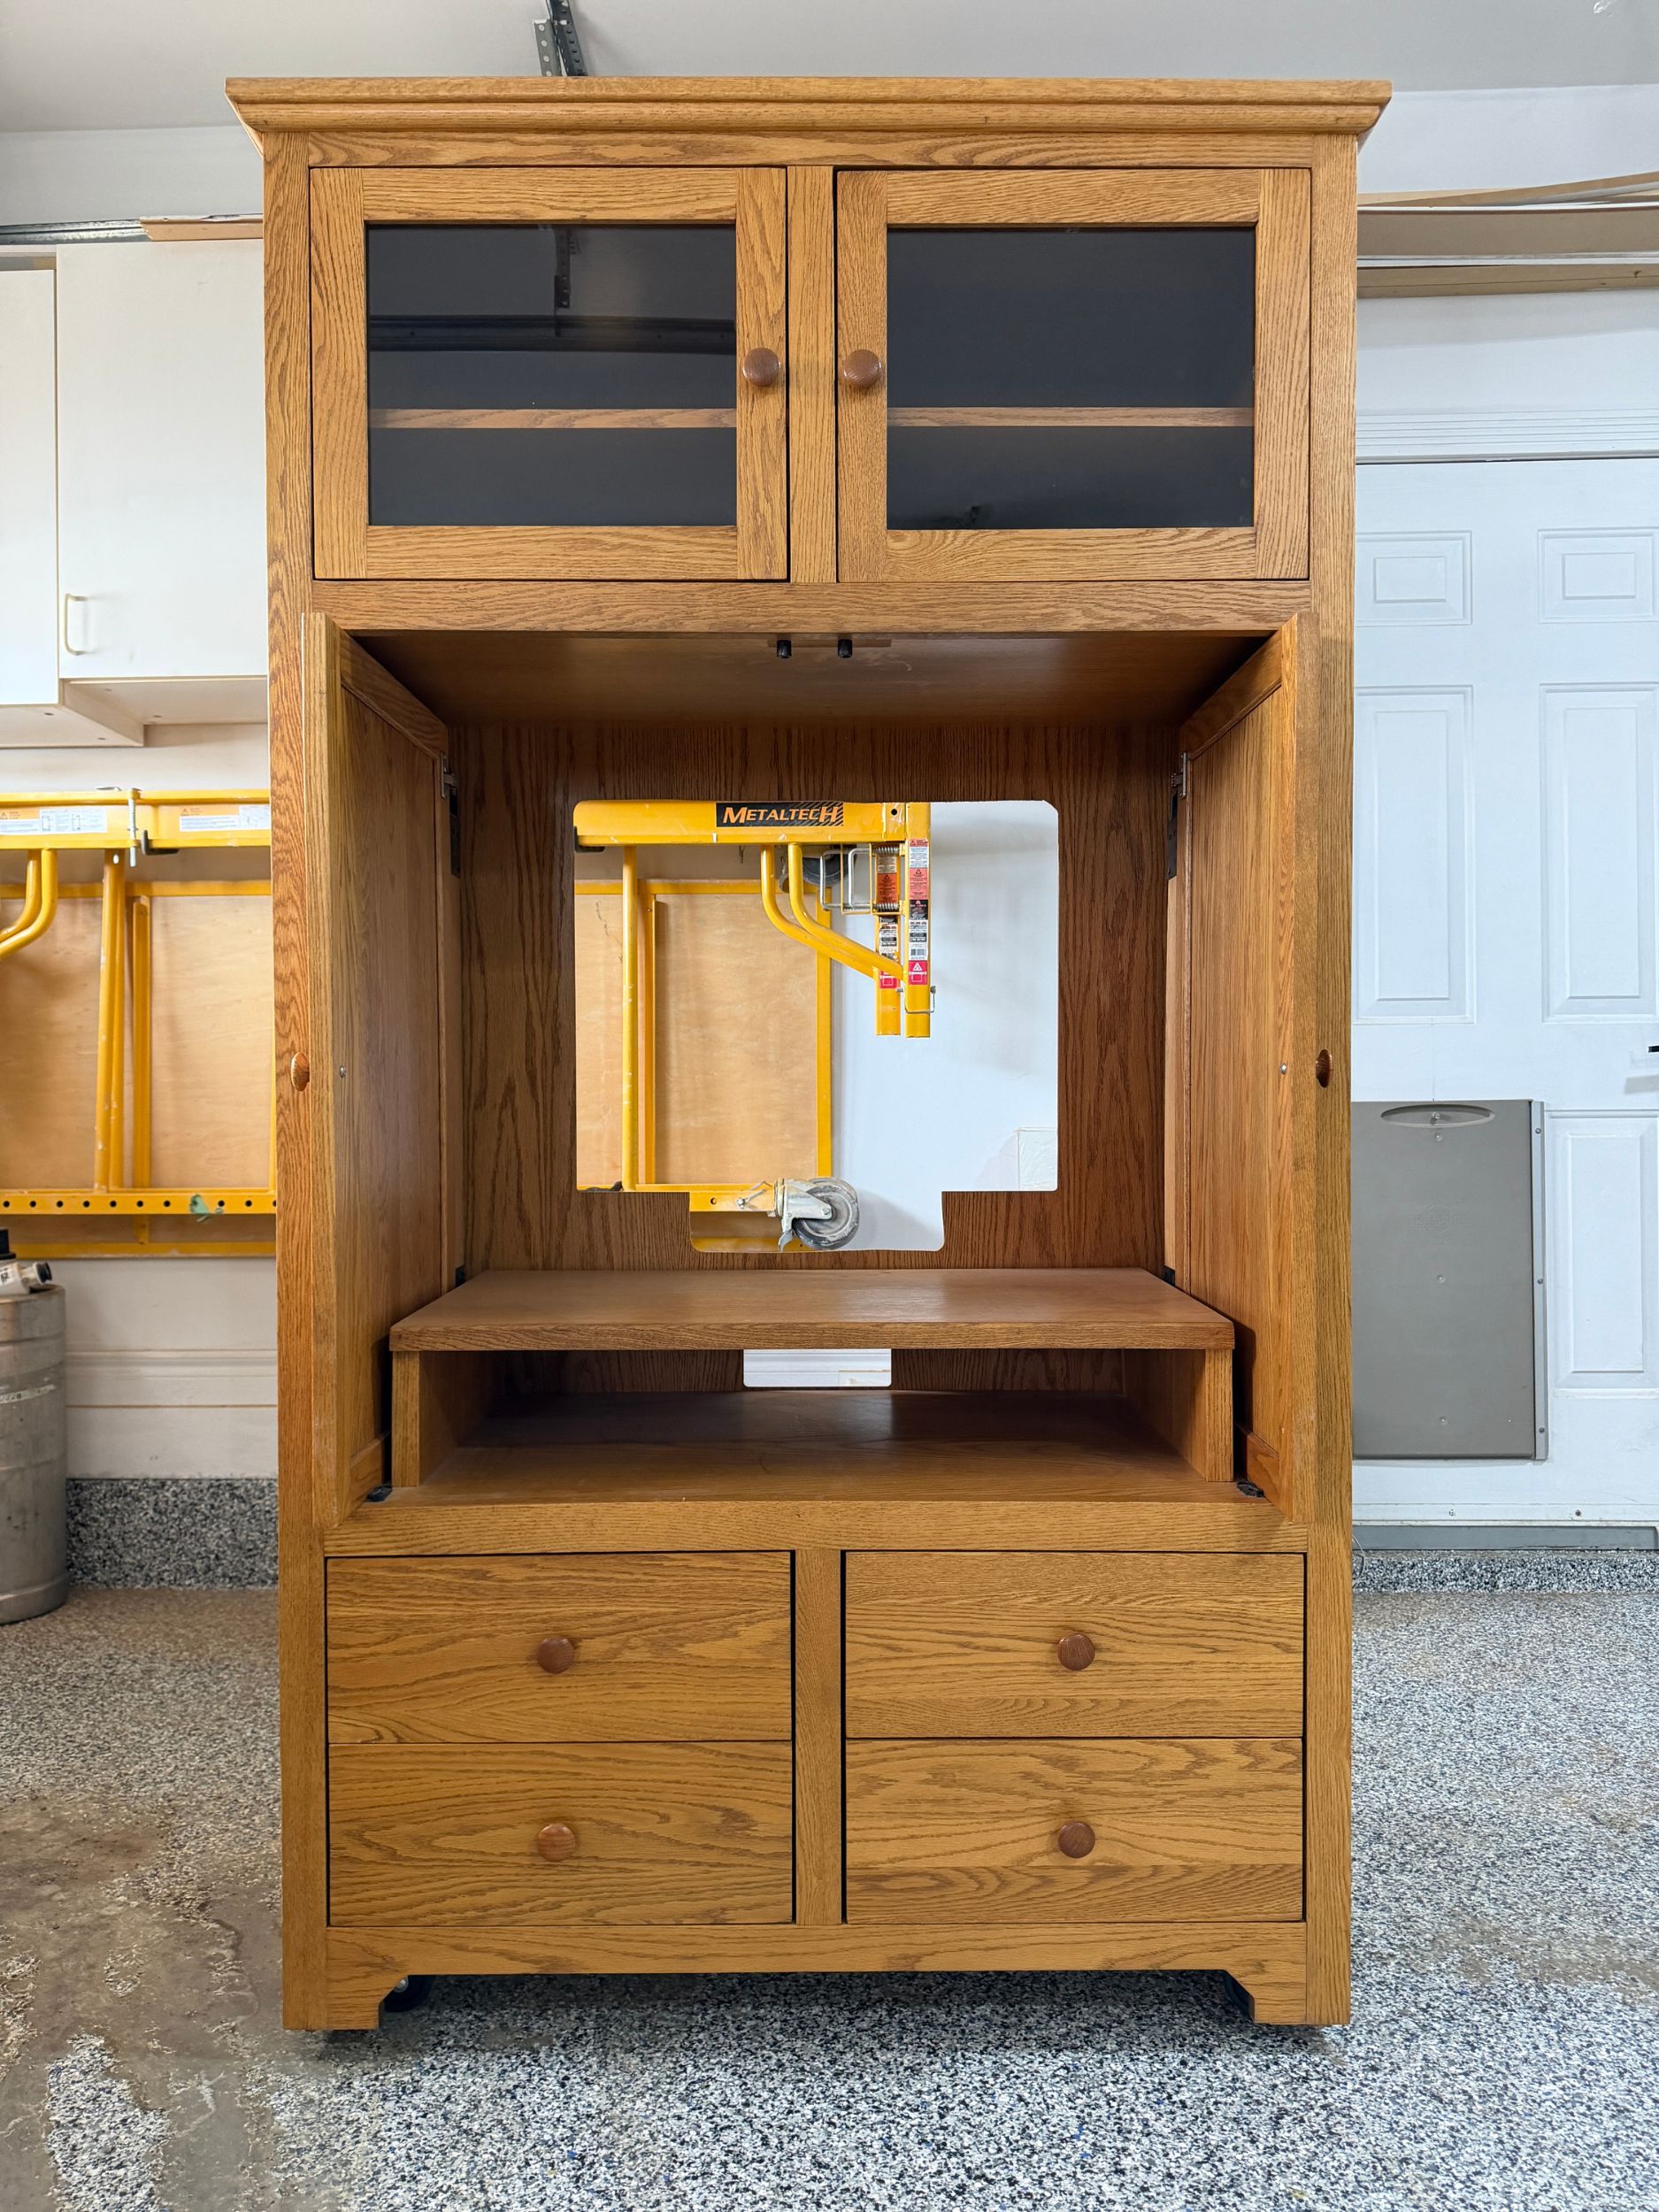
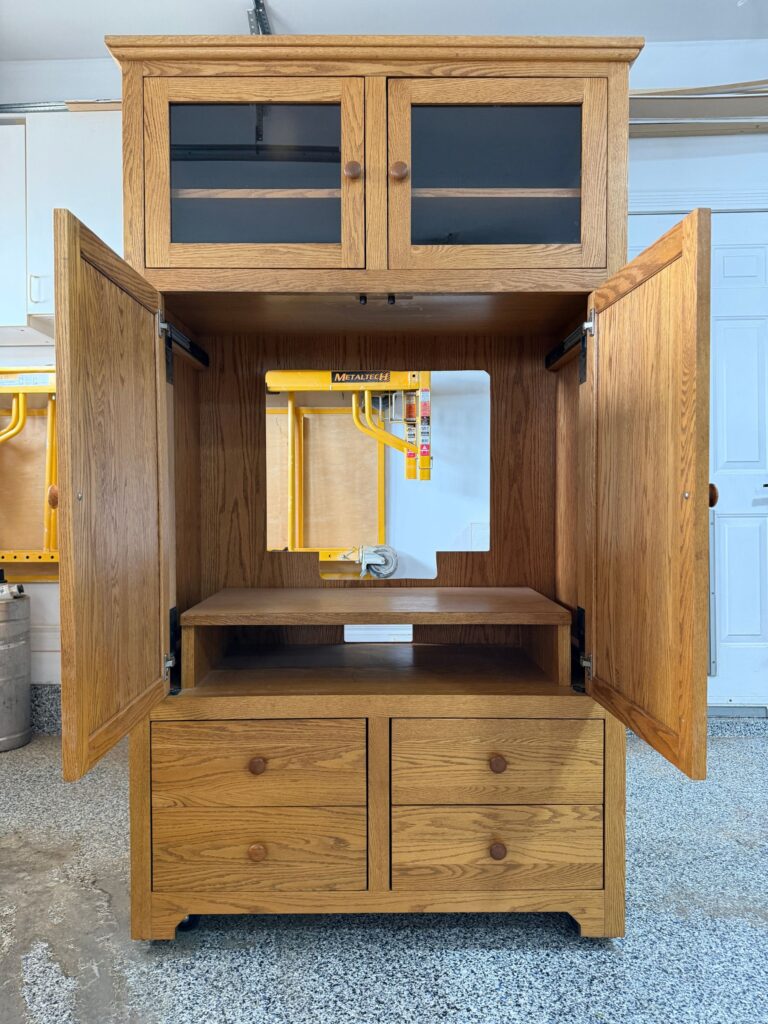
Reconfiguring the Inside
I removed the old shelf that acted as a spot to put a TV box or VCR back in the day, but I decided to recreate something super similar to act as my countertop.
I cut the shelf into three pieces to use as my support. I then added a piece of butcherblock to the top to act as the countertop. (I had some leftover from our bar project!)
I also used some Osmo butcher block oil to finish it off and it turned out the exact same color as the existing finish! Meant to be! I really love that this adds counter space to our small kitchen.
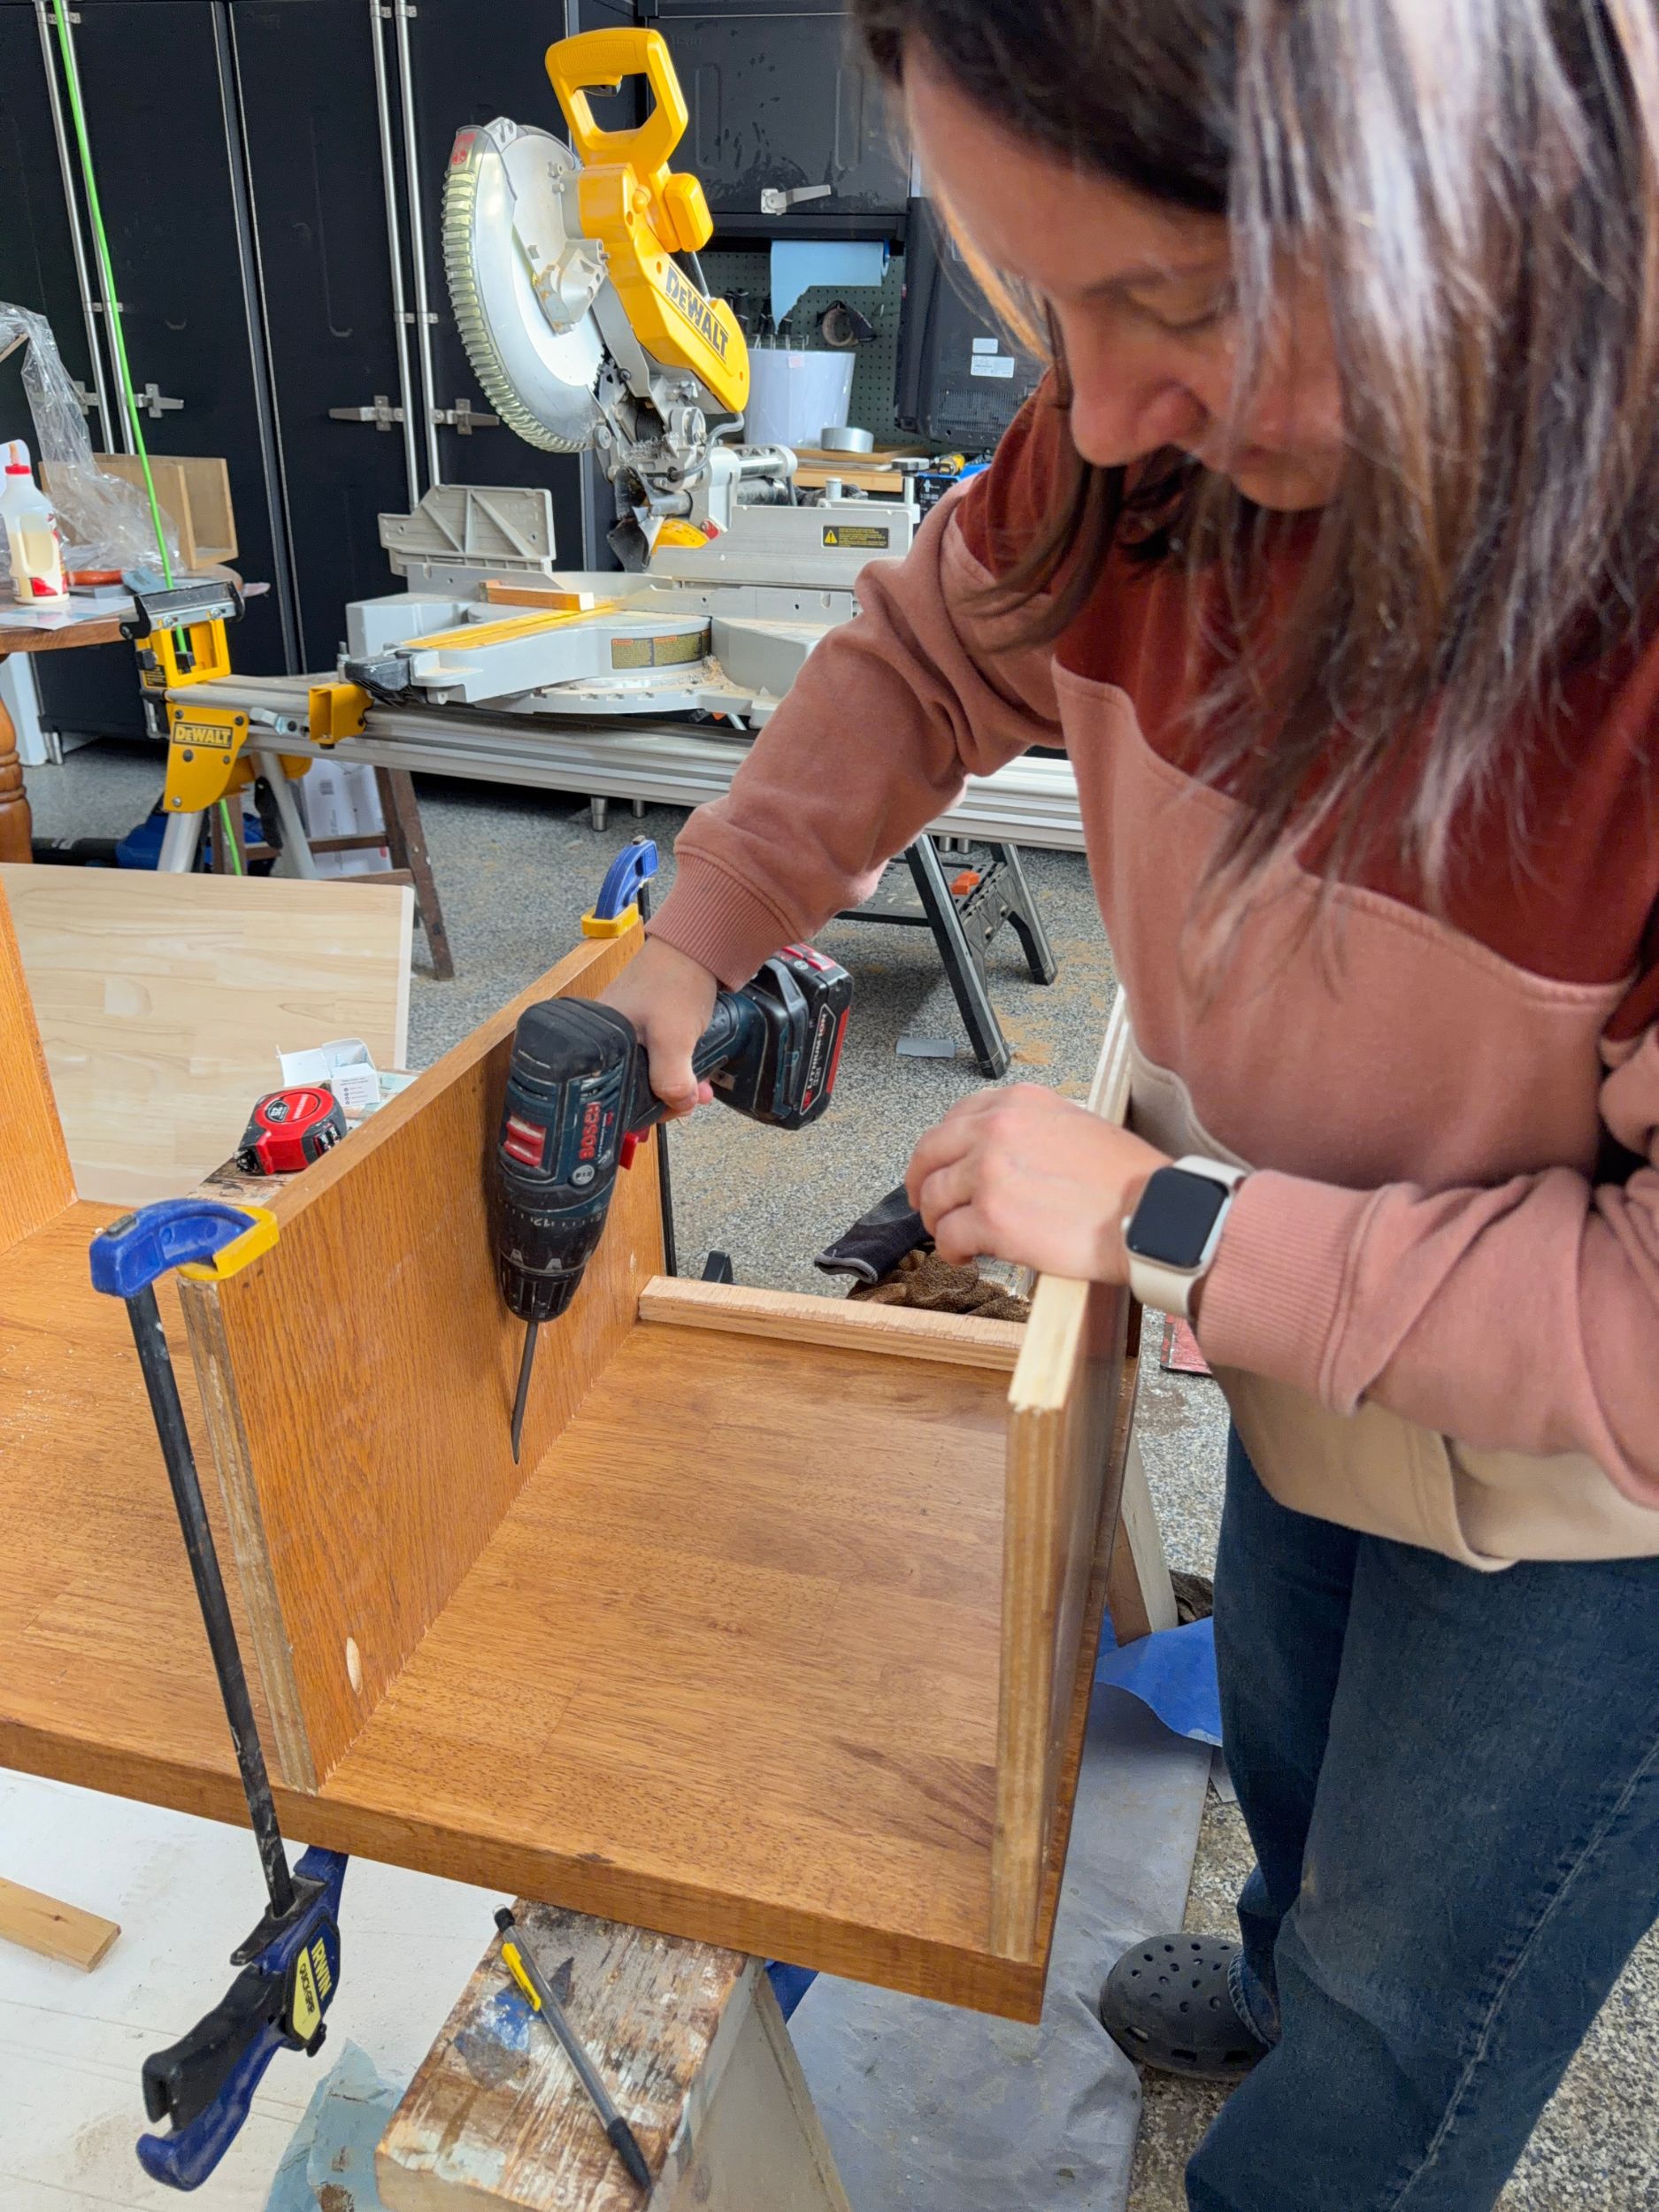
I made one of the openings the exact size for a microwave I bought for the hutch. I drilled a small hole in the back to fish the cords through. In the other opening, I decided to build a little drawer. I think that drawer will probably house our coffee pods for our coffee maker pods to keep those in easy reach. (This whole project was built with the coffee lover in mind!).
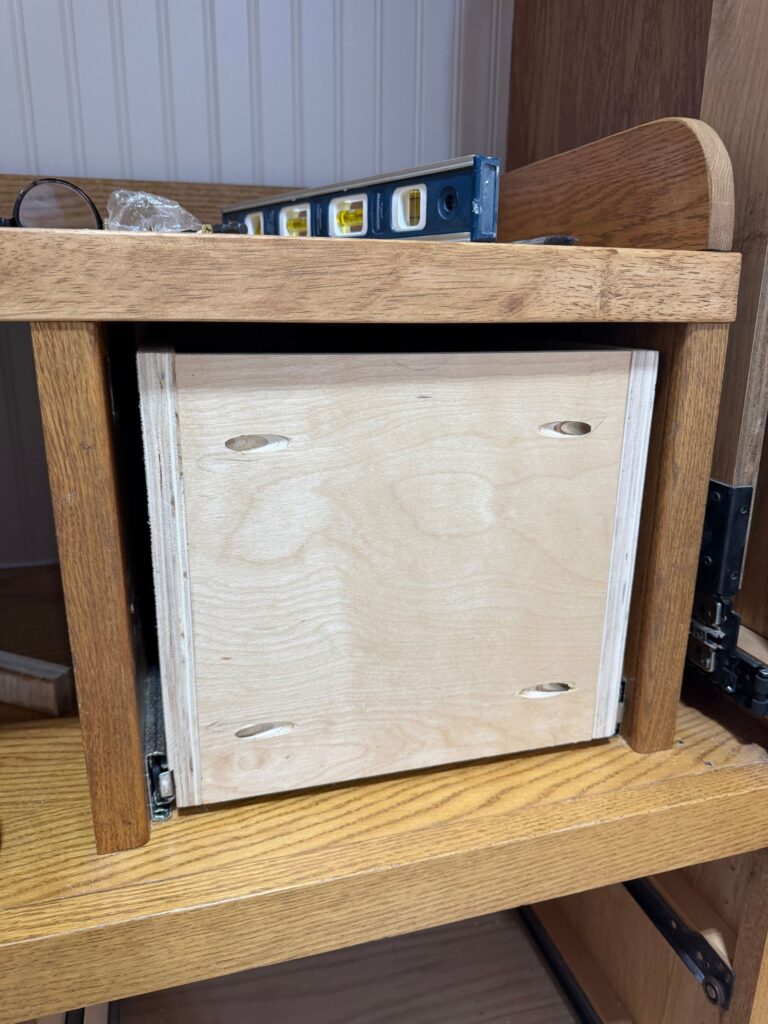
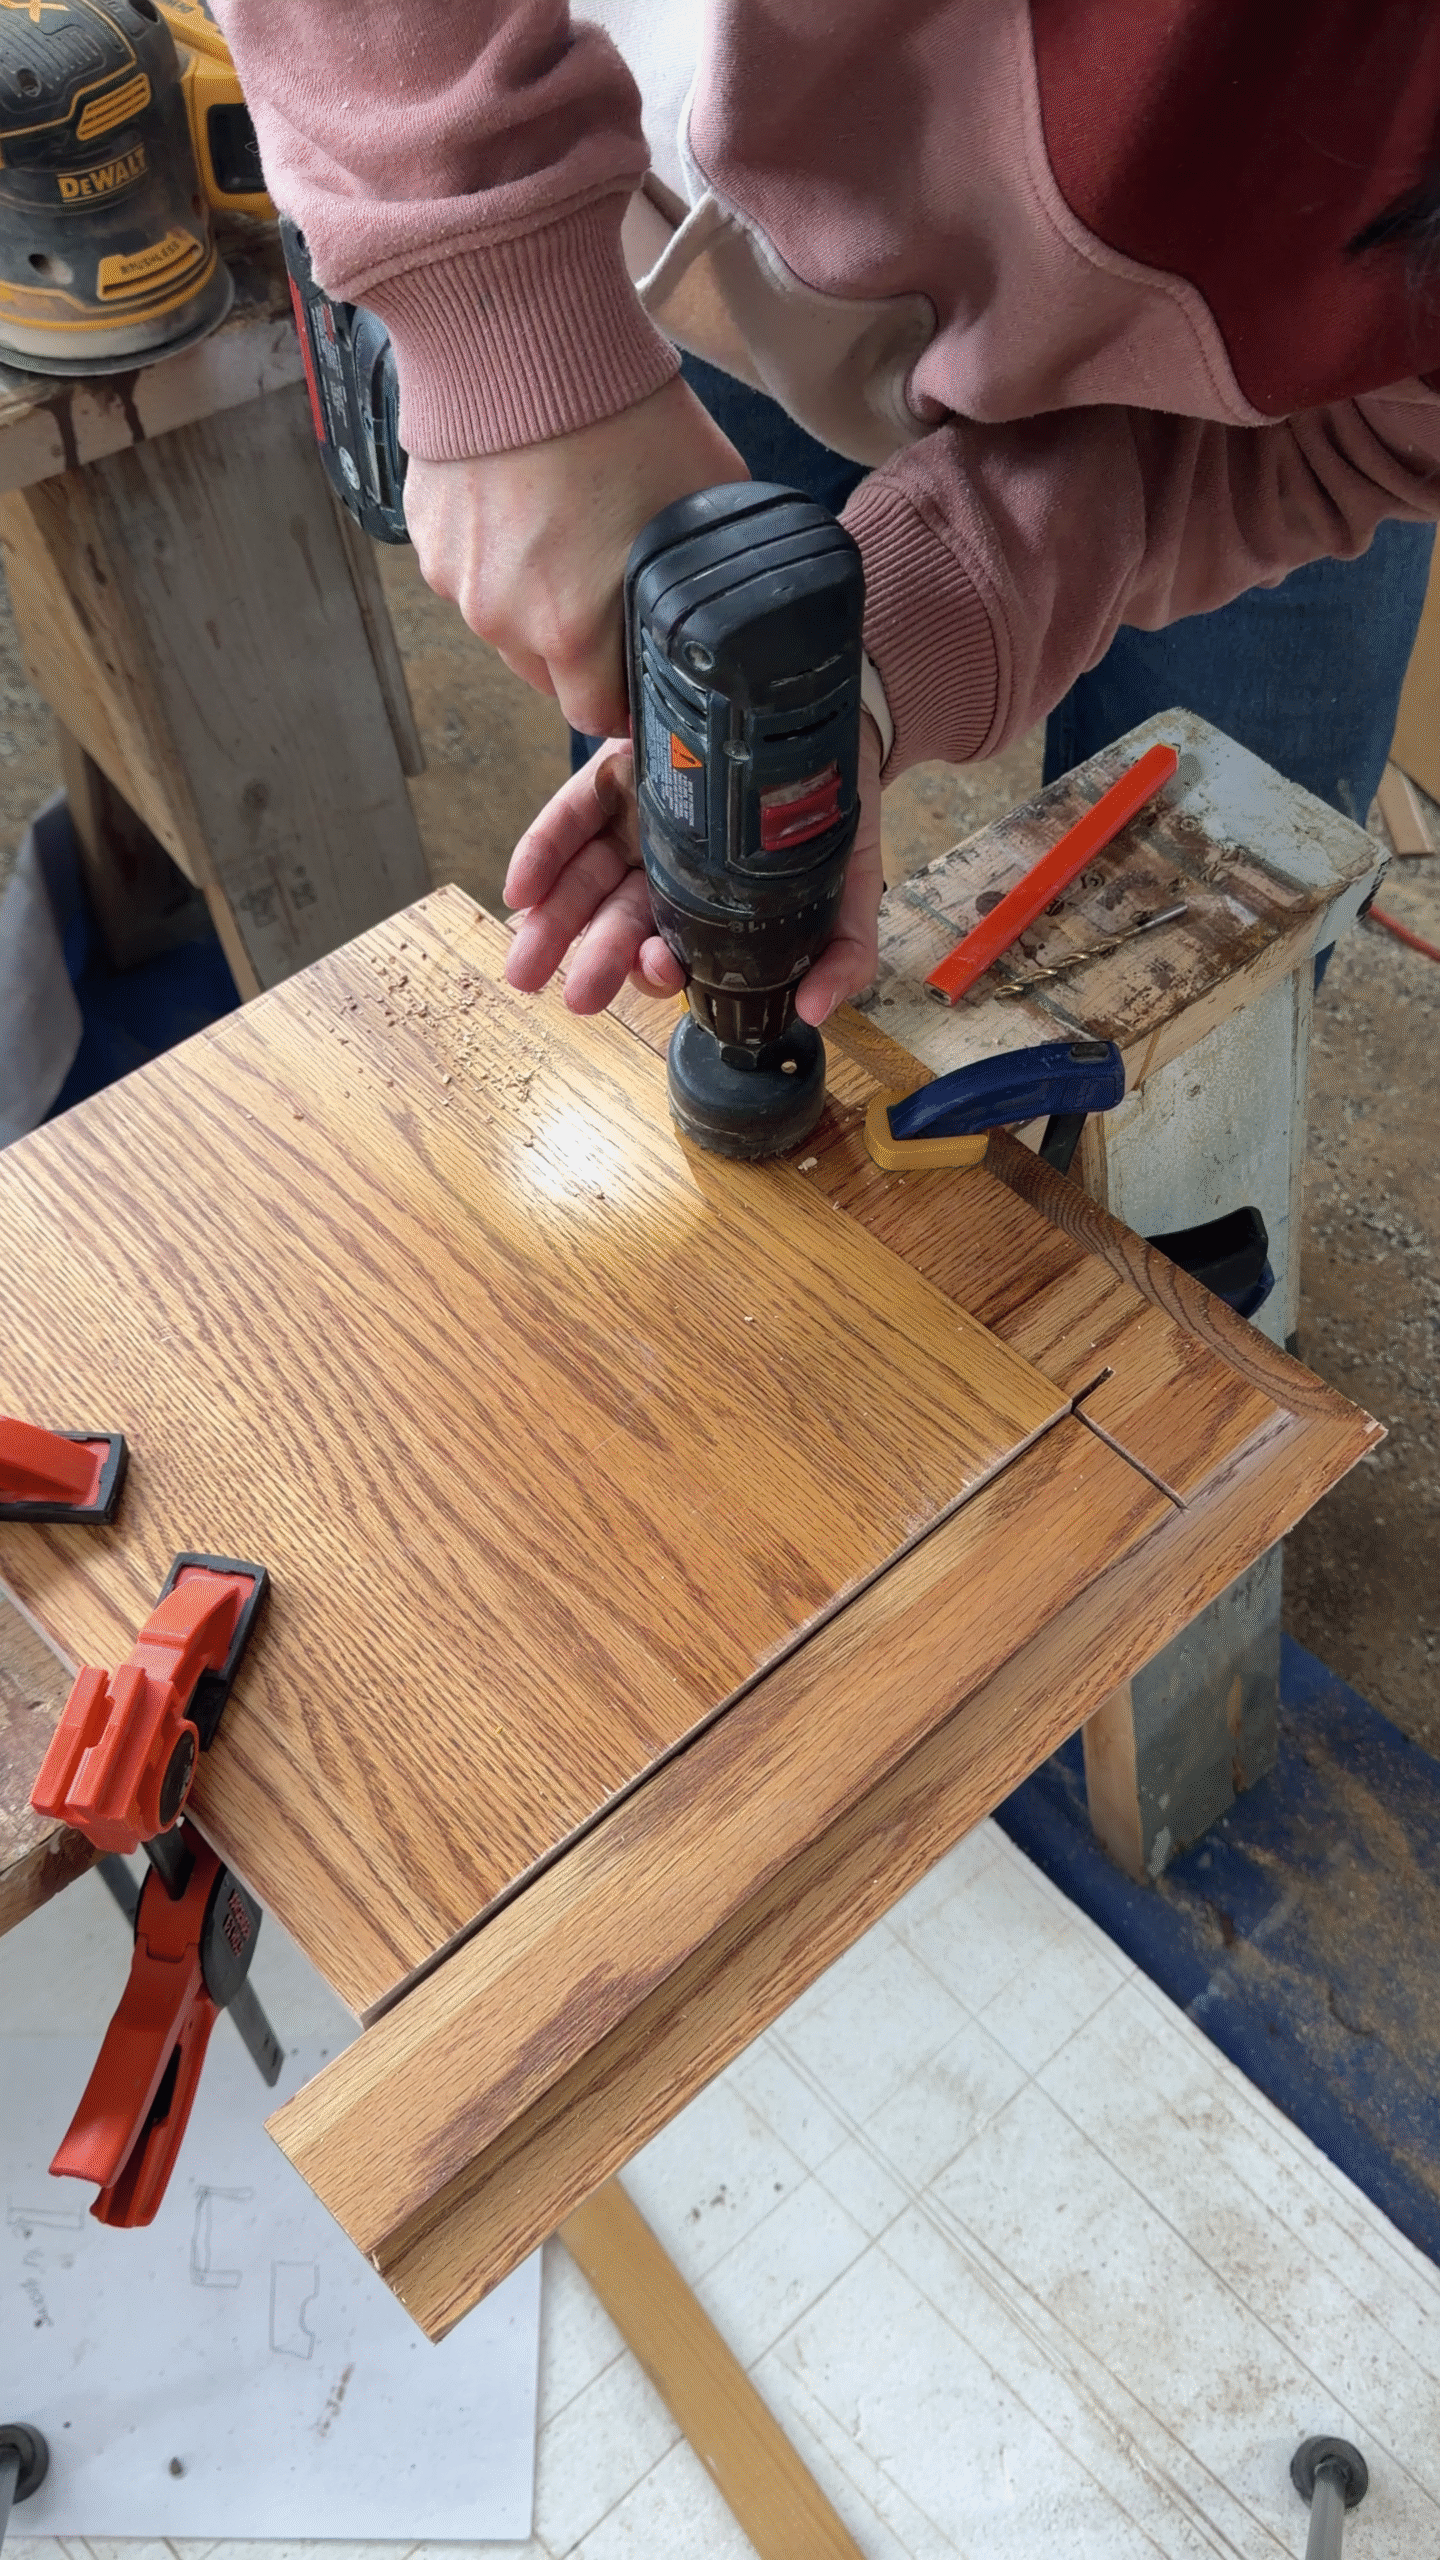
I used pocket holes to build a drawer box and added some drawer slides to the sides. I cut a drawer front out of the door panel that I had cut out of the big door. I cut a little finger cut out using a hole saw.
In order to just cut a partial hole, I clamped the door and scrap piece together before drilling so I could drill through both at once, since cutting a half-hole is pretty much impossible, ha!
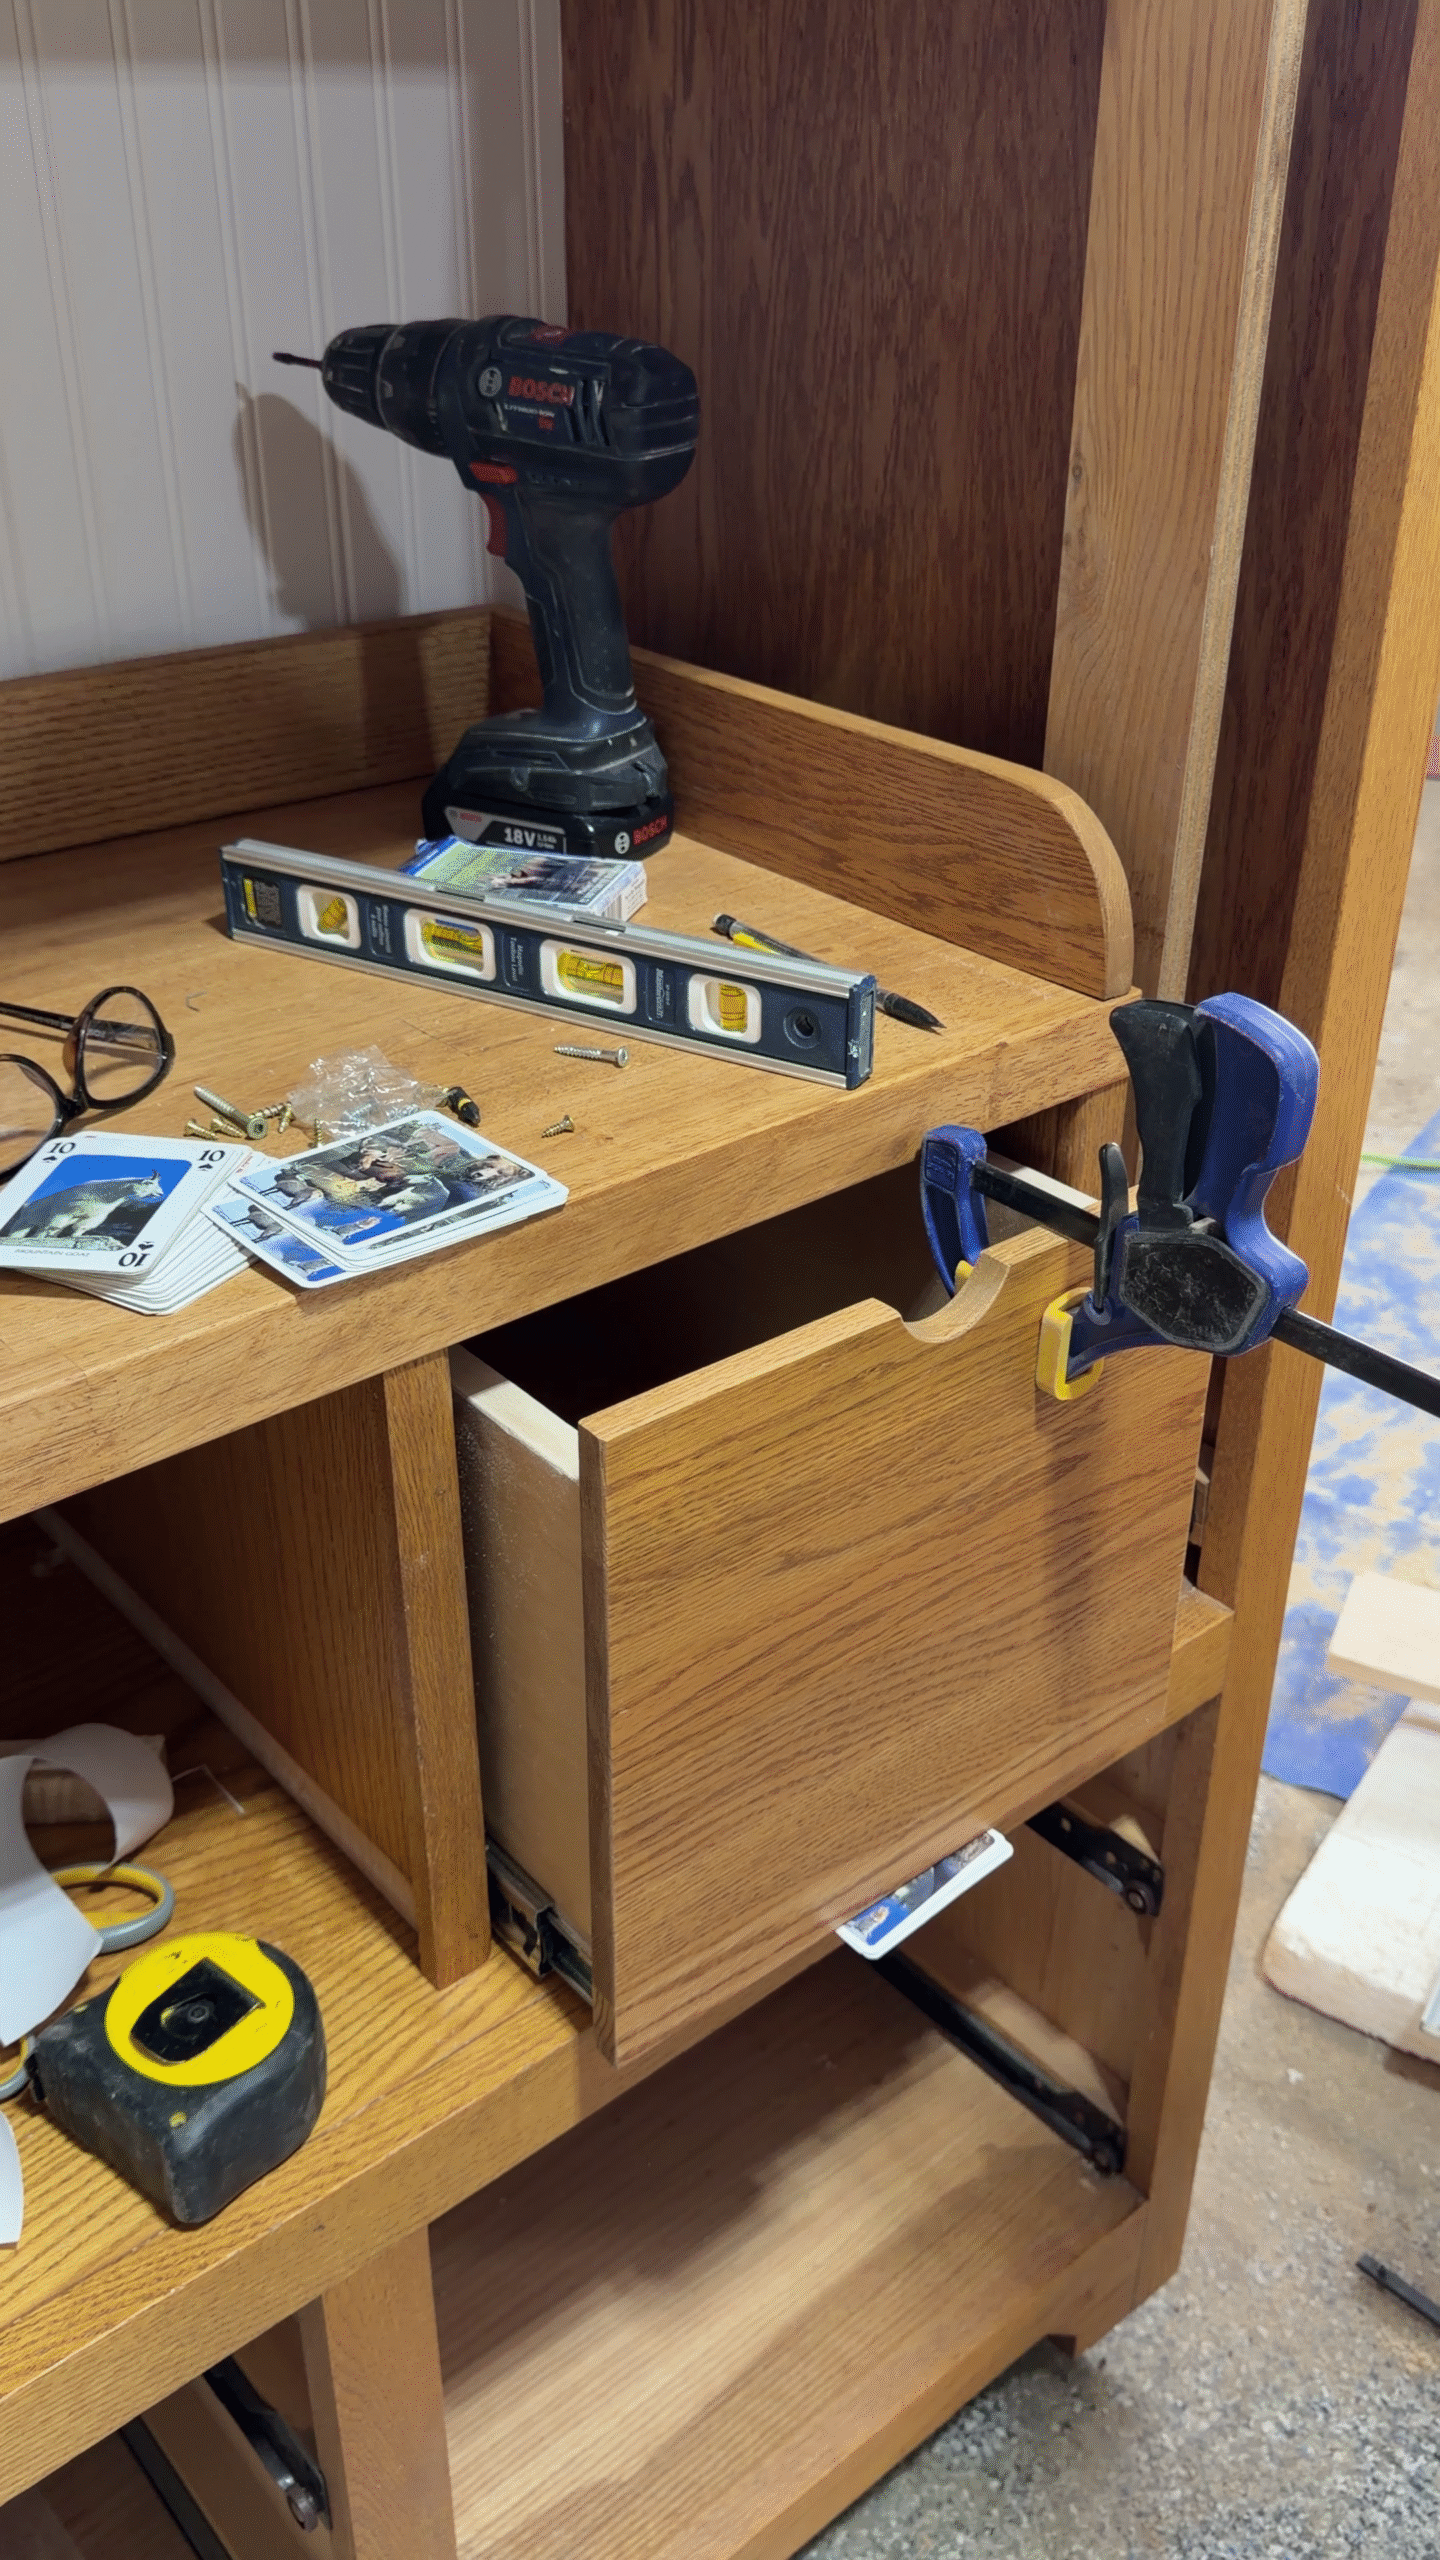
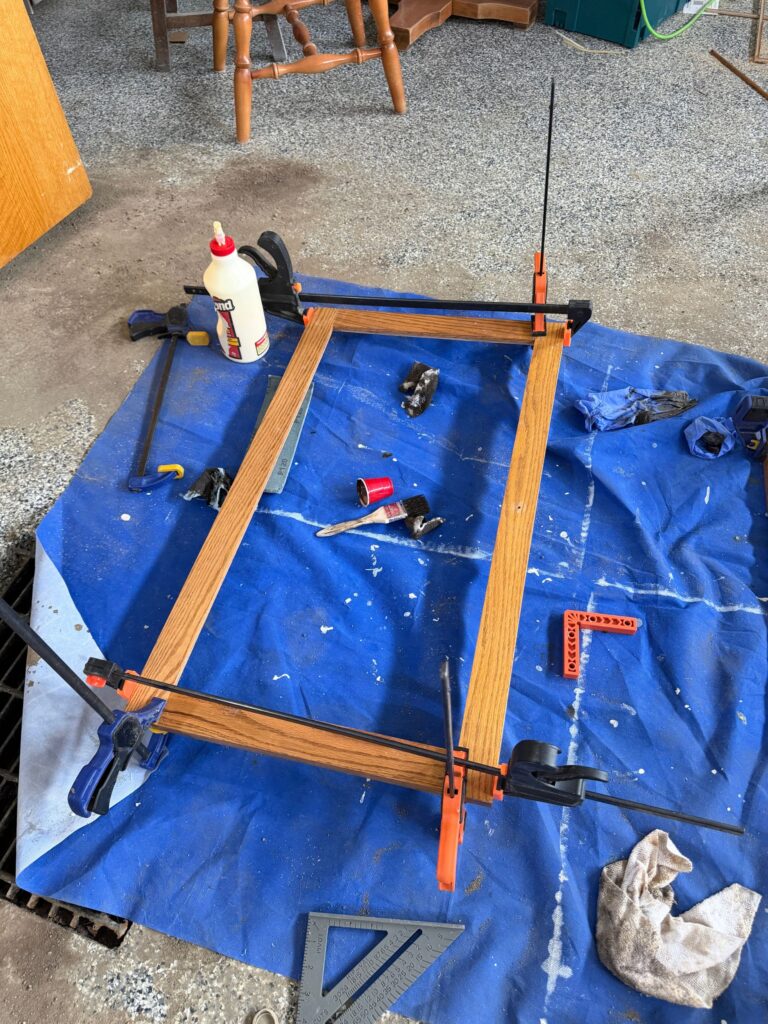
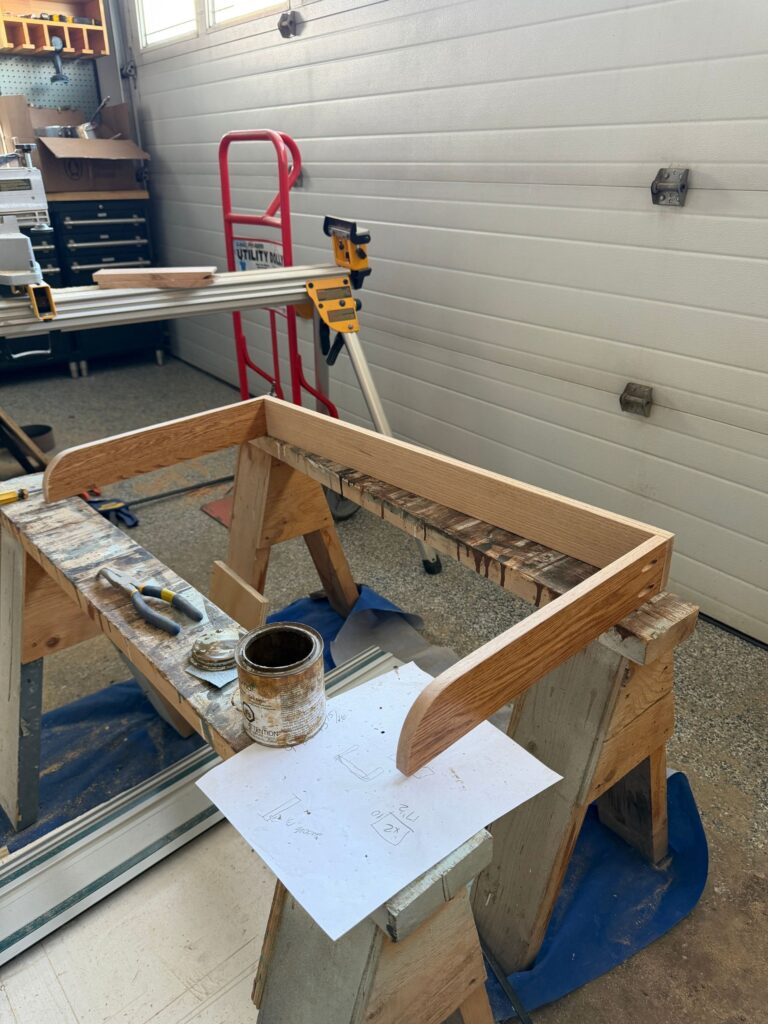
Finally, I decided that the counter needed a bit of a backsplash. I used scrap from the door panels again to create about a 4″ strip along the back and sides. I curved the front of the side pieces using my jigsaw. I connected them using pocket holes (that I put on the outside, so they would not show) and then glued it to the counter. (I bought this pocket hole jig for this project, I’ve been wanting one for a long time!)
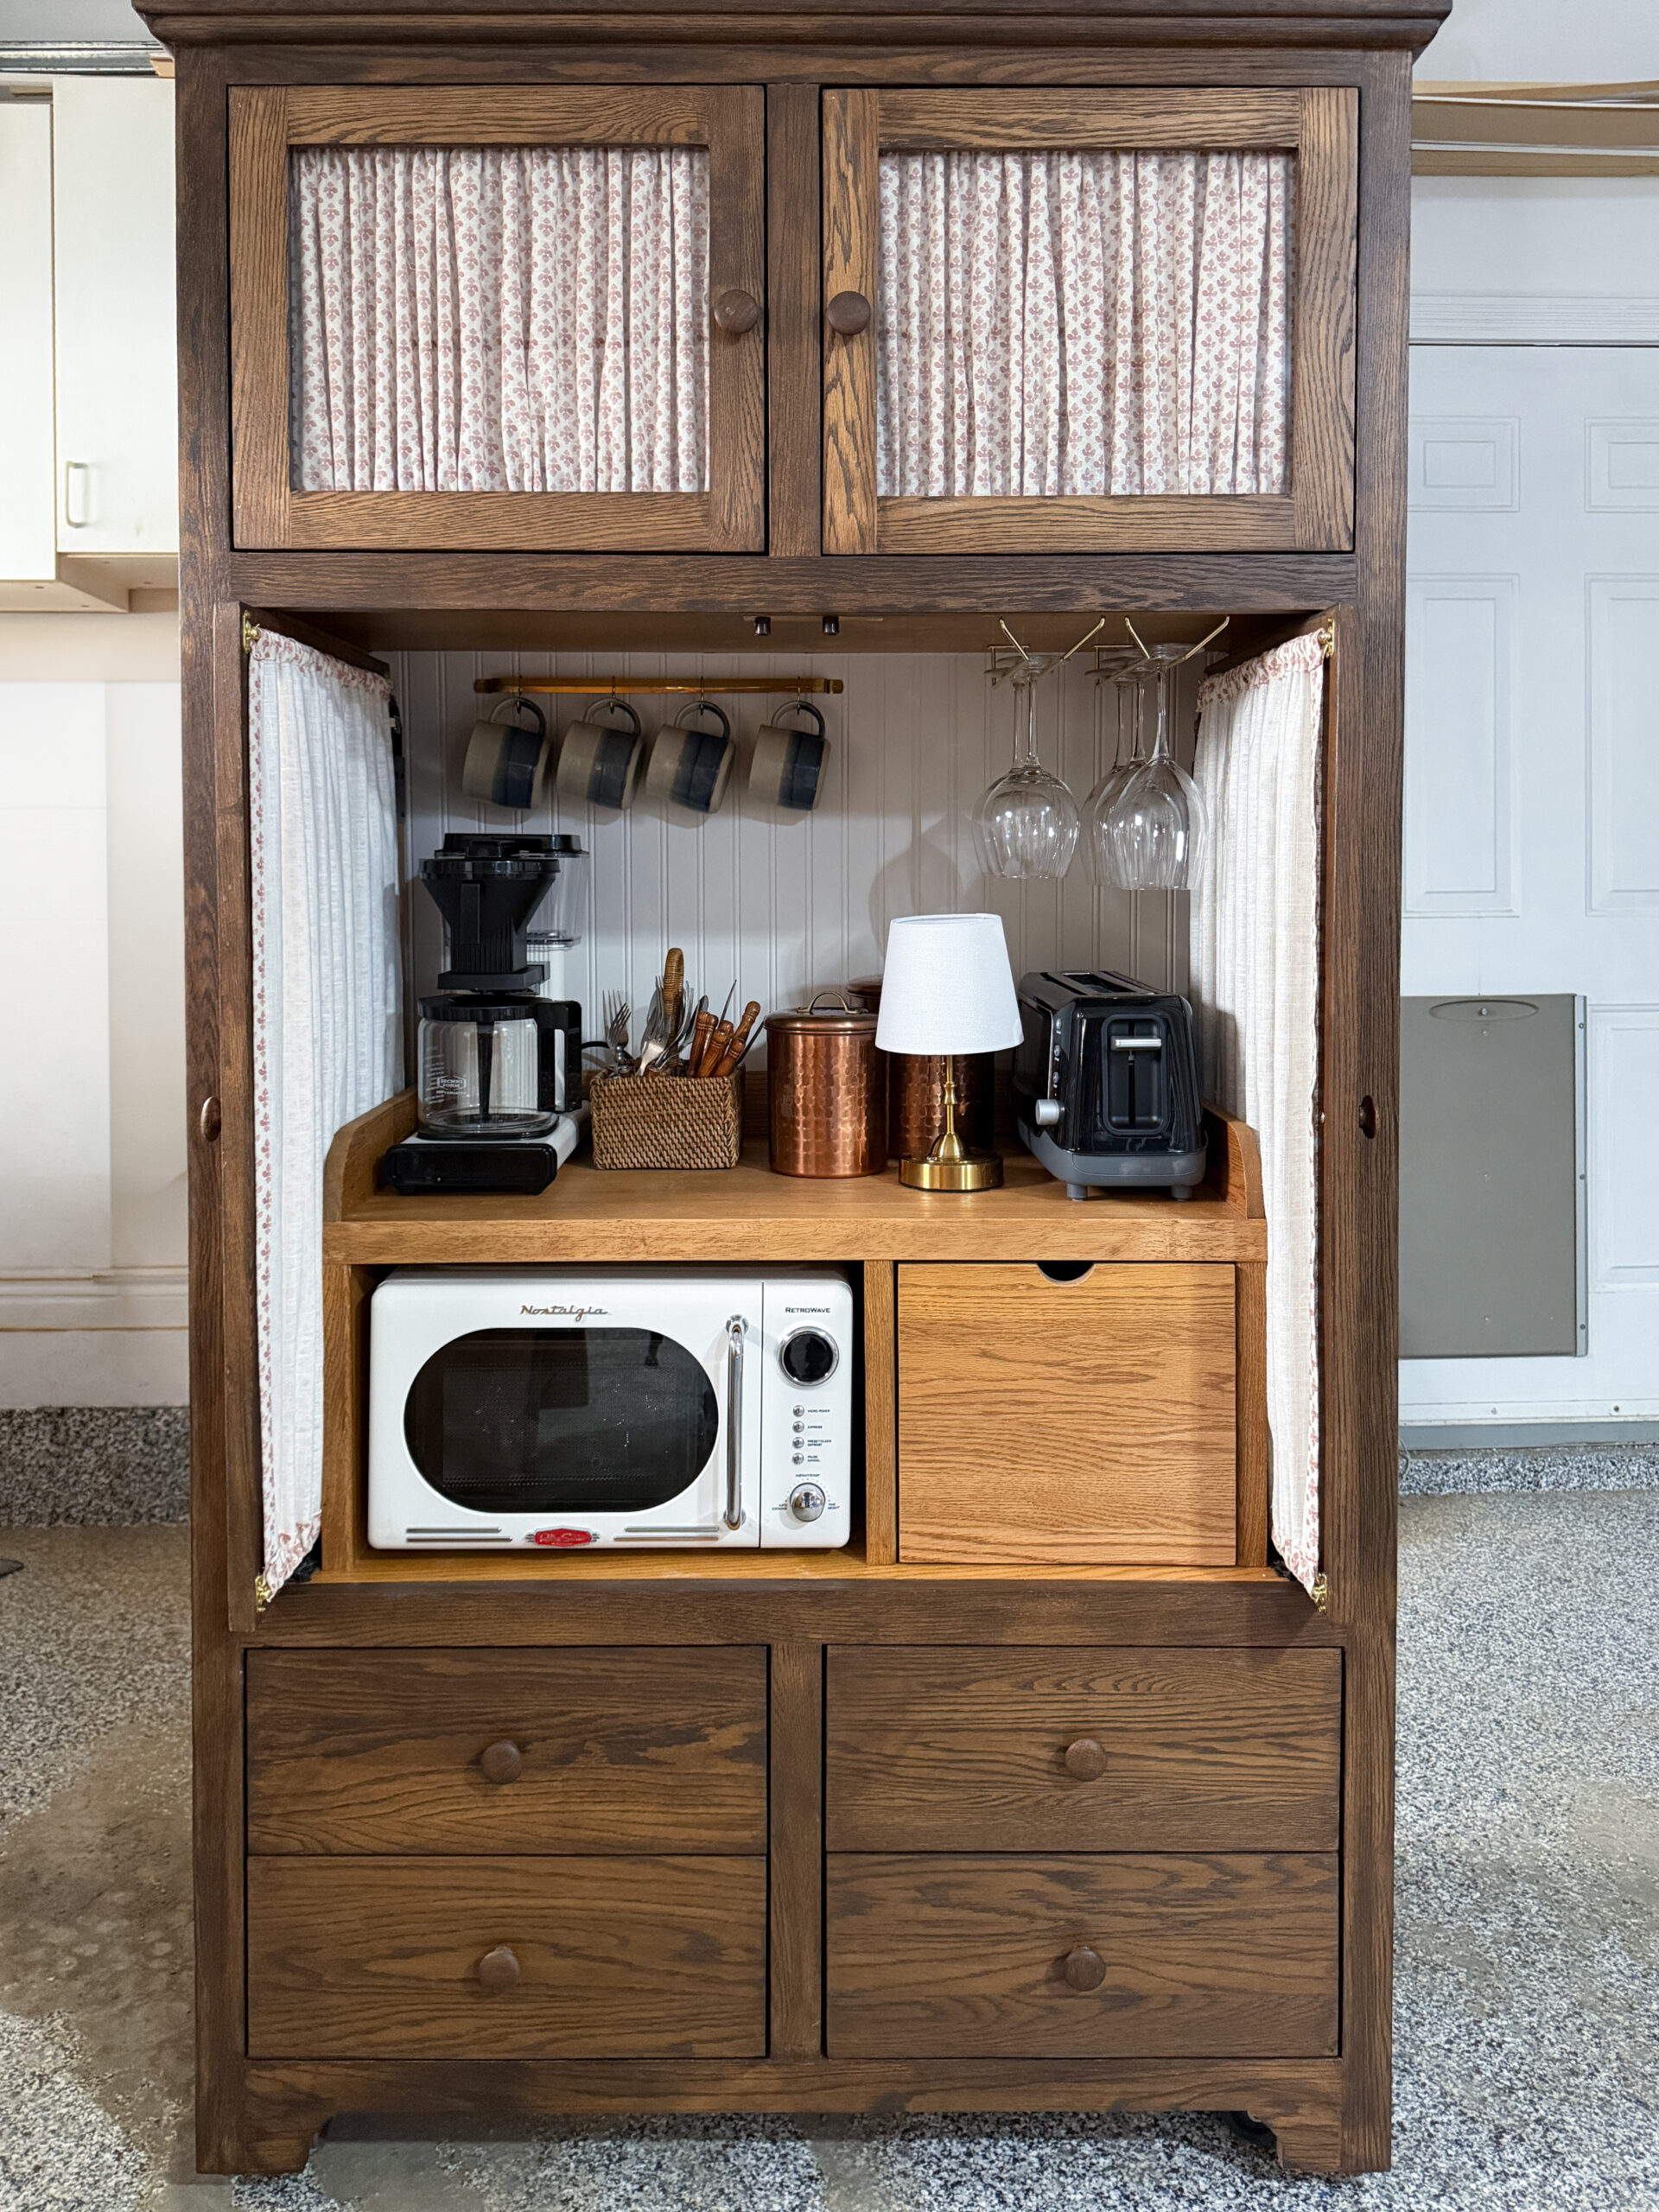
I added some wine glass holders to the roof of the main area on the inside of the cabinet, and some hooks for our favorite mugs so they would be in easy reach.
A few people asked me about having appliances inside a cabinet like this, and if it was to code. Codes do vary depending on where you live, so that’s up to you to look into! However, where I live, you are not allowed to put an electrical outlet inside an enclosed cupboard. However, this is a free standing cabinet and there are no code restrictions if the power source is located outside of the cabinet (we will run the cords out of a hole in the back and plug them in the wall outlets.
Obviously, we will use caution and only use the coffee machines or other countertop appliances when the doors are open.
Interior Accessories
I really want this little unit to act as not only a coffee bar cabinet, but also an appliance garage and place to hold a few other things, like coffee cups and wine glasses.
In addition to the microwave and coffee machine, there is enough room for a toaster as well. I styled it up with a few cannisters and a little lamp, but in reality I might get a motion sensor light to affix to the top to save on countertop area in this small space.
Refinishing the Cabinet
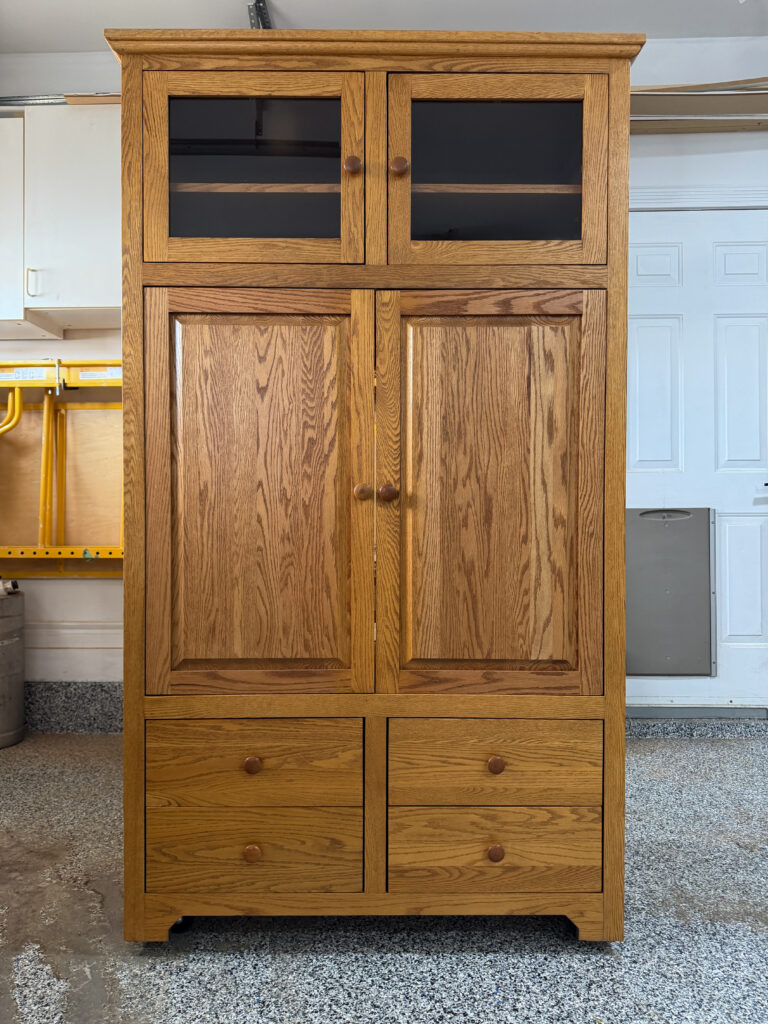
I did like the existing color of the cabinet, but my favorite stain colors are always a little more dark and rich.

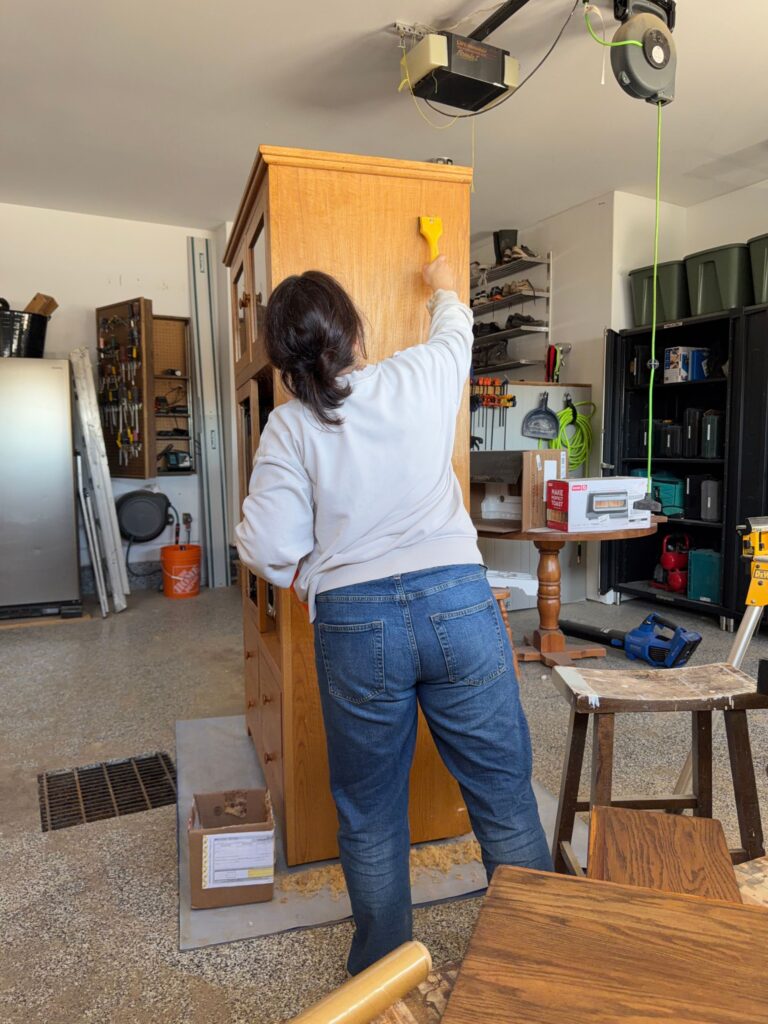
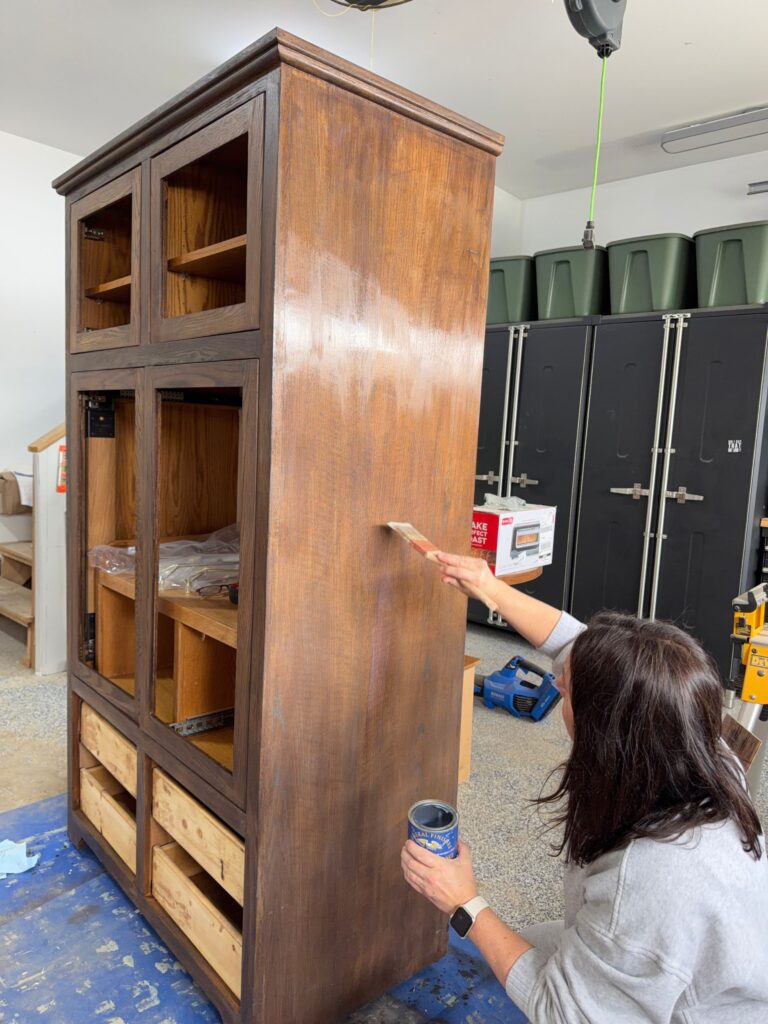
I stripped the whole outside of the cabinet down using a paint stripper and then sanded.
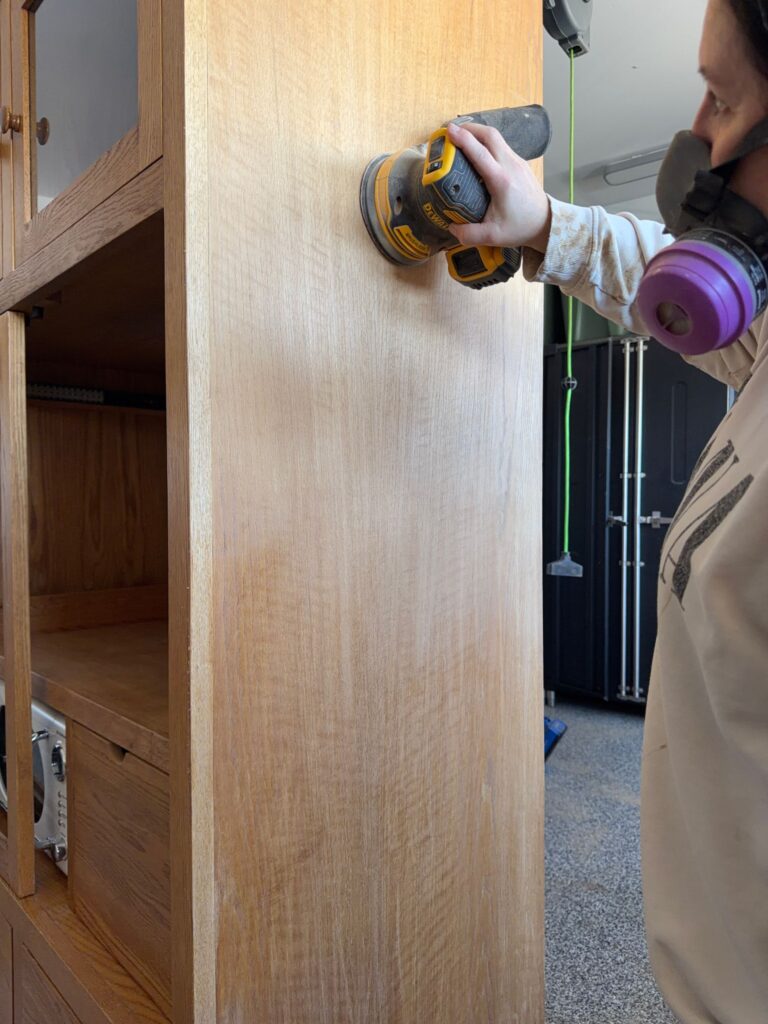
I stained the whole thing using General Finishes oil based stain in spiced walnut and topped it with their High Performance Topcoat in flat.
The darker stain made this look a lot more like an old piece than a piece from the 90’s, in my opinion!
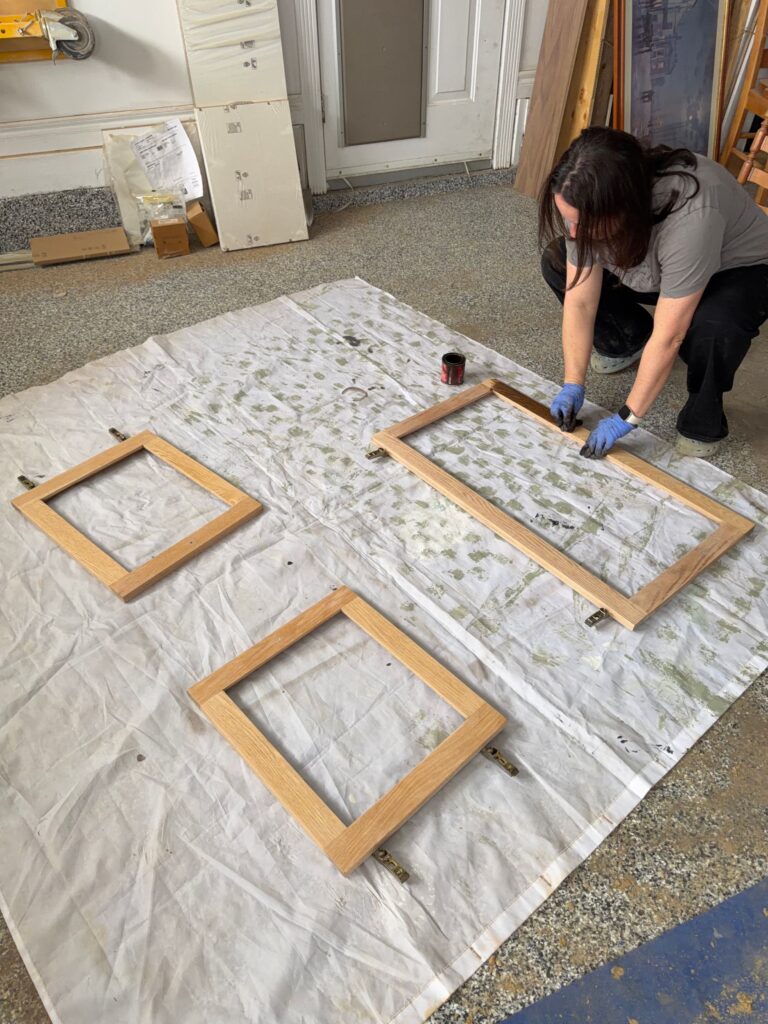
Adding Glass to the Doors
After I cut the panels out of the doors, I carefully measured the opening and had a piece of glass made up for each door. I subtracted 1/8″ off each side so it would be sure to fit with a little wiggle room.
I originally bought some clips to hold the glass in place, but they were not the right size. What I decided to do was silicone them in place.
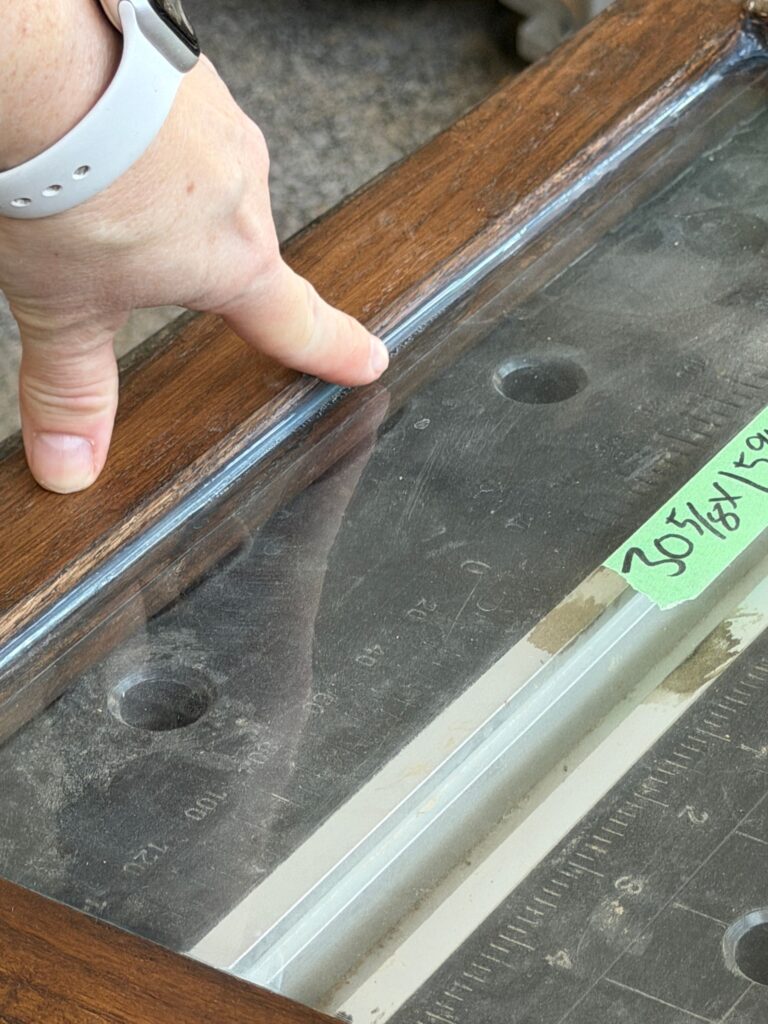
I added a small bead of silicone to the bottom lip of the door, and then dropped the glass on top of it. Then, I added another larger bead on the top edge between the glass and the door. This worked very well!
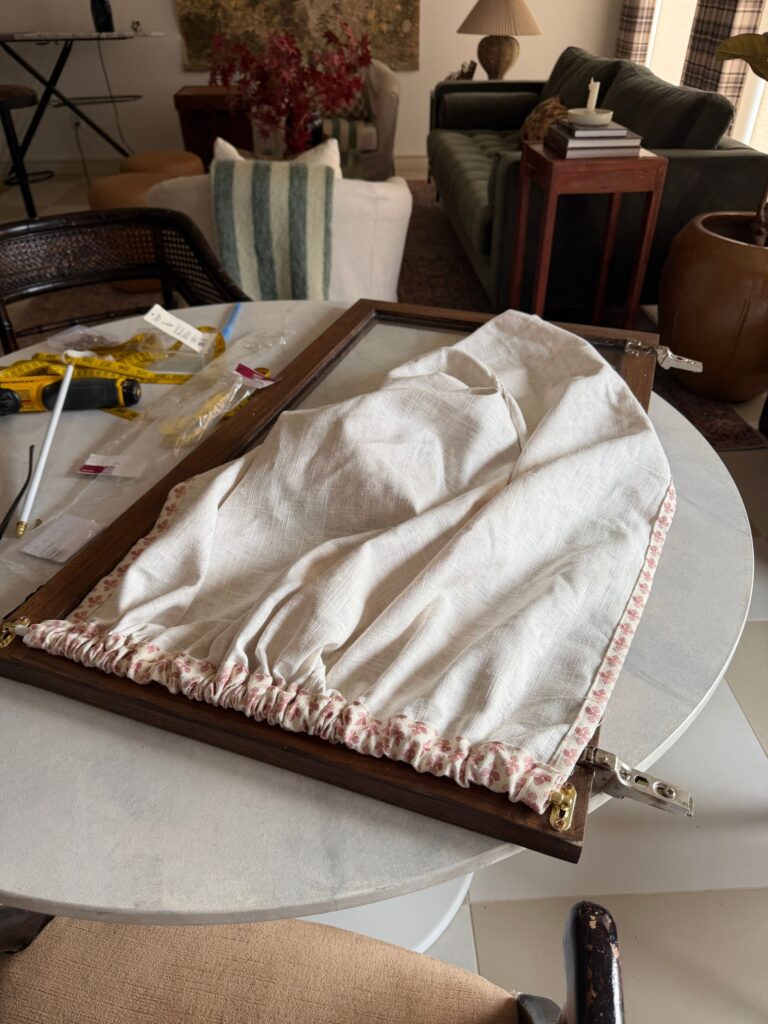
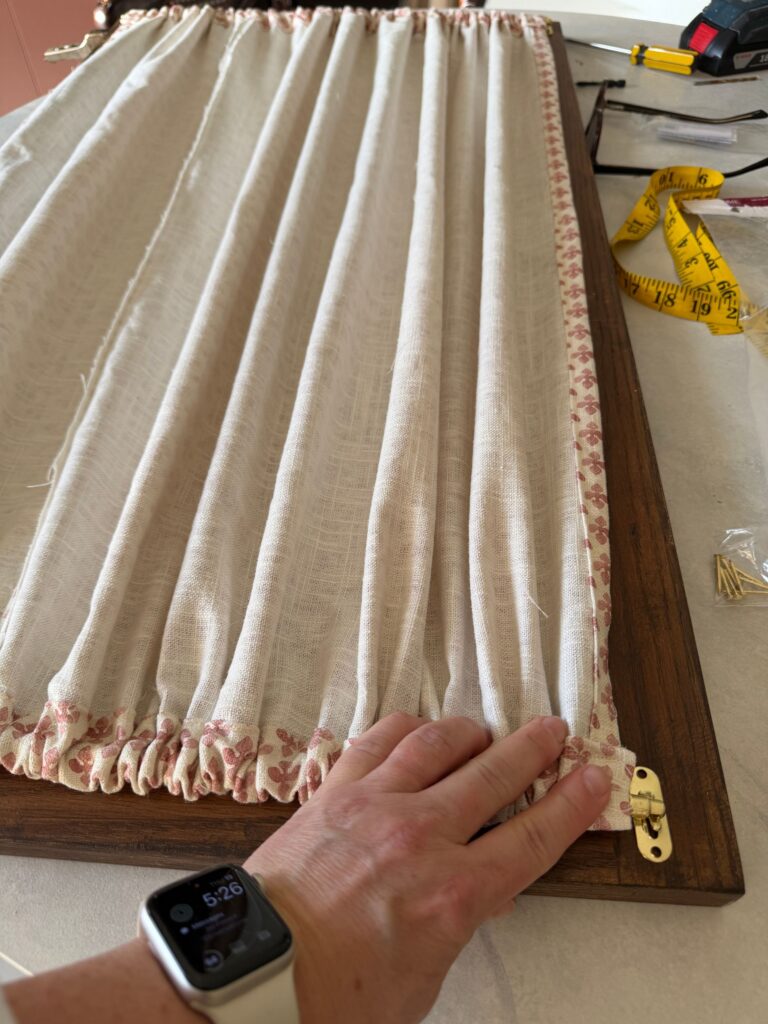
The Door Curtains
The last thing that I wanted to do was add some little curtains for inside the doors.
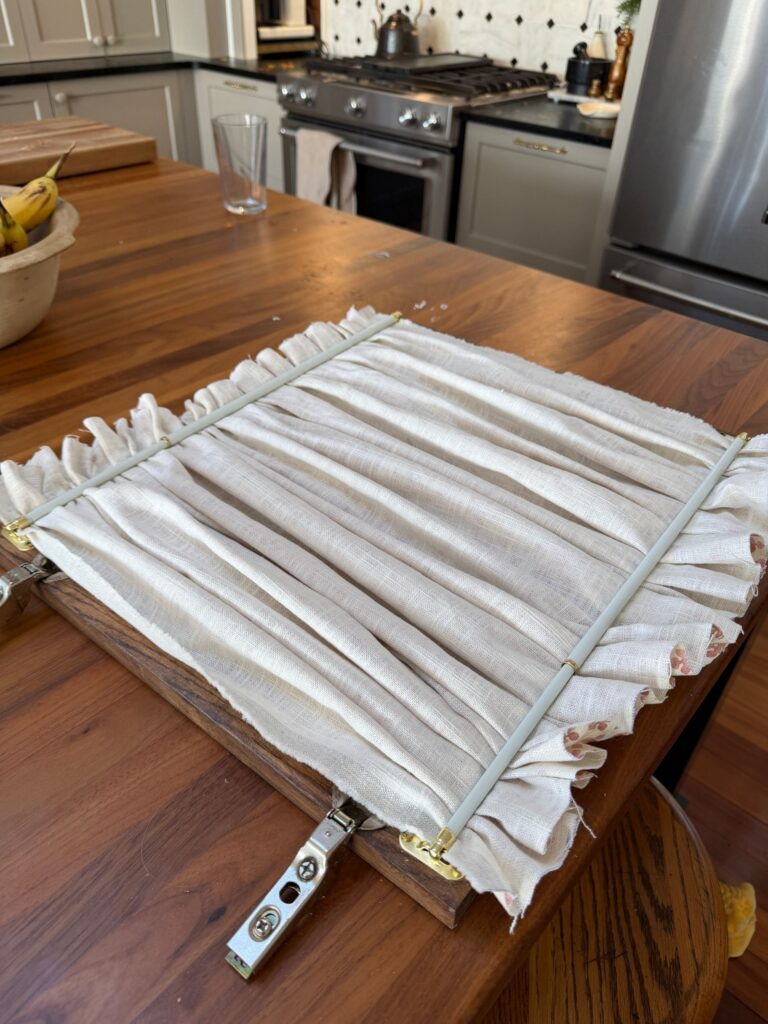
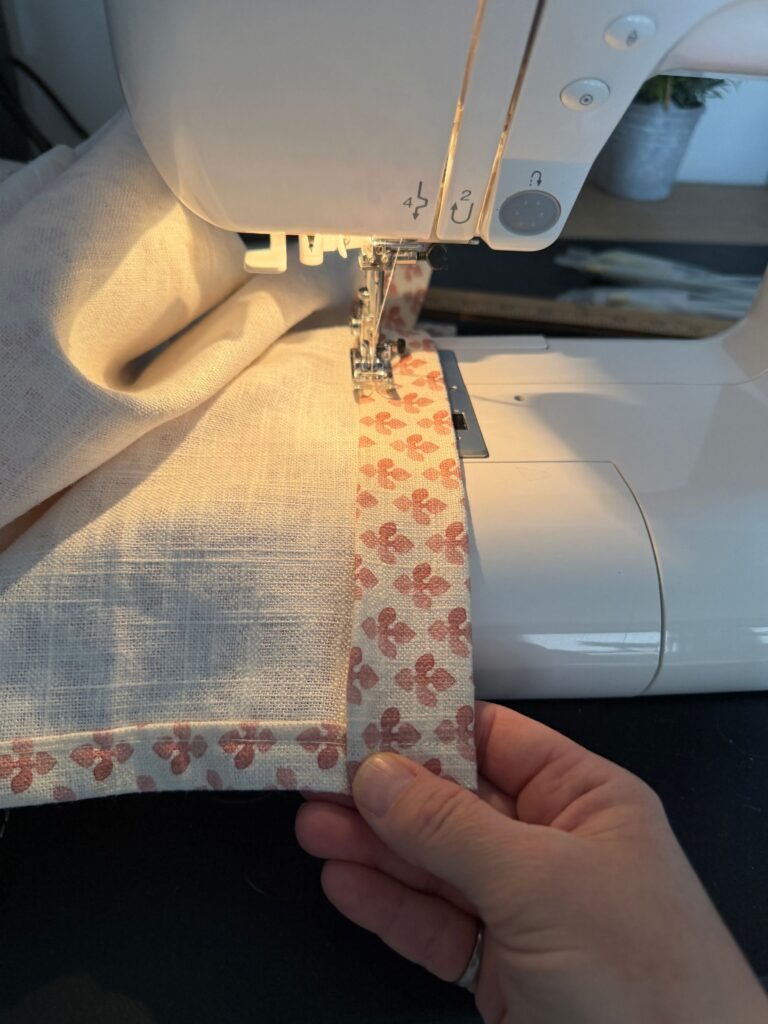
I might do a separate post on how to make these, but they were super simple! I found the cutest fabric from Tonic Living, it was mid-weight drapery fabric. (Tonic Living gifted me the fabric for this project). I cut some fabric to fit each door, with some allowance around the outside. Then I hemmed each side, leaving a pocket at the top and bottom for a rod.
What I found worked best was to install the rod on the top of the door, then install the curtain in the rod before adding the bottom one. I was then able to pull the bottom rod nice and tight, which looked a lot better. Pulling the rod with the curtain installed in it tight, and then screwing it into the door, made for a nice tight overall fit.
A few people mentioned that having this as a prep area might end up with these curtains getting dirty. I honestly did not think about that at first, but if that happens I can easily take them off to wash them and throw them back up!
The Final Look
I’m so pleased with how this turned out! It is so practical and useful for our cabin kitchen! It eliminates countertop clutter by housing our smaller appliances, but it gives a lot of storage space for other things as well. We were originally planning to build a pantry in the area that this is going in, but this saved us a lot of money and added a lot to the charm factor! I love good budget friendly projects, especially when it turns out so cute! It is honestly one of my favorite things I’ve made in a while!

Using an old piece of furniture like this is a great way to make small kitchens more functional and a dedicated space to keep small kitchen appliances. It not only adds extra space, but the pocket doors allow for quick access for everyday use. The old kitchen in this cabin was small, and it did not have very practical or useful kitchen storage. This piece is going to go a long way towards having the kitchen organization that I dream of!
Here are a few satisfying before and afters!
Be sure to stay tuned for the rest of the kitchen renovation! We are using Ikea cabinets again (you know I love an Ikea hack!) and it’s going to be suuuuper budget friendly!
Very, very nice. The end result is not my aesthetics, but the method is surely repeatable for any style. Thank you for the detailed tutorial.