DIY Wood and Brass Spice Rack
This is a post that has been a long time coming and maybe the most asked-about DIY project from our kitchen renovation – how did we DIY the built-in wood and brass spice rack in the stove nook? We did this near the end of our kitchen renovation so I will be honest, I was running out of steam when it comes to documentation and I don’t have the best photos. What I lack in photos I will hopefully make up for in instructions and maybe some fancy diagrams, so you can hopefully DIY your own wood and brass spice rack!
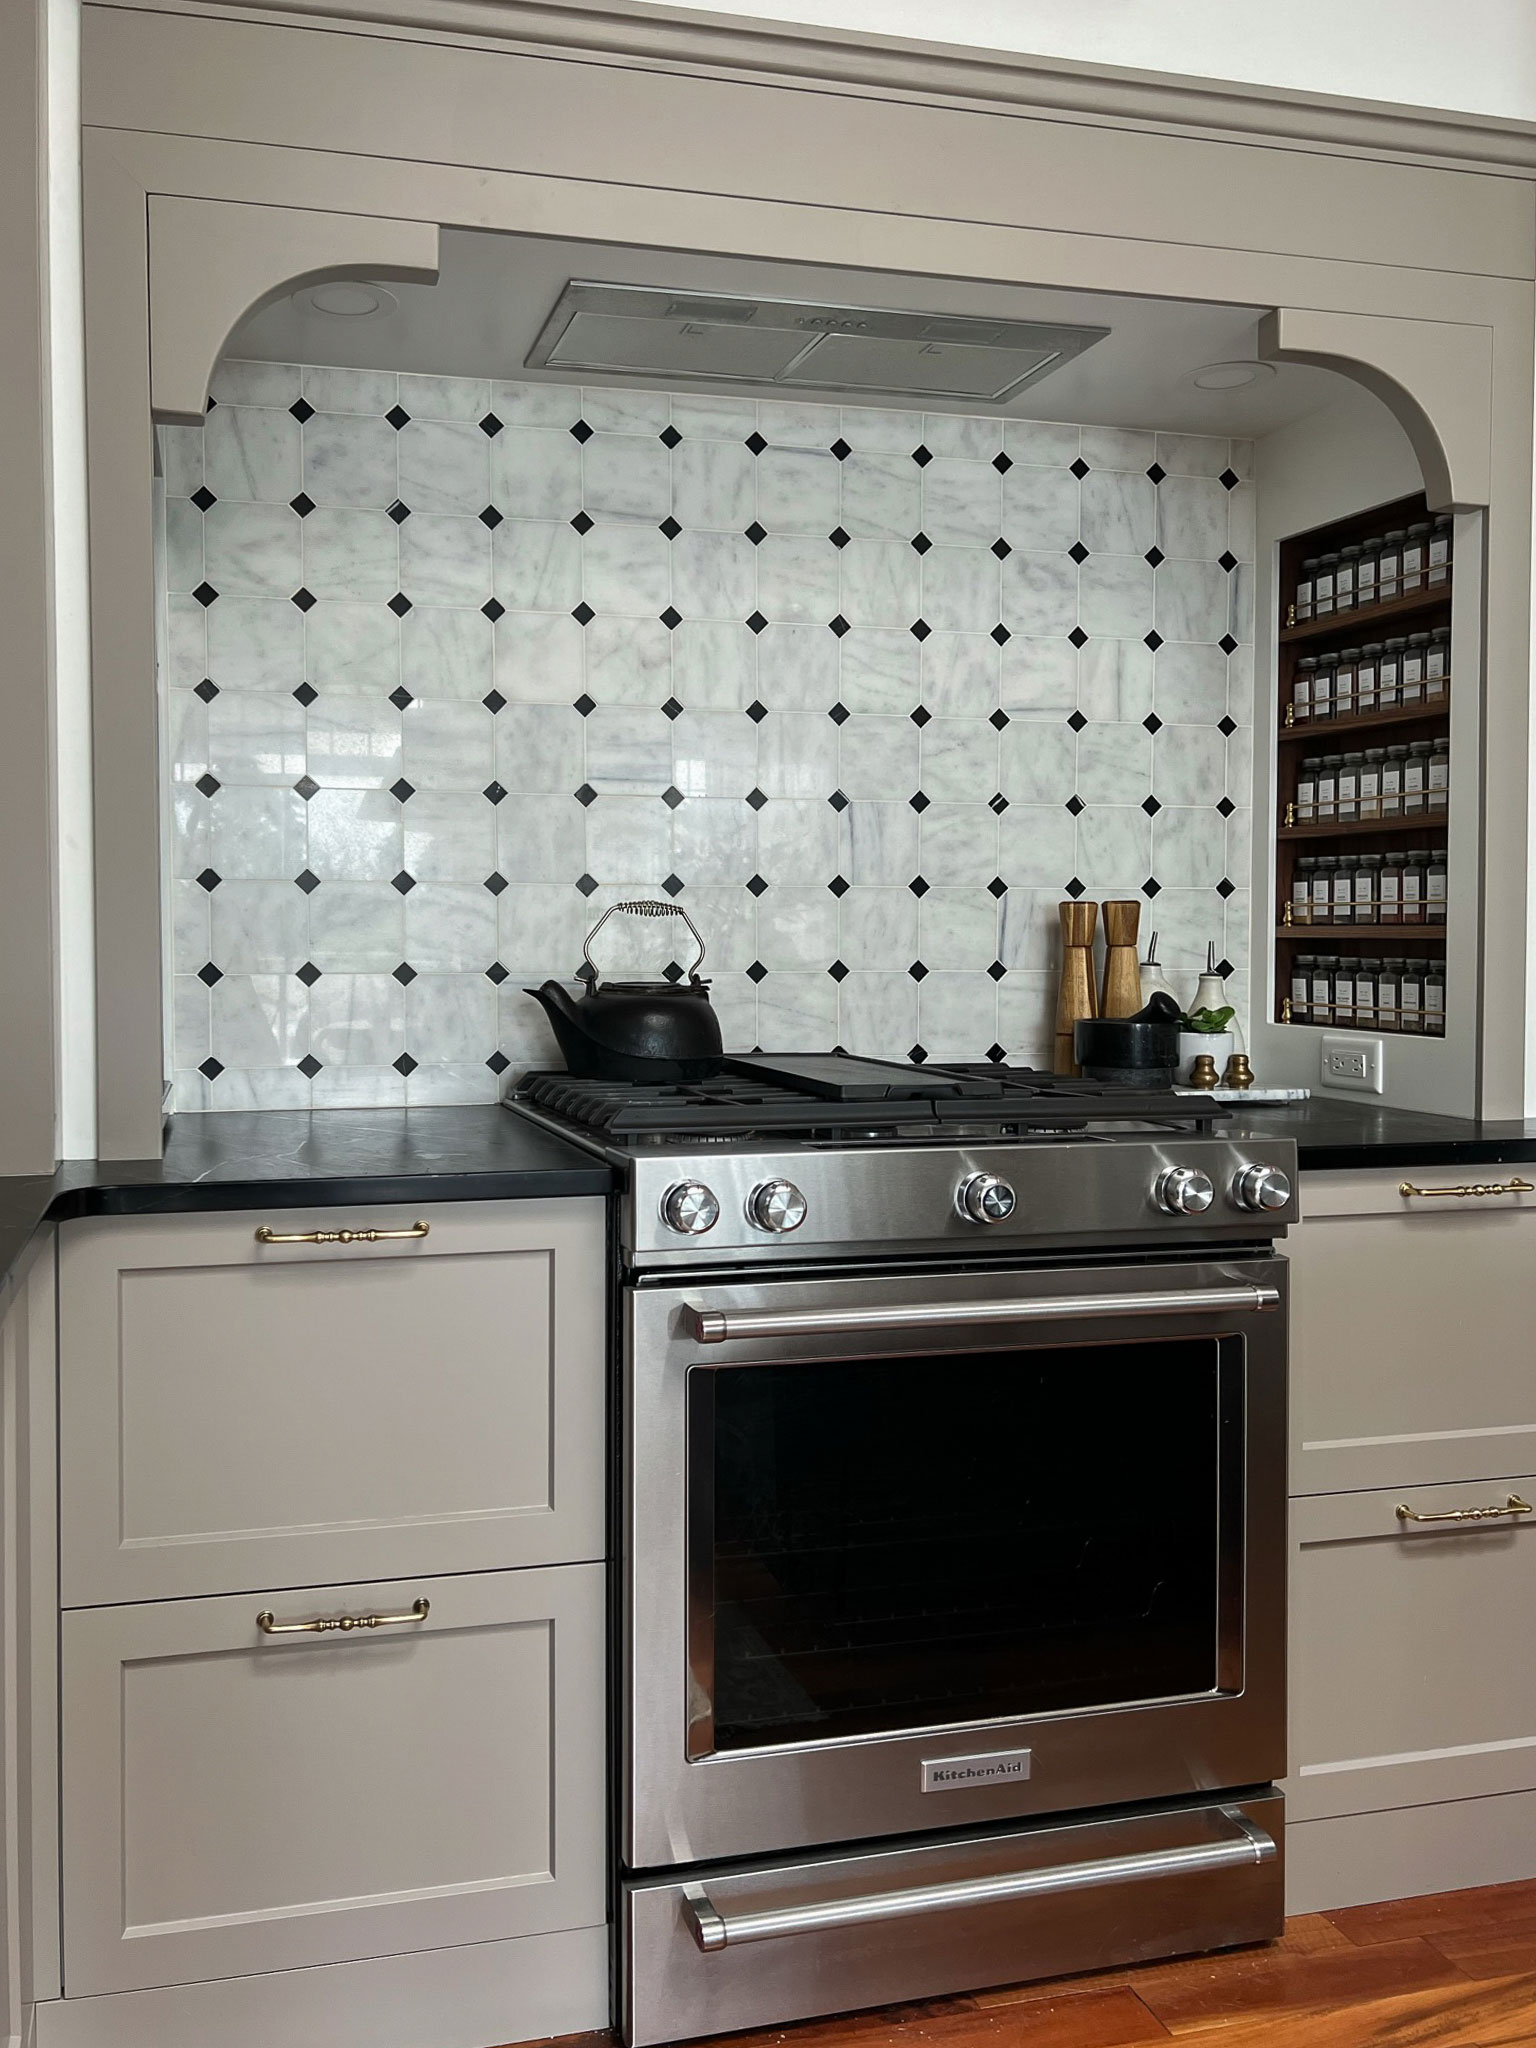
We placed our spice rack inside our stove alcove in easy reach of the range. Having the spices there is super convenient and helps with kitchen organization, as I don’t have to designate a kitchen drawer to spices, and I’m using up dead space that already existed in the kitchen alcove. That turned out to be the perfect solution for us and a great way to save on cupboard space.
This post may contain affiliate links. That means if you purchase anything from these links I earn a small commission, at no extra cost to you! This helps support my blog, so thank you!
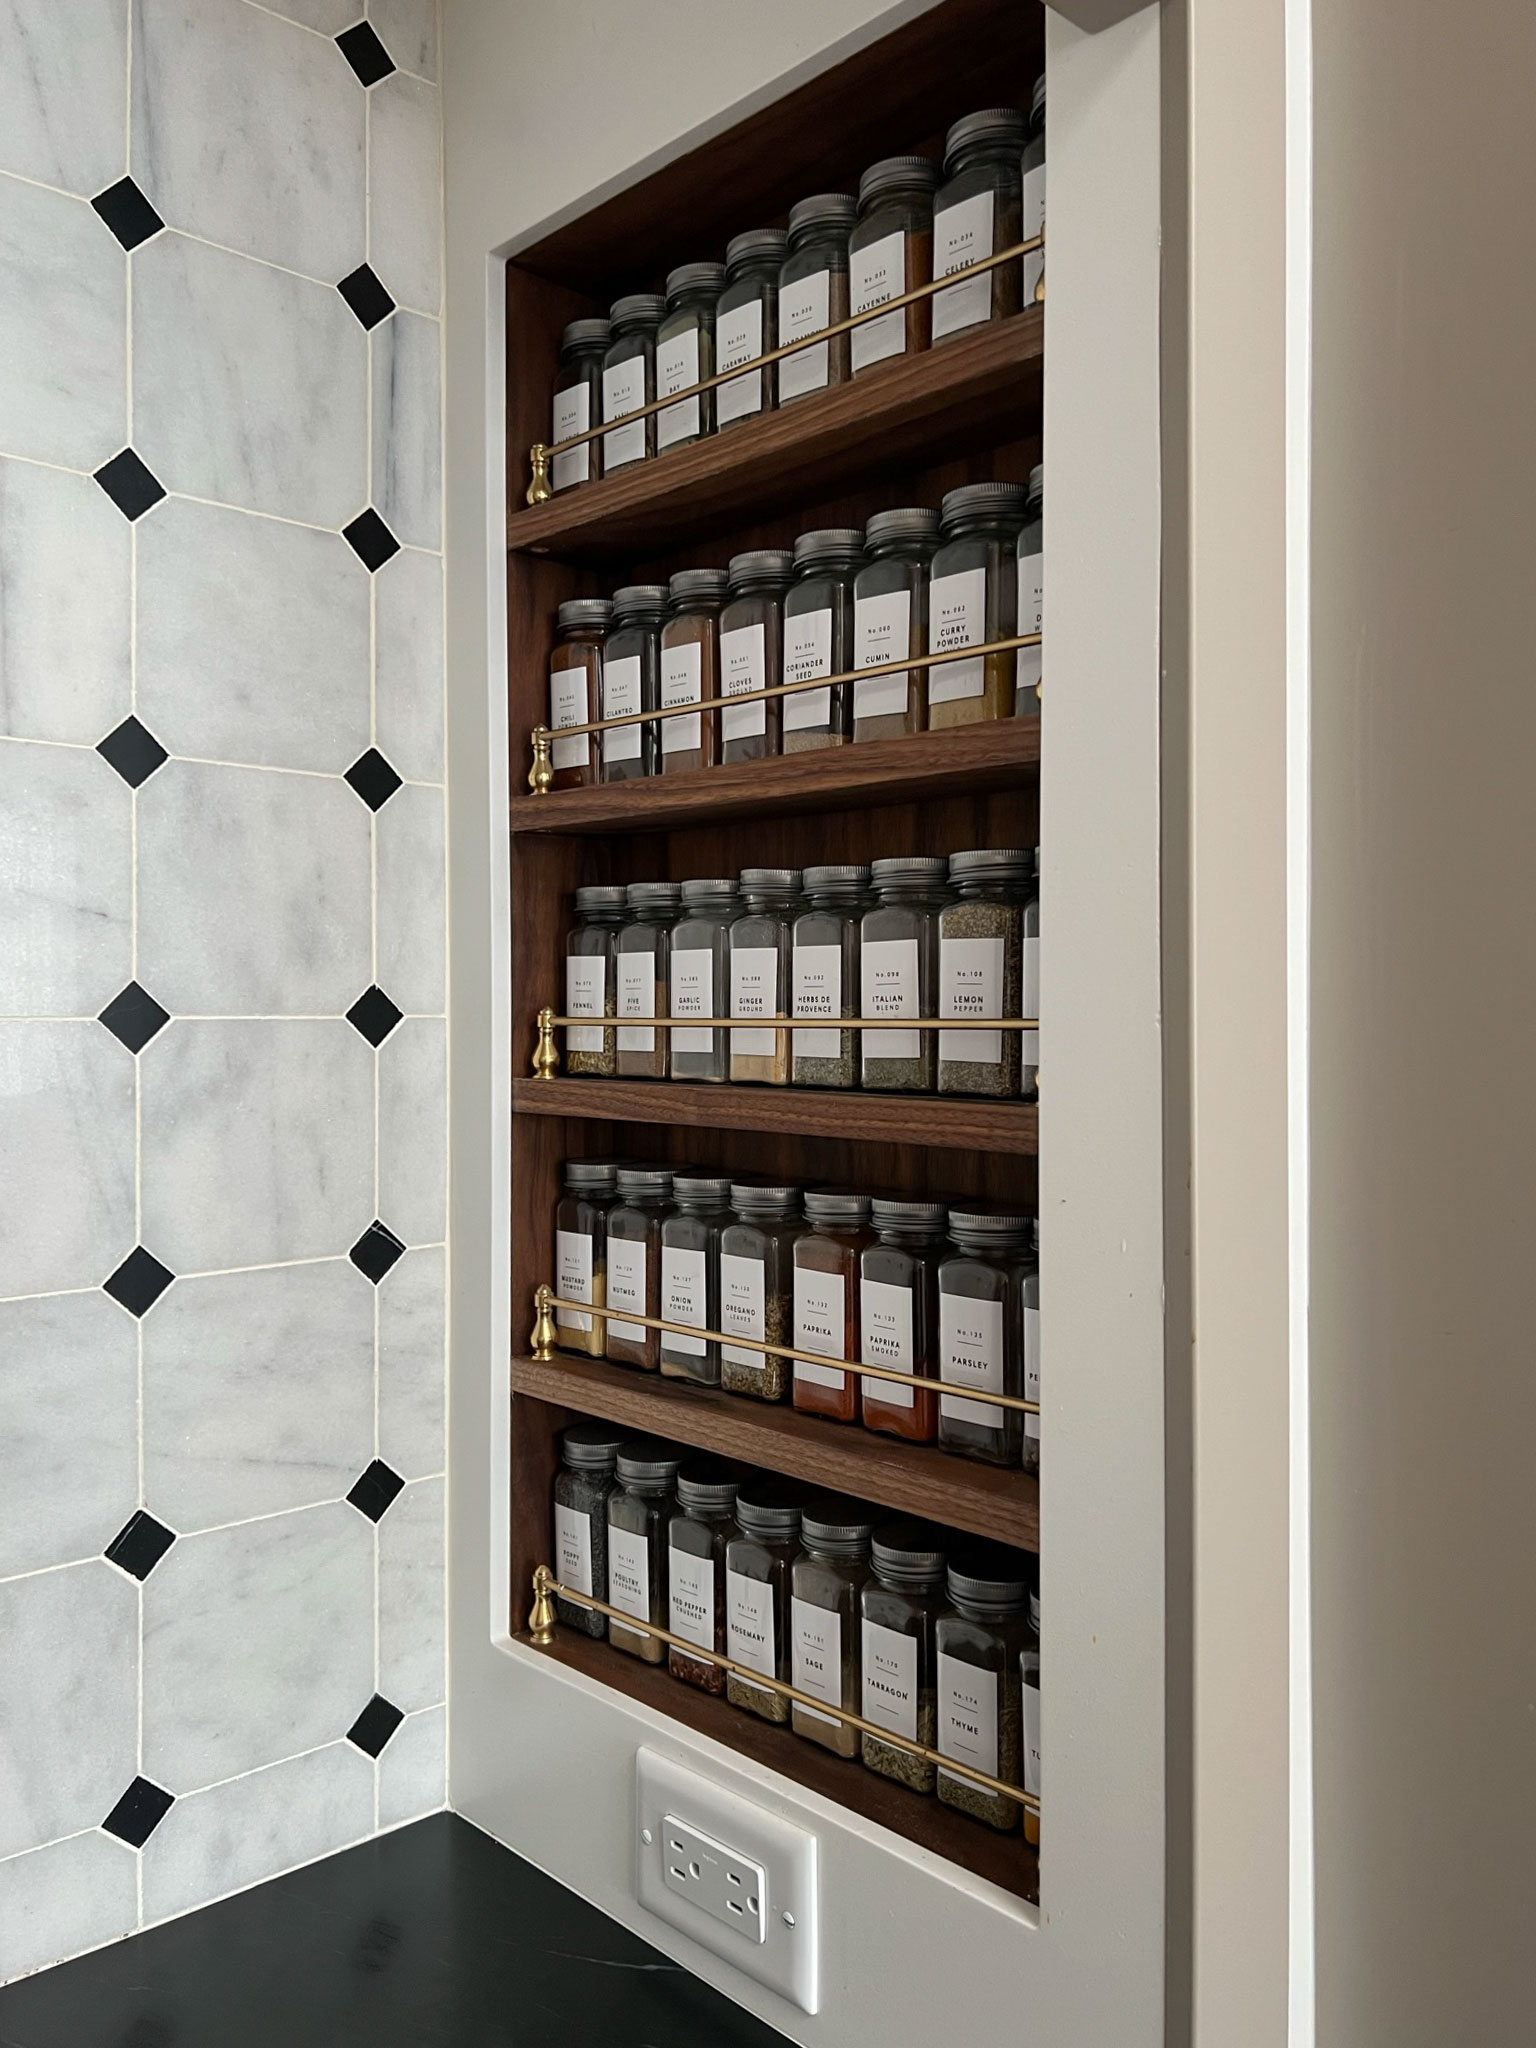
Table of Contents
- Materials for the DIY Built-In Wood and Brass Spice Rack
- How to Built the Wood and Brass Spice Rack
- How to Add the Veneer to the Edges of the DIY Wood and Brass Spice Rack
- Inserting the DIY Walnut and Brass Shelf into the Wall and Covering the sides with MDF
- Finishing the MDF and installing it over the DIY Wood and Brass Spice Rack
- Installing the Brass Rods into the DIY Wood and Brass Spice Rack
- FAQ’s:
Materials for the DIY Built-In Wood and Brass Spice Rack
The Wood
I used walnut plywood for this project. I wanted walnut because my island top is also walnut and I needed to repeat that element. However, any type of plywood can be used for this in whatever type you like. We used ¾” thick plywood and the best place to buy it was from our local hardware store Windsor Plywood.
Why did you choose Plywood for your DIY Built-in Wood and Brass Spice Rack?
First of all, what exactly is plywood? Plywood is really just thin sheets of wood glued together to create a large sheet. If you look at the flat face of a sheet of plywood, the surface that consists of whatever type of wood (walnut, in my case) in a veneer (basically, a thin sliver of wood that is glued onto the surface of the sheet). If you look at the side of a piece of plywood, you can see the layers that are glued together, most of which contain other types of wood or OSB (OSB is an engineered wood). The edges of the plywood need to be hidden or covered in some way in order to have a nice finished product. Plywood is nice to work with for a project like this because it is very stable and flat, and has a lot less warping issues than normal wood due to its manufacturing process and so works great for this purpose. It is significantly cheaper than a solid piece of walnut would have been, so there’s that too!
Veneer
In order to cover up the edges of that plywood, you are going to need to get some veneer edge banding in the same wood finish as the plywood. In my case, walnut. (If you have oak plywood, for example, you would find some oak veneer edge banding). Most veneer edge banding products are iron-on and have some glue on the back that is activated by heat. It is an easy DIY – I had never done this before this project and mine came out great! I bought mine from Windsor Plywood as well but I found a similar one on Amazon. (Make sure you get something wider than the wood. I used 3/4″ plywood so a 1″ wide veneer will give about 1/8″ of overlap on either side to file off, but the width doesn’t matter that much as long as it’s more than the plywood. More on that later!)
Brass
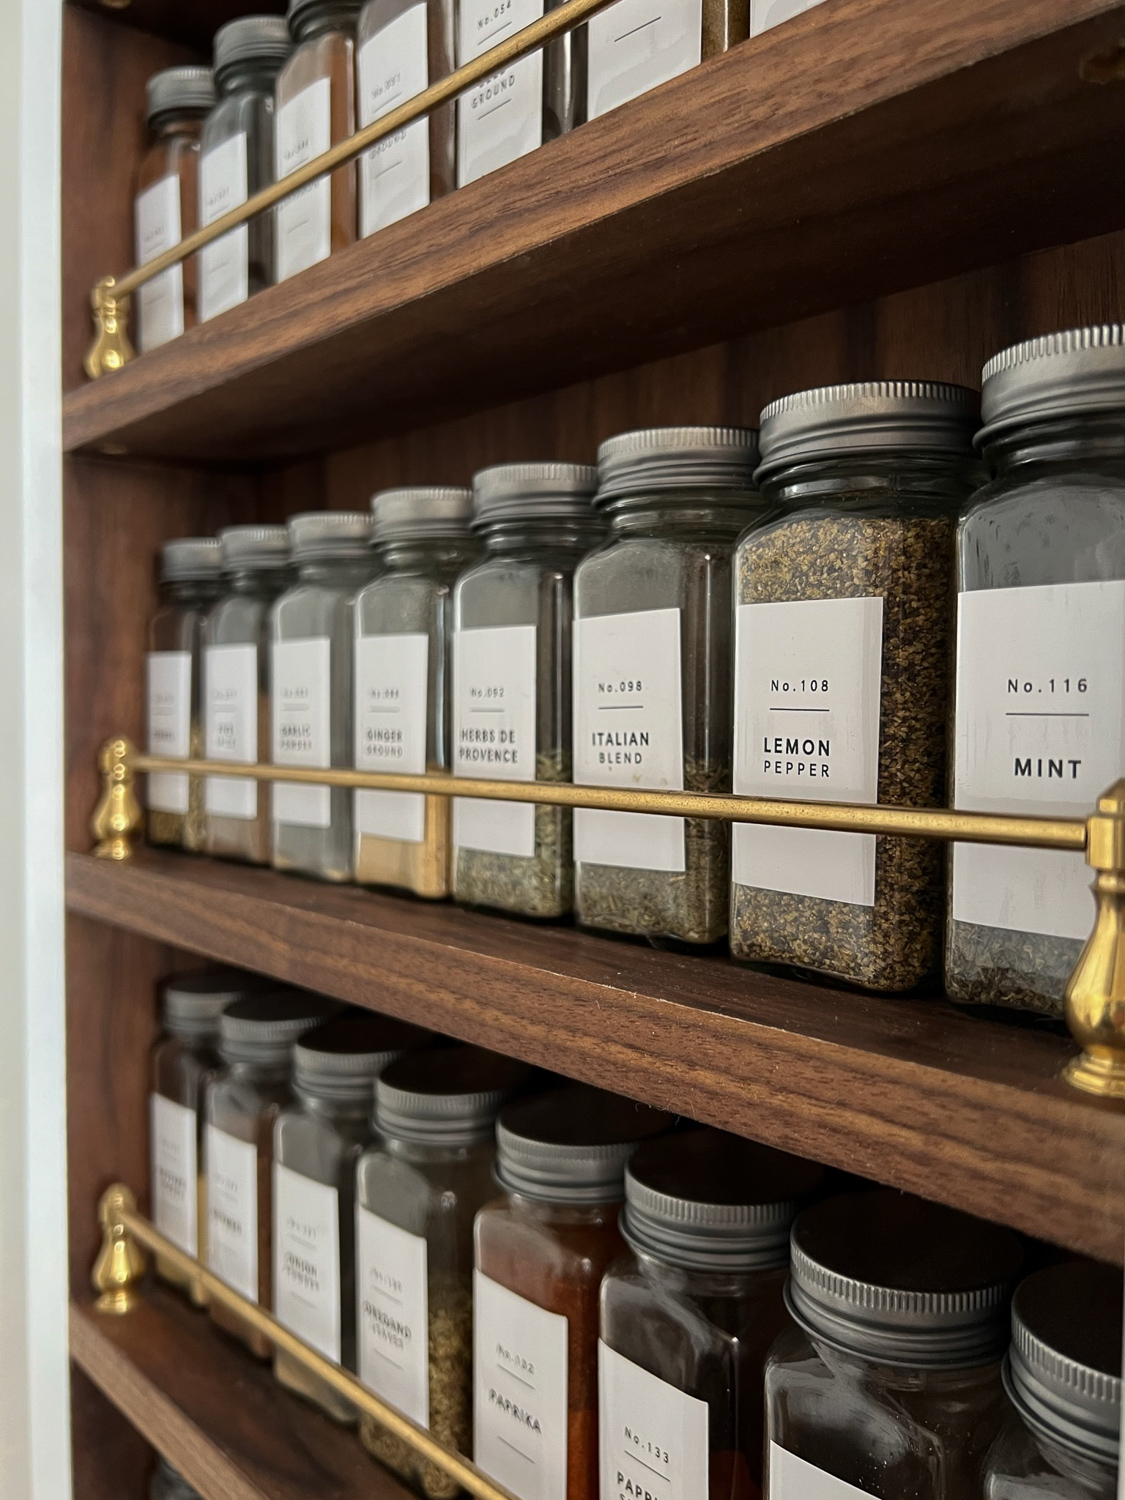
The most asked question I get about my spice rack is where did I get the brass for the rails? They certainly do give the DIY wooden spice rack a unique look. I grabbed those online at this store here.
For my spice rack, I have 5 shelves and so I needed two end pieces for each shelf and one brass rod. The brass rods are easy to cut on any mitre saw to size, so I ordered 5 of the 18″ long rods and cut them to size.
Rods (I bought 5 of the R-1 Size Rod)
End Posts (I bought 10 End Posts, Large Size, W1-B)
Jars:
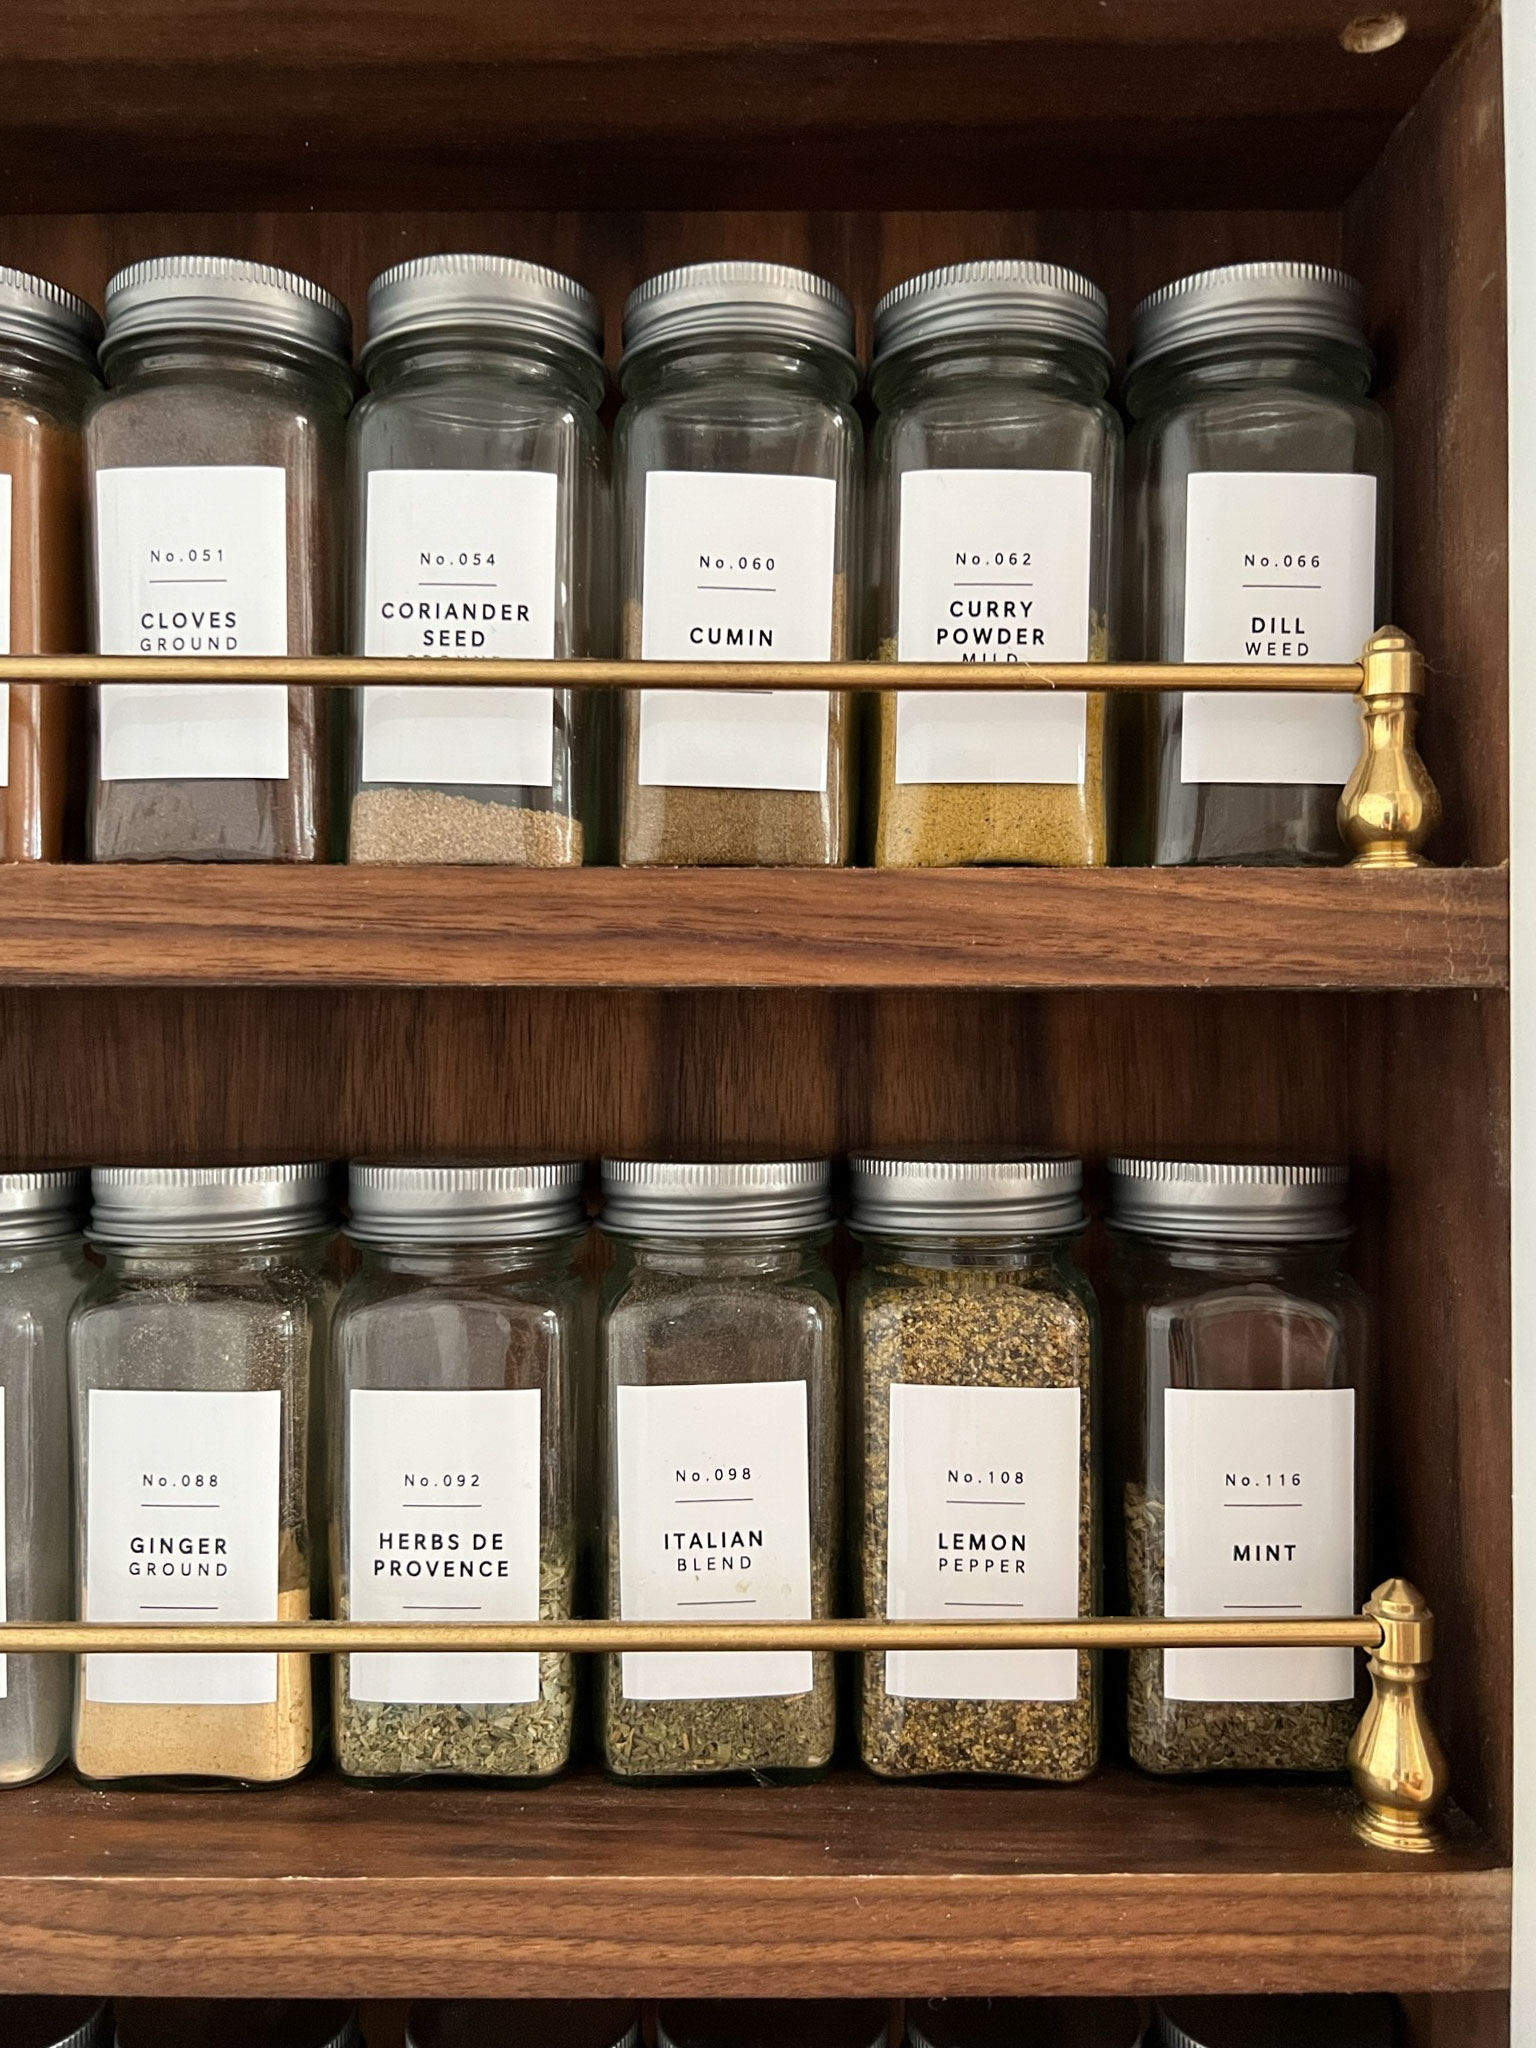
Before we started the DIY spice cabinet, I wanted to make sure it was sized properly to nicely fit small spice jars, so I chose those first. I ordered this set off of Amazon and these spice labels. I really love both, the jars are sturdy and easy to fill, and the labels are vinyl and so they aren’t damaged by water. Once I had the jars, I sized my spice storage rack to fit exactly 8 across and with 5 shelves. If you want a different size for your spice rack, I recommend getting the jars and seeing how many fit on a shelf (with a little wiggle room) and how much space above the spice containers you need to tip the jar and pull it out of the shelf.
If you just want to build one to the exact same dimensions as the one I built, this one works perfectly and is a free plan for the jars I listed above (or any jars of that dimension).

How to Built the Wood and Brass Spice Rack
The first step in creating your DIY wood and brass built-in spice rack is to build a wood box. Here are the steps:
Cut the plywood to size. We cut the plywood on a table saw, but you could also cut it with a circular saw and a guide. You will need the following pieces:
- Back piece – Quantity 1 – 16″ x 30-3/4″
- Side Pieces – Quantity 2 – 30-3/4″ x 2-3/4″
- Shelves and Top/Bottom – Quantity 6 – 14.5″ x 2-3/4″
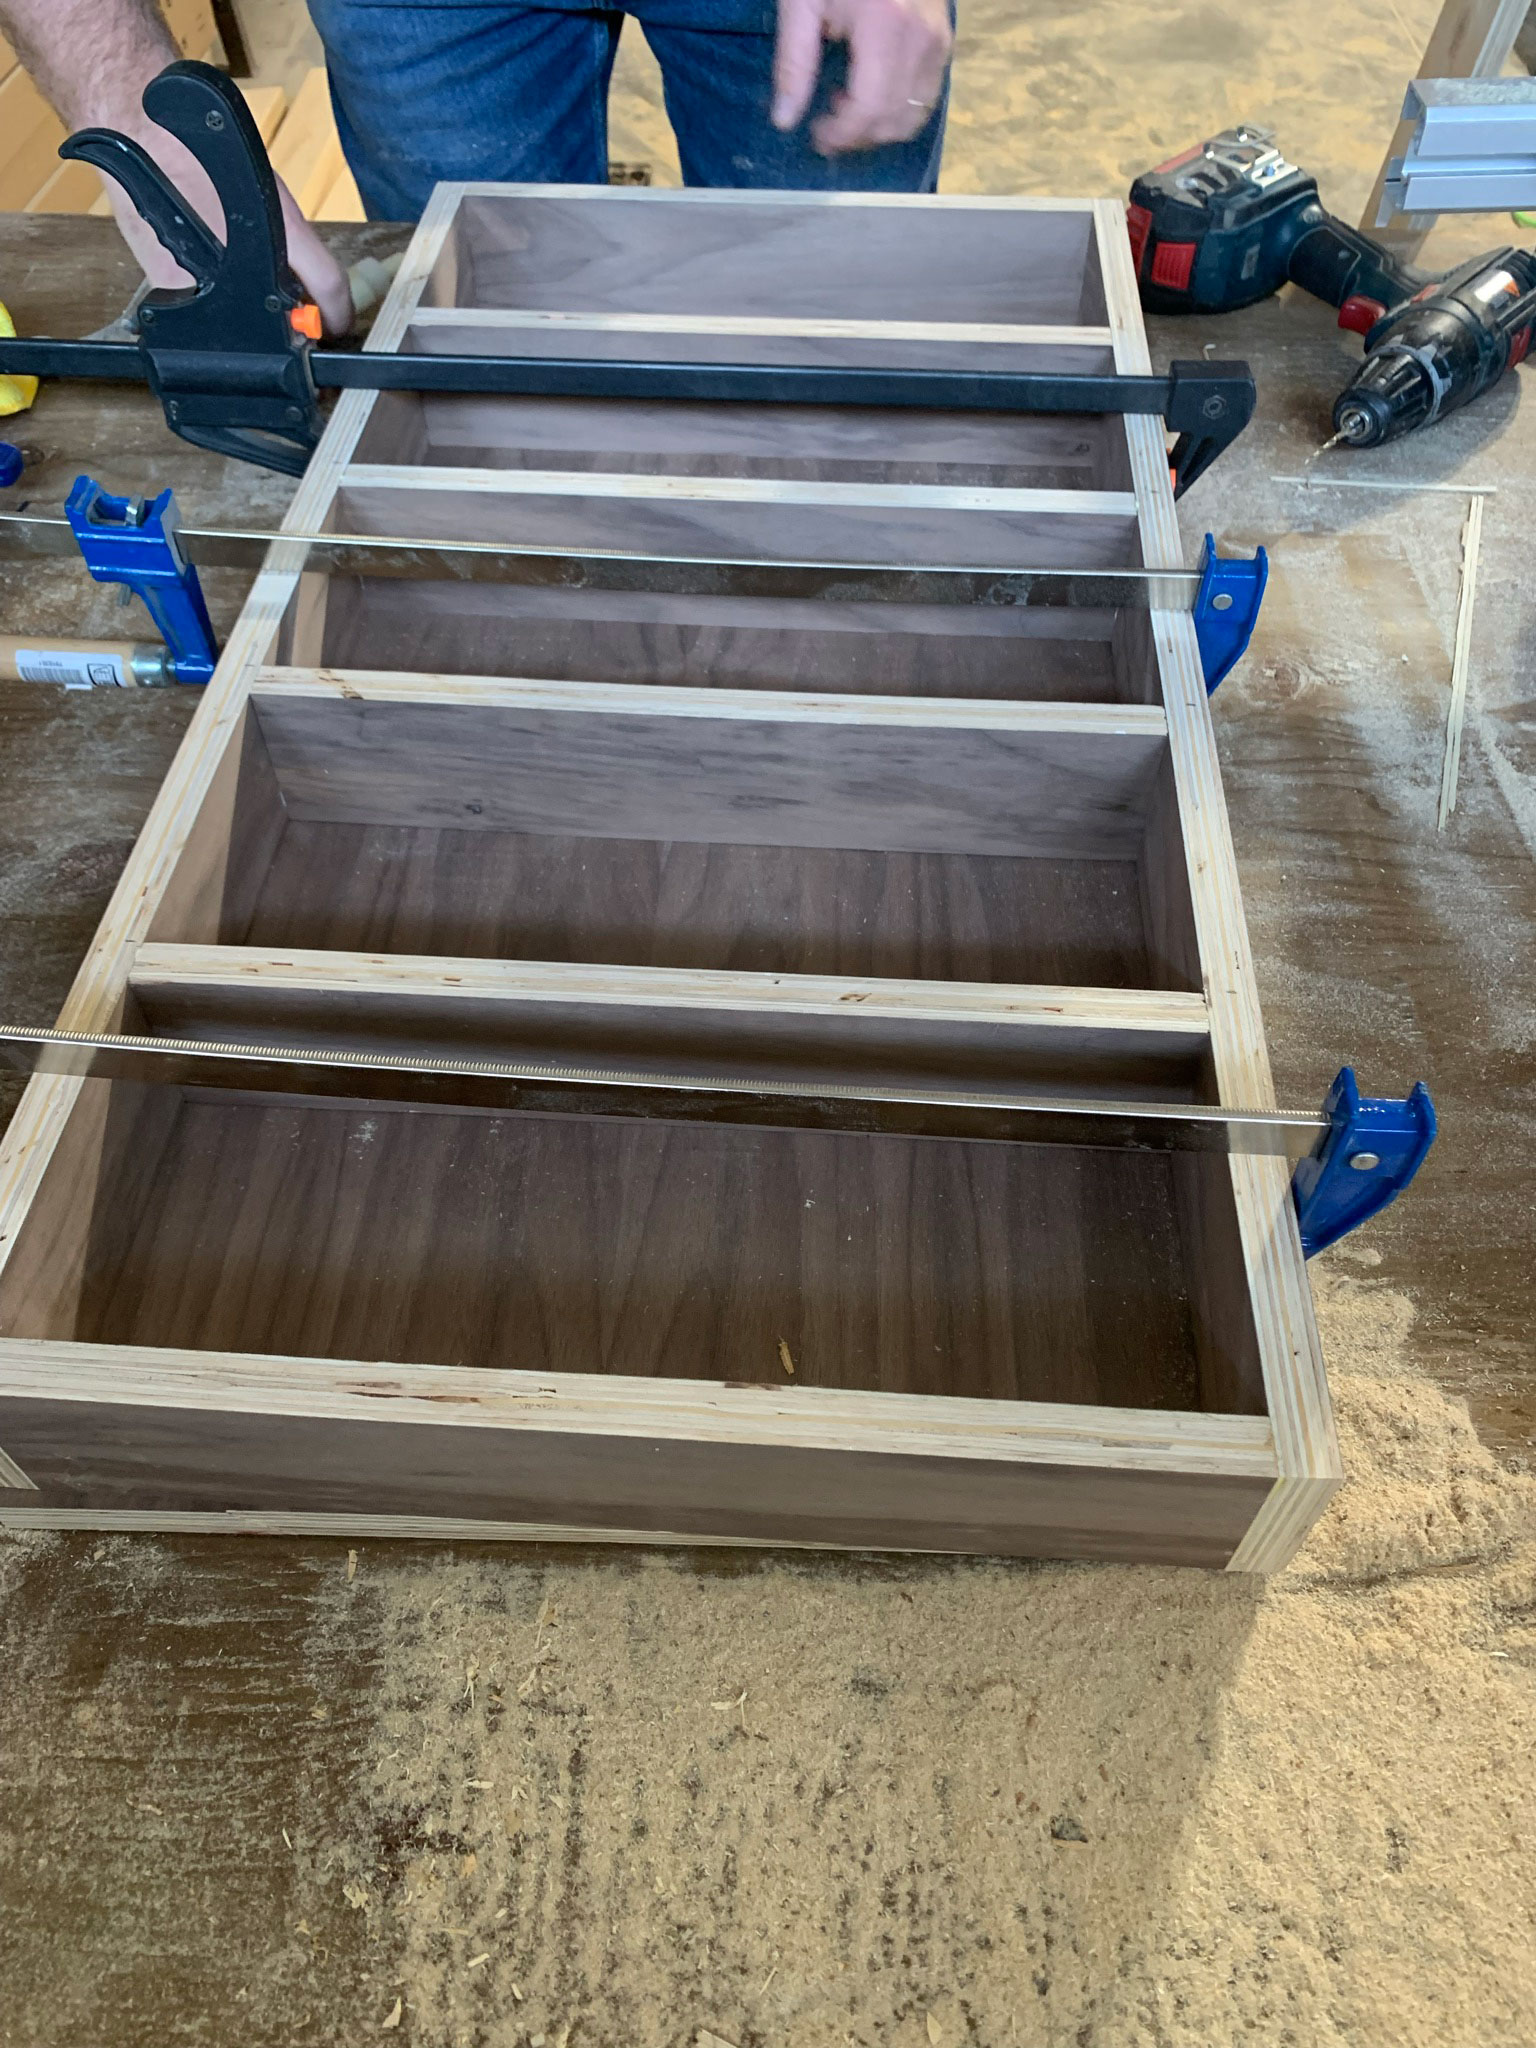
Attach the sides and top/ bottom pieces together by adding some glue to the edges of the sides and top and bottom pieces. Then, add some clamps to hold the pieces together tightly and add a few finish nails at each of the 4 corner connections, being careful to shoot the nails straight so they don’t come out the front finished face.
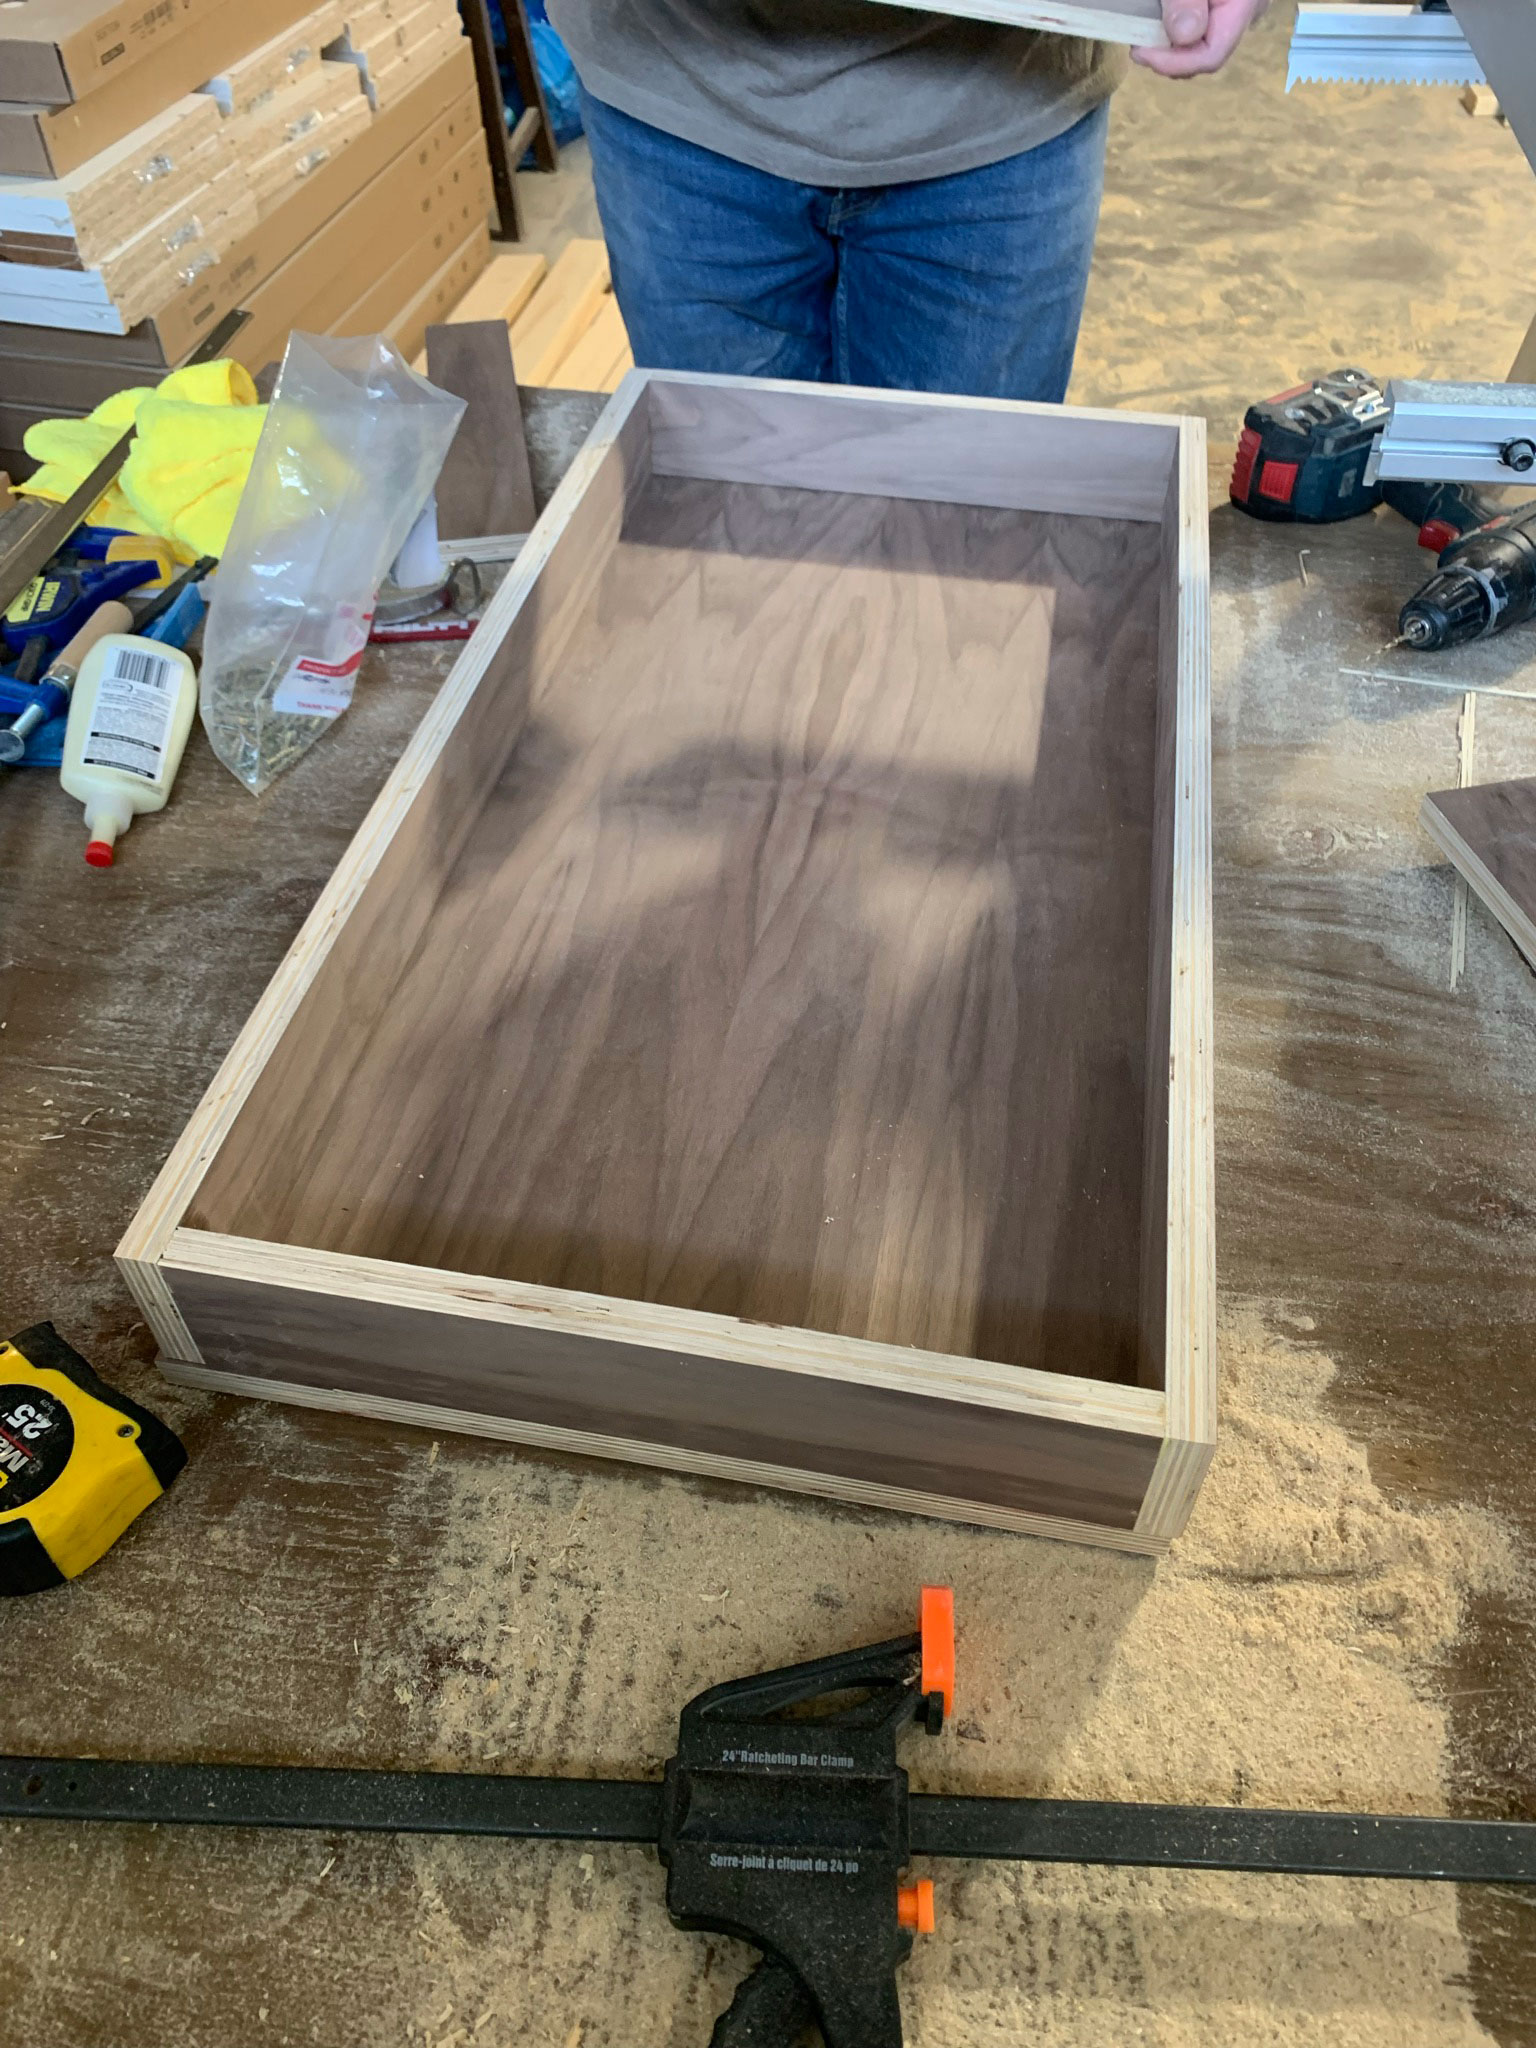
Once the sides and top/bottom are nailed and glued to each other making a wood frame, you can set the back piece on top. After you have added wood glue to the edges where they will contact the back piece, you can clamp that. Lastly, add finish nails to attach the back to the sides and bottom. At this point, you have a shallow box. (Make sure to wipe up any excess glue that seeps out with a wet rag.)
Before you add the shelves, it’s a good idea to drill the holes for the brass rods, as they will be very difficult to drill afterward. We decided where we wanted the posts (we centered our hole 1/2″ from both the front edge of the shelves and the side of the shelf) and marked both sides of one board. Then, we clamped the boards together tightly and drilled through several boards at once in the locations that we marked. This ensures that all the holes are perfectly aligned. We used a drill bit that is big enough to accommodate the screws that come with the brass posts.
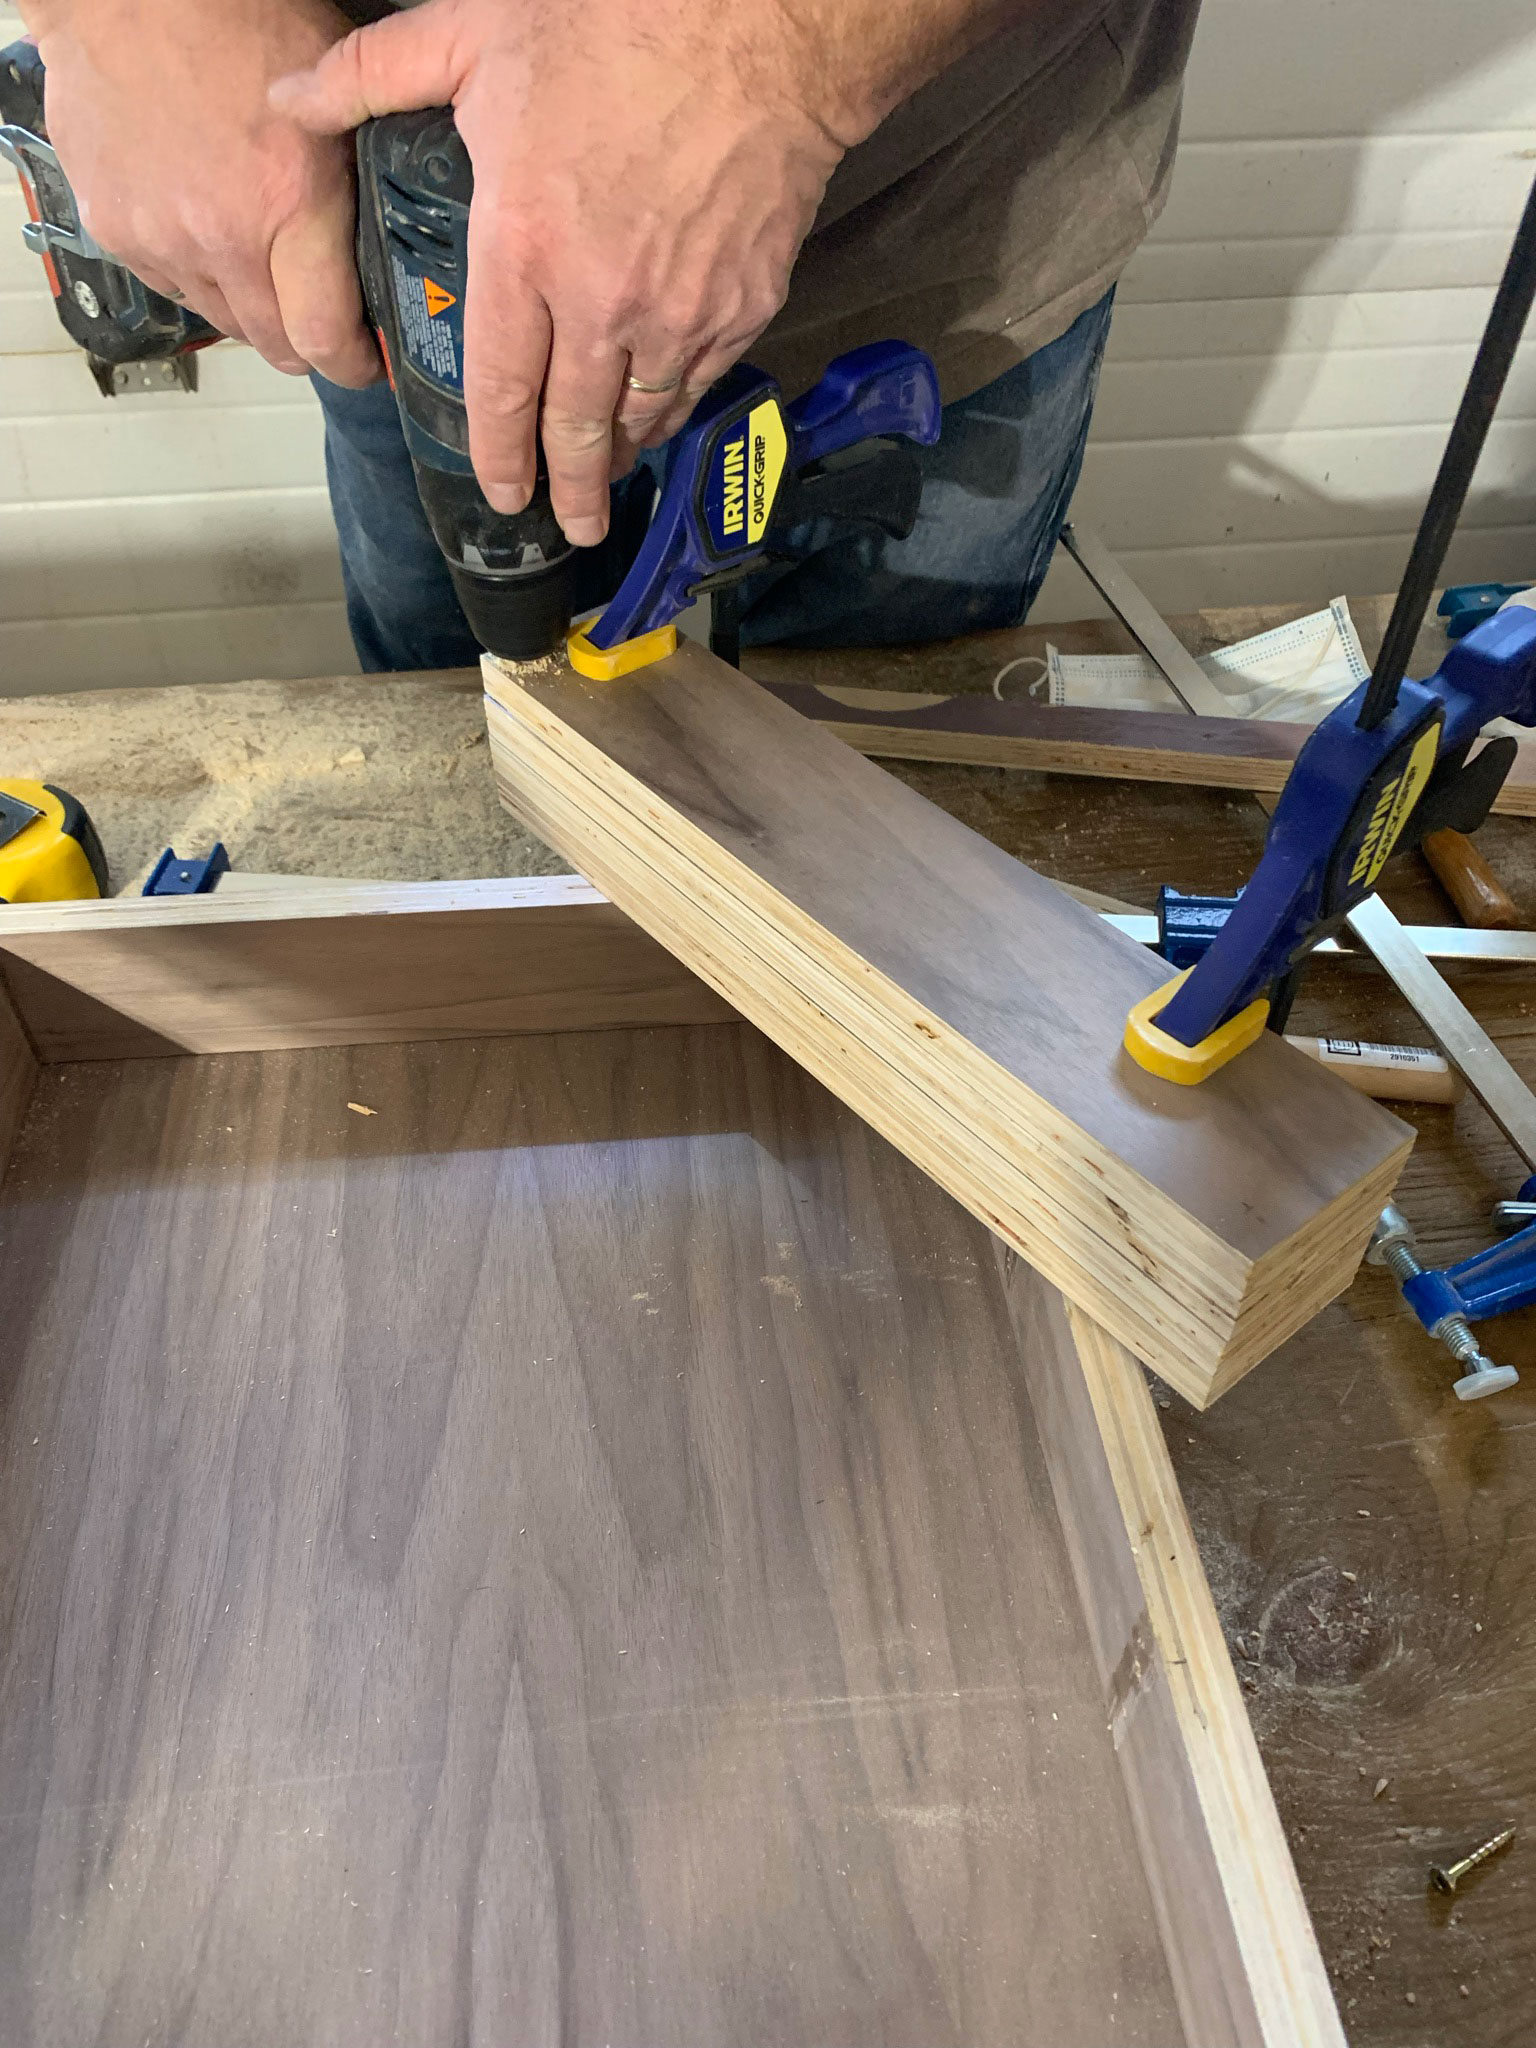
Once the holes were drilled, we realized that the screws that came with the brass posts were not long enough to go through the wood into the posts. Rather than getting longer screws, we drilled out a small area for the screw head to inset into. We used a bit big enough to fit the screw heads and we added a little painter’s tape onto a bit to mark how deep to drill the holes (so we didn’t go too far). I prefer how this turned out as the screw heads are not really visible in the finished shelf, so I recommend doing this.

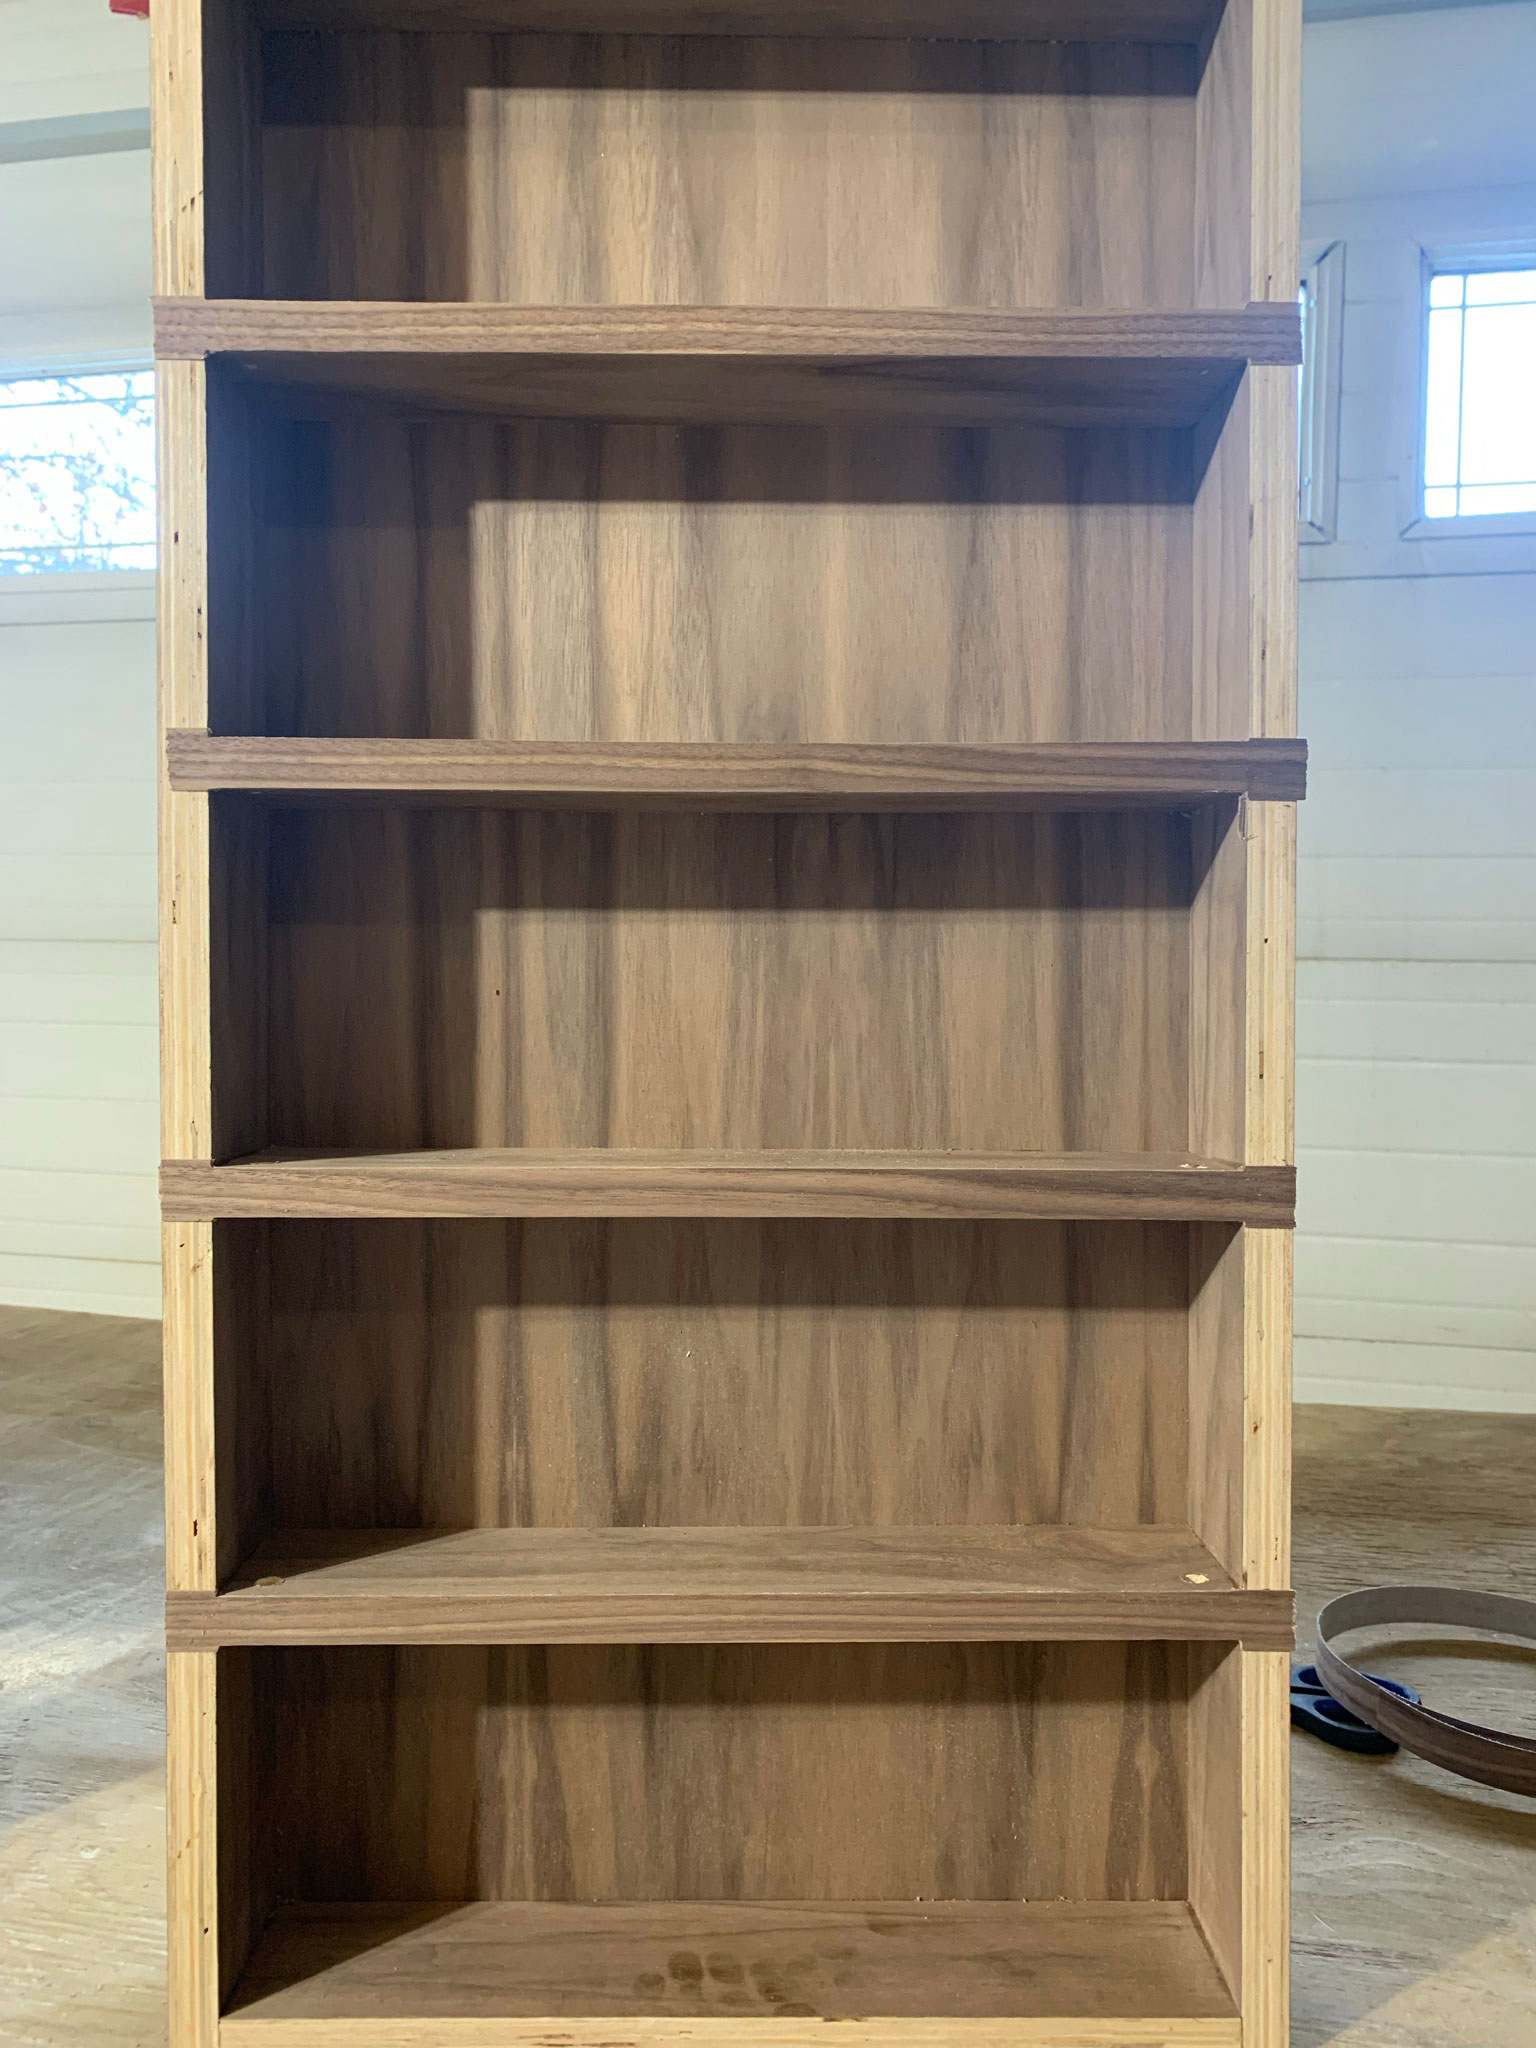
Mark the location of the shelves making sure they are all evenly spaced. My shelves are 5-1/4″ apart – I made up a little diagram to illustrate the spacing.

Add glue to the sides and back of each shelf and slide each one into position, using the marks you made as a reference. Add clamps and nail each of the sides in place. Once again, be very careful that the nails are centred on the plywood and go in very straight so you don’t shoot a nail out of any finished faces.
Let the glue dry and leave the clamps in place overnight.
How to Add the Veneer to the Edges of the DIY Wood and Brass Spice Rack
I have never done veneer before so I watched a few youtube videos to see how it was done. There are special tools you can buy to add veneer, but I didn’t want to buy any more tools so I decided to see if I could do this using what I already had – a household iron, a metal file, and some sandpaper. I tried the veneer on a scrap piece of wood and I recommend trying that as practice if it’s your first-ever time using veneer edge banding.
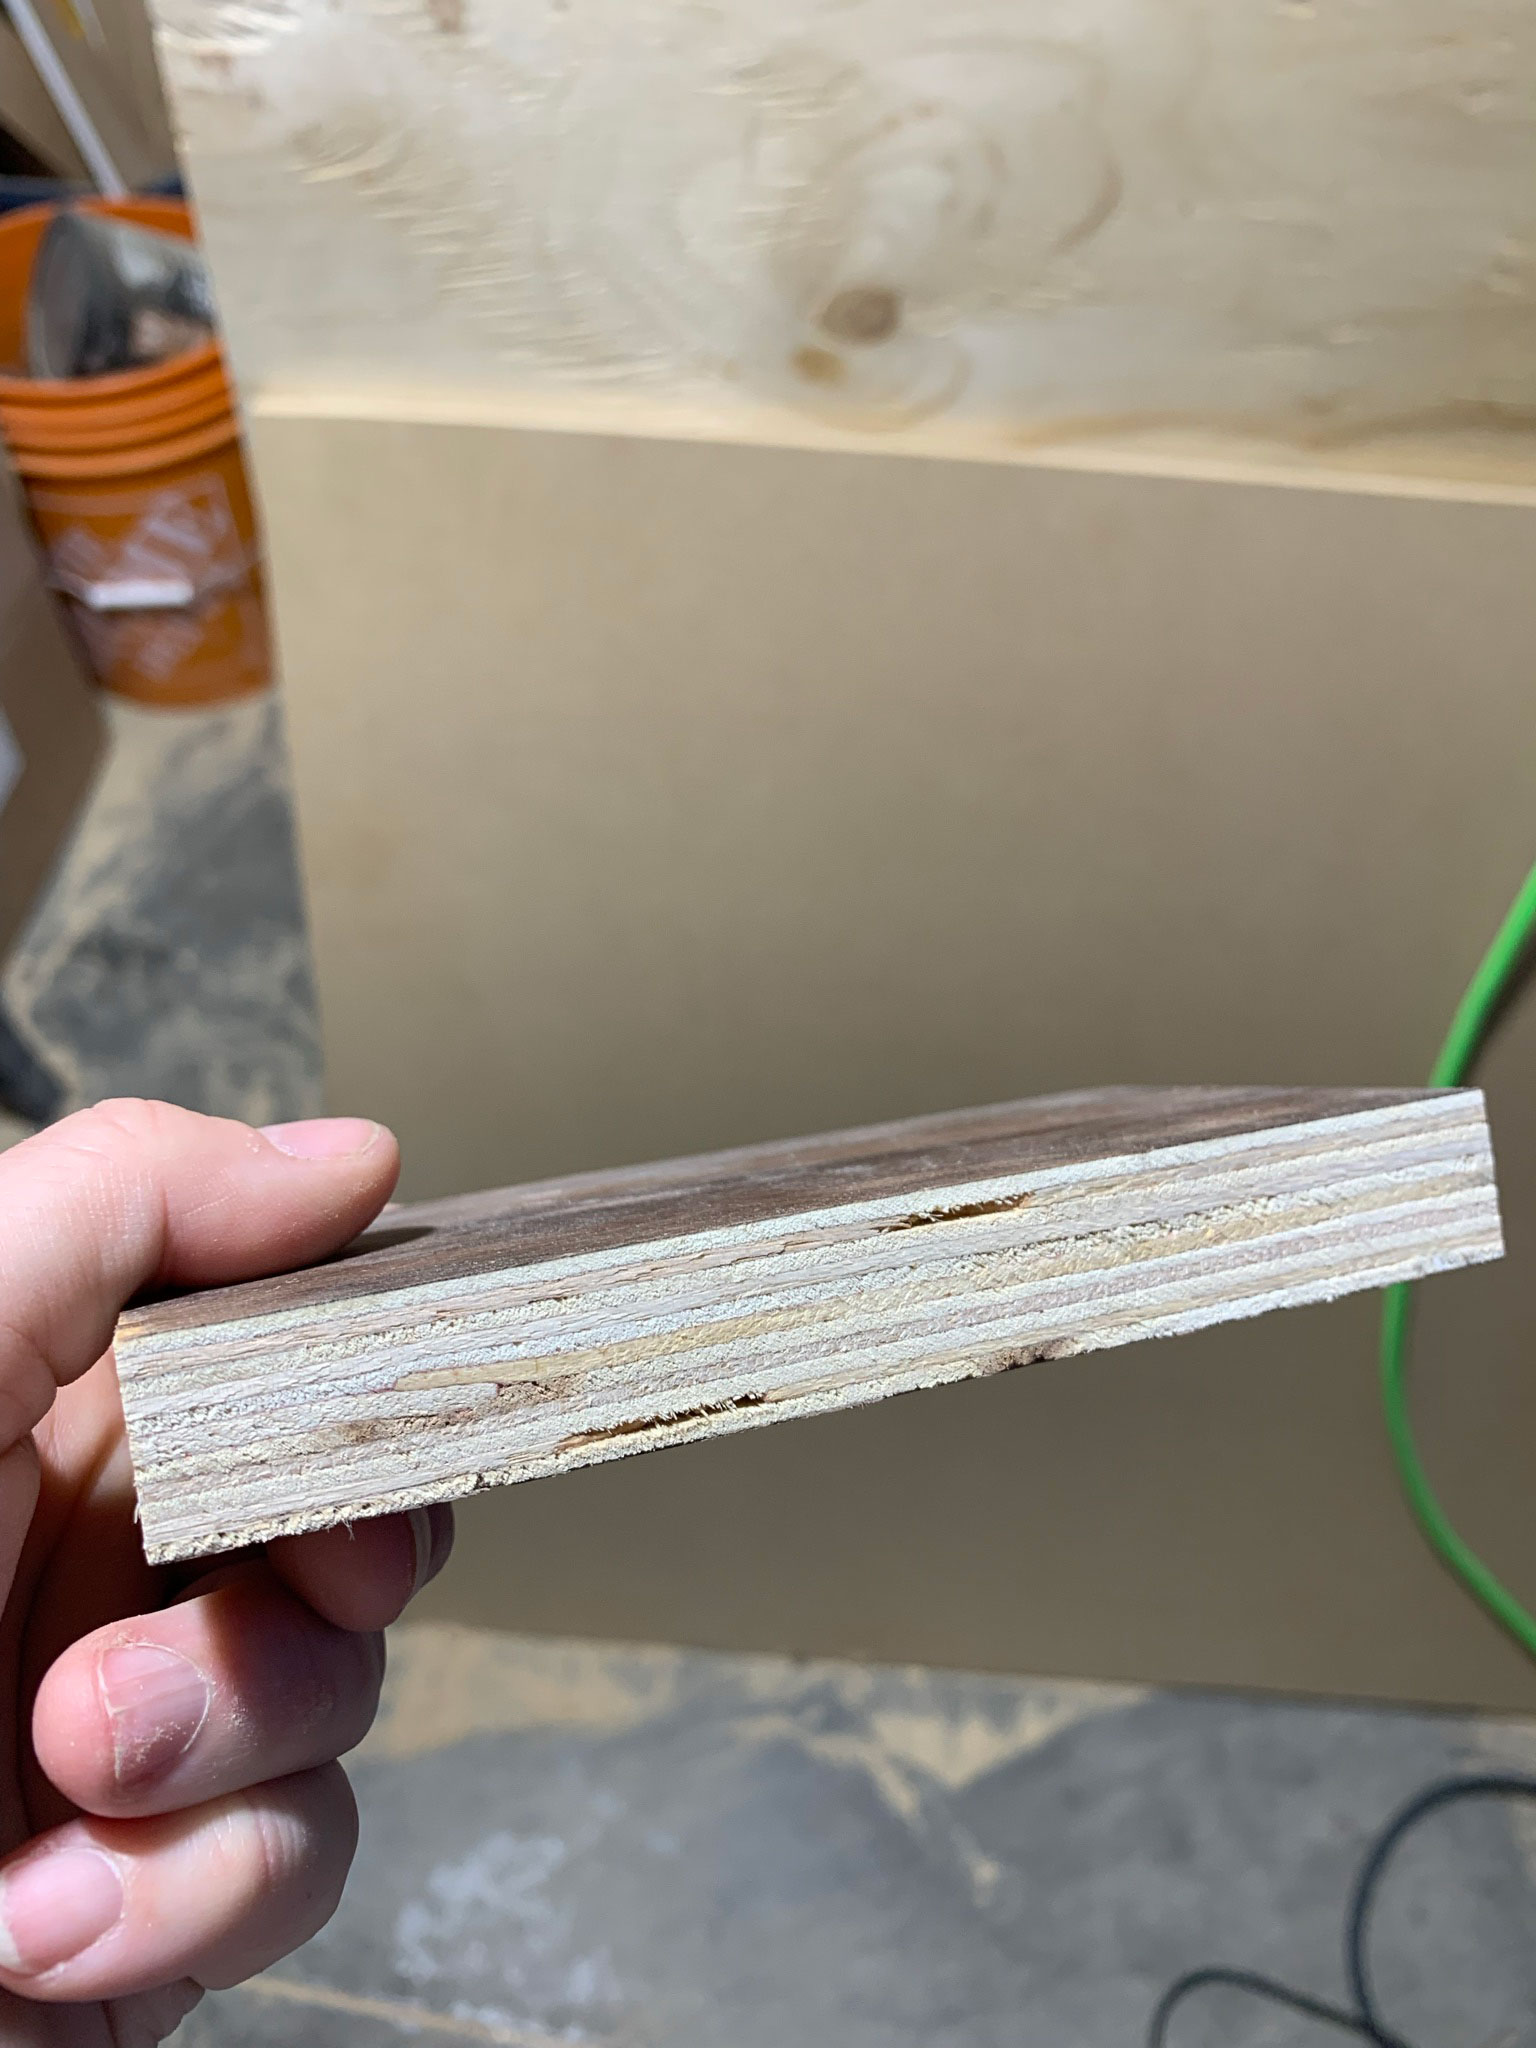
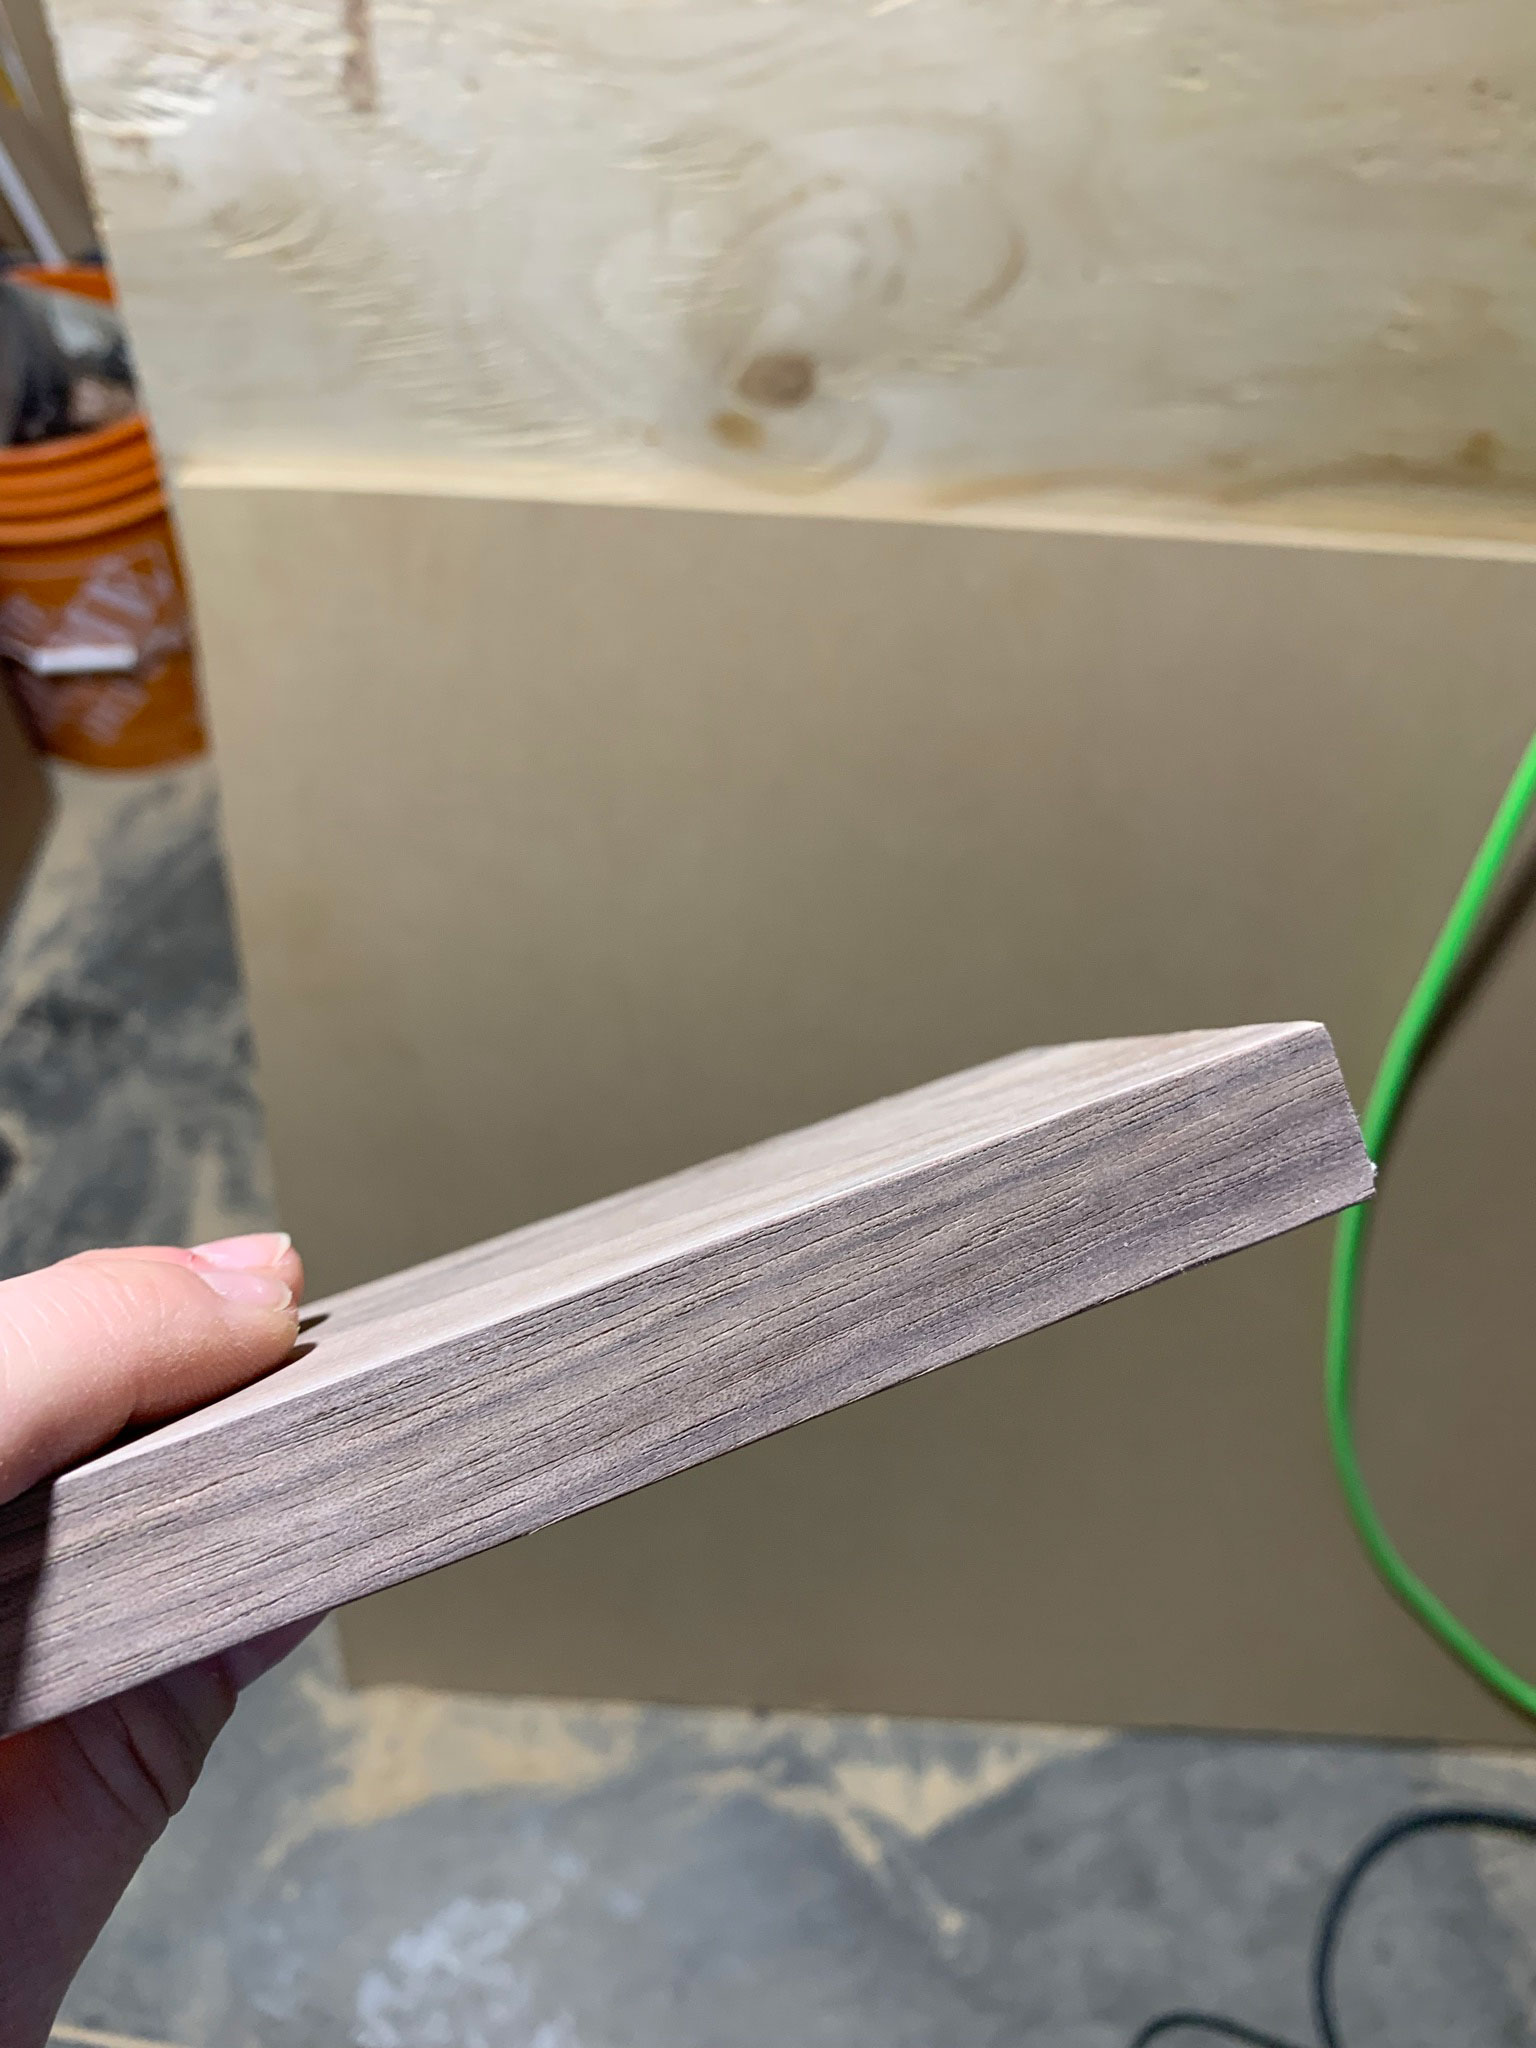
I added veneer to the shelf fronts only, as the top and sides I had plans to cover with MDF (more on that later!) One thing to note: the veneer you buy should be wider than the plywood thickness and you place it so it overlaps on both sides. It is tempting to try to line it up on one side but you will end up with a much better end product if you overlap it on both sides. It’s much easier to sand the sides off perfectly than to iron it on perfectly. I bought mine at a local lumber yard, but it was similar to this.
- Start by cutting a piece of veneer banding just a little longer than the shelf pieces (veneer cuts easily with a utility knife or scissors). Sit it in place on the shelf, and use a household iron to press it in place. Run the iron along the veneer for a while (a minute or two) until the glue is activated and it seems to be stuck. While the glue is still hot, take a small block of wood and press it hard along the veneer, running it down the veneer a few times to really make sure the glue has well adhered.
- Let it cool for a few minutes.
- Take a file and start at one side, using a downward motion, and file the excess off one side of the veneer. The downward motion is so that you don’t accidentally lift the veneer up again off the edge. The veneer will start to “curl” off and you will be able to work your way all the way down the side. The edge might be slightly rough still at this point, but getting the excess off is the first step. Once you get that off, you may wish to do it one more time if there are a few raggedy bits.
- Sand the edge lightly with high grit sandpaper. This will get off any excess glue or stubborn bits that were missed when filing.
- Repeat the veneer process for both sides of each shelf.
- Once the shelf is fully veneered, that is a good time to stain and finish the wood. I used Rubio Monocoat which is a single-step stain/ protectant, but you can stain using any wood stain you like and top with a clear coat.
I made this quick 15-second video to show you how I added the veneer if you are more of a visual learner!
Inserting the DIY Walnut and Brass Shelf into the Wall and Covering the sides with MDF
I’m not going to lie, this part was the trickiest part and the part we actually re-did a few times before we were happy. We also sort of made it up as we went along and I feel like there must have been a better way to do this, but this worked out for us, eventually!
You really do need to be extra careful with your measurements and cuts in this step because if your wall opening doesn’t line up well with the edges of the spice rack, it’s not going to look very professional.
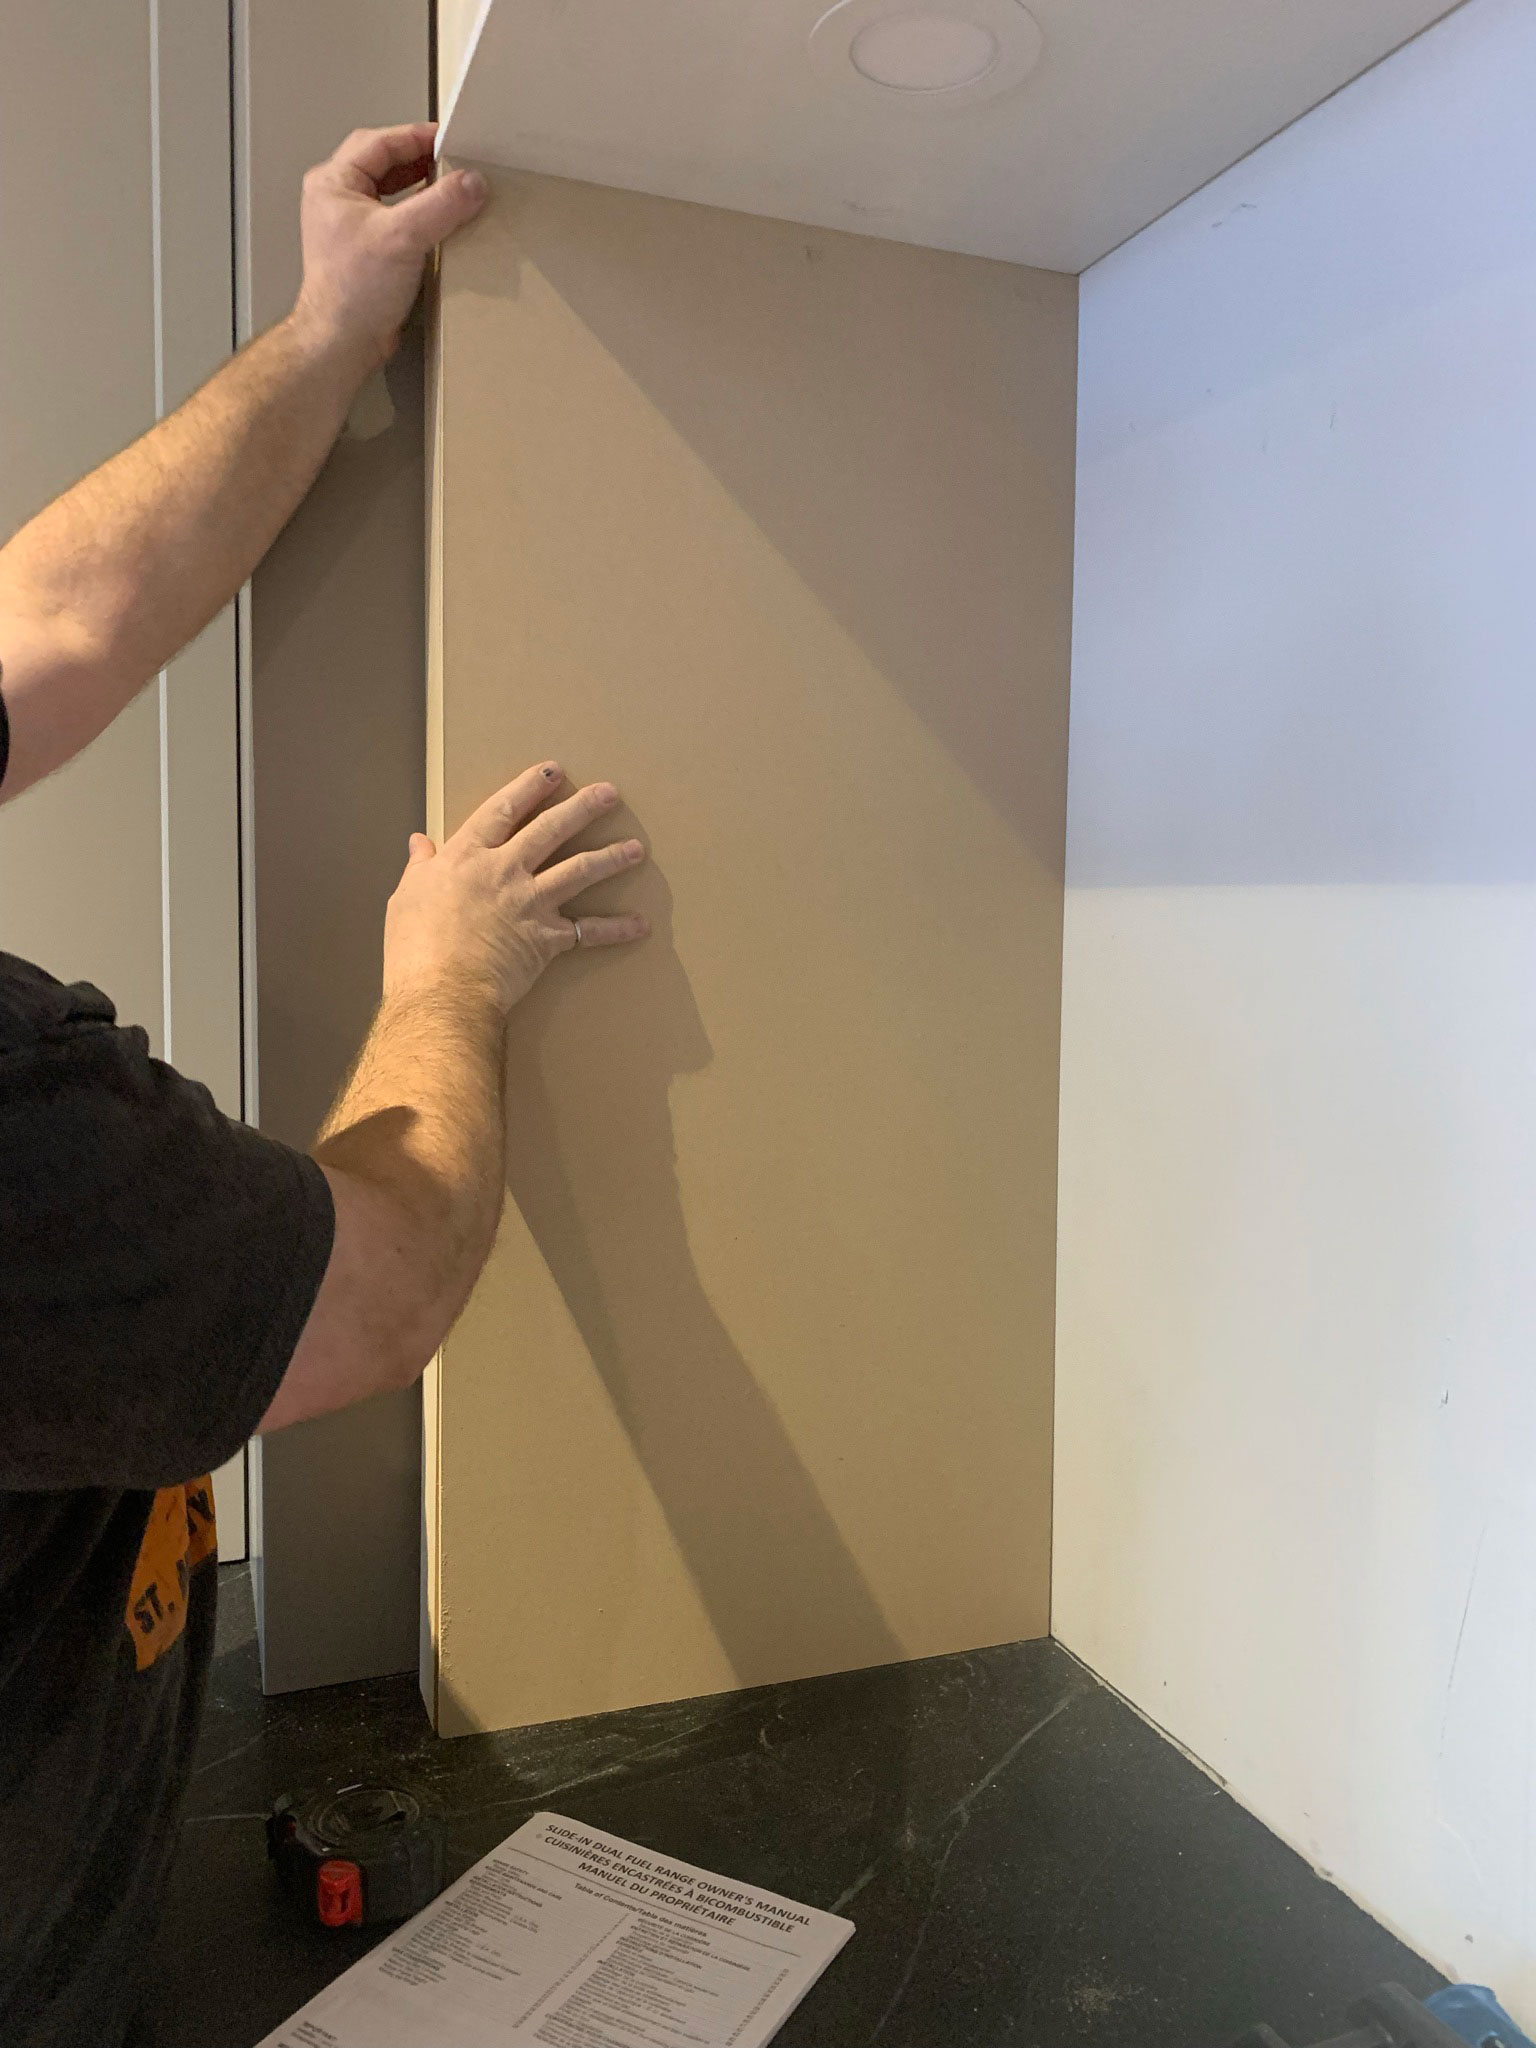
A word about the location of our spice rack – we have this set into the side of the oven “nook” which we built entirely out of MDF, so we used MDF to “face” the shelf. That meant, we needed to cut a piece of MDF to fit this side of the nook perfectly which also had to have the cut-out for the shelf located perfectly. The MDF would cover the raw edges of the plywood box and would be painted. We used ½” MDF for this.
If you don’t have a router or want an easier way to finish this shelf off, I gave some ideas for that at the end of this post!
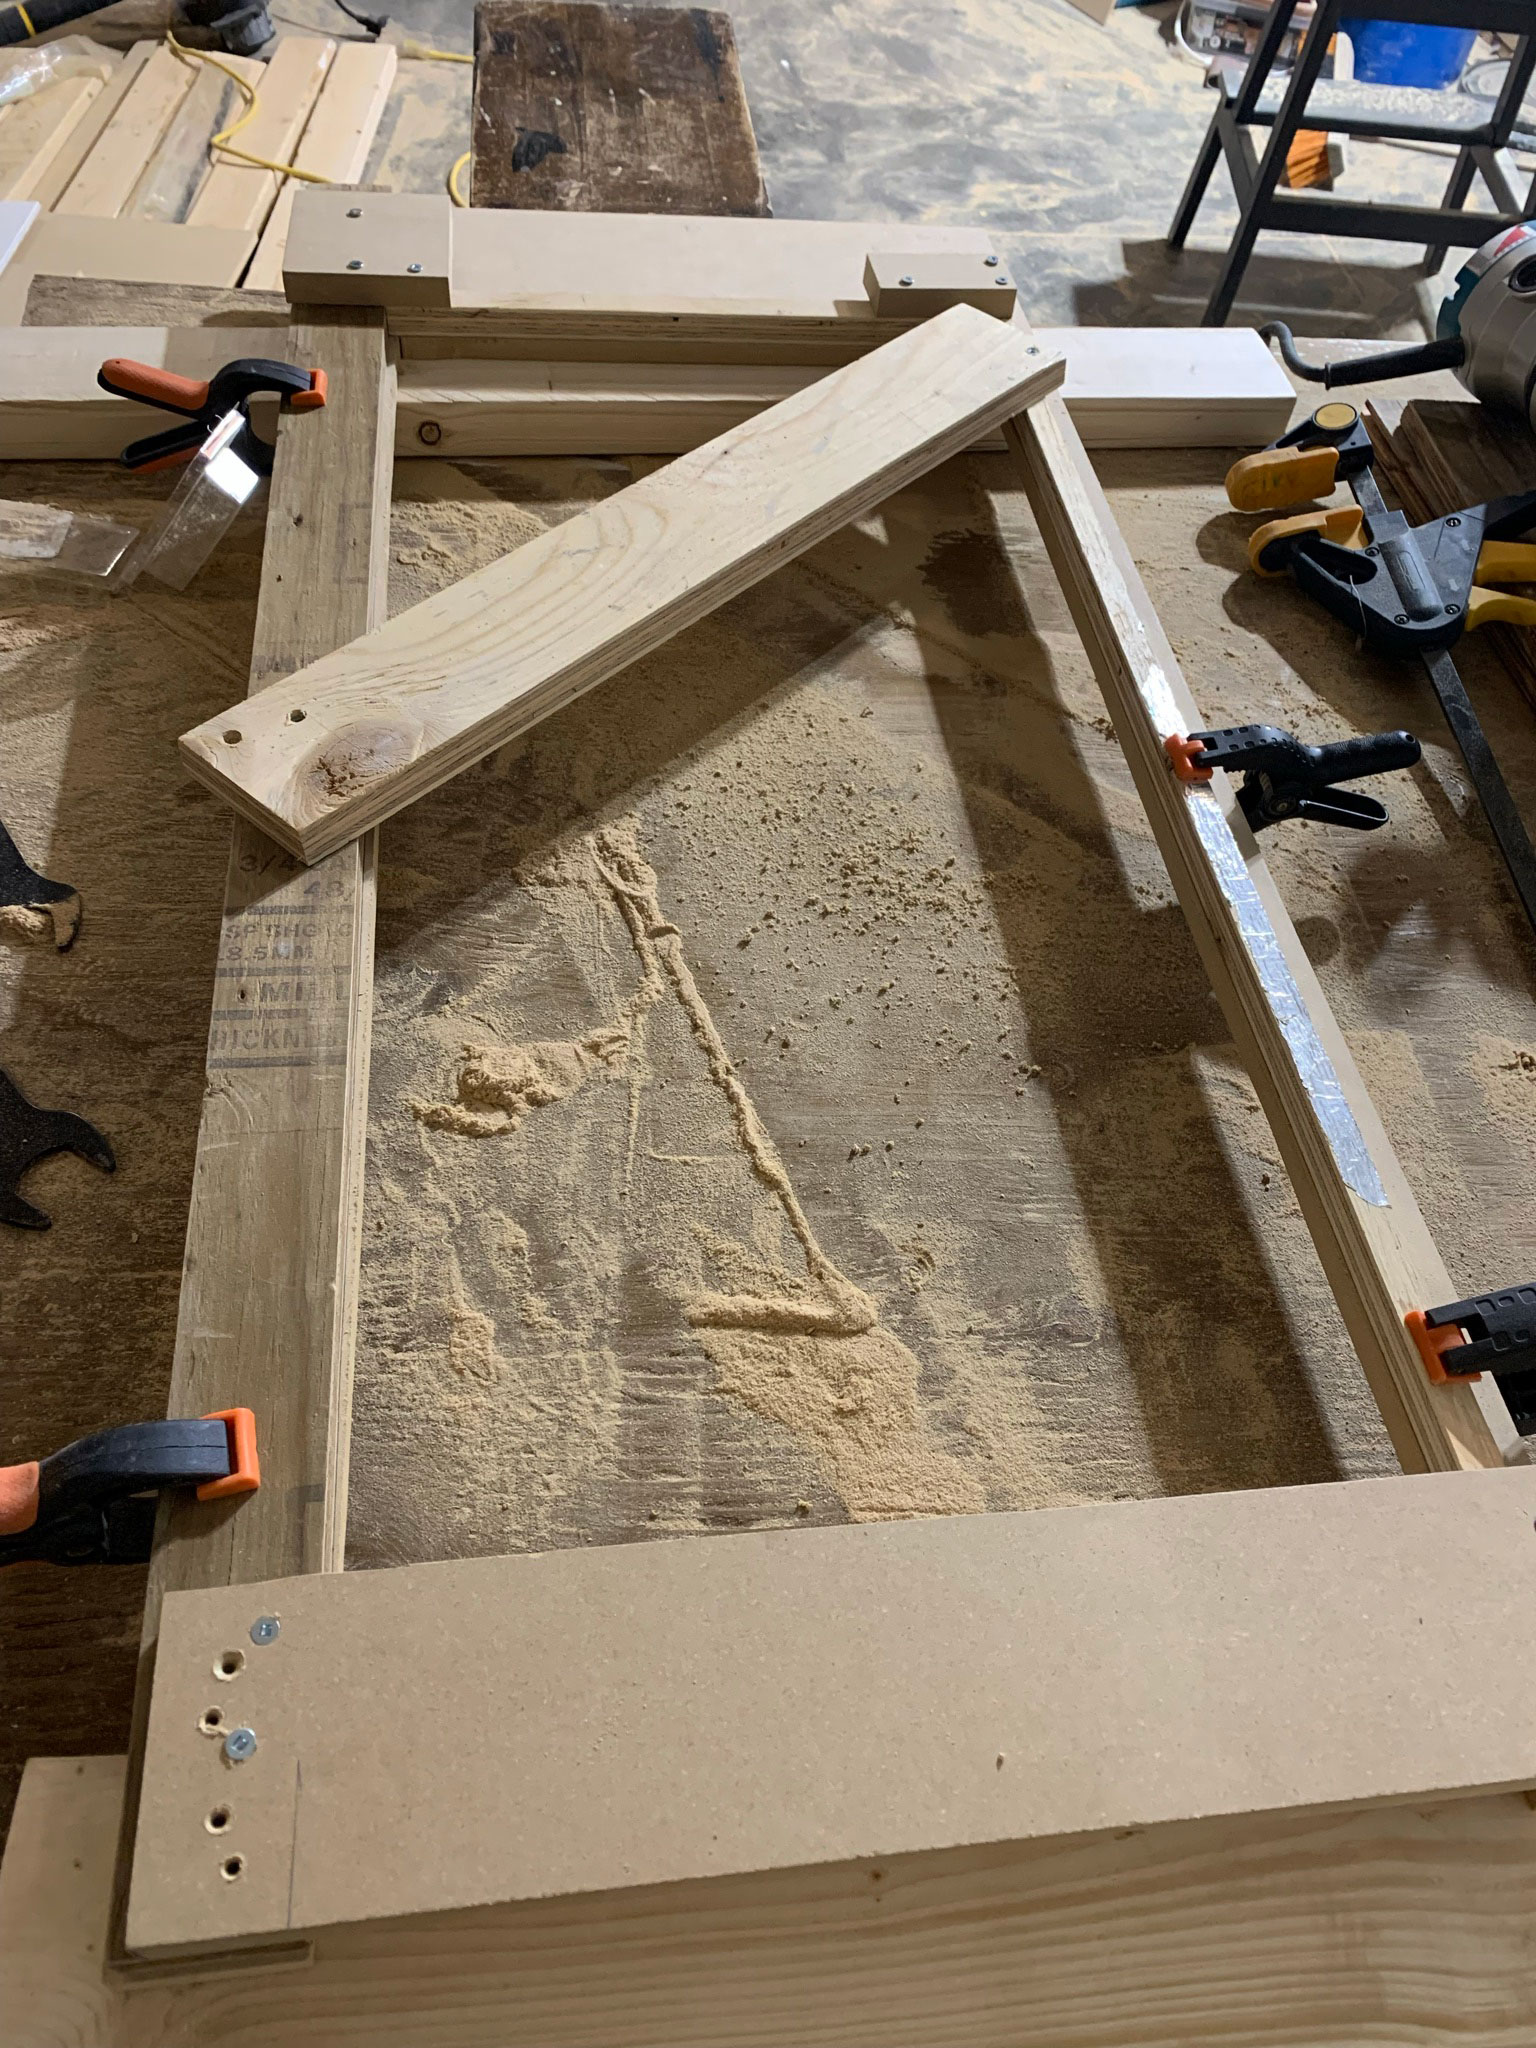
Making a jig to cut the MDF “Face” of the Spice Rack
The first thing we did, before we installed the spice rack into the wall, was to make a template for our router. What we needed was a frame for our router to glide along to cut out the hole for the spice box exactly, and we found that if we took scrap pieces of wood and placed them perfectly onto the edge of the spice rack we built, we could manipulate them into position. We used other scrap pieces at each of the corners and as diagonals to hold the makeshift “frame” together. Once we had this frame built , we set it aside and installed the spice rack into the wall.
Locating the Spice Rack in the Wall
We started by framing out the location of the shelf where we wanted it. We built it such that the top of it would line up with the top of the walnut box we made for the opposite side of the range nook, and so that there would be adequate space below it to add a plug-in (I tried to locate all of the plug ins such that they were somewhat camouflaged!) We added some framing so that the spice rack would sit where we needed it, and secured that in place by screwing through the framing using screws that were long enough to go right through the framing but only partially penetrate the plywood. You could also use some finish nails for this, as long as you make sure they aren’t too long and won’t go through the finished wood surfaces. The front of the shelf is flush with the framing if you are going to finish it the way we did, with MDF overlapping the shelf sides.
If you are inserting this into existing framing, you will likely need to expose the inside of the wall and reframe a little to make this fit in between the existing studs.
Cutting the MDF to cover the edges of the spice rack
We then cut a piece of MDF to cover this whole side wall of our range. We did this just by carefully measuring the space. Although it was very close to square, it wasn’t perfect so we took measurements at a few locations to trace onto a piece of MDF to cut out to make sure we didn’t have any gaps. This is a very finicky task, luckily MDF is relatively cheap because we did this a few times before we were happy with the fit. You could also use a piece of cardboard to make a template, that might have made it a little easier!
Once you have a piece of MDF cut to fit the space, you will need to measure and mark out exactly where the spice box is on this “wall” so you know where to cut the opening. Measure 10 times, cut once!
Before we cut the hole out with the router in the MDF, we rough cut the hole out using a jigsaw so we could tell if the hole was in the correct location and to make it easier to see what we were doing when we were using the router. After marking the location of the spice rack onto the MDF we cut about 1” inside that line using a jigsaw to create the rough hole.
We used the frame we made using the scrap wood and placed it on the bottom of the MDF piece in the location that we marked. We clamped this to the MDF in the correct location using lots of clamps. You can see in the photo below we have the MDF that we are trimming with the router on the top, and the jig we made clamped to it on the bottom. We use a bottom-bearing flush-trim bit for our router. Bottom-bearing means that the bit on the router has a little wheel on the bottom of it that rides along the template and the blade is above that, cutting the piece out.
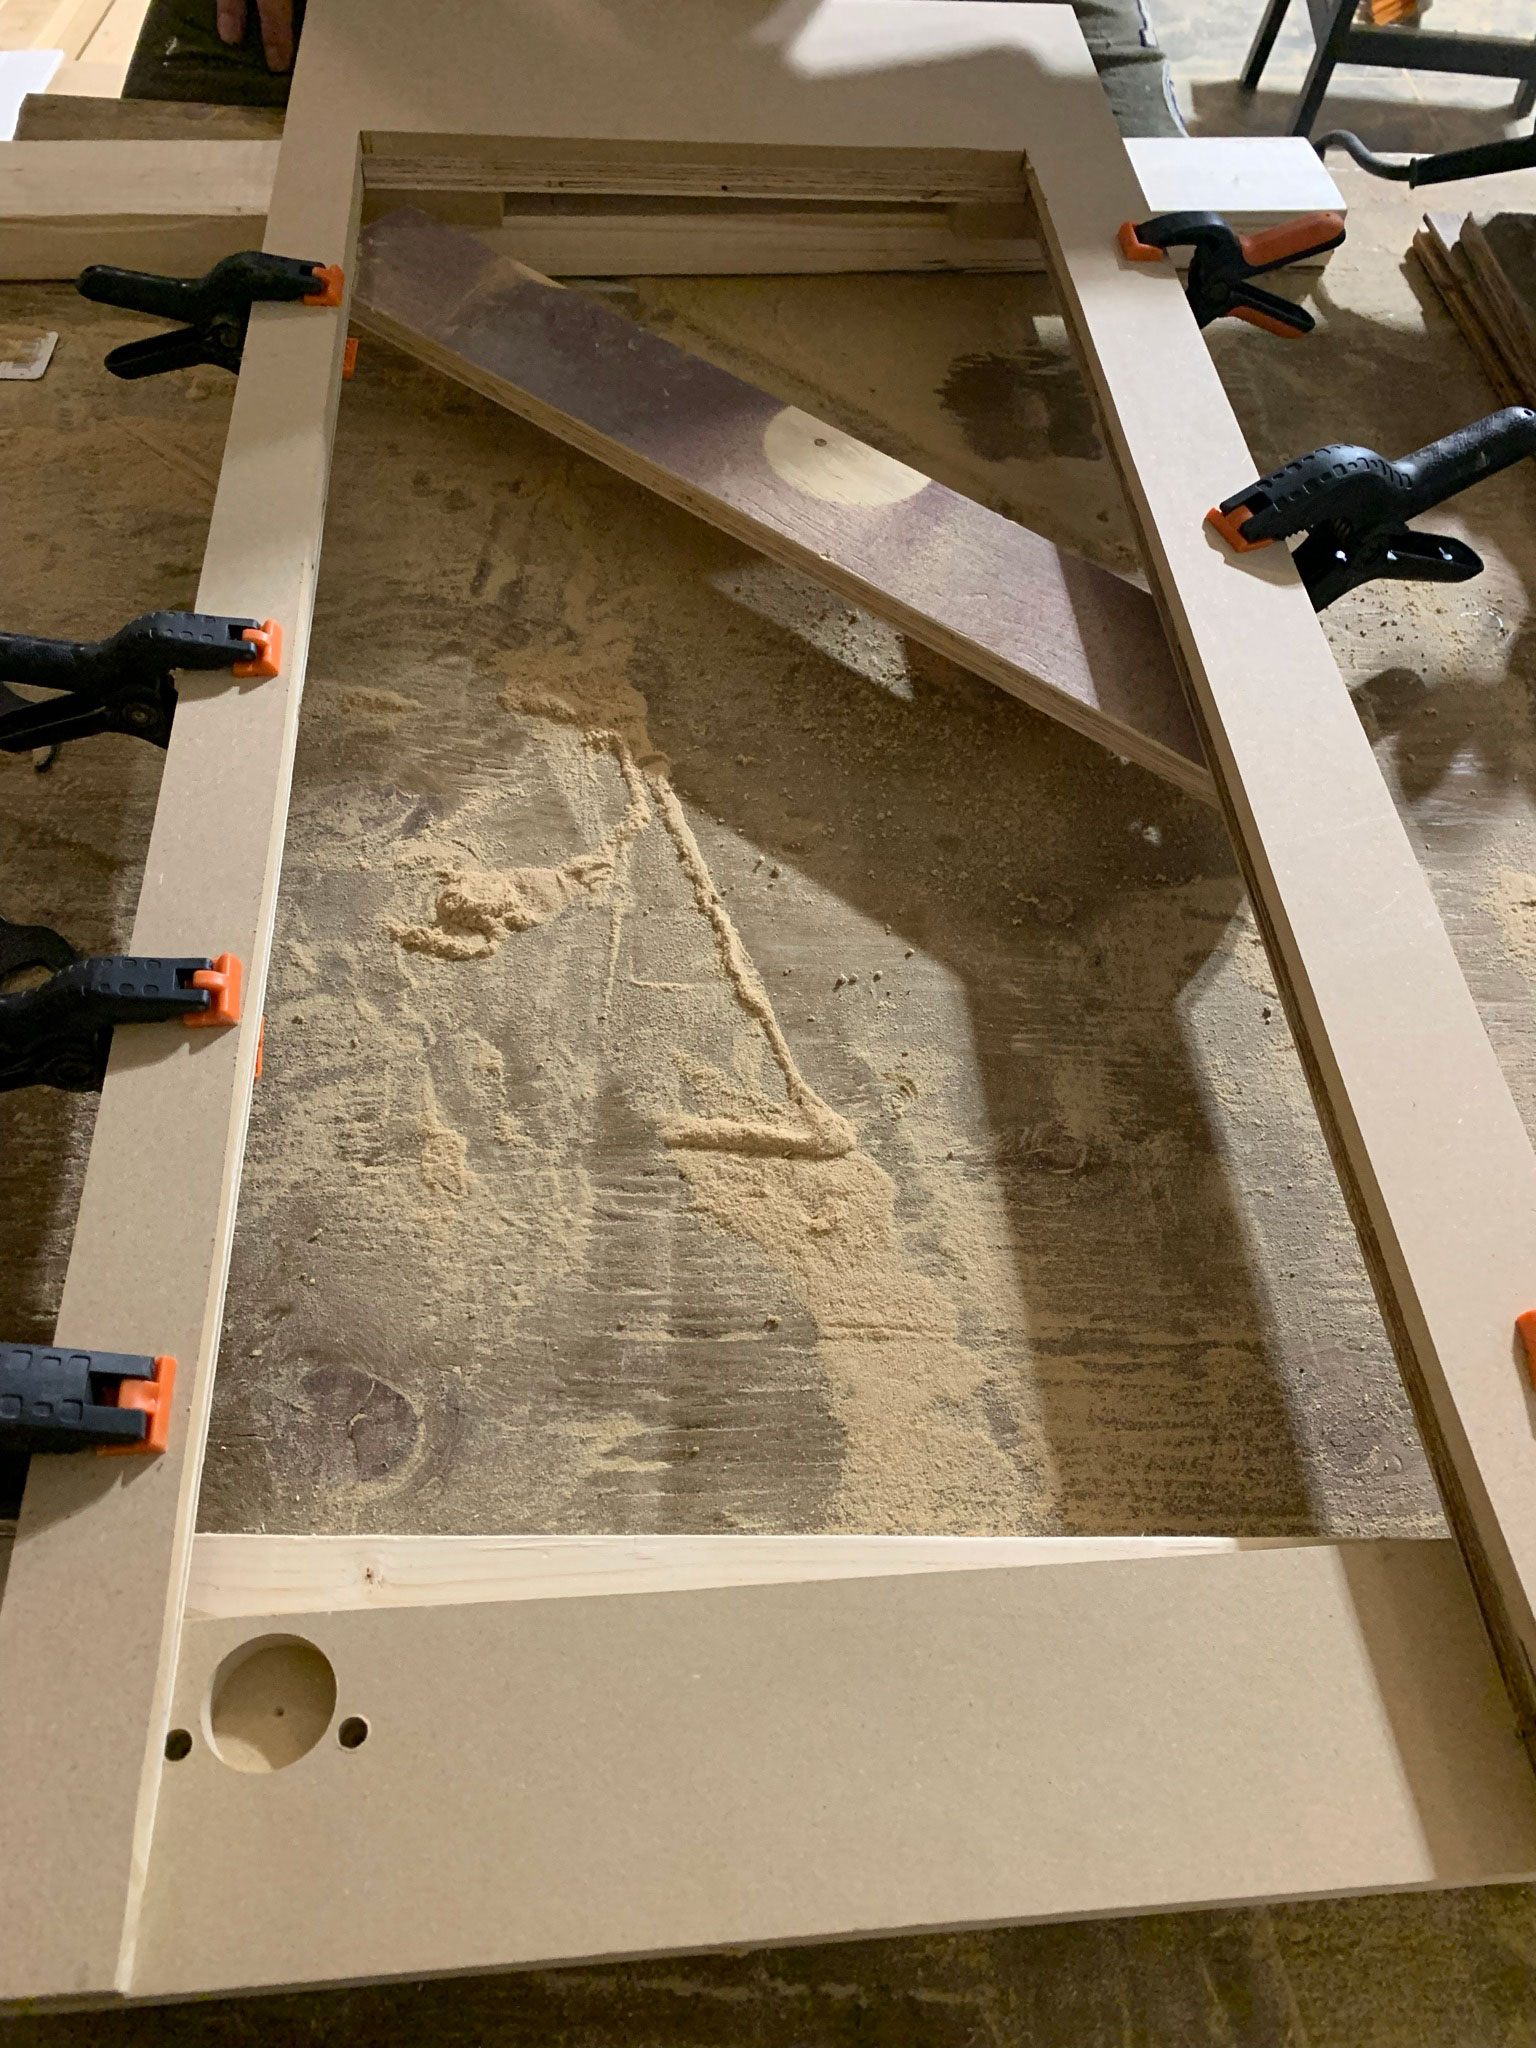
We set the depth of the router such that the wheel rode along the guide below it and the flush cutting blade cut through the MDF. (This is a super dusty process, wear a mask! You will still likely have brown snot for a few days!)
Don’t be frustrated if this doesn’t work the first time, like I said, it’s very finicky to get right and we did it a few times until we were happy with the fit, making adjustments and learning as we went. If you use MDF to frame it out as we did, it’s not that expensive to try again with a new piece of MDF, especially if it’s a small piece like ours was.
Finishing the MDF and installing it over the DIY Wood and Brass Spice Rack
Once the piece was cut out, we sanded the opening just a little to smooth out the cut edges. Then we sealed the whole thing with shellac-based primer, sprayed it with two coats of Benjamin Moore Advance, and allowed it to dry before installing.

To install the MDF, we just used finishing nails to secure the framing onto the wood shelf. We filled the tiny finish nail holes with filler and touched them up with paint.
Installing the Brass Rods into the DIY Wood and Brass Spice Rack
- Cut the brass bars to length using any saw, we cut them on our mitre saw (brass is pretty soft and cuts easily). Mine are 13-1/2″ “ long.
- Slide two posts onto the brass bars and set them into position, and add the screws into the holes you pre-drilled when making the shelves
- Repeat for all the shelves.
- Fill your bottles with spices, add the labels and you have finished your DIY wood and brass spice rack!
FAQ’s:
Is there an easy way to build this and still have it look built in?
I would say that framing the edges with a bit of trim would have been a lot easier than trying to make a perfect opening cut in the MDF and would still look pretty good. You could even make it look more decorative by choosing something sort of fancy to trim it out.
Keep in mind that if you are going to trim it out instead of facing it with MDF as I did, you should put the front edges of your shelf flush with the wall surface (for example, drywall) so it will need to sit proud of the framing in the wall by the thickness of your drywall (or whatever wall material) so the trim can overlap both the drywall and the edge of the shelf.
Do I have to use MDF to build this in?
No! If you want to insert this into a normal (drywalled) wall, I would suggest that you use trim to cover the edges of the drywall and the edge of the shelf, just like framing out a window.
Do I have to build this in?
No! You can use this entire tutorial to make a hanging spice rack for the kitchen wall which is overall a pretty simple project. Just add veneer banding to the outer edges of the box as well as the shelf fronts to finish those off, or substitute the plywood for solid wood and skip the veneer process altogether. Then, just hang it on your wall!
Does it get dusty?
Yes, a little! When I clean I run my cloth along the shelves in front of the bottles, once in a while I take them down and wipe all the shelves and bottles. It does not bother me to do that occasionally, but if that is something that would bother you then an open shelf like this might not be for you!
Do you like having spice shelves next to your stove?
I love having my spices there! It is such easy access for whatever I’m cooking. The spice jar labels I have are also numbered in alphabetical order so spices are easy to find any particular spice. (Until I alphabetized my spices I didn’t realize how many spices start with C!) I honestly love it so much and am so happy we added this, I have zero regrets. It has helped so much in terms of having an organized kitchen and saved me cabinet space to boot!
Is this big enough for all your spices?
Yes, this spice rack fits all the collection of spices I use regularly but of course, we all cook differently and perhaps you have more (or less) than I do! There are 40 spices on this shelf. You can adjust the size of the shelf to fit more or less or put lesser-used ones in your pantry, depending on your spice organization needs. To me this is the perfect spice storage solution and it doesn’t take up a lot of space. It could even be something that was made to hang on the inside of a pantry door, great for small kitchens.
I hope this tutorial was helpful for you to make your own DIY spice rack! If you have any questions at all, please leave a comment and I will do my best to clarify!
You might also like:
- A DIY Kitchen with Ikea Cabinets – the Kitchen Reveal!
- DIY Pull-Out Tray for Appliances (Using a Stone Remnant!)
- How to Cut Your Own Octagon and Dot Tile
- The Kitchen Plan!
- How to Make Your Refrigerator Look Built-In
- How to Customize the Width of an Ikea Cabinet
- How to Design and Install Cabinet Toe Kicks for Your Kitchen
Amazing! Did you oil or poly the finished wood surfaces as all?
Thanks Larissa! Yes I did, I used the all-in-one product called Rubio Monocoat which is a waterproof matte sealer.
I’m speechless. This is truly lovely, creative & useful! Great tutorial too.
Thank you so much Bonnie!
Hello! So gorgeous!! Did you get the antique brass or polished brass? Appears to be polished but wanted to see!
Hi Sarah! I got the polished brass. And thank you!
Another idea for extra spice storage would be to make the box the depth of the alcove, and make the spice rack double-sided to form a door to that box (like the second pic here but without the door: https://www.cwponline.com/cabinets/storage-solutions/34/spice-it-up). This would be useful for any spare spices or any that were in ugly packing that you didn’t want to decant; just hide the spare/mismatched ones on the reverse rack. Alternatively, for anyone who preferred not to have the spices on display and the associated cleaning, keep the door and store all the spices behind it (which would increase their longevity. as spices last better when kept cool and dark).
Given the apparent depth of your alcove, there would likely be enough room to add more shelves to the back wall of the box, or maybe even hooks for utensils, to free up even more drawer space, and use the alcove space to its full capacity.