How to Hang String Lights in the Yard (Without Trees!)
Spring is upon us and with that, the outdoor projects begin! To kick off the summer season, I wanted to start with a quick and easy project by adding some outdoor string lights to our backyard firepit area. However, we don’t have any trees! We figured out a quick and easy way to hang string lights in the backyard, without trees!
This was a very easy and quick project, we did it in one day! What I liked about it was that it’s not permanent, either. You can easily take this down or move it around if you want to move the light strands to a different location. Let’s get into it!
This post may contain affiliate links. That means if you purchase anything from these links I earn a small commission, at no extra cost to you! This helps support my blog, so thank you!
But First We Plan
You want to start this project with a layout of your backyard. I started out by making a bit of a plan for how we wanted our string lights to go. We wanted it around the fire pit area but not too close so they risk being damaged by fire. We decided to string our lights in a circle around our outdoor space.
If you have any anchor points that you want to use to string the lights to that are already in the yard (fence posts, the house, a deck railing, a tree), take note of their locations and be sure to include that in your plan.
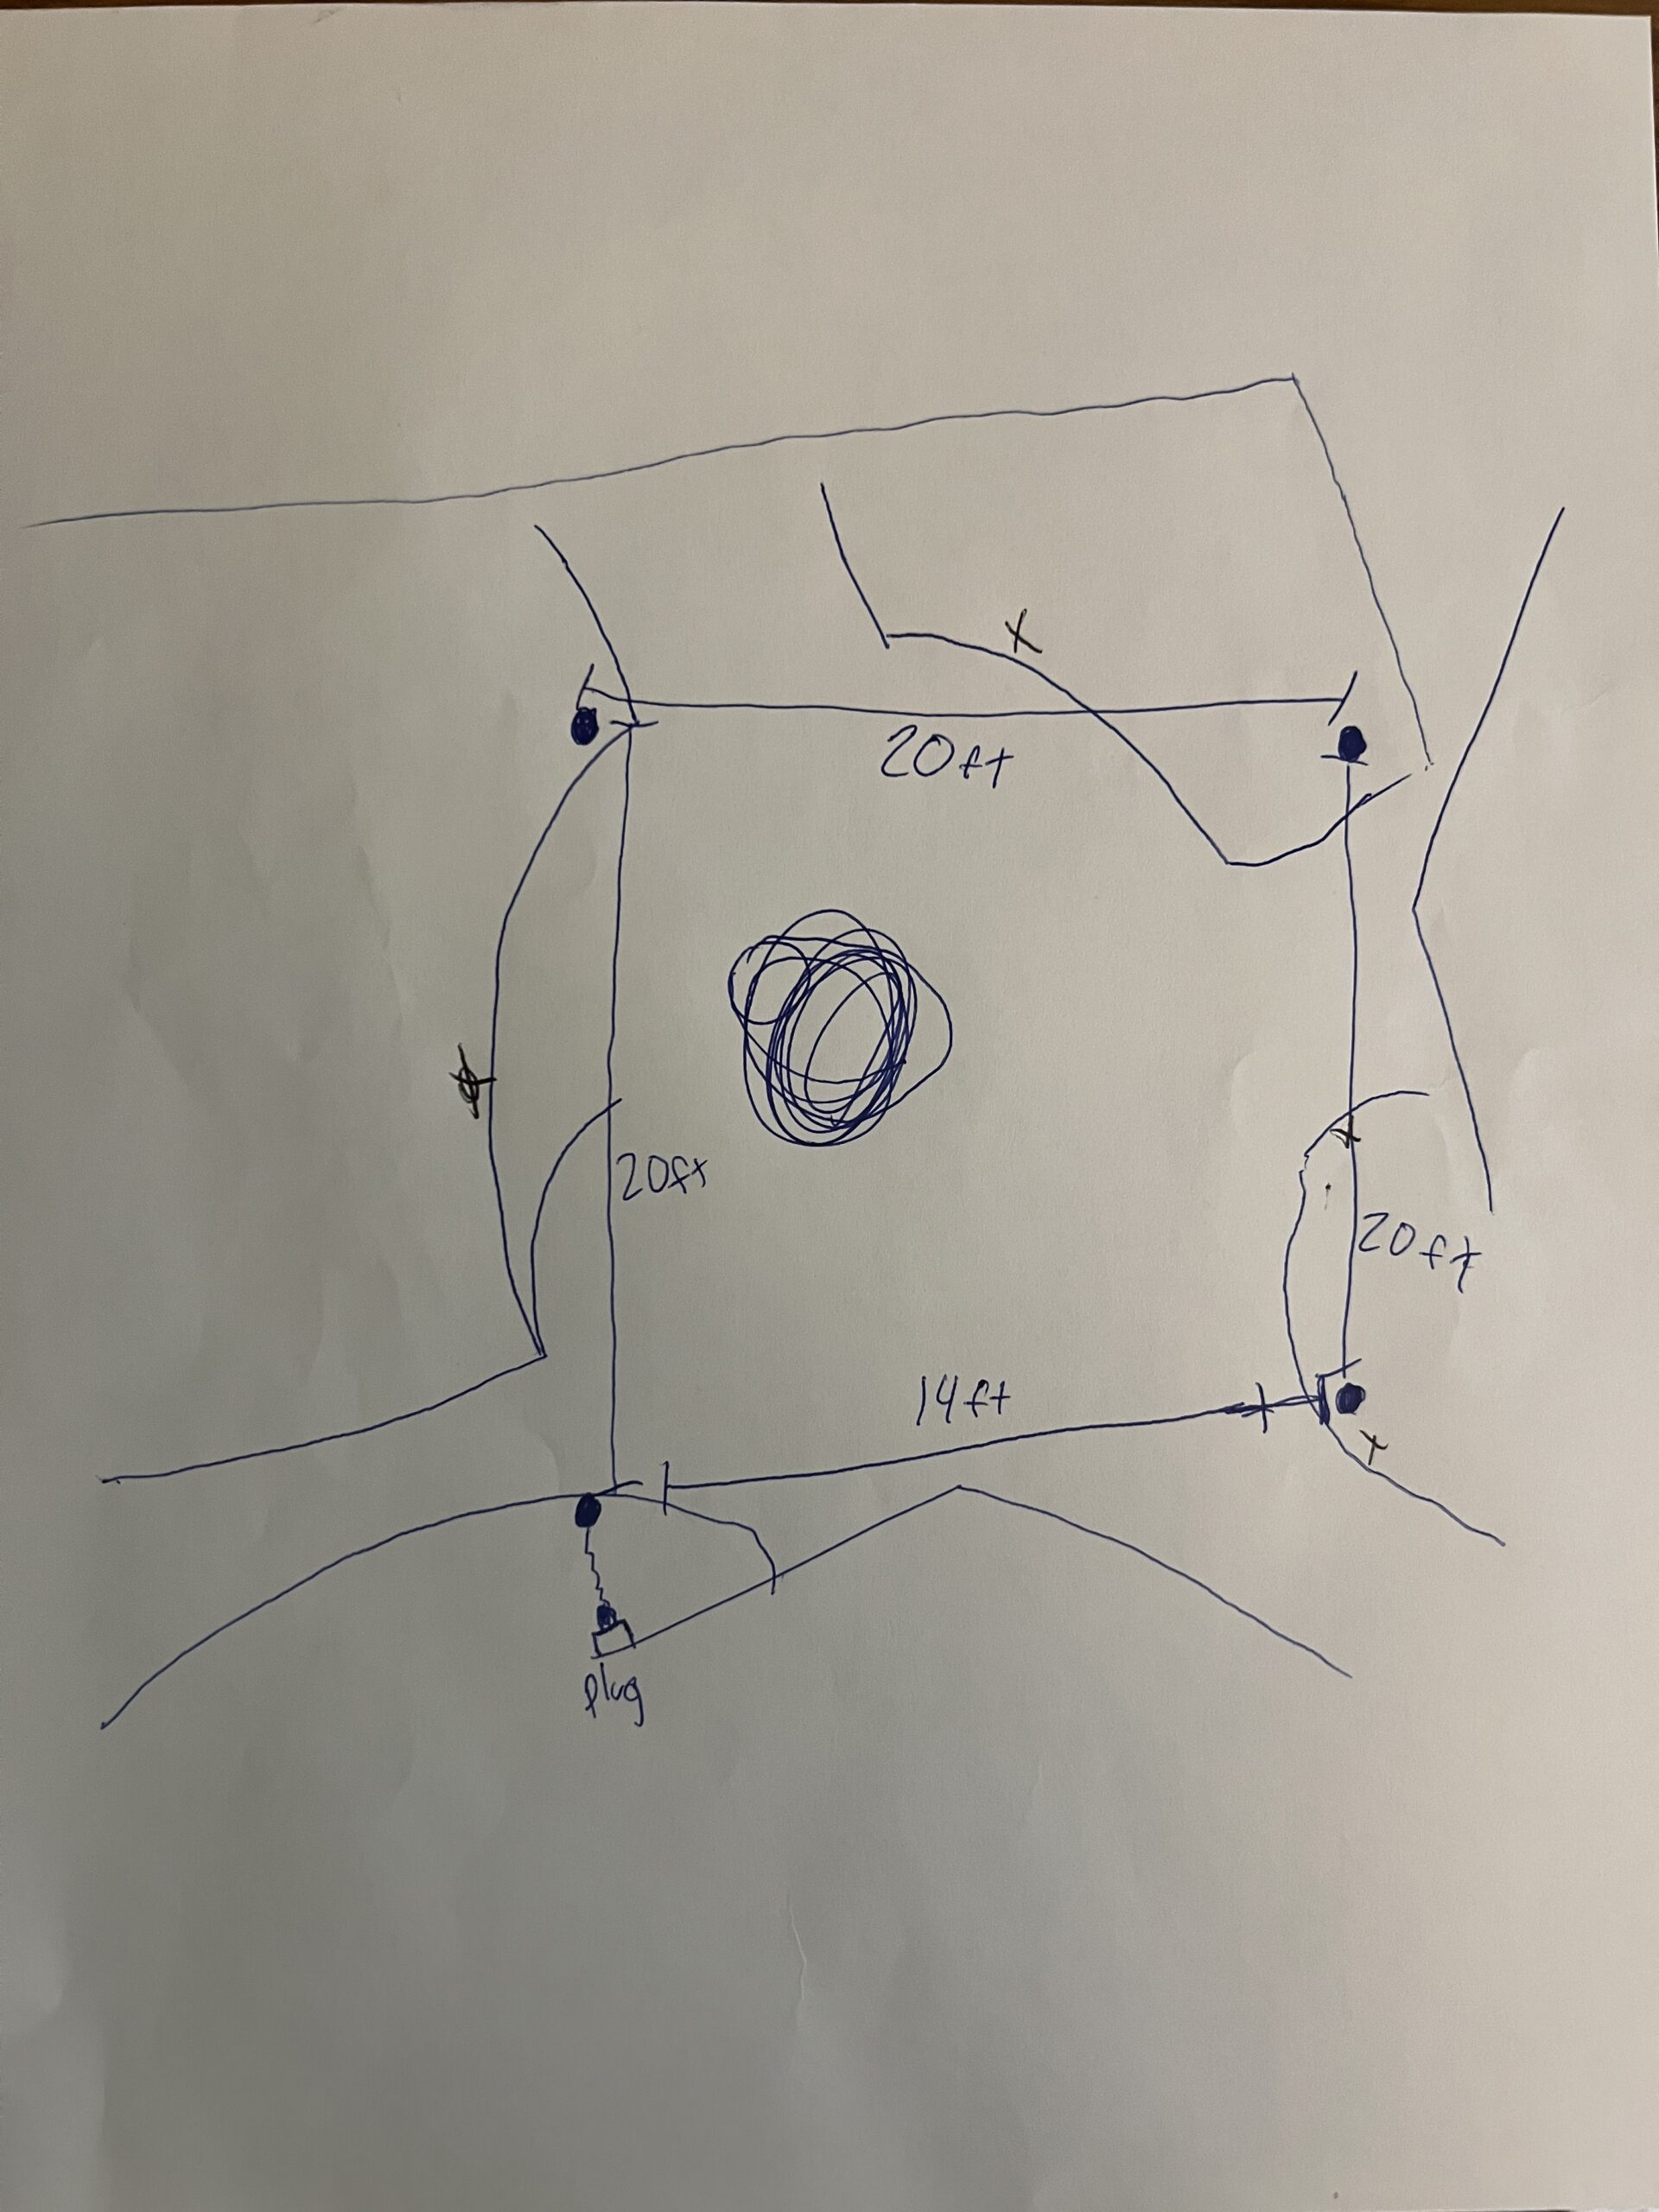
These need to be plugged in somewhere, so we planned to also attach the lights to the house just above where we have a power source. Then we could string the lights from the house to the first pole and around the circle.
If you don’t have a power source you could use solar string lights too!
Once we had a rough plan, we planned our support locations, ensuring that we had support no more than 10 – 15′ apart so that they didn’t sag too much. We measured the total distance to determine how many strings of cafe-style string lights we needed.
If you need to string your lights over longer distances, or if you don’t want them to sag, you can string a guide wire up first and hang your outdoor lights on that. We opted not to do that but if we find them sagging too much we can always add that later!
Supplies for Hanging String Lights in the Yard Without Trees
These are the supplies we used for our project:
- Cedar Planters – one for each pole location ( you can use any planters you like here depending on your personal preferences, I bought mine at Home Depot Canada)
- Wooden Posts (You can also use 4×4’s here, but I liked the round, smaller posts and they were pretty inexpensive compared to a 4×4!!)
- Eye Hooks (one for every post and one for each spot on your house/ fence/ etc that you want to attach the lights to)
- Quick set concrete (you need one bag for each pole you are planning to use)
- 5-gallon pails (one for each pole location)
- String lighting of your choice (I used some commercial grade string lights that I’ve used before and love, they are sometimes available at Costco early in the season too!) (I used 2 Sets)
- Outdoor Smart Timer (optional, but recommended!)
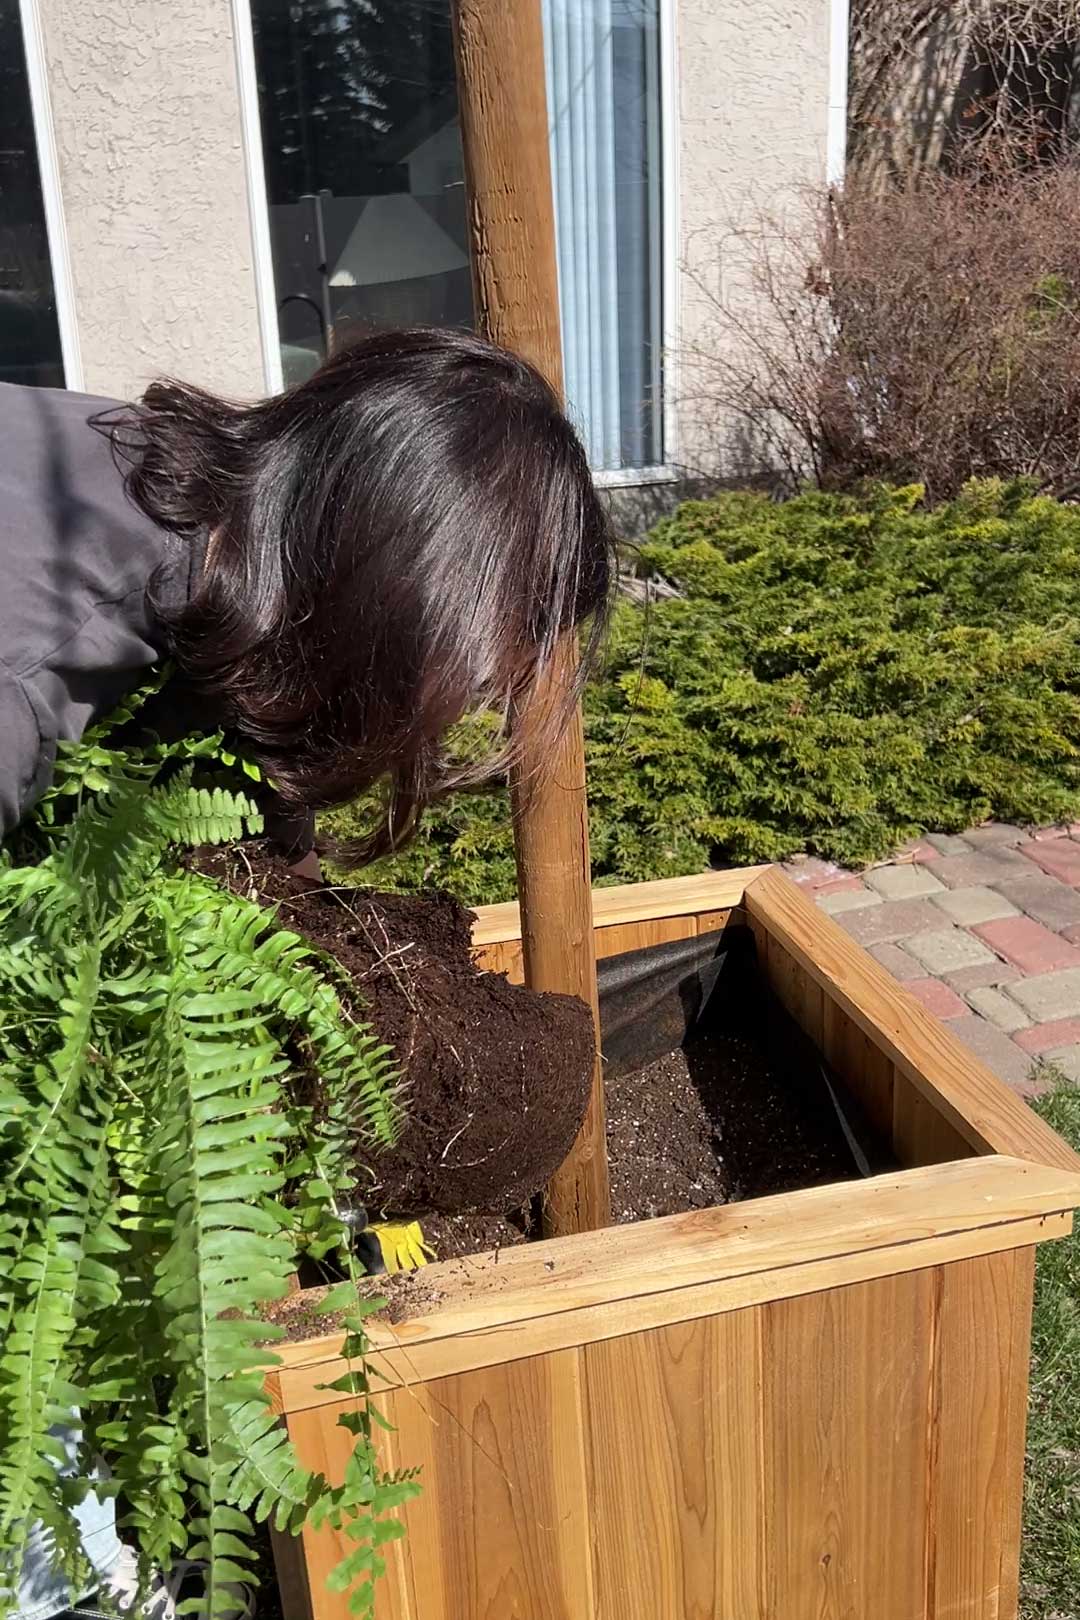
- Potting Soil
- Flowers (optional)
- S’mores (not optional!!!)
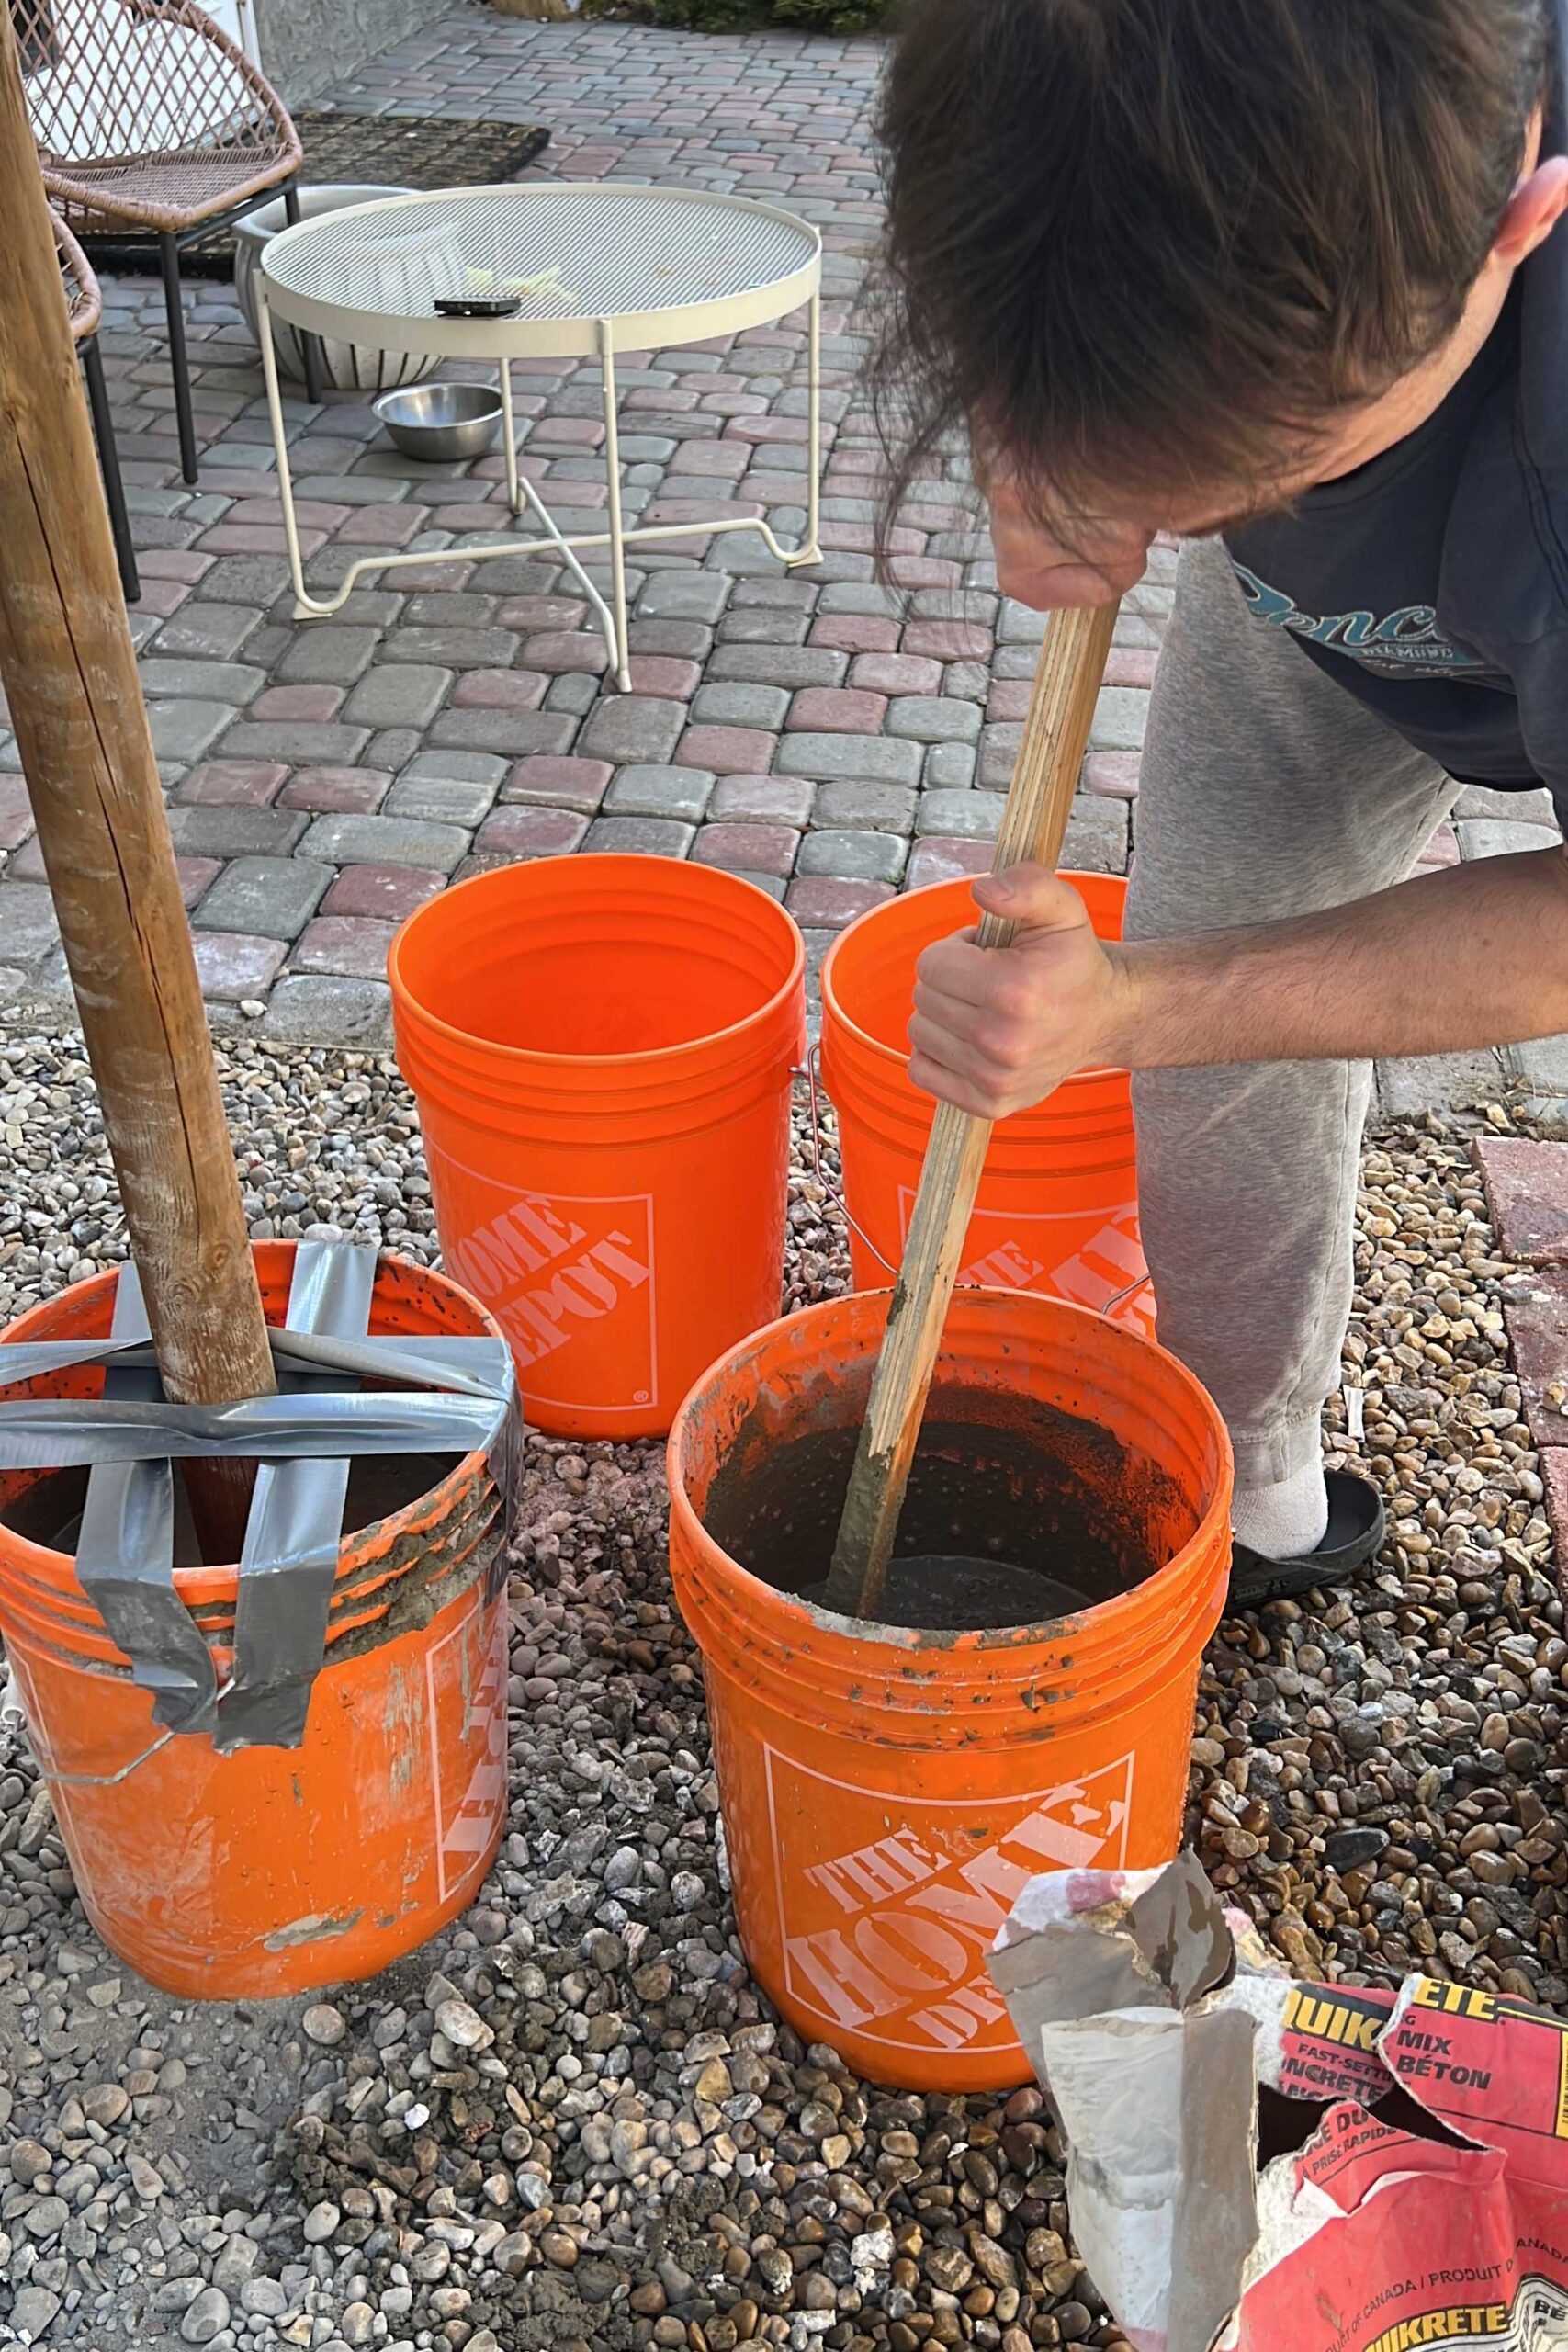
Step 1 – Pour Concrete into Buckets
I almost bought some string light poles that I found online that just stick into the ground with spikes, but then my husband reminded me that we have underground irrigation lines so sticking spikes into the ground was maybe not the best idea. I also considered digging a hole and putting a fence post in the ground with some concrete, but we didn’t want to make this permanent in case we changed our mind later.
What we decided to do was pour concrete into buckets and set the posts in there. That way they were easy to move and not permanent, and no digging, yay!
The concrete we bought came in 50 pound bags and filled a 5-gallon pail up about 2/3 full, and worked perfectly.

We set our buckets down on a level spot in our yard. We used a rocky area where we used to have a hot tub that we plan to do something about this summer, so we didn’t worry too much about spilling a little concrete on it. And spill some, we did. Ha!
The first bucket, I poured the entire bag of concrete in, then added water, and then attempted to stir that with a stick. Let’s just say that was a good lesson in what not to do! We were not able to stir it enough to get the concrete way at the bottom wet.

We ended up pouring out about half of the concrete into another bucket so we could mix it properly.
What we learned was that if we added about 1/3 of the bag, then some water and mixed that, it was much easier.
We didn’t measure the water we just dumped some in until it was a good consistency, a little bit at a time. We added some water, mixed it until it looked too dry, and then added a little more. You want to be able to mix it but you don’t want it to be too soupy.
Step 2 – Insert the Poles into the Concrete
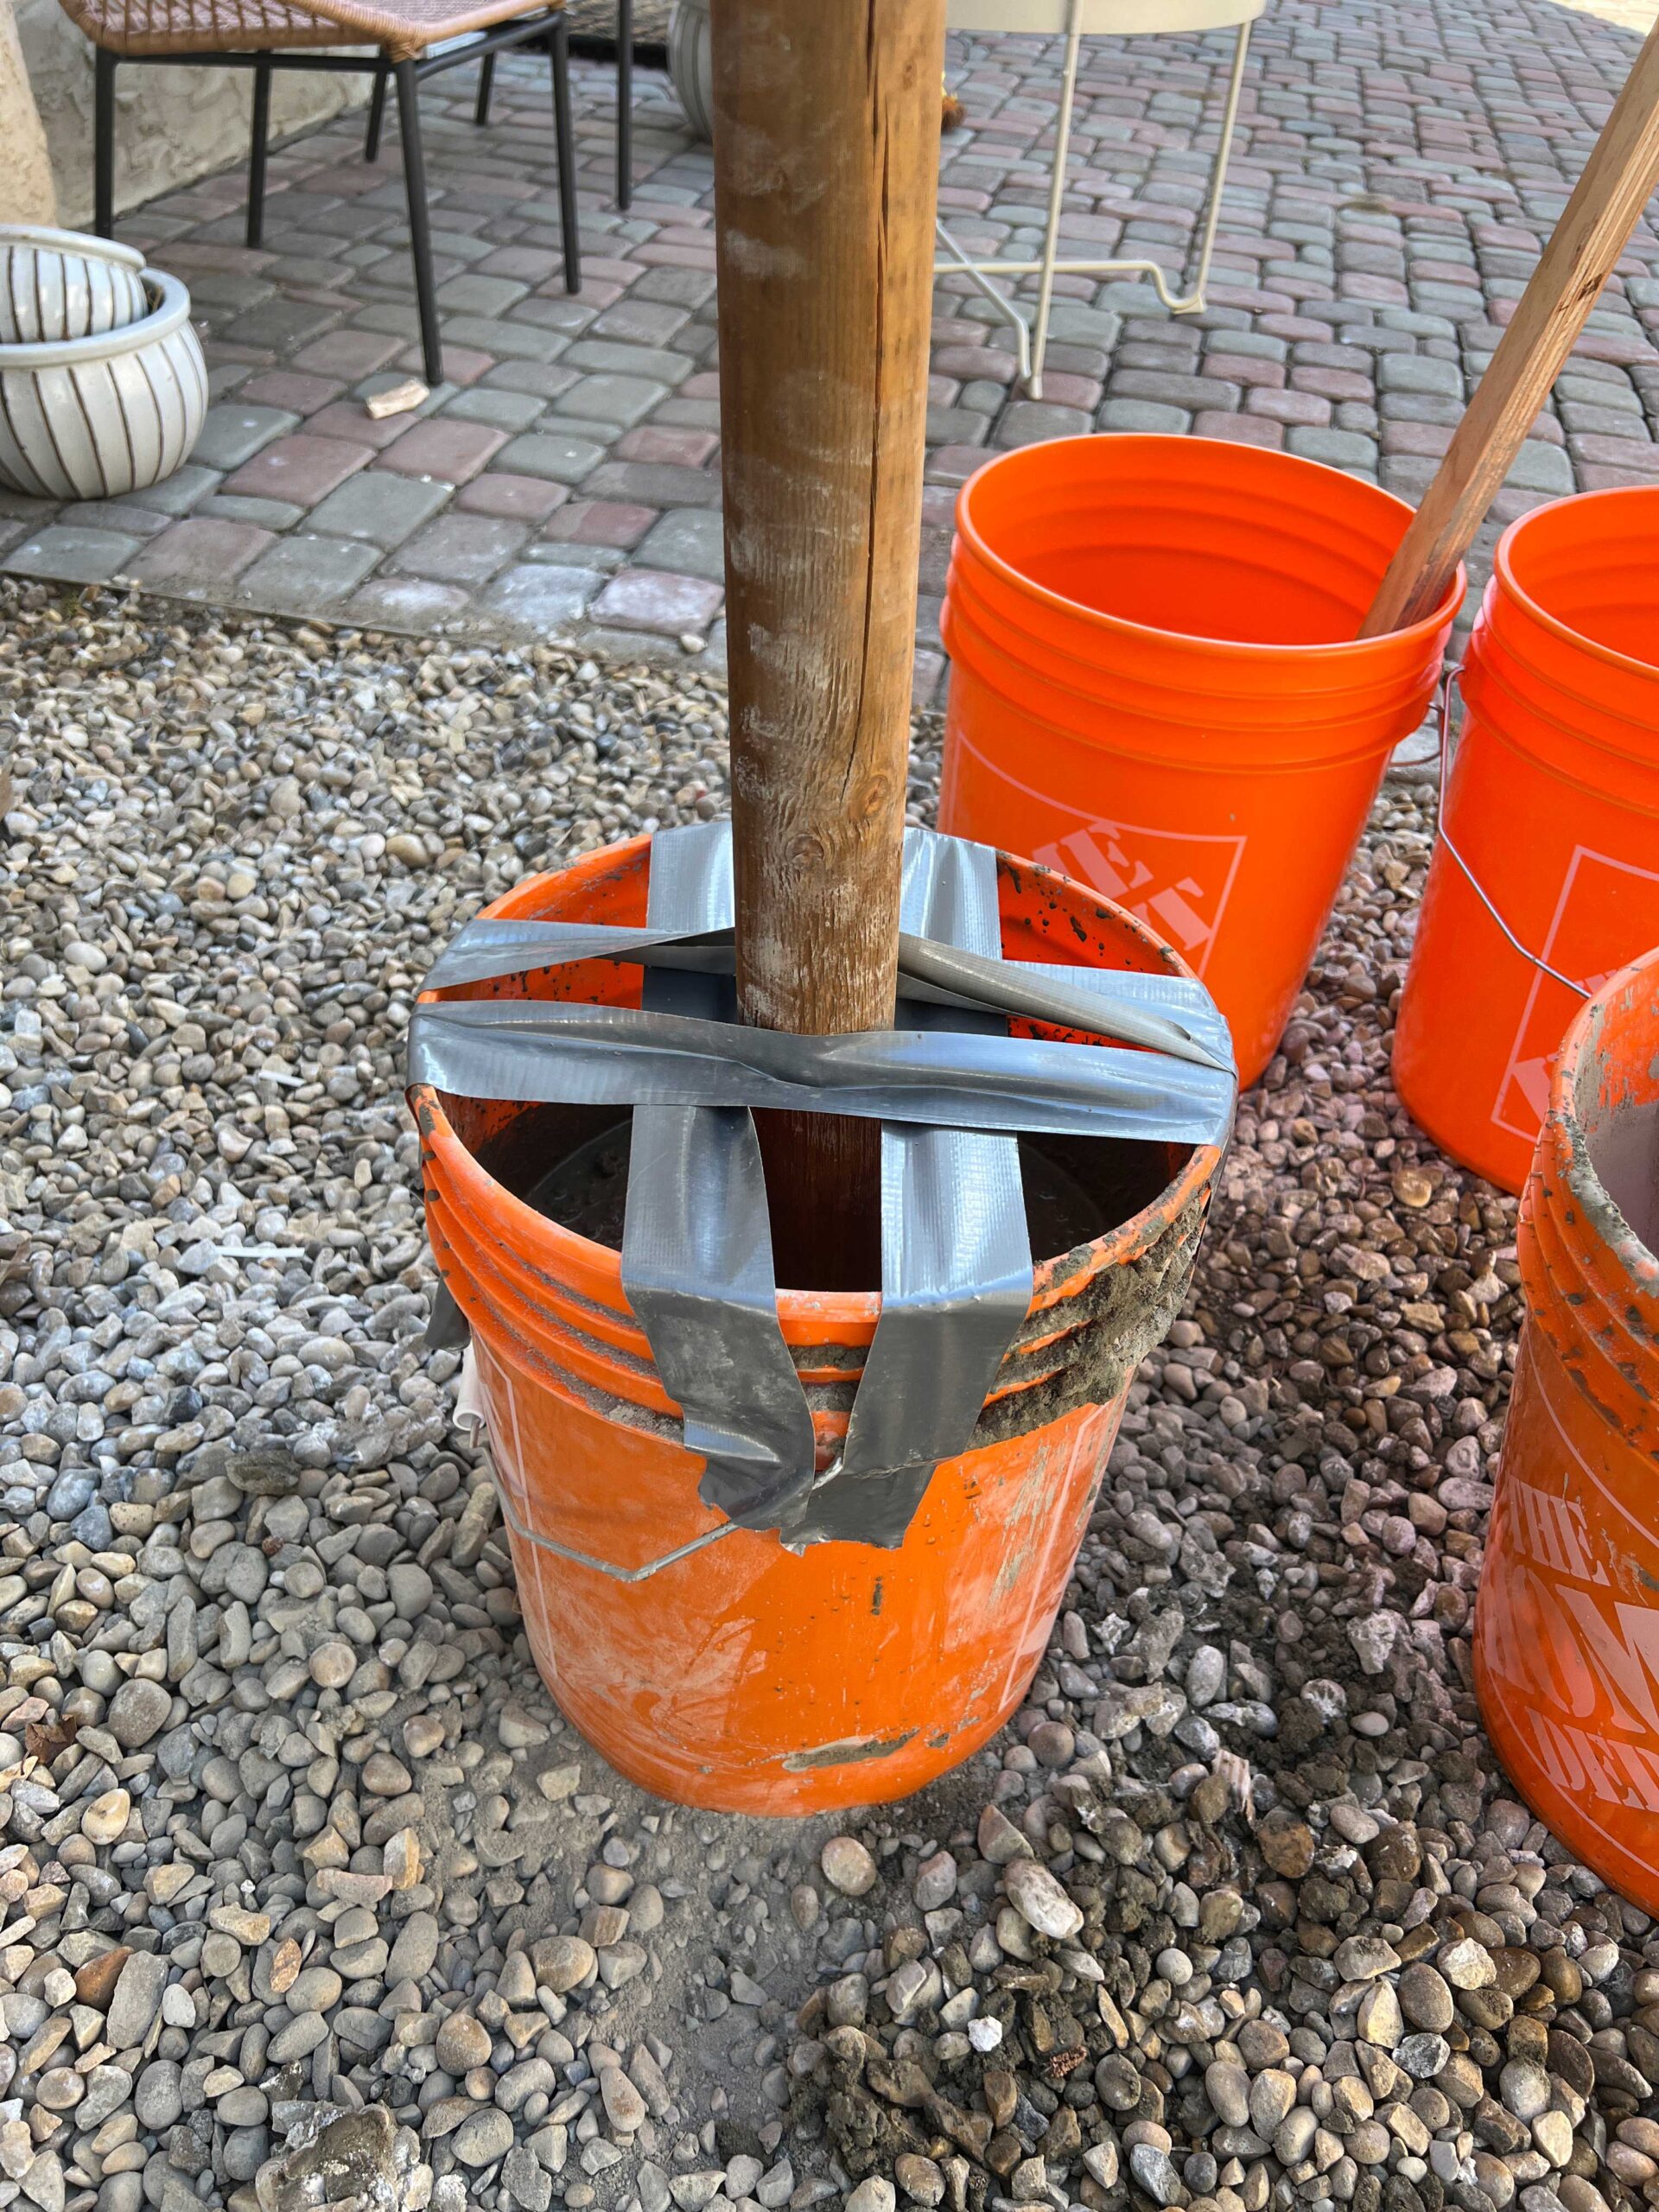
We stuck the wooden poles in the center of the bucket and the concrete. To hold it in place while the concrete was drying, we used some duct tape to tape a grid around all four sides of the top of the bucket. We used the level again to make sure the poles were pretty straight before we left them to set, but in the end, this did not matter all that much, because you can level the buckets themselves once you put them into the planters. More on that later!
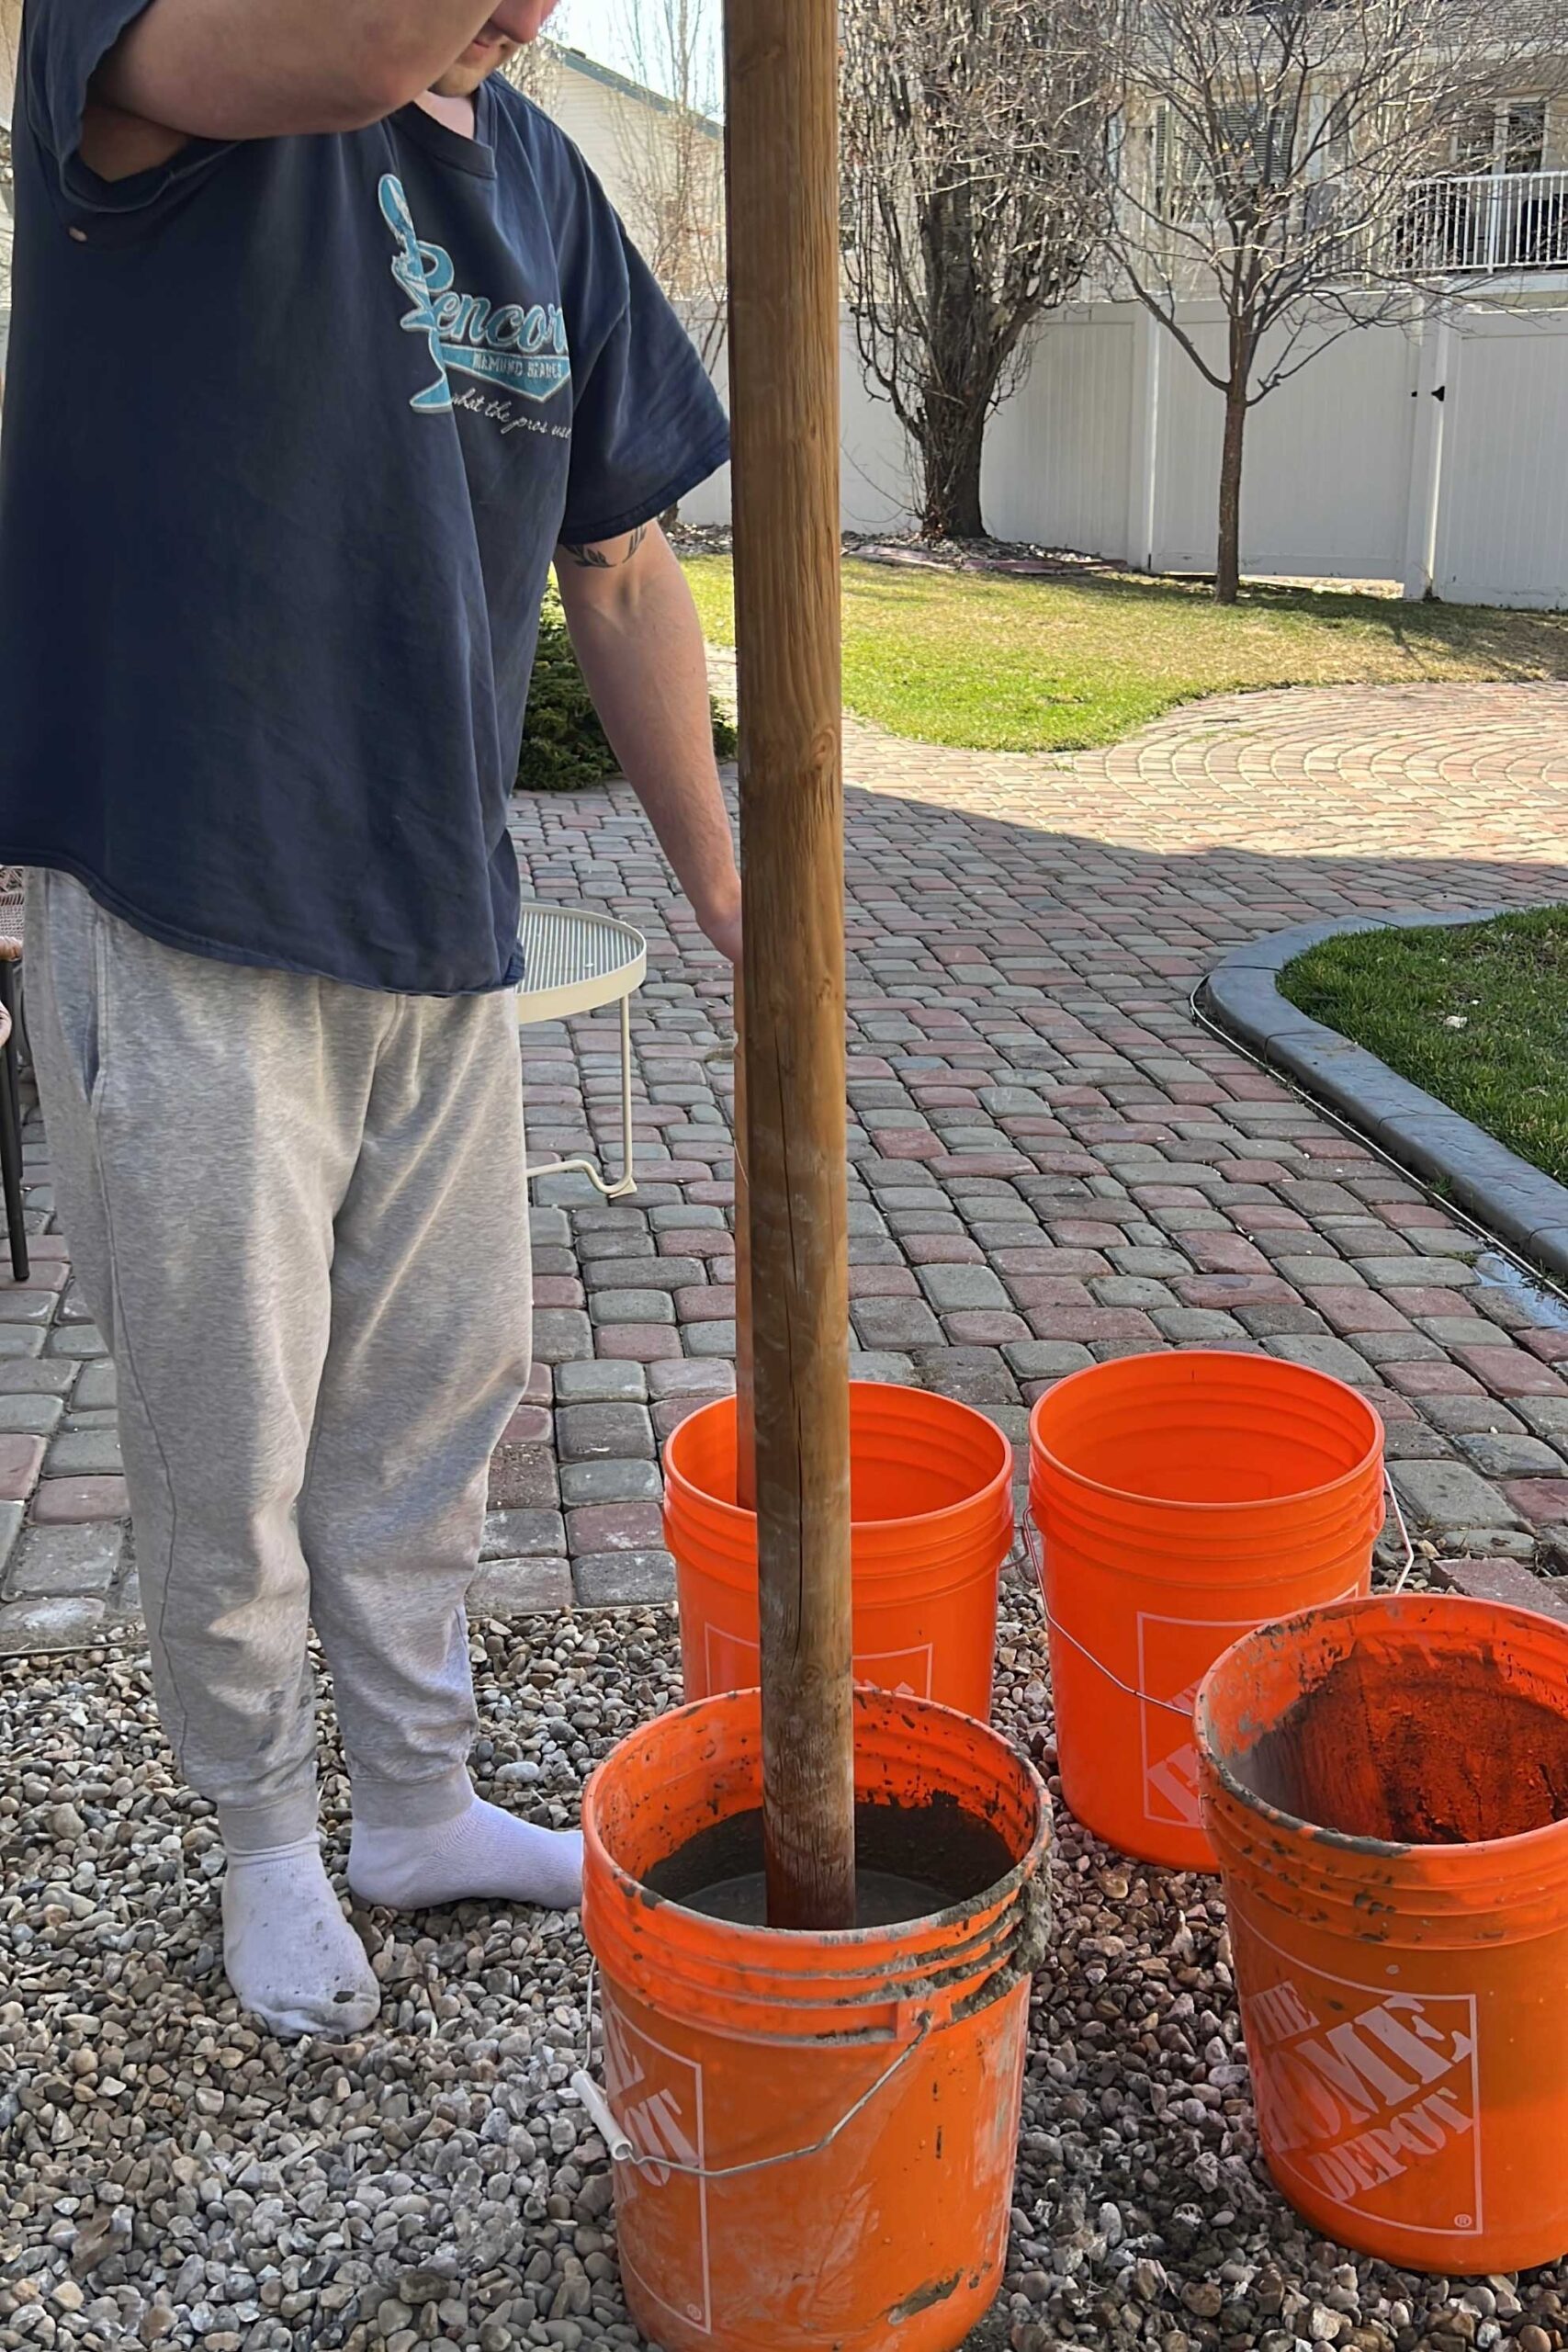
This is quick setting concrete and it says that it sets up within about 20-40 minutes! I am not sure how long they took but when I checked on them about 2 hours later they were hard.
This did the trick! We now had four posts to use for our backyard string lights that were not permanent, and moveable!
Step 3 – Add Metal Hooks for the Light Cords to Attach
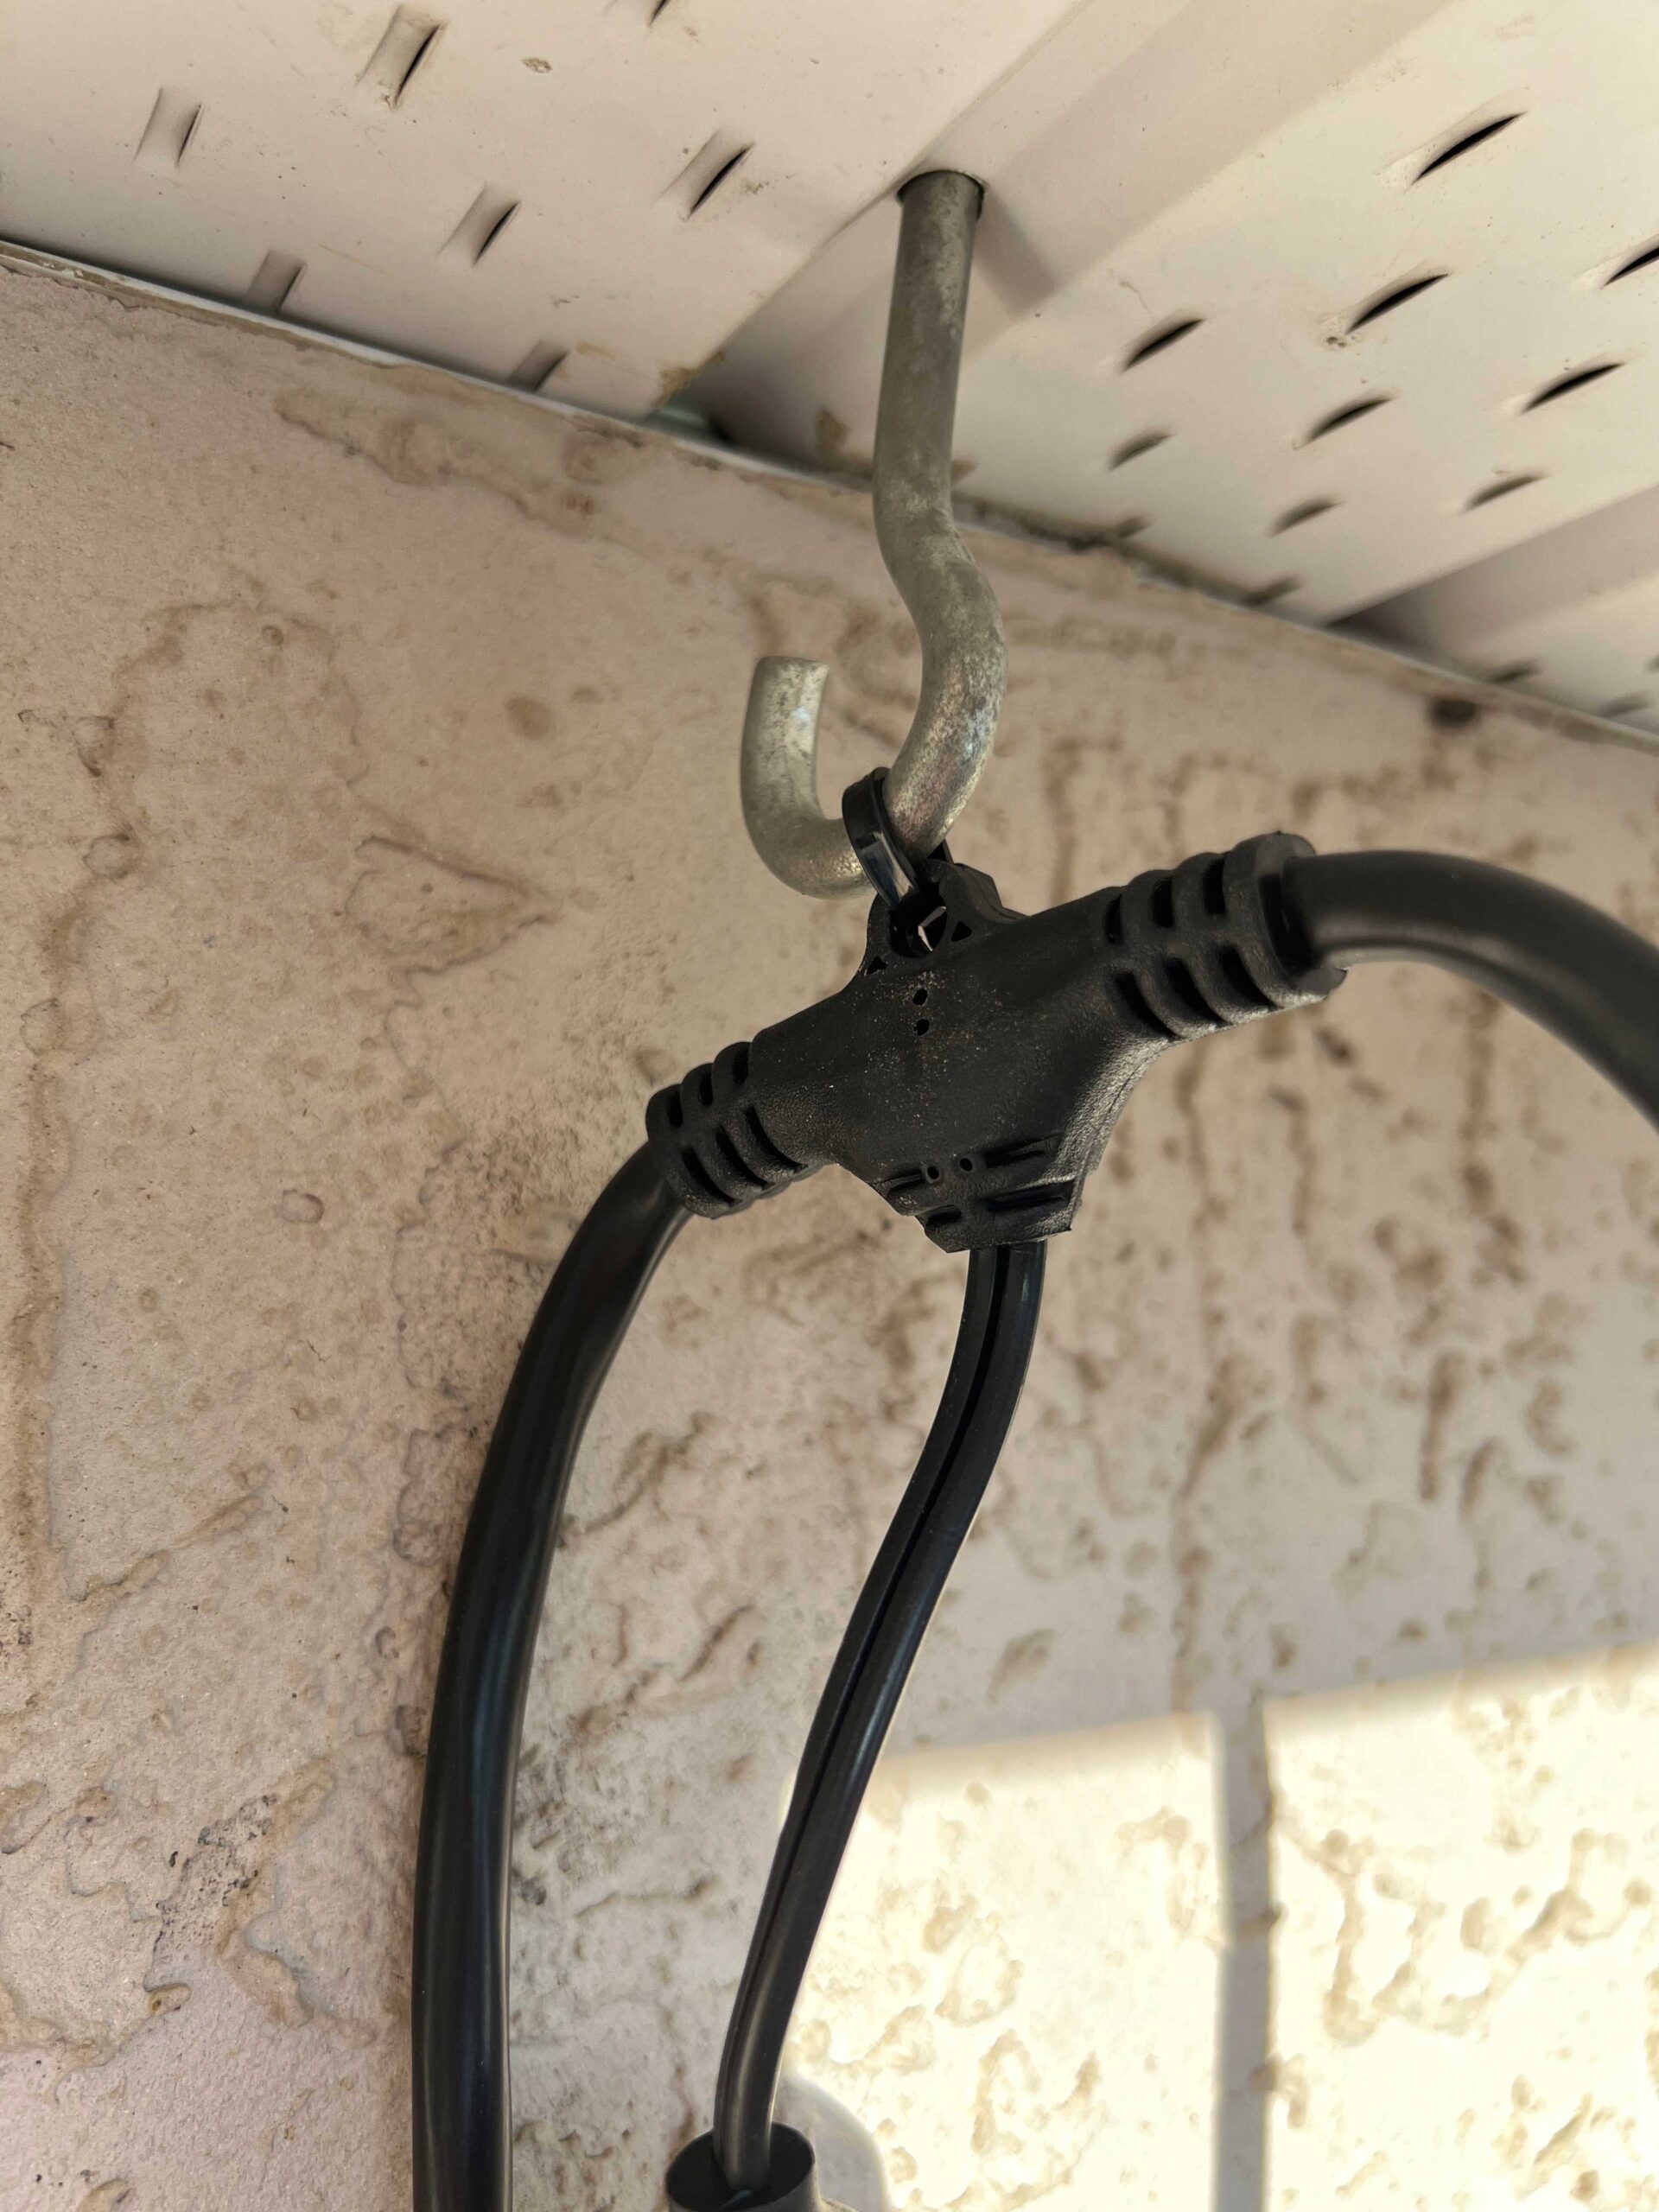
Before placing the poles around the yard, we attached some screw eye hooks to the top of the post. In hindsight, It would have been a good idea to do this before we put them in the concrete! So perhaps this should have been Step 1!
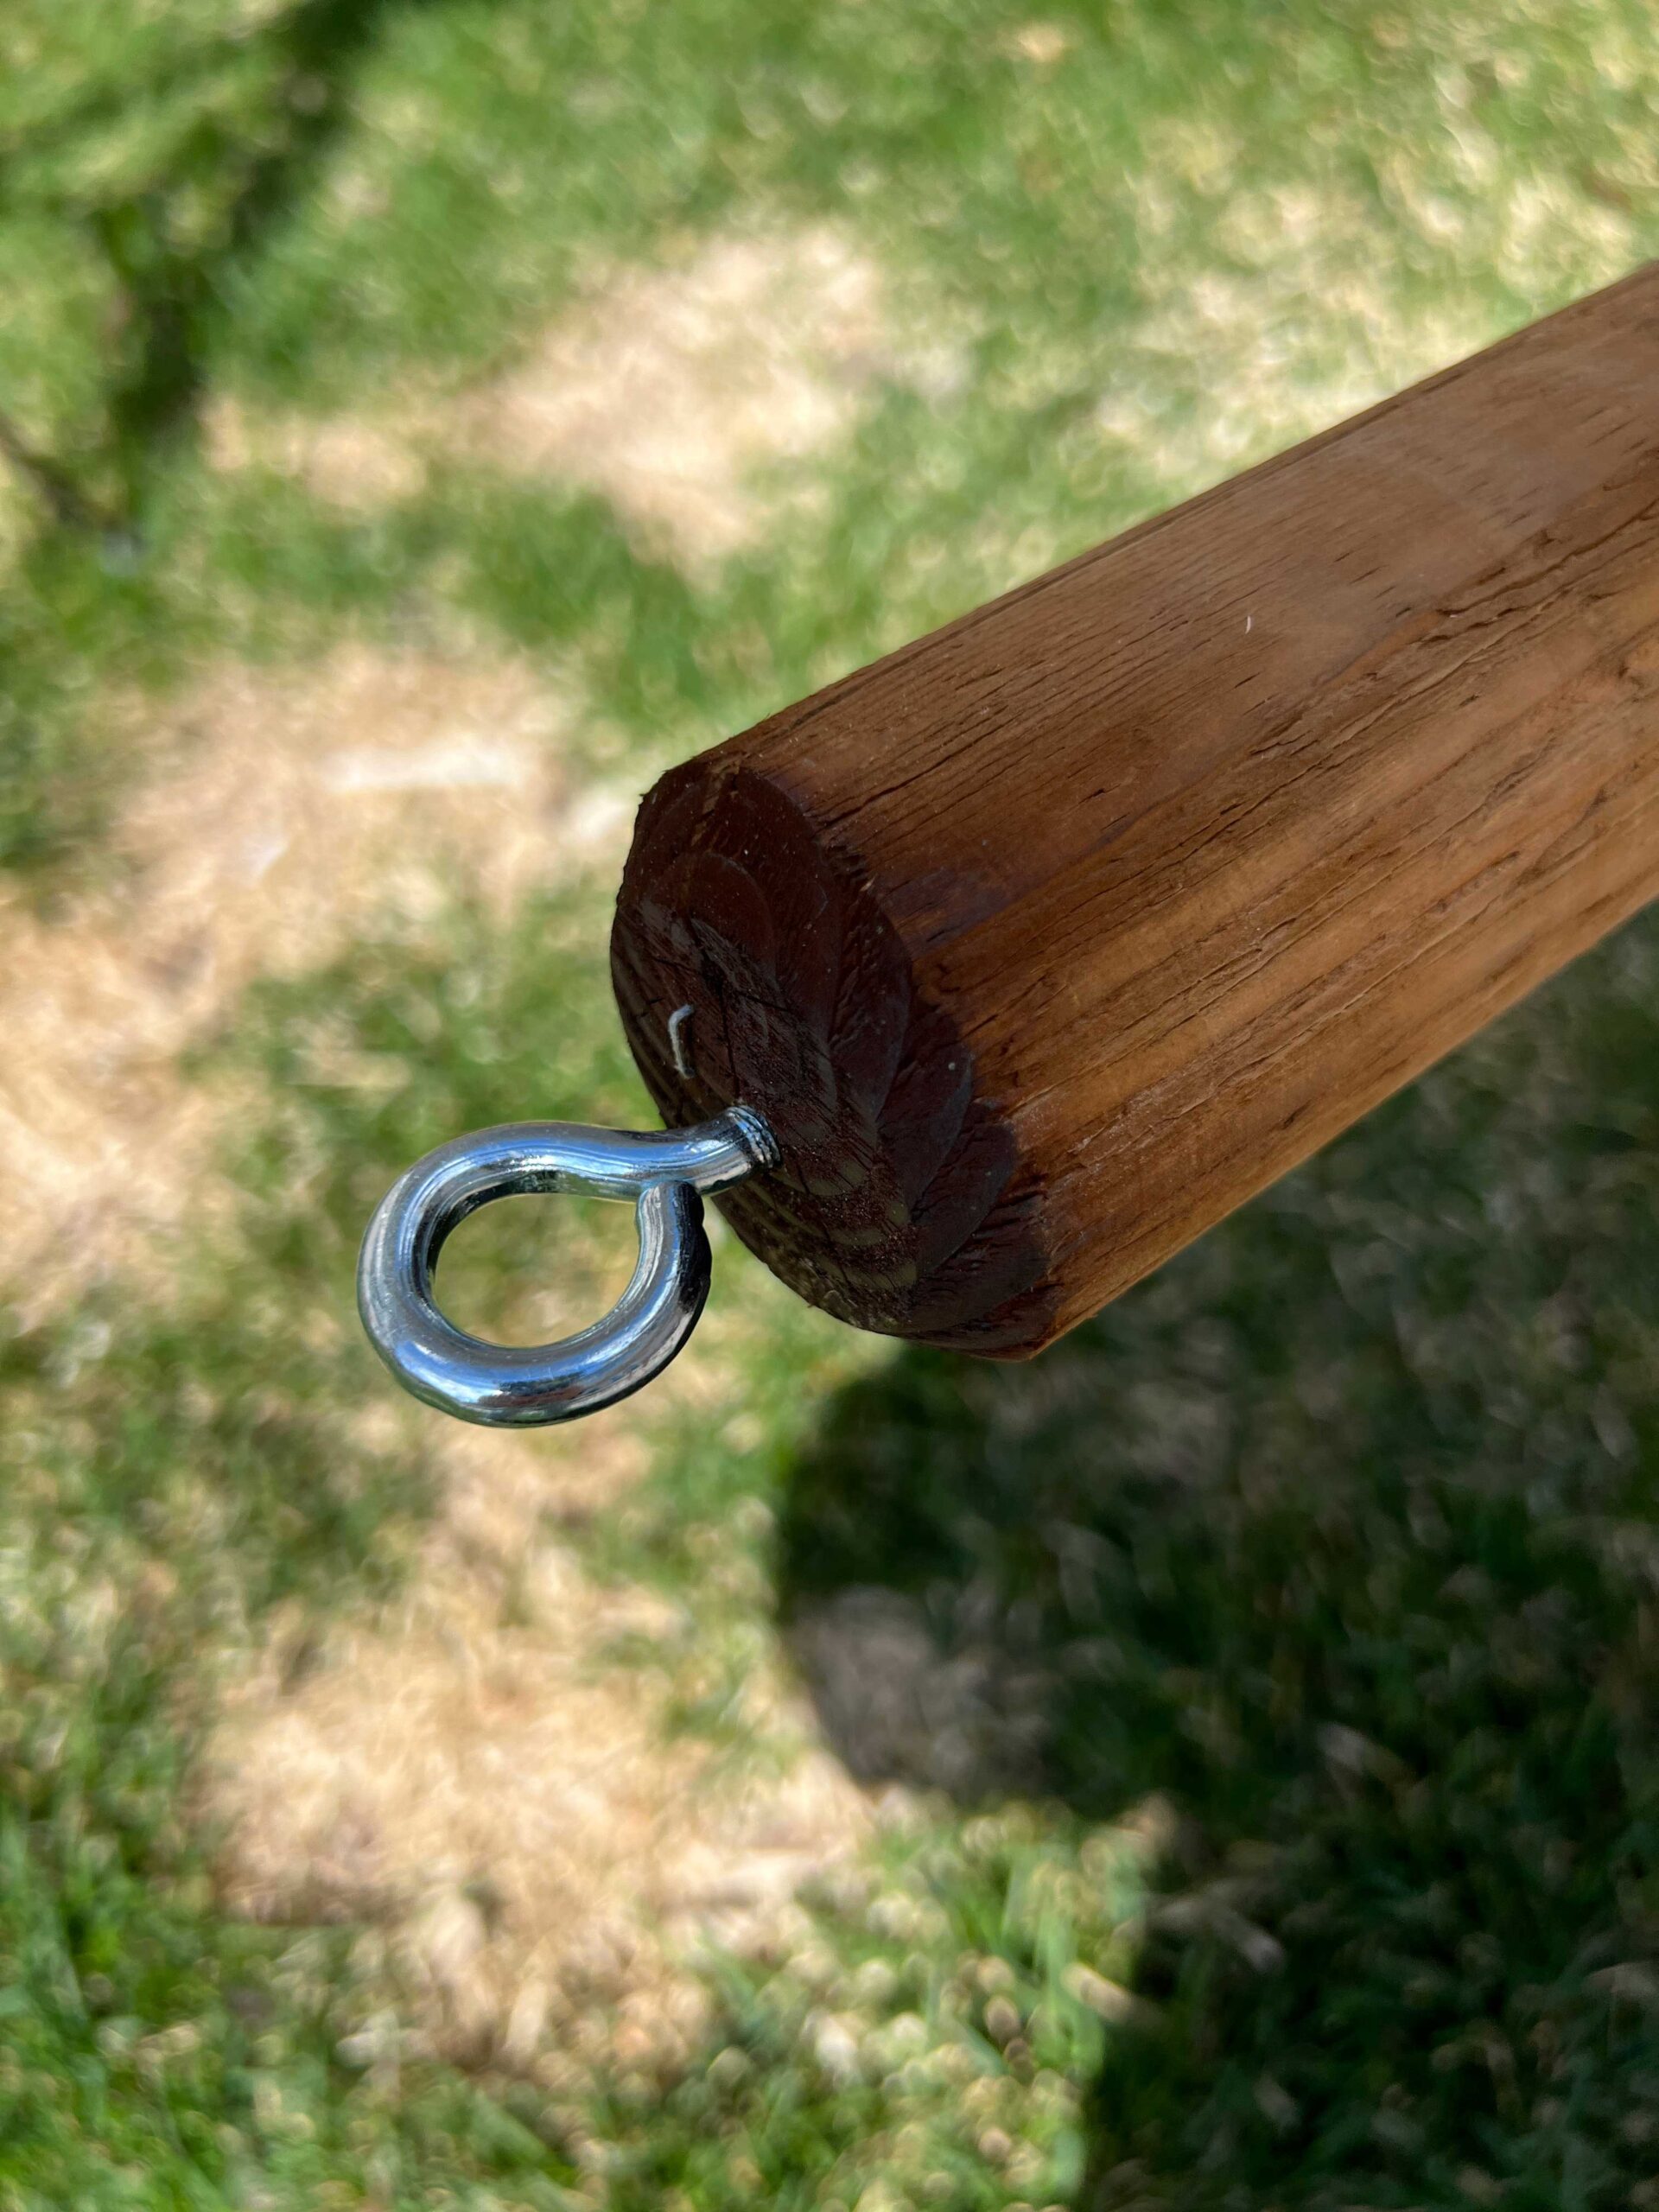
Nevertheless, if you forgot as I did, you can just tip the buckets over once the concrete is set to access the top of the poles. I pre-drilled pilot holes in the wooden poles with a drill bit and then just twisted the screw eyes in.
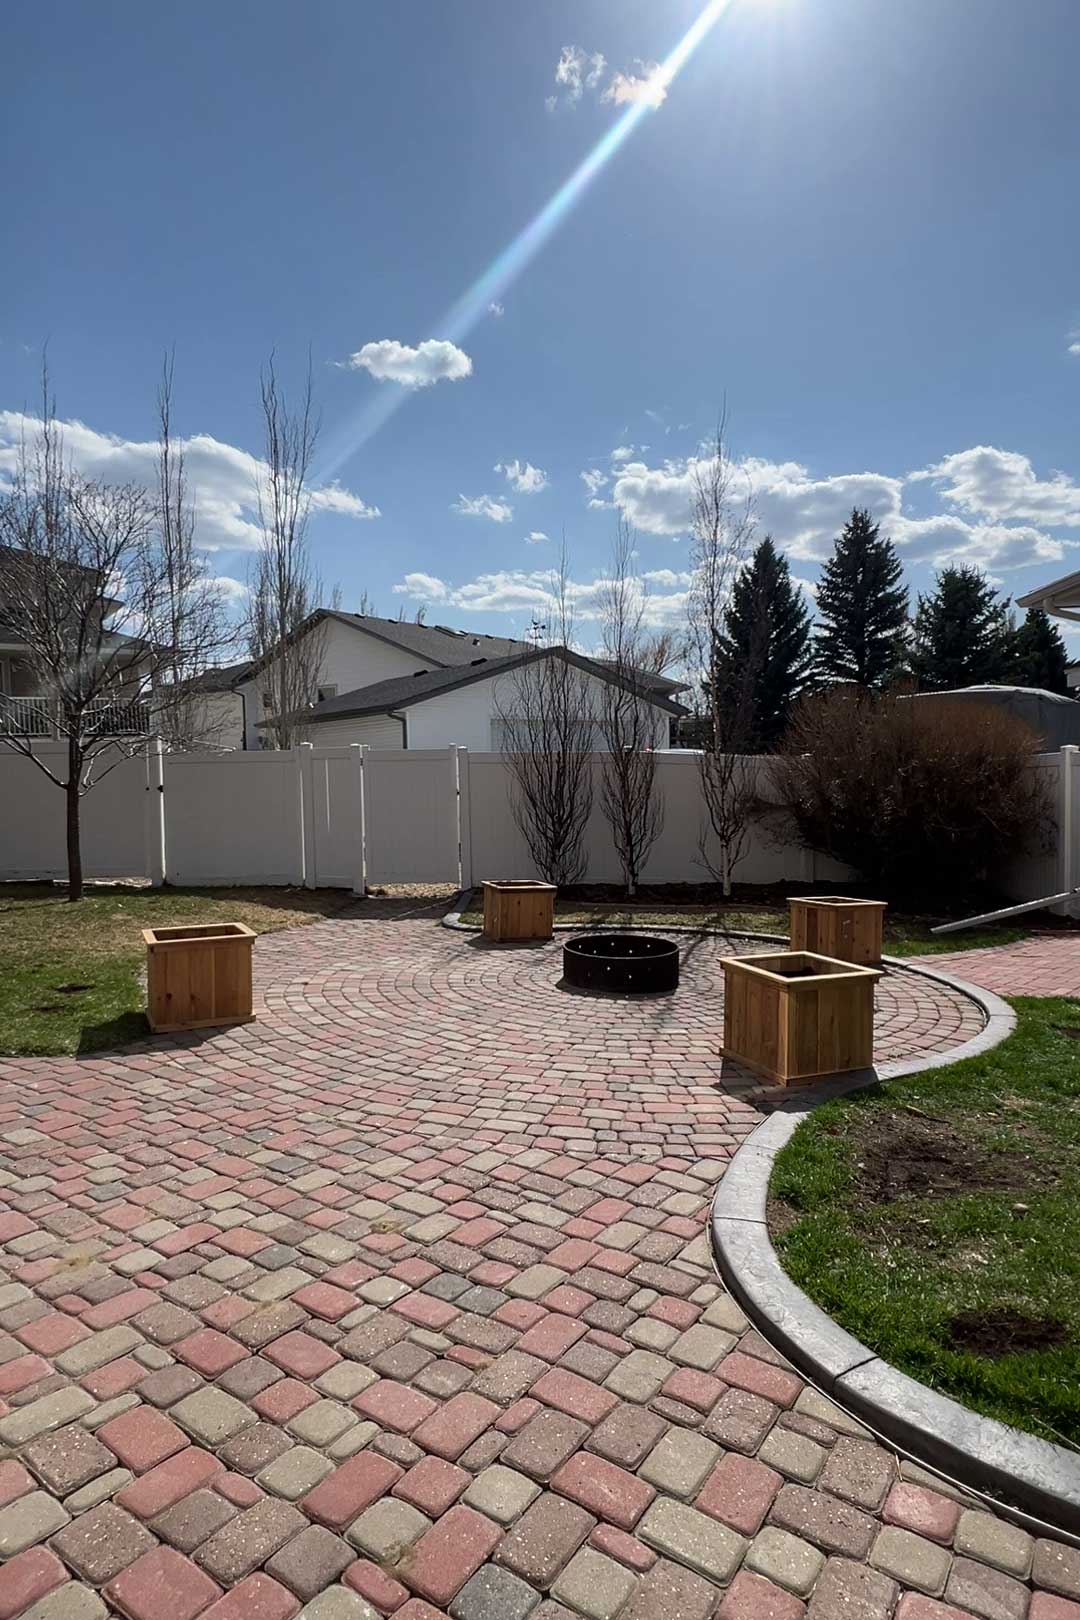
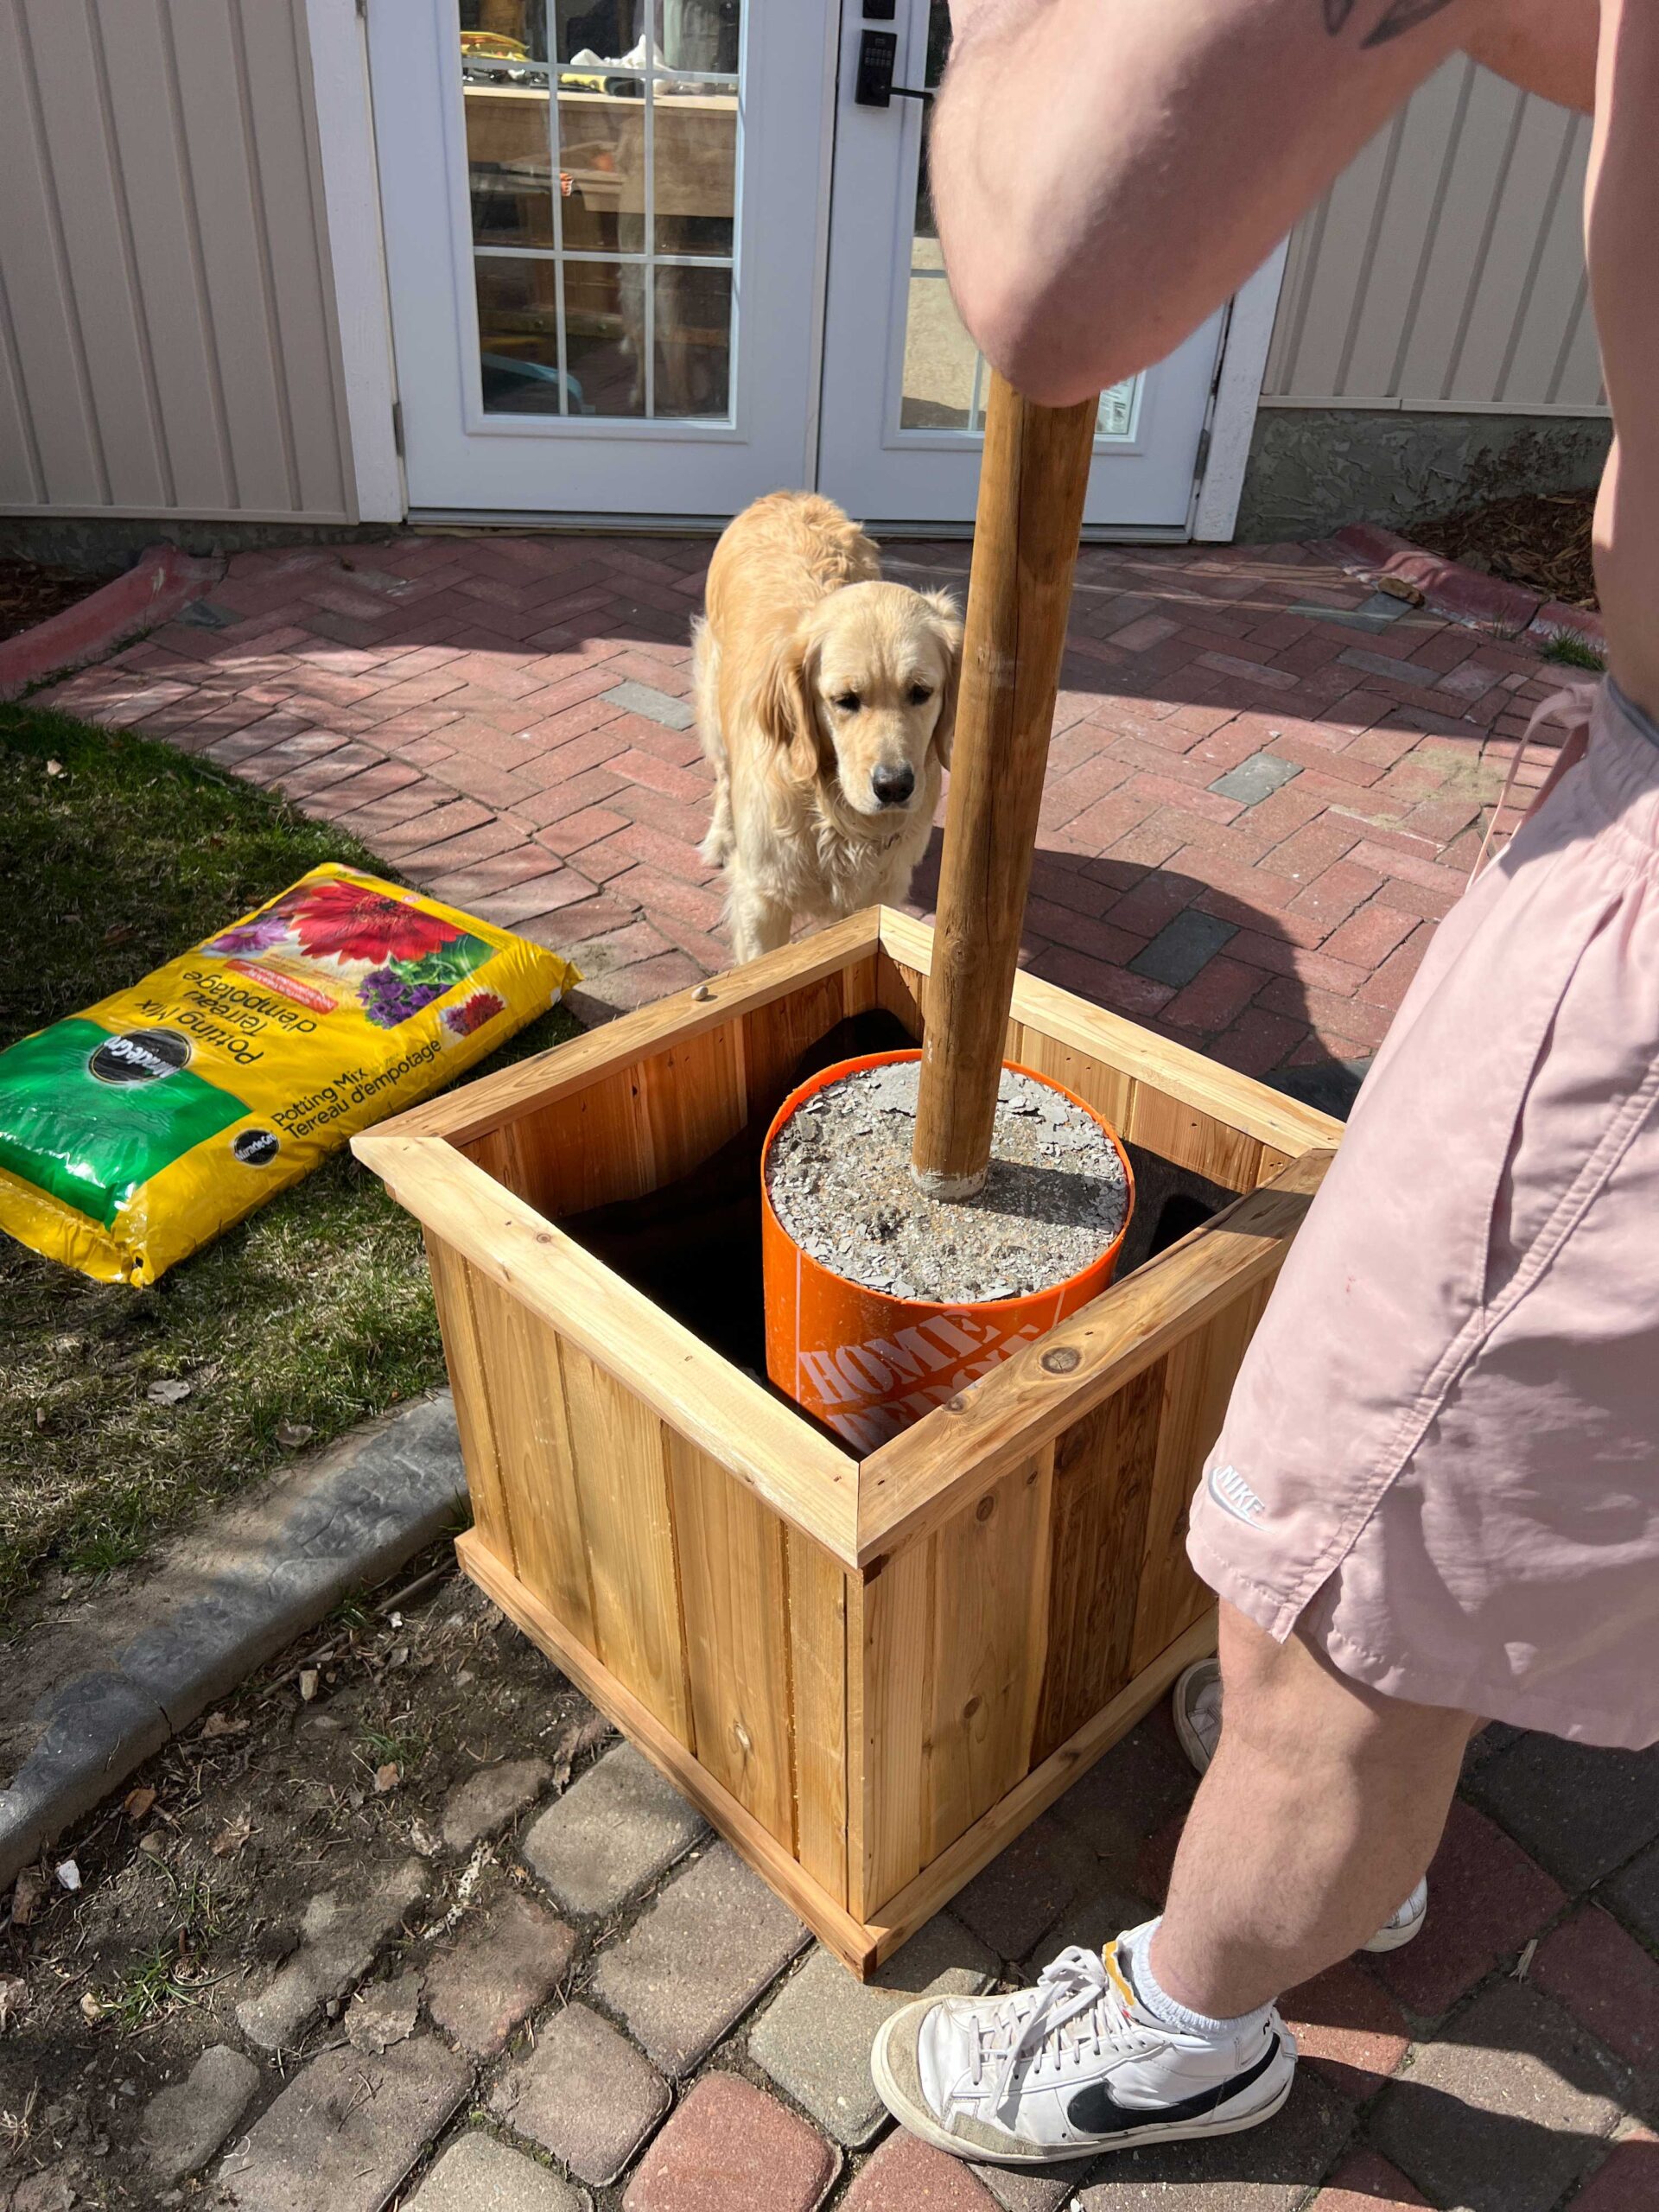
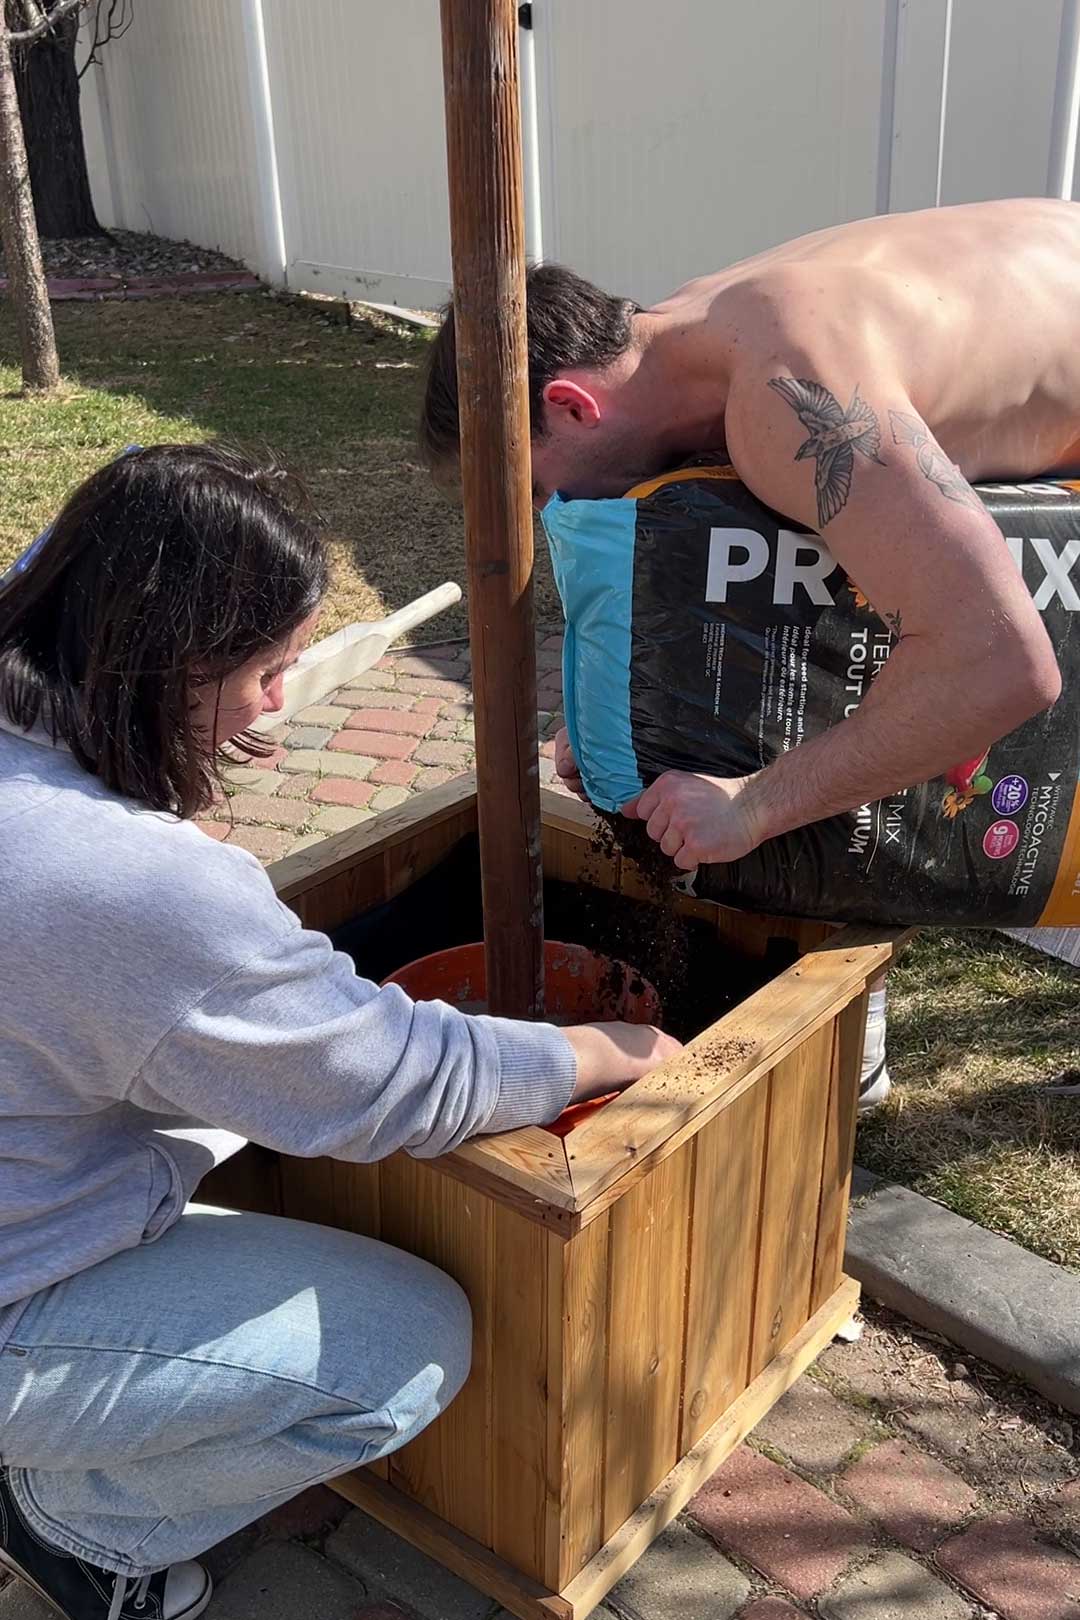
Step 4 – Place your Planters and Add Dirt
Next, we placed our planters around the yard according to our plan. We moved them a bit here and there, and checked the distance between them with a tape measure to make sure they were pretty equal distance apart.
Once we were happy with the relocation, we set the buckets with the poles inside the planters.
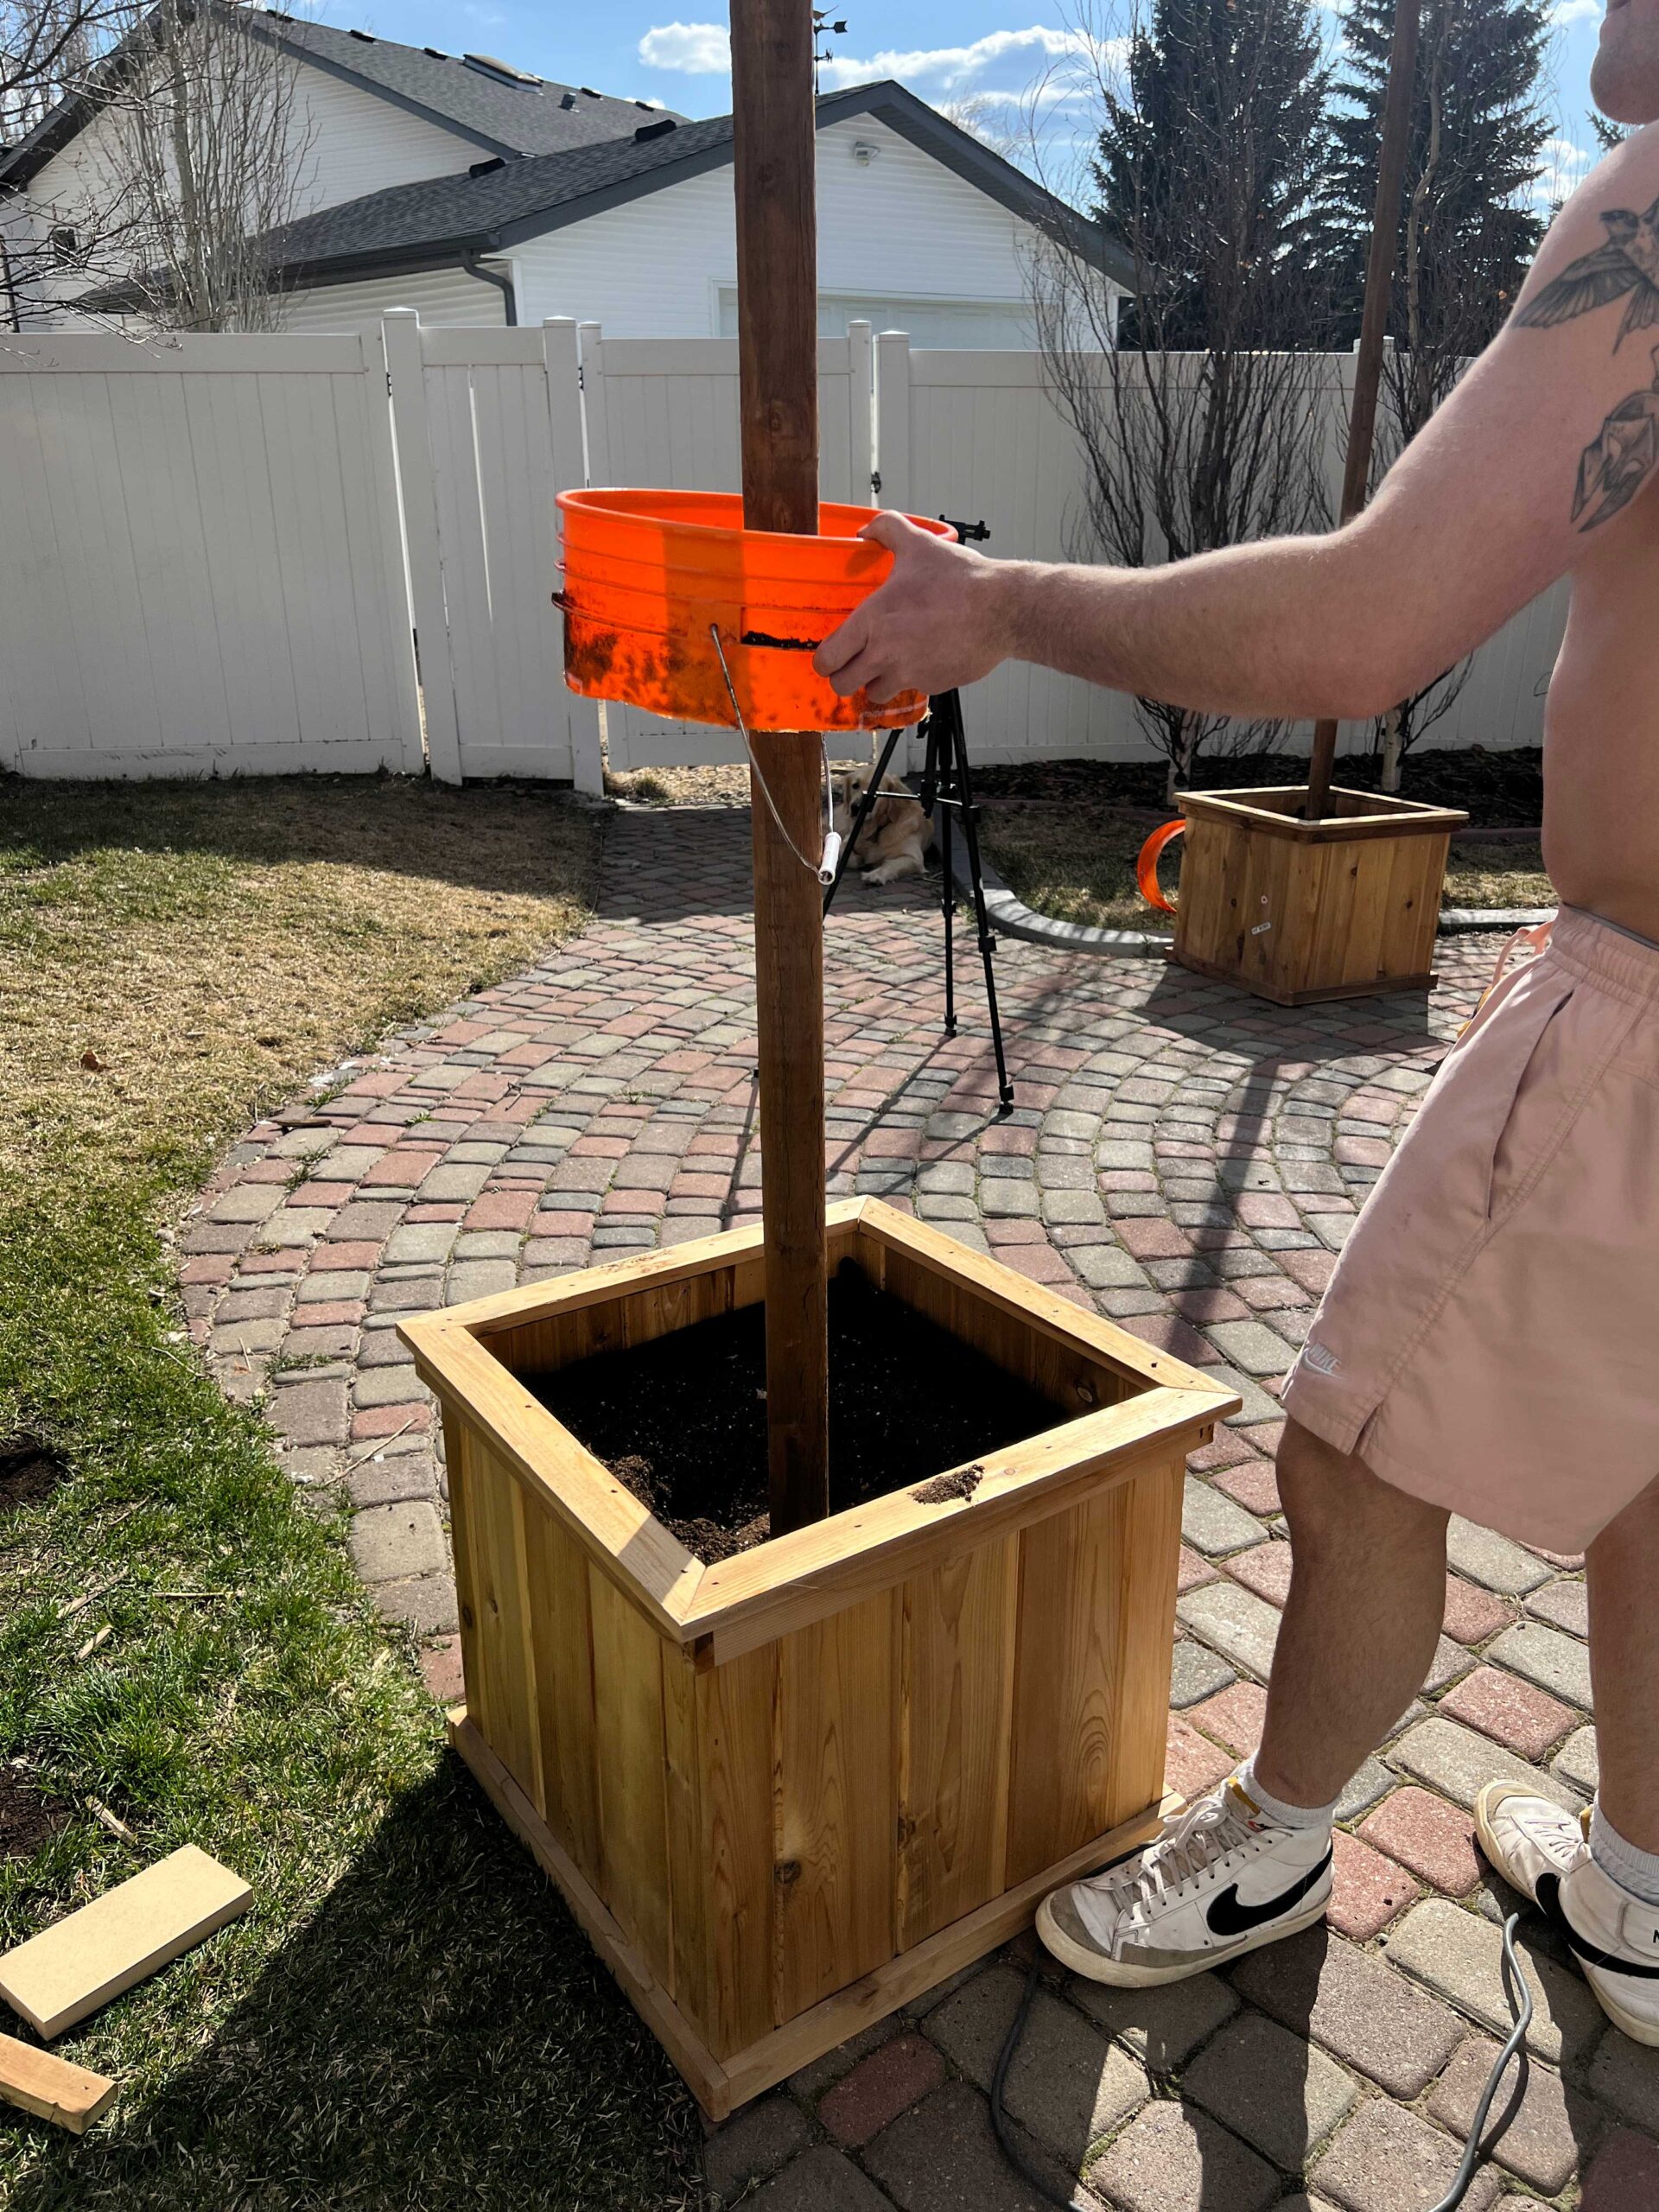
Note that after we had some of our buckets placed, we realized that we probably should have removed the top of the bucket above the concrete level so that it did not trap water.
We cut the top of the bucket off with a flush-cutting tool in place. It would have been easier to do this before the buckets were placed inside the planters, and you can use any kind of saw to cut that off. Even a hand saw works!

You want to make sure you consider drainage in your planters. If you have a plastic or wood planter like mine, you can just drill a couple of holes in areas outside where the bucket is so that water can drain.
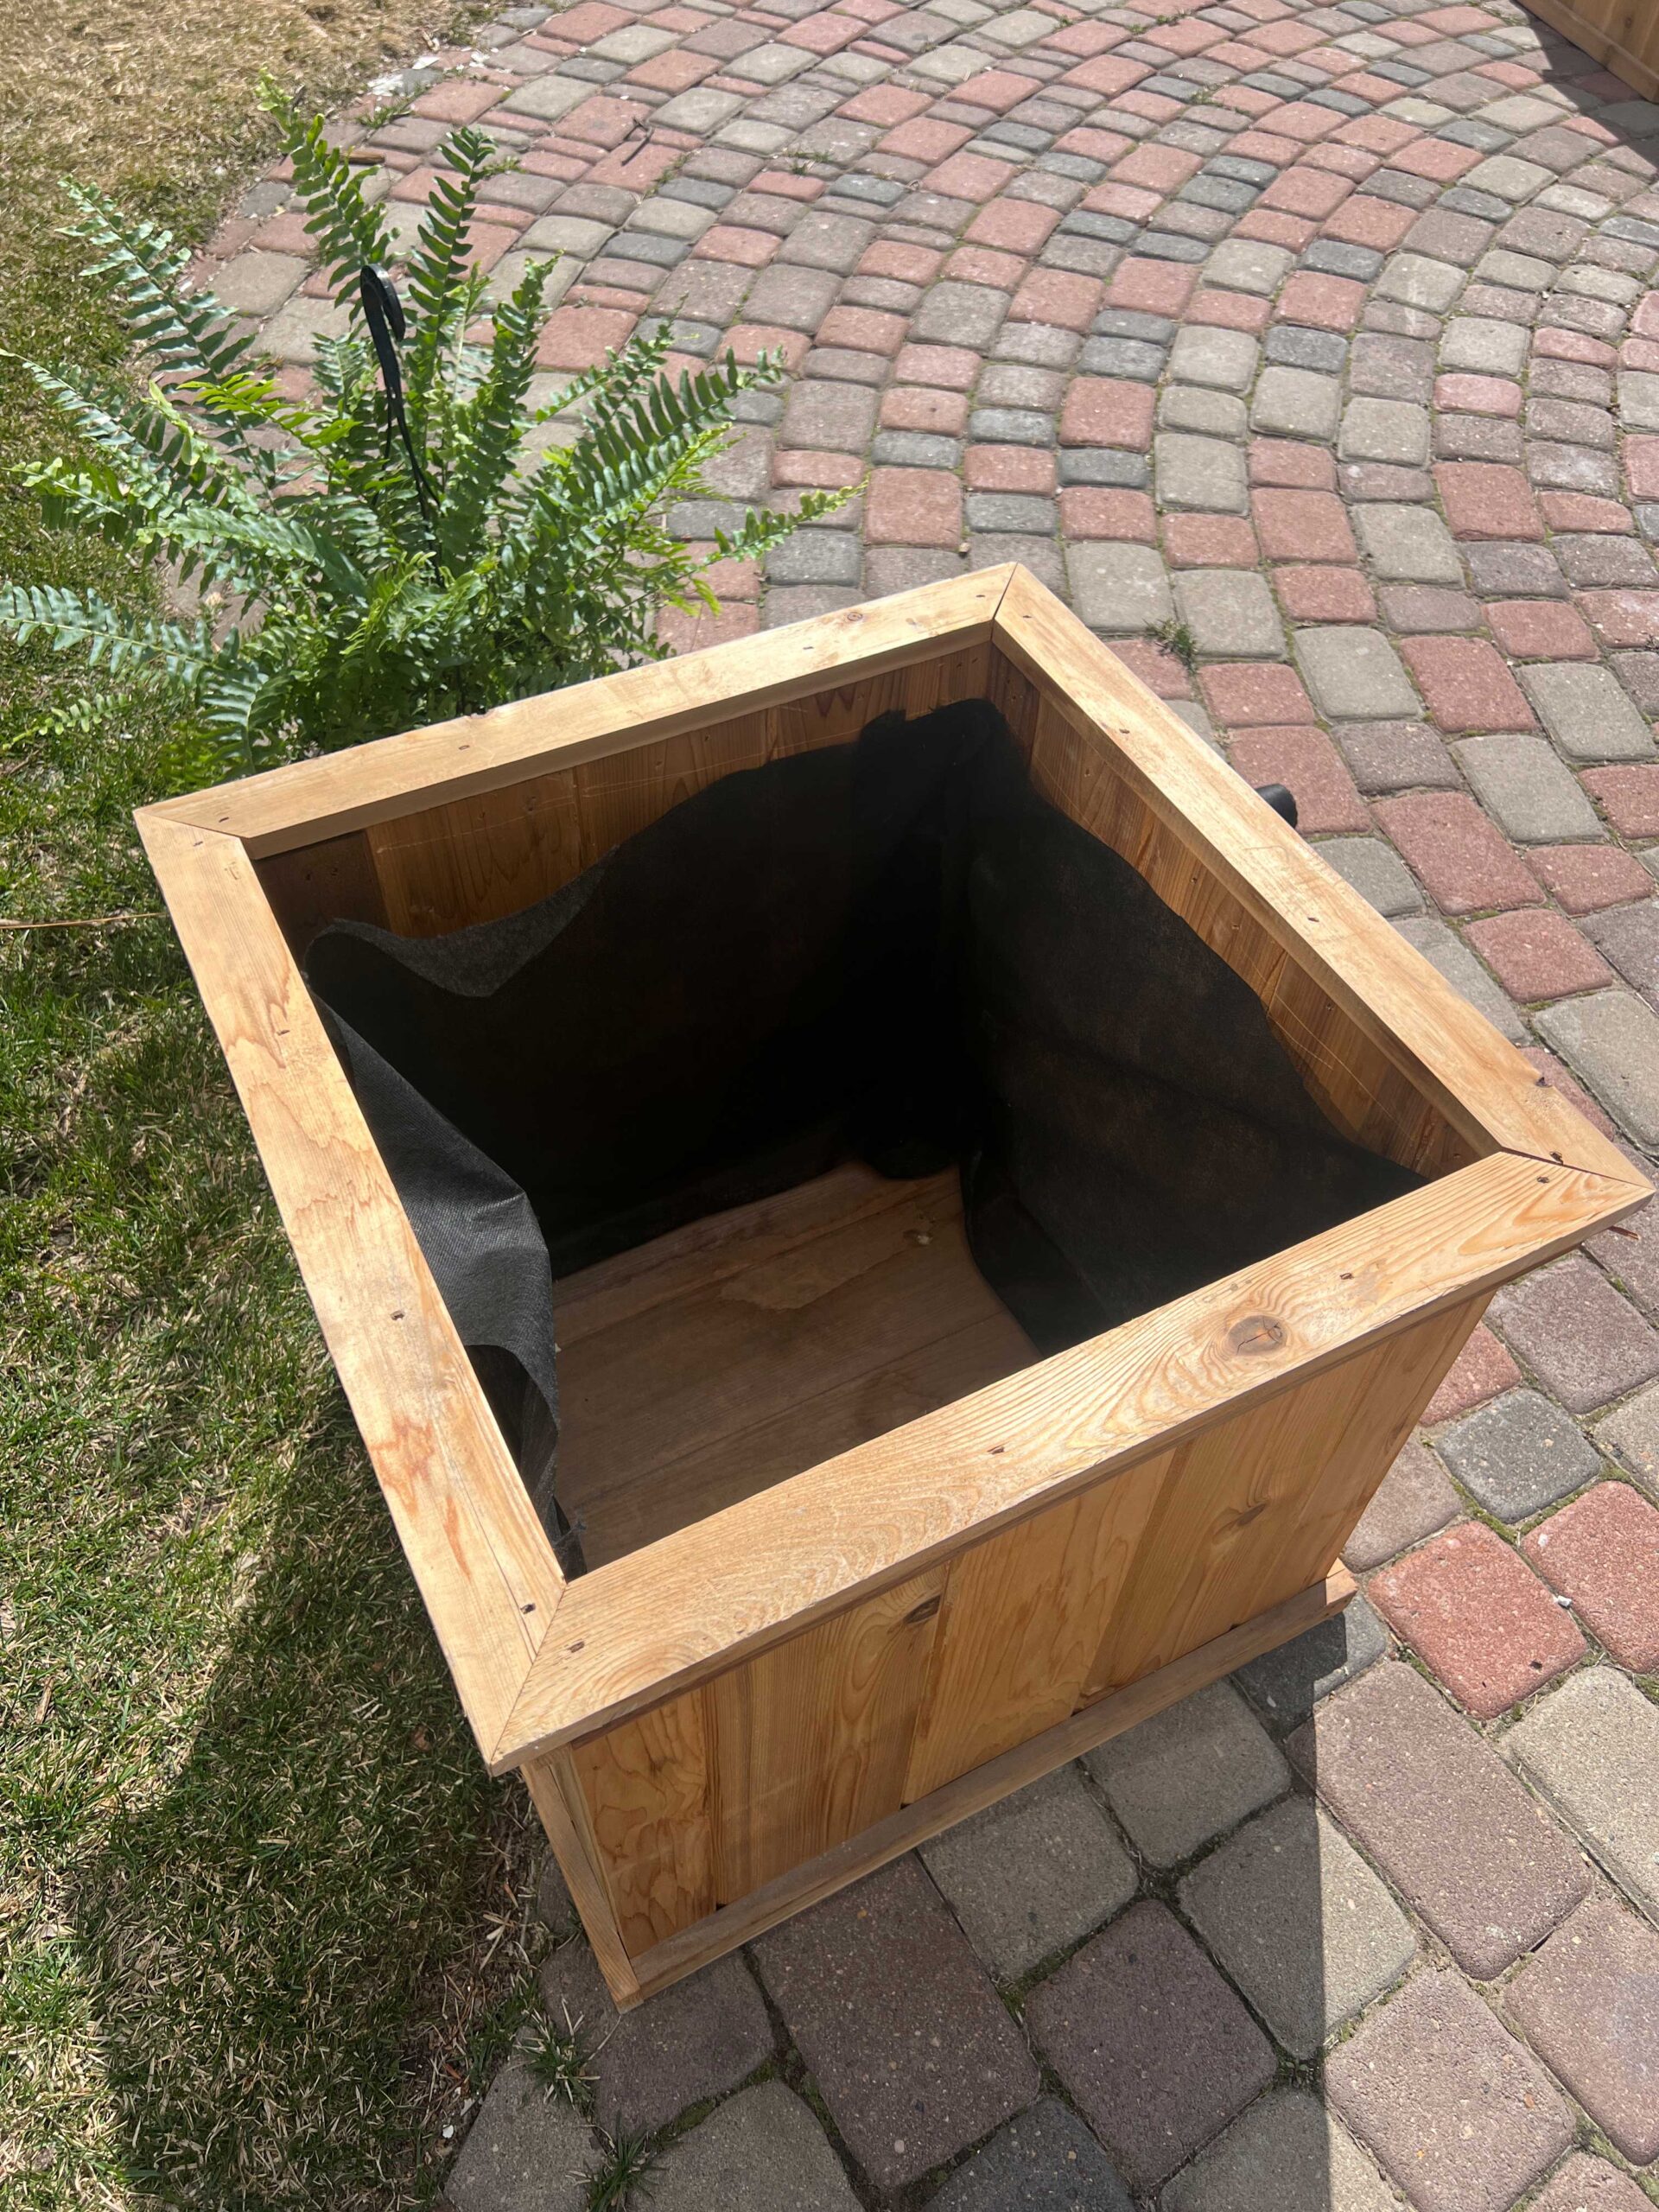
If you have a ceramic planter, you could add a layer of drainage rock to the bottom of the planter so that the hole in the planter is not blocked by the bucket. A layer of drainage rock will help if you need to level your poles a little bit, too!
We placed our buckets in the planters and made sure they were level. If they are not, you can add some dirt, gravel, or even wood shims under your planters so they sit straight. Nothing ruins the look of outdoor lighting like a crooked pole!
Once you are happy with their location, and levelled the buckets inside the planters, you can fill the space around them with dirt.
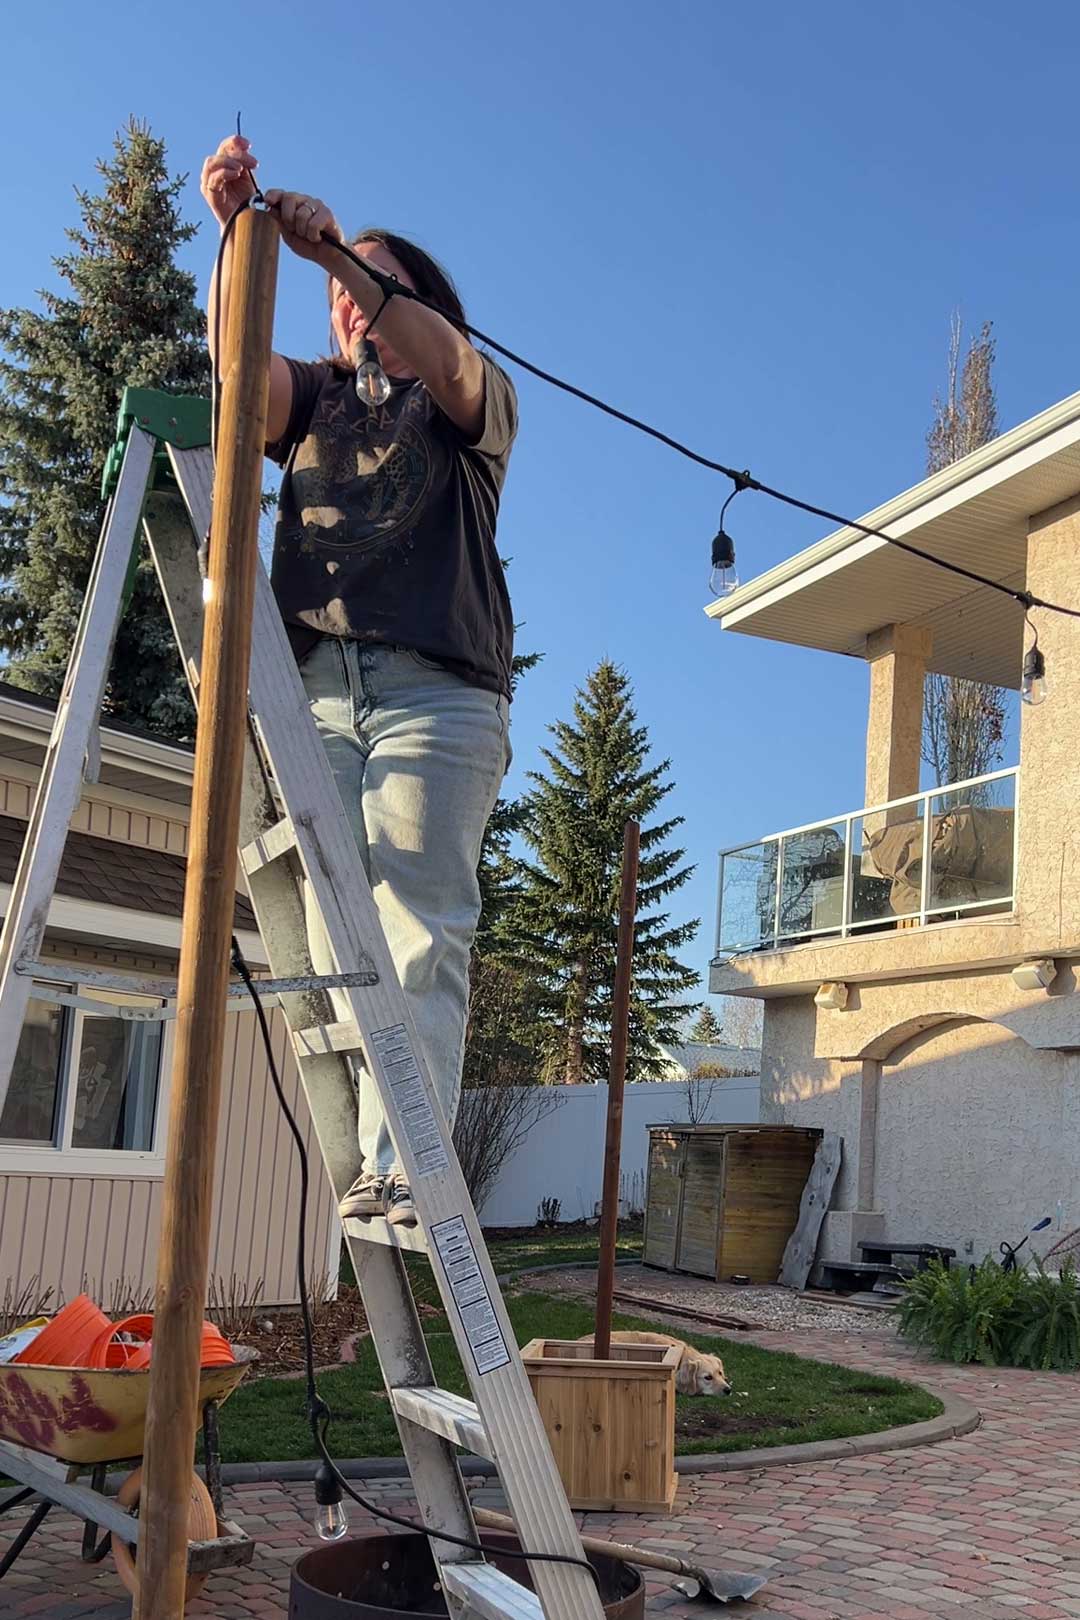
Step 5 – String the Lights
I bought these string lights, which I have had before at our last house and they are excellent quality. If you are a Costco member they sell them in the spring there, or else you can find them here. They are commercial-grade string lights and good value for such a long string!
These cafe lights also connect end to end, which is important if you want continuous patio lights! They also have shatter-resistant plastic bulbs which I feel better about having as backyard lights than glass bulbs.
I bought 2 strings and easily made it all the way around our yard.
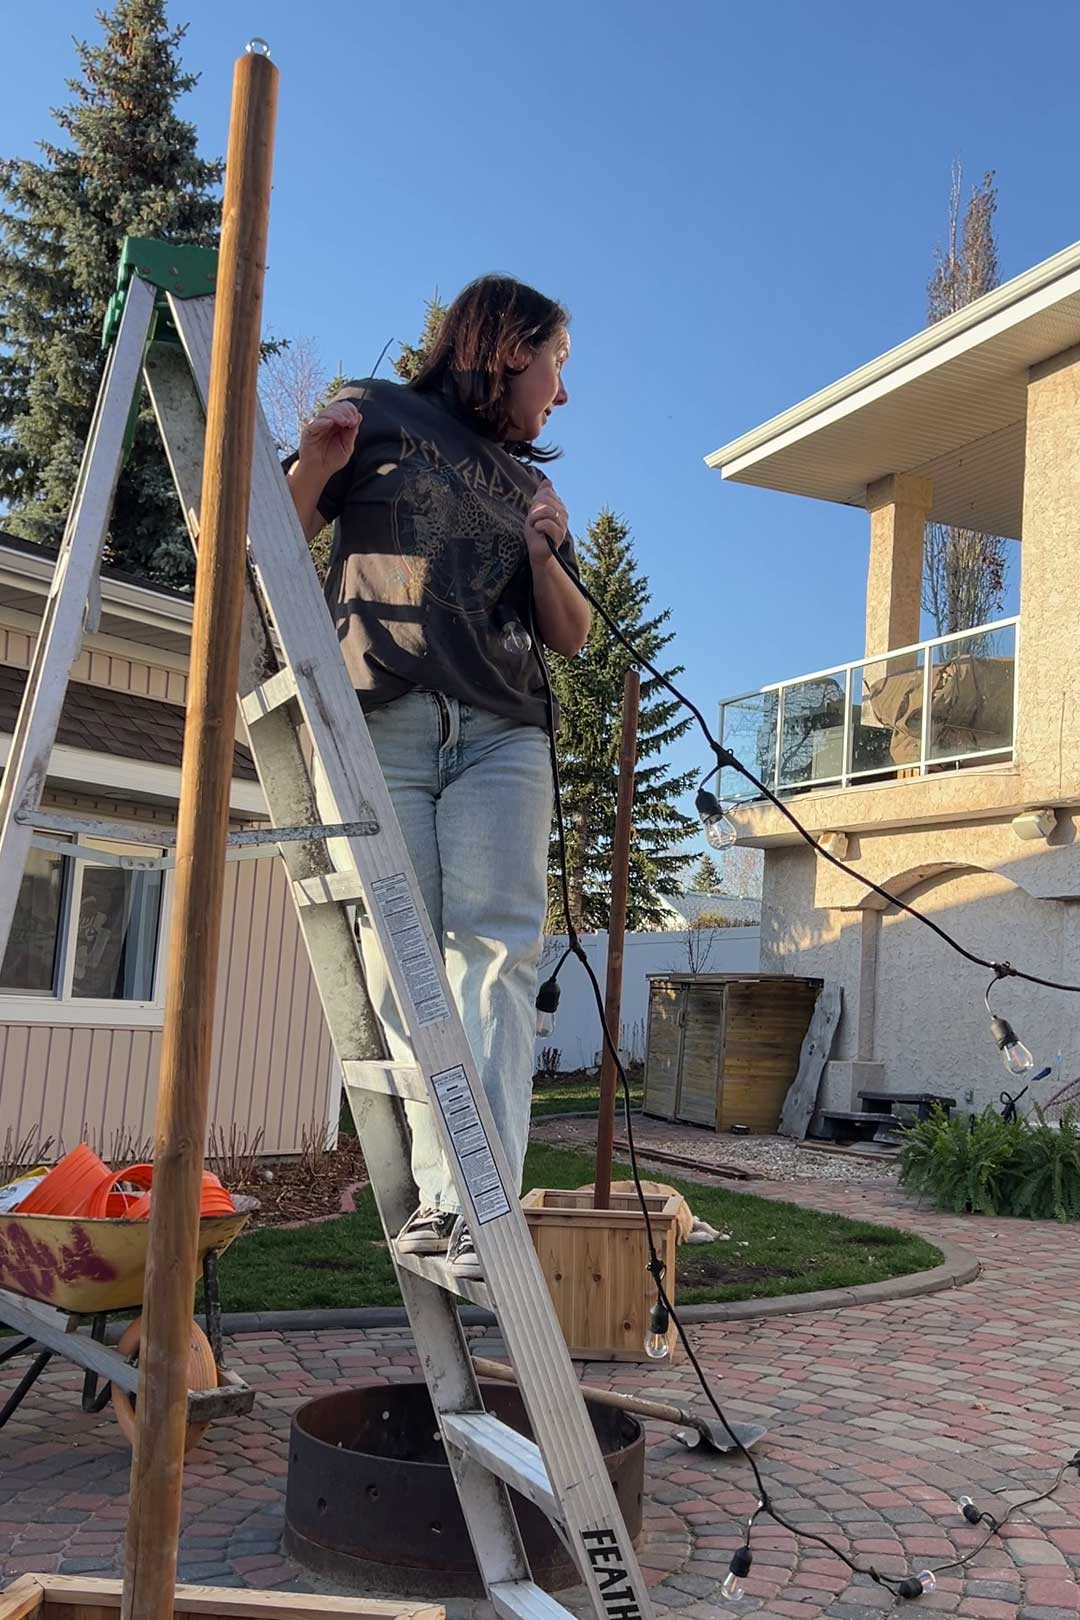
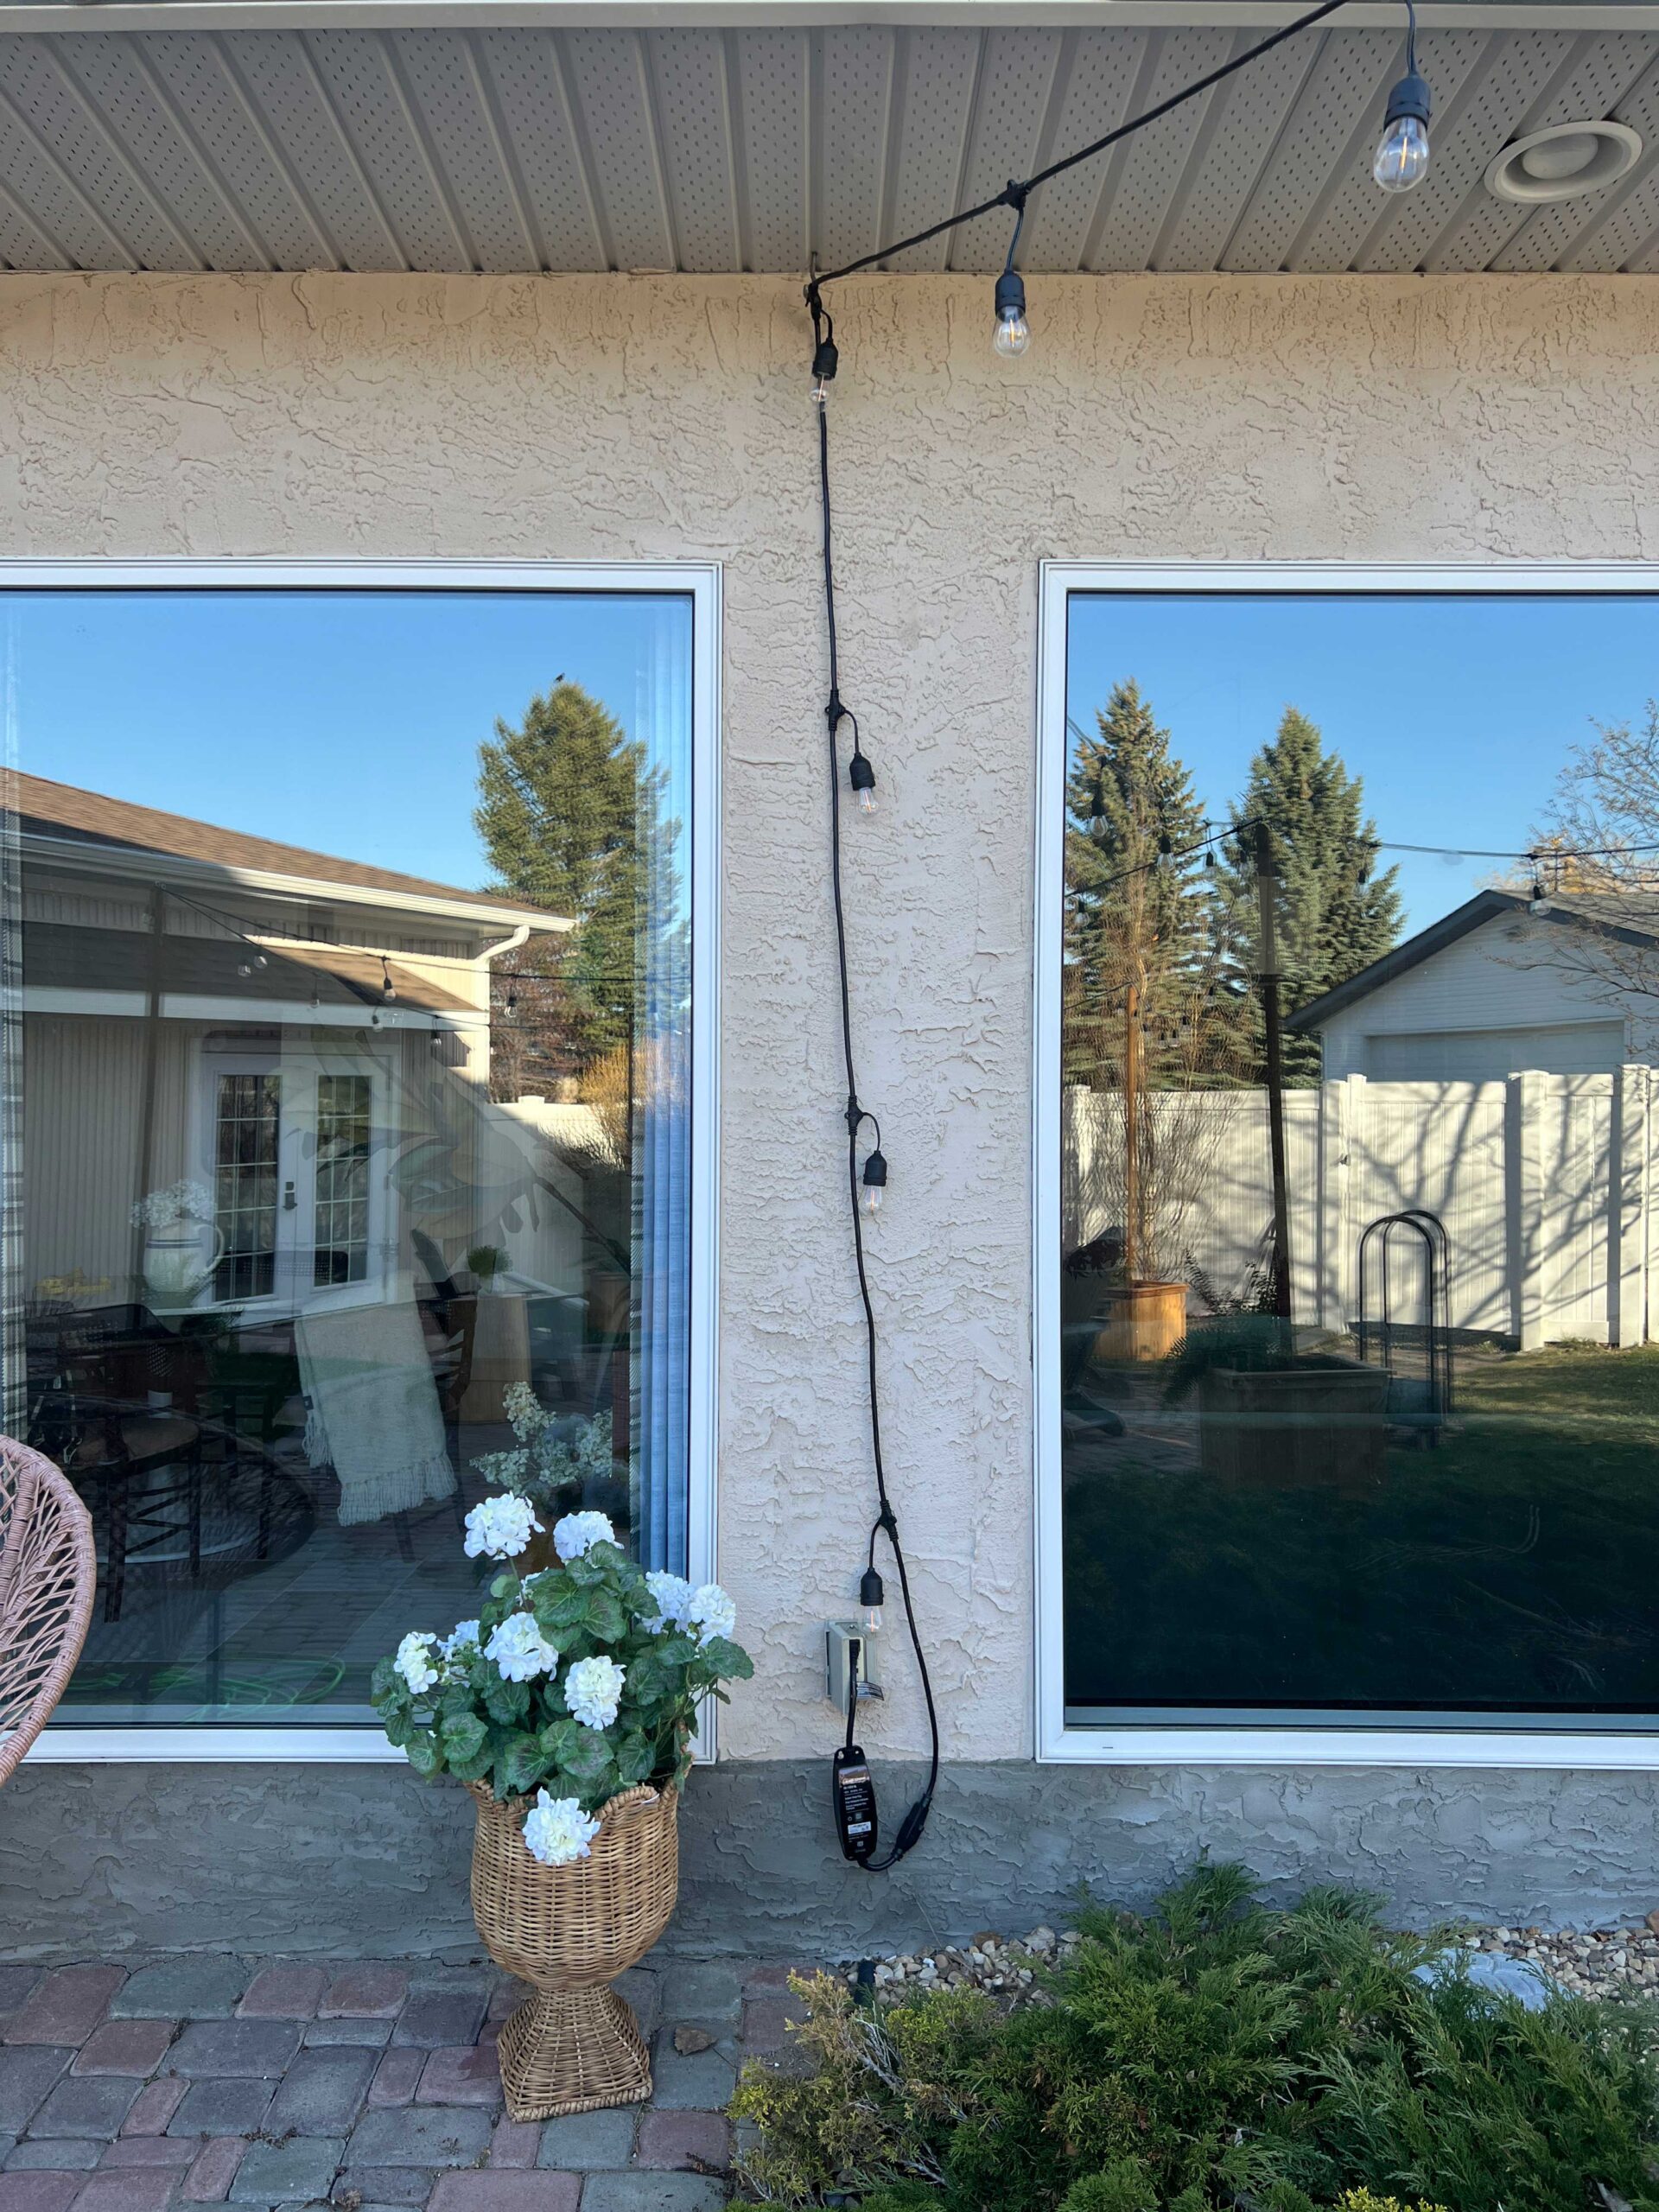
We started with the plug end at the house, leaving enough slack to plug it in. We added a hook just above the plug on the house itself and used some cable ties to attach the string there.
The next step was to string them from pole to pole to pole. Use zip ties as you go to secure them, and snip off the excess.
You may have some other natural supports you want to work into your plan like fence poles or decks, it really up to you what you want to attach it to!
Instead of plugging it in directly or using an outdoor extension cord, we plugged ours into a Caseta Outdoor Smart Plug! That way we can turn it on with our phone or with Alexa.
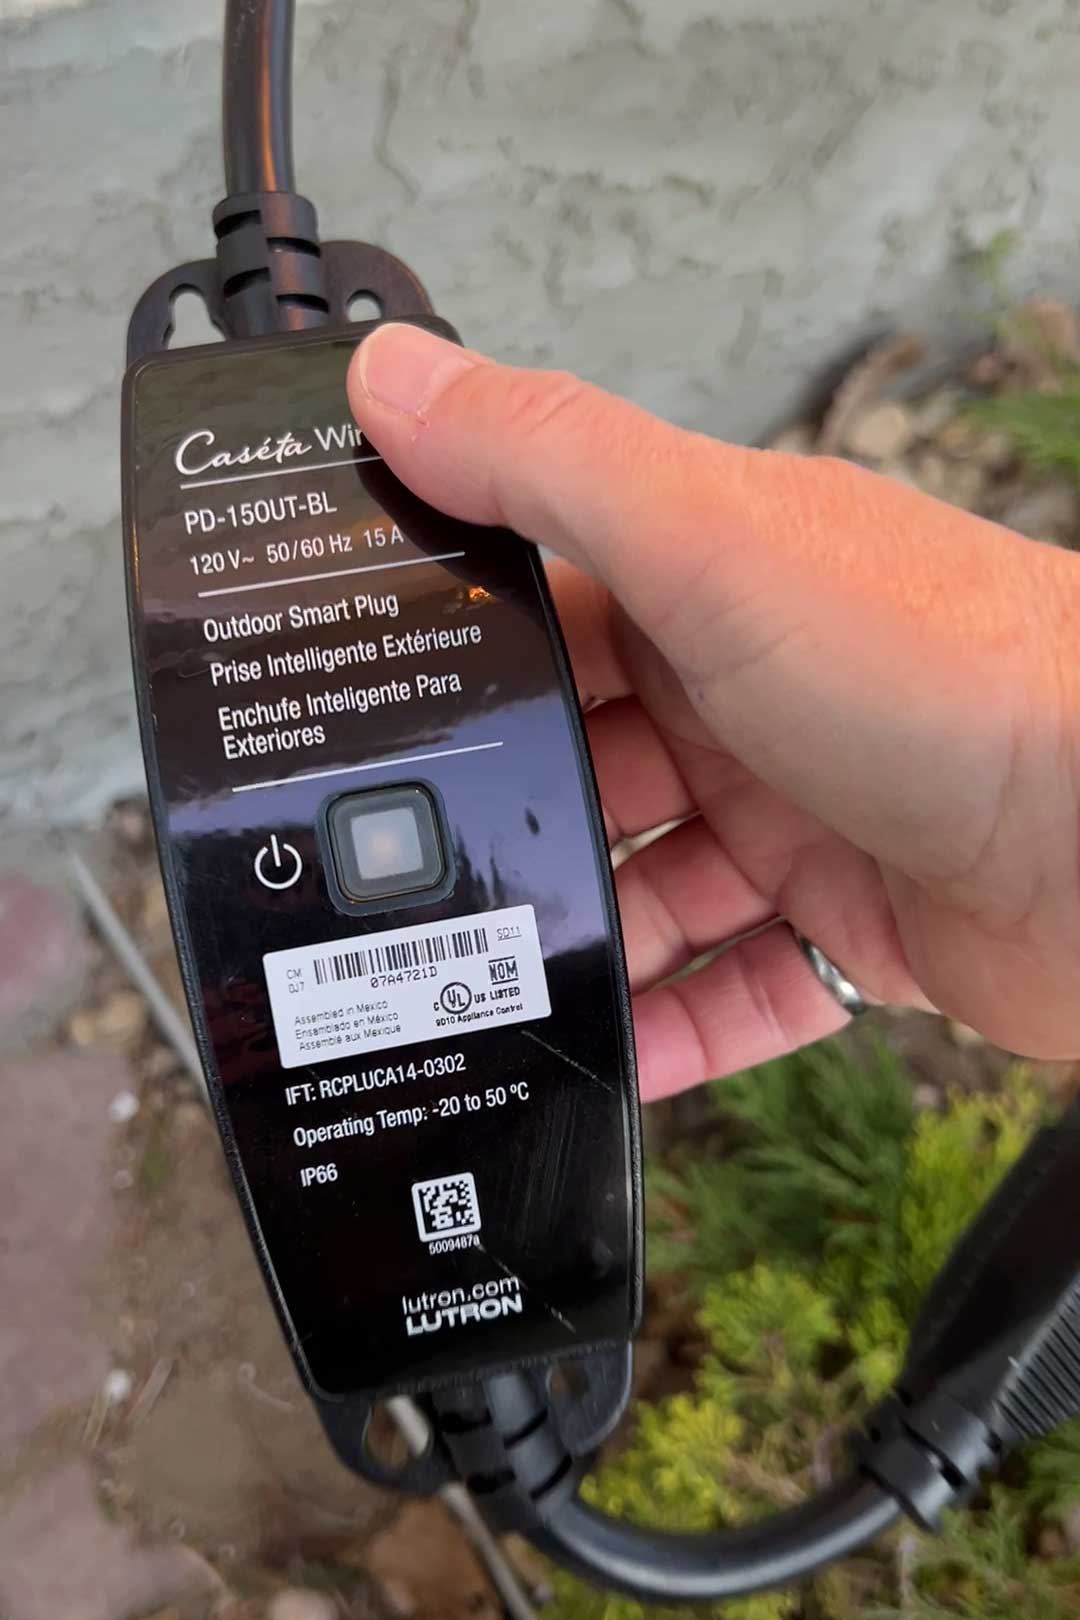
I’ve got it set up right now to turn on at sunset and turn off at 11:00 every night! It’s magical seeing the yard light up every evening, and in the winter I plan to use the same smart plug for my Christmas lights.
A Little Tip on Keeping the Poles Straight
We thought that the weight of the buckets inside the planters would have been enough to keep the poles straight. However, once we got the string lights up and pulled them tight, we found that the tension on the lights caused the poles to lean in a little. They didn’t seem like they were going to fall over, but the dirt that was packed around the concrete was not enough to keep them straight.
In order to combat this, we grabbed some metal strapping and strapped them around the pole and screwed them to the inside of the planter. That did the job.

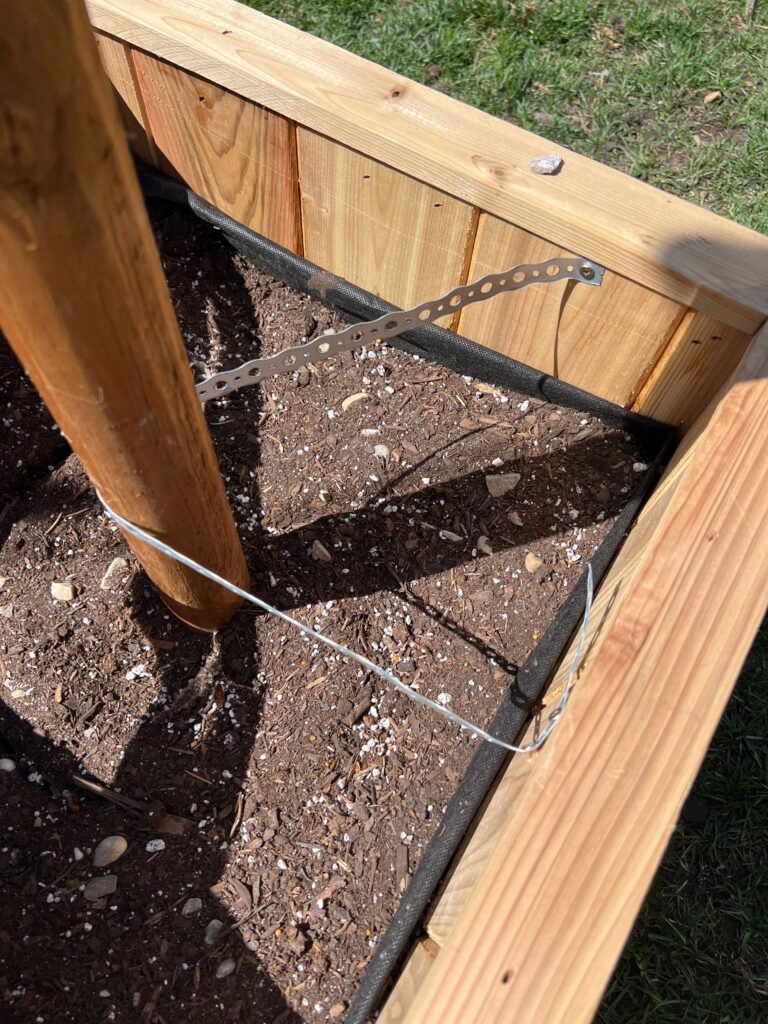
If we had to do it again, I think we would have just poured concrete directly into the planters so that there was no room around them for dirt, so they couldn’t move. That would have required a fair bit more concrete with the large planters we chose, though.
What we did do ended up working out great in the end!
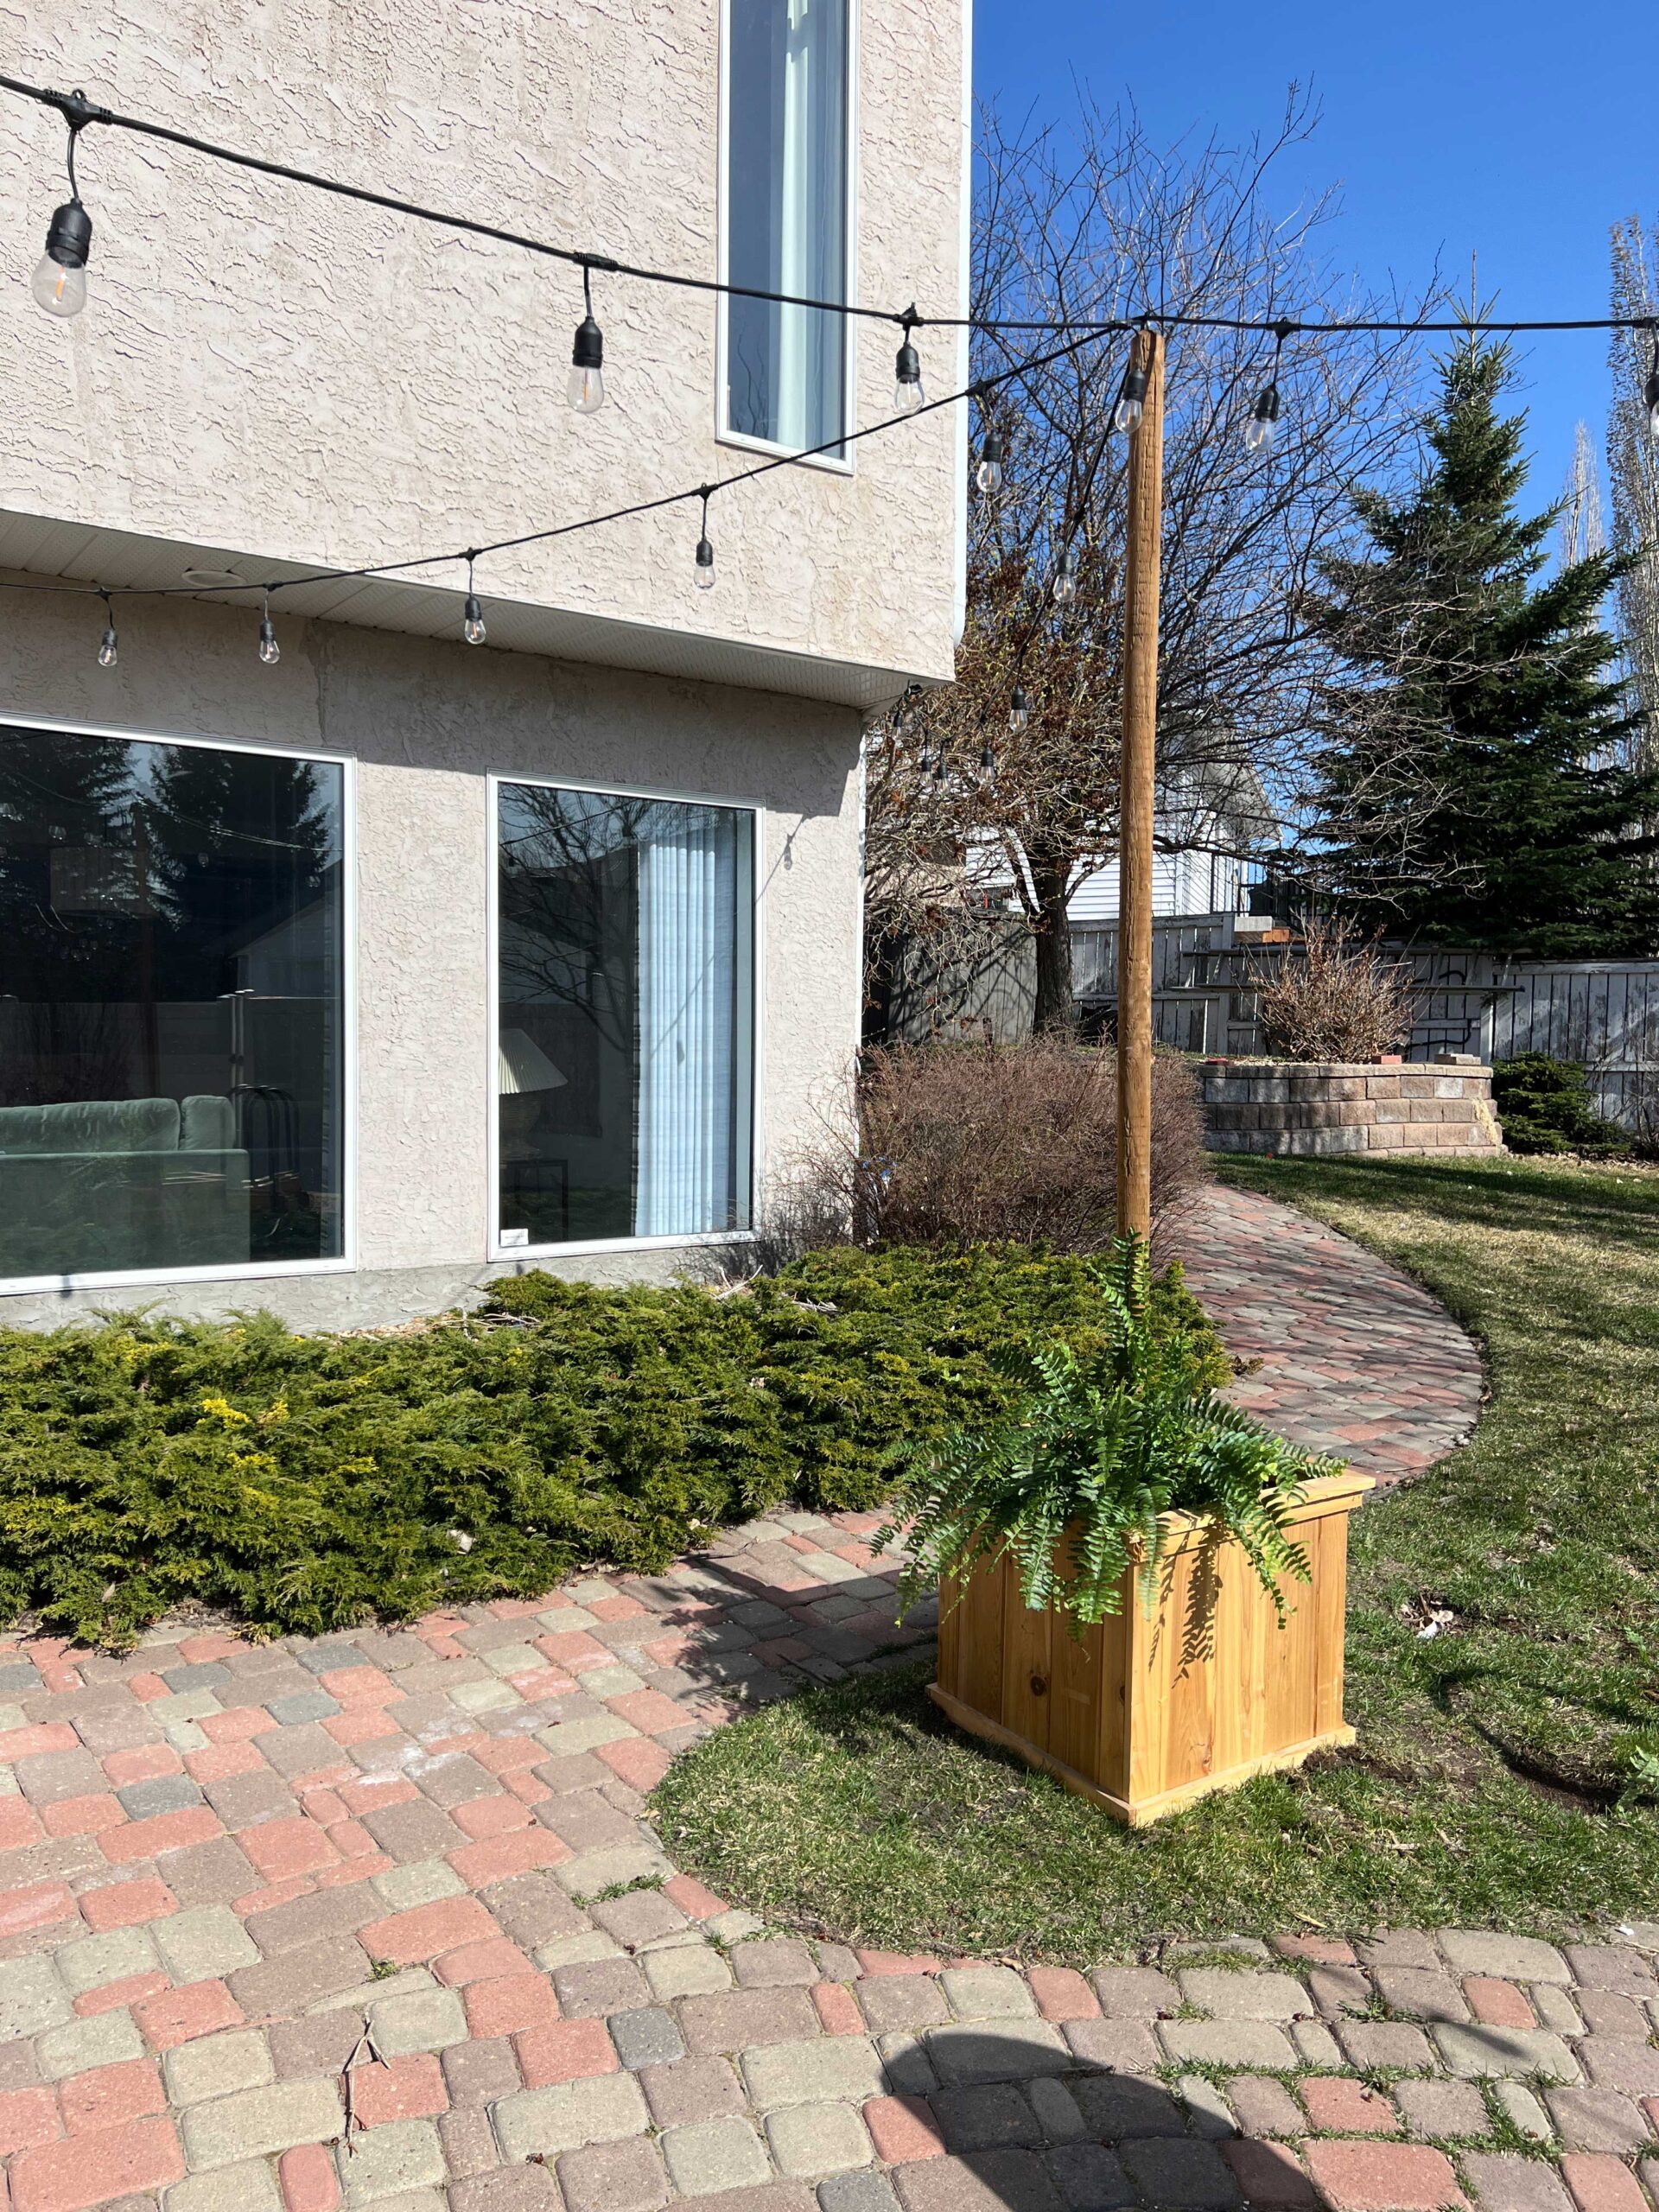
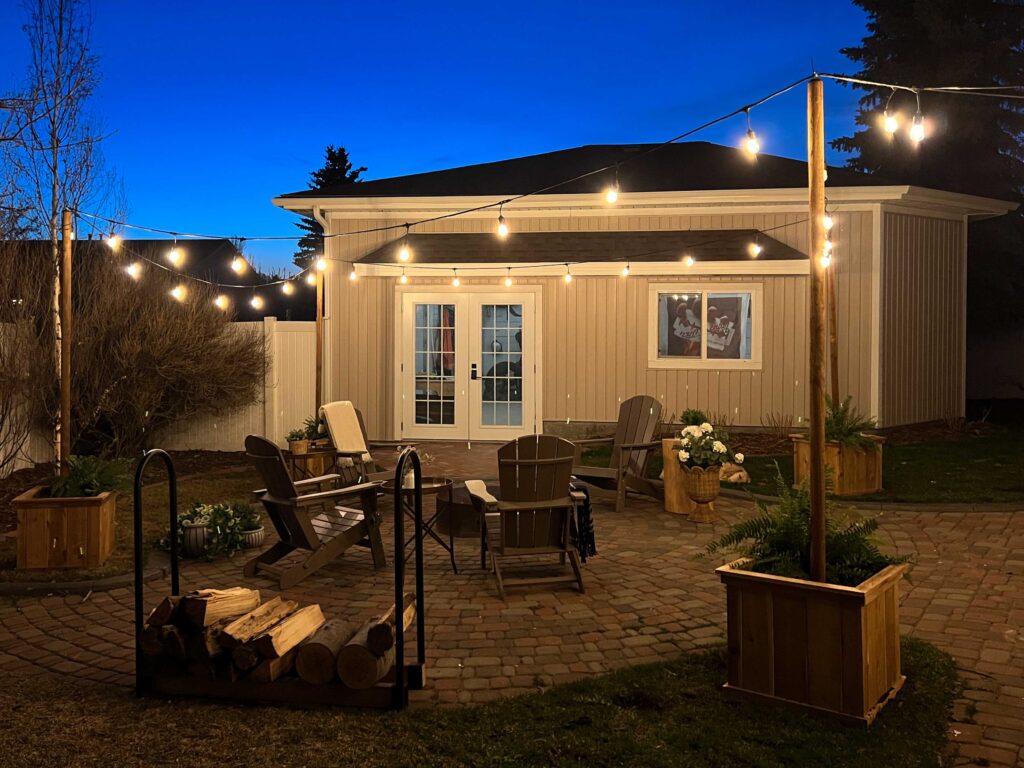
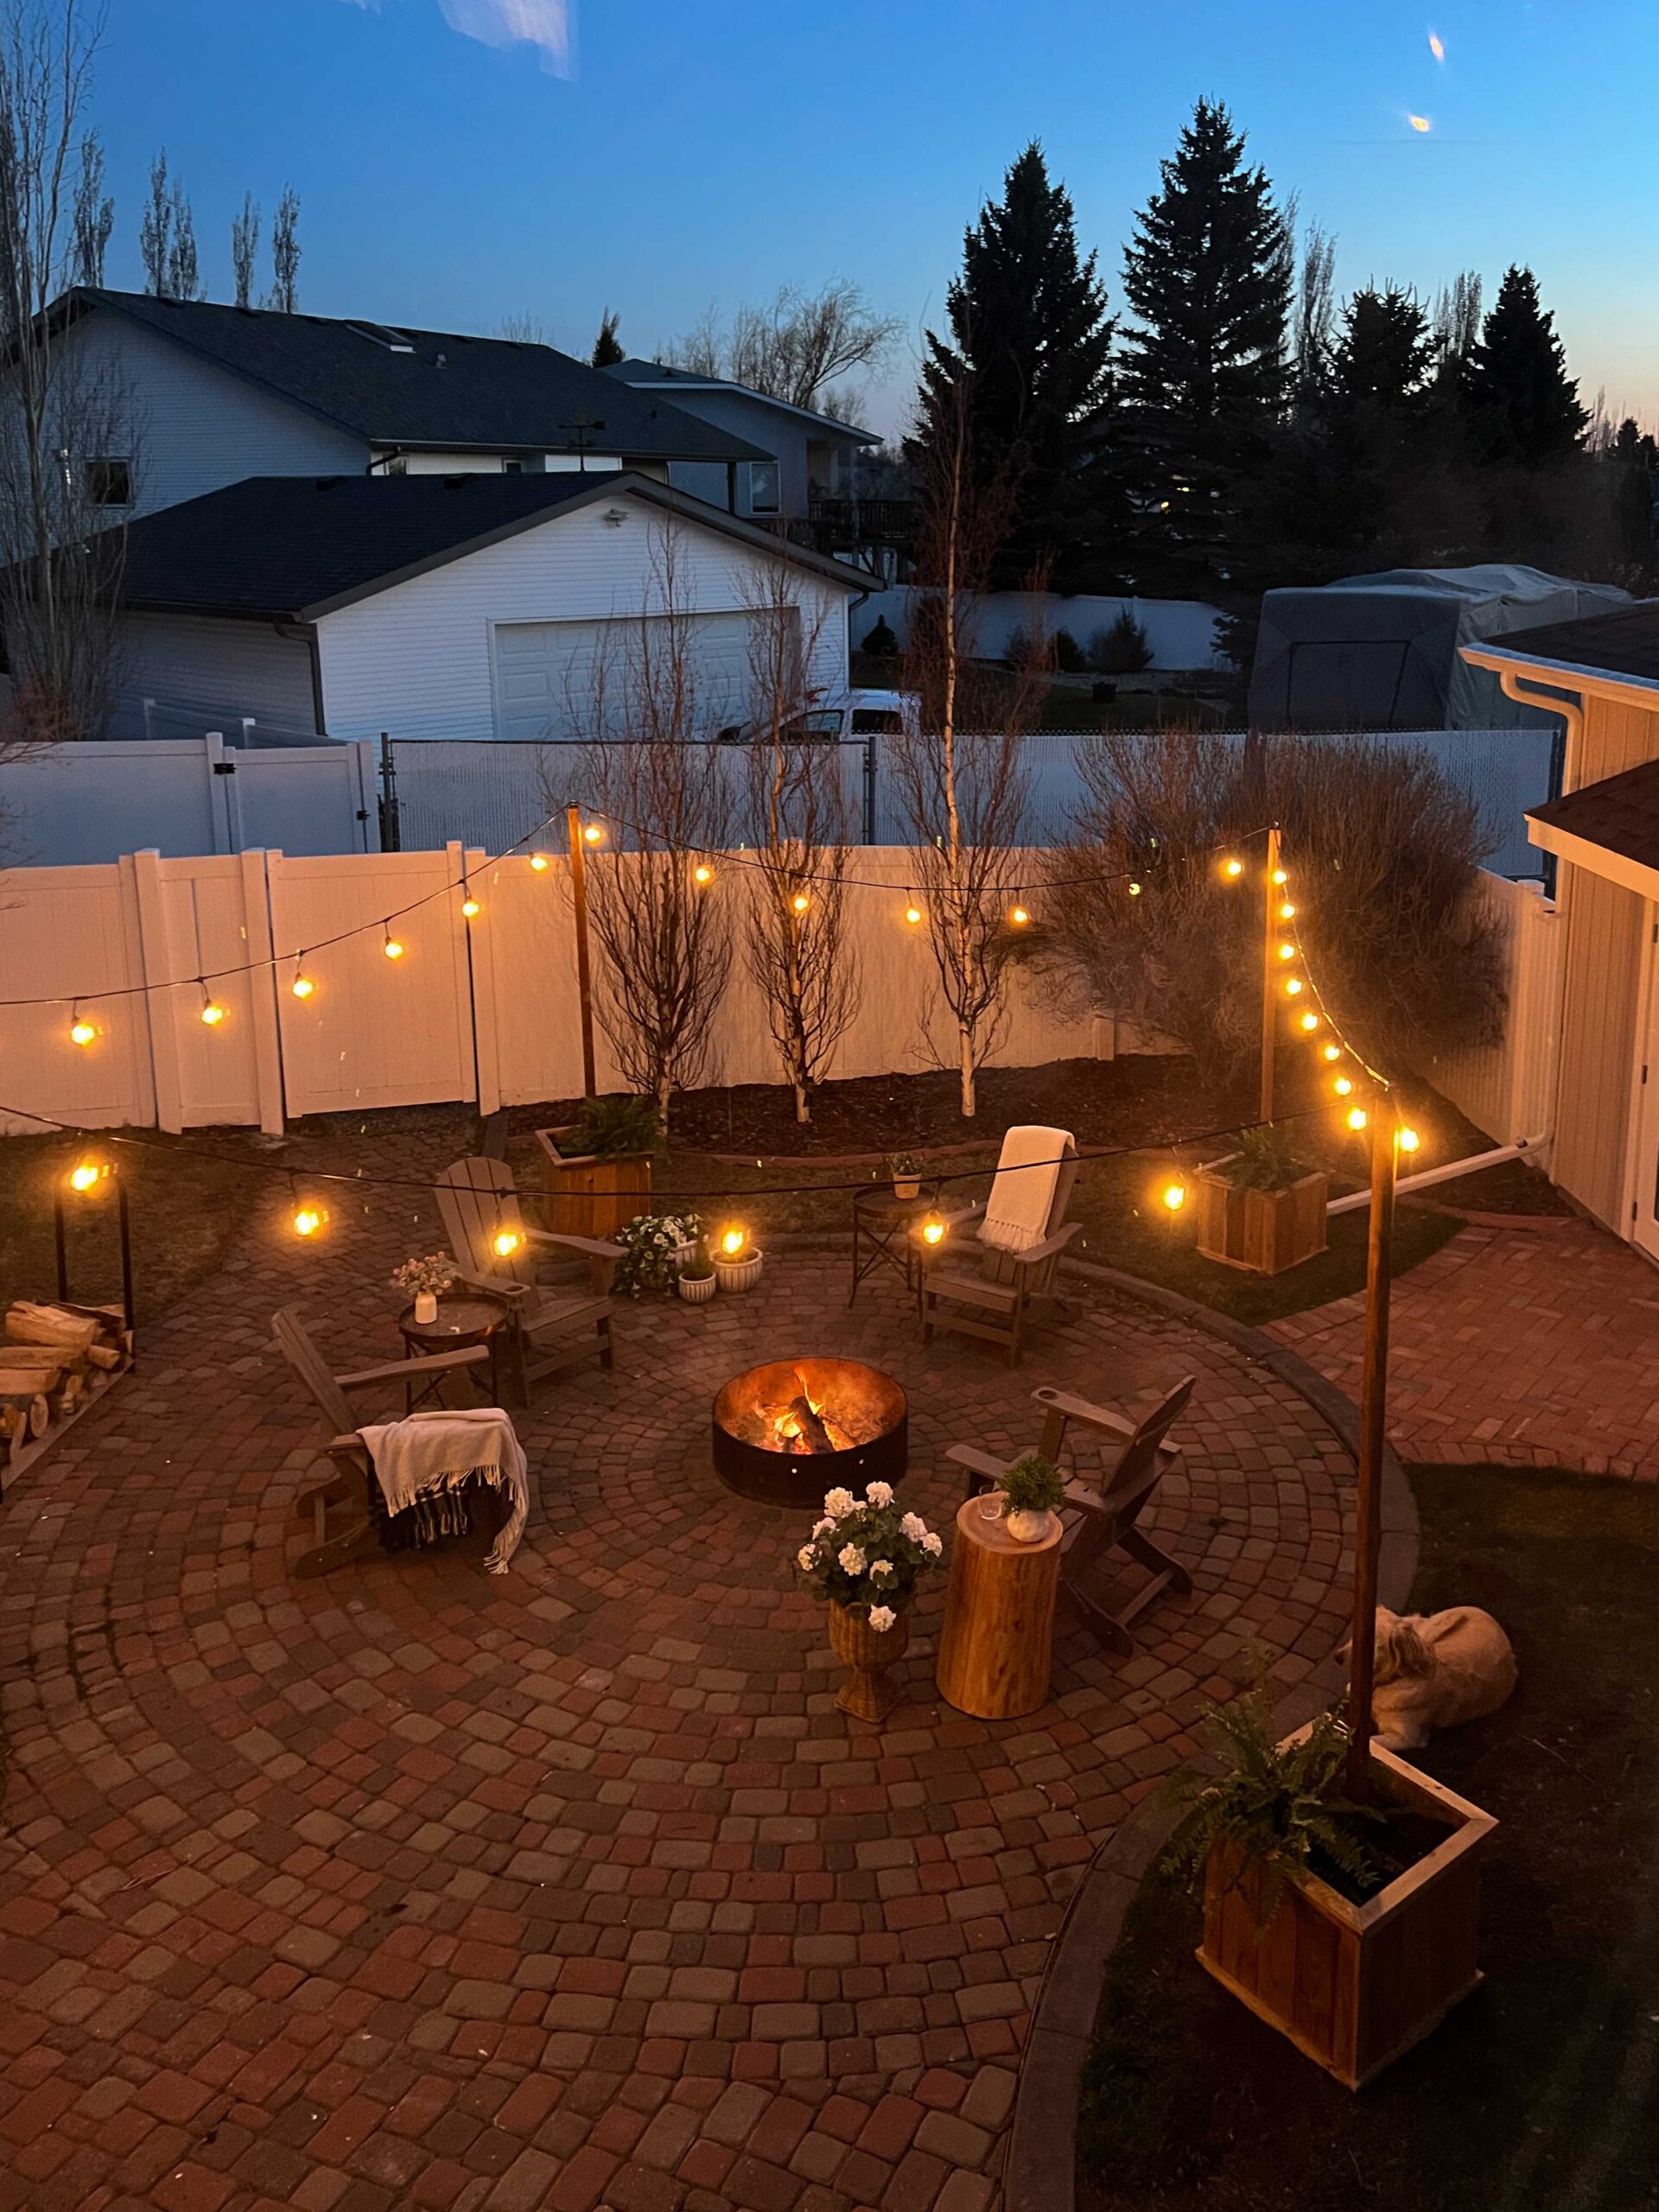
The Results!
I bought a few more plants and a little outdoor decor and here is how our outdoor area turned out! We love the warm glow of the lights so much, and the planters add some nice greenery to the yard. I underestimated how much we would love having this backyard lighting set up!


I like these patio string lights so much that I might add some more to our covered patio!