How to Design and Install Cabinet Toe Kicks for Your Kitchen
When I designed my kitchen cabinets, I had a dream of installing gorgeous furniture-style flush cabinet toe kicks, but I didn’t know exactly how to do that ourselves. I was also a little worried about whether or not a flush mount toe kick would be awkward to stand at. There was also the issue of our built-in dishwasher, which would stand out like a sore thumb without a toe kick. After working out all of these issues through our reno, I’ve compiled this post on how to design toe kicks for your kitchen cabinets, including tips if you want to DIY.
This post may contain affiliate links. That means if you purchase anything from these links I earn a small commission, at no extra cost to you! This helps support my blog, so thank you!
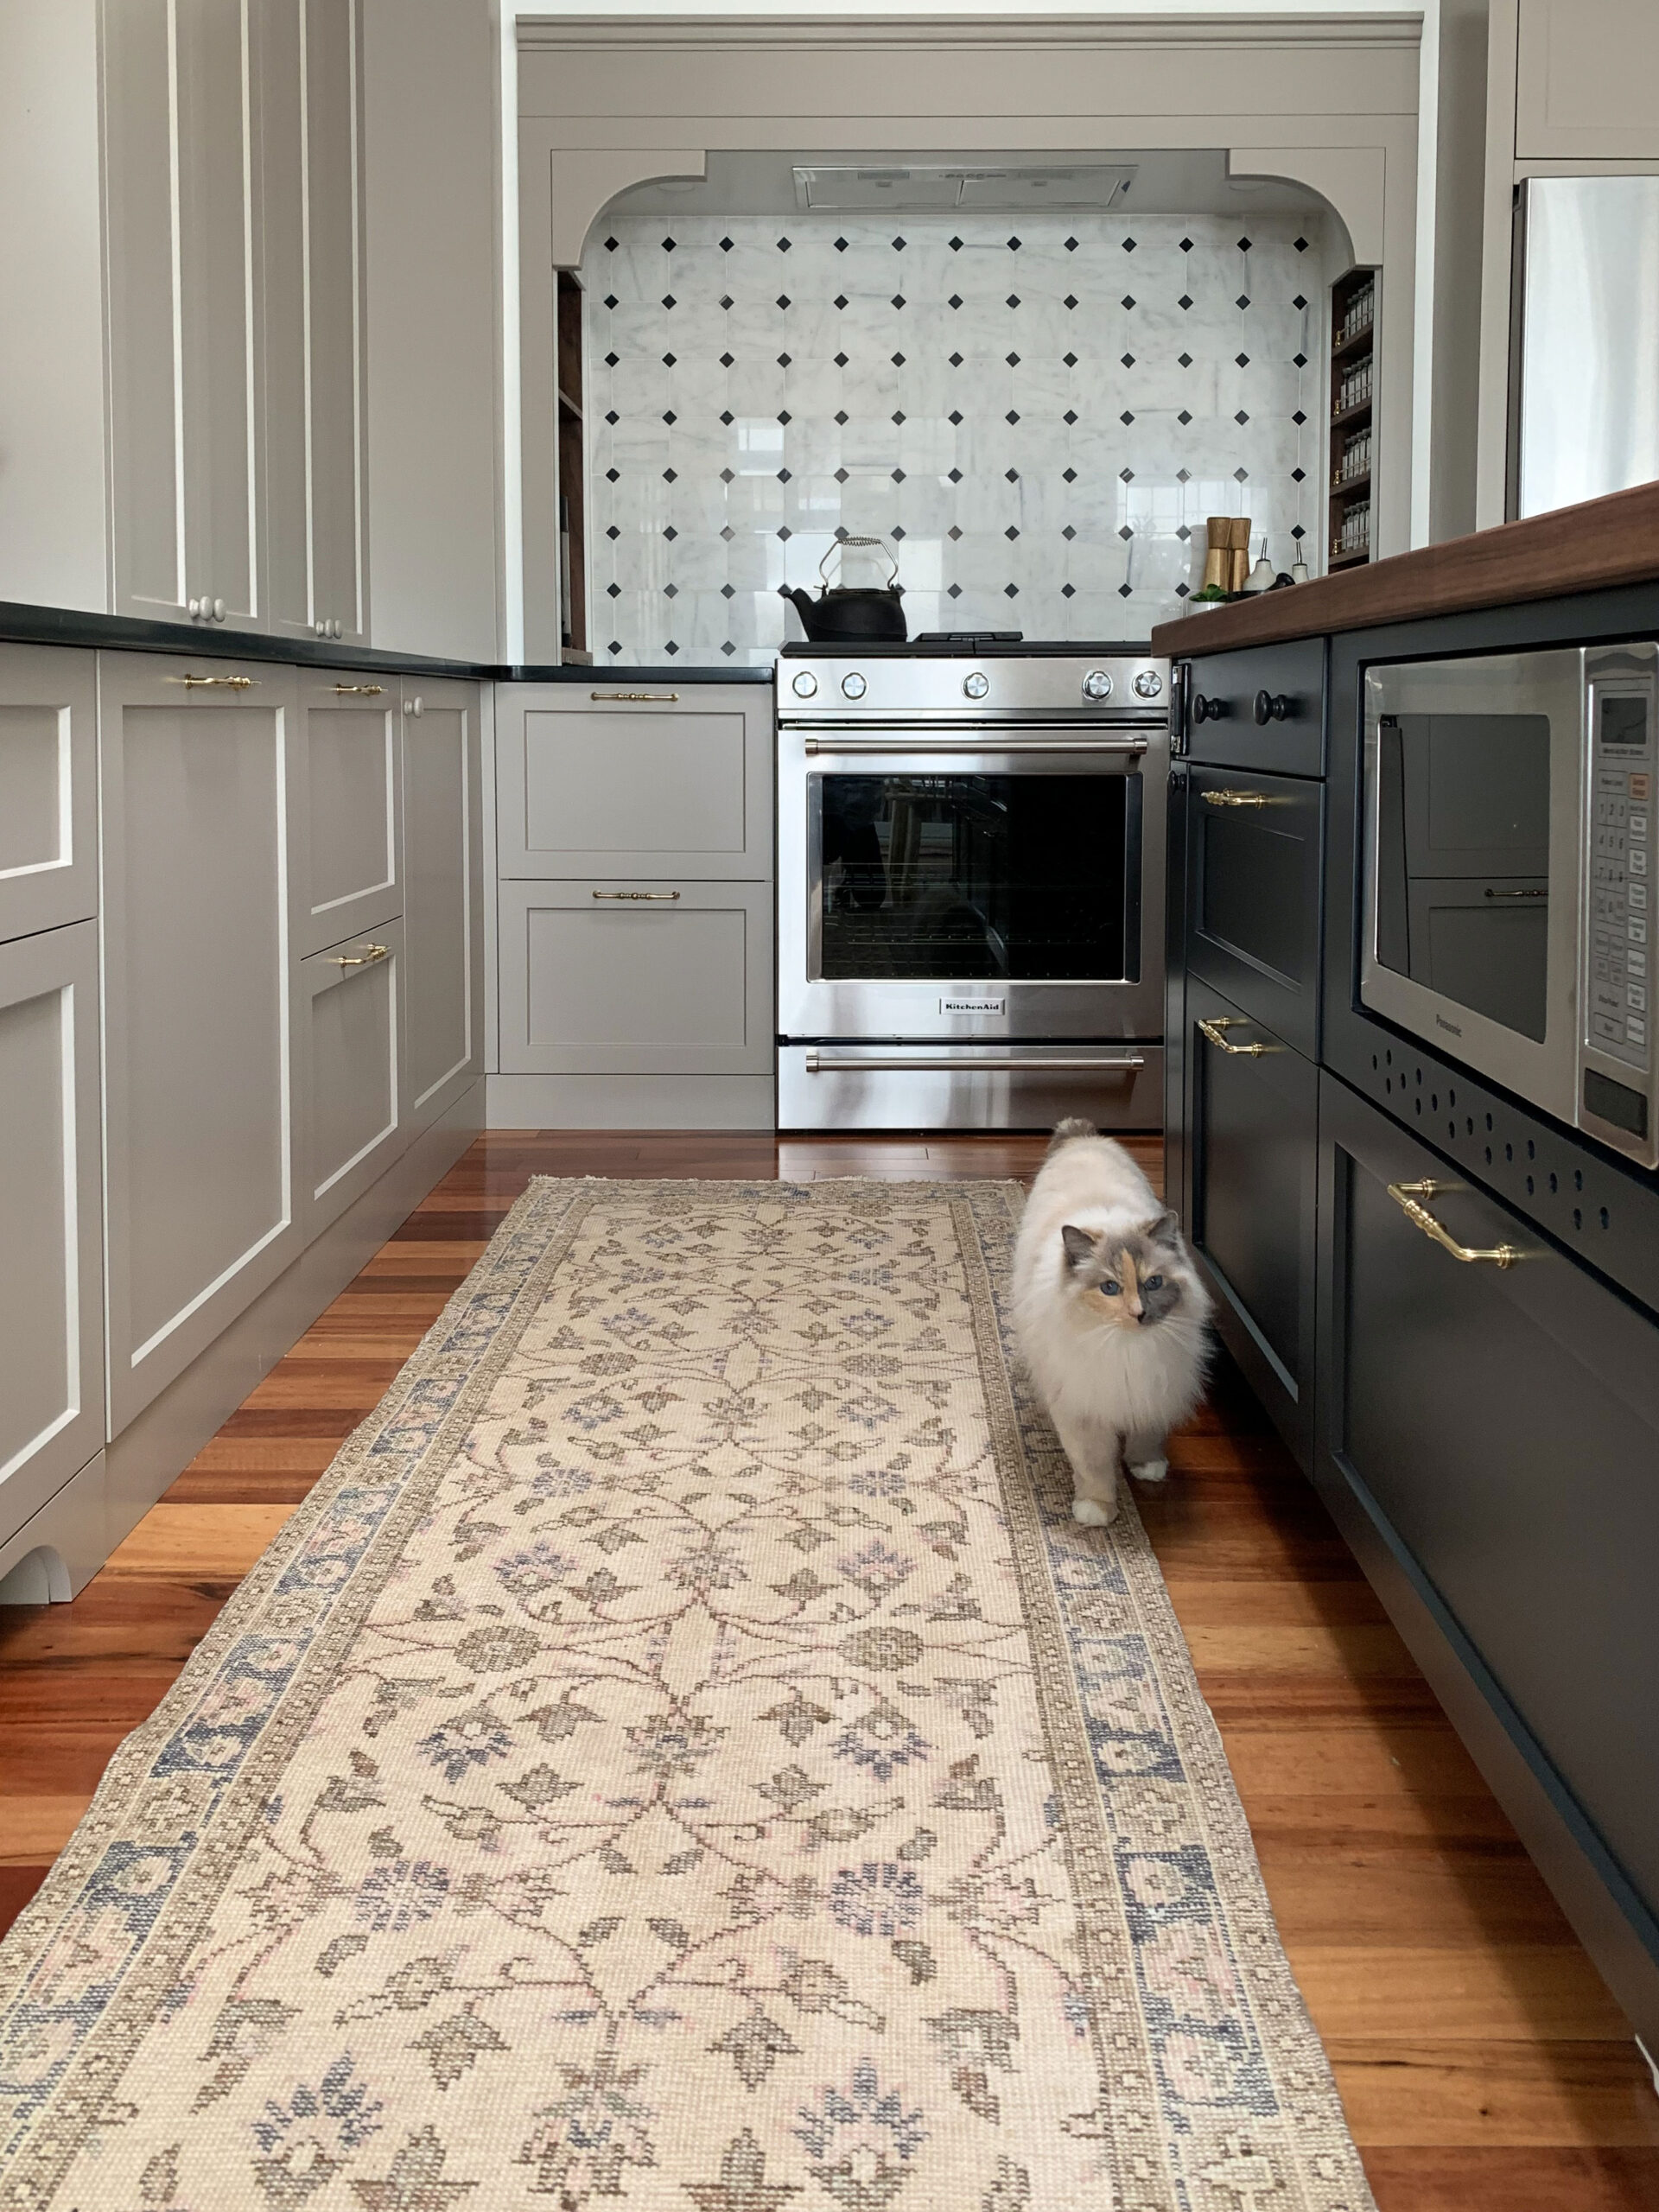
Table of Contents
- Toe Kick FAQs
- How to Install Toe Kicks
- Specialty Cabinet Toe Kicks
- Would I Install Flush Mount Toe Kicks again?
- You Might Also Like:
Toe Kick FAQs
What is a toe kick?
What do I mean when I am talking about a “toe kick”? A kitchen cabinet consists of a plywood box that has a door on it. If you were to put this cabinet directly on the floor, you can imagine that the door might scrape across the floor. If your house is anything like mine, it would also be picking up mass amounts of dog hair along the way!
A toe kick covers the space that exists between the bottom of the cabinets and the floor. It usually matches the materials of your kitchen cabinets and acts as a filler piece covering the cabinet supports.
It is called a base cabinet “toe kick” because people think that this is the space for your toes to sit when you are standing at a cabinet because they are usually recessed (or set back slightly) from the front face of the cabinet.
I do not think that most people’s toes actually sit in that toe kick when standing at the counter. I have never found that my foot hits the cabinet, but more on that later!
What are toe kicks made from?
Toe kicks are usually made from the same material that the cabinet fronts are made from, to match. If the cabinets are painted MDF, generally the toe kick material is also painted MDF. Oak cabinets? Oak toe kicks. You get the picture. They are just trim pieces that are used to cover the unsightly gap in the toe kick areas.
What are the different options for toe kick designs for your kitchen design?
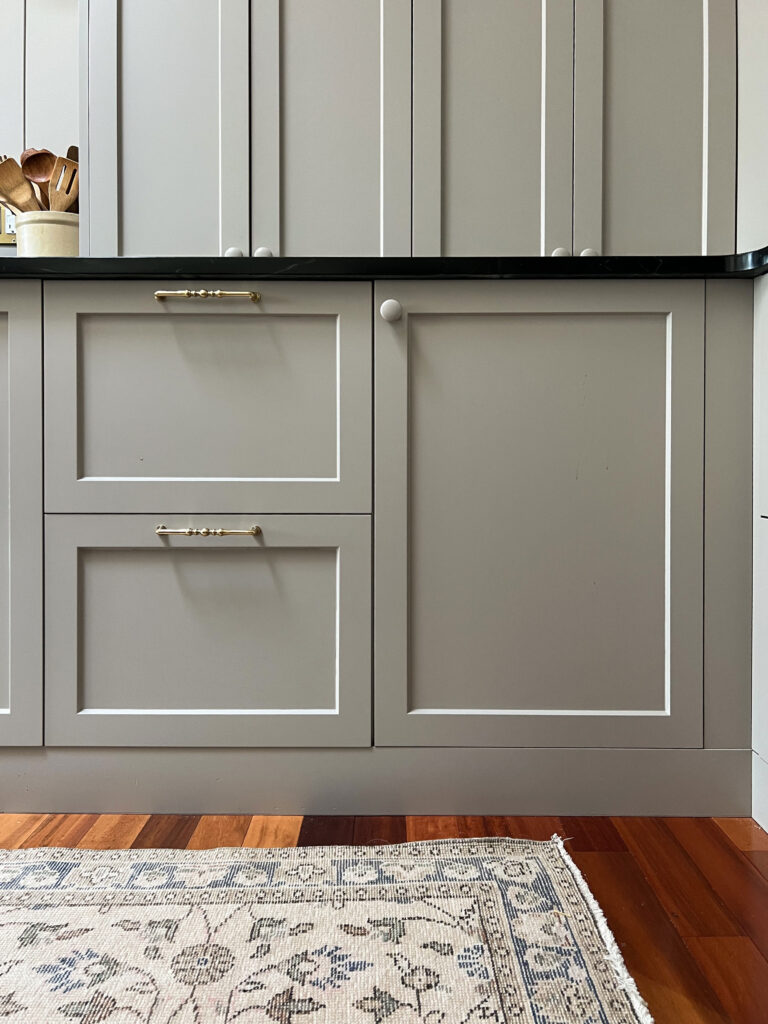
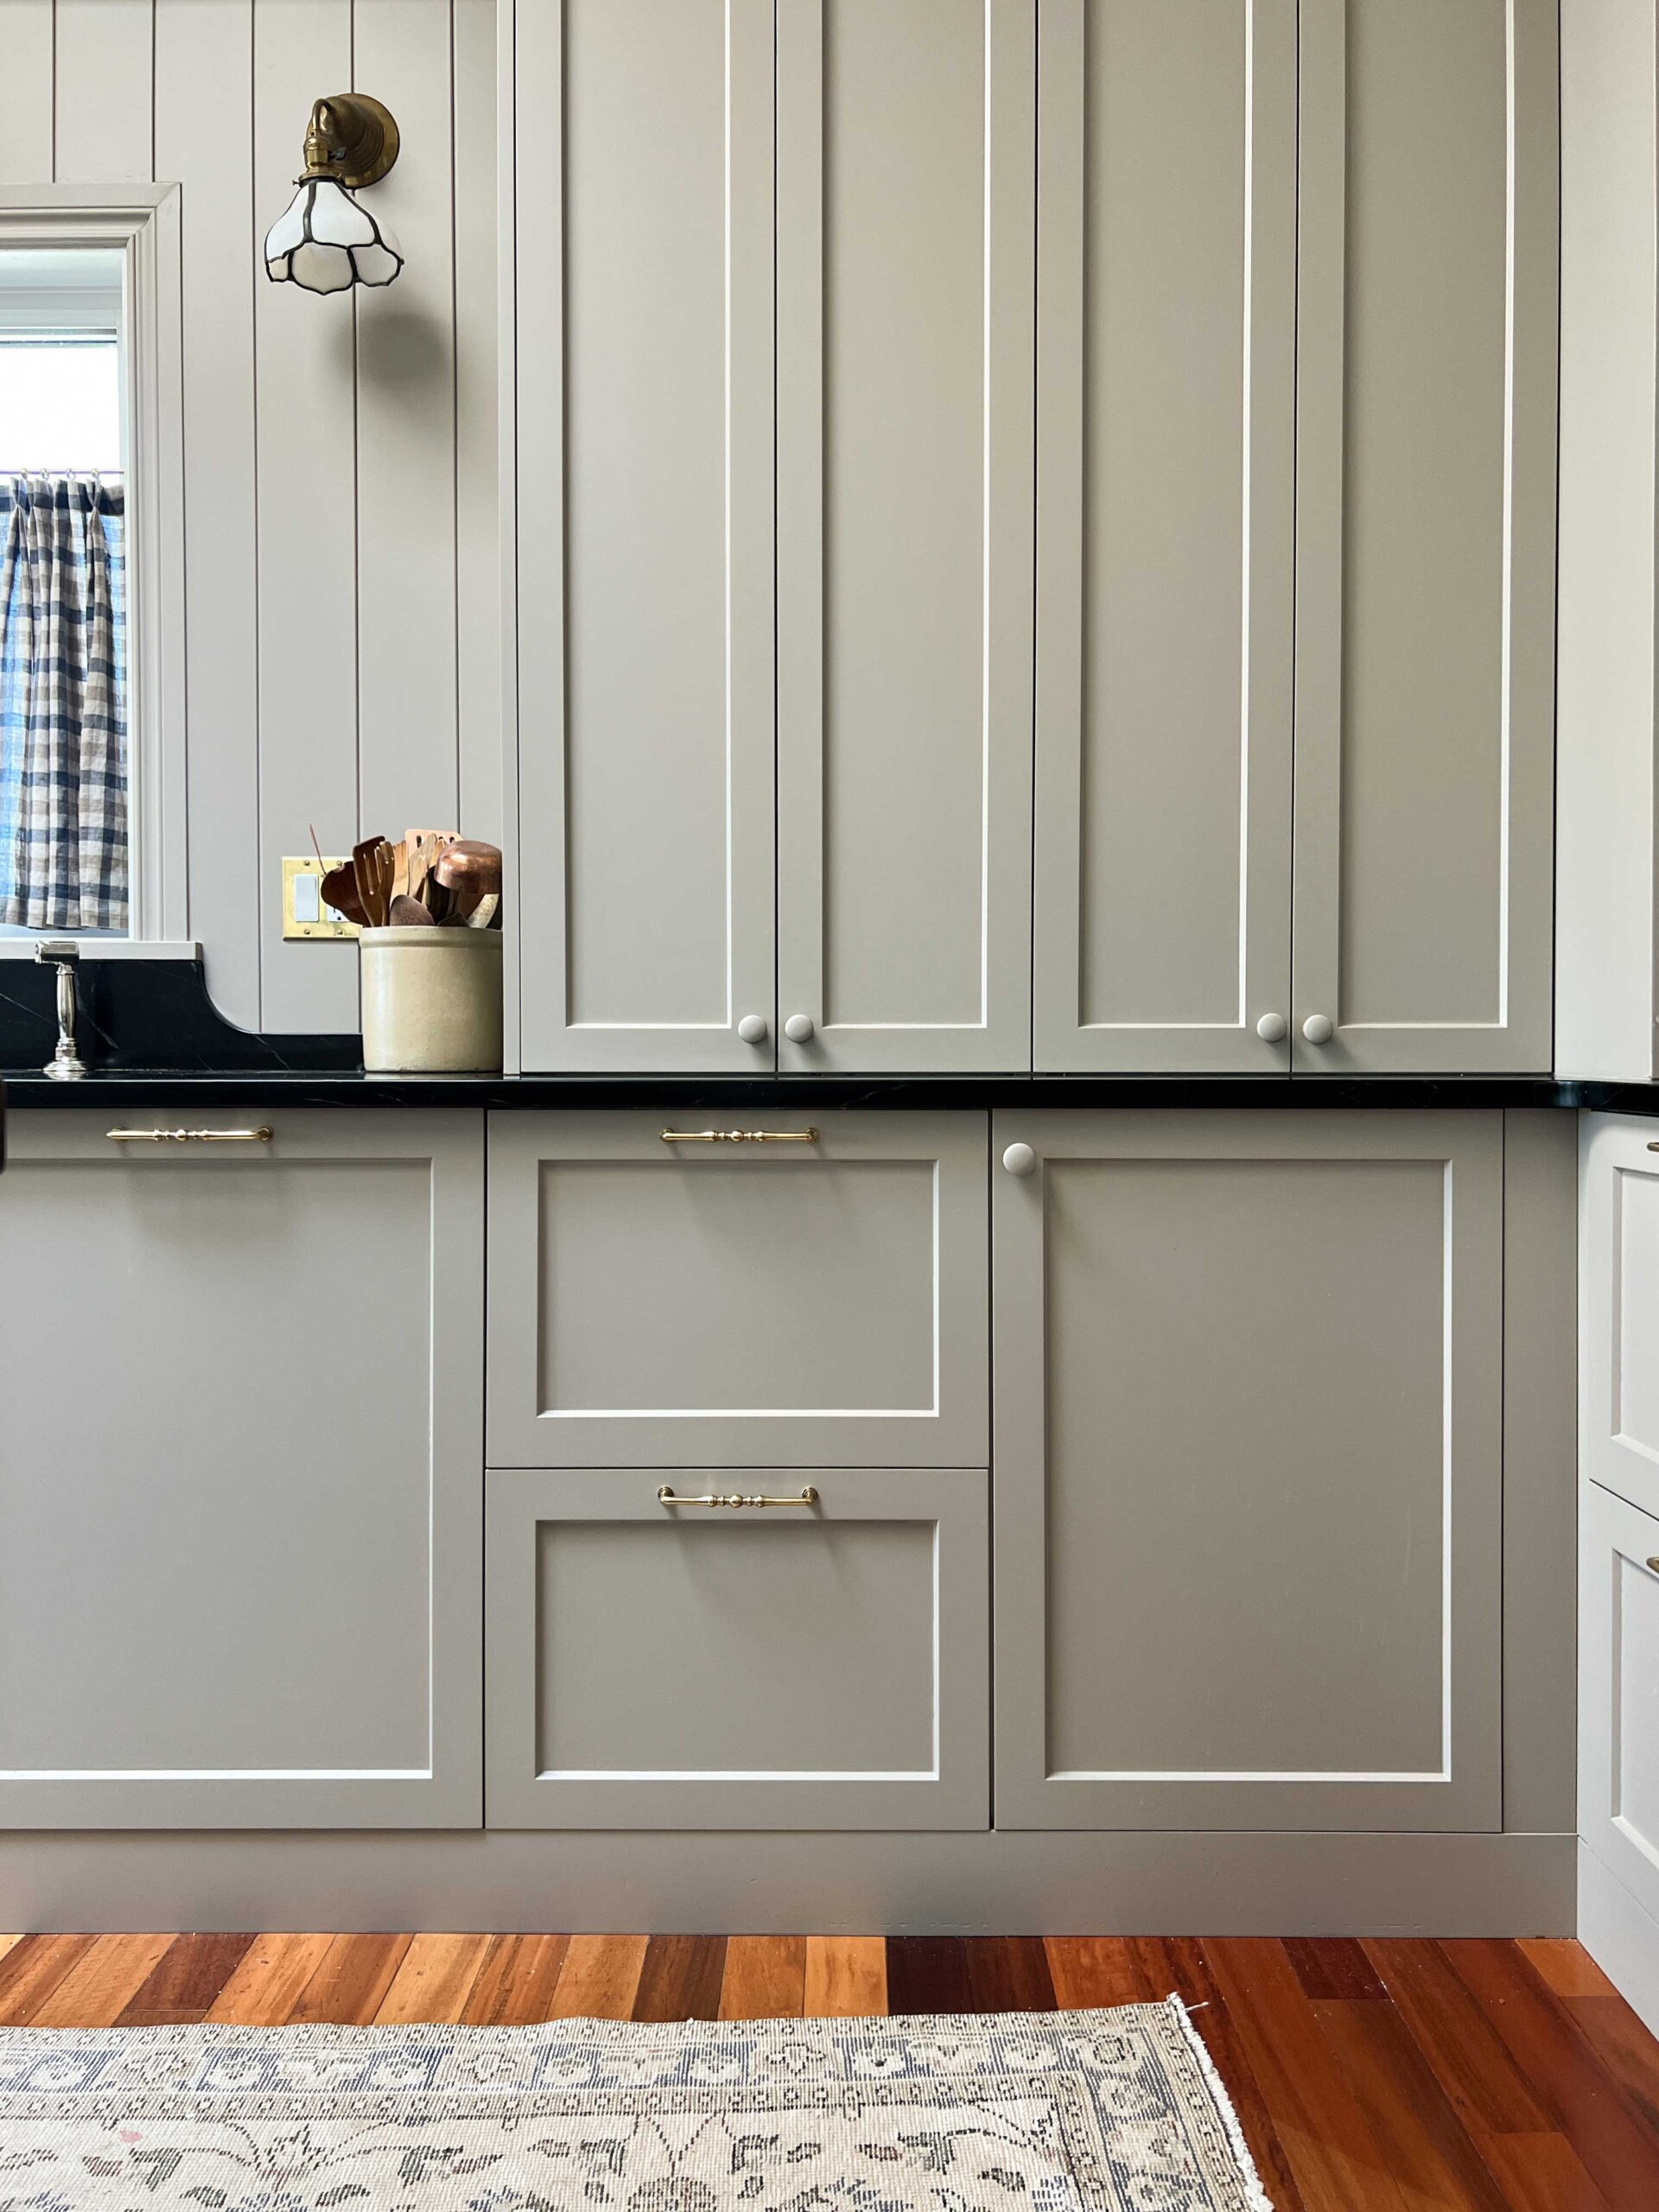
There are generally two ways to install toe kicks, either recessed or flush.
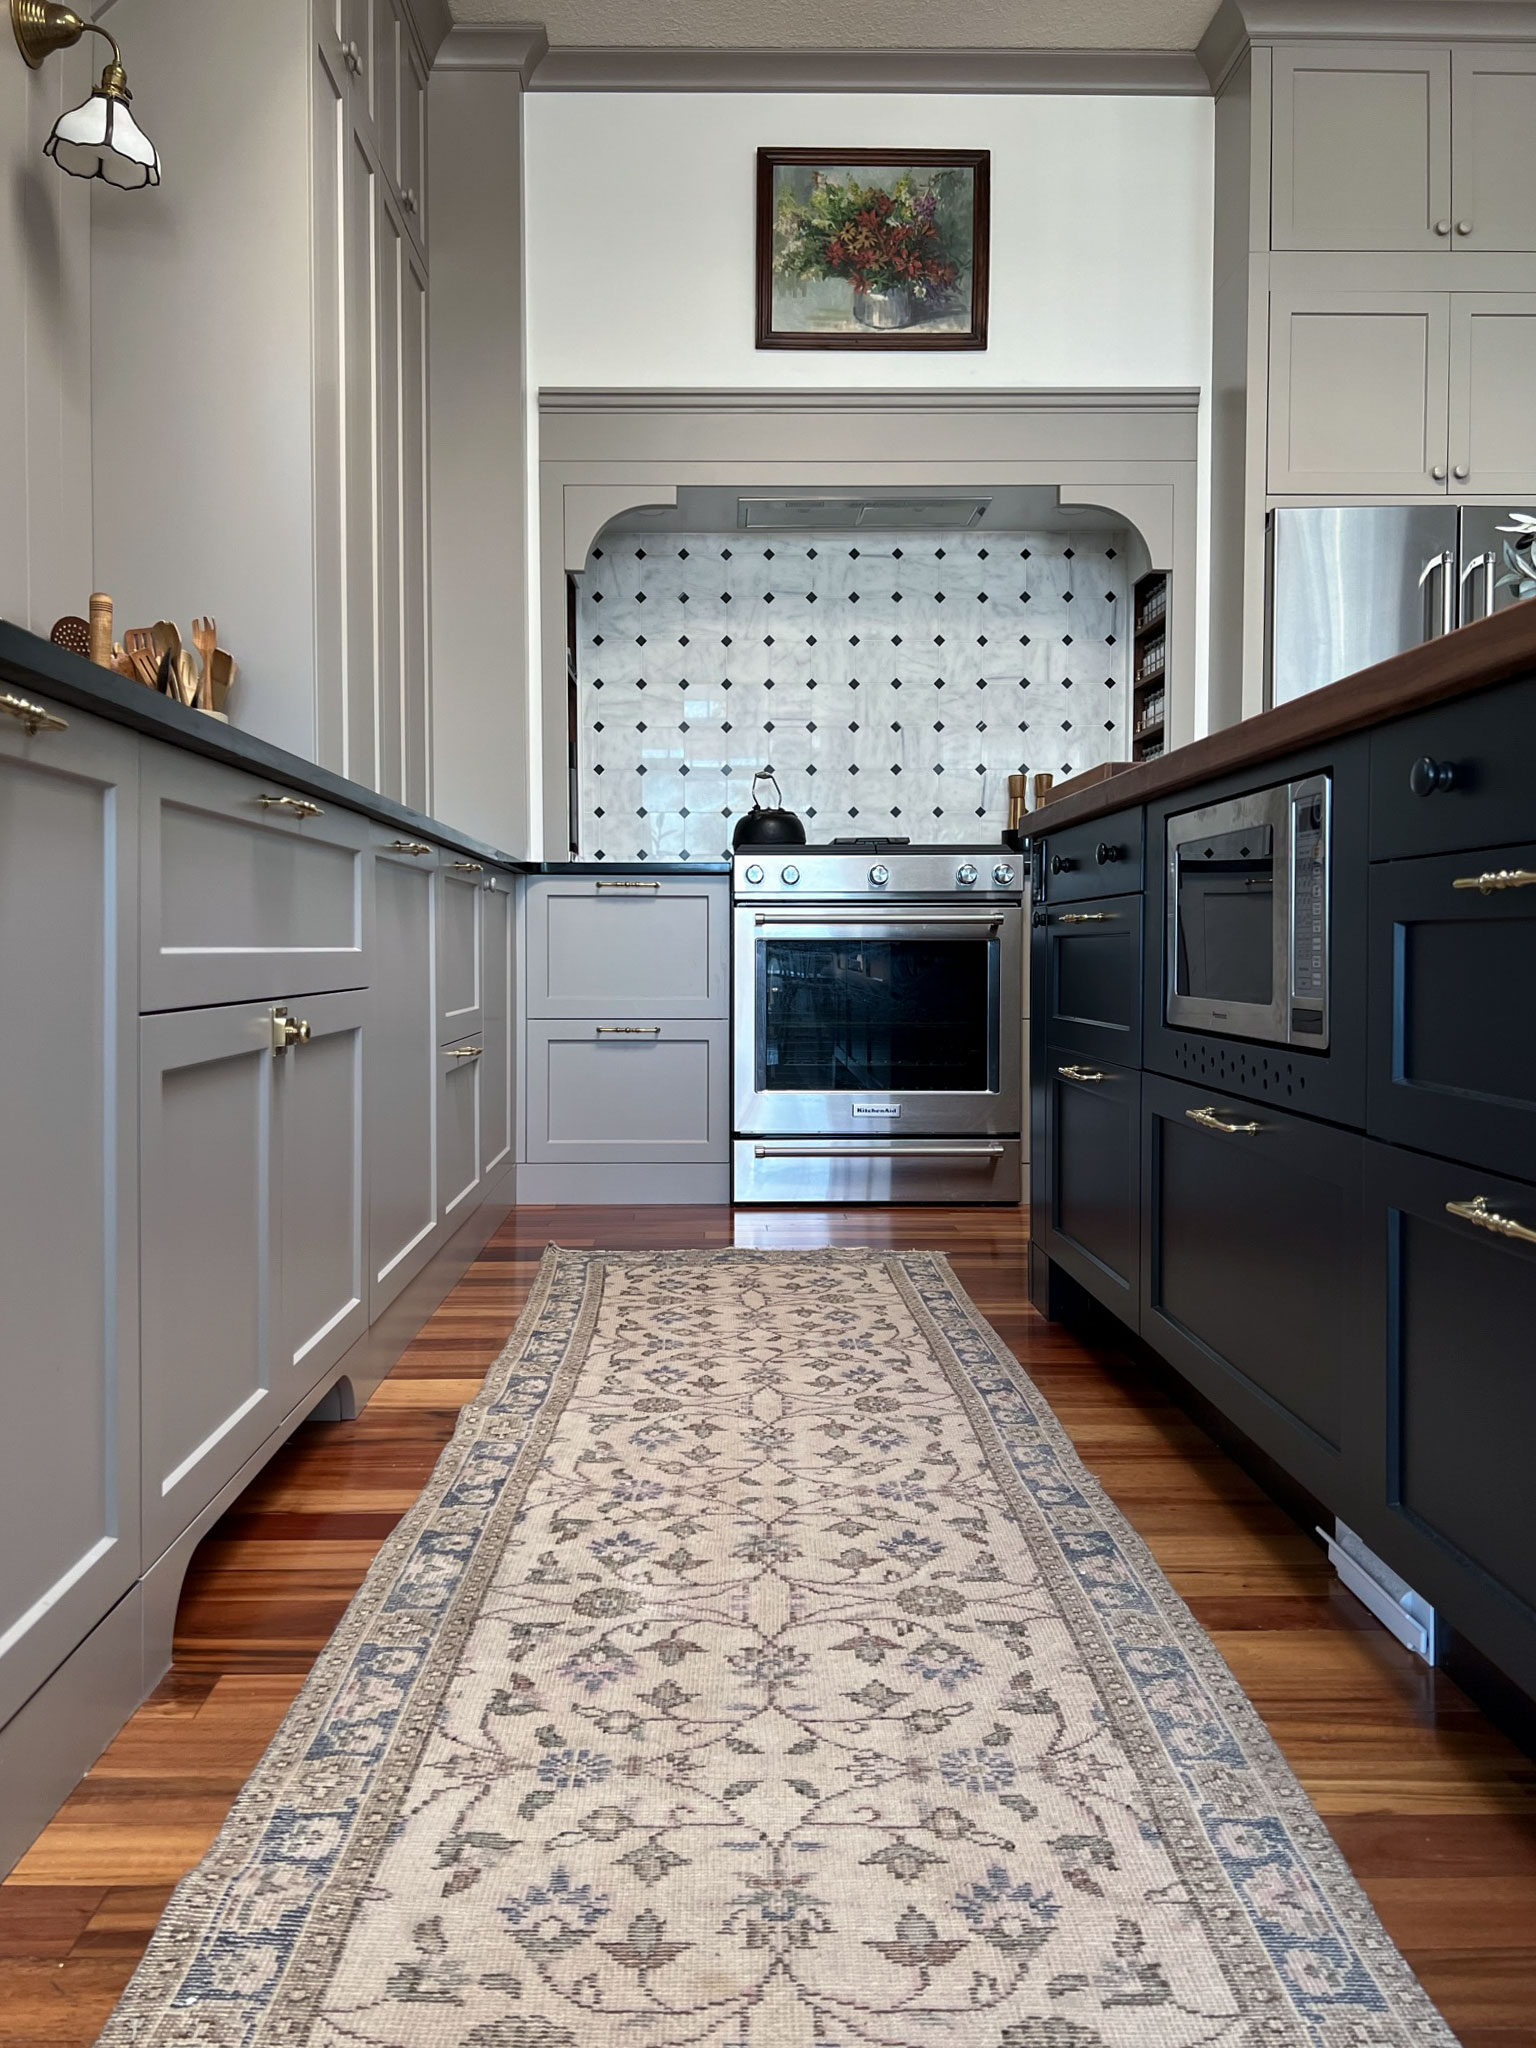
Recessed toe kicks are set back about 3″ inches from the cabinet face. This is the most standard style of toe kicks and one you will see most often in kitchens.
Why is this the most common type of toe kick? I believe this is because it is the easiest to install and the most forgiving, so, therefore, the least expensive. A poor fit on recessed toe kicks does not really show under the overhang of the cabinets.
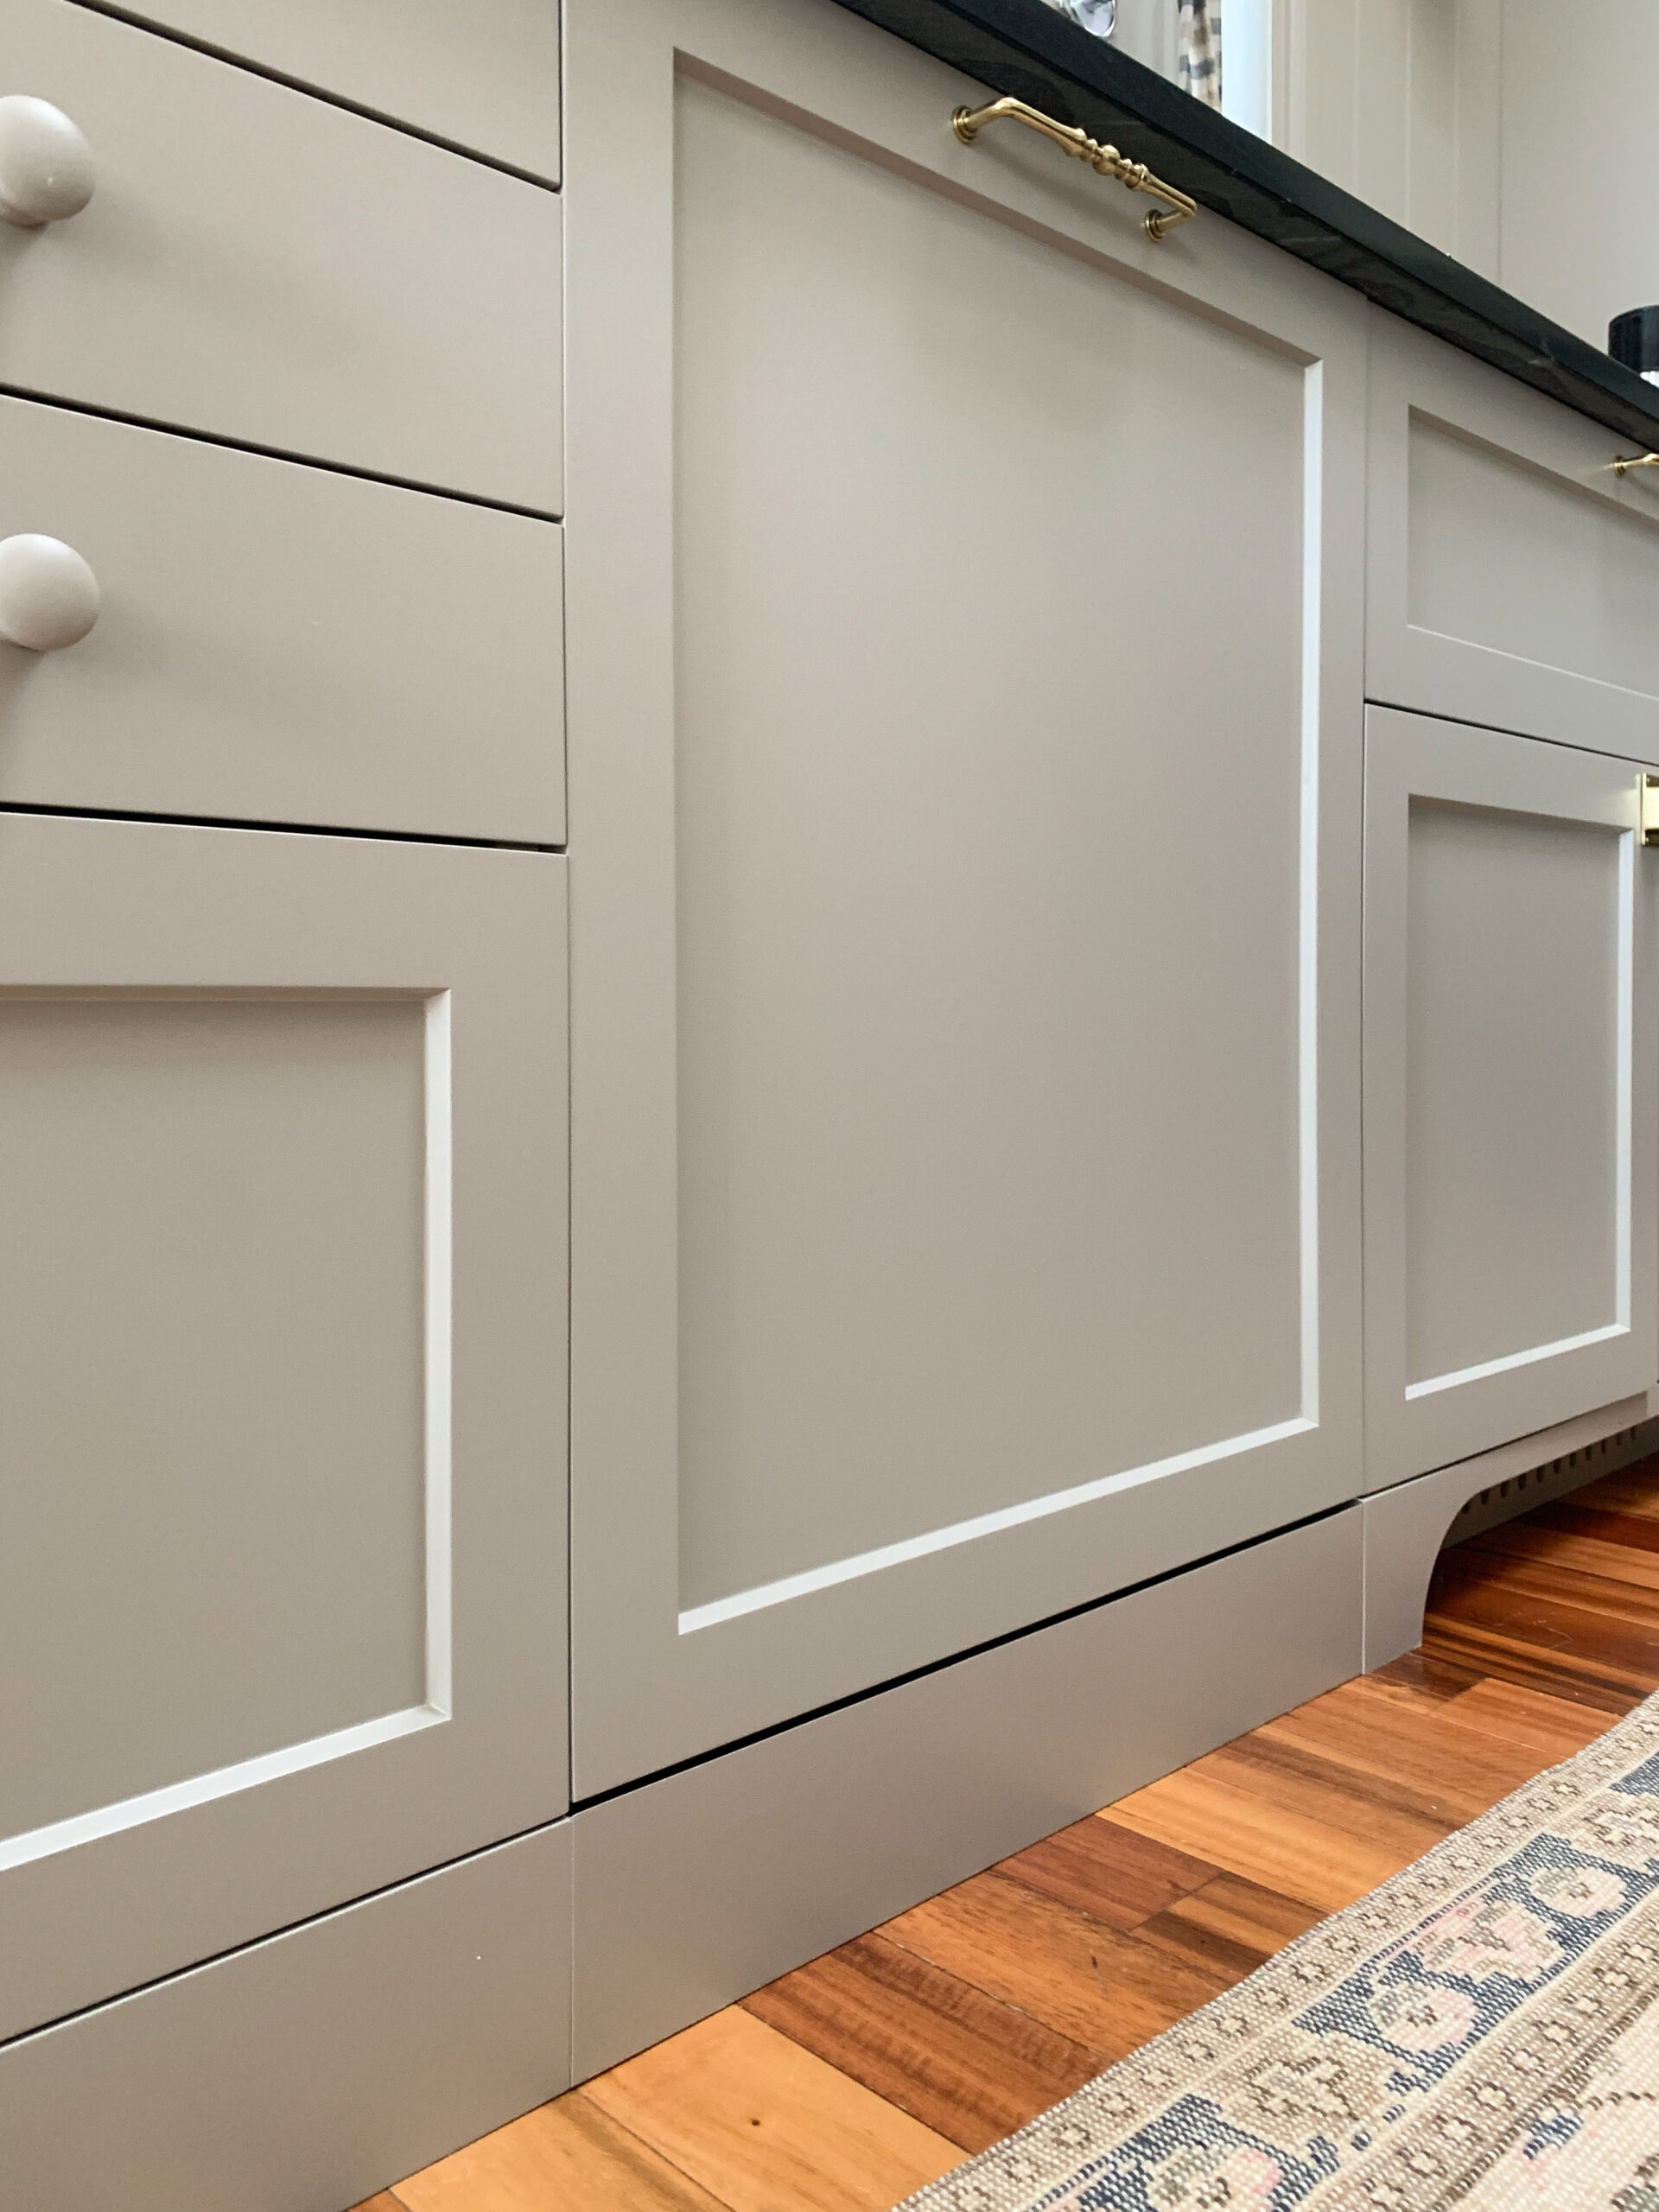
Flush toe kicks are flush with the doors on the cabinets (or sometimes even slightly proud, or in front of) the face of the cabinet door. Installing flush mount toe kicks involves a lot more precision because in general, floors are not level. You install your cabinets level, so the filler piece (or toe kick) between the cabinets and the floor will be level with the cabinets and have to be scribed to account for slight variations if the floor slopes. (Scribing is a process where you have to fit an element to an uneven or irregular surface, such as a floor slope).
What are the standard dimensions and height of a toe kick?
Most kitchen toe kicks are about 4” – 4.5” tall, but they can vary. In general, standard kitchen boxes are 30” tall, and a standard kitchen counter height is 36”. If the countertop material is about 1-1/2” that leaves about 4.5” for toe kick.
When we were considering our cabinetry design, the cabinet company that we used supplied 4.5” high toe kick material so that is what we based our height on.
What about decorative toe kicks?
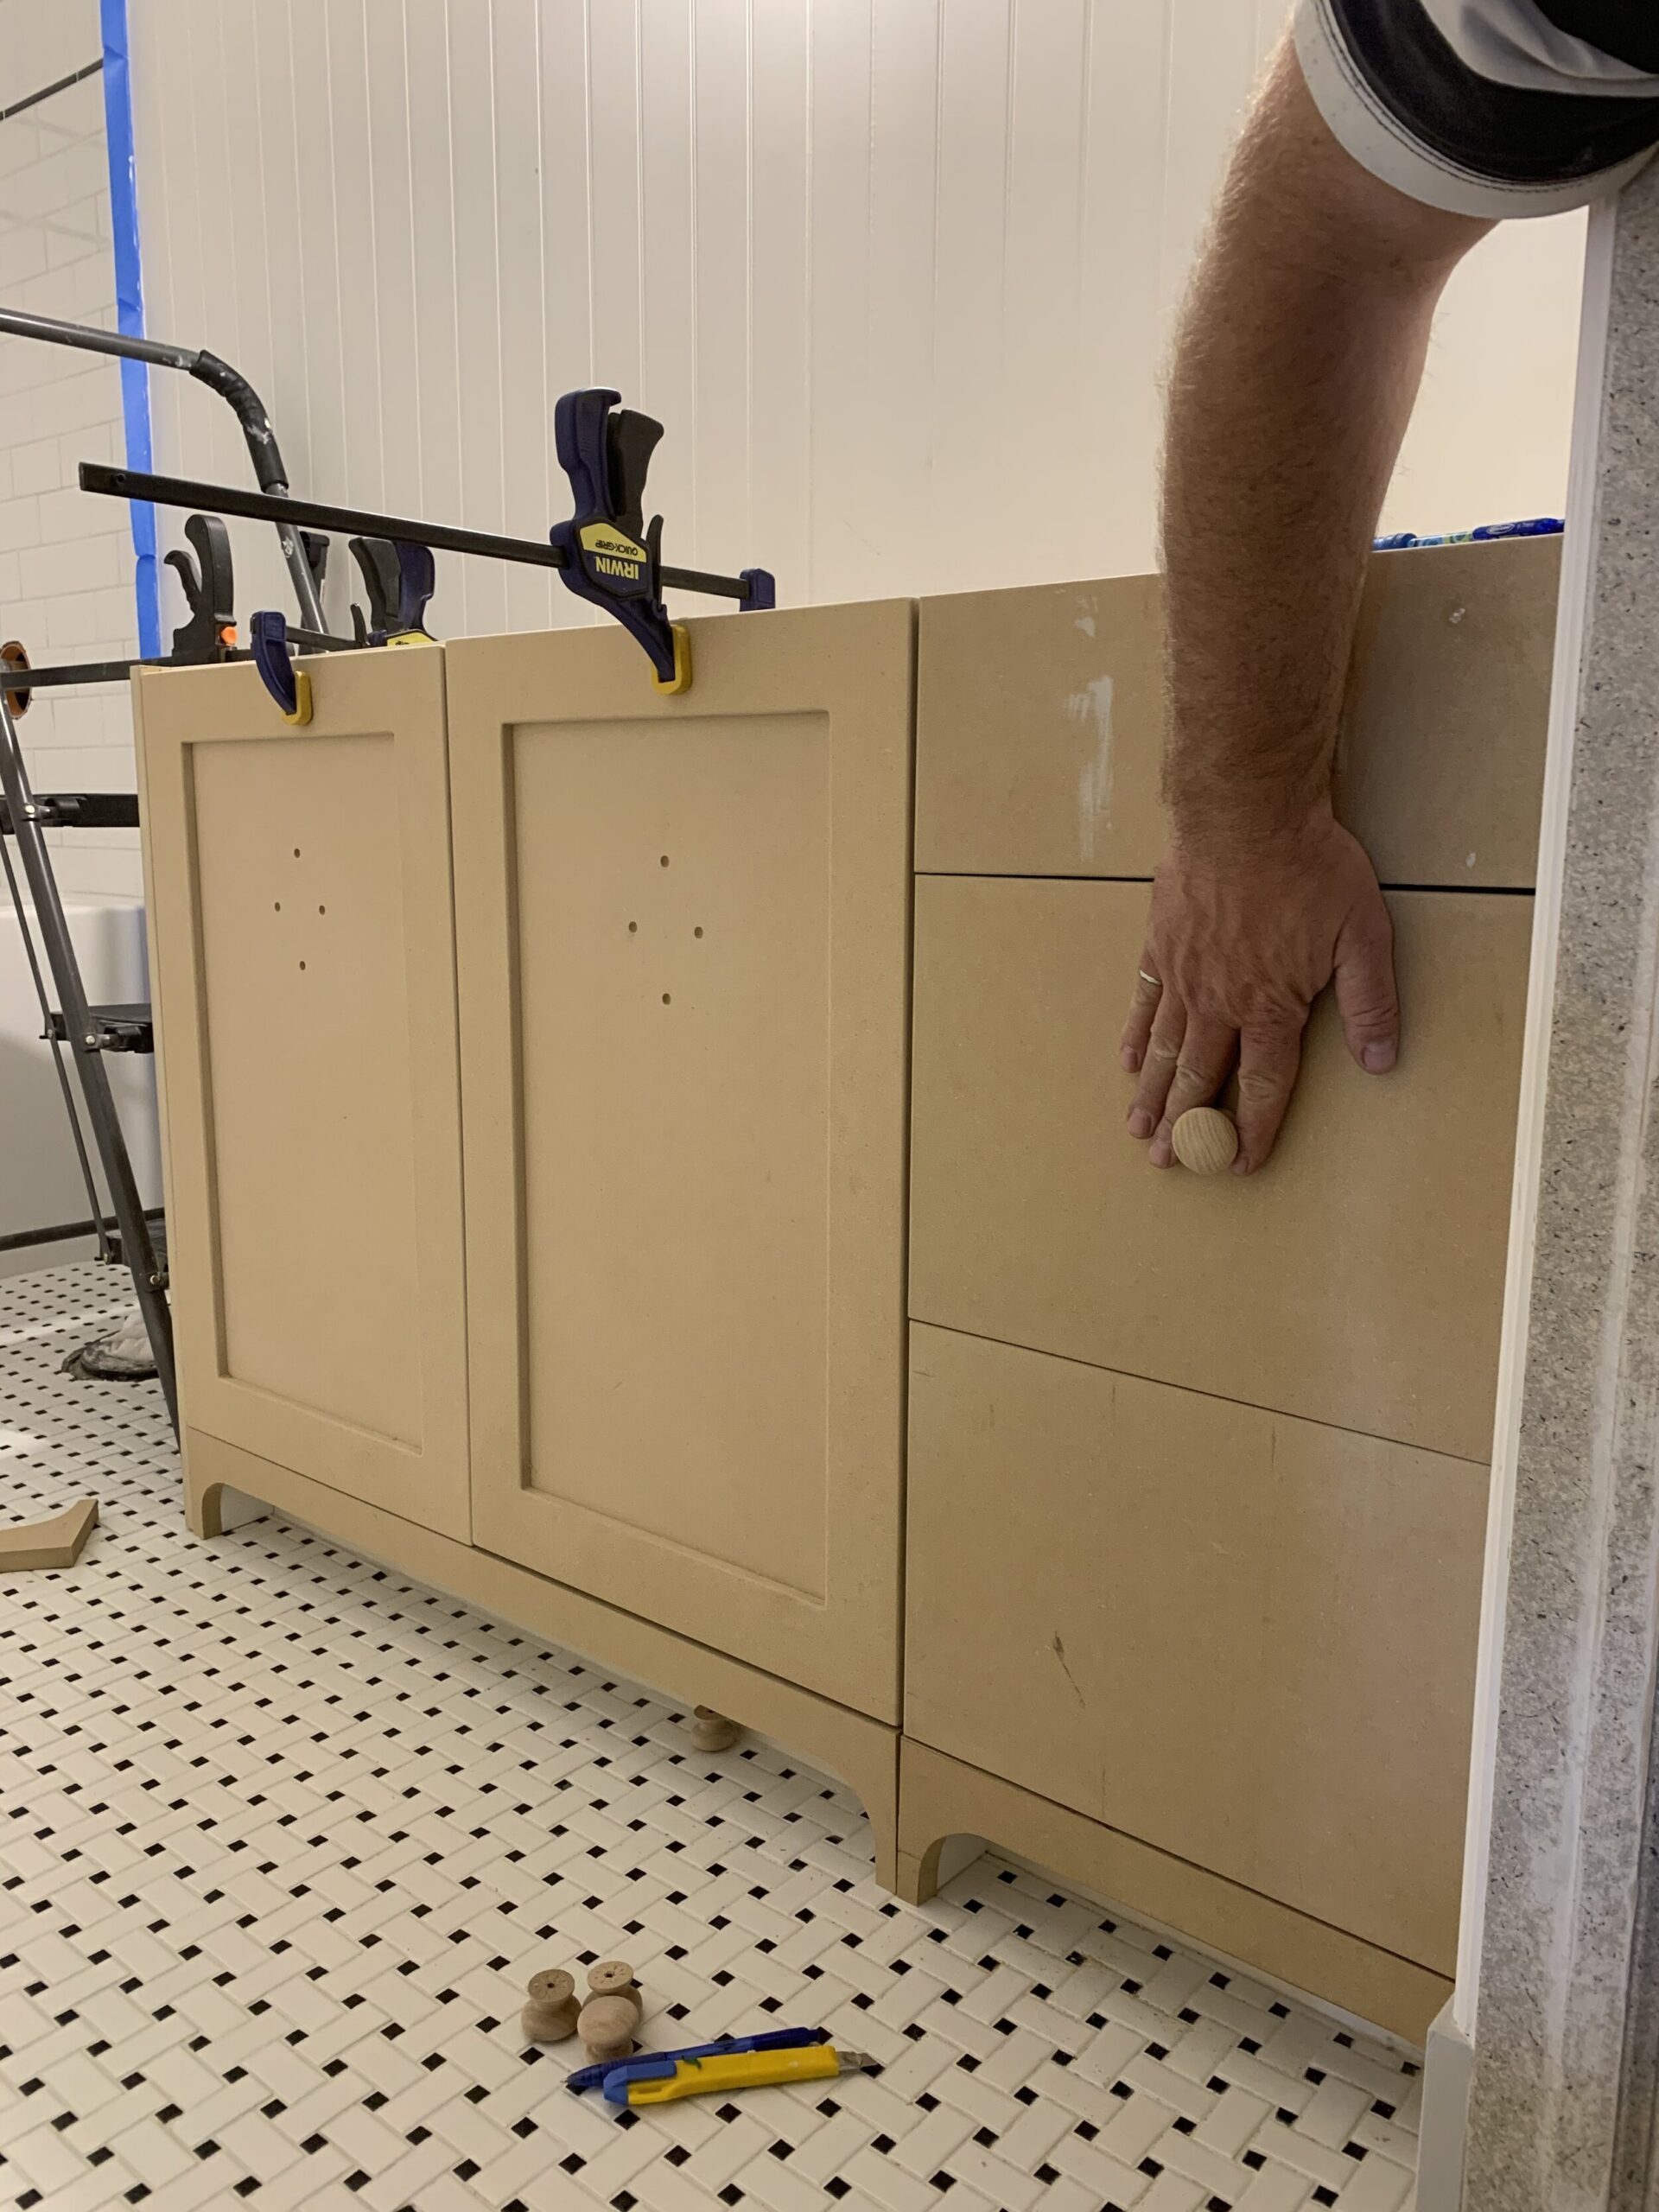
You can also install decorative toe kicks like the little cabinet feet that we used here in our kid’s bathroom vanity, which was the first time we installed a toe kick that was not recessed.
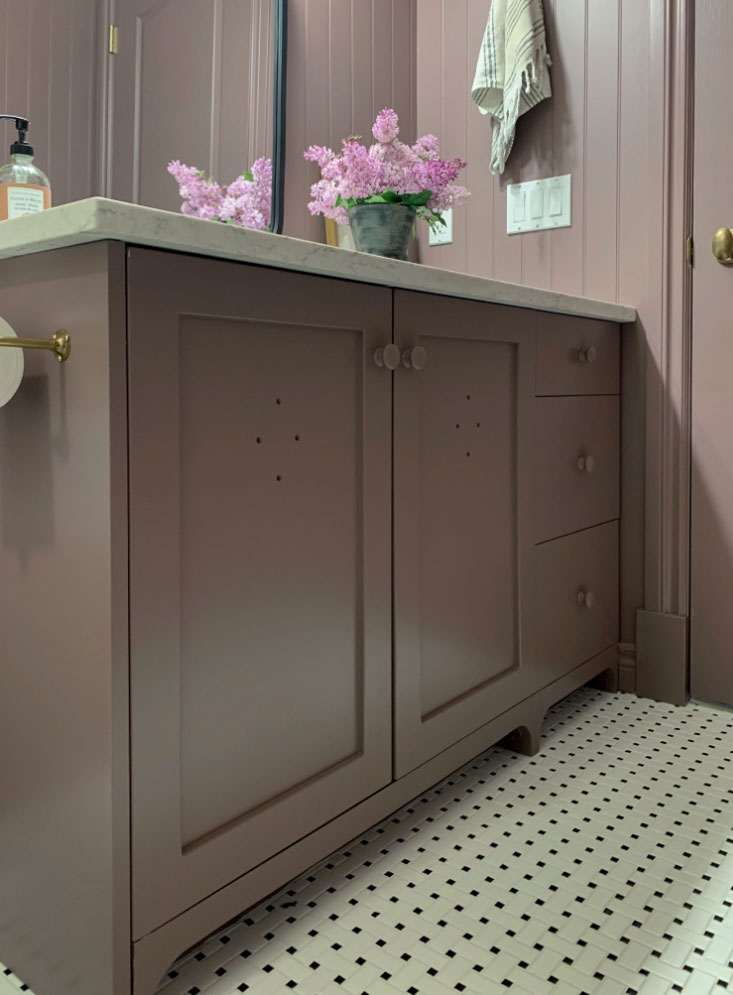
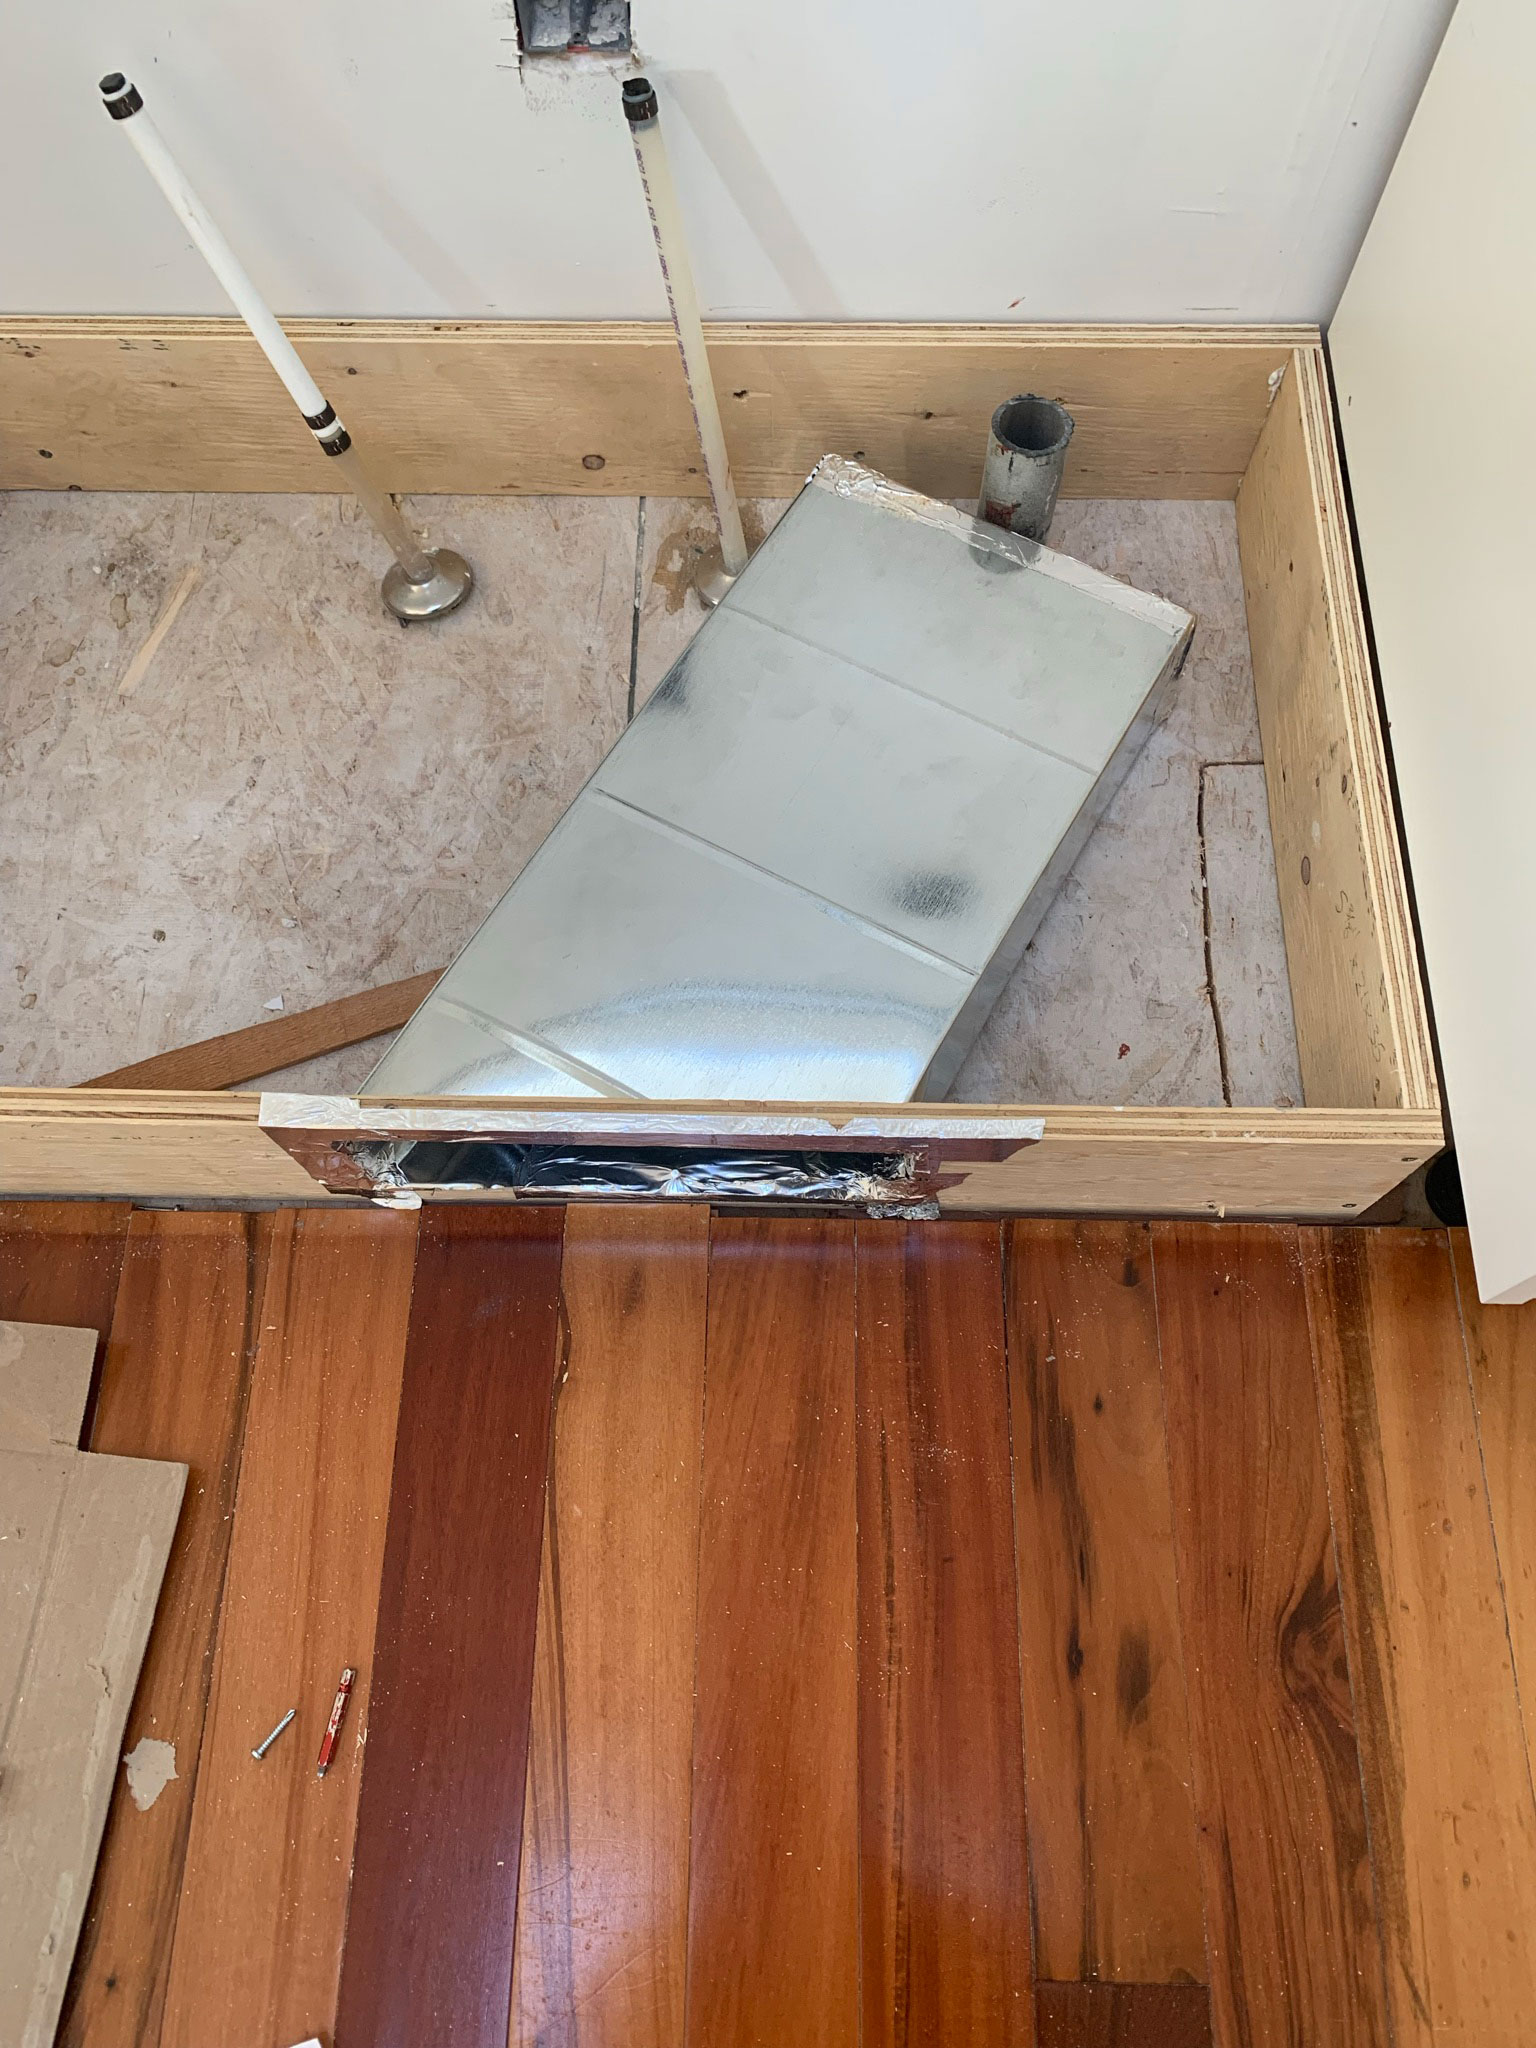
In front of our kitchen sink, we installed a combination of a recessed toe kick and a flush mount toe kick in front of it with a cutout. There was a heating and cooling vent under the sink so we drilled some holes in the recessed toe kick to let the air out and then in front of that, did a decorative flush mount toe kick. More on that below!
How to Install Toe Kicks
How to Install the Cabinet Bases for the Different Types of Toe Kick
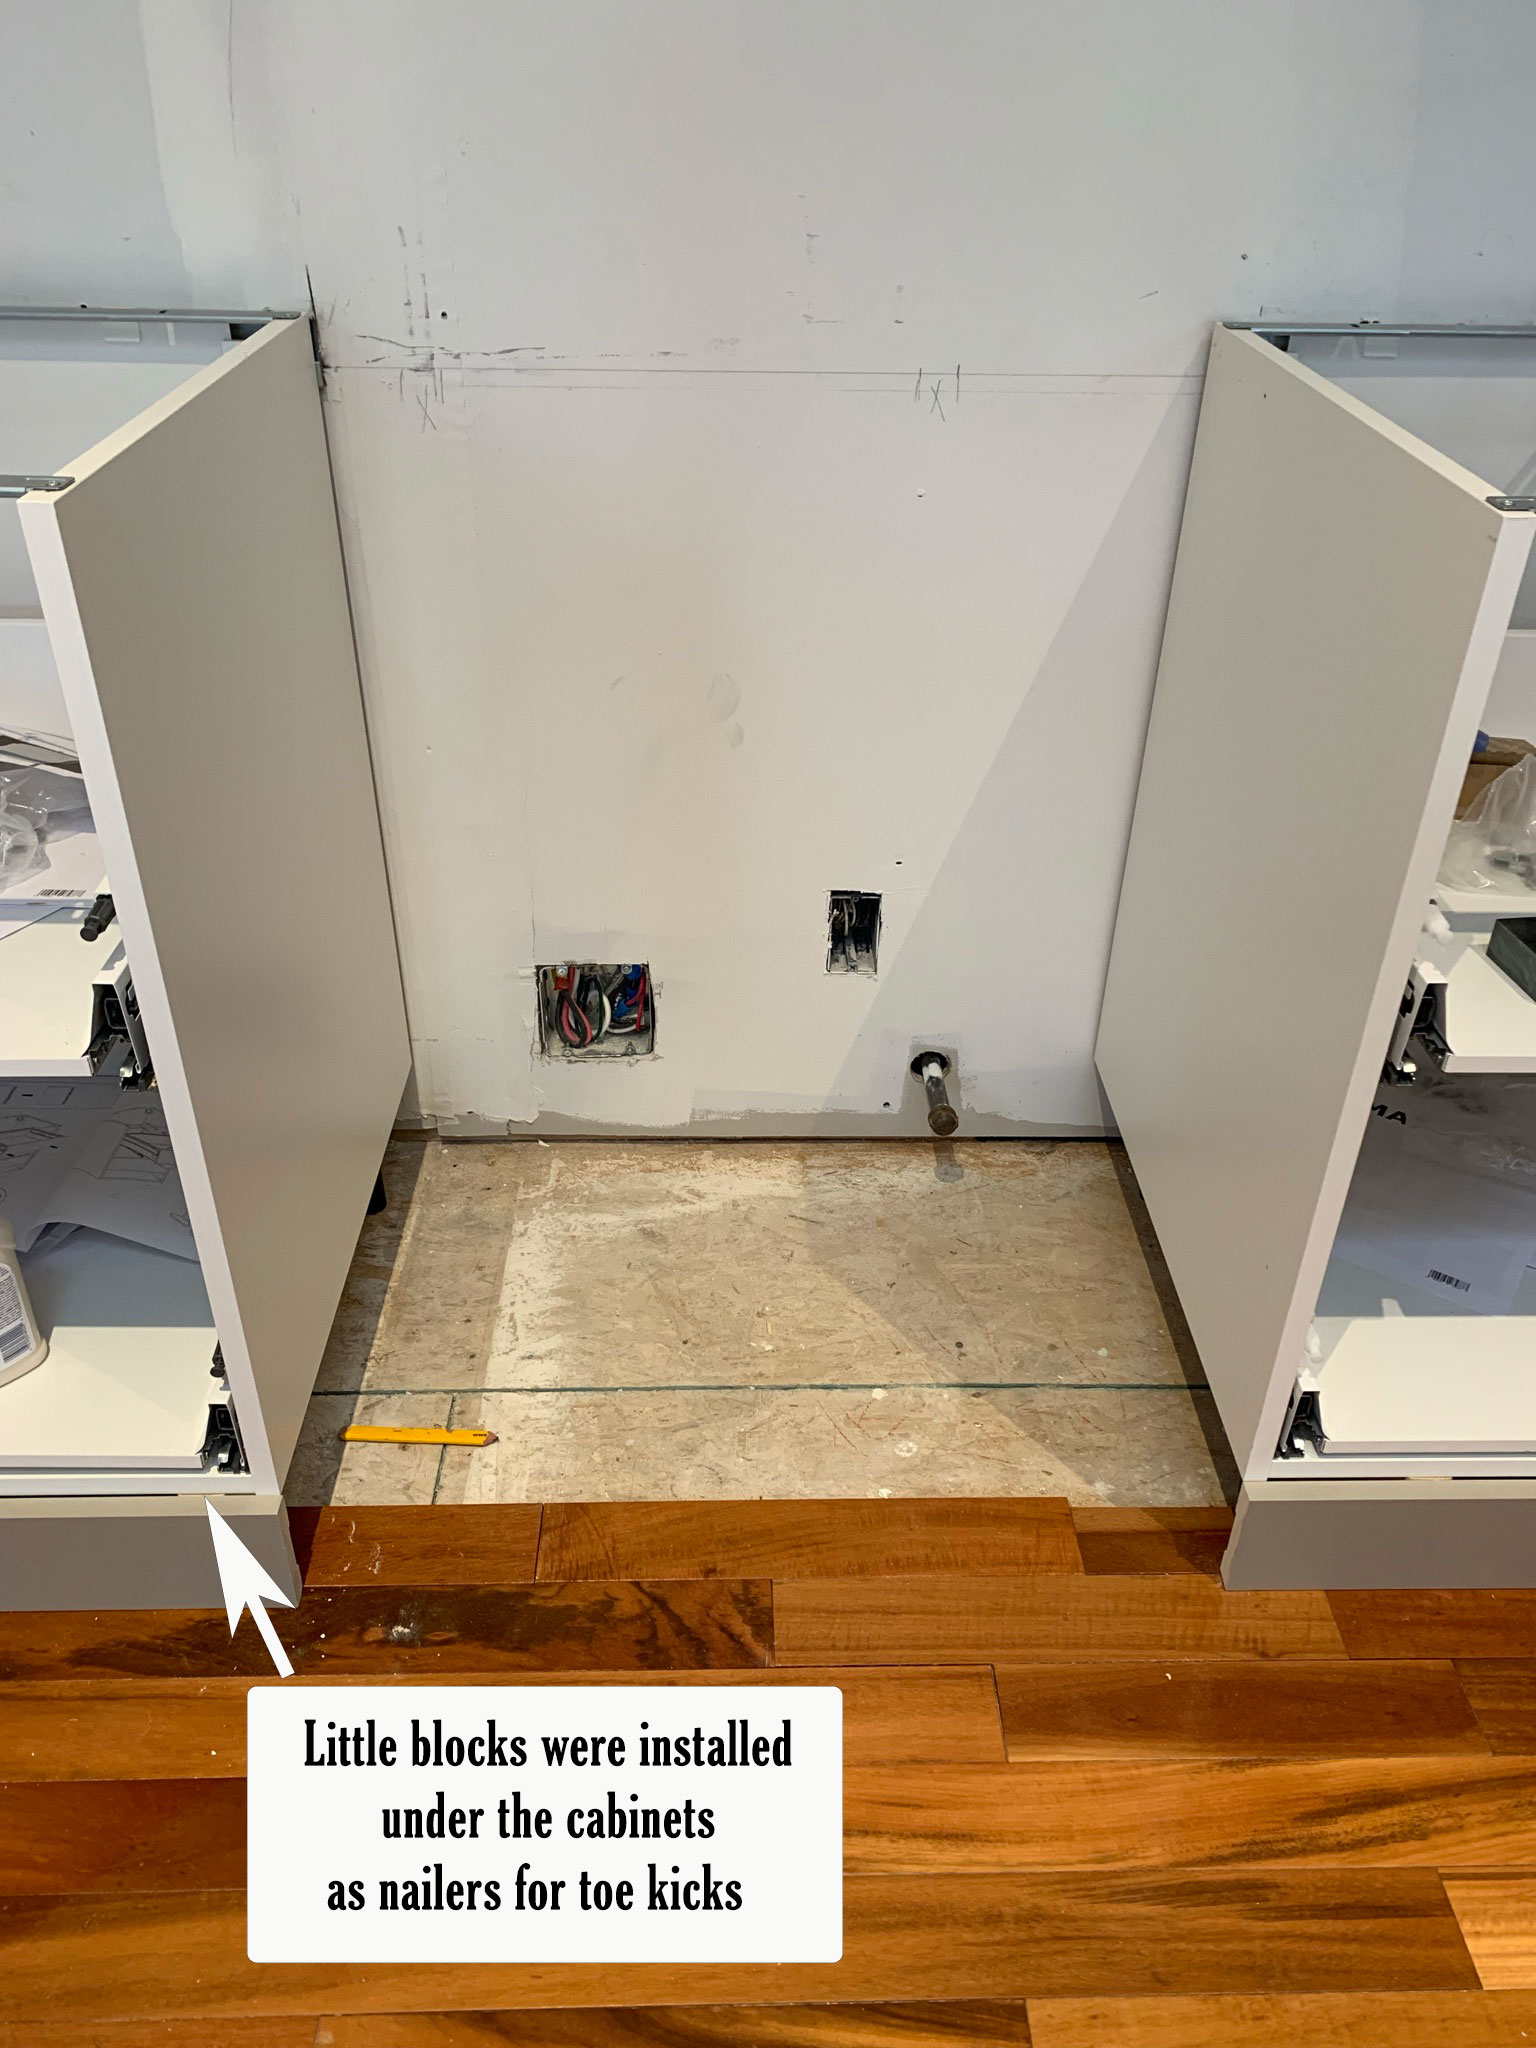
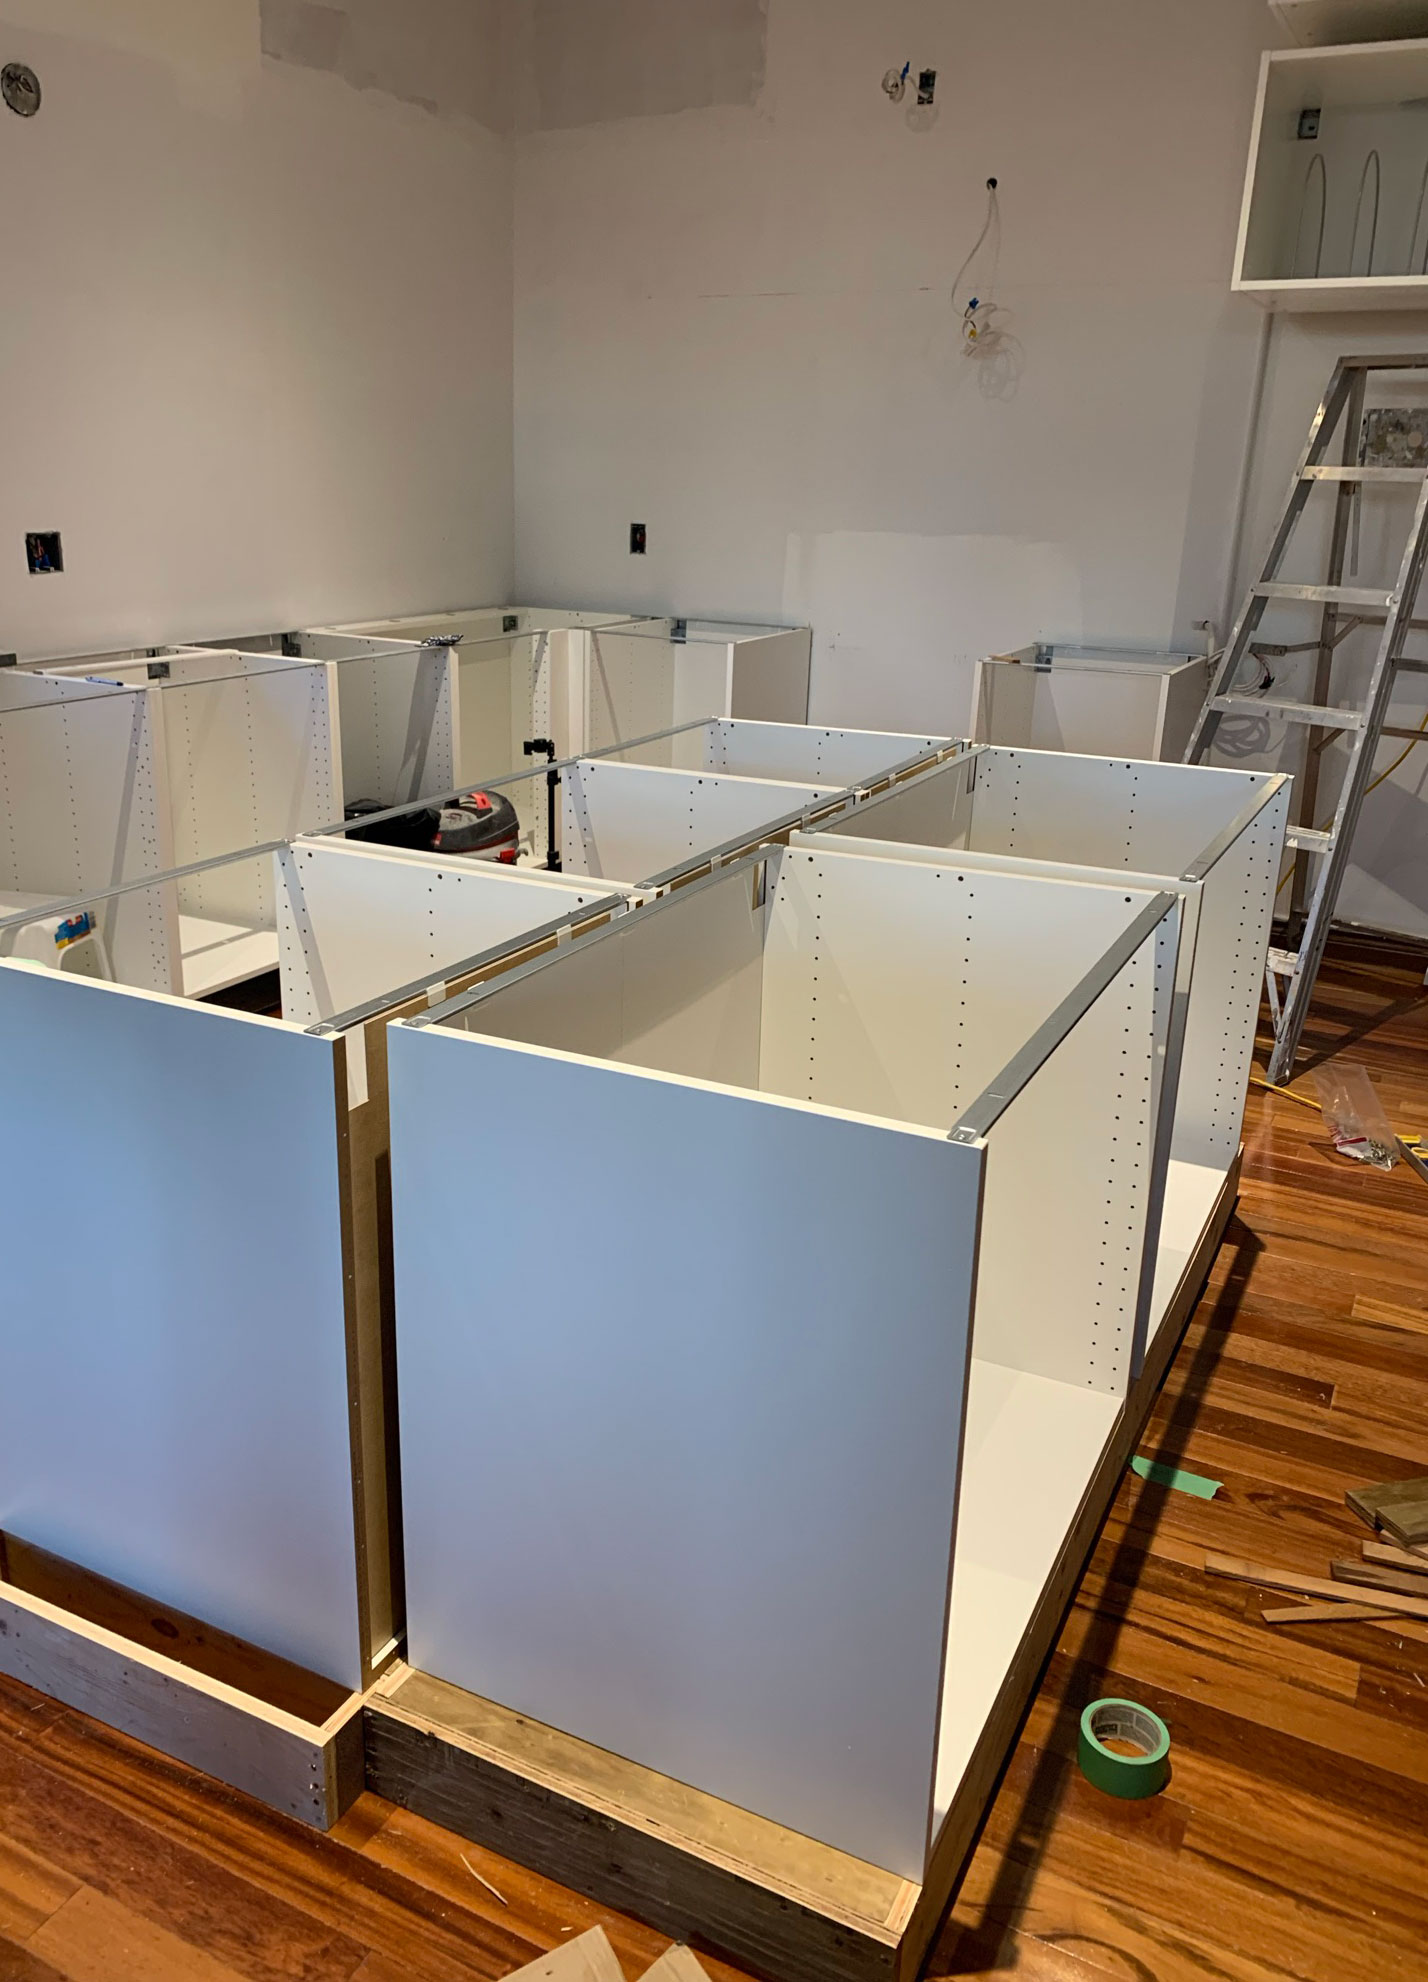
So you should know what type of toe kick you will have before you install the cabinet bases so you can construct the bases accordingly. We have Ikea cabinets which are installed on leg levelers so there was actually nothing to attach the toe kicks to in our scenario.
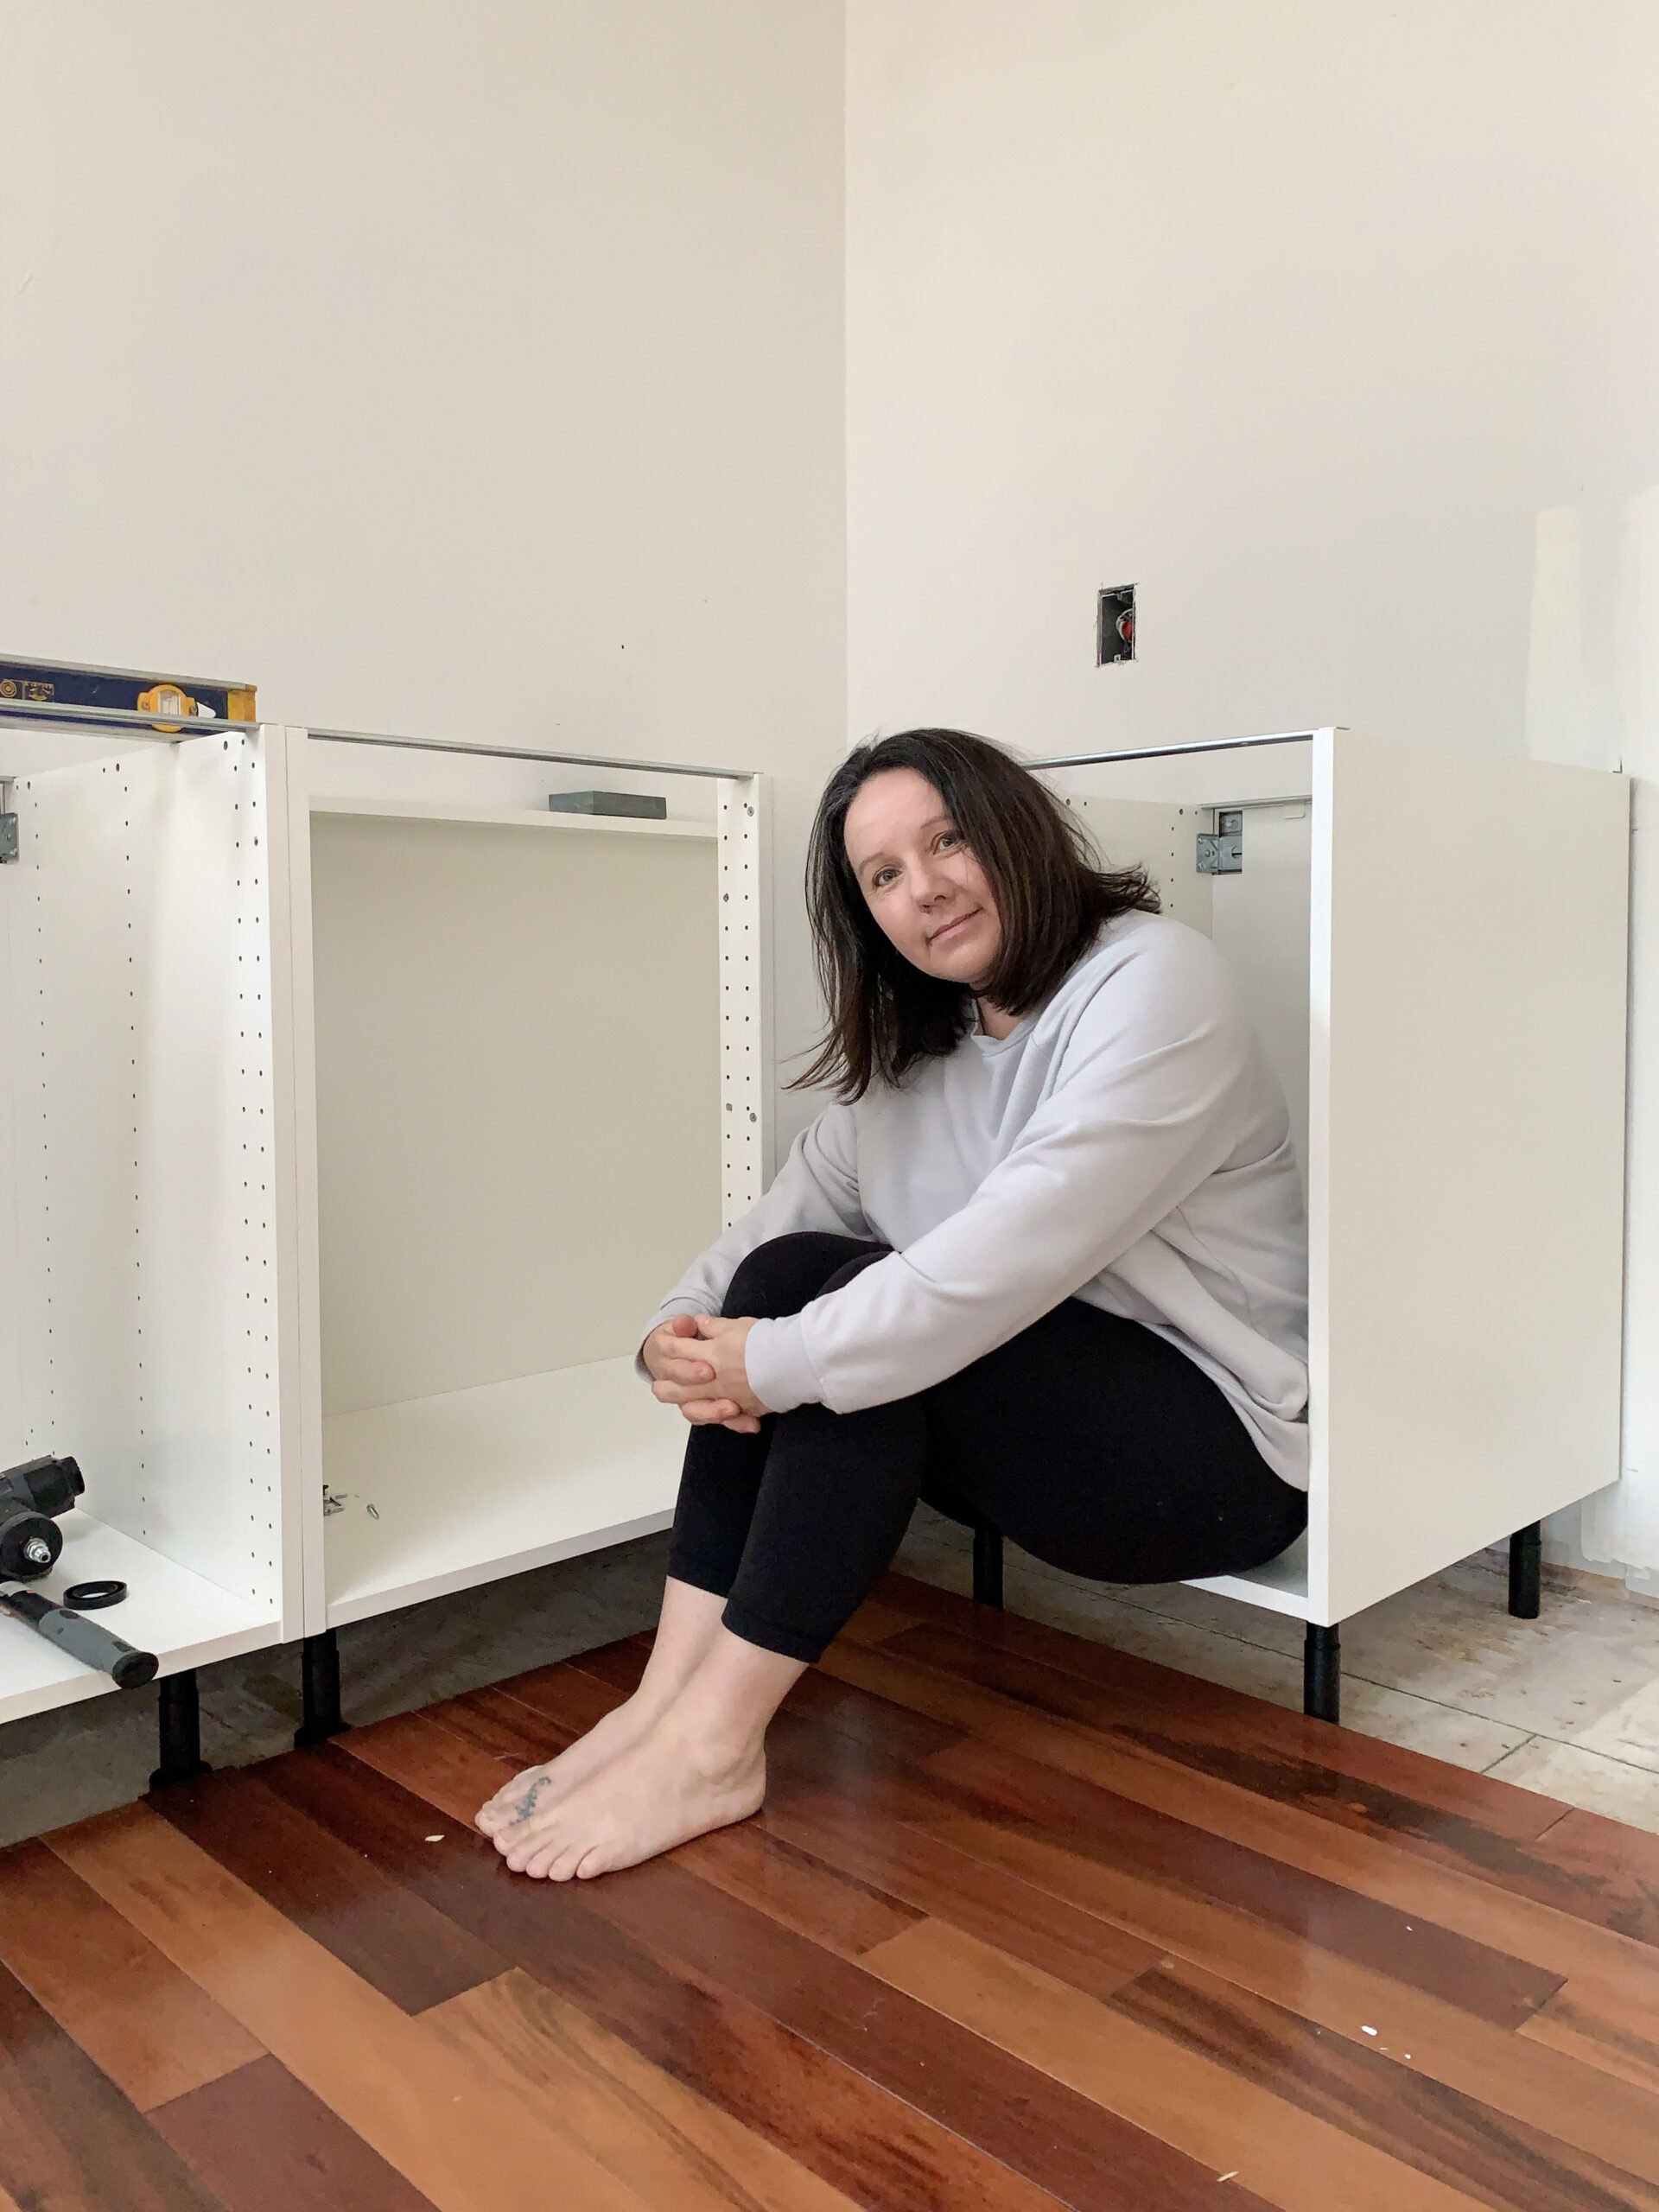
Ikea sells little clips for their base cabinet toe kick that clip onto the leg levellers to make the installation of their recessed style toe kicks easy, but we weren’t using that system for our toe kicks.
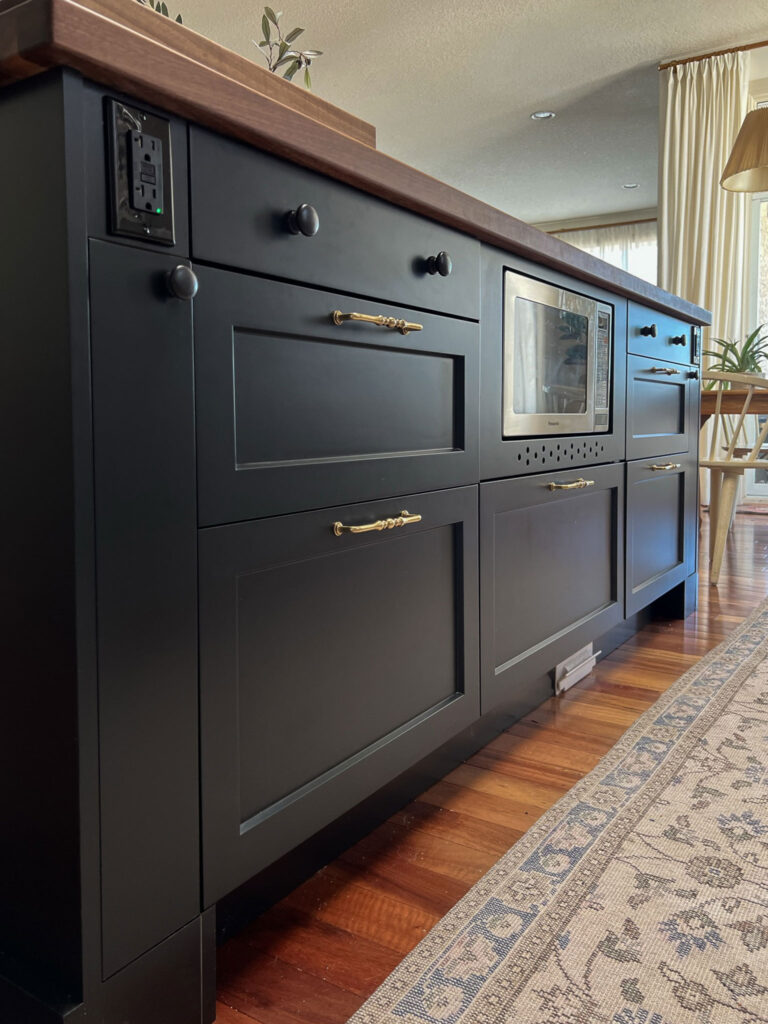
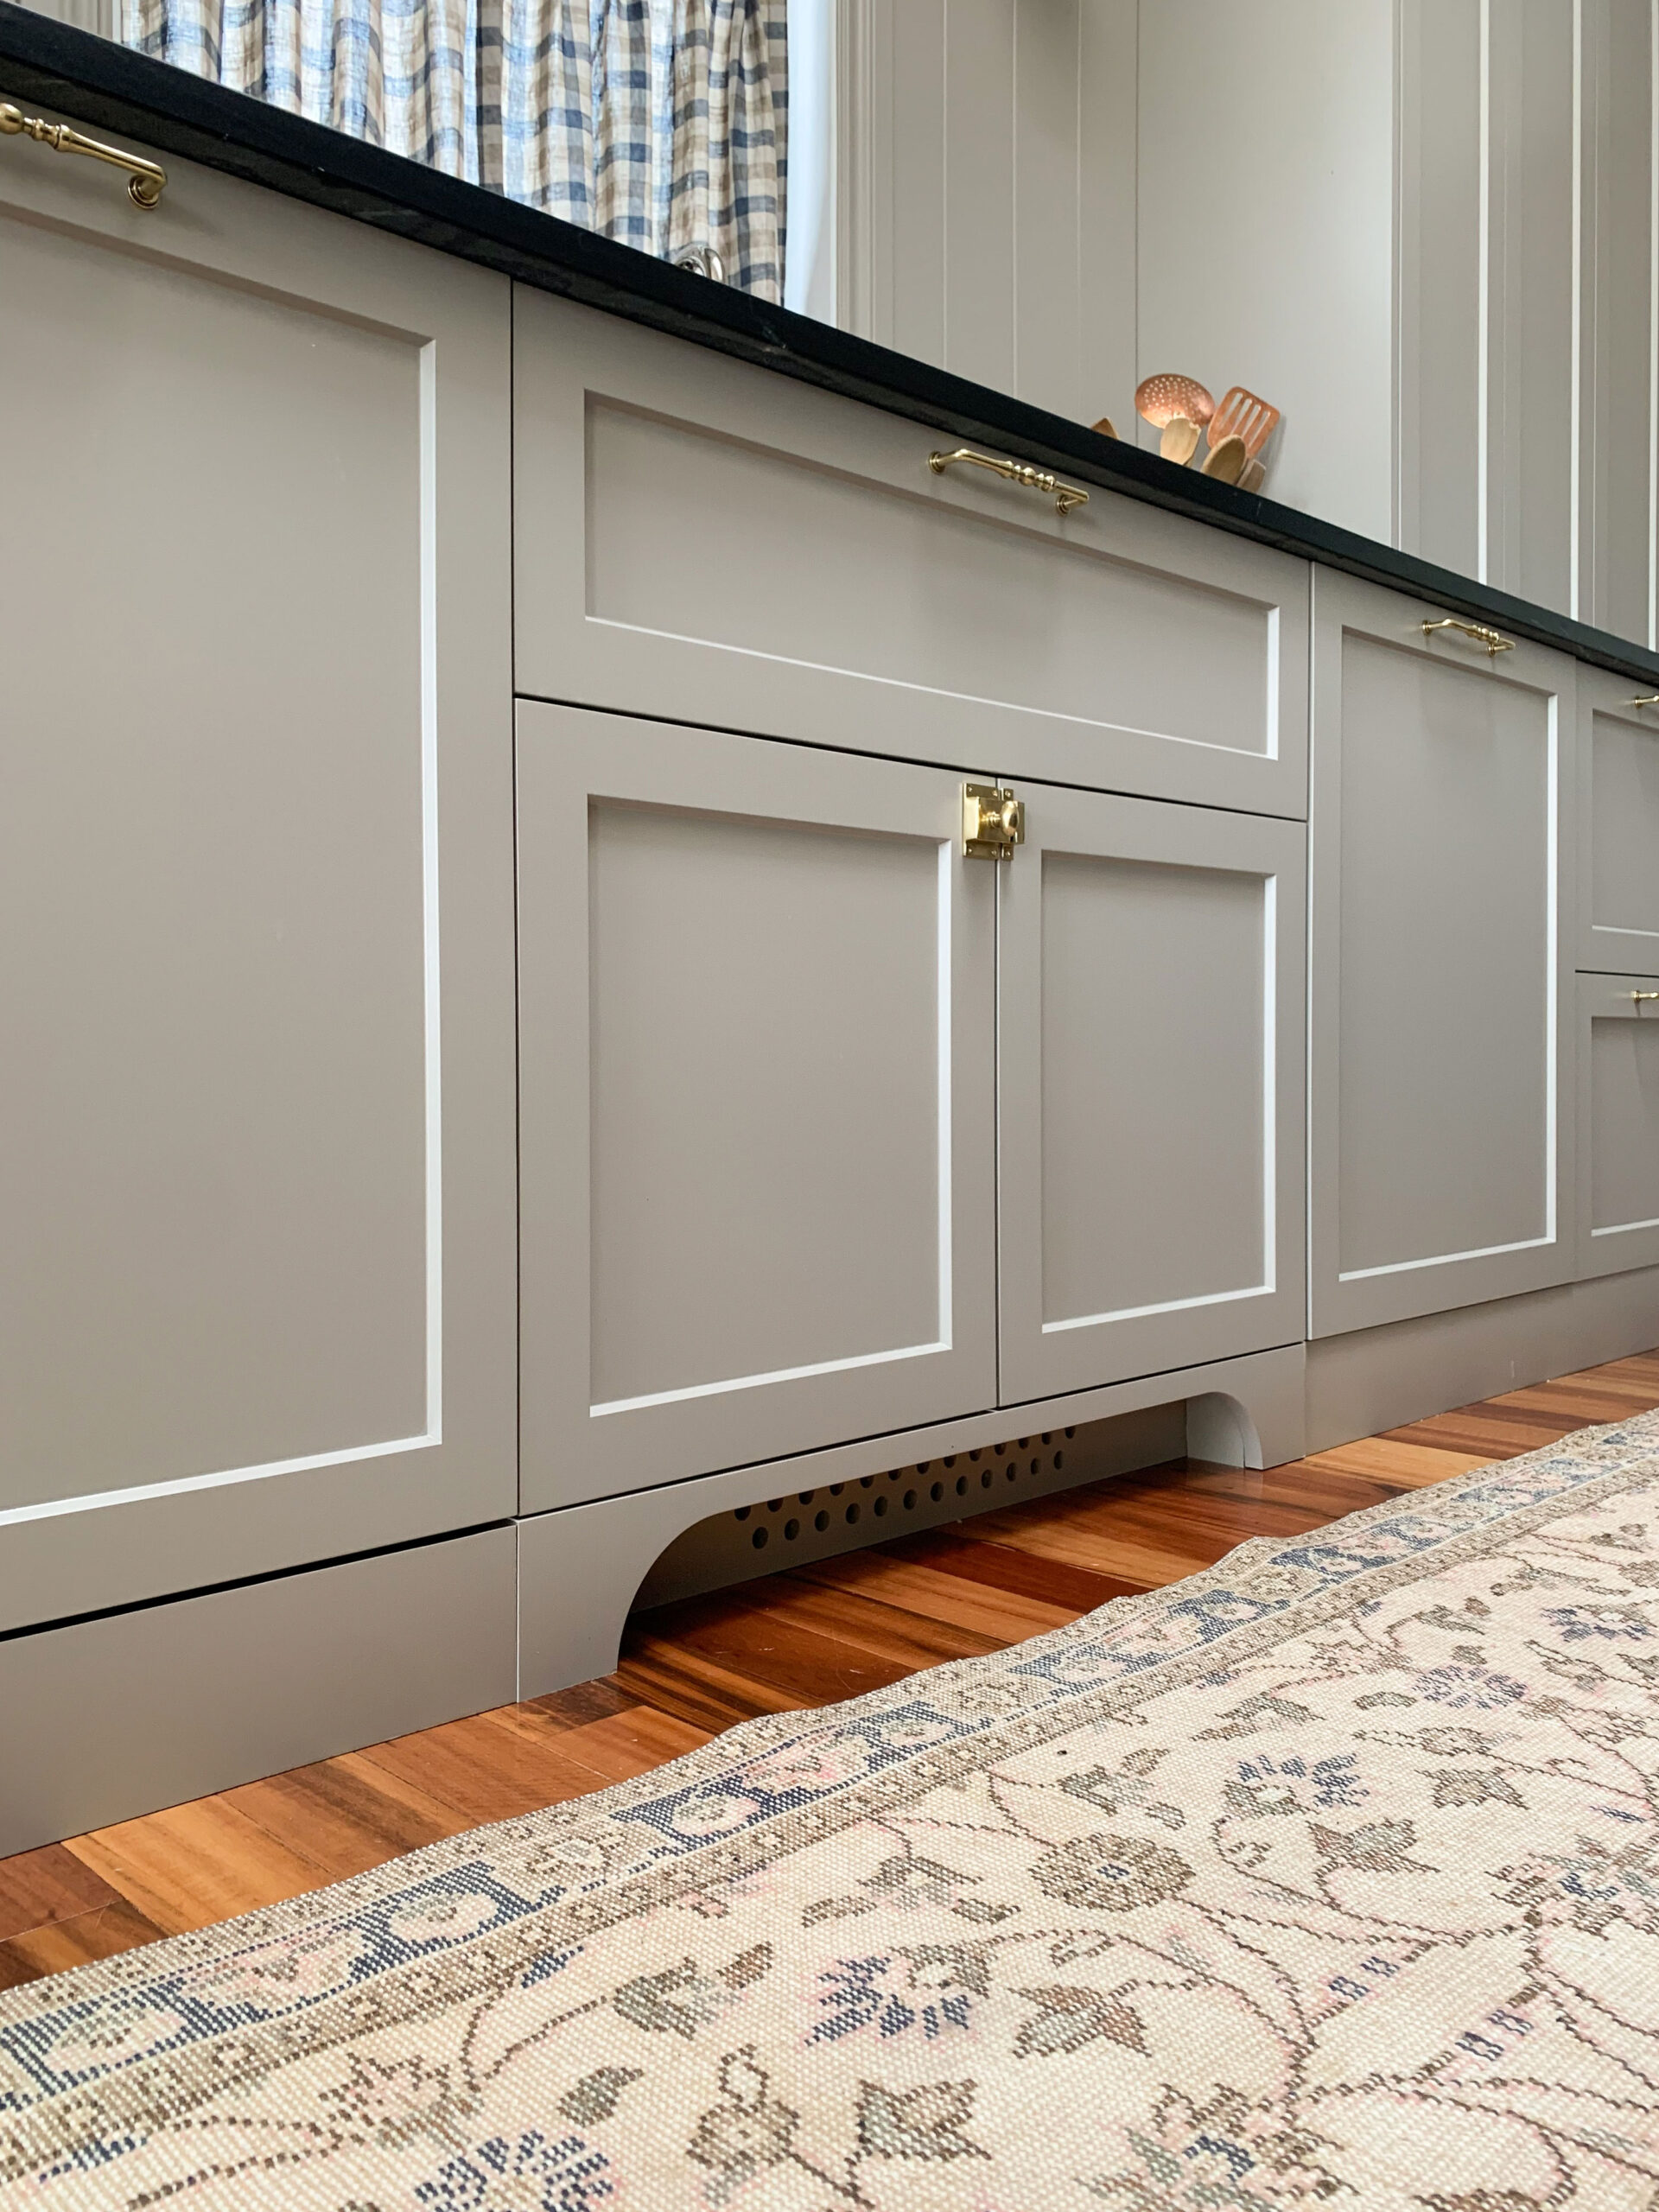
On our island cabinet, we built the base out of plywood framing. On the back of the island where the stools are we installed flush mount toe kicks, and on the inside where we generally work we decided to go with recessed. Therefore, we built the base of the island to the size that was needed for the toe kick. In the recessed areas, we make the base so that the cabinet hung over by 3 inches, and in the flush areas, we made the base flush with the cabinet boxes.
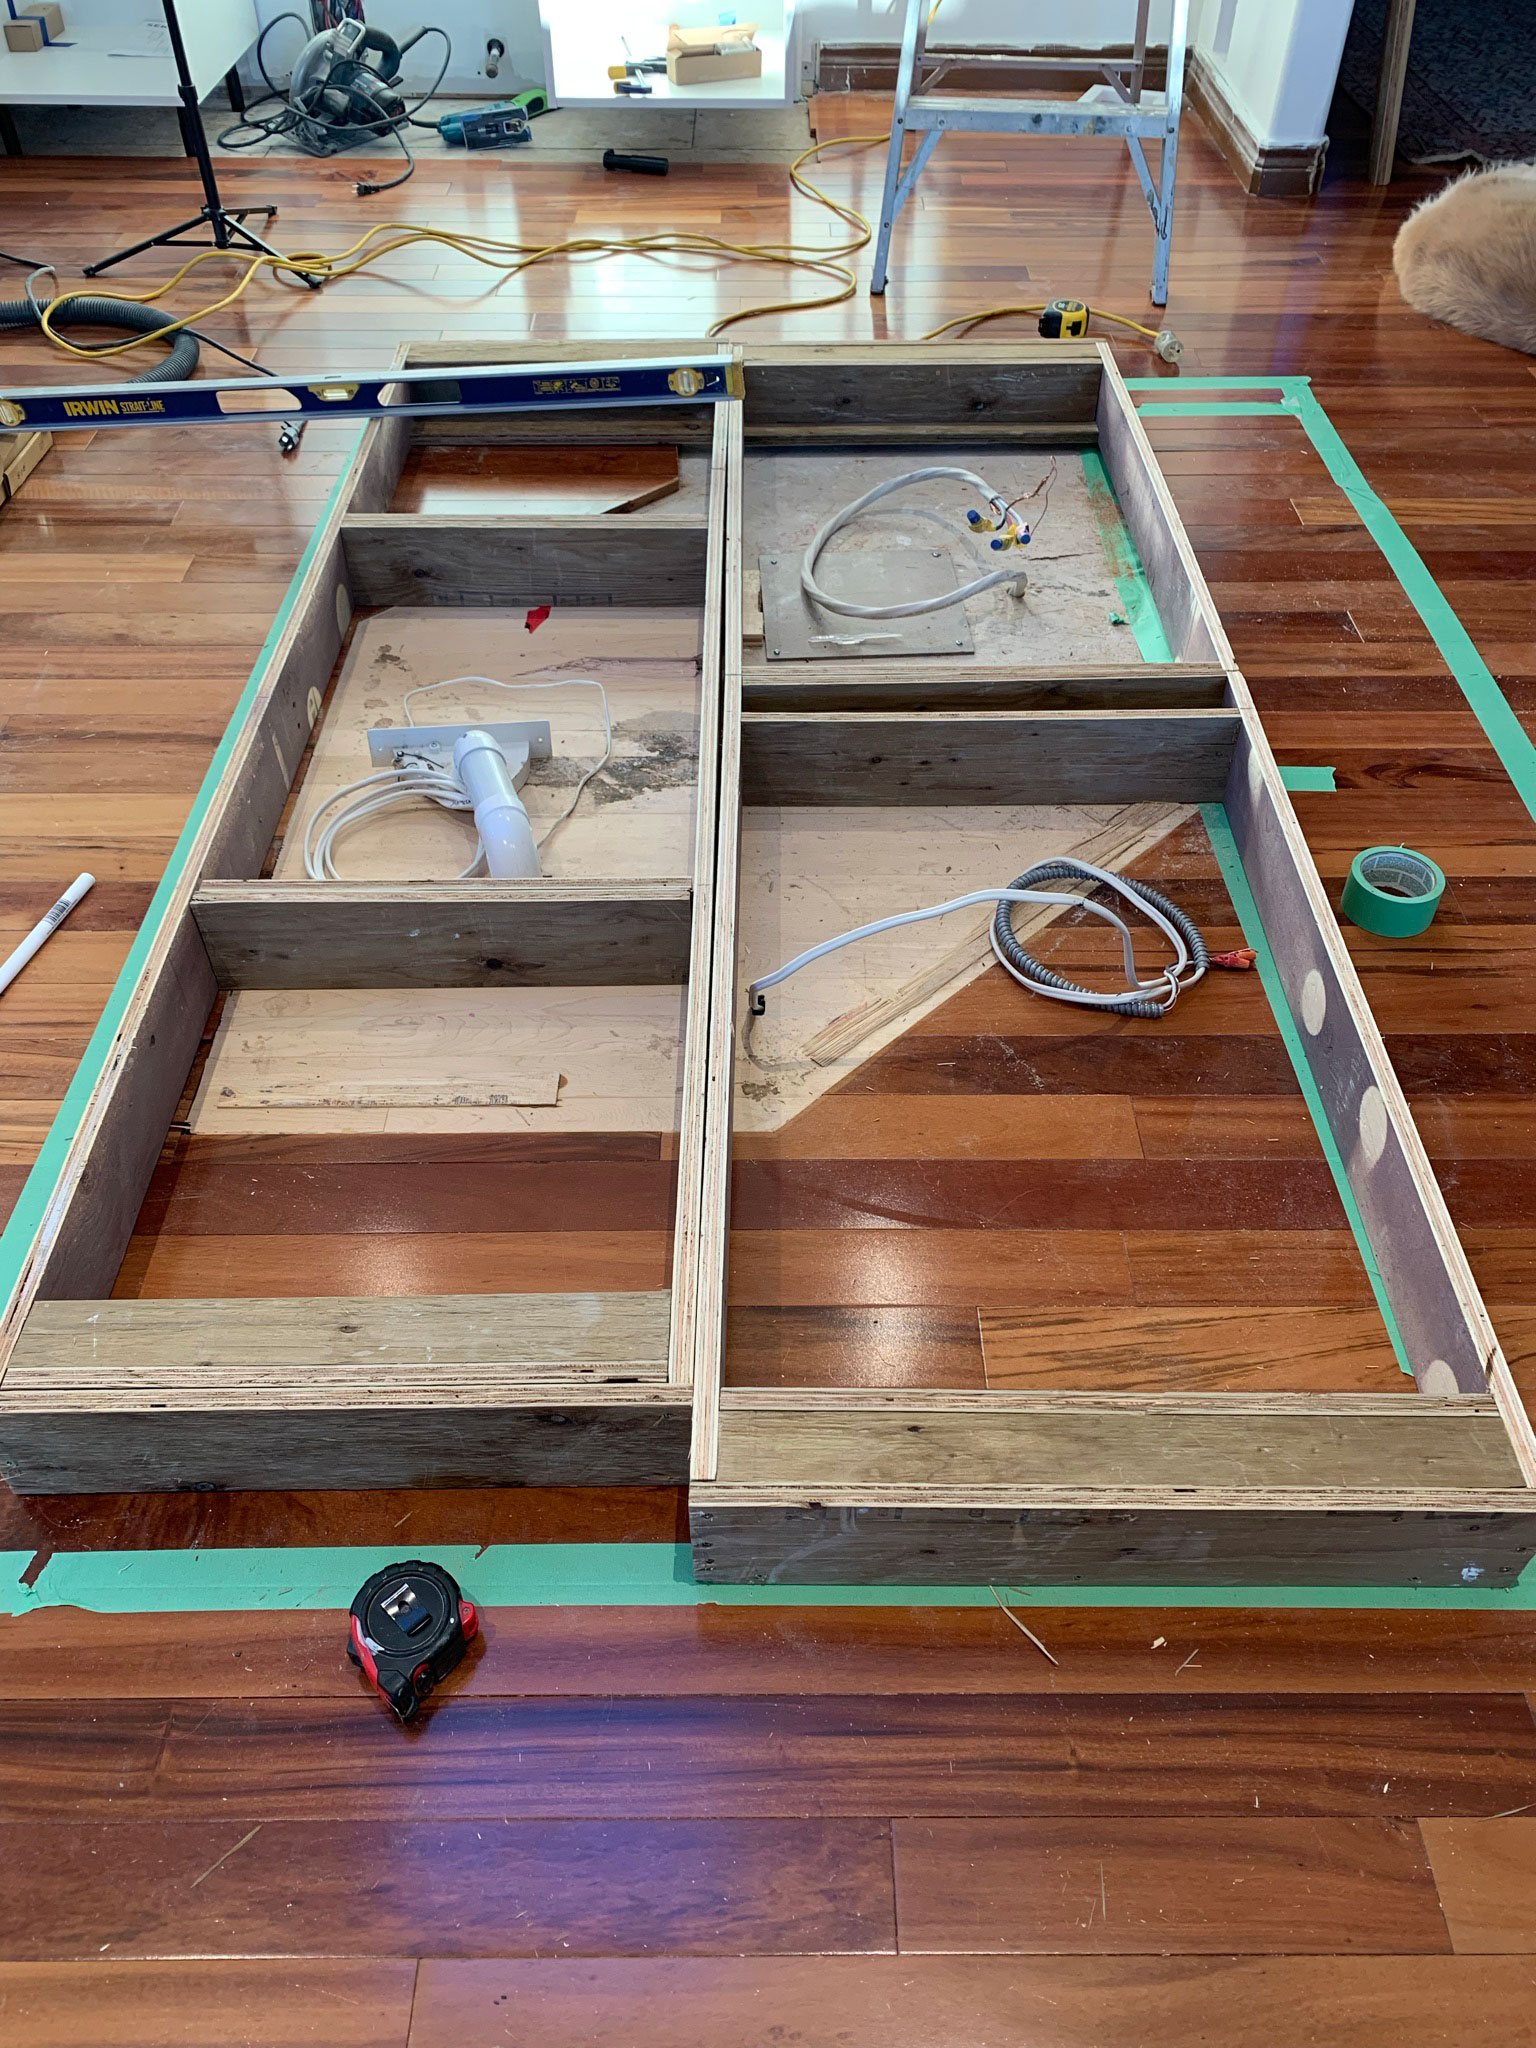
On our perimeter cabinets, we used Ikea’s levelling system and so we did not have a plywood base to attach our toe kick to. What we did instead is add a filler piece flush with the cabinet fronts between the cabinet and the floor. We used plywood for this and it involved adding support blocks to the underside of the cabinets. It was a bit of a pain to do and in retrospect, I wish we had just installed a wood base for the cabinets instead of using Ikea’s legs to make the toe kick installation easier.
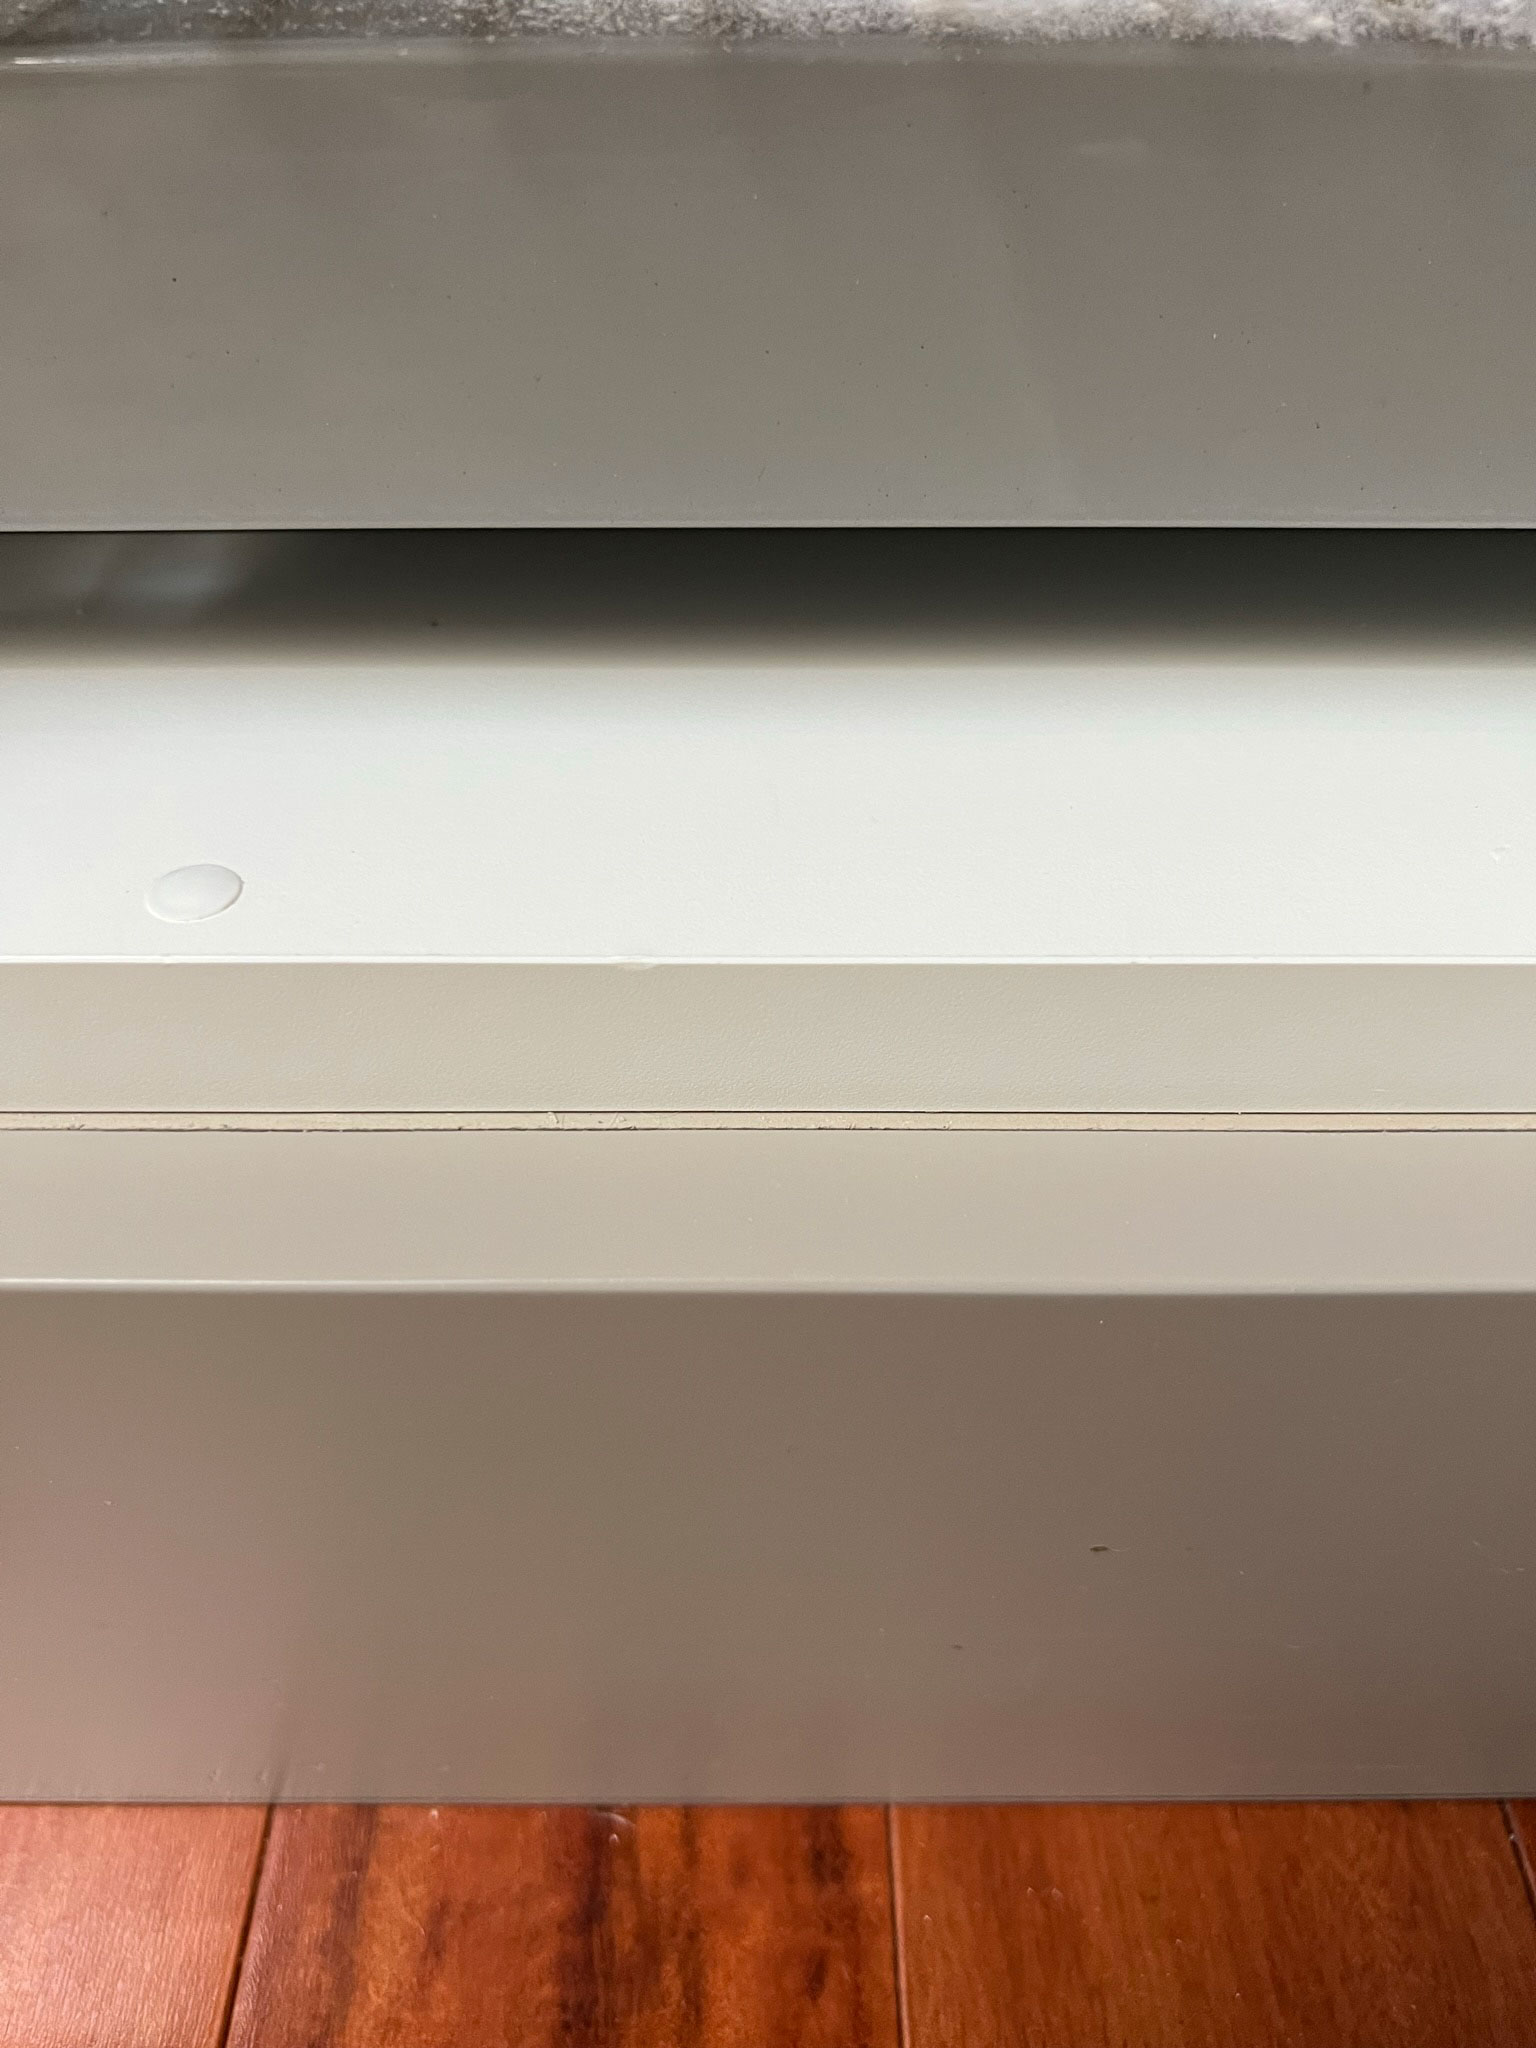
Another thing I wish we had done differently with the cabinet bases is to use painted MDF or white melamine instead of plywood. There are a few spots where we have the flush toe kicks where a little bit of the plywood base is visible. This is only visible when you open the cabinet doors (and only on the cabinets that have doors, not drawers) so it doesn’t bother me that much. It could have been eliminated by using a material that matched our cabinets a bit better for the base, so once again, you can learn from our mistakes!
How to Install Recessed Cabinet Toe Kicks
Let’s start with the type of toe kick that has easy installation, the recessed kind. The reason these are easy is that they don’t have to be super precise.
Measure the toe kick space in a few places to determine the shortest measurement. The toe kick is then cut to the shortest measurement. Then you slide it in there flush with the floor and attach it.
In our case, we had a plywood base for our cabinets so it was just a matter of installing a few finish nails through the front of the toe kicks into the plywood.
There will be slight variations between the space between the top of the toe kick and the cabinet underside, most likely, unless you are lucky and have level floors. Never fear, this doesn’t show unless you are on the floor looking up at it so you don’t need to do anything to cover that up. Easy, right?
How to Install Flush Mount Cabinet Toe Kicks
First of all, whenever I show my flush toe kicks on Instagram I get questions about whether or not my feet hit the toe kick or if it is uncomfortable to stand in front of them. The answer to both of those questions is NO!!! If you don’t believe me, the next time you are chopping carrots, look down and see where your feet are. I’m about 90% sure that they aren’t under your cabinets in the toe kick area. If they are… well maybe this style of toe kick just isn’t for you!
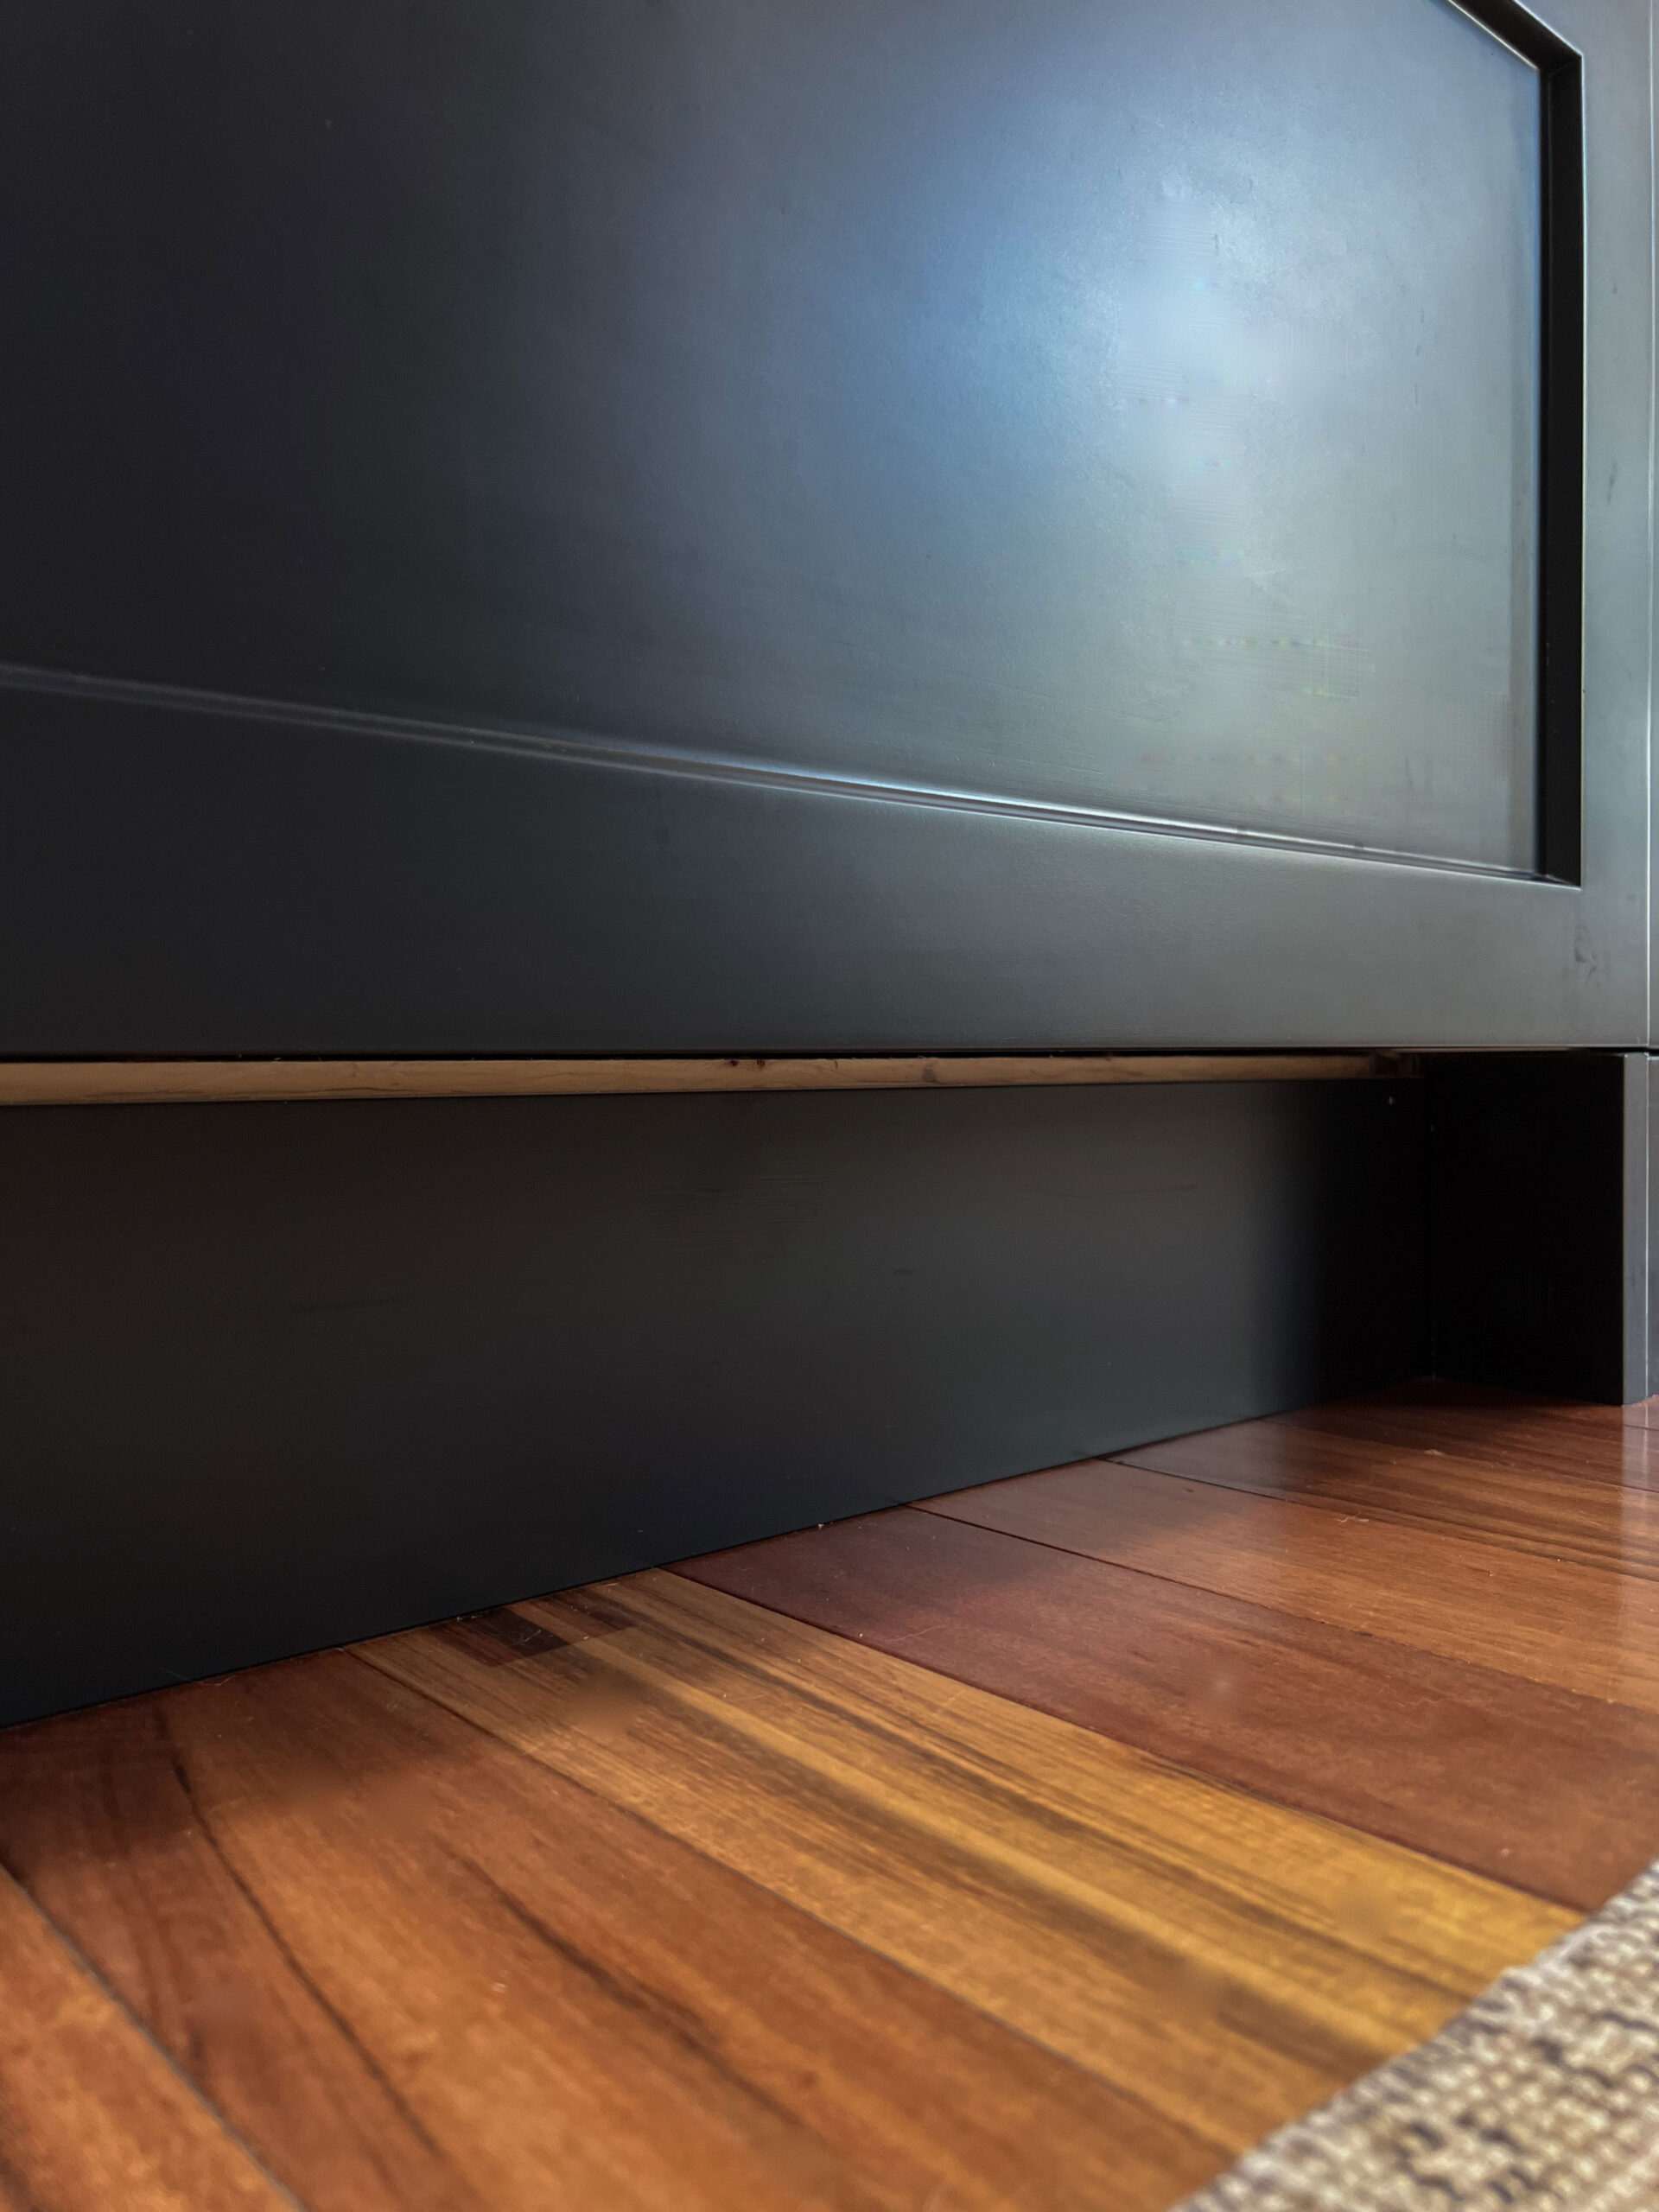
Install a cabinet base for your cabinets to sit on that is flush with the front of the cabinet boxes. For flush toe kicks, the toe kick material (in our case, ¾” MDF) goes on top of the cabinet base material so it is flush with cabinet doors. (Our doors were also ¾” thick so they end up being “flush” as a result).
Now in order to have the flush toe kick be level with your doors and sit tight to the floor, you are going to need to scribe the bottom of the toe kick material. (I’m going to assume that your cabinets are perfectly level here!)
In order to scribe the toe kick, you need to first cut the toe kick to the maximum width of the area between your cabinets and the floor. Be sure to leave a little bit of space between your door and the toe kick so that the door doesn’t rub on the toe kick when it is opening and closing.
For example, If you measure 4.5”, 4.75”, and 4.4” along a run of toe kick you want to install, you are going to want to cut the board down to 4.75”, the highest of these three measurements.
Let the toe kick sit on the floor and level it and have someone hold it or clamp it in place in a level position. Measure the largest gap between the floor and the bottom edge of the toe kick.
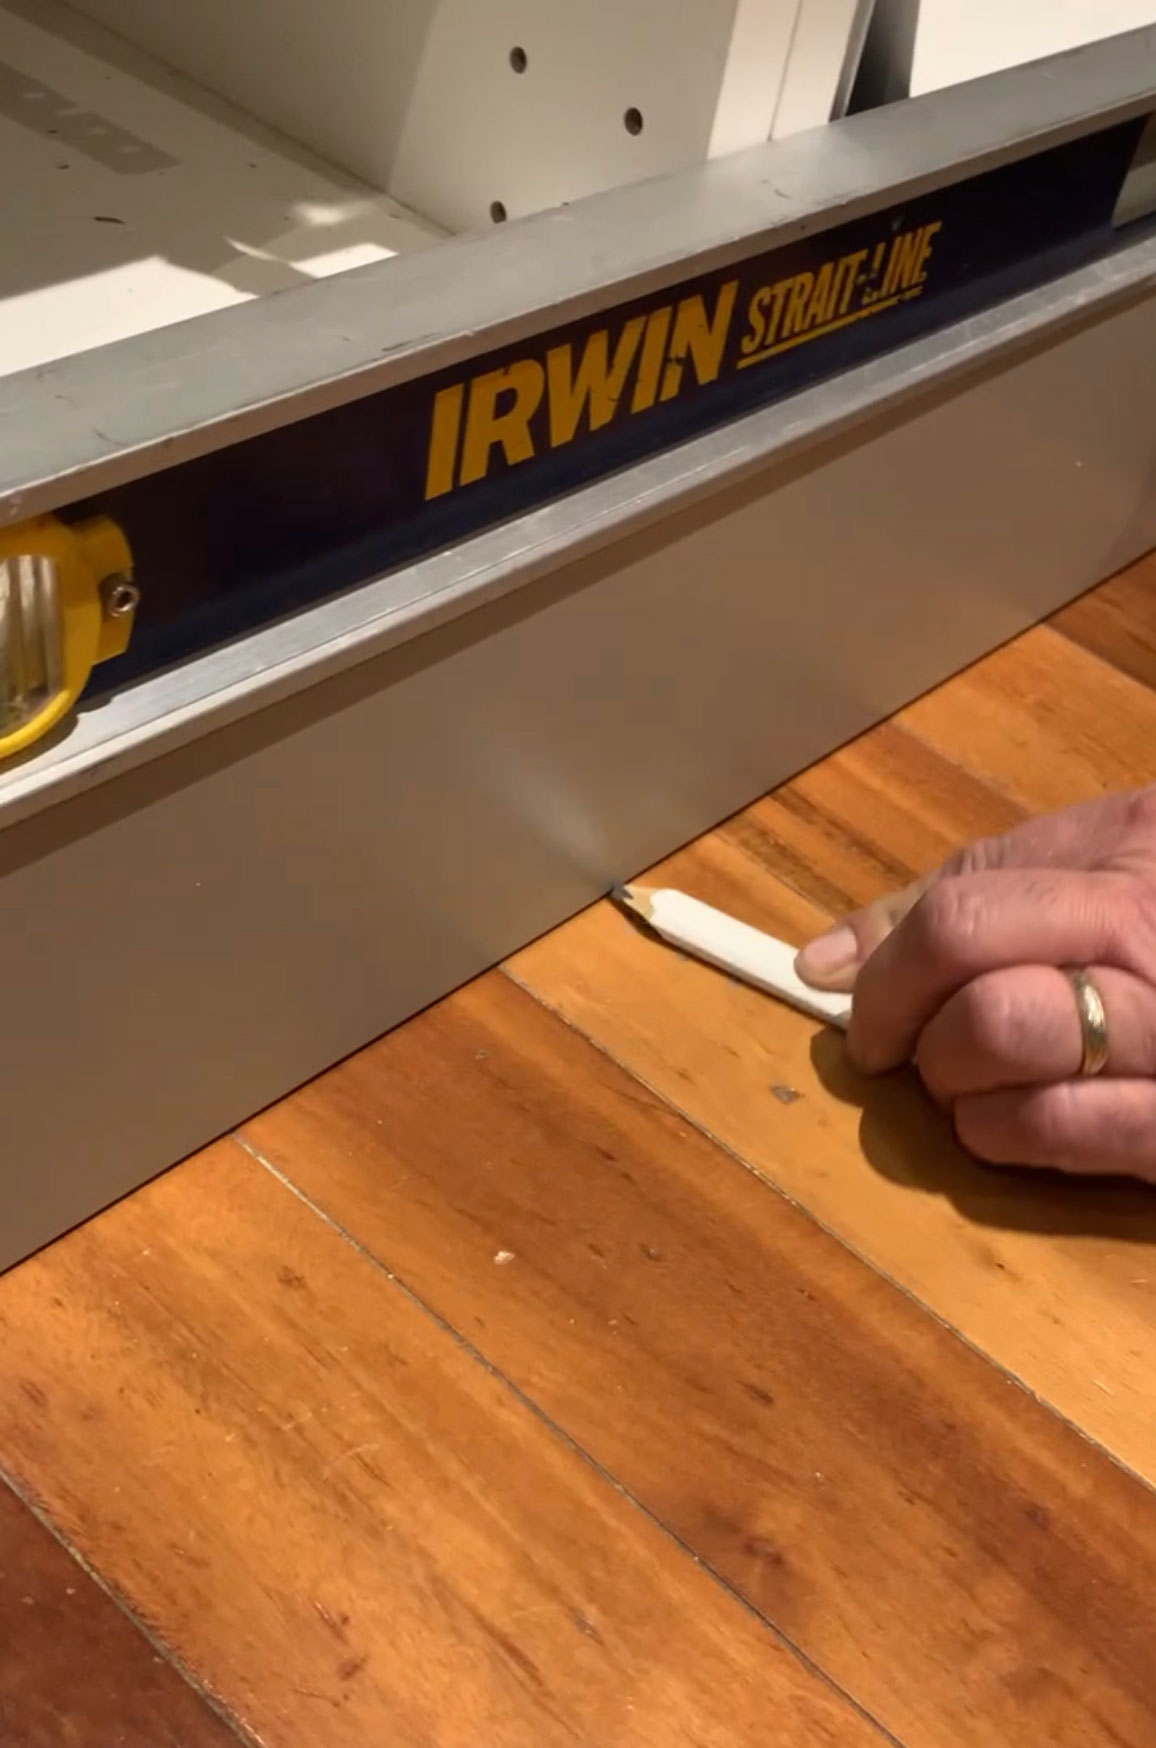
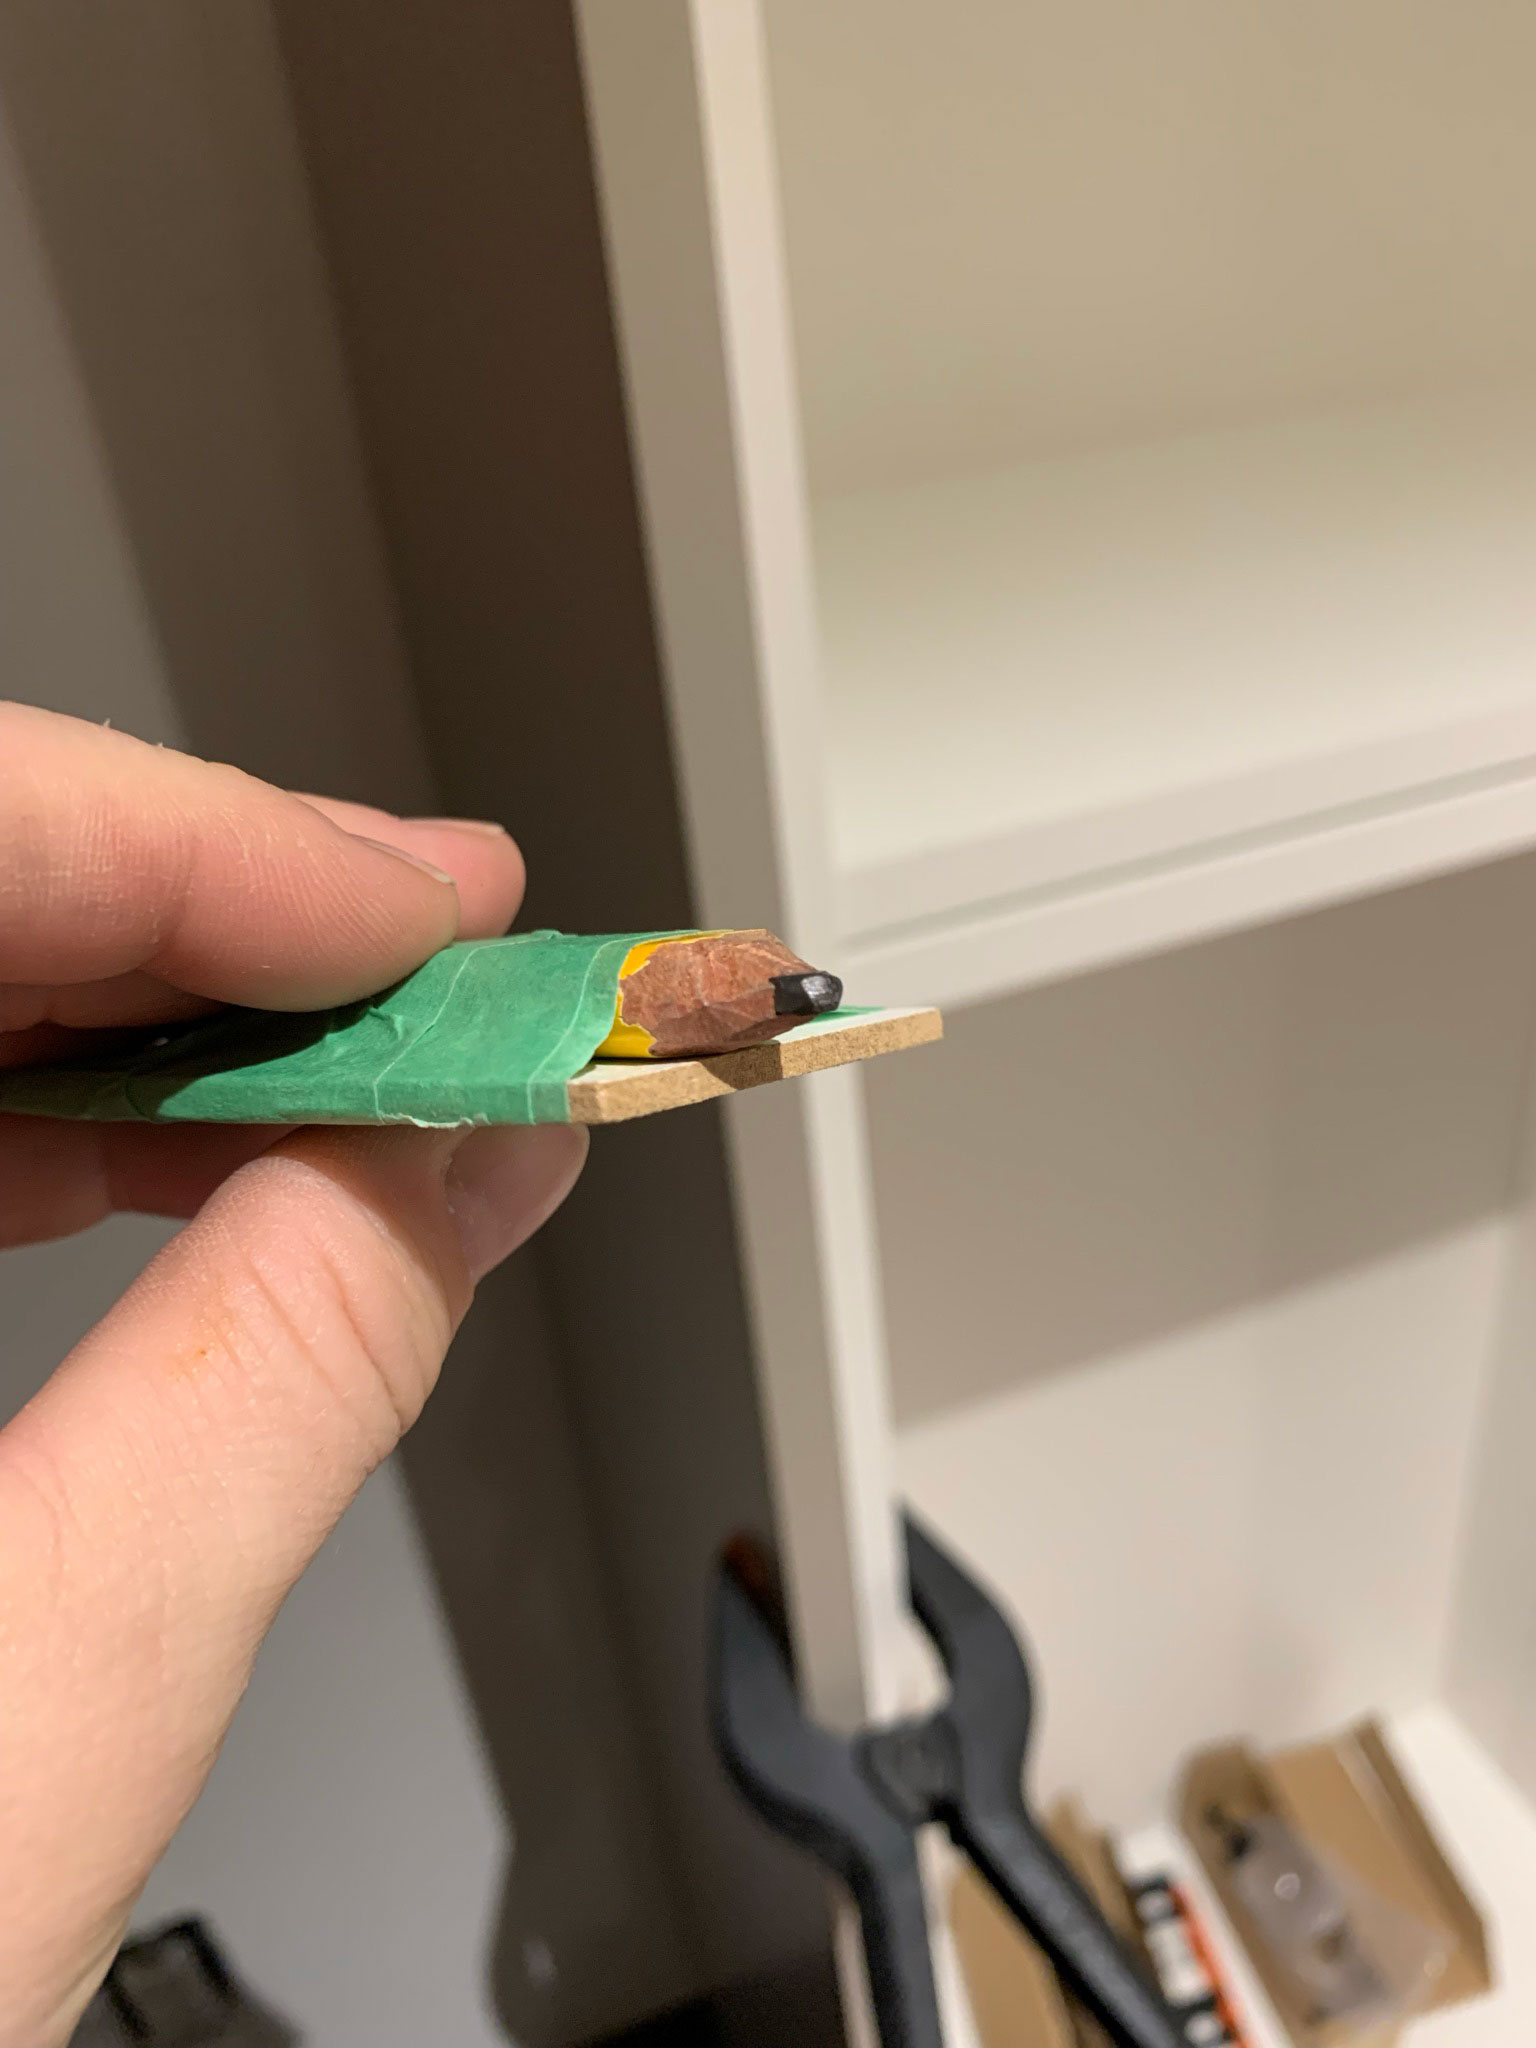
We used a scrap piece of wood taped to a pencil that is the thickness of the largest gap, and ran that along the floor to mark where the toe kick would need to be cut. You can also buy a scribing tool for this but we’ve always gotten along just fine using what we have on hand.
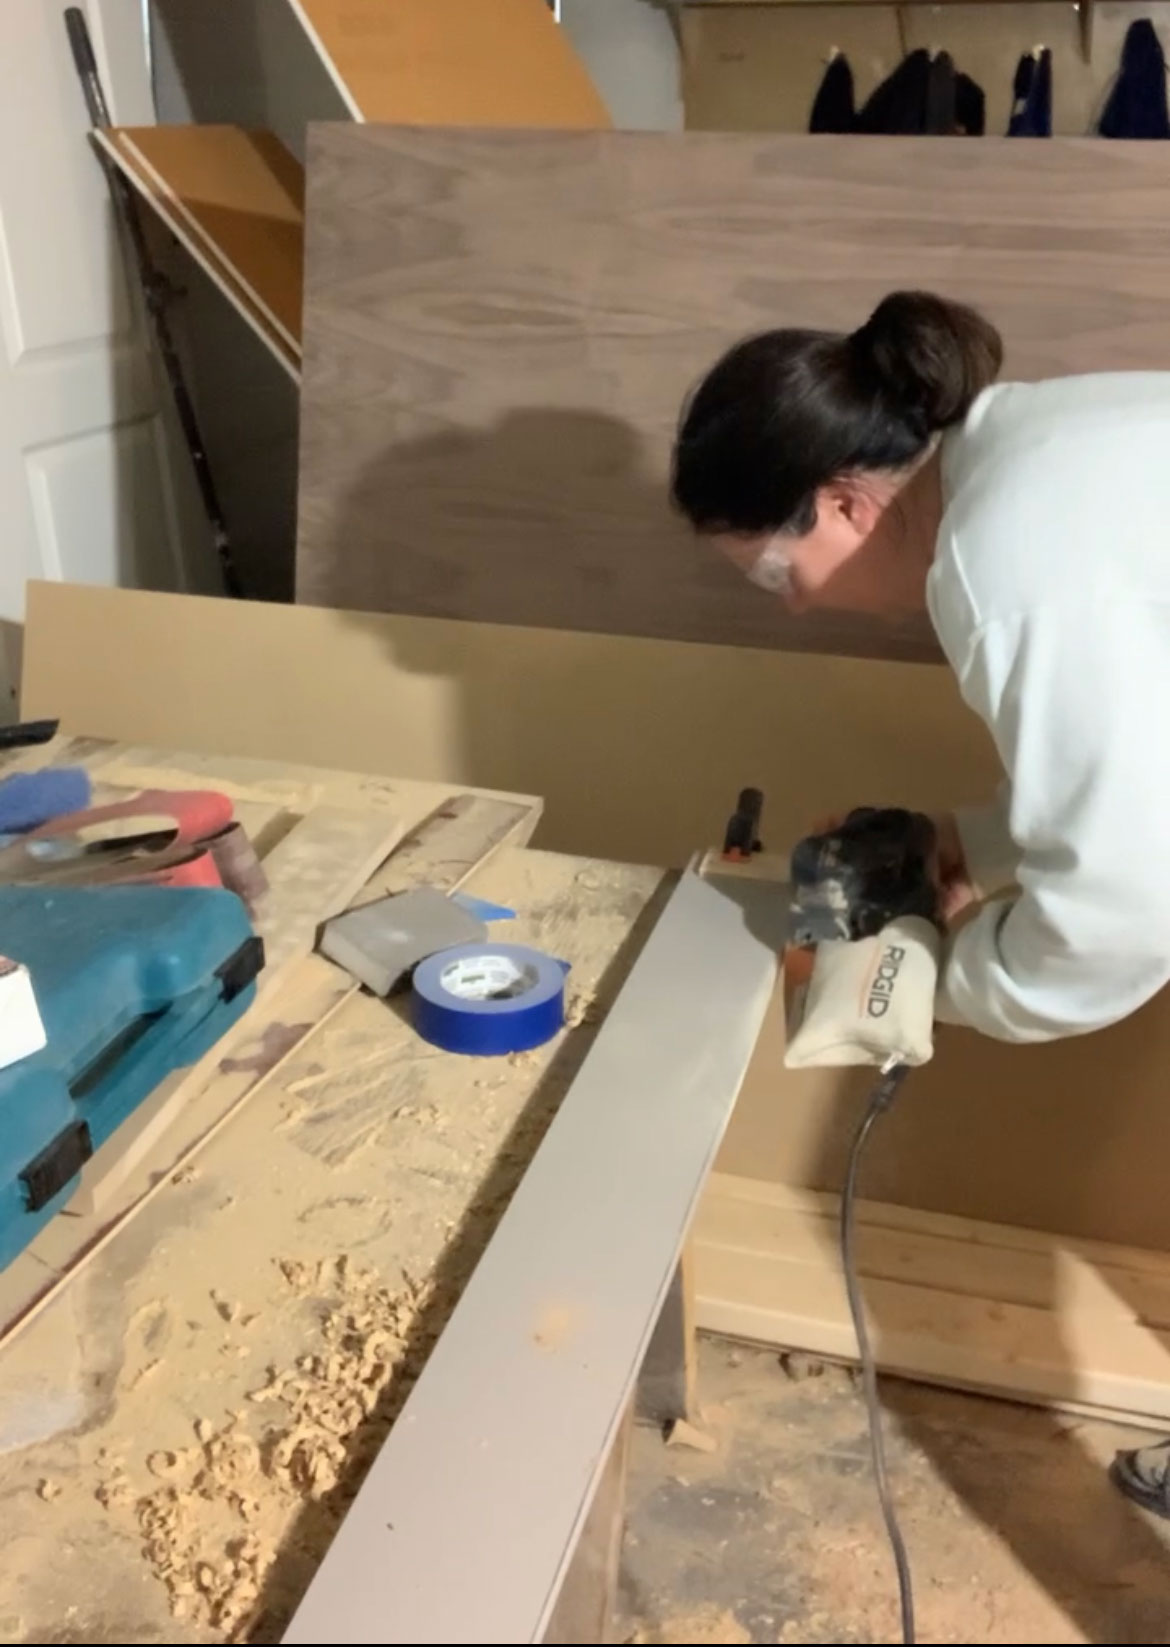
Then, cut along the (wavy) line you made. We used a jigsaw for larger cuts and a belt sander to fine-tune the amount we were taking off, sanding down until we reached the line we made.
When you place the baseboard back on, the scribed part should follow the floor and the top will be level with the cabinets.
Once the toe kick is scribed, it can be attached to the cabinet base using glue and finish nails.
I find scribing hard to wrap my mind around and even harder to explain, so if that didn’t make any sense, this article explains it pretty well!
Specialty Cabinet Toe Kicks
How to Install a Vent in the Decorative Cabinet Toe Kicks
Under the sink, we had an existing vent that needed to stay. Rather than install a regular vent cover, we decided to jazz it up a bit with something more decorative. I ordered an arched toe kick piece from my cabinet door supplier to fit this cabinet and then DIY’ed the rest.
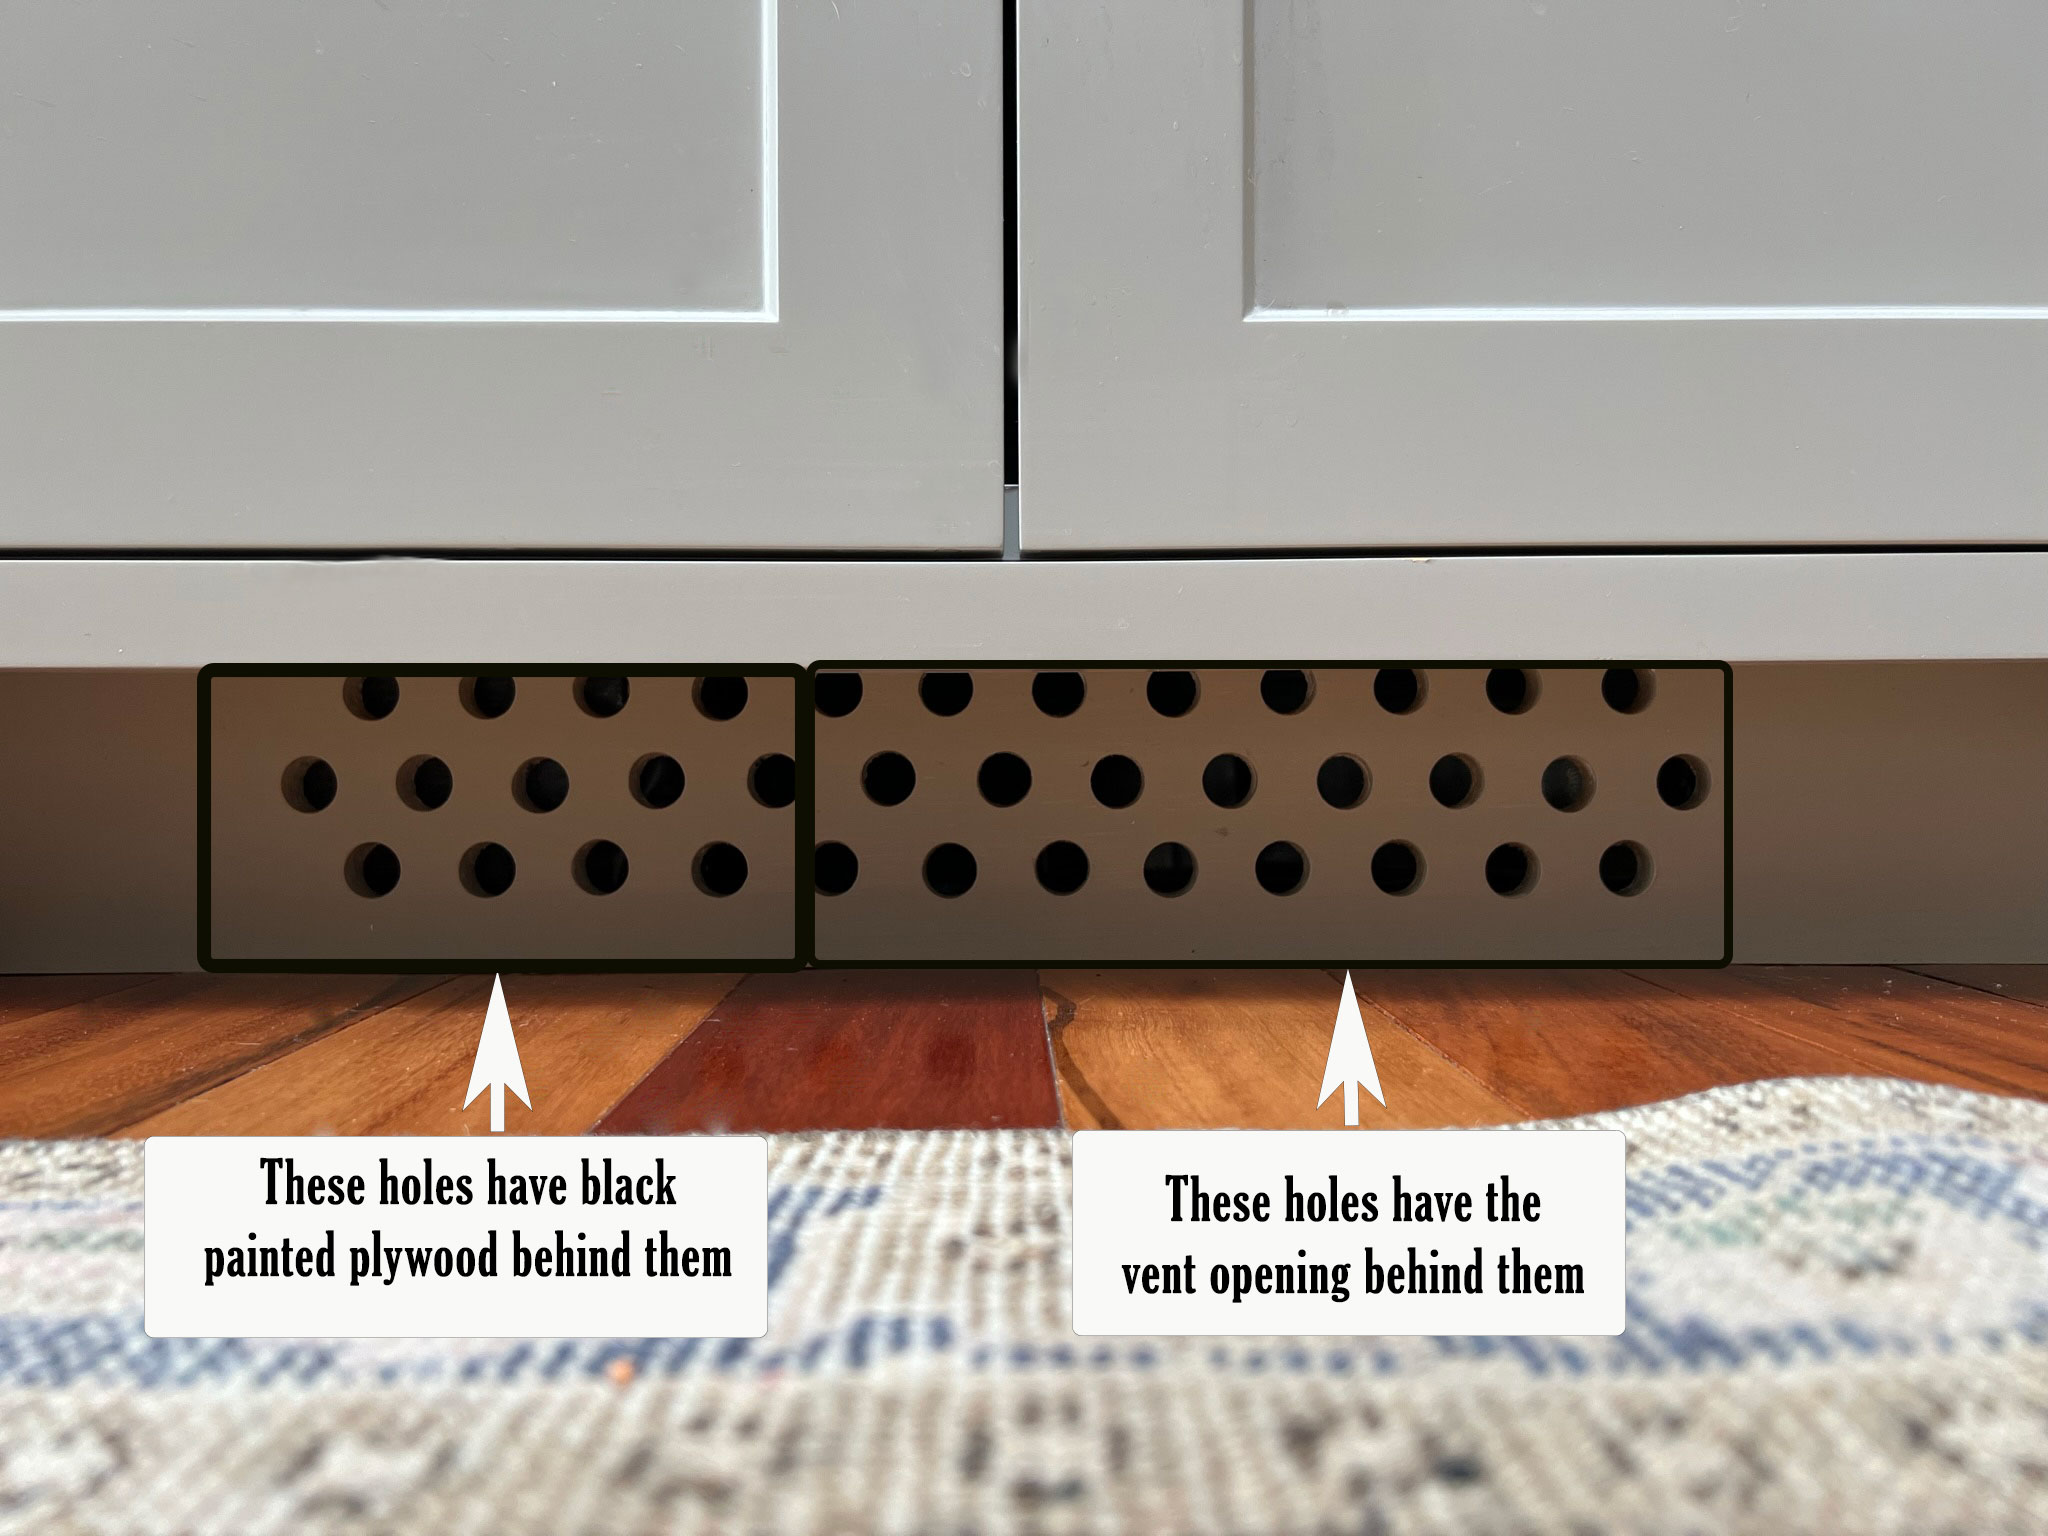
Since you can see through the arched shape, we needed to have both a flush mount cabinet toe kick and a recessed one, which would also be visible. We decided to drill holes in the recessed version to allow air flow rather than have a standard vent cover. The recessed toe kick was installed directly onto the plywood base that we had built, and the flush arched toe kick was installed in front of it flush with the doors.
You can see in the photo below I also added little pieces where the arched toe kick met the floor to block off the area behind the arched part. I have had these types of toe kicks before and I know from experience that all kinds of dirt gets caught back there if you don’t do that!
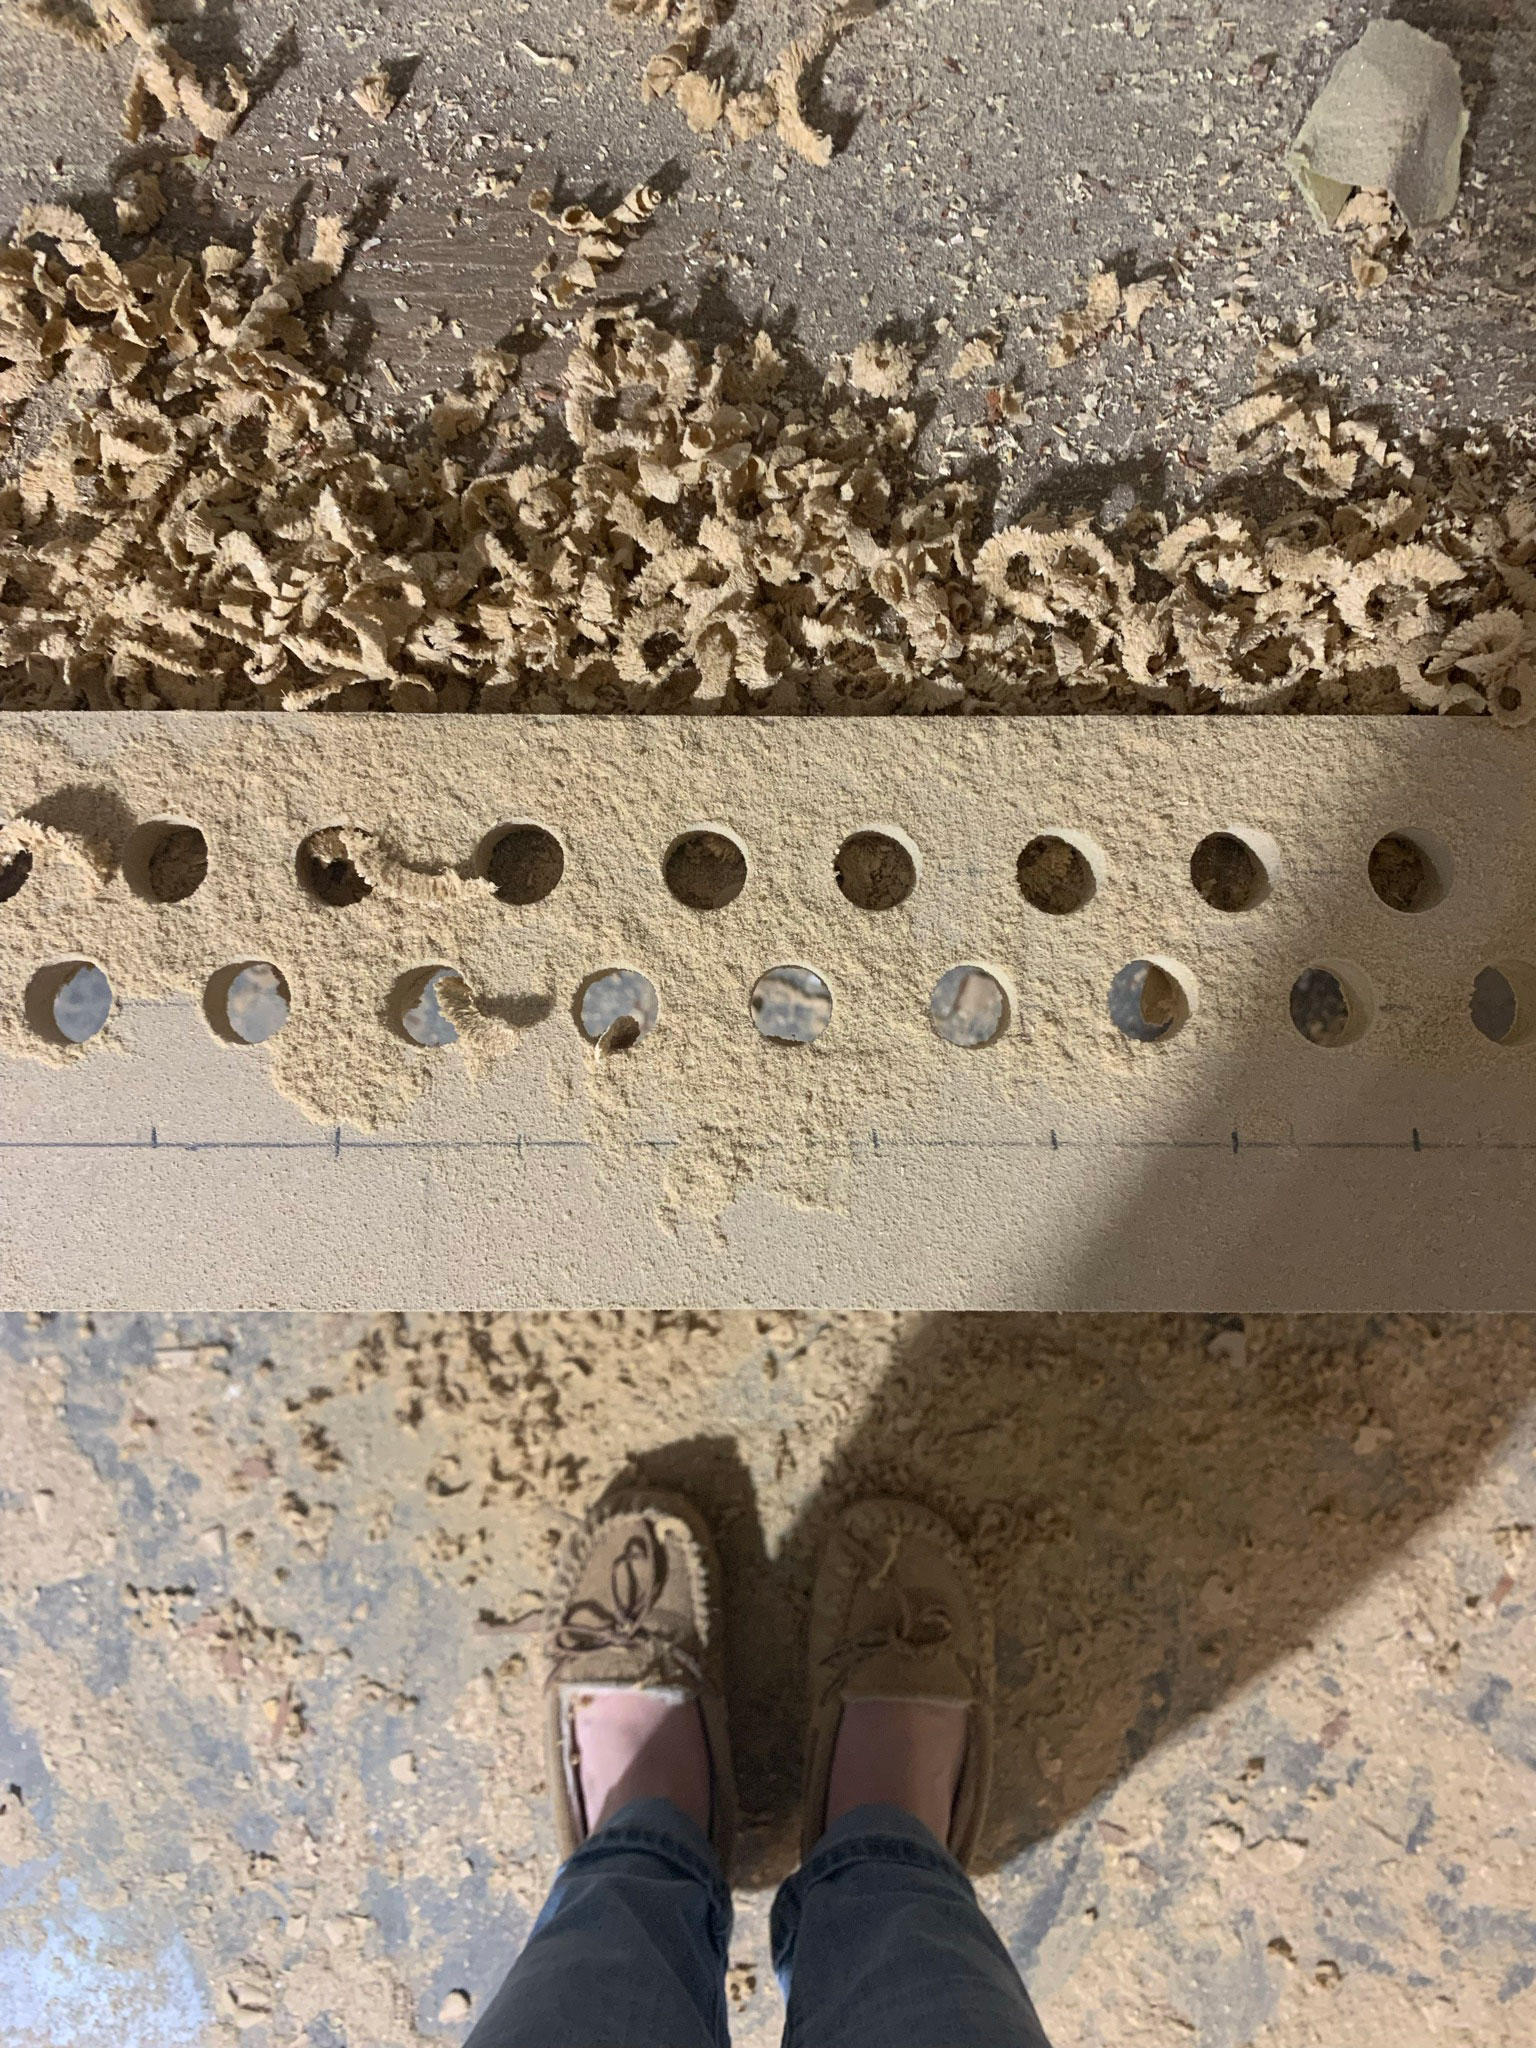
Fun fact – the vent under this sink was off-set slightly. Rather than have the holes offset, I drilled extra holes on the left so the vent would appear symmetrical, and then I painted the wood behind that part black so it would appear that there was a hole behind it instead of the wood cabinet base. It worked like a charm!
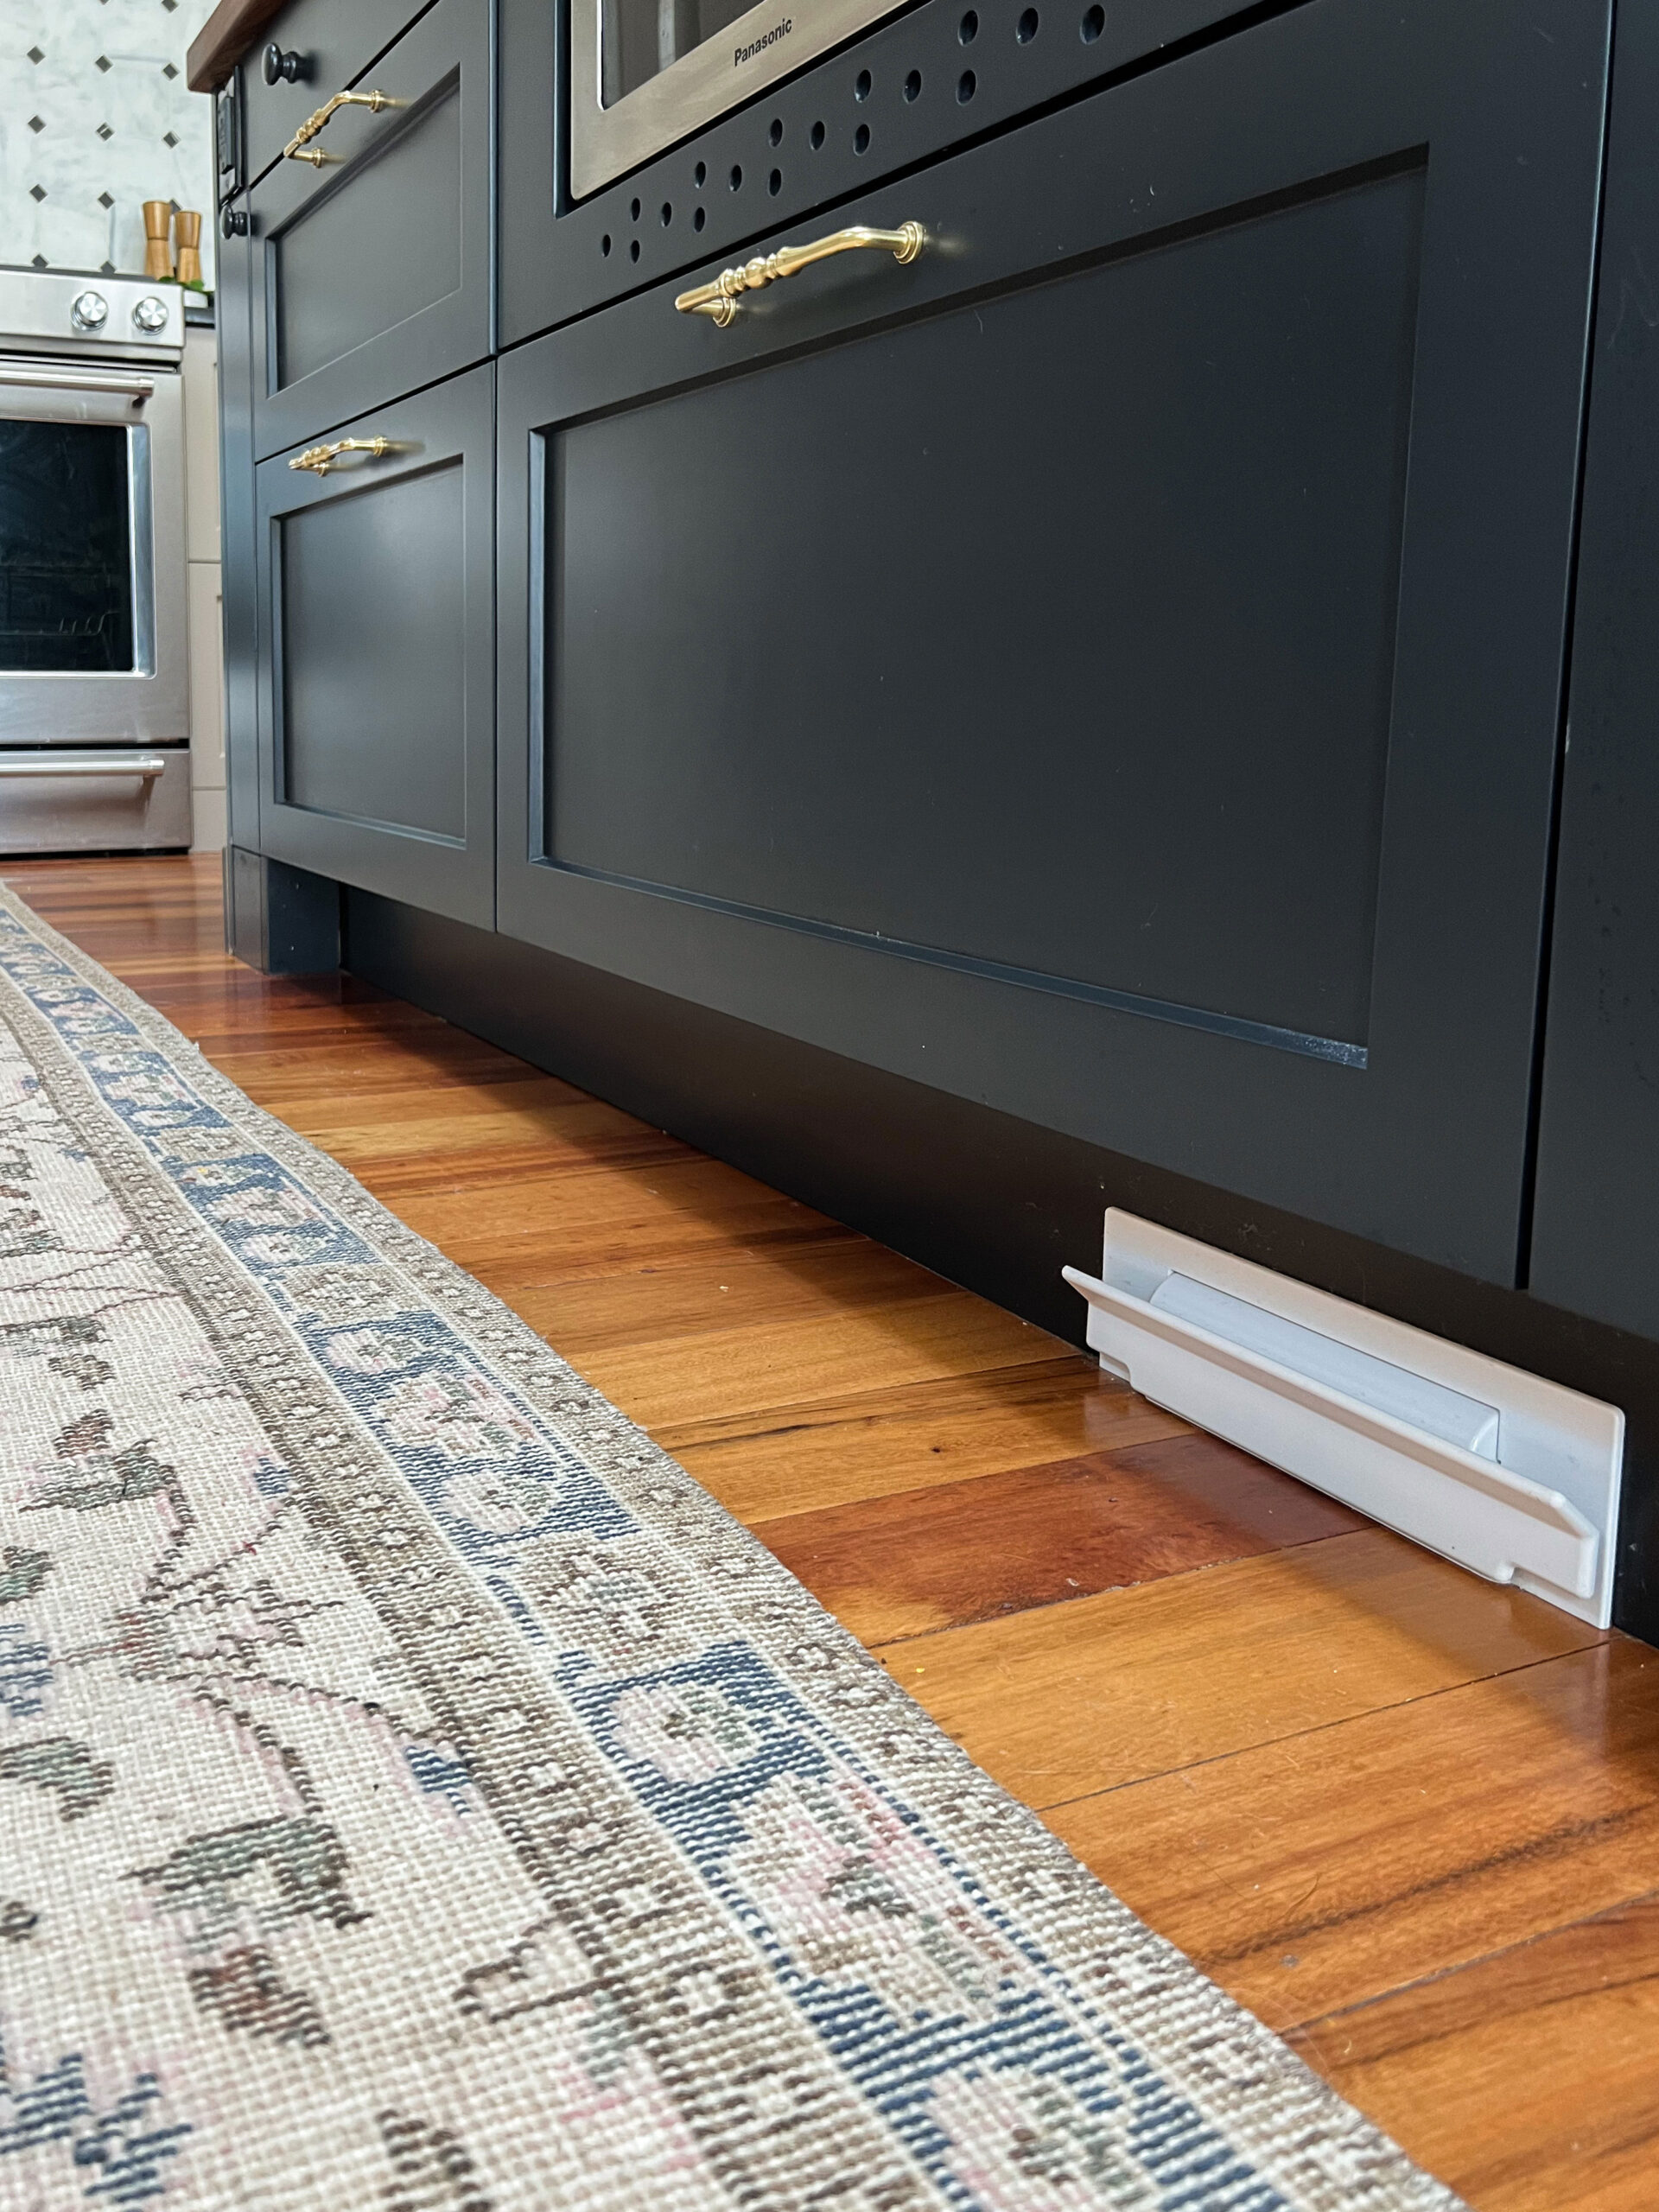
How to Install Cabinet Toe Kicks in front of the dishwasher
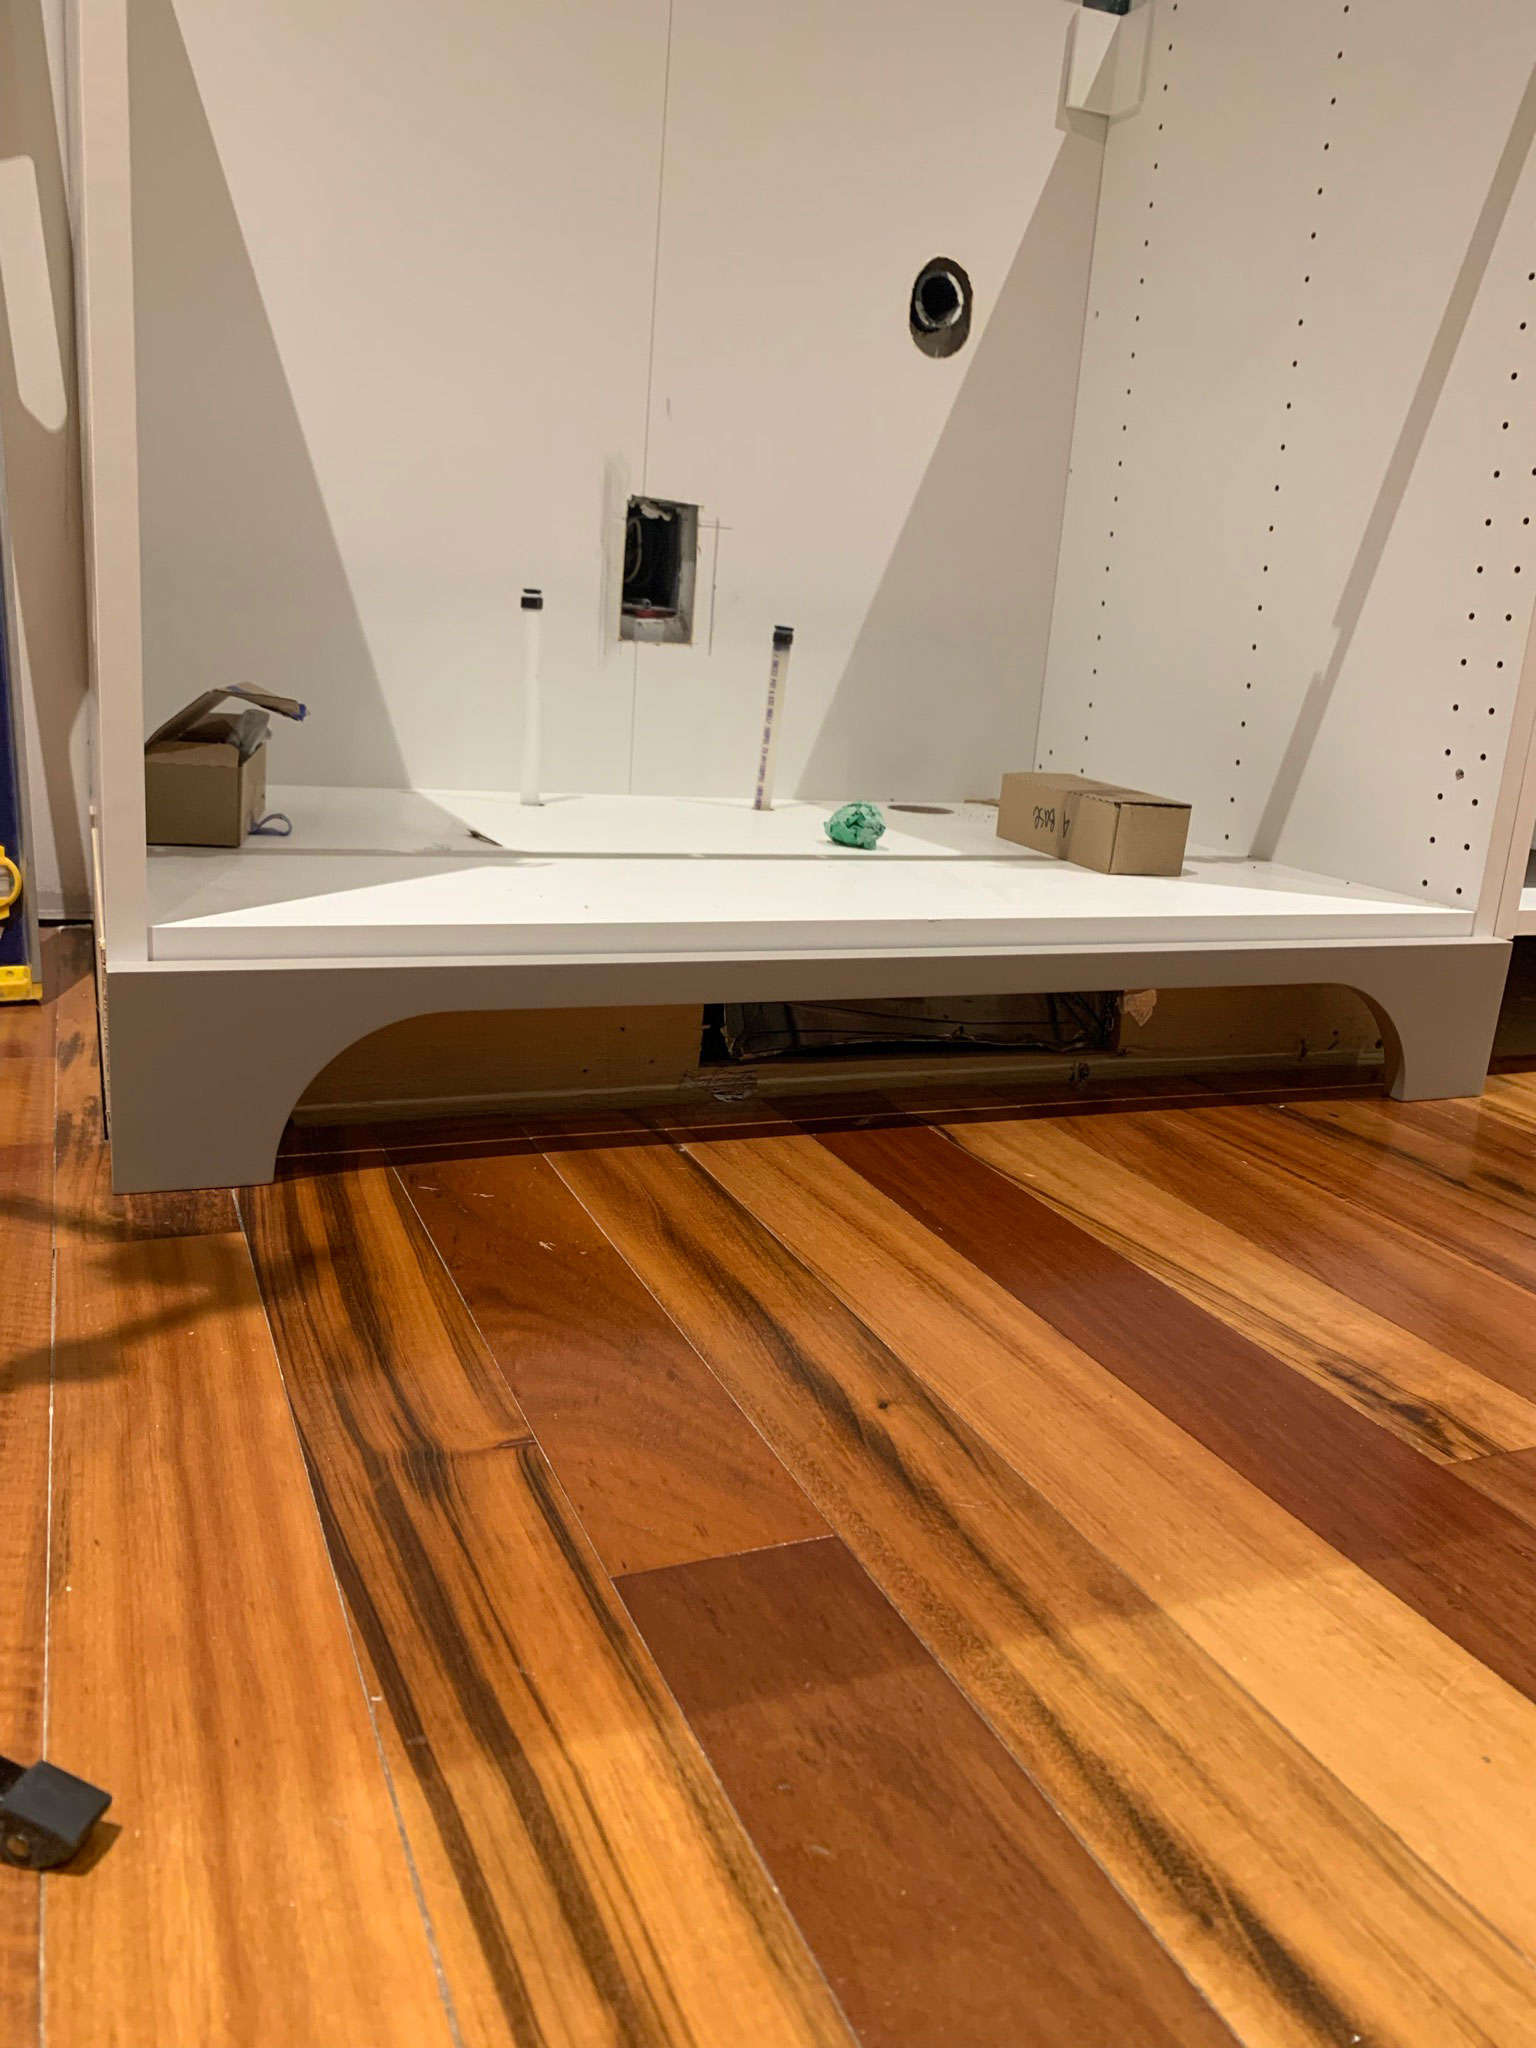
We have a panel front dishwasher (which means that the dishwasher has a cabinet door on it to make it look like just another cabinet.) Having the toe kick not run continuously under there bugged the heck out of me.
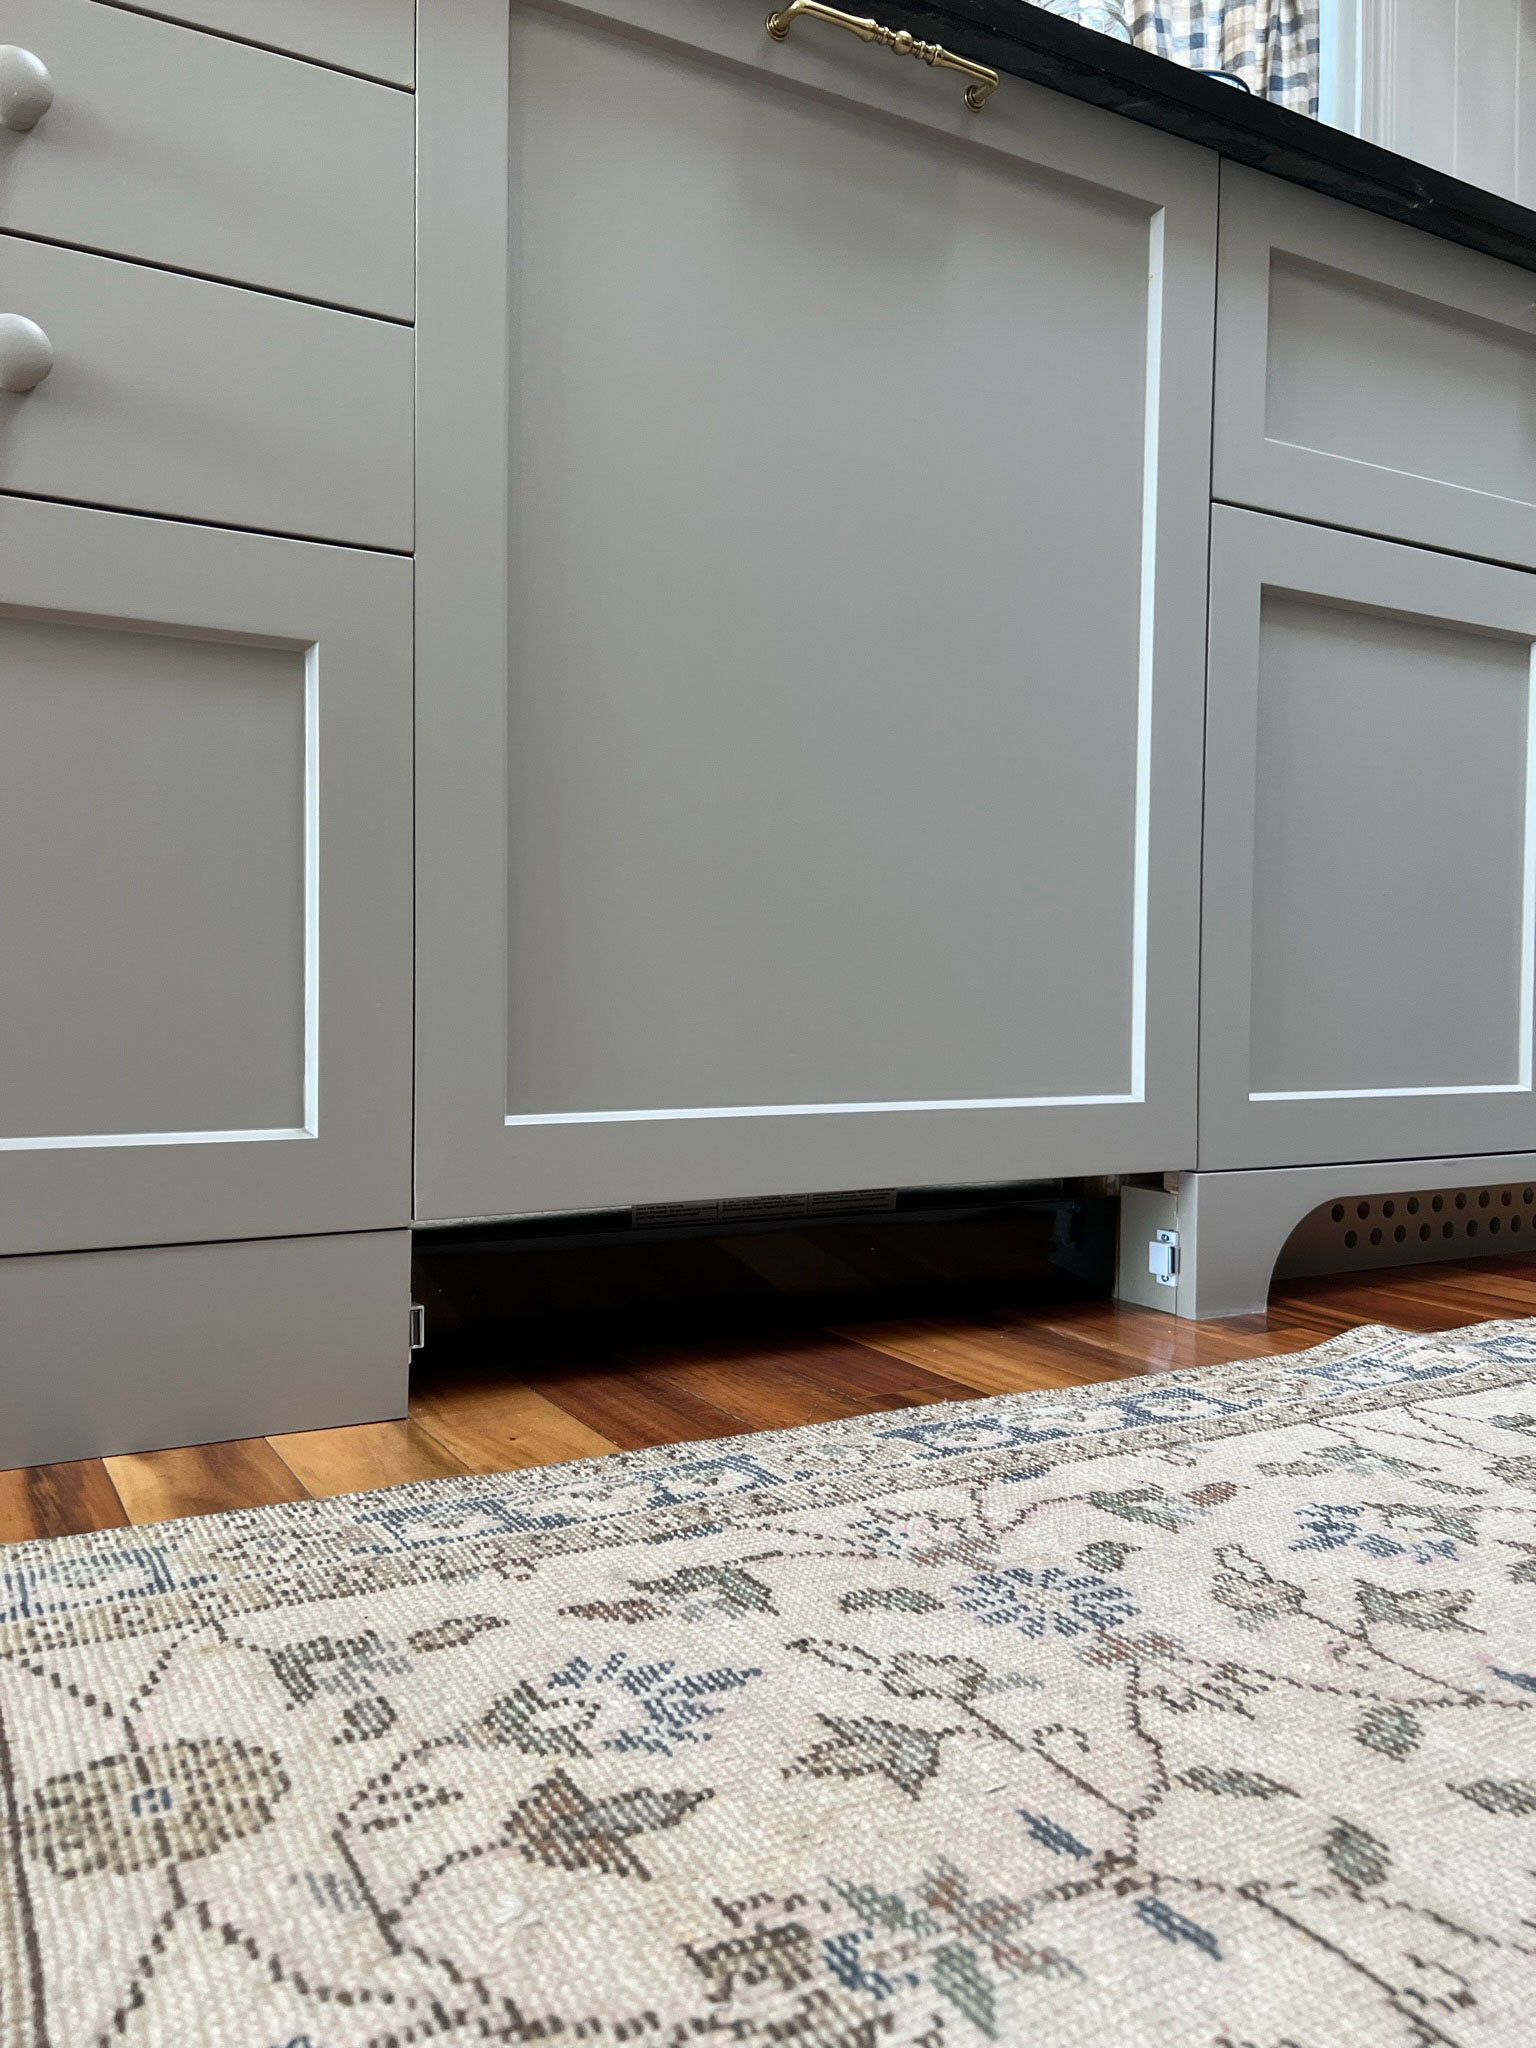
Installing a toe kick in front of the dishwasher would have meant that if the dishwasher ever had to be pulled out for any reason, the toe kick on the whole kitchen would need to be removed. Considering the appliances they make these days have a lifespan of about 5 minutes, I knew I wanted to have something that could be easily removable.
I got down low on the floor and had a good look at how my dishwasher opened and traced the path of it onto the adjacent toe kick. I could see that if I angled the top of the toe kick, the door would still be able to open if I placed a flush toe kick there. Problem one, is solved. I cut a piece of toe kick on an angle at the top and the width of my dishwasher opening.
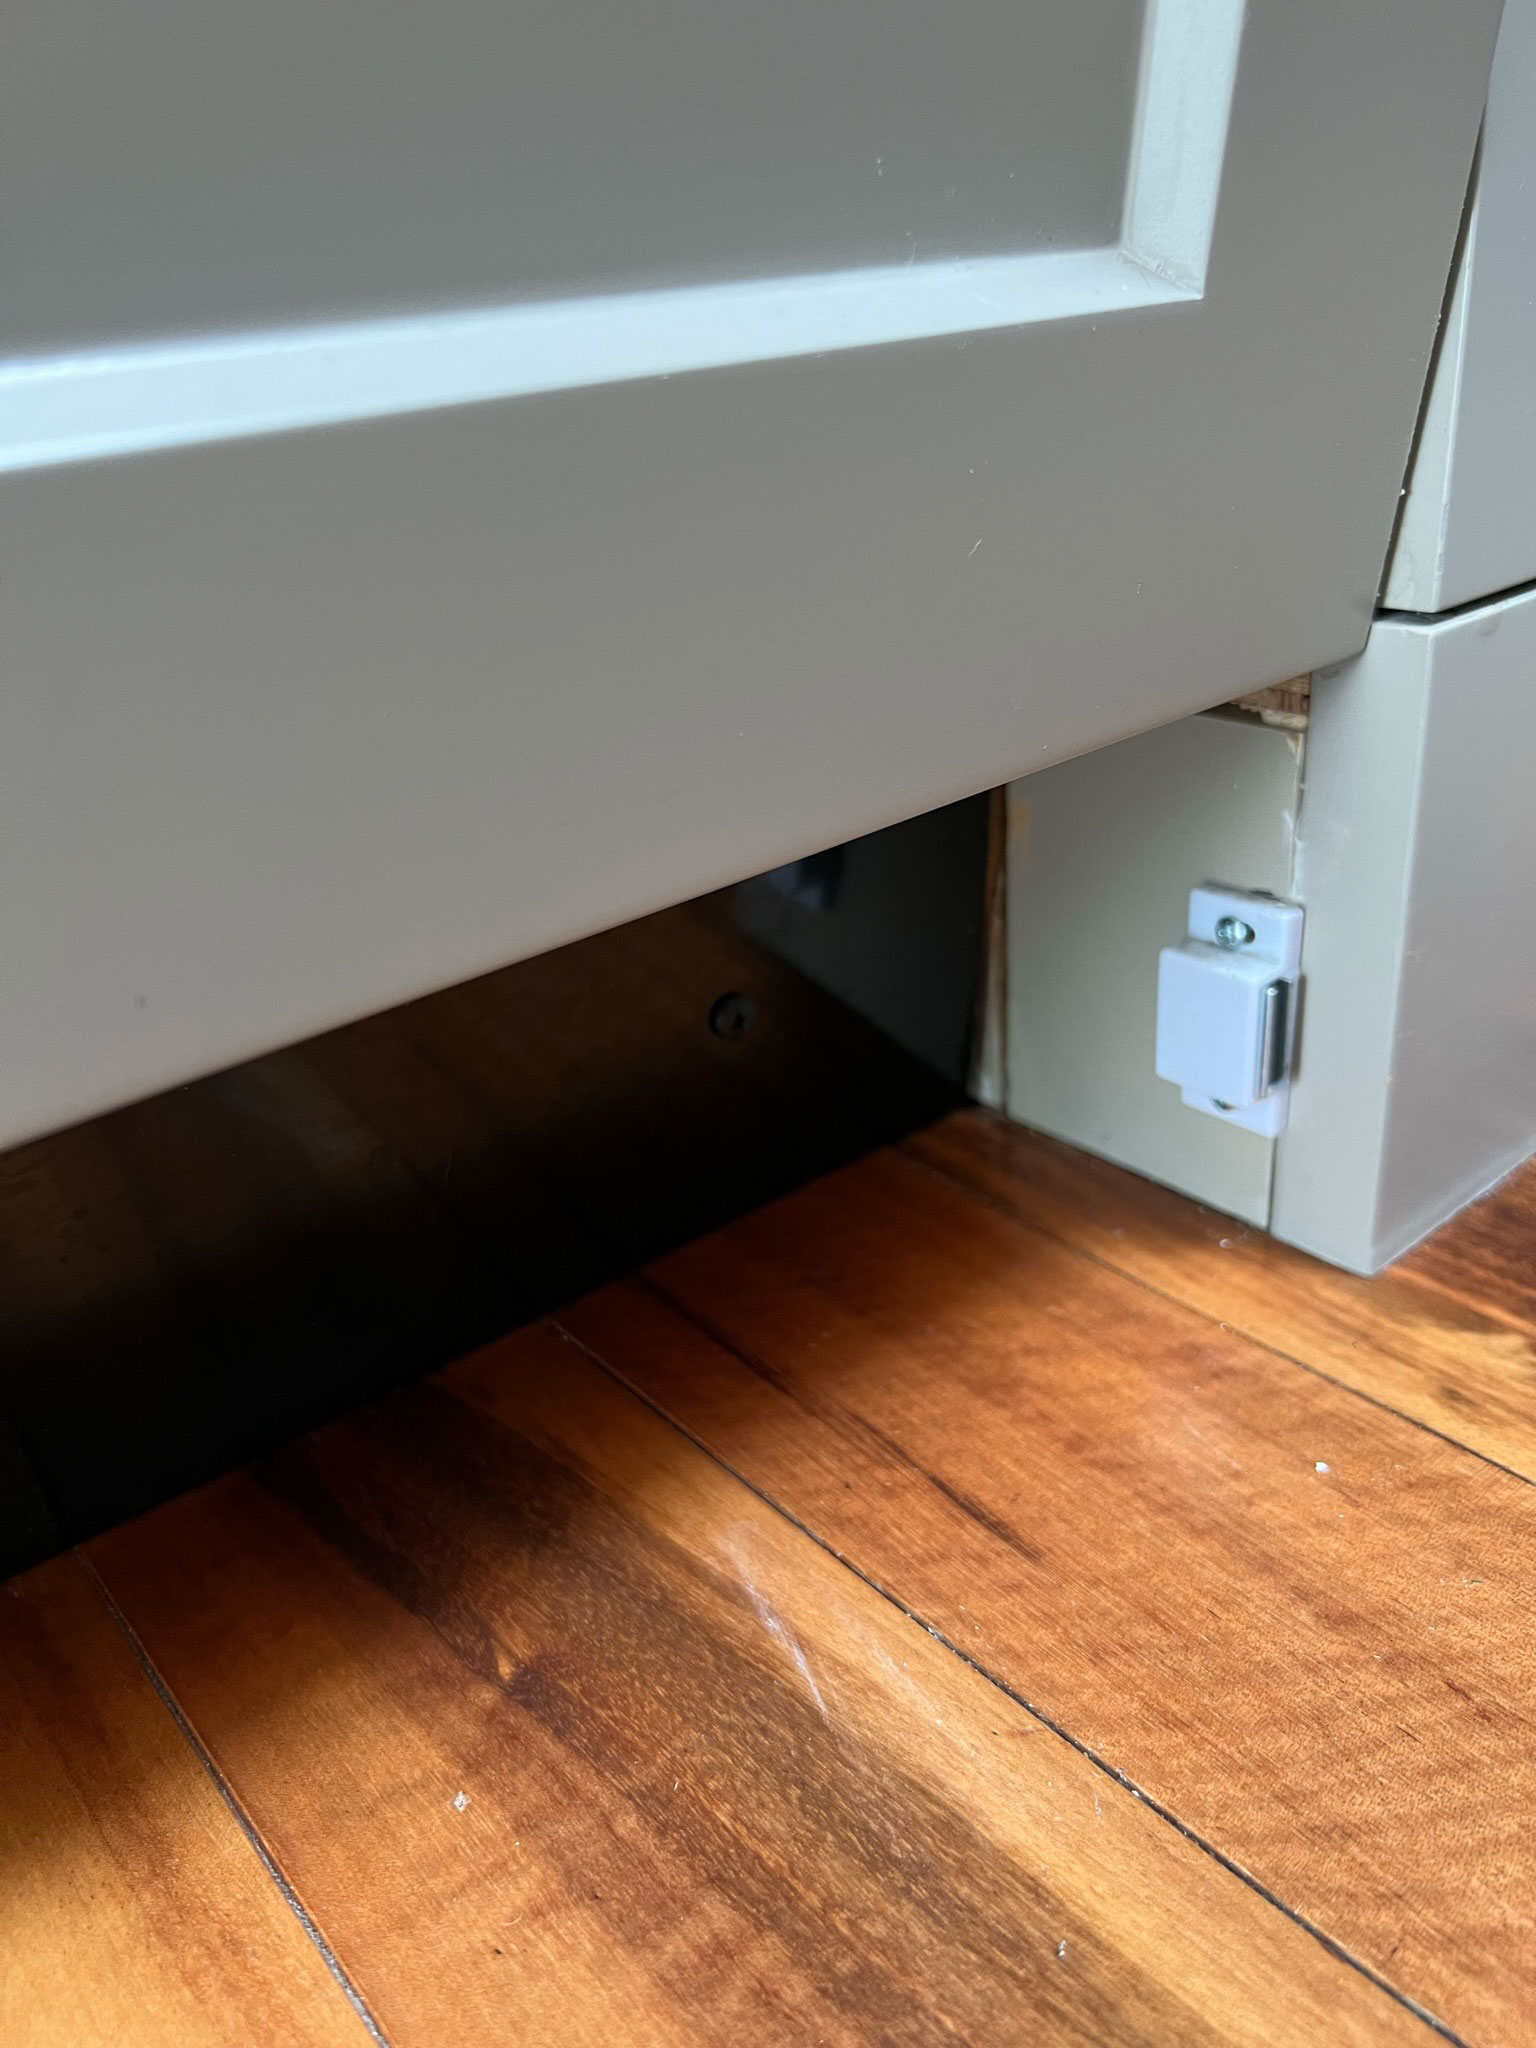
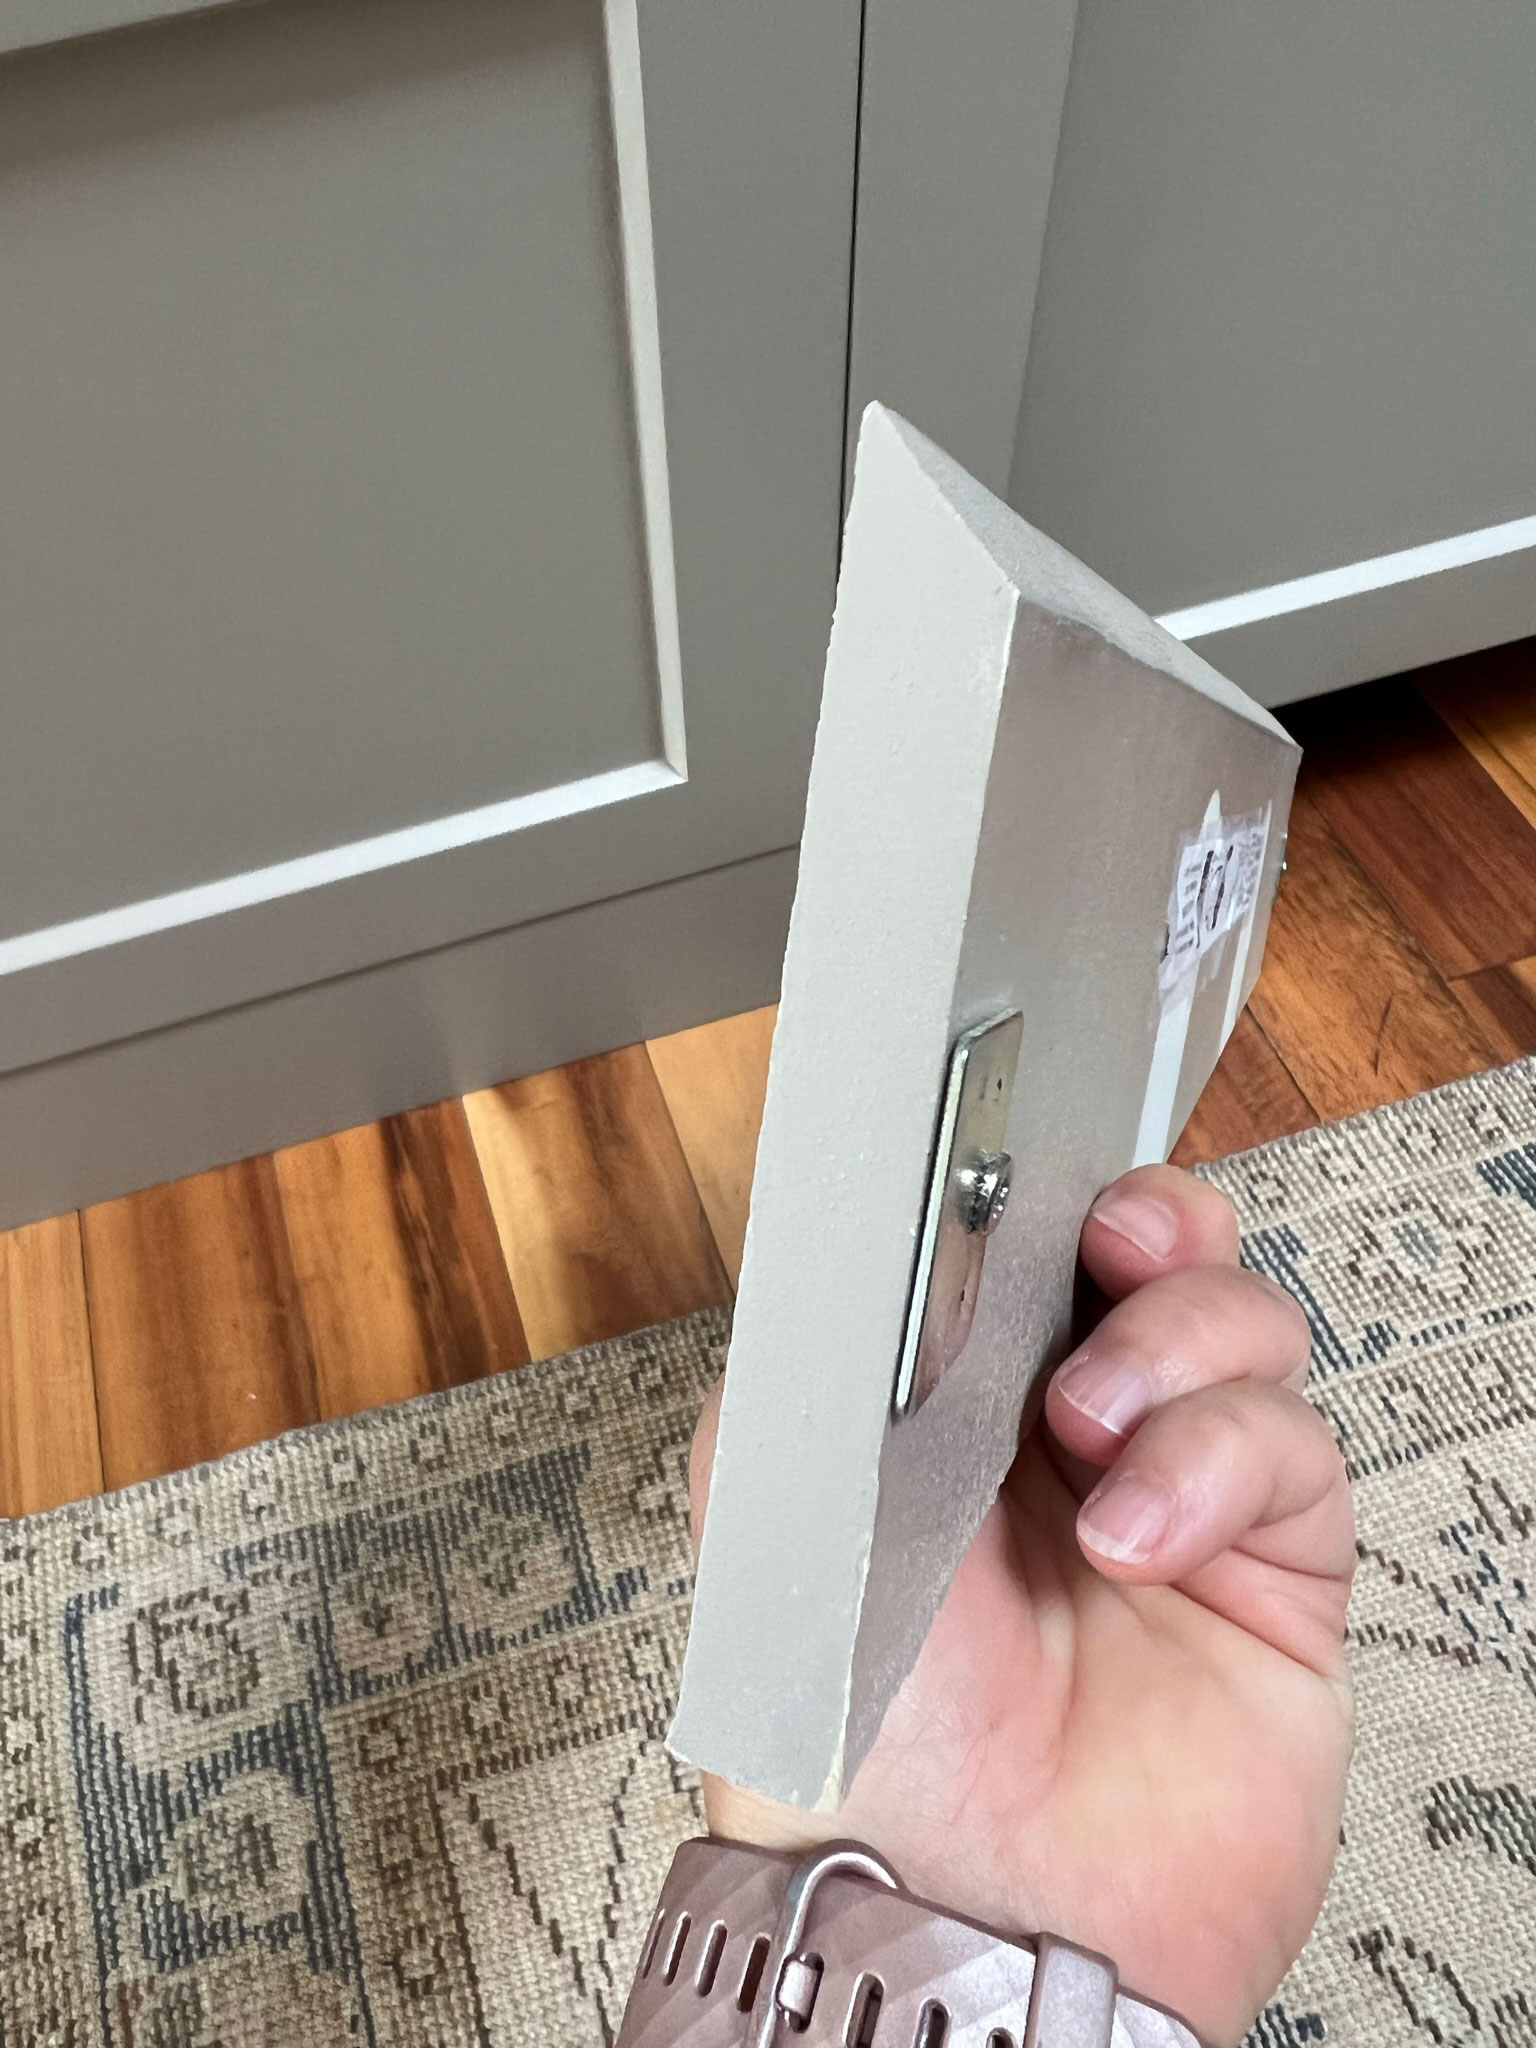
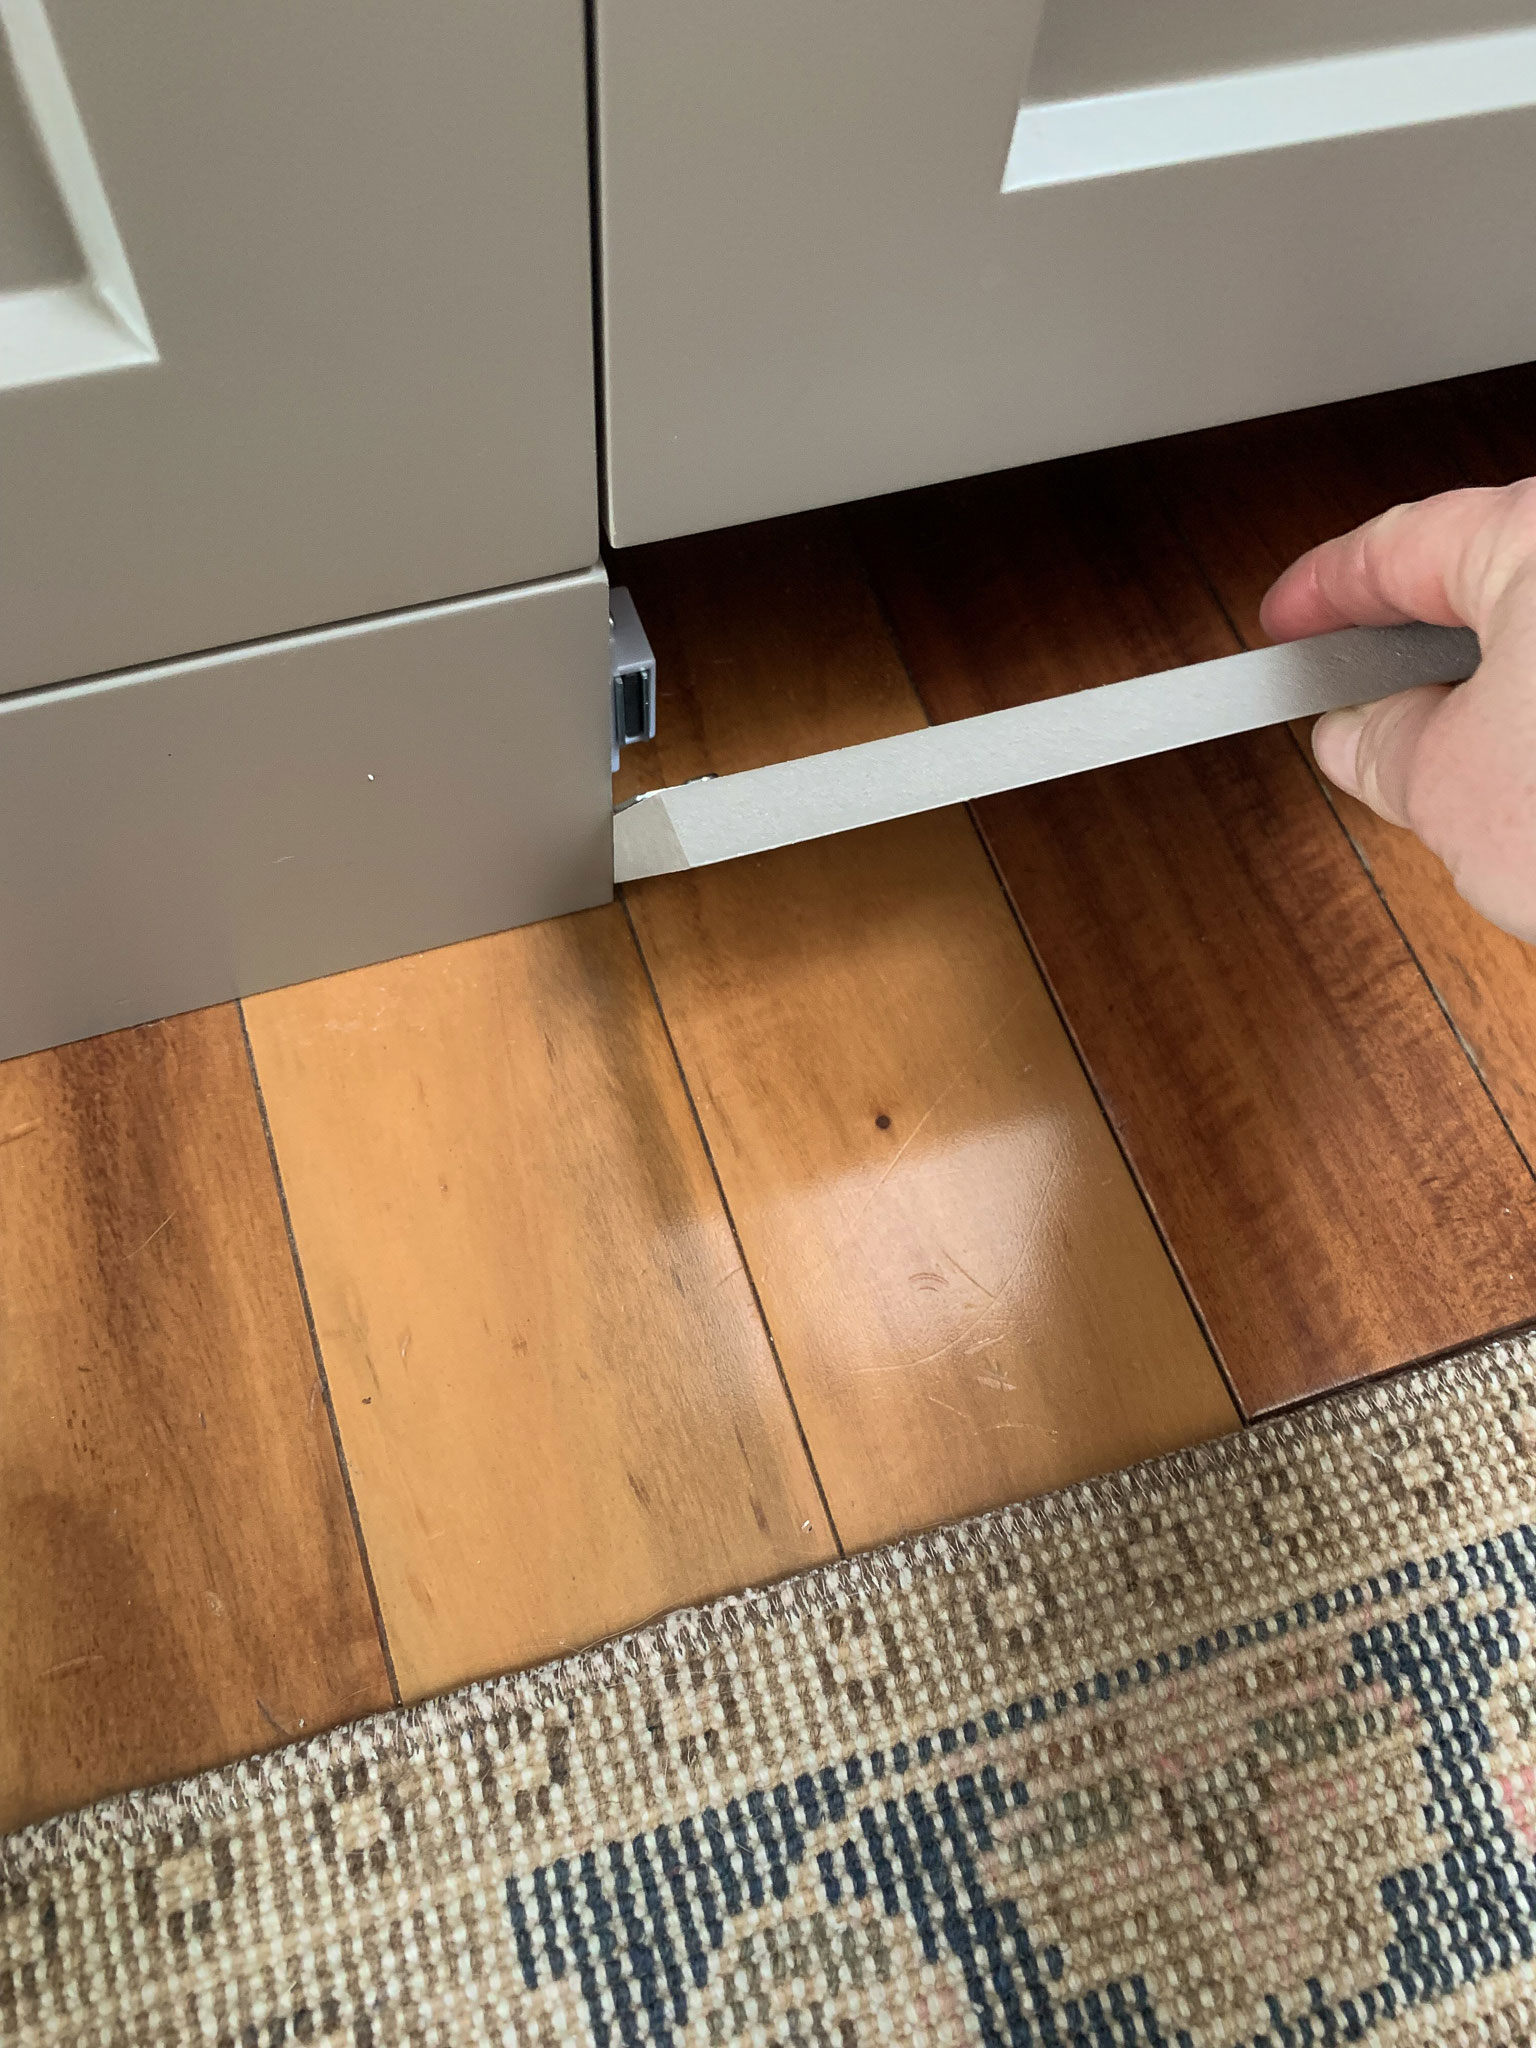
The next thing I had to figure out was how to attach it so it was removable and flush with the adjacent toe kick. I went and wandered around the hardware aisle at Lowes looking for some sort of magnet that would work. I found a magnetic cabinet latch that I could attach to the sides of the cabinet base behind the toe kick with the other half of the magnet on the toe kick itself. After a bit of careful measuring and adjustment, I was able to install the magnets and they hold the toe kick perfectly.

If the dishwasher ever needs to be pulled out, I can just unscrew those 4 little screws, easy peasy.
The toe kick can easily be removed if I want to clean behind by popping the magnets off. I can no longer see the little light that shines on the floor when the dishwasher is on, so occasionally I have to pop it off so I can see if it’s still running (it’s so quiet I can’t tell!).
(If you had a recessed toe kick and want to cover the bottom of the dishwasher, you could attach a piece of toe kick on the front of the dishwasher using a flat magnet or even a piece of velcro picture hanging strips.)
Would I Install Flush Mount Toe Kicks again?
Installing the flush mount toe kicks was a look often only found on custom cabinets and I really wanted that for our Ikea kitchen. When we decided to do them, I had no idea what I was getting into and they turned out to be quite a bit of extra work!
That being said, I love how they look and I 100% would do them again. I think if I did, I would pull them out just a little bit more so they weren’t flush with the doors but even a little bit proud. I would also have started the right way and built all my cabinets on bases instead of using Ikea’s levelling system. (I’m not knocking Ikea’s system, you all know I think they are Swedish geniuses. But for this type of toe kick those legs were a bit of a pain.)
What do you think, was it worth the extra effort?
You Might Also Like:
- How to DIY Cabinet Filler Strips for a Custom Look
- A DIY Kitchen with Ikea Cabinets – the Kitchen Reveal!
- How to Make Your Refrigerator Look Built-In
- How to Customize the Width of an Ikea Cabinet
- DIY Laundry Room Countertop (Using an Old Door!)
- Blind Corner Kitchen Cabinet Ideas
- How to Build a DIY Arched Door or Interior Opening

I love the way that you’ve done the toe kicks in your kitchen! Thank you very much for so much great information!
Absolutely beautiful kitchen!
Thank you so much Leslie!
Thank you Elaine!
Another great article! I despise recessed toe kicks and plan to have flush/proud toe kicks in my kitchen refresh, thank you for documenting all the things!
Best of luck with your toe kicks! We learned a lot doing our flush ones and so I hope this is helpful when you do yours!
Hi there this looks great! Would you mind sharing the size of bit and tool you used to cut such perfect holes in the vent cover? I am doing a similar project and a little nervous they won’t turn out like yours.
Hi Cheryl! We used a 1/2″ drill bit. We first sketched the holes out in pencil on the board to make sure we liked the placement and spacing, and practiced on a spare piece of wood to make sure we didn’t get too much tear out. After drilling we smoothed them a little with a rolled up piece of sandpaper before painting. It’s not really all that noticable even if it isn’t perfect since its way down on teh ground so don’t stress it too much, you can do it!
what color are you kitchen cabinets? love what you did with all of it!
They are benjamin moore Indian River!
I just saw this and am in love with your flush toe kicks. In general the whole thing gave me the freedom to “make the toe kicks look great” as opposed to sticking to however they will look with my IKEA base cabinets.
It’s a little teeny thing, but on the part about the flush toe kicks being a pain (for the wall base cabinets). I think I’ll try installing the base cabinets first using the IKEA levelers (just like you did), but then I’ll screw 2×4 LSLs (like this: https://www.menards.com/main/building-materials/trusses-i-joists-engineered-lumber/laminated-veneer-lumber-lvl-strand-lumber/2×4-laminated-strand-lumber-lsl/1068501/p-1642874261786864-c-5663.htm) to the floor underneath the cabinets and in front of the leveler legs, flush or proud of the cabinet frame. The LSLs are perfectly flat and true. I’ll use pocket screws to affix them to the floor which should let me do that from the front side, as well as providing a recessed mount for nailing the toe kick. I’m figuring this will let me have both the ease of using the IKEA leveling legs for quick install, plus avoiding needing to affix the persnickety nailing blocks.
Thanks for this inspiration!
That should work I think, good luck!
Hi!
This is so helpful thank you for this post!
One question I can’t seem to find the answer to anywhere is that do you cover up any venting or risk having moisture issues when you do a flush or proud toe kick? I want to do proud but am scared of the risk of moisture or mold but can’t seem to find out if there’s venting at the bottom of a dishwasher or not that would interfere! Thank you for your insight!
Great question! I asked my dishwasher appliance repair guy that exact question when he was here because we had a problem with the dishwasher shortly after we bought it, and he said that the dishwasher does not vent there so there was no problem with adding the toe kick.