Living Room Reveal with Budget-Friendly Decorating
Our cabin living room is officially finished, and the first room in the house that we have completed! I’m so excited to share it with you. We needed to purchase almost every single thing in this space, so I really had to make sure we went with affordable finds. This is post could also be titled “how to decorate a living room on a budget” because that is really what it was all about!

This post may contain affiliate links. That means if you purchase anything from these links I earn a small commission, at no extra cost to you! This helps support my blog, so thank you!
Some of the products in this posted were given to me as a part of various collaborations completed on other social media platforms. This post is not sponsored, and my opinions on all of these products are my own.
The Design Plan
I feel like because it was the first room we did, it really needed to set the tone on the style. I floundered a little on defining the style at first, but the first thing I bought was actually a table for the kitchen. It ended up being the most perfect size, and it’s a gorgeous antique rustic table. Given that this is a cabin, I decided to lean into that rustic side a little bit more than I did in my own house. I also wanted lots of patterns and color for a cottage vibe.
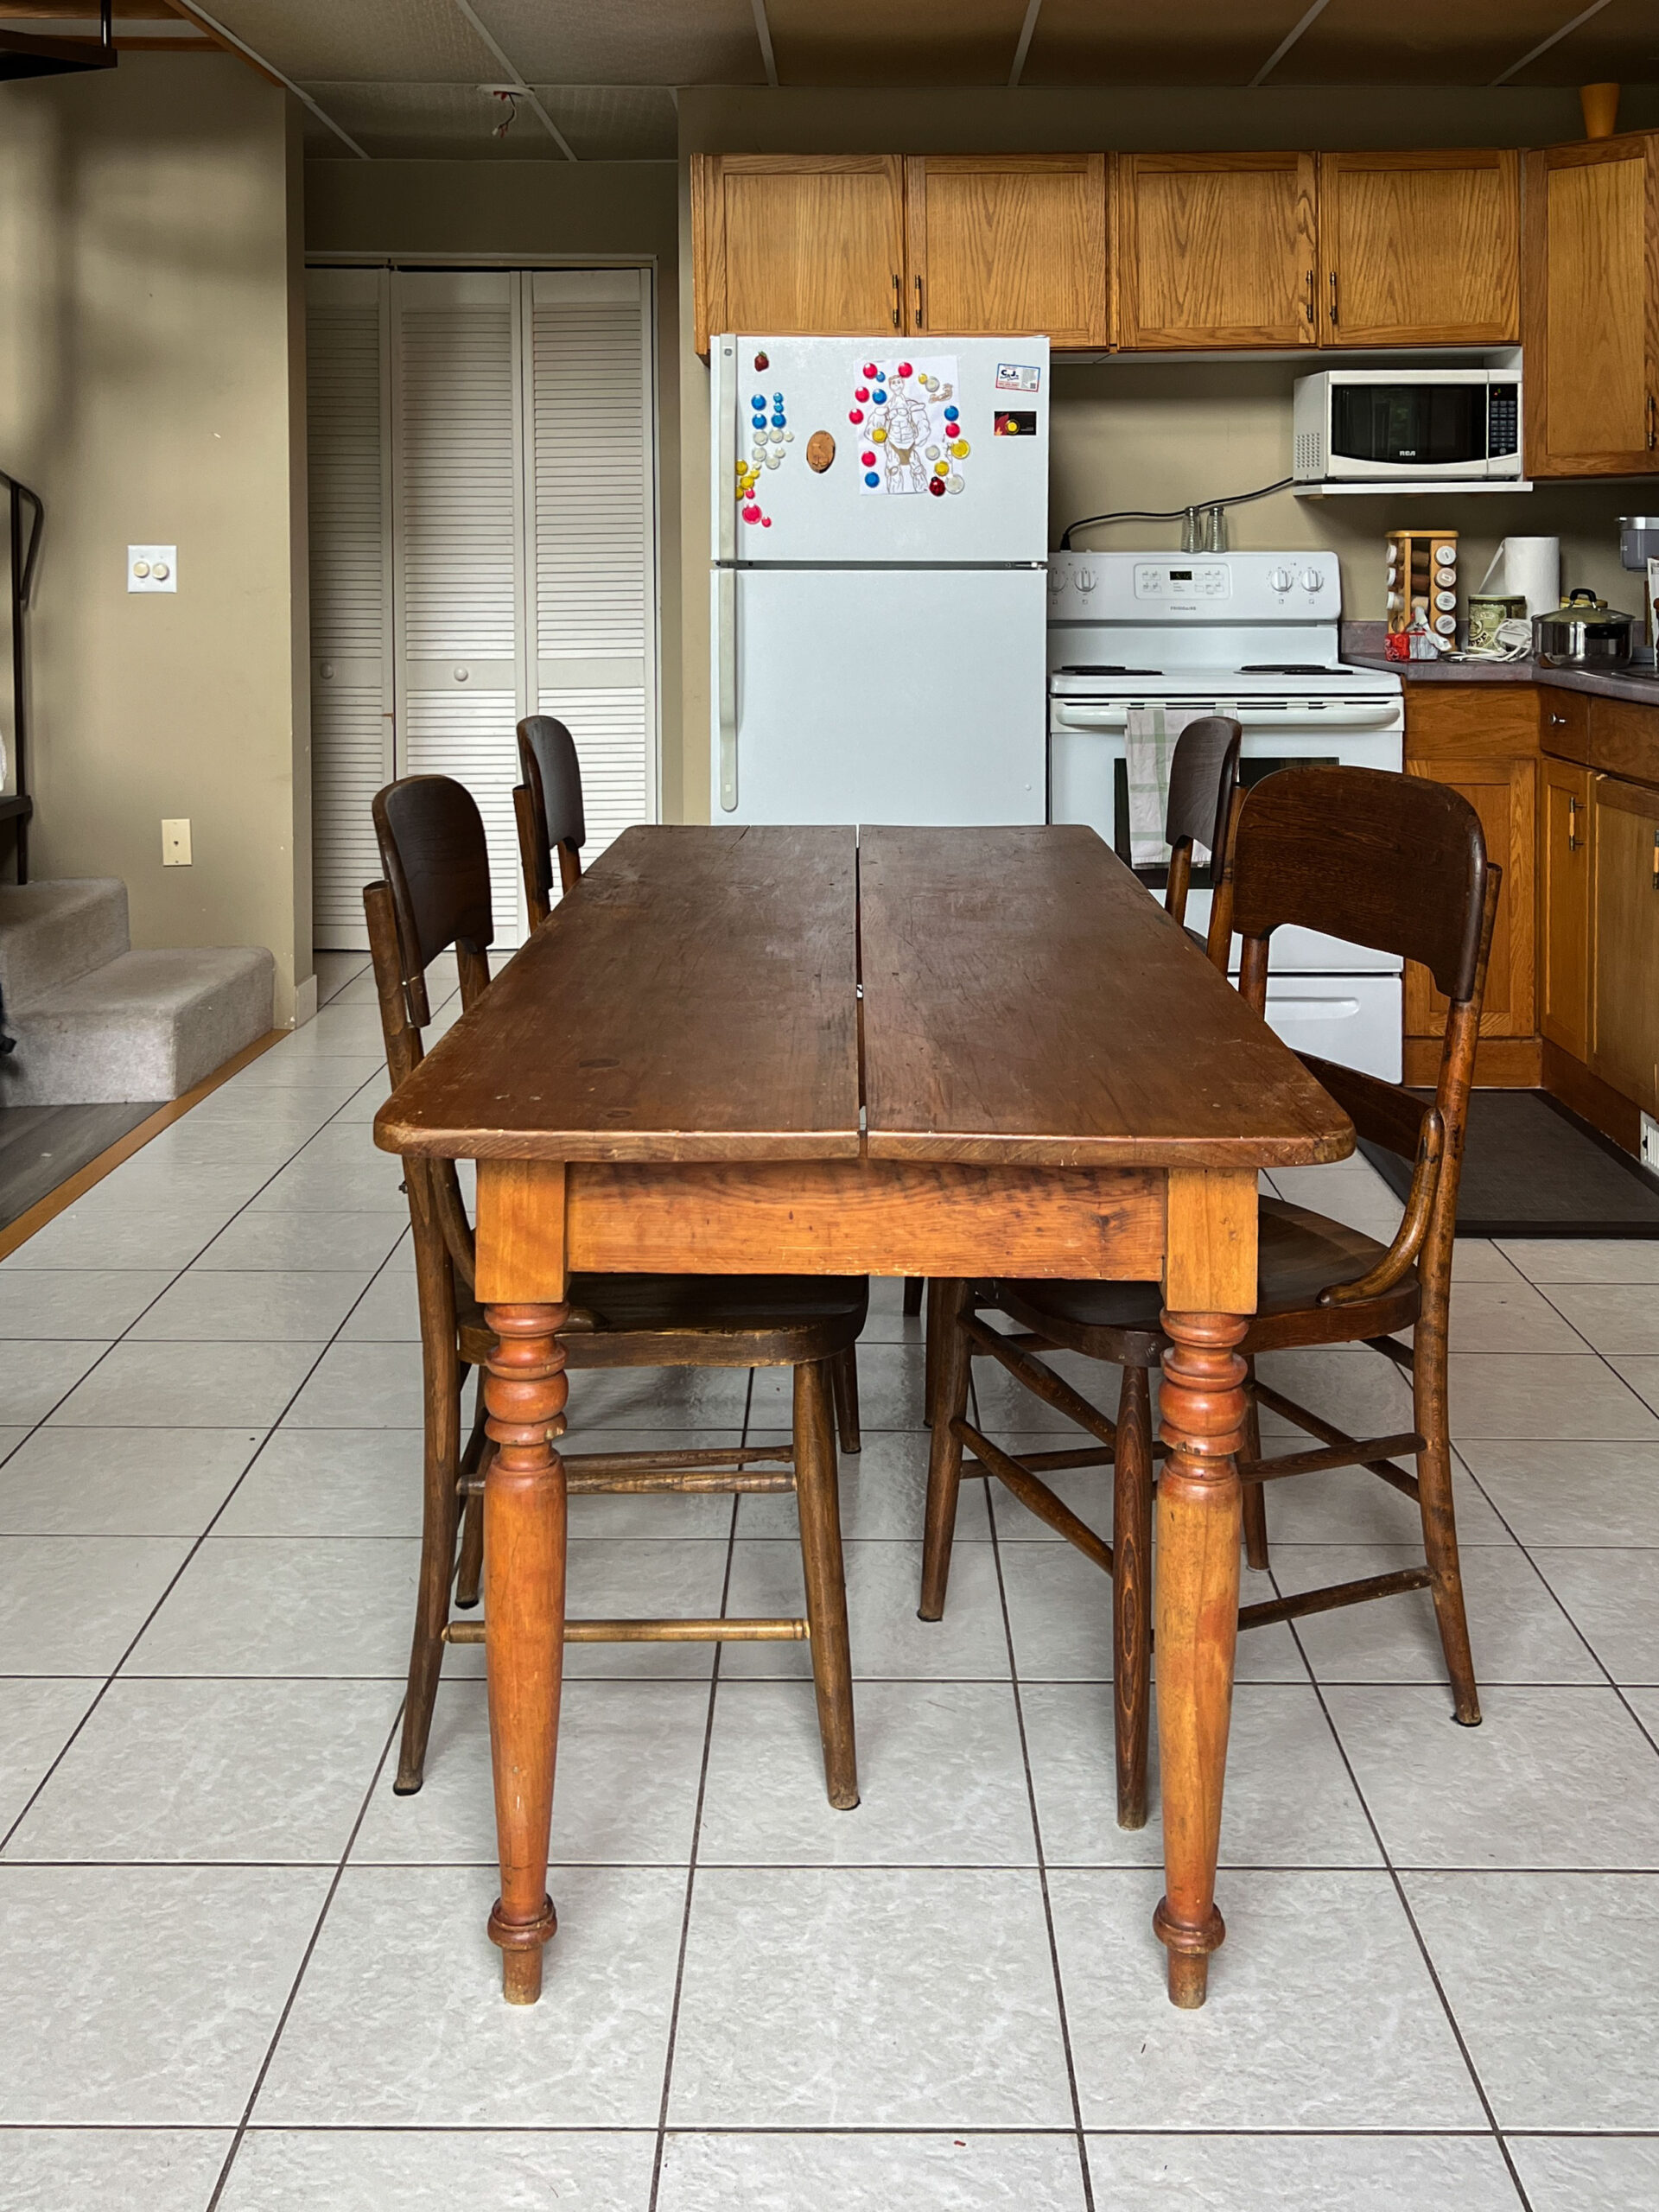
Since the whole living area is open concept (kitchen and living room), the kitchen table was actually the jumping off point for the living room, ha! Who would have thought?
Once I had a style in mind, I started collecting a few fabrics to get a colour scheme together. I wanted a little colour sprinkled throughout but I didn’t want the whole room to be the “green room” or the “blue room”. I wanted to use lots of colours that went well together but nothing was too dominant.

I also knew we were dealing with a lot of wood with almost all the of the furniture pieces being wood as well as the ceiling and floors, so I kept everything pretty light and airy to contrast all of that.
Here is the moodboard I created for the room:

The Before
Let’s take a look at how this living room looked before:
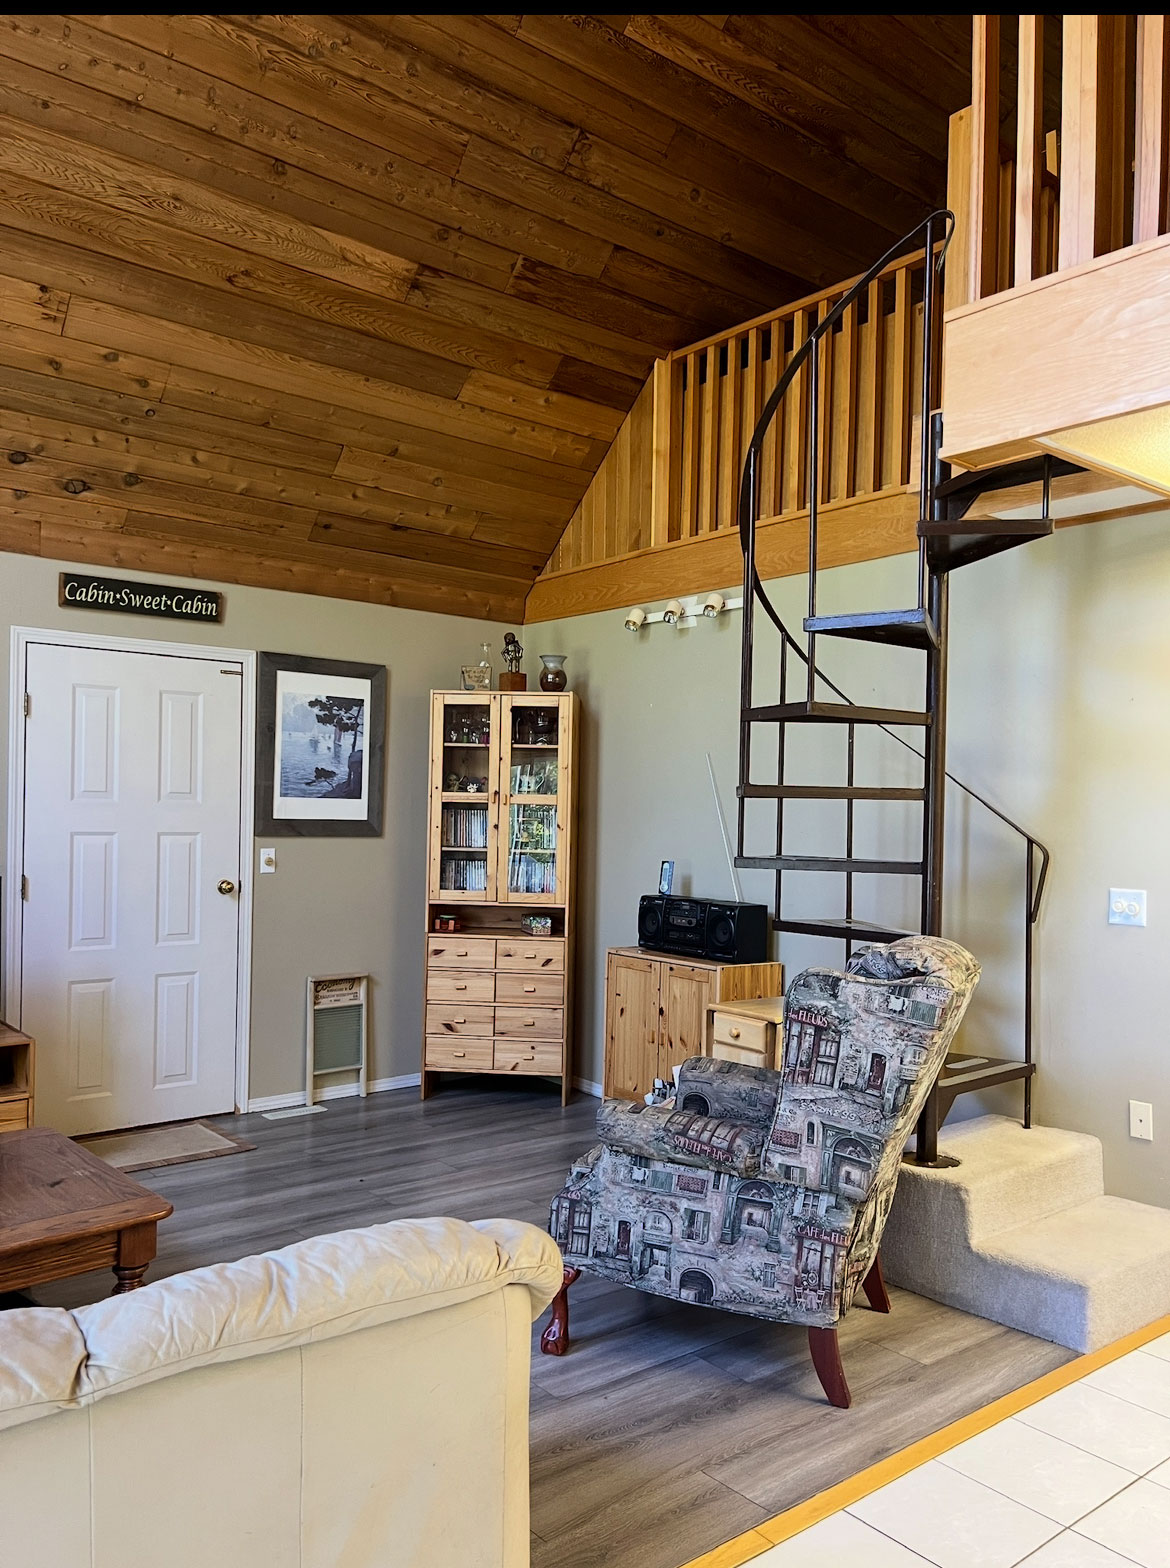
The good? The wood vaulted ceilings, the large windows, the wood stove. The bad? The flooring, all the furniture, (and the wood stove). The old furniture was nice to inherit with the cabin so we didn’t have to rush to furnish it, but it did not reflect my personal style. The wood stove was not bad in itself but the platform it was on had to go.

The flooring was not continuous through this big open room which is really a big pet peeve of mine, I really wanted one continuous floor that went better with the wood ceilings.

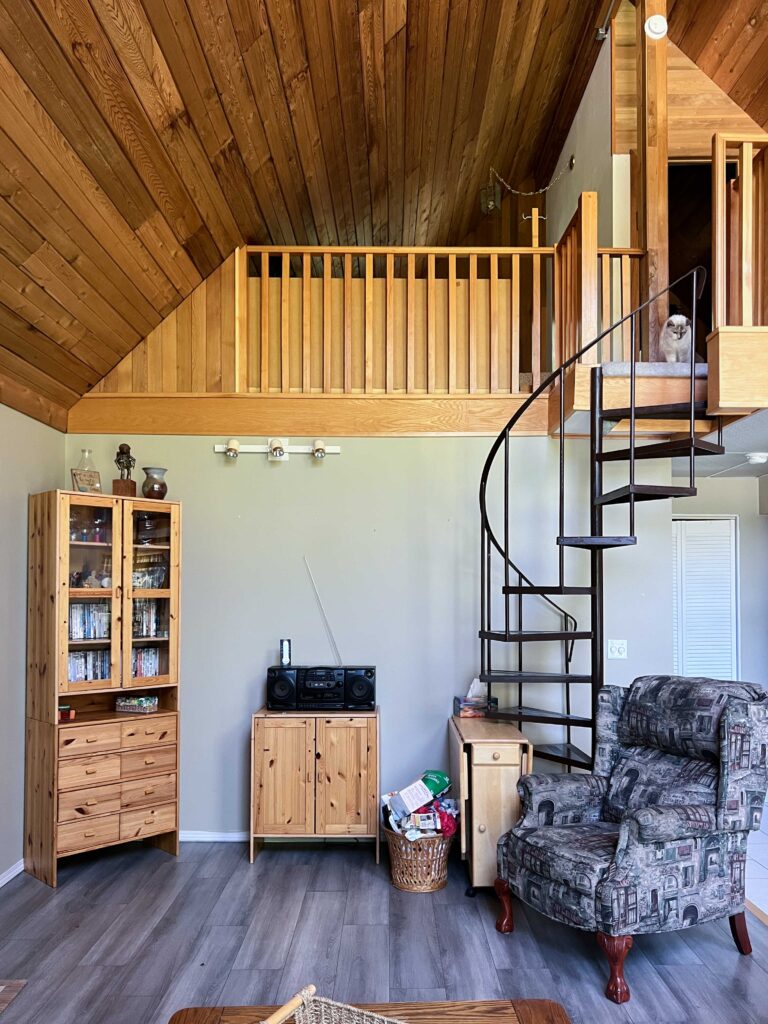
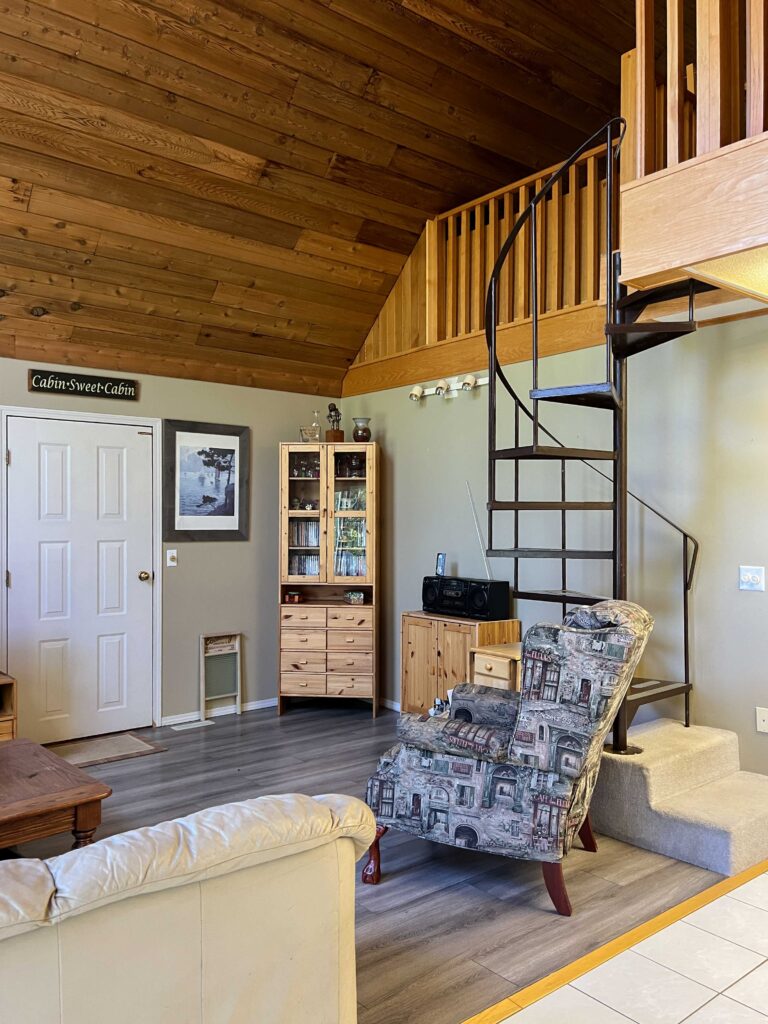
I especially did not like the wall with the staircase on it and all those little cheap wood storage pieces. It looked super cluttery, and I knew that replacing all of that with one big piece would not only provide so much more storage but it would look better, too.

When you look at the before you can really see how the look of a room is affected by it’s furniture! The main thing that I focused on on for this update was bringing in the main furniture pieces to give this room new life.
But before I get into the furniture changes, let’s talk about what we did to update the rest.
Paint
The walls in this cabin were painted a beige colour which was not bad in itself but it really was not the best choice to go with the wood ceiling, and certainly not with the grey laminate floors! A fresh coat of paint made a world of difference, and only took me a couple of days.
There is something about fresh paint to make a place feel fresh and clean. I used Benjamin Moore Dove Wing which is a very nice soft, warm white. I’ve used it twice before, in my ensuite and my office and loved it in both rooms!

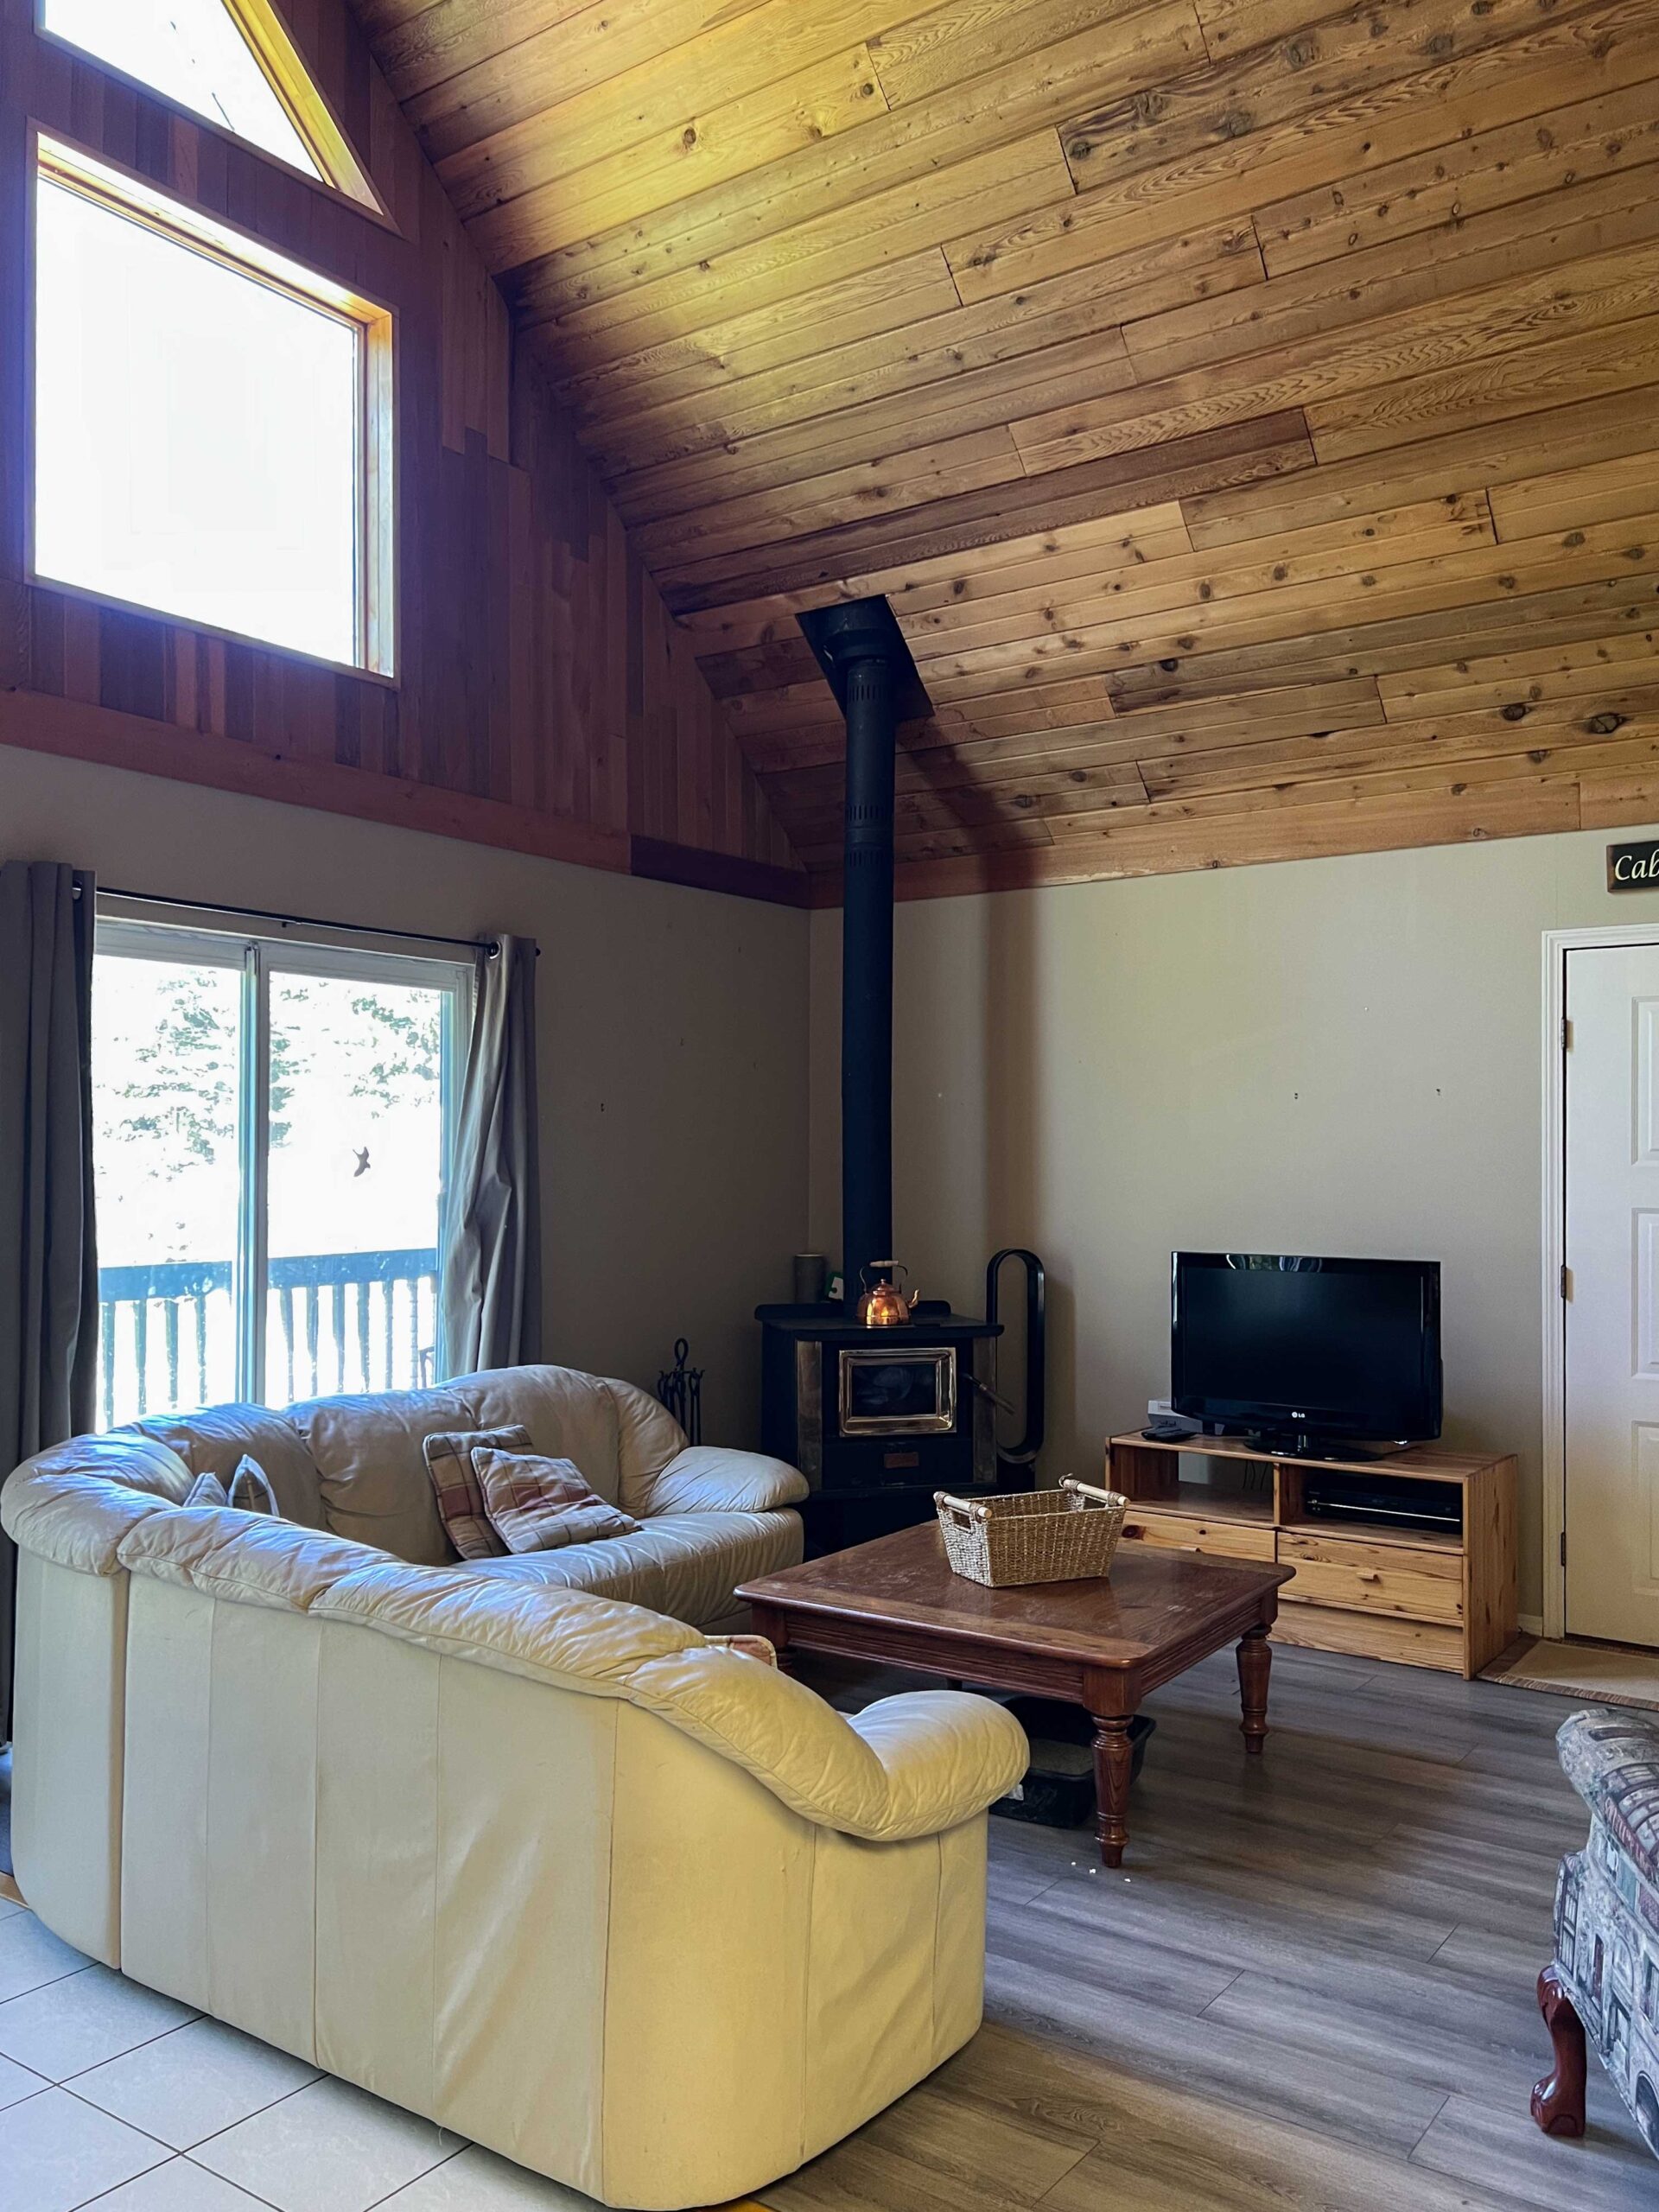
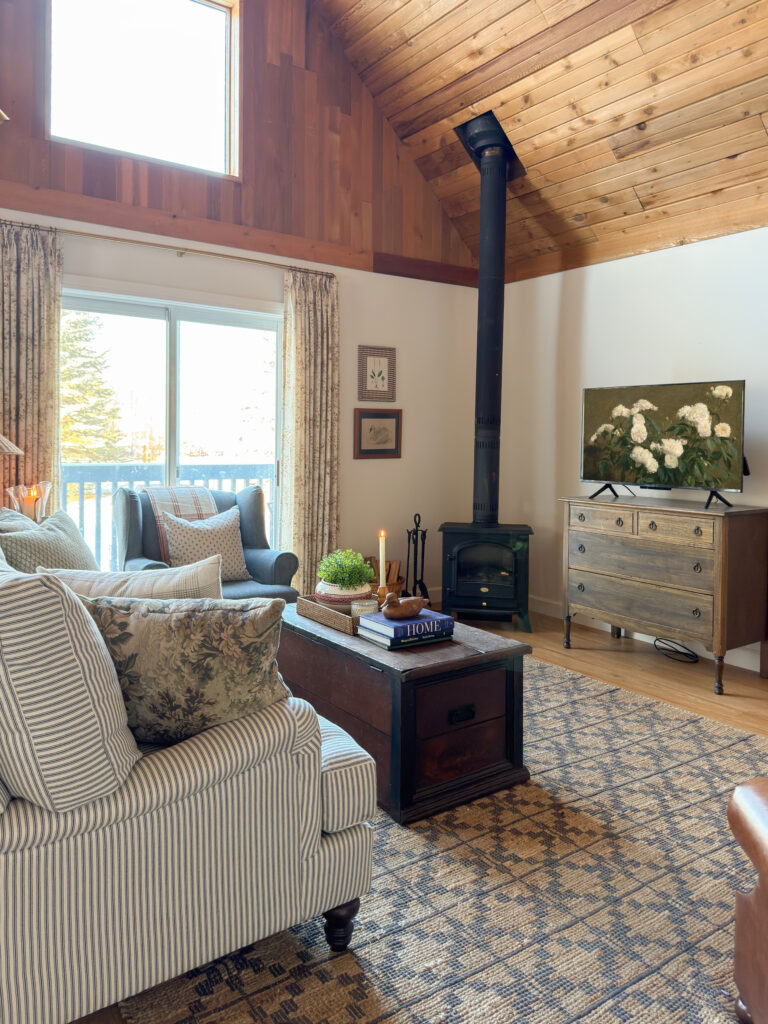
The Saga of the Fireplace
We really did go back and forth so much about the fireplace. It was a great focal point for the A-frame and added so much to the charm factor. I really did not like the platform that it was sitting out, but I found out that it was not a code requirement to keep that.
What was a code requirement was the clearance around the fireplace that needed to be non-combustible. Meaning that the corner would have had to be tile or brick or something like that, and even larger than the platform that was there before.
Since this living space was already pretty small, we didn’t want to take up so much of it with the fireplace. In addition, it needed a few repairs to be safe to use.
We did not think it was something we would often use. I grew up with wood burning fireplaces and they were messy, smelly, affected the air quality, and I also worried a ton about safety. We come and go from the cabin a lot, so unless were were going to be there for days at a time, I would not feel good about leaving the fireplace unless we were sure the fire was really out. It is also becoming exceedingly hard to get insurance when you have a wood burning stove where I live, due to the fire hazard.
Then, late in the summer the cabin behind us burned to the ground. We still have not heard conclusively that it was the wood burning fireplace but that is the rumor in the neighborhood. That was enough to seal the deal and help us decide to get rid of it for good.

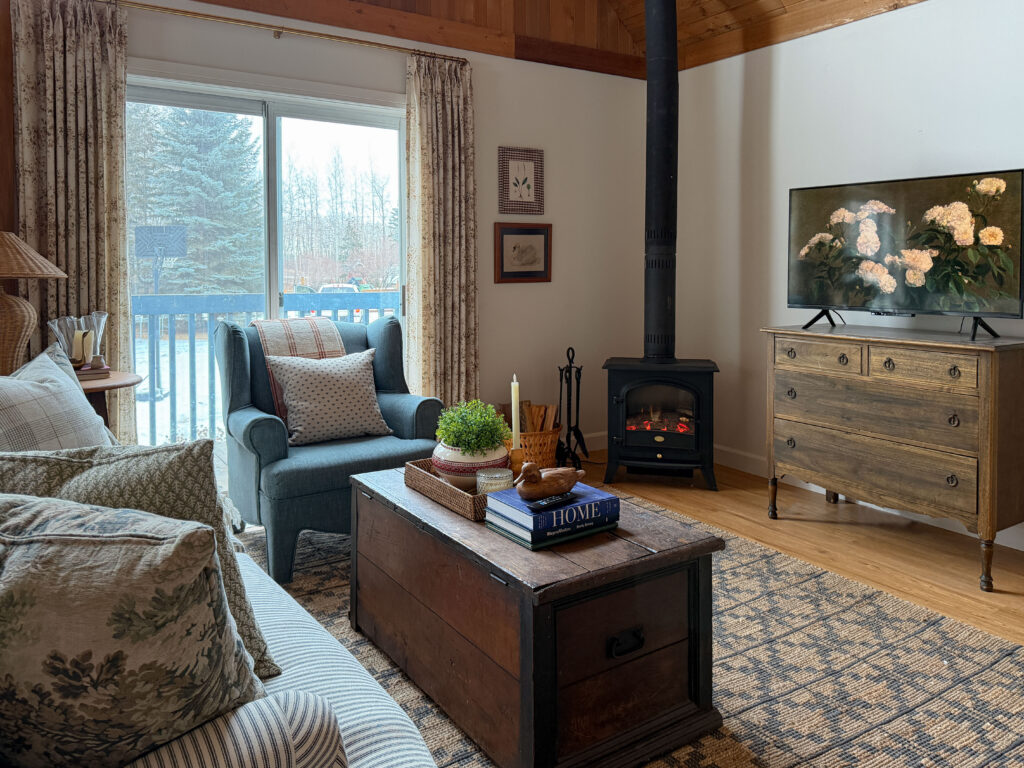
We did like the cozy factor though and wanted to keep all the charm and a little of the heat. I ended up finding an electric stove on Facebook Marketplace! I was actually looking to buy a new one and came across one for $100 so I could not pass it up.
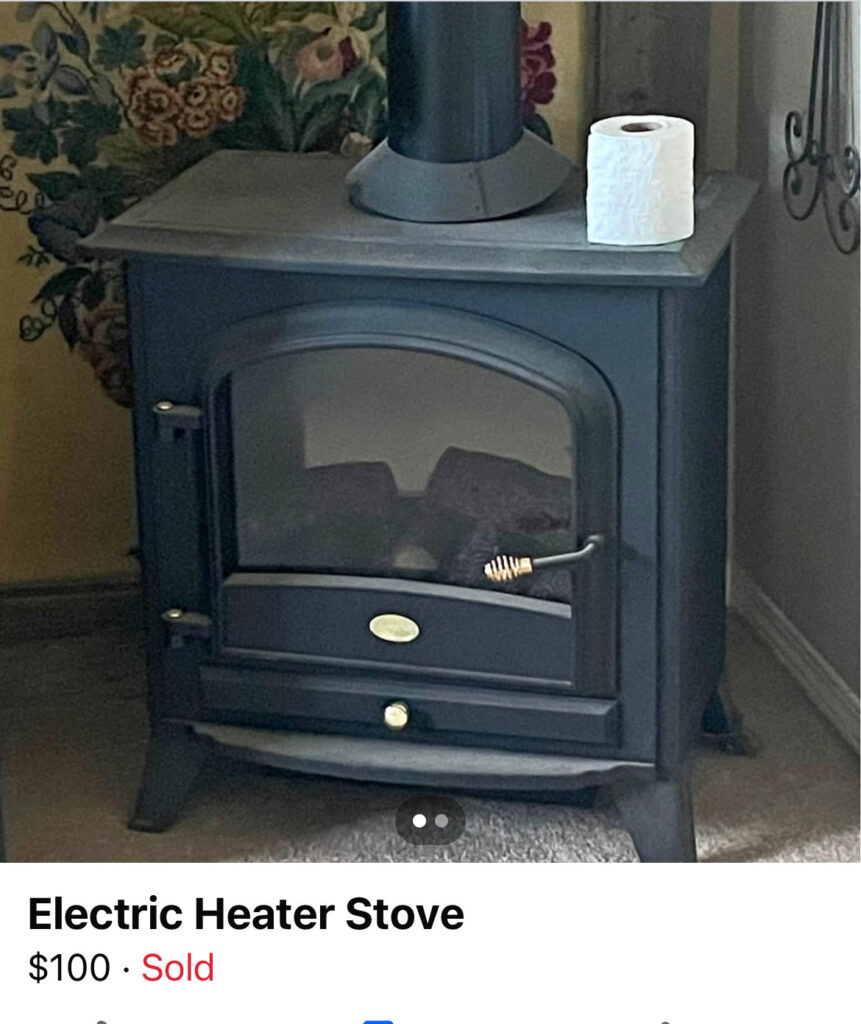
We saved the ducting from the old wood burner and attached it afterward to make the electric one look more real. I’m so happy with the final result, it turned out so cute and takes up a lot less room than the old one with that huge platform.
Those Wonky Floors Tho
So this is the non budget friendly part of this renovation but the expensive and slightly annoying part. The ONLY thing that bothered us about the bones of this cabin was the floors. Or lets just say, it bothered me. They were anything but flat.
Soon after we bought the place we started investigating ways to level the floors. There are different ways to go about that, including jacking from below or leveling from above. In the end, we were worried about things cracking inside like windows if we jacked from below, so we decided to level from above.
This was by no means a necessary thing but if you know me at all you know that I could feel every 1/8″ of an inch of drop in that floor and I thought it wouldn’t bother me (it’s just a cabin, afterall), but it DID.

We ended up doing some crazy stuff to get the floor flat and I think that is the content for another post! The final layer was self levelling concrete and we had never done that before, but found some pretty useful videos on how to do it on Youtube and it turned out so great!

Flooring
Once we had the floors level, I installed some LVP from Costco. I actually used laminate from this same brand at Costco probably 25 or more years ago in a rental property that we used to own. That stuff held up amazing in that rental and was so easy to install, so once we decided on LVP I found out Costco was still carrying that brand. I reached out to them to work with me and they agreed!

I am certainly fortunate to be able to work with brands that I know and love, but even if we were purchasing this ourselves it is very affordable! And if you are like me, you TRUST it because it came from Costco, and they just don’t really sell junk.
So far we have been very happy with it. It looks fabulous, it went down easily and it’s waterproof and very durable, which is perfect for the cabin.

Furniture
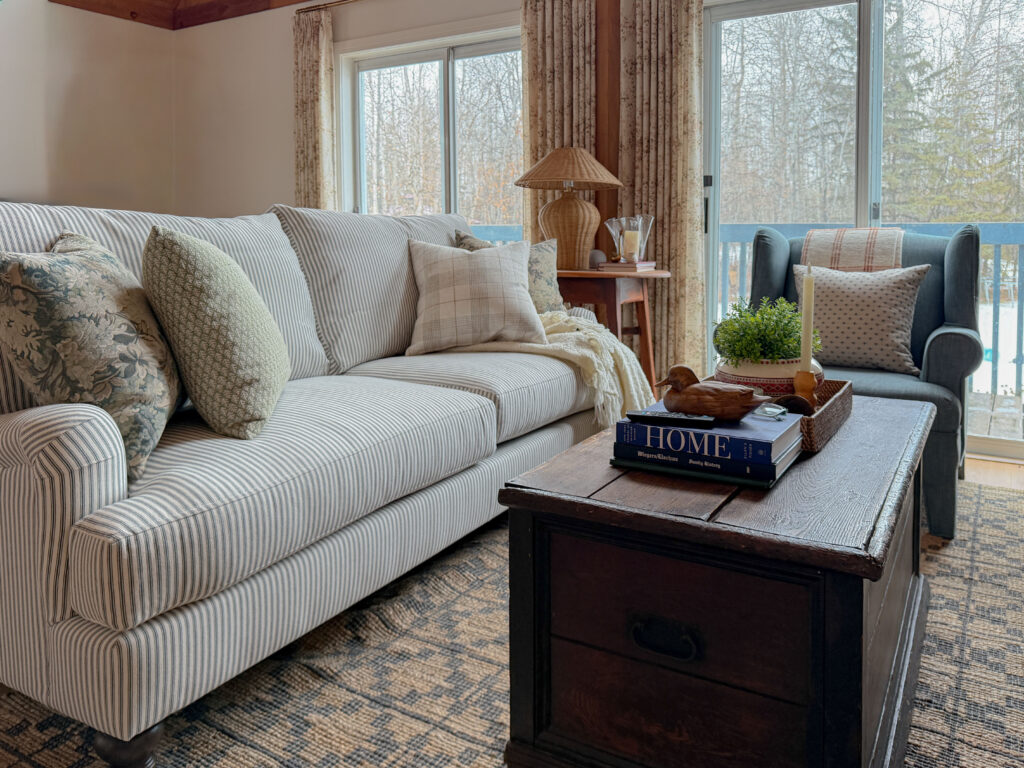
So this entire room needed new furniture, everything must go! The sectional especially was so very 90’s.
I spent HOURS (days? Weeks? Months?) scouring Facebook Marketplace for furniture. It was a small living room but we still wanted to pack in as much seating as we possibly could! If you have a small decorating budget, shopping second hand is KEY. Not only is it one of the most cost-effective ways to furnish a room, but I feel like you get way better quality pieces for so much less.
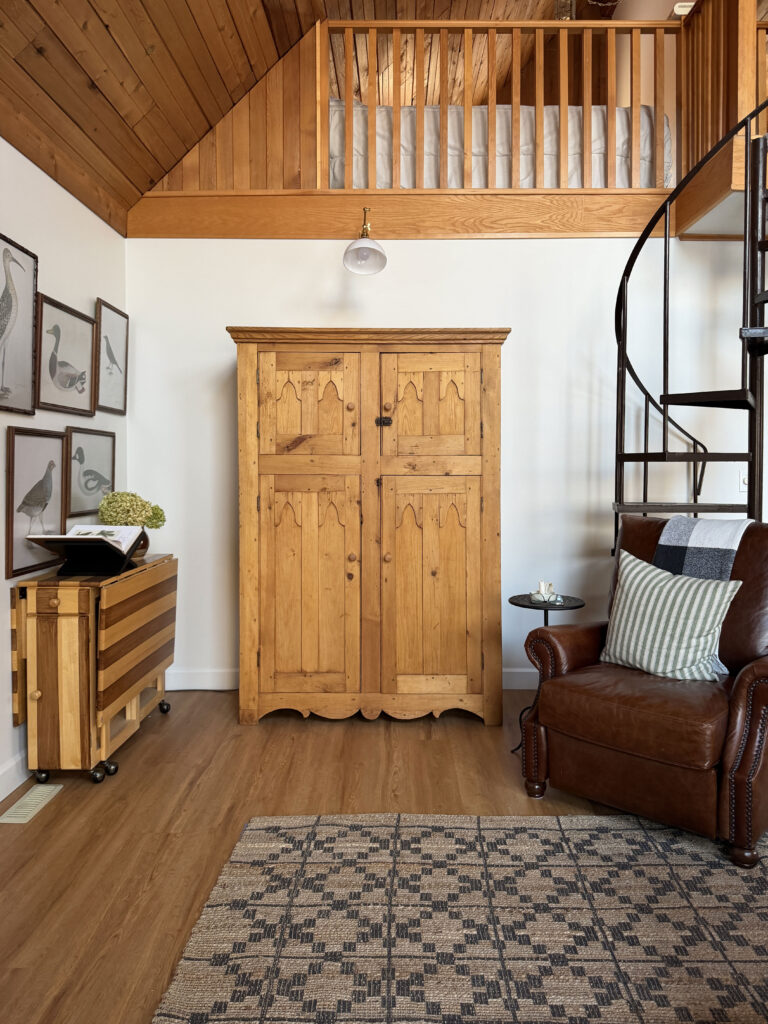
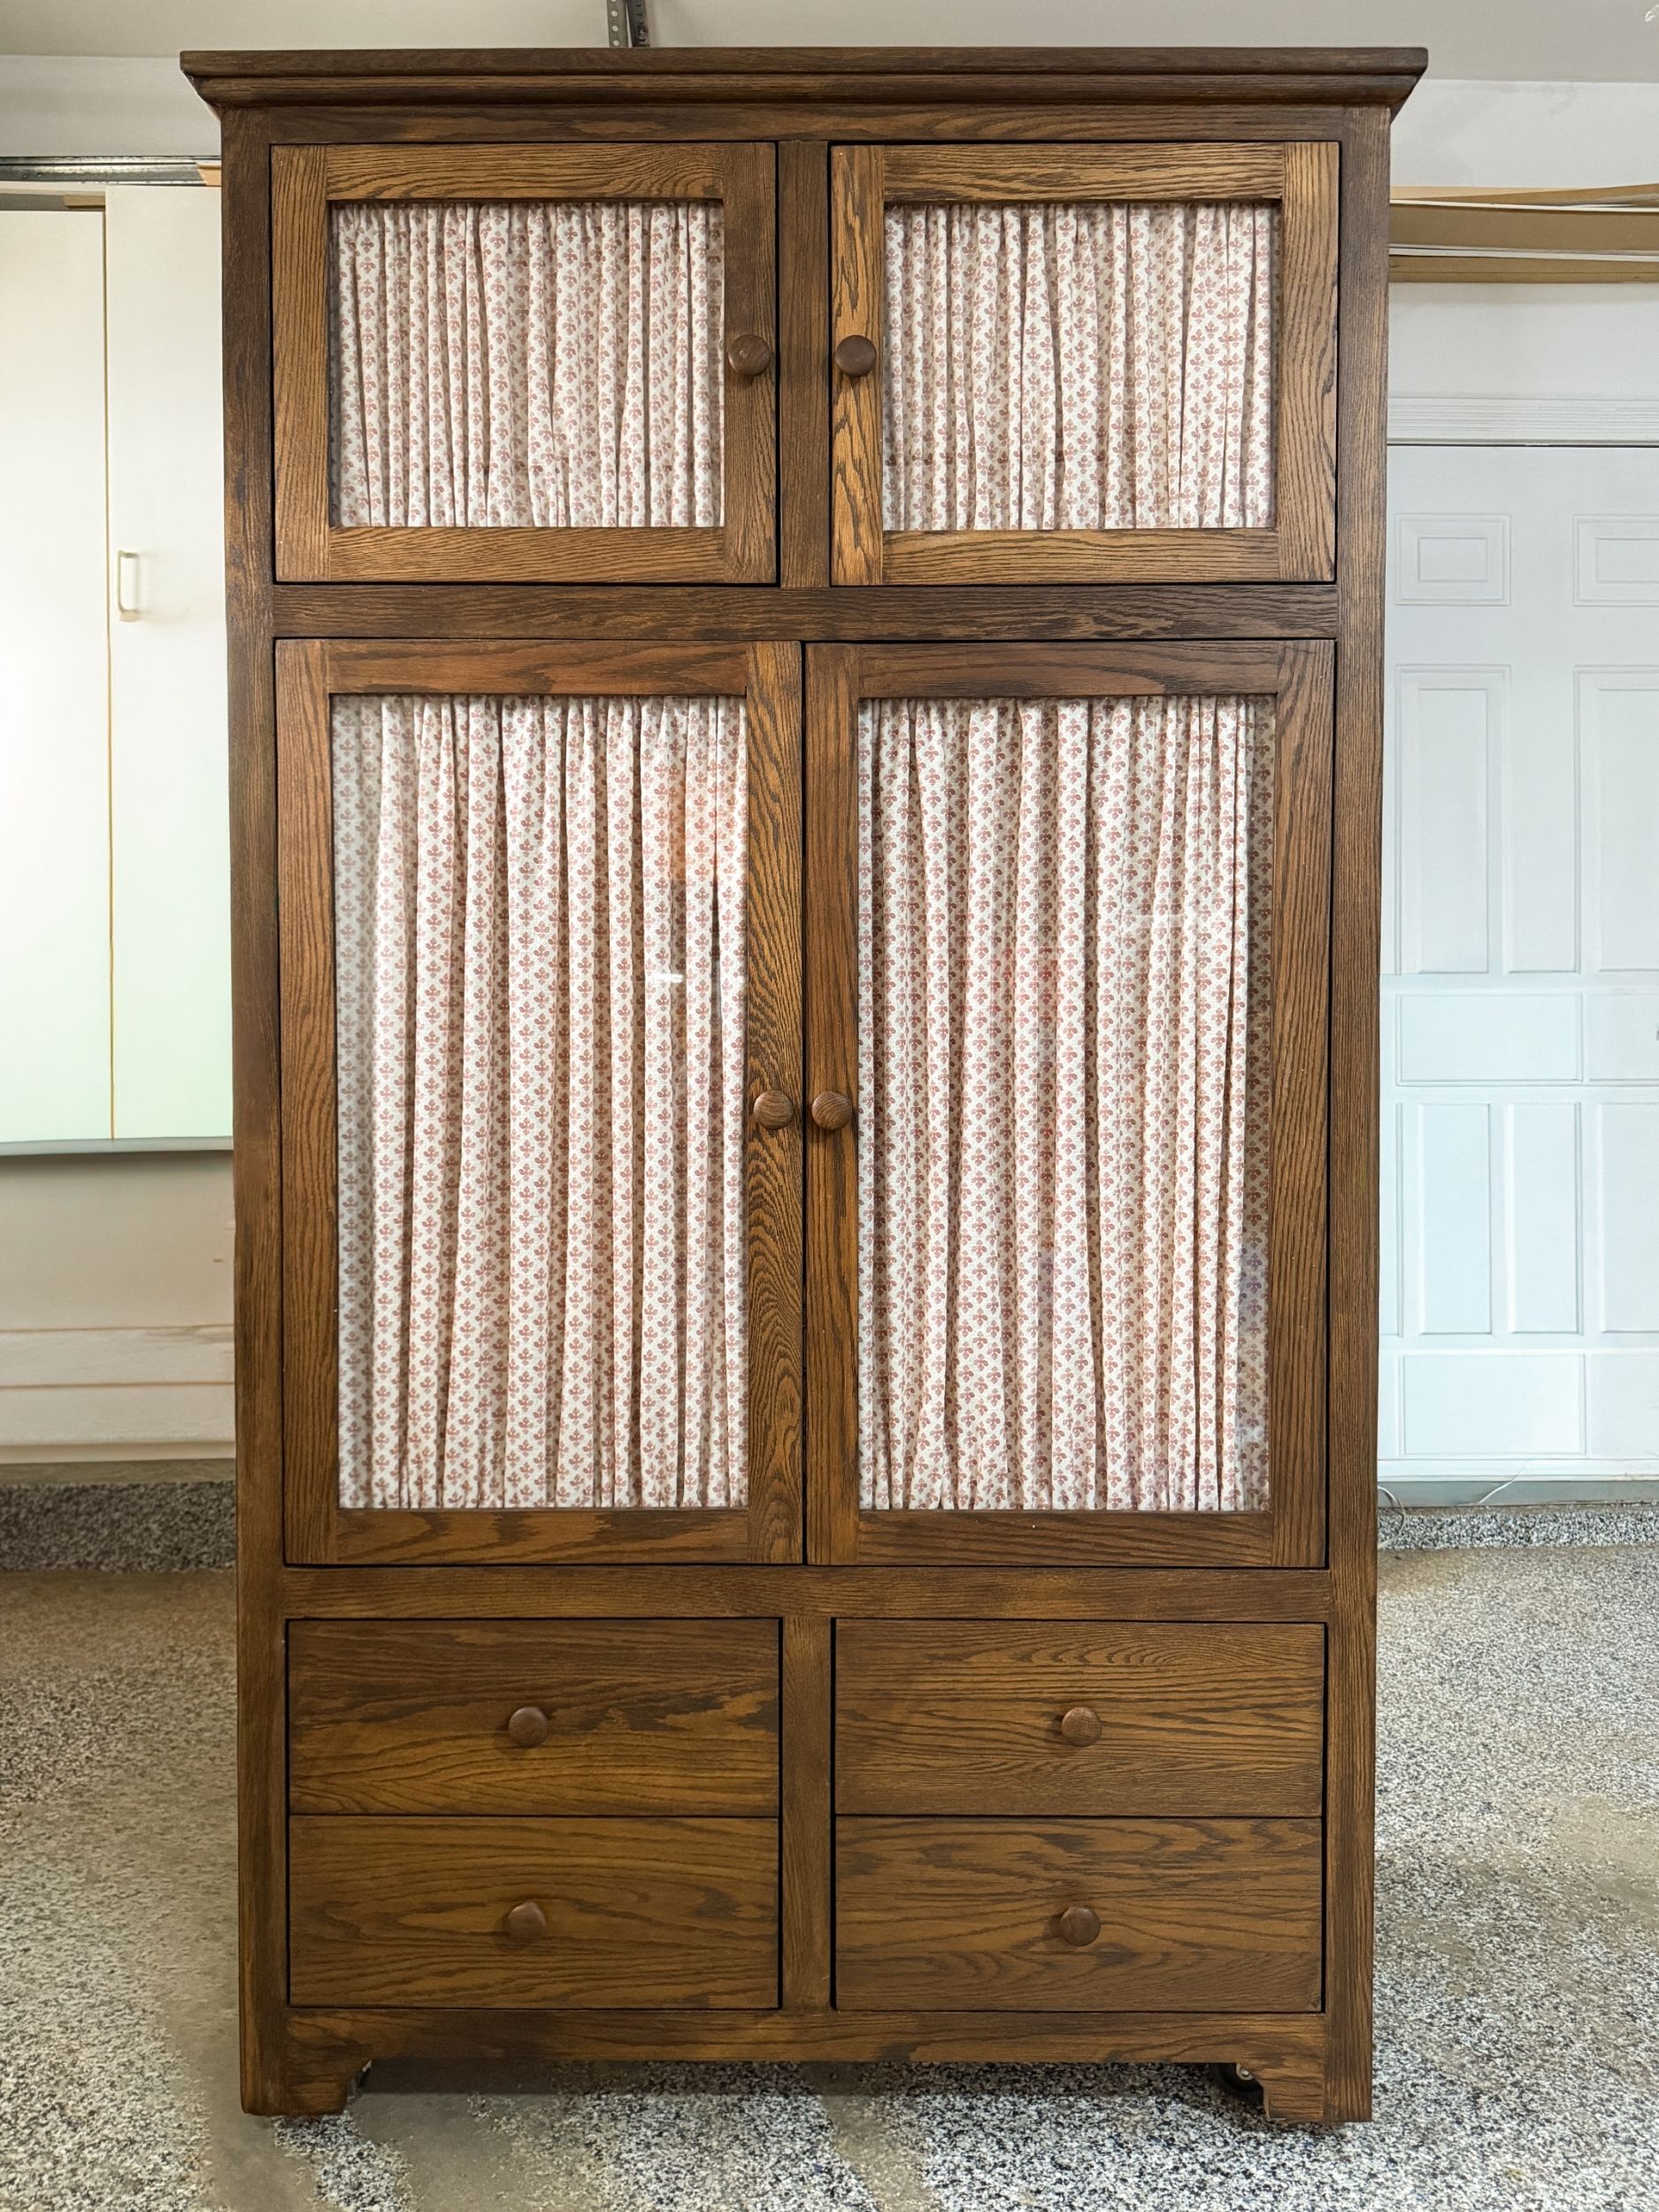
Let’s take this armoire I bought off Facebook Marketplace. I paid $350 for it. It is solid wood, unique, and full of character. It will retain it’s value if I ever decide to change it up. If you were to look up what type of a large storage piece that you can buy for $350, not the highest quality, if you can find anything that big at all for that much money at the big box retailers.

I wrote a post recently all about Facebook Marketplace and how to shop it.
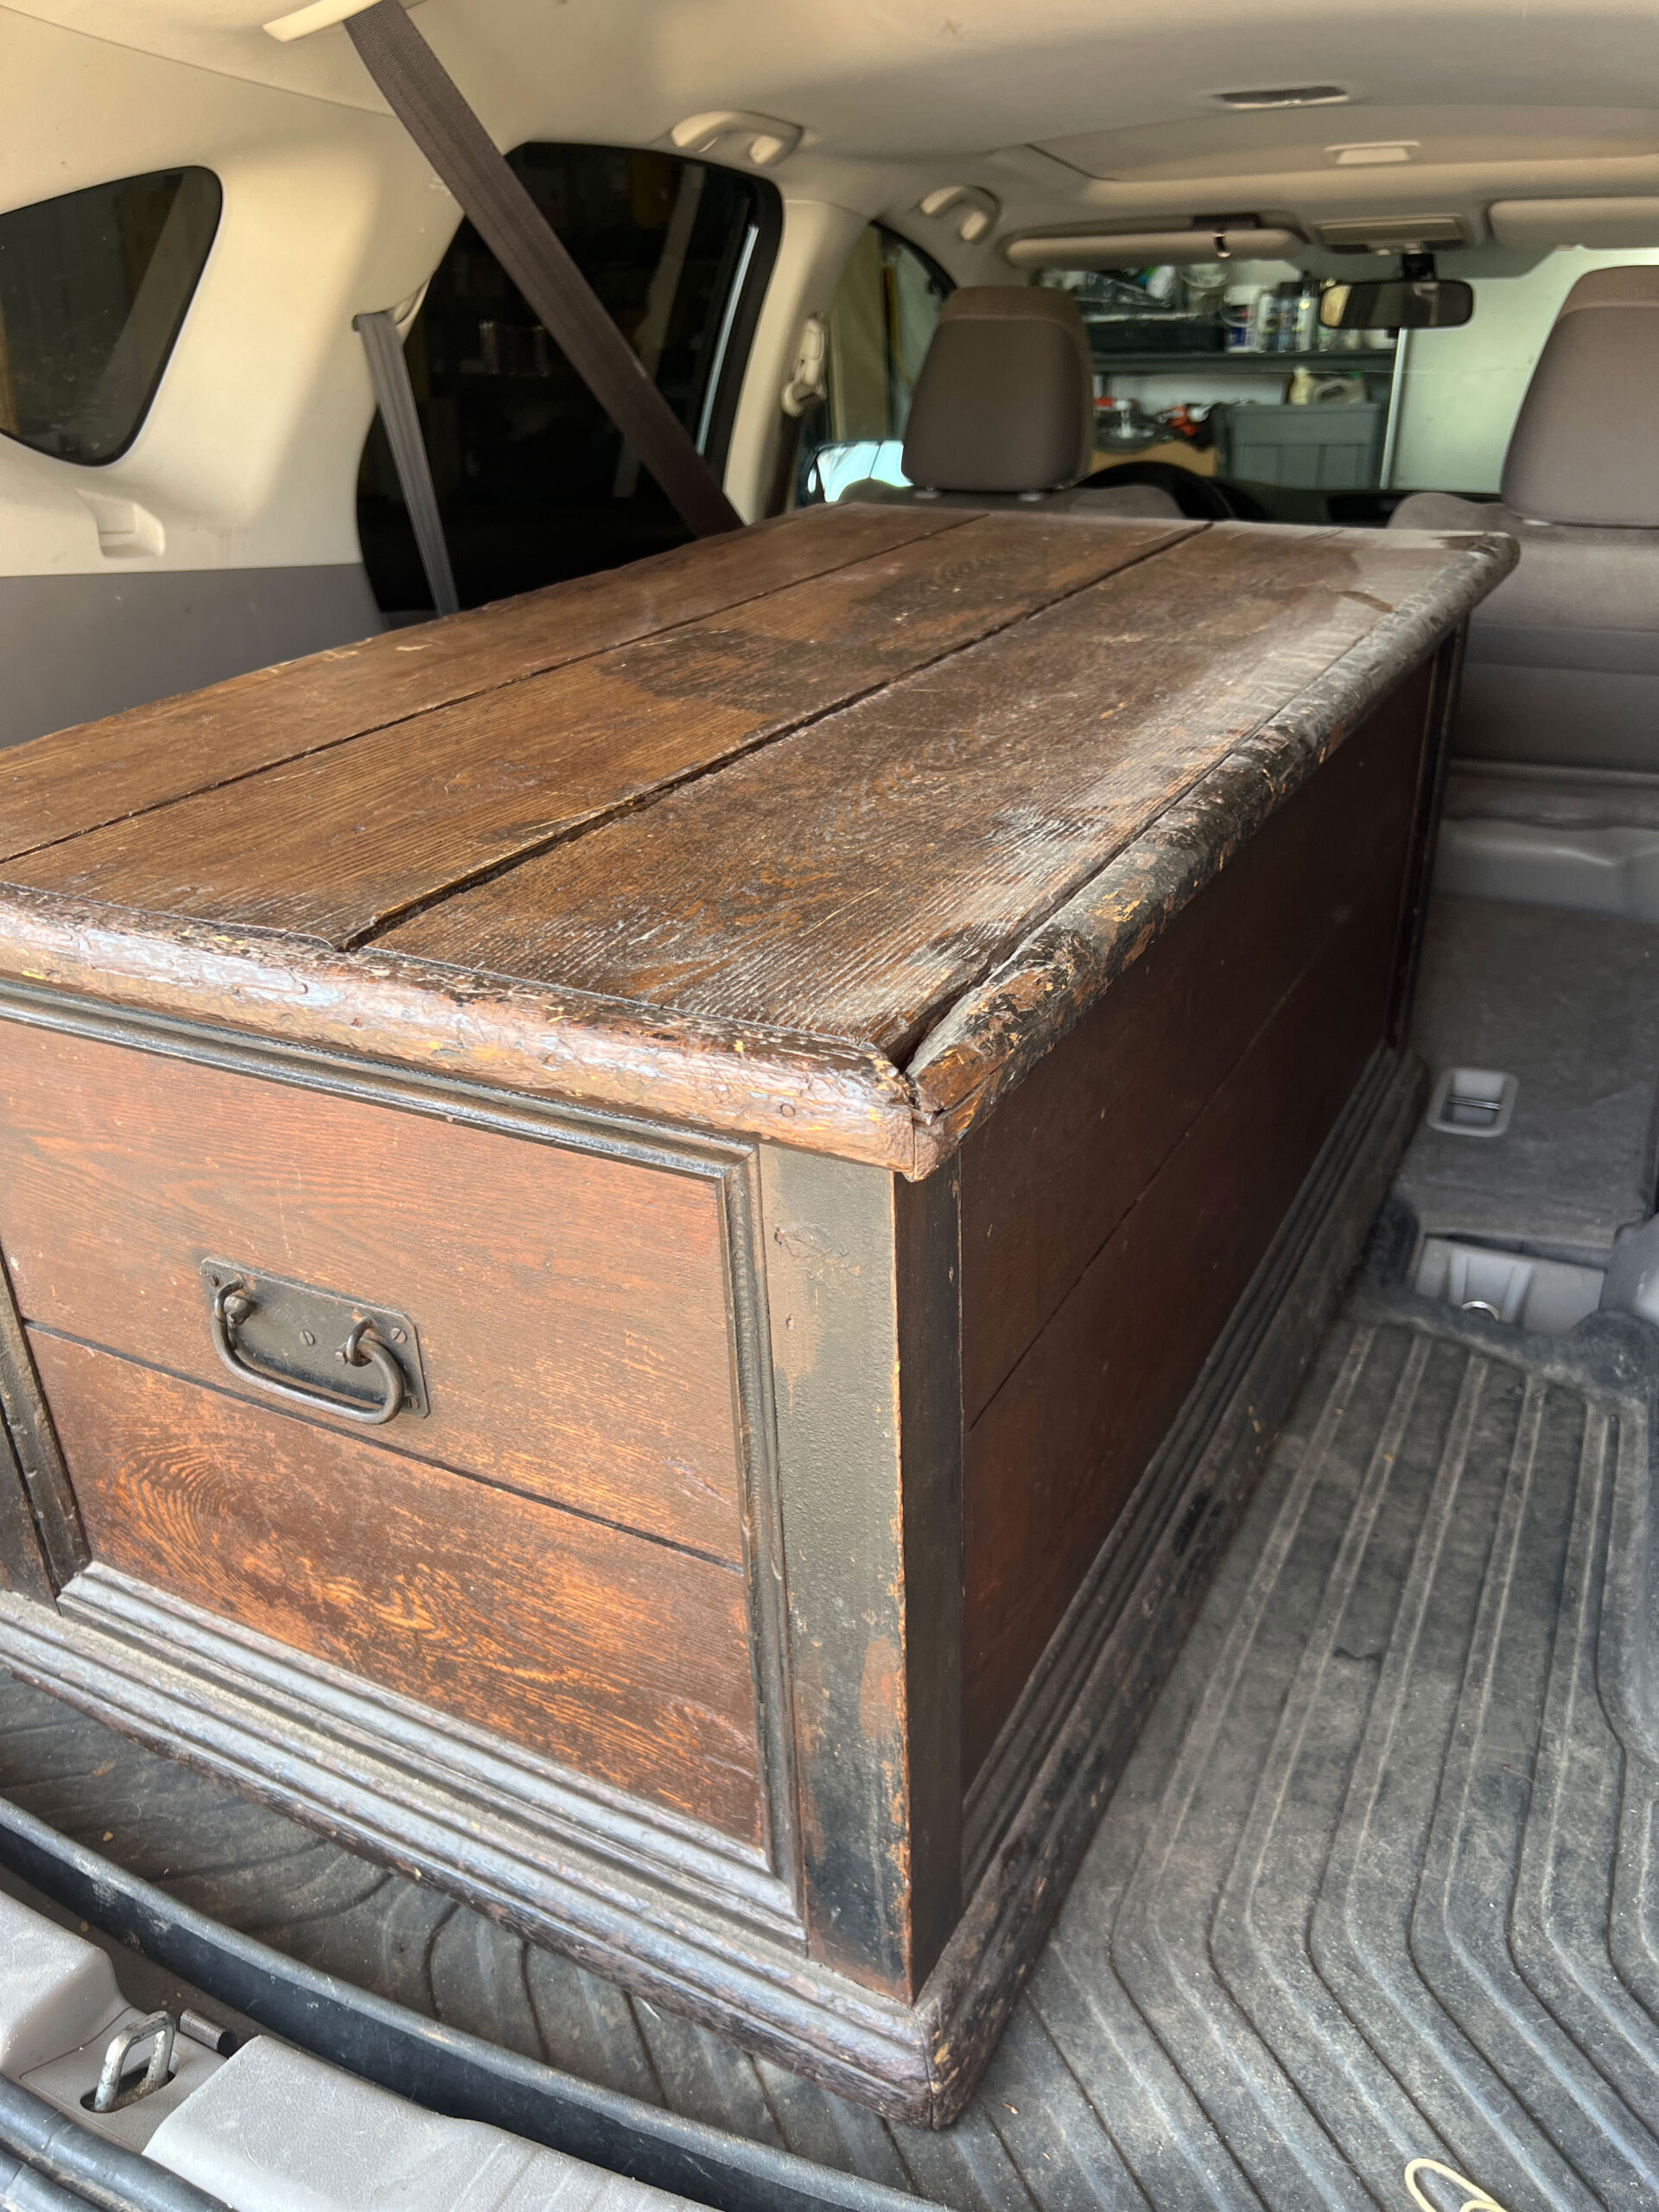
I also looked at things I already had (at my house or what we inherited in the cabin) and tried to look at ways to give things a second life. I added some dark stain stripes to a drop leaf table that was left behind at the cabin and I think it turned out so cute!

I bought a lot of accent pieces and styling items from home too, rather than buying all new.
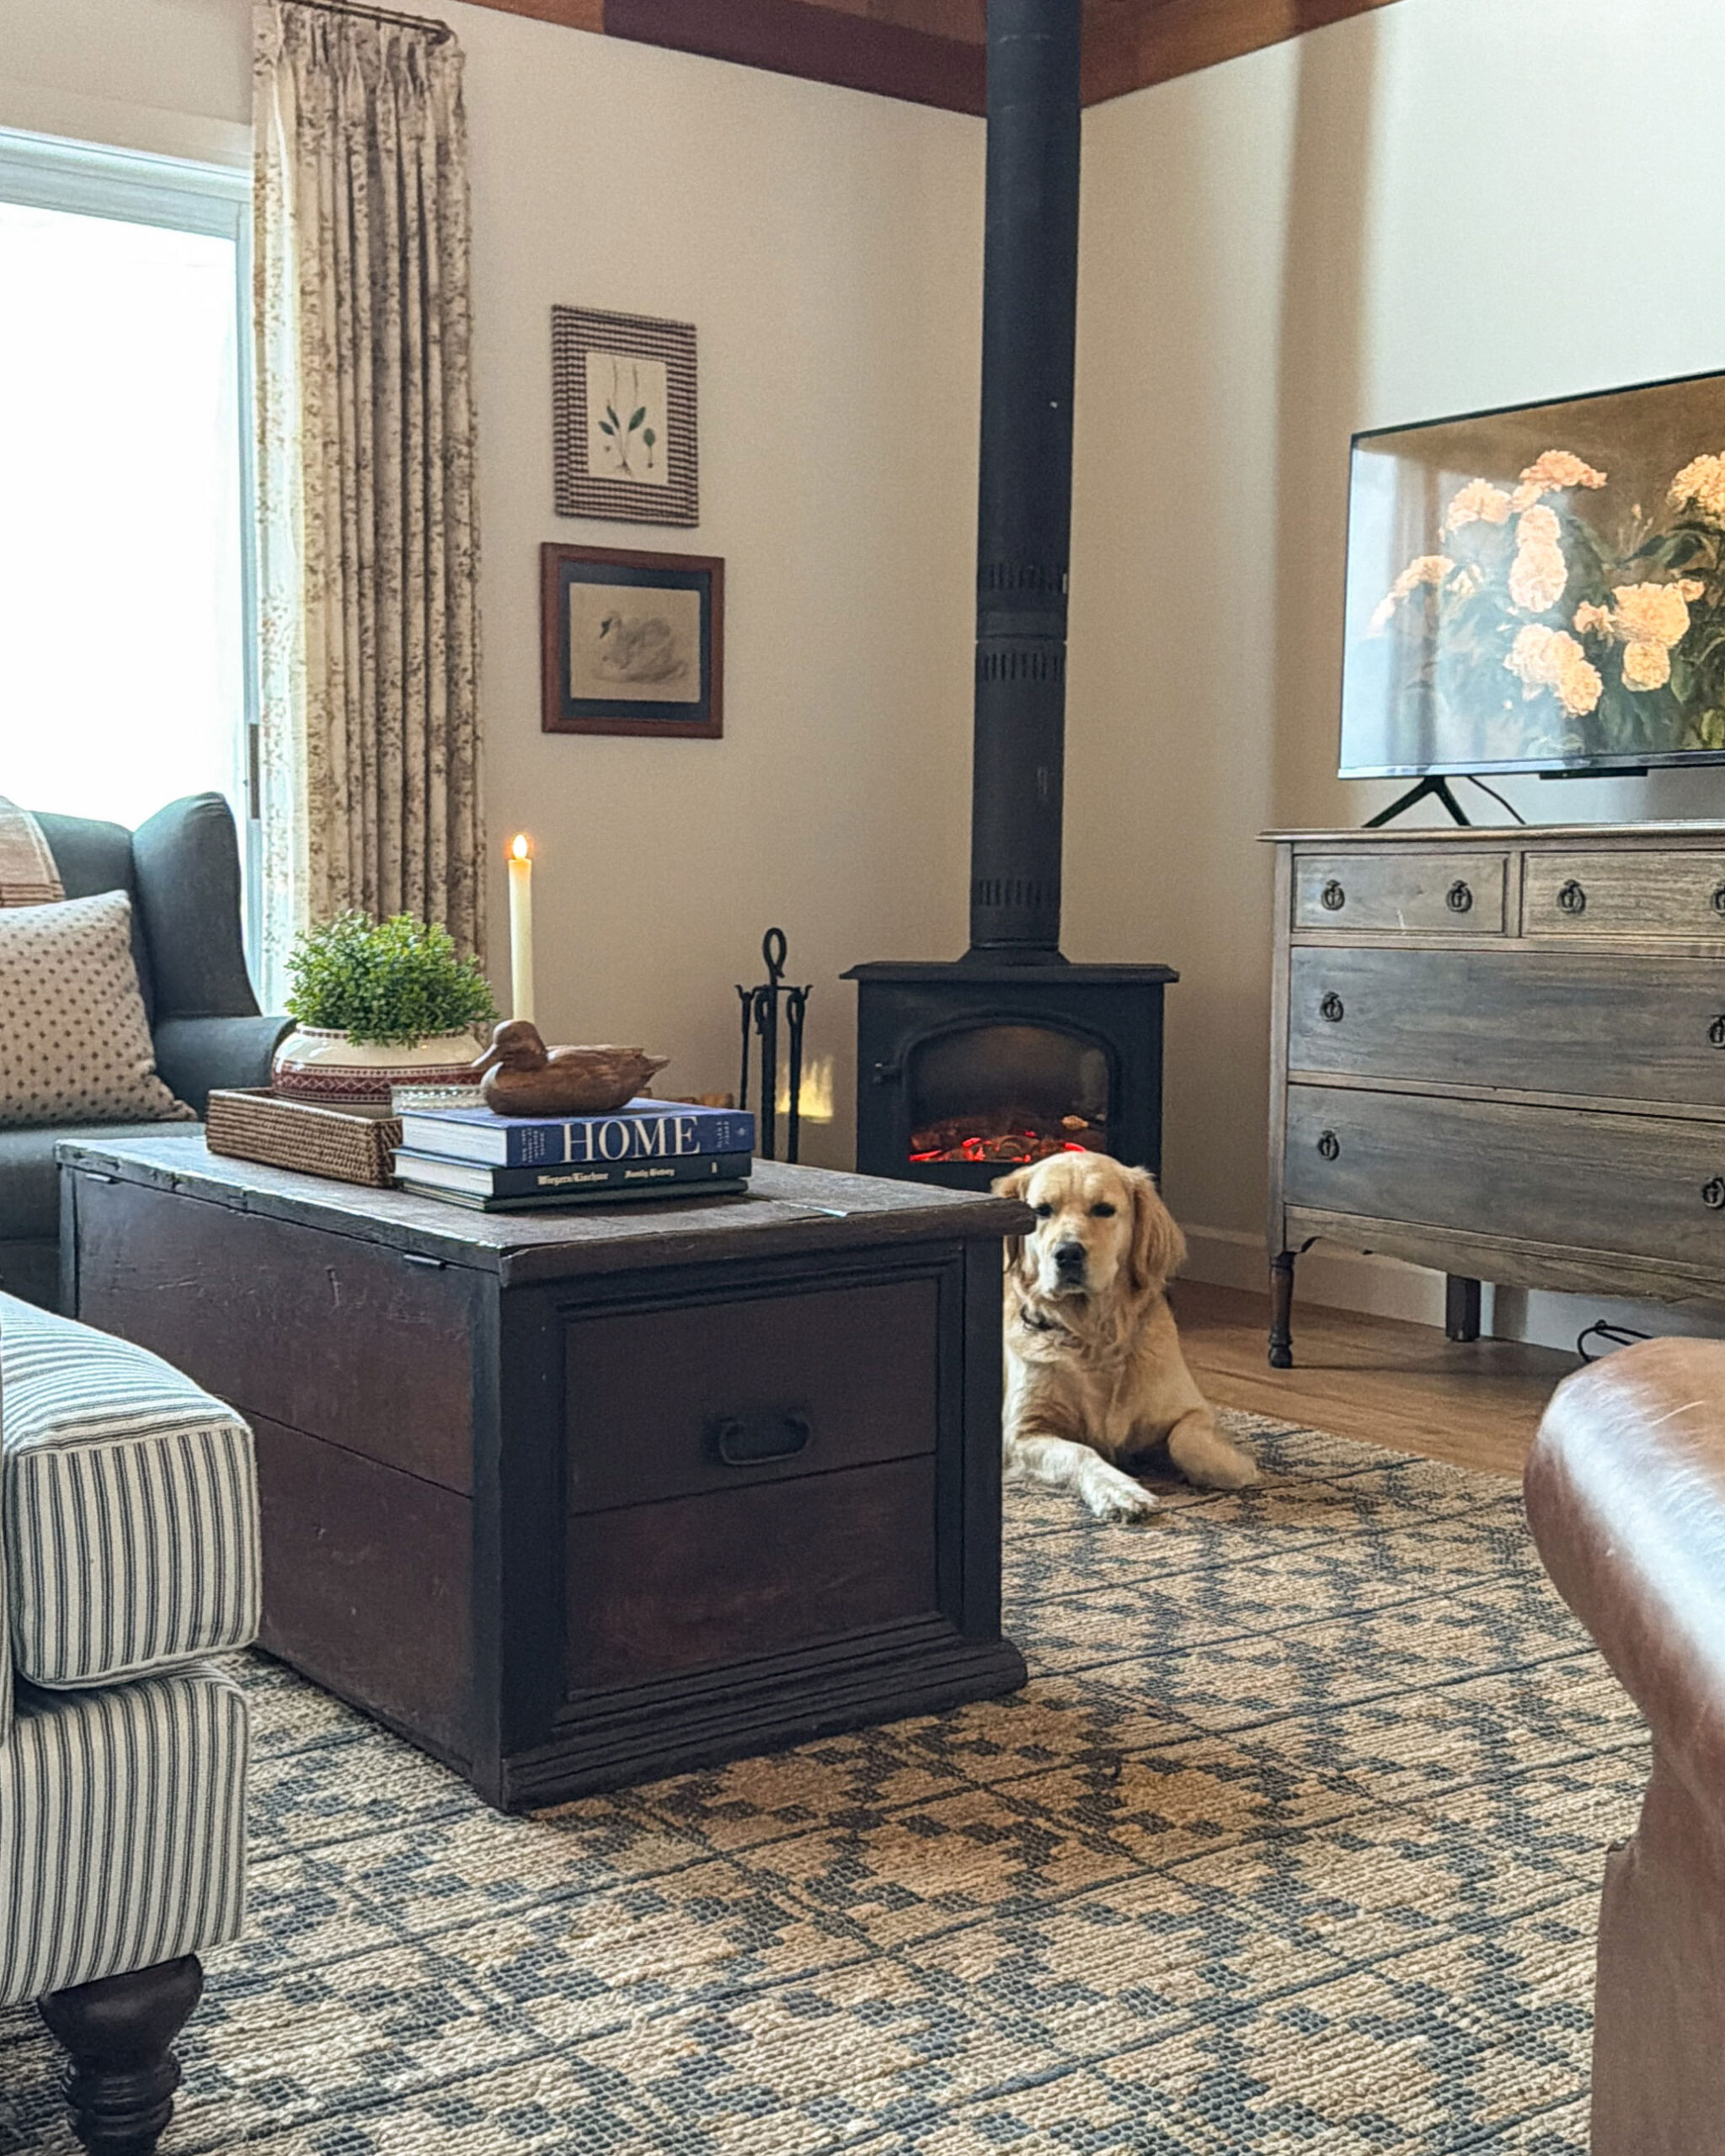
In this room the things I bought second hard included all the frames for the gallery wall and wall art by the fireplace, the coffee table, the dresser under the TV, the blue accent chair and the Pottery Barn leather accent chair, the dining table and chairs, the corner accent table, and the electric stove!
I even found an old worn and dirty chair and recovered it myself. That ended up being quite an undertaking, but it was a great way to give an old chair a whole new look. (I think that is a post for another day!)

Mix in a Few New Pieces
I looking for a long time for a sofa but finally ended up buying one. I purchased this striped beauty that I have bought before, we already have two of these in a beige colour in our theatre room. I knew that the quality for the price was unmatched on this sofa and I just loved the stripes!
I also got a new rug gifted to me from Loloi. I really wanted this particular jute rug, I just couldn’t get it out of my head and it went so well with the color scheme and design plans.

We bought a new TV. I really wanted a Frame TV but I could not really justify a purchase like that for a cabin house. I had planned to hang that on the wall and build a frame for it but I ran out of time/ energy/ motivation.
I did choose an Amazon Fire TV because it has a pretty good Ambient mode that displays art like a Frame TV. After living with both, it’s not the same exactly because it’s not as glare free or low profile, but it’s better than a big black box on the wall.

I got a few new decor items like a tray, a vase, a wood duck, a wicker lamp (Home Sense) and a book stand. I did find a few things at thrift stores too, that’s such a great place to look for affordable home decor.

The throw pillows are all new from Tonic Living. I love Tonic Living’s pillows because they are affordable while also being such great quality. Their pillows are double sided with the nice fabric, and they have the most amazing inserts. I also like that they have such a nice curated selection so it is not too overwhelming.

I also got some semi-custom window treatments from Two Pages. It is maybe a bit of a stretch to call these affordable, but they really have such an expensive look without the full price of custom curtains. I have to say I like TwoPages curtains so much that I think they are always worth it, and I do not think I will ever be able to go back to ready-made window treatments.

I do think that having a nice mix of old and new makes the space feel fresh and its a lot easier to splurge on a few special things when you have saved money in some other places!
The Gallery Wall
I found all new frames at various thrift stores to create this Gallery Wall. Every single one of them came with glare free glass. If you don’t have any art with glare free glass, it’s a game changer! It makes your art the star and usually if you find a frame with that, it was originally a custom frame and therefore pretty good quality. A really nice frame paired with a print is a really nice way to get an affordable and beautiful custom piece of artwork.
I downloaded all the bird art from the Public Domain HERE. I reformatted them and modified them a little in photoshop to make them fit the frames that I had, and then printed them at PosterJack. (Side note – I love Posterjack to print art, it’s a great place to get a good price on printing and their art paper is amazing!) Printing and framing your own art is such an inexpensive way to fill your walls!
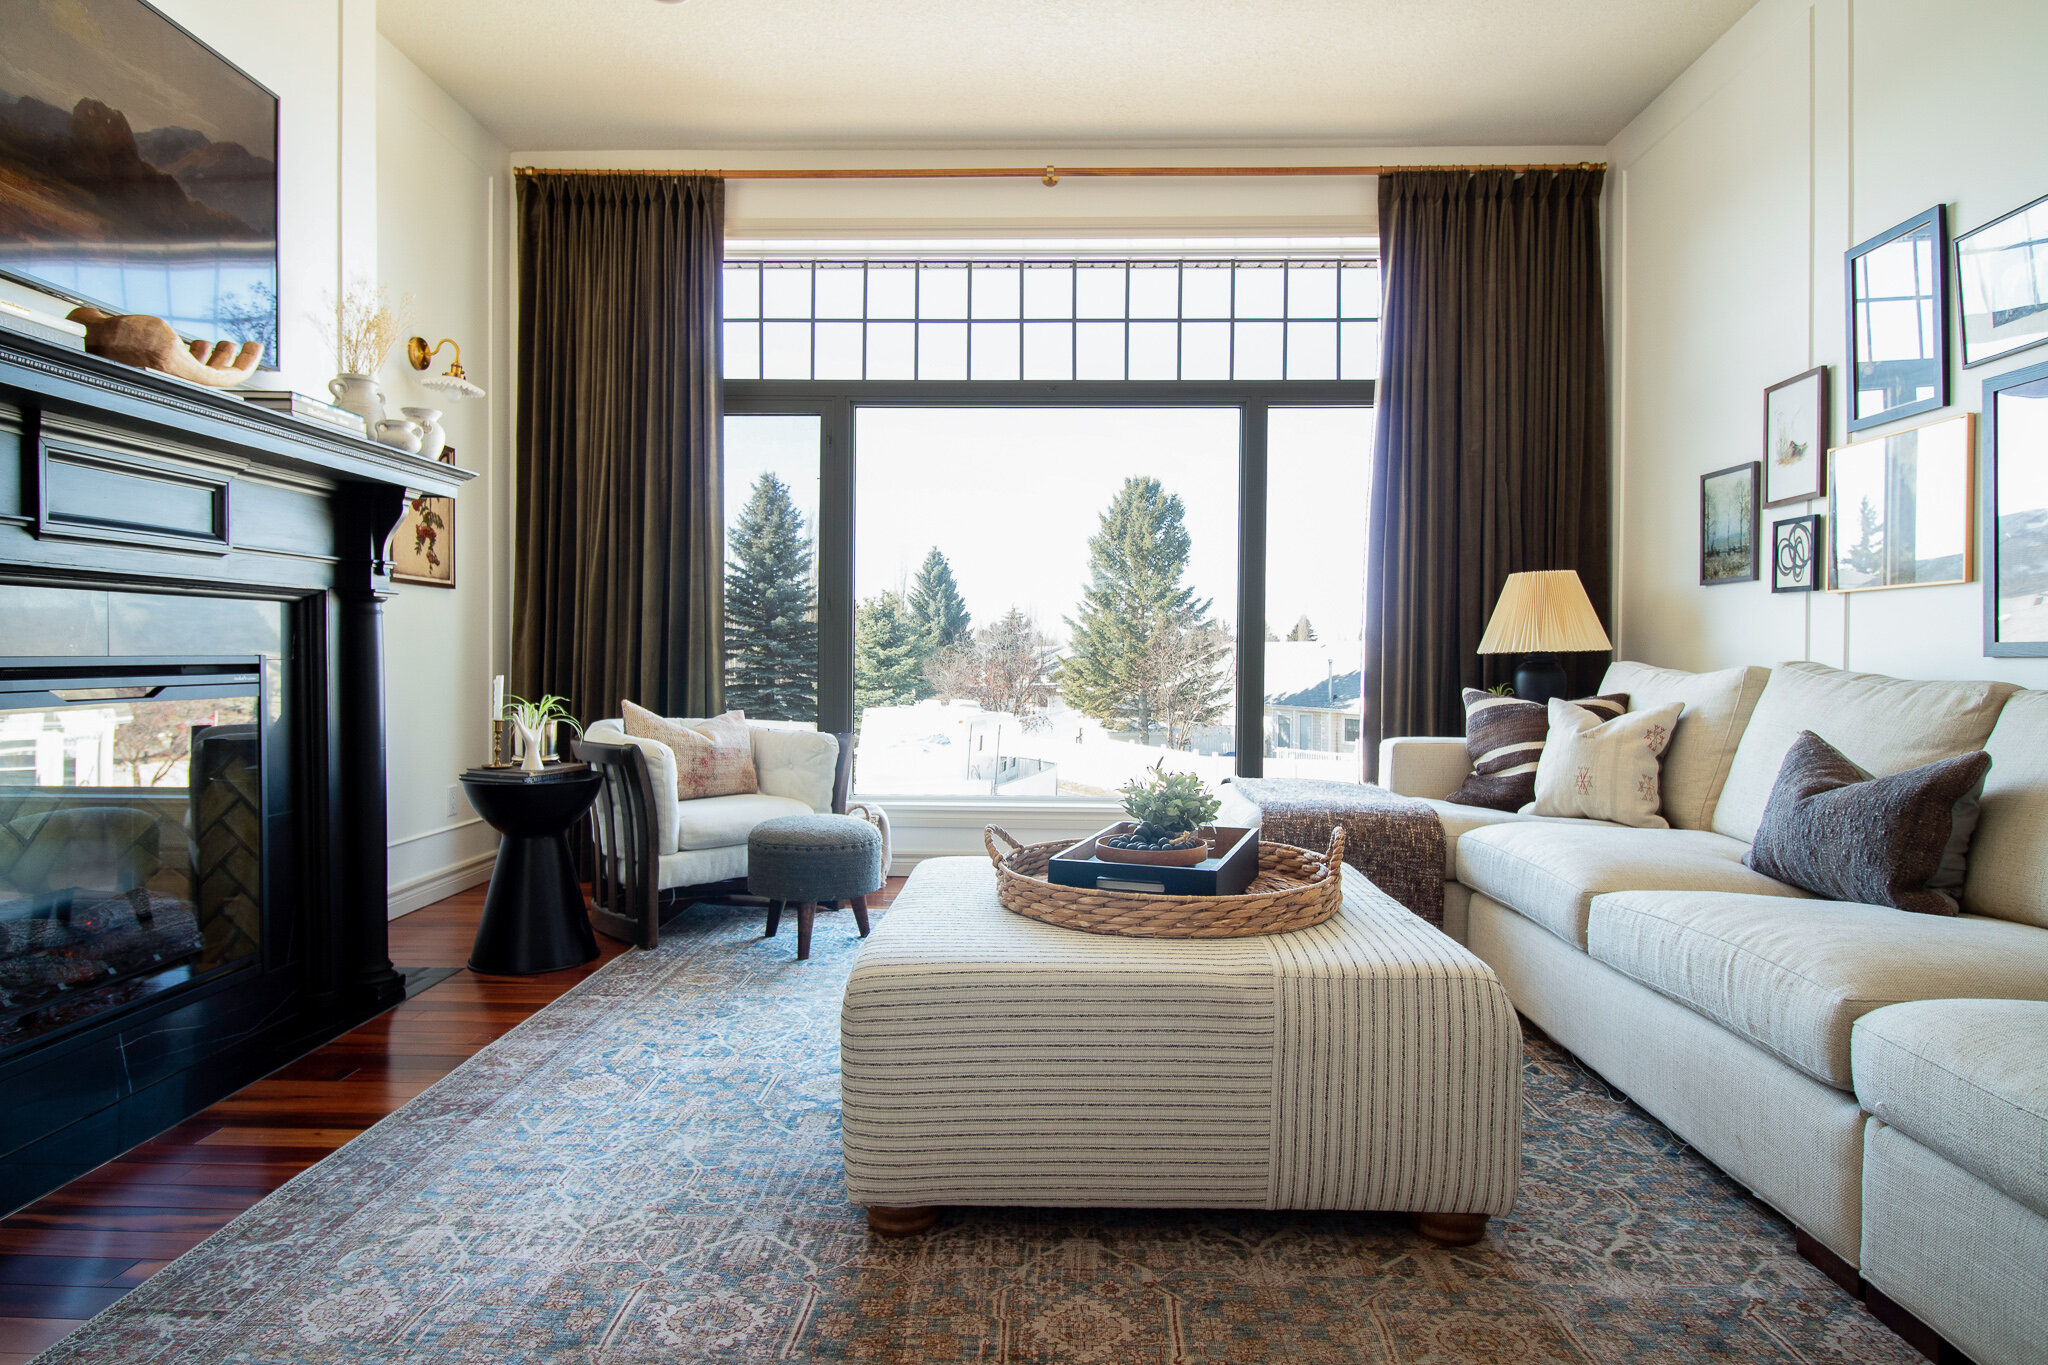
The Results
Here is how the room turned out! I’m so pleased with it, it’s the most cozy room and it’s making me like the rest of the cabin just a little bit less. Ha.


Before and After
Are you ready to see all the before and after photos of our living room space? We really did not change a whole lot, but it goes to show what a big difference small changes and personal touches can make!


Sources
I have linked everything that I could for this makeover below! I tried to include links to similar items where one wasn’t available.
I hope this has inspired you to think outside the box if you are furnishing a room from scratch (or even just giving it a little makeover!) in ways you can have a room that is affordable, beautiful, and full of character.
Erin, this is a home run! I love the collected look of all the pieces, it looks so interesting and intentional. We have a similar ‘woody’ a-frame mountain cabin and I have gone back and forth about hanging curtains to frame our french doors. Seeing your reveal, I think I need to hang curtains! This is the best of instagram, being truly inspirational. Bravo!! Catherine
Thank you so much Catherine! I am with you on the curtains, they are the last thing I did and I was like…. wow that added so much. I am so happy you got a little inspo from this, good luck with your mountain cabin!
Absolutely perfect!!!
Thank you so much!
Absolutely beautiful! Can’t wait to see the rest of the transformation!
You did a beautiful job on this space. And even though the fireplace is electric, the details of adding the fireplace tools and a small basket of curated wood is a nice touch!
The room came together beautifully, Erin! You all will enjoy this space!
Thank you!
Thank you! I tried to fake it a little 🙂
Thanks so much Michelle!
so inspiring, as usual!!
Thanks Lori!
This is wonderful – you did an amazing job! I’ve reread this post several times and loved finding new details to swoon over. You are really so talented and I love how you are able to pull together such a curated room on a budget – it’s very relatable for most of us without unlimited budgets!
Thank you so much!