How to Make Easy DIY Wall Shelf Brackets
If you have been following along on my office makeover, you know that I have been thinking about adding a wood shelf in my desk nook. I have been on the hunt for wooden shelf brackets that I could paint that were charming and cute and my search has come up a little short. I did find some that were okay, but they were kind of expensive for what they were. I decided that I was going to try to make my own DIY shelf brackets for my open shelving and guess what? It was pretty easy. Today’s post is a tutorial on how to make easy DIY wall shelf brackets.
This post may contain affiliate links. That means if you purchase anything from these links I earn a small commission, at no extra cost to you! This helps support my blog, so thank you!

Table of Contents
- The inspiration
- The Plan
- The Materials
- Tools
- Step by Step to make simple brackets
- Finishing or Painting
- How Many Brackets Do You Need?
- Hanging the Brackets
- Cost
- You Might Also Like:
The inspiration
Let us just start by saying that I was not originally going to make these, but after a pretty exhaustive internet search, I just could not find beautiful shelf brackets that I could paint. There were plenty of really special metal ones, but I was looking for a paintable wood solution.
I did find a few that were nice including these from the Home Depot. I was carrying them around the store and calculating the cost of 6 shelf brackets in my head, wondering why they cost so much. (These were $30 each in my store in Canada but the price varied depending on where you live.)

I had a good look at the way they were put together and decided to put them back and instead pick up a simple pine board, and try to make them myself. They turned out great, and were quite easy if you have some very basic woodworking skills you can do this too!

The Plan
The first thing to do is to decide on a plan and design for the bracket. I found an image on Pinterest of a bracket that was round with little star cutouts in it and I decided that was the direction that I wanted to go.
The basic construction of the shelving brackets I saw at Home Depot consisted of two wood pieces in an L-shape with a decorative angled piece of solid wood between them. They appeared to be simply glued together and tacked in place with some finish nails.
If you think about the way weight sits on a bracket like this, there is very little need for a strong bond between these different pieces of wood. The weight of the shelf will push these pieces closer together and they do not need to resist pulling apart. that is why these types of wood shelves are easy to construct and function well.
In determining the size of the bracket you would like to make, consider the shelf depth that you are looking for. I wanted my shelves to be about 10″. You can have your shelf overhang the brackets a little bit, too.
In the tutorial below I will share the exact measurements for the brackets I made so you can replicate them, but you can easily modify this method for a different size bracket to suit. If you want deeper shelves, just make the brackets a little bit bigger.
I also started by cutting the center bracket curved piece using a scroll saw but I was not happy with it and ended up buying some round disks to use instead. If you want a different shape, you can certainly cut your own if you have a scroll saw or a jigsaw.
The Materials
I used pine for my shelves because pine is inexpensive and I am planning on painting my brackets, but you can use any type of wood you like including pieces of scrap wood.
- 1×10″ or 12″ pine board (or other scrap pieces of wood)
- 18″ Pine Round
- Wood Glue
- Finish nails or wood screws
Tools
There are just basic tools required for this job, with the exception of the router which is optional!
- Mitre Saw or other wood saw
- Router (optional) and Router Table (Optional)
- Drill
- Nail Gun (you can also screw your pieces together if you don’t have a nail gun!)
Step by Step to make simple brackets
Cut the Wall Cleats (And Router, If You Want to Get Fancy)
Cut the wall cleat pieces first. I decided that I wanted my brackets to be slightly longer on one side than the other, so I cut blocks out of the 1×10″ pine board that were two different sizes. One board was 8″ and one was 8-3/4″ long, and they were both 2.5″ wide


Next, I mitered the corners of one of the short sides of each of the boards. Mitering the corner simply means that the end is cut on a 45 degree angle on the mitre saw.


Then we used our router to add a little detail to the edges of the three sides that were not mitered. This is an optional step and is purely for decorative purposes, so if you don’t have a router, don’t worry too much about this step. Just lightly sand the cut edge of each of the pieces to remove any roughness.

Cut the Quarter Circle
For my first attempt, I cut my quarter circle out of the 1×10″ pine board that I bought using a scroll saw. I simply traced an upside-down bowl onto the wood to get the circle shape and followed that line with my scroll saw to cut it out. This could also be done with a jigsaw.

This method could be used to cut out any shape that you want. You only need to make sure that you have a 90-degree corner on one side to sit up against the shelf underside and the wall, and the rest is only limited by your imagination.

I can be a little bit of a perfectionist at times and the circle was not perfect. So I took a trip to my local hardware store and came across these 18″ wood pine project panels.

These were a little big for what I needed but I knew I would be able to cut them down. Each circle would make 4 brackets.
The circles were 18″ in diameter, so to find the center I measured across it and marked 9″, then measured in a different direction and marked 9″ again. The location where these lines intersect is the center.

To cut the circle in half, I set up it up on my mitre saw so that the saw hit my pencil marks going right through the center.

I took one of the resulting half-circles and put the flat side up against the fence on the saw. I cut again so that the blade went right through the center line that I had marked, to make quarter circles.


Now these quarter circles are a little too big for my brackets, so I decided how long I needed the flat side to be and marked a pencil mark from the curved part to where it needs to be cut off, and trimmed it down.

I then turned it the other way and repeated this and ended up with quarter circles that were x” on each side.
Assemble the pieces
Before you assemble the brackets, give any rough edges a quick sand as they are easier to sand before they have been assembled.
Take the quarter circle and place it on the back board to mark the position. The first one I did I marked by measuring to find the middle, but after the first one I found that I was able to eyeball the middle pretty accurately. Hold the quarter circle in place and mark a pencil line along the edge as a guide.

Take the two mitered wall cleats and add wood glue to the mitered corners.

Hold these in position at 90 degrees to one another and add a nail (or if you are using screws, drill a pilot hole and add a wood screw) to hold them. (At this point I just added one nail so if I needed to adjust anything it would be easy to take out).

Add wood glue liberally to the back plates and to the edge of the quarter circle and place along the pencil lines you made.

Use a finish nail to nail from the back of the wall cleat into the center of the quarter circle.

Be careful to nail straight so that your nail doesn’t pop through the side of your circle! Add nails in all sides to hold the circle in place. The nails act to hold the bracket together while the glue is drying.
Add a few more nails to the corner mitre at this point too.
If you are using screws instead of finish nails, be sure to predrill some pilot holes to prevent the wood from splitting.
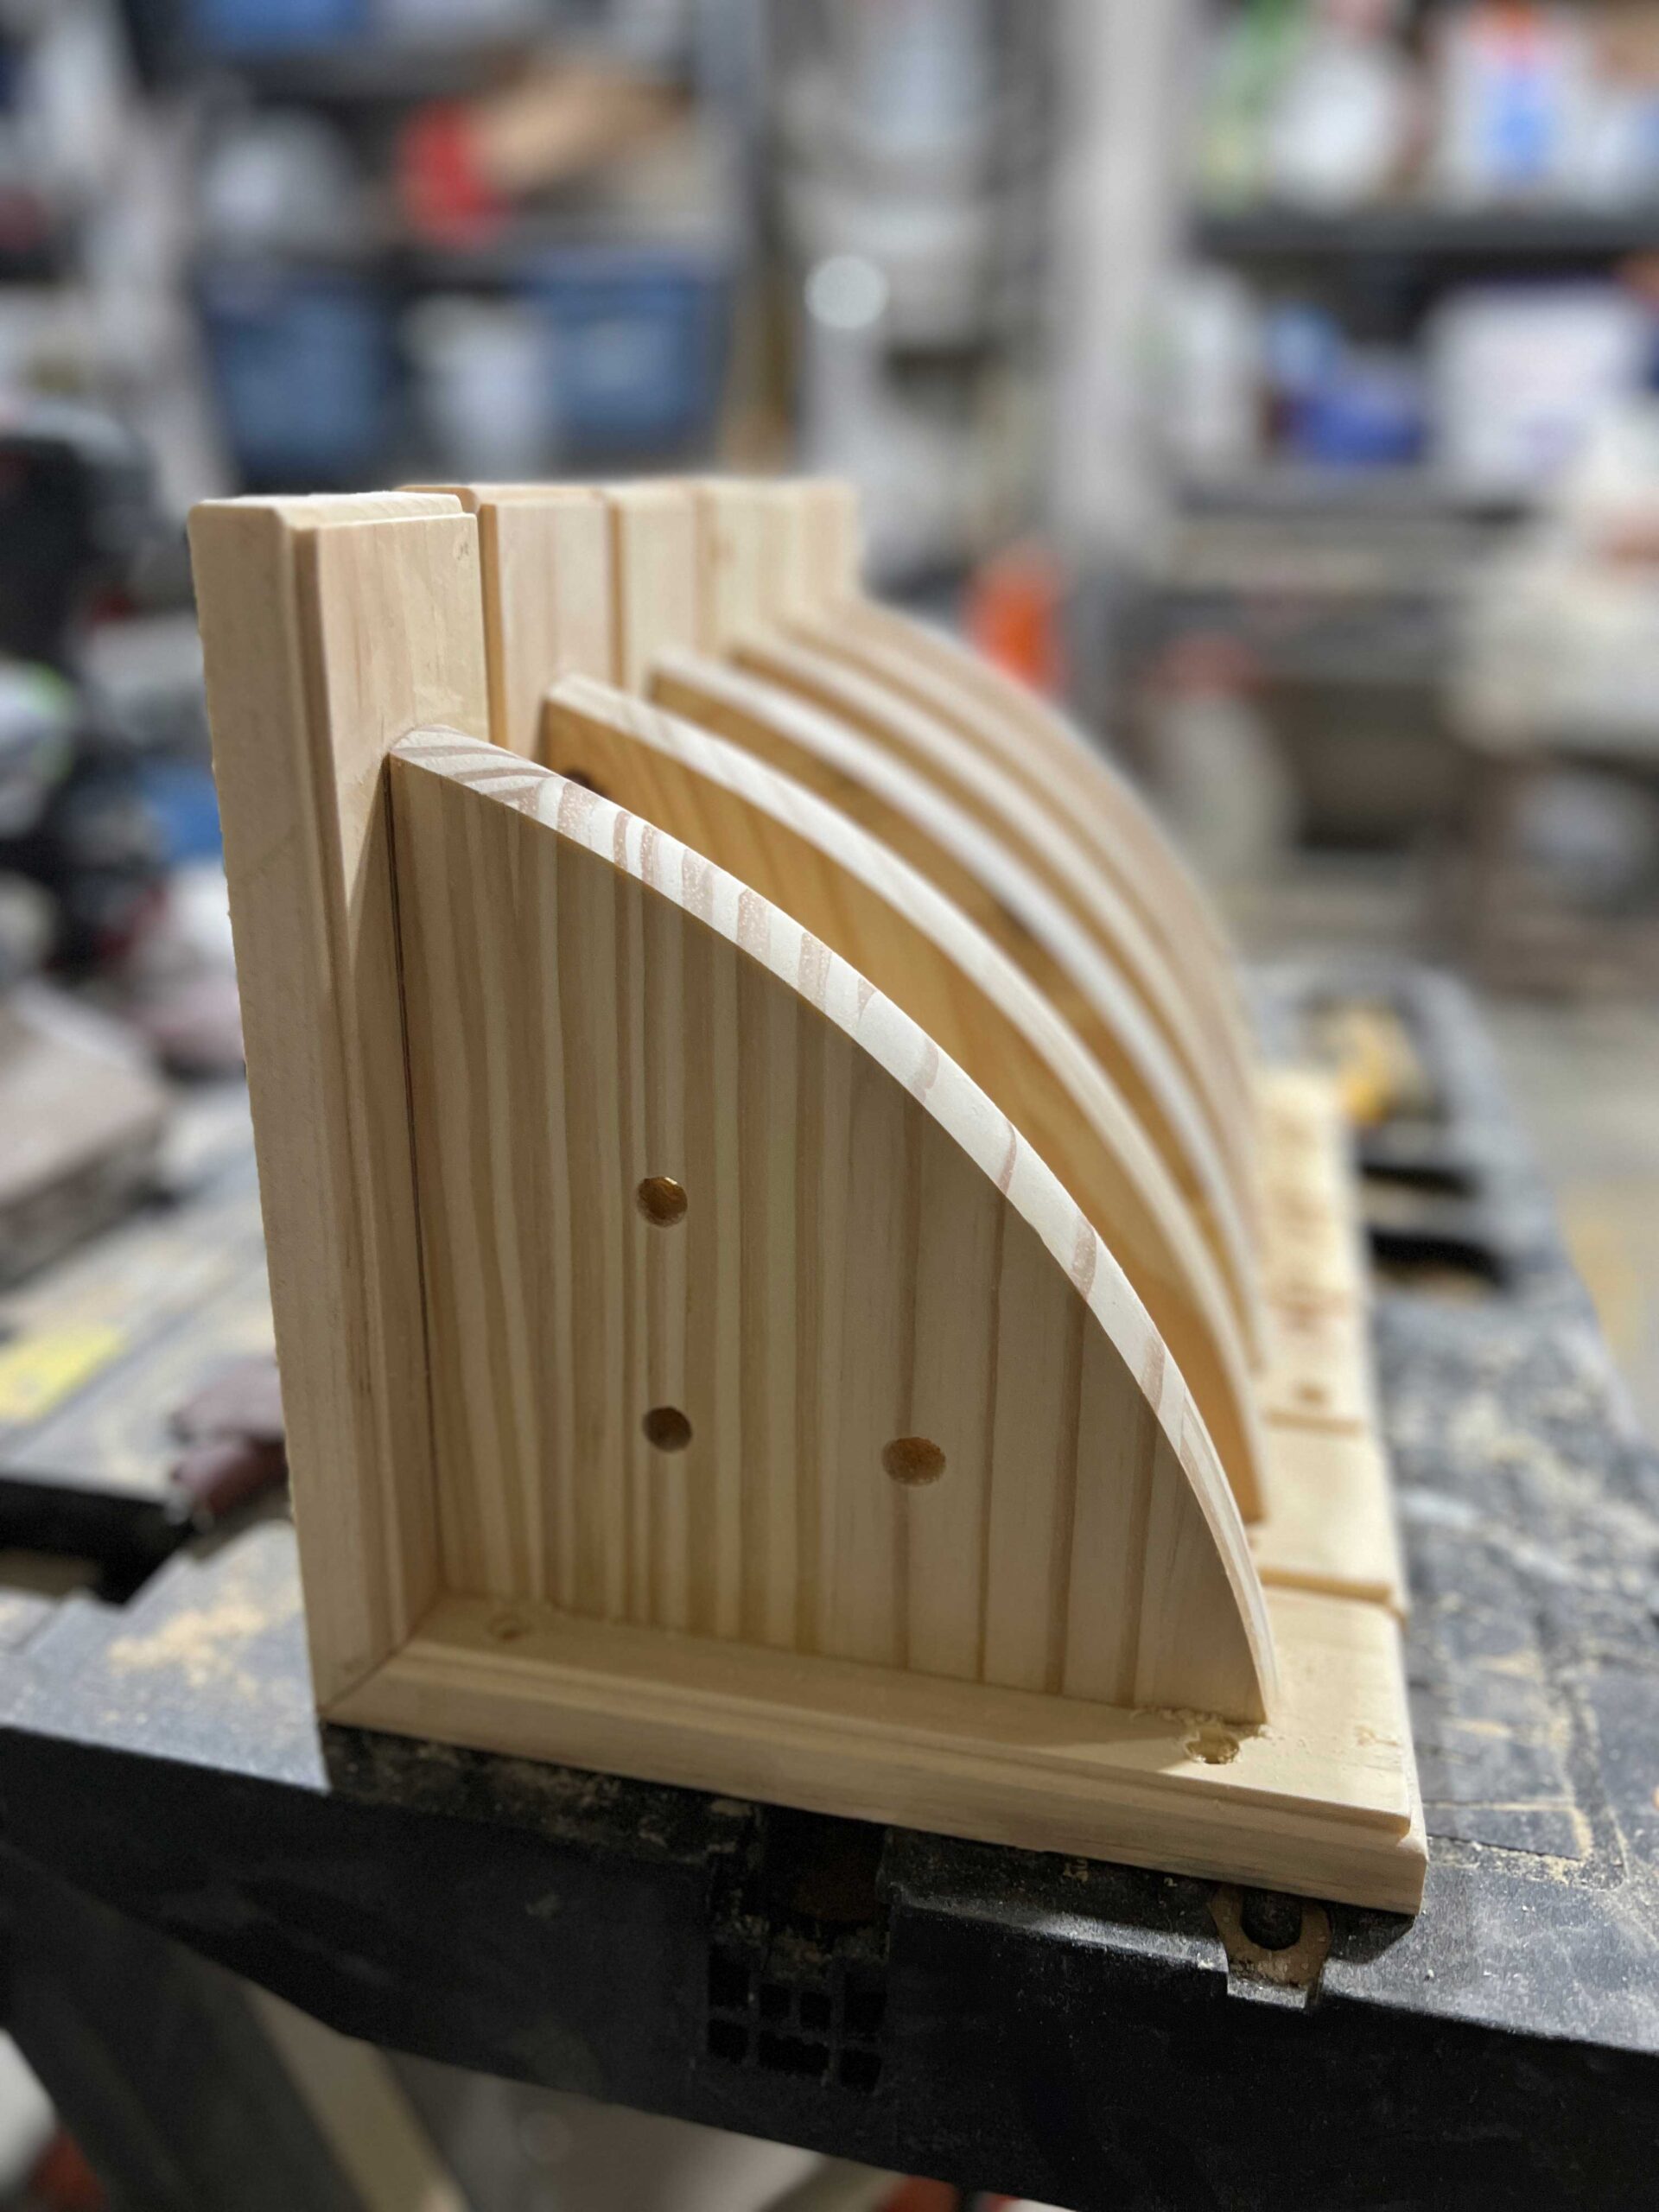
Optional – Drill Some Cutie Little Holes
OK so this is my personal design and entirely optional, but I saw some brackets on Instagram or Pinterest or somewhere that had little star-shaped cutouts in them and I couldn’t get it out of my head. I decided to drill some holes in my quarter round to add some detail.
I played around with the layout until I landed on something that I liked and then I made a little paper template so that all the holes would be in the same spot on every bracket.

I used a spade bit to drill most of the way through the board (just until the bit barely broke through the back) and then flipped it over and drilled from the other side to minimize tear out in the holes.


Finishing or Painting
At this point, you can paint or stain your brackets (or you can do that after you hang them too, which is what I am going to do).
I plan to paint mine, and I will fill any chips with some wood filler and sand lightly before priming and painting.
How Many Brackets Do You Need?
The number of brackets that you need for your project depends on what you plan to use your shelves for, and what the shelf itself is made of. I found this super handy calculator to help you figure out how many brackets you might want for a sag-free shelf by figuring out how far certain thicknesses of wood can span between supports.
(Note at the bottom of the calculator there are some notes for estimating what to put in as far as shelf load, in case you aren’t sure what a fully loaded shelf of books might weigh!)
We were originally planning to use 3/4″ MDF as our shelf but when I put it in the calculator above, it turned out that the shelf would sag too much. I had two options, to either increase the number of supports or change the shelf material to something that could span a greater distance.
We wandered around Home Depot for quite some time looking for a good solid wood option that would paint up well, wasn’t warped or twisted and didn’t cost an arm and a leg, and could find nothing. And that was when we came up with the idea to make the MDF shelf thicker.
We glued a 3/4″ and 5/8″ piece together and then cut it to size. Once the edge is cut flush, filled and sanded it looks like one solid piece.
I am so happy with how that came about as I love the chunkiness of the finished shelf! It was born out of necessity but looks better two which is a major WIN!

Clamps – Worktable
Hanging the Brackets
The purpose of the wall cleats that we added is to make them easy to hang. My plan was to just screw right through the flat part into the wall.
For the best support, you should locate your brackets over the wall studs. However, you probably want your shelf brackets to be evenly spaced, so that is not always possible. If you can use a stud finder to find the studs and can place your brackets such that one or two of your brackets hit some wall studs, that is always a good idea.
If not, make sure you use proper wall anchors for the type of wall you attach the shelf to. I would not recommend hanging a shelf that will hold anything heavy, like books, using only drywall anchors.
Use a laser level or level to mark the location of the bottom of the shelf (or top of the bracket).
Predrill a pilot hole through the wall cleat. then, use a larger bit (a Forstner bit or a countersink drill bit works well for this) to drill just a little bit into the wall cleat so that you can sink your screw heads below the surface of the wood. We put one screw on either side at the top and at the bottom.


Screw through your predrilled hole into the wall.

Continue in this manner until all your brackets are up.
Once the brackets are in place, add your shelf board. You can let the shelf float or you can add a wood screw or a finish nail down from the top of the shelf into the bracket to hold it in place.

To fill the screw holes, I used this Kwik wood product to fill the holes. You can sand flush and then paint over them and you will never know they are there. Keep in mind though that you will not be able to remove these shelves easily if you fill the screw holes.


if you want to be able to remove the shelf brackets at some point, use wood plugs the size of your countersunk hole instead. These just push into the drill holes and can be painted or stained along with your bracket.
Cost
So the brackets that I was going to buy from Home Depot were $30 each. The Pine Rounds were $30 and the 1×10″ x 8′ was $14. I bought two rounds and one pine board and that was enough to make 8 brackets, putting my cost per bracket at about $9.25. (Except I only ended up using 4 of the 8 I made). If you only need a pair of brackets it might be easier and almost as cost-effective to just buy them. (But then where is the fun in that?)
I didn’t make these to save money (although that was nice!), my thought process was more about wanting to have something a little more unique and the exact dimensions that I wanted rather than relying on what was readily available. Often I see something in a store and think to myself, I could make that, and then the challenge is on, ha!

wow