All About our Custom Oak Wood Vanity with Cabinet Joint
This post may contain affiliate links. That means if you purchase anything from these links I earn a small commission, at no extra cost to you! This helps support my blog, so thank you!
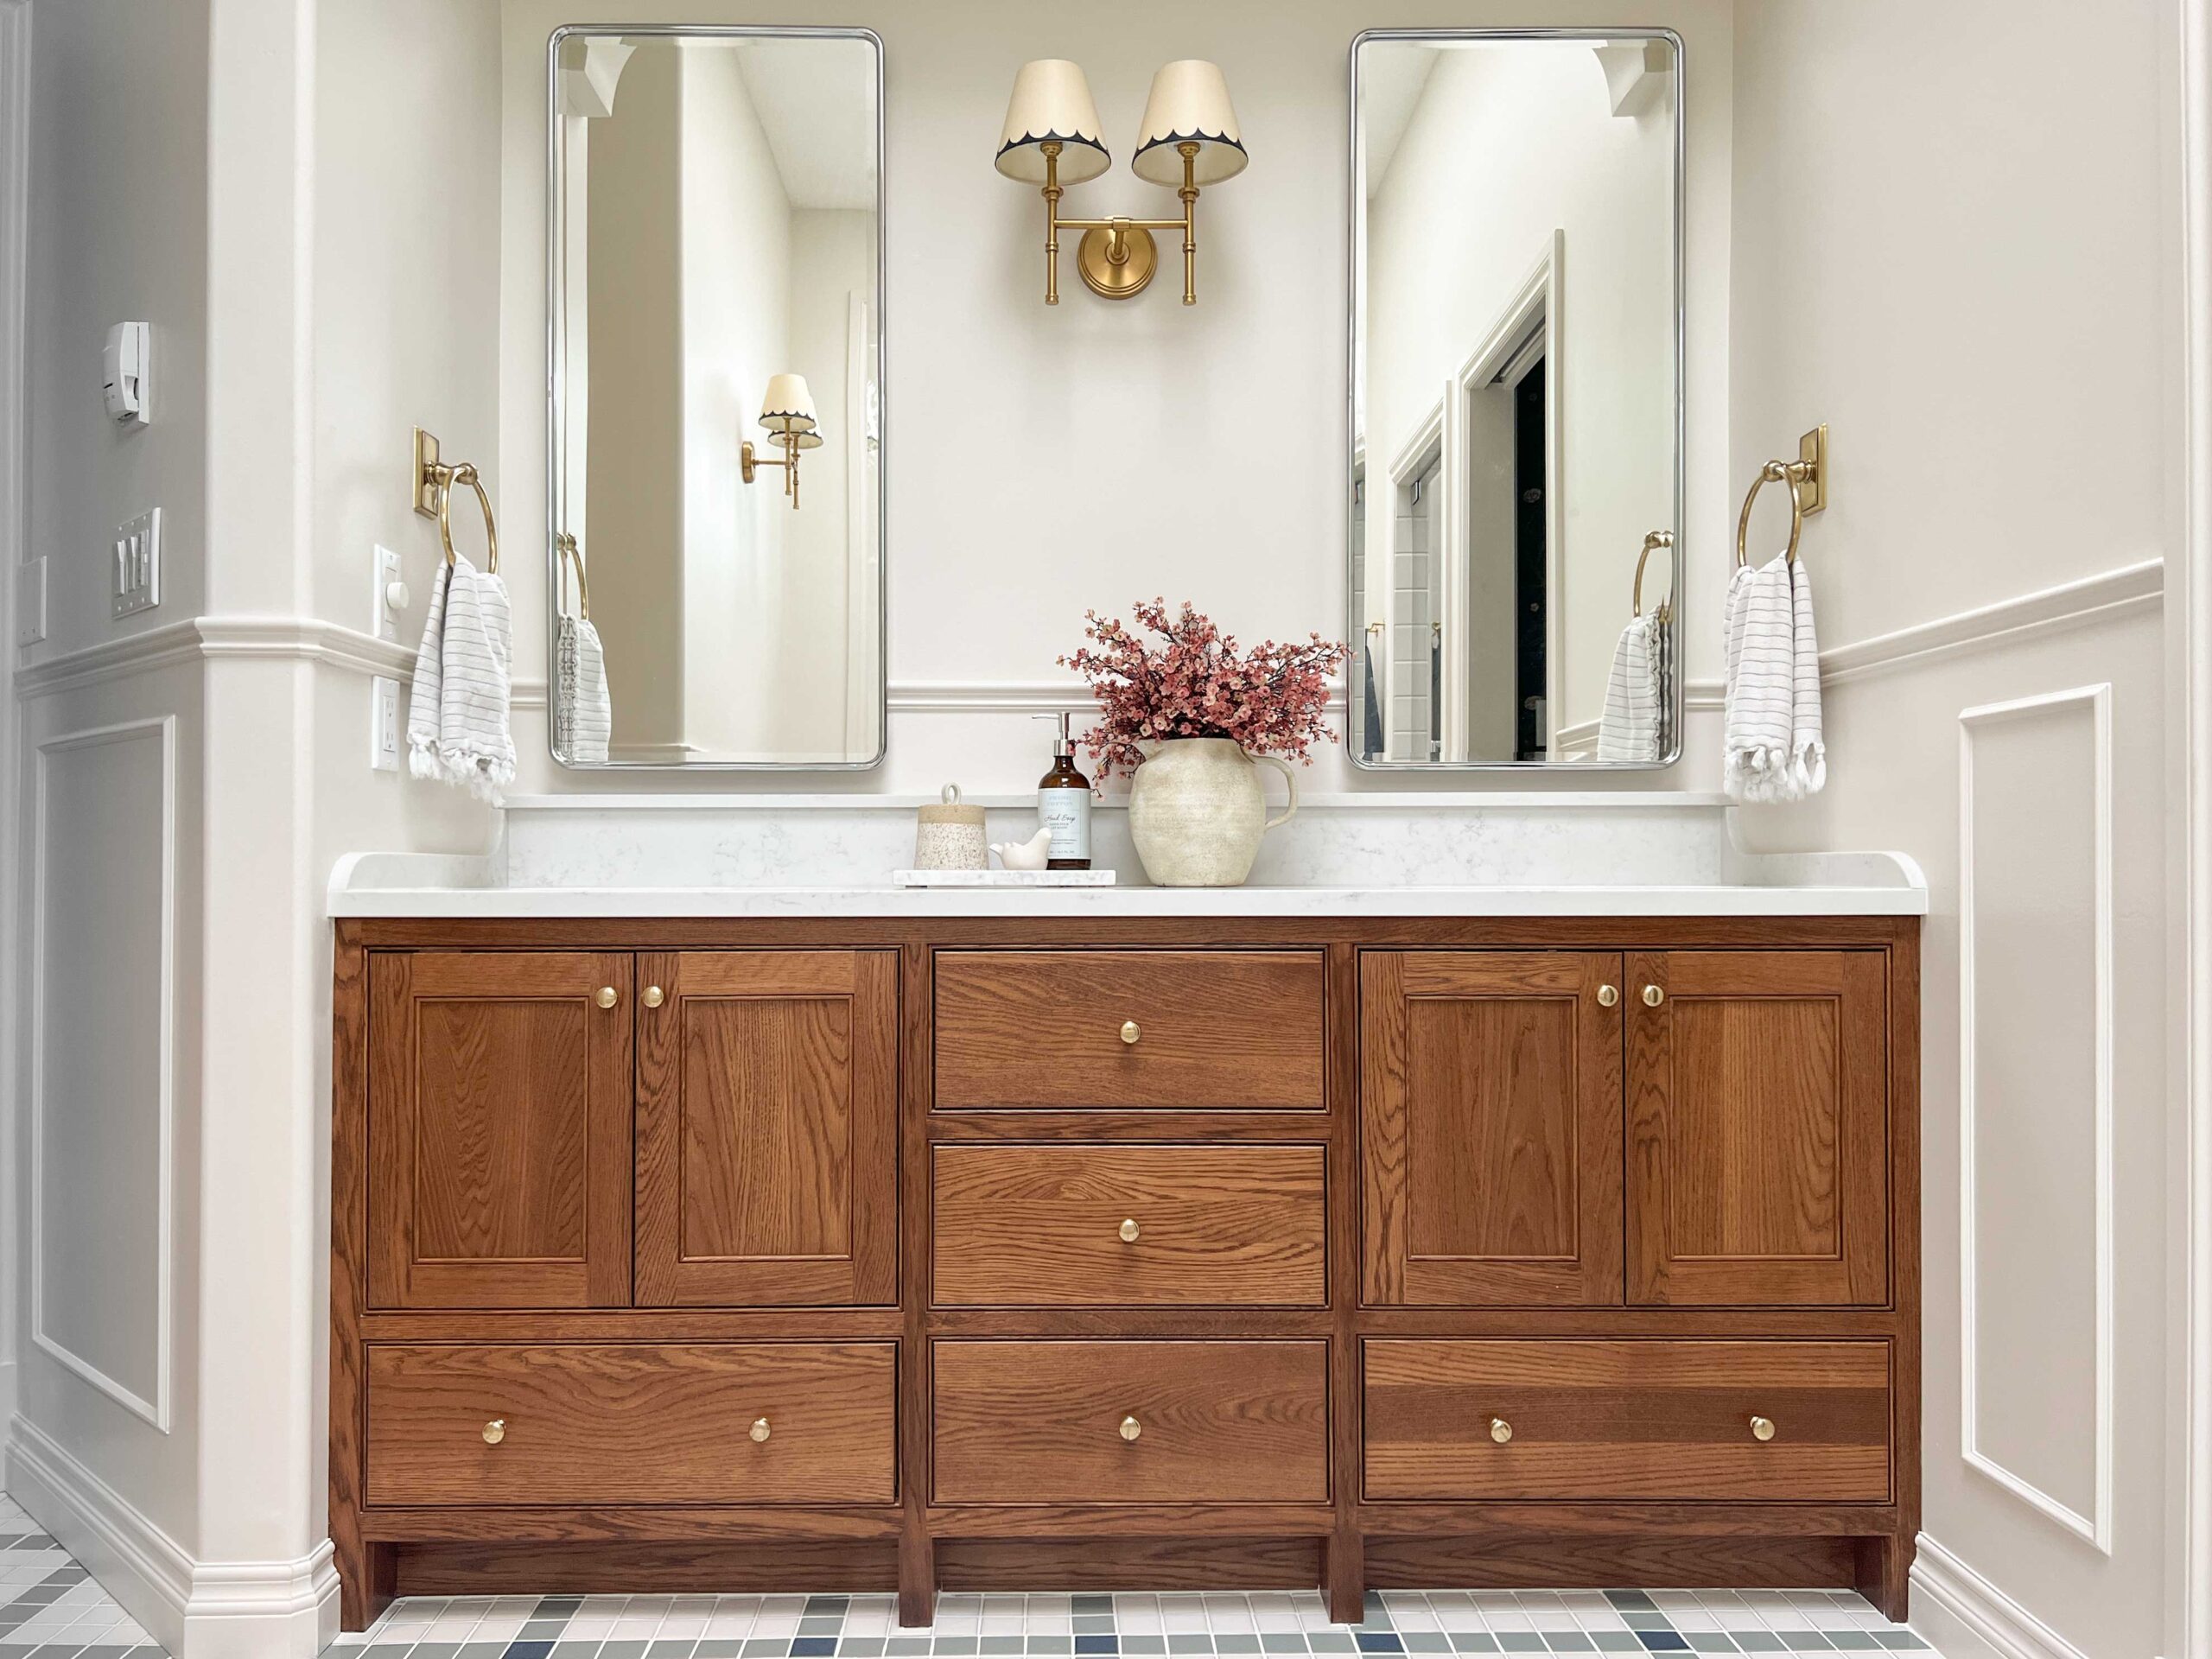
The new custom oak vanity has gone in and we are smitten! I am getting a lot of questions about the custom bathroom vanity and so I thought I would put together a little post all about our custom oak vanity with RTA (ready-to-assemble) cabinets from Cabinet Joint!
This post is written as a part of a partnership with Cabinet Joint, and all experiences and options are my own!
Mirrors – Knobs – Vase – Pink Florals – Sconce (similar)
Table of Contents
- Why Custom?
- Why Cabinet Joint
- The Design Process
- The Assembly
- Our Installation was a Little Tricky!
- Modifying the Legs
- Installing the Doors and Drawers
- The Finish and Quality
- The Final Look
- You Might Also Like:
Why Custom?
We considered keeping our old vanity when completing this renovation, but the old one wasn’t working that well for our specific storage needs. We wanted a few more drawers and customizations, and the old vanity had some water damage from the last 25 years of use. We briefly considered keeping the old cabinet boxes and just getting new doors and drawers, which is something we did in the kid’s bathroom. However, when we thought about what we wanted from this bathroom renovation, better-organized vanity and more drawers were high on the list.
The alcove where our old vanity was was just about 71-3/4″ wide, which, if you have ever shopped for vanities, is not exactly a standard size. 72″ is a pretty standard size and the next smaller size would have wasted way too much space in the alcove and we really needed to maximize storage. So buying something off the shelf was not an option for our new bathroom space.
Once we decided that a new vanity was in the cards and that we wanted to maximize storage by having the vanity go wall-to-wall in our alcove, we decided to look into a custom oak vanity cabinet.
Why Cabinet Joint
If you have been following me for a while, you know that we are no strangers to cabinet installation. We have installed cabinets in the kitchen, and the mudroom, replaced doors and drawer fronts in our kid’s bathroom, and even modified the size of and reinstalled the cabinets in my guest room. We were very comfortable going the DIY route to install.
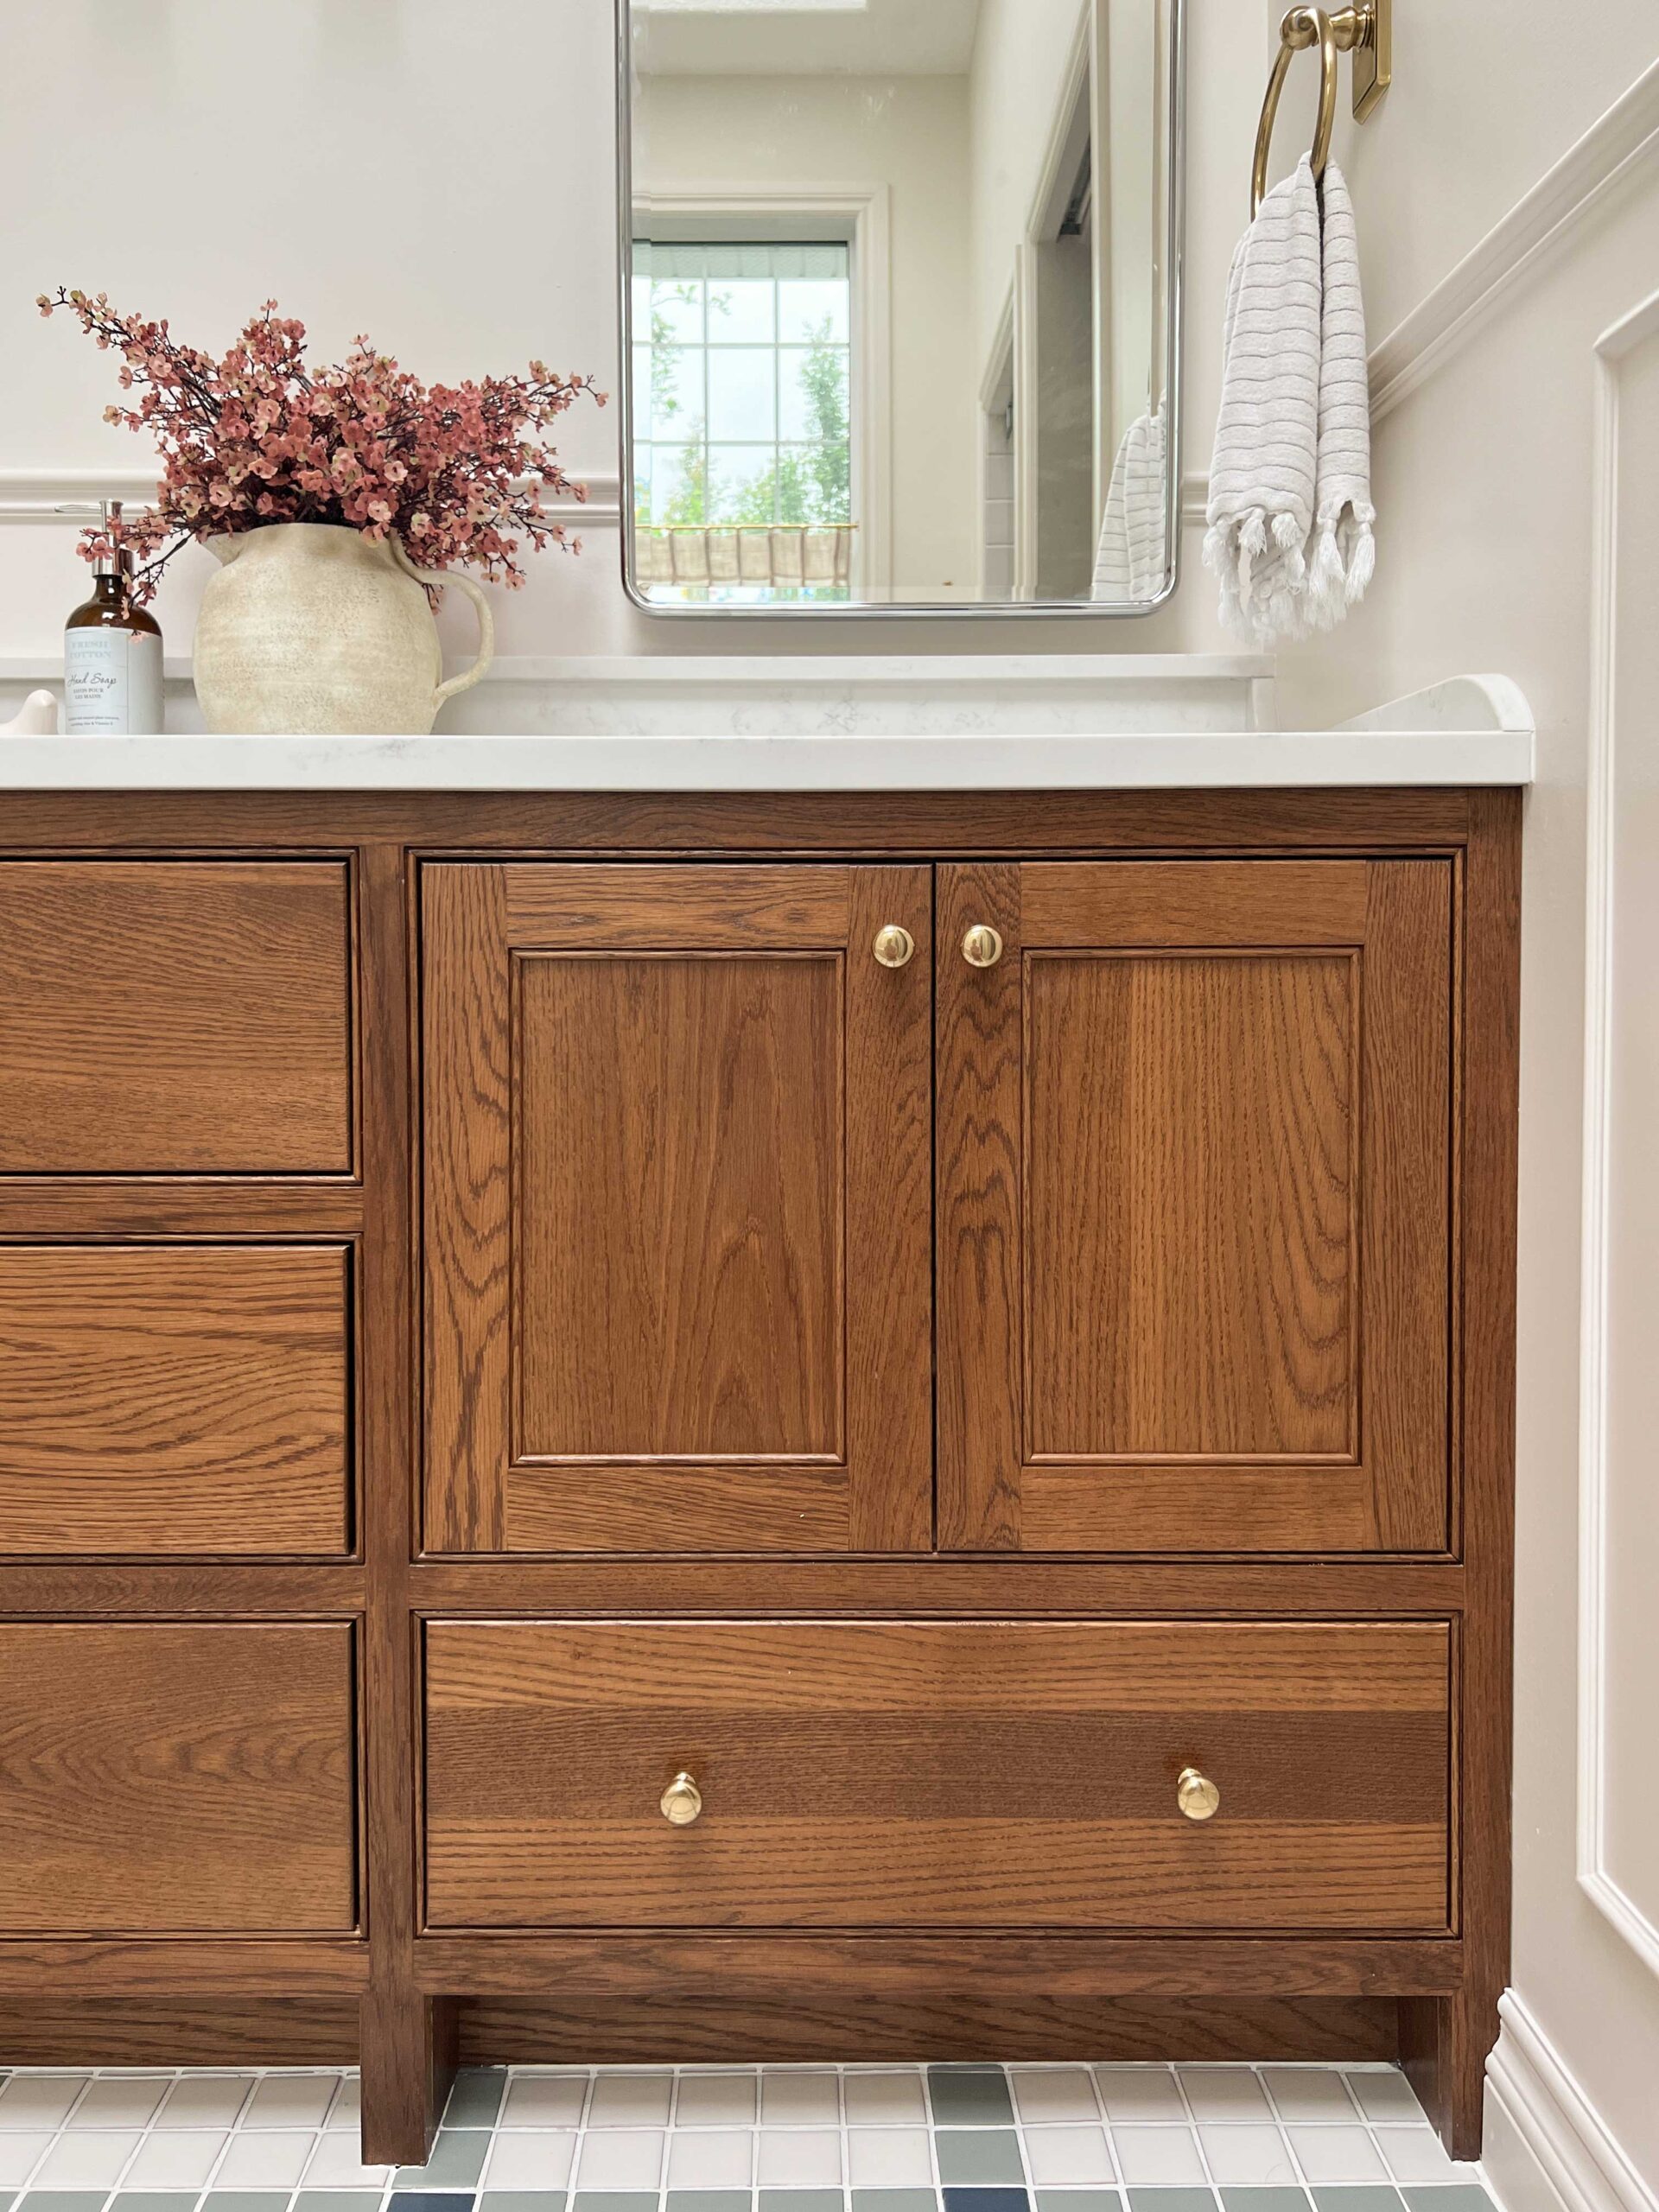
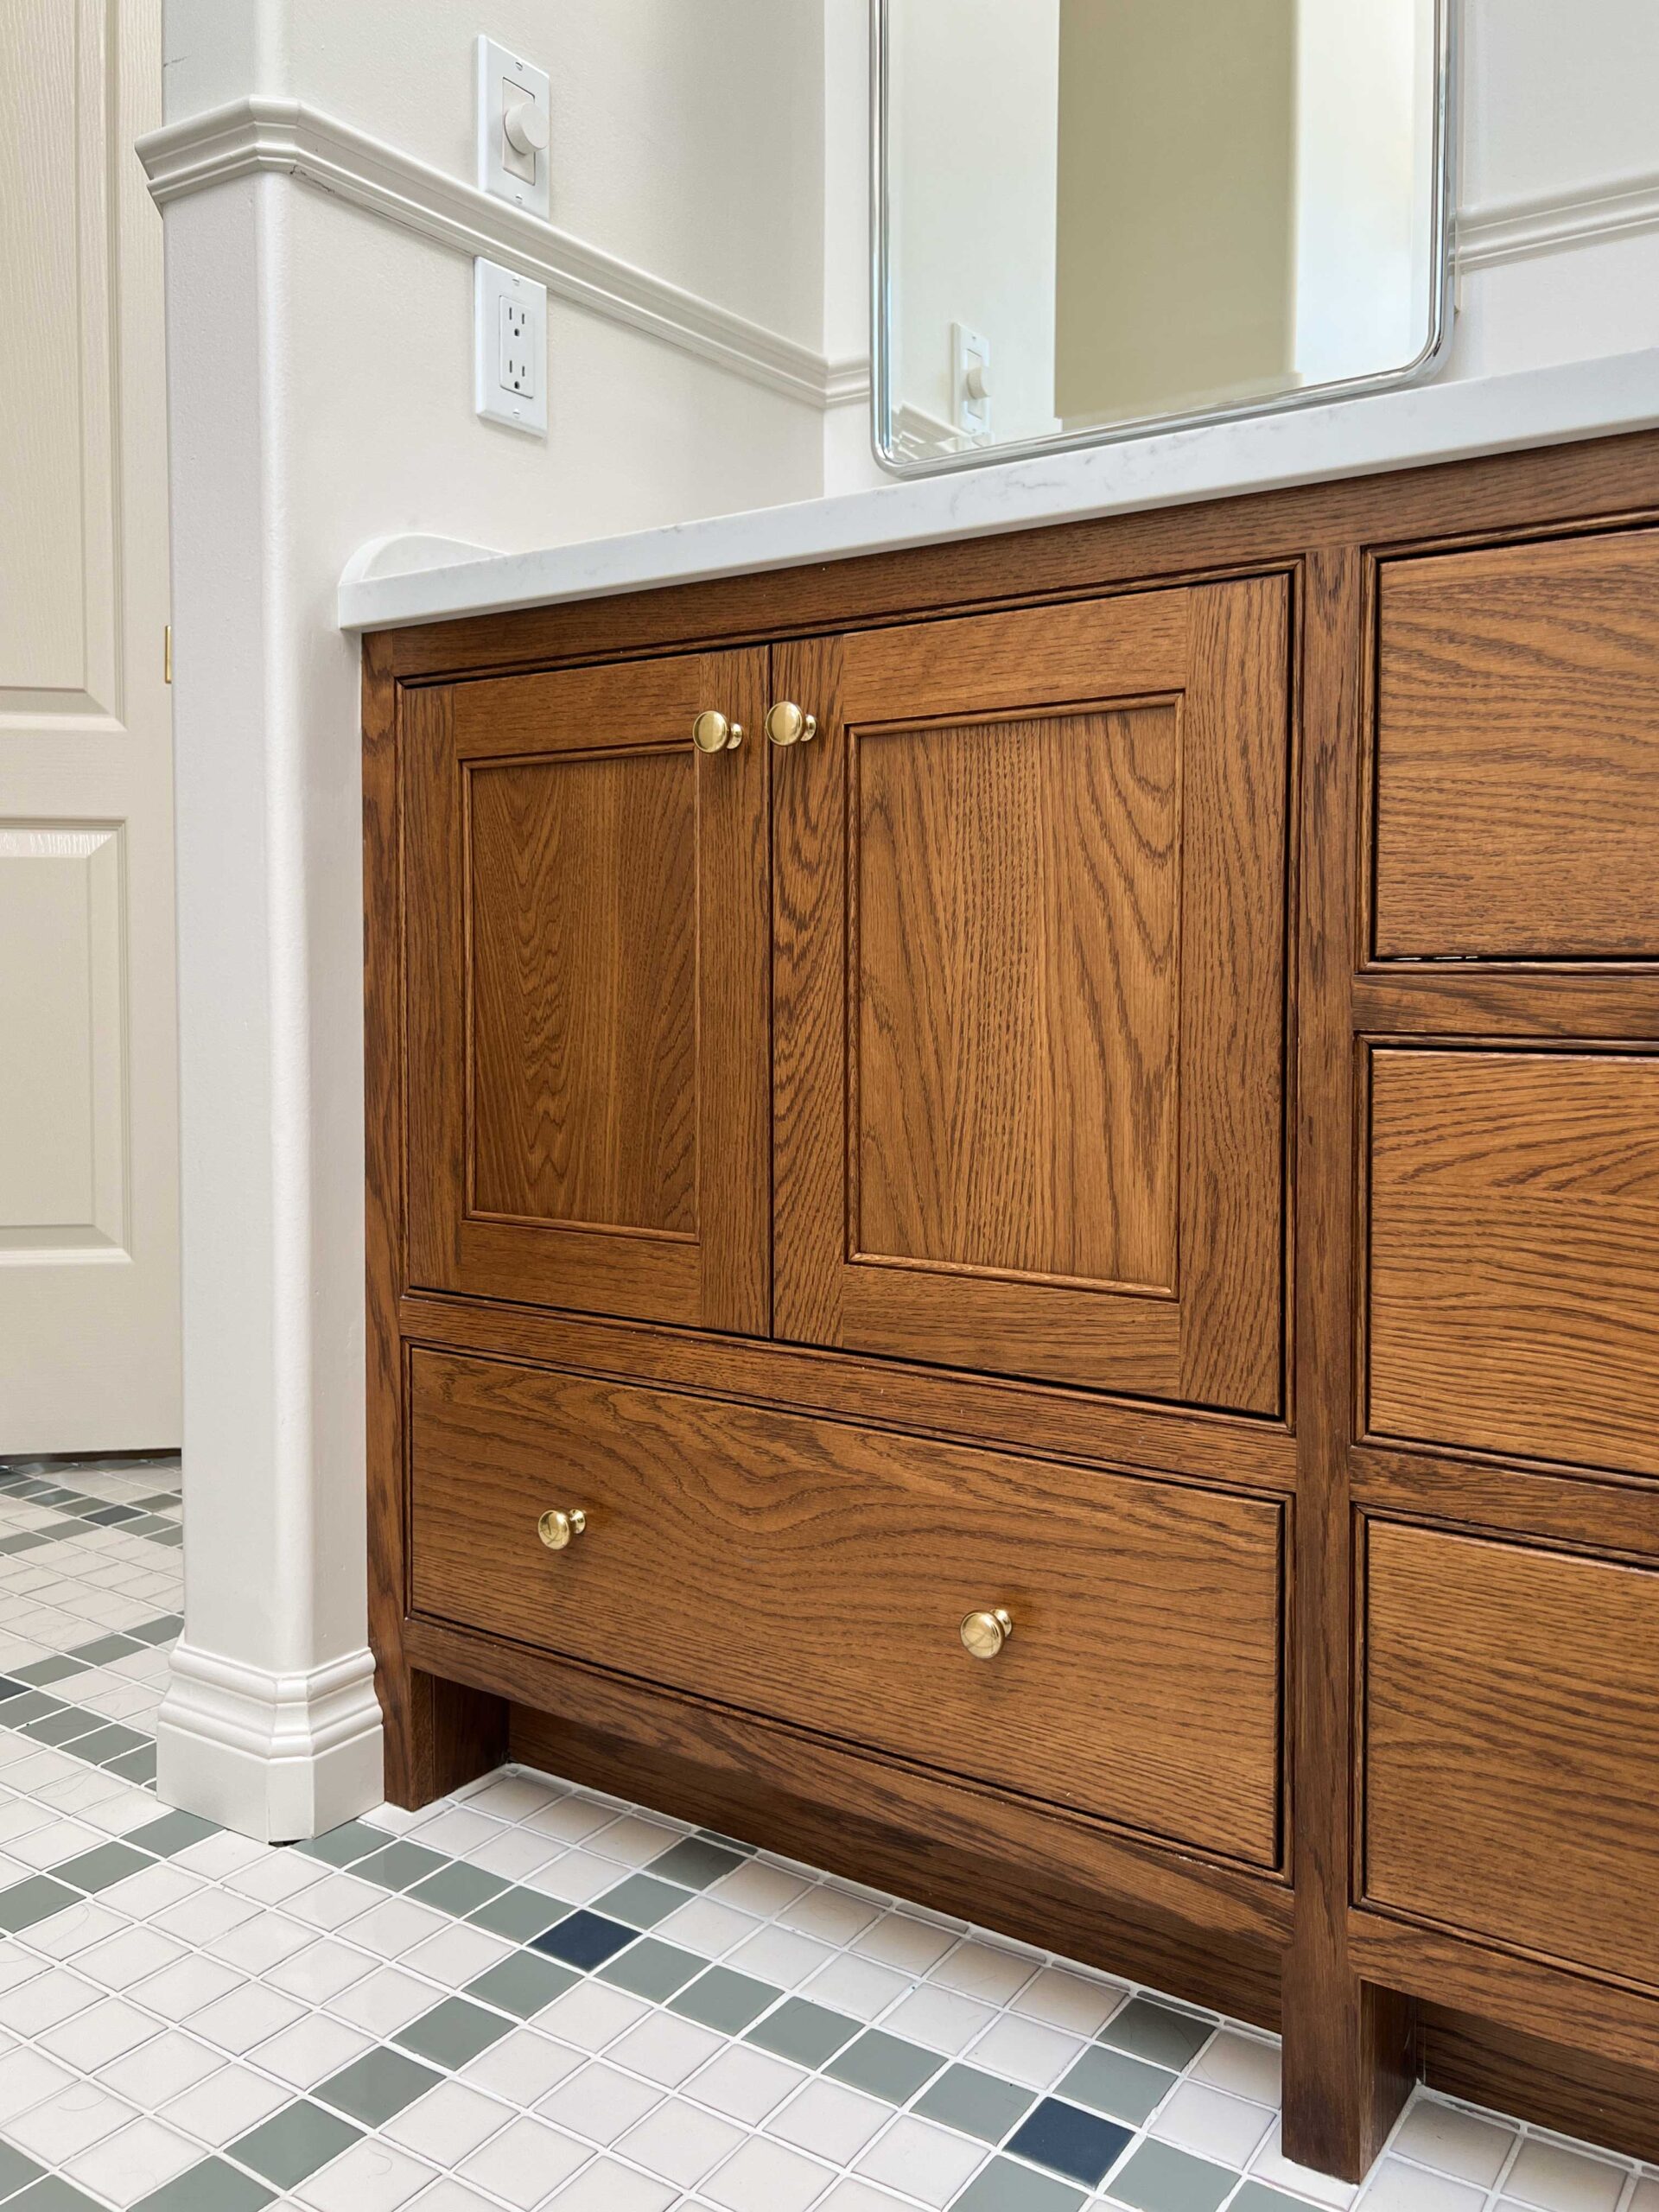
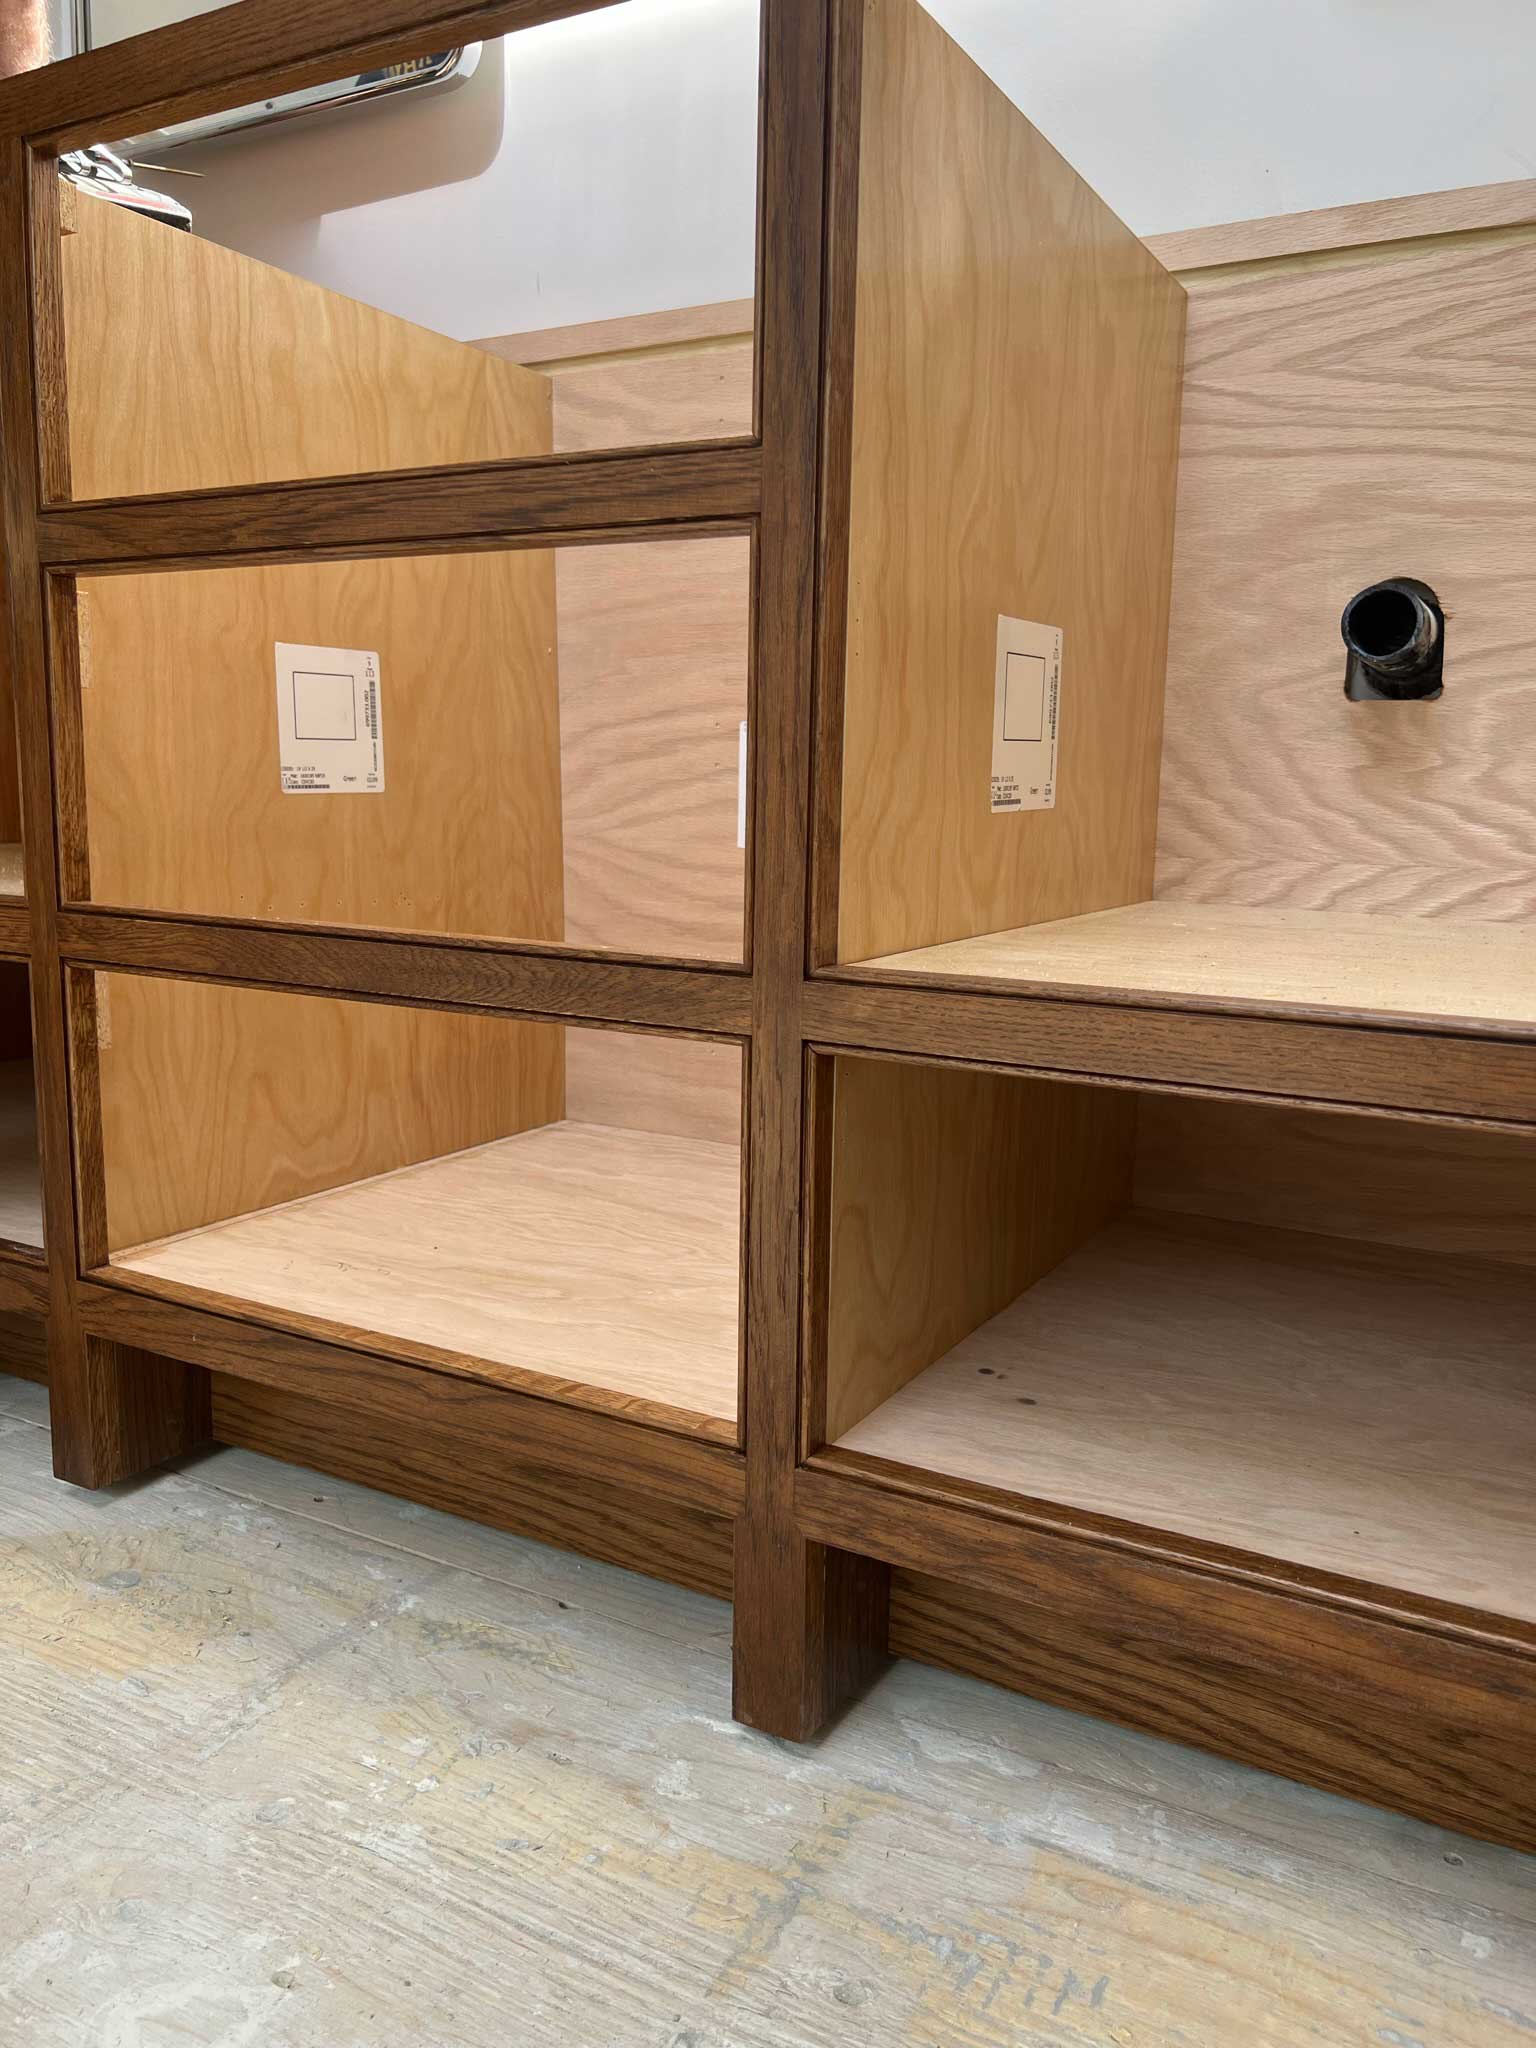
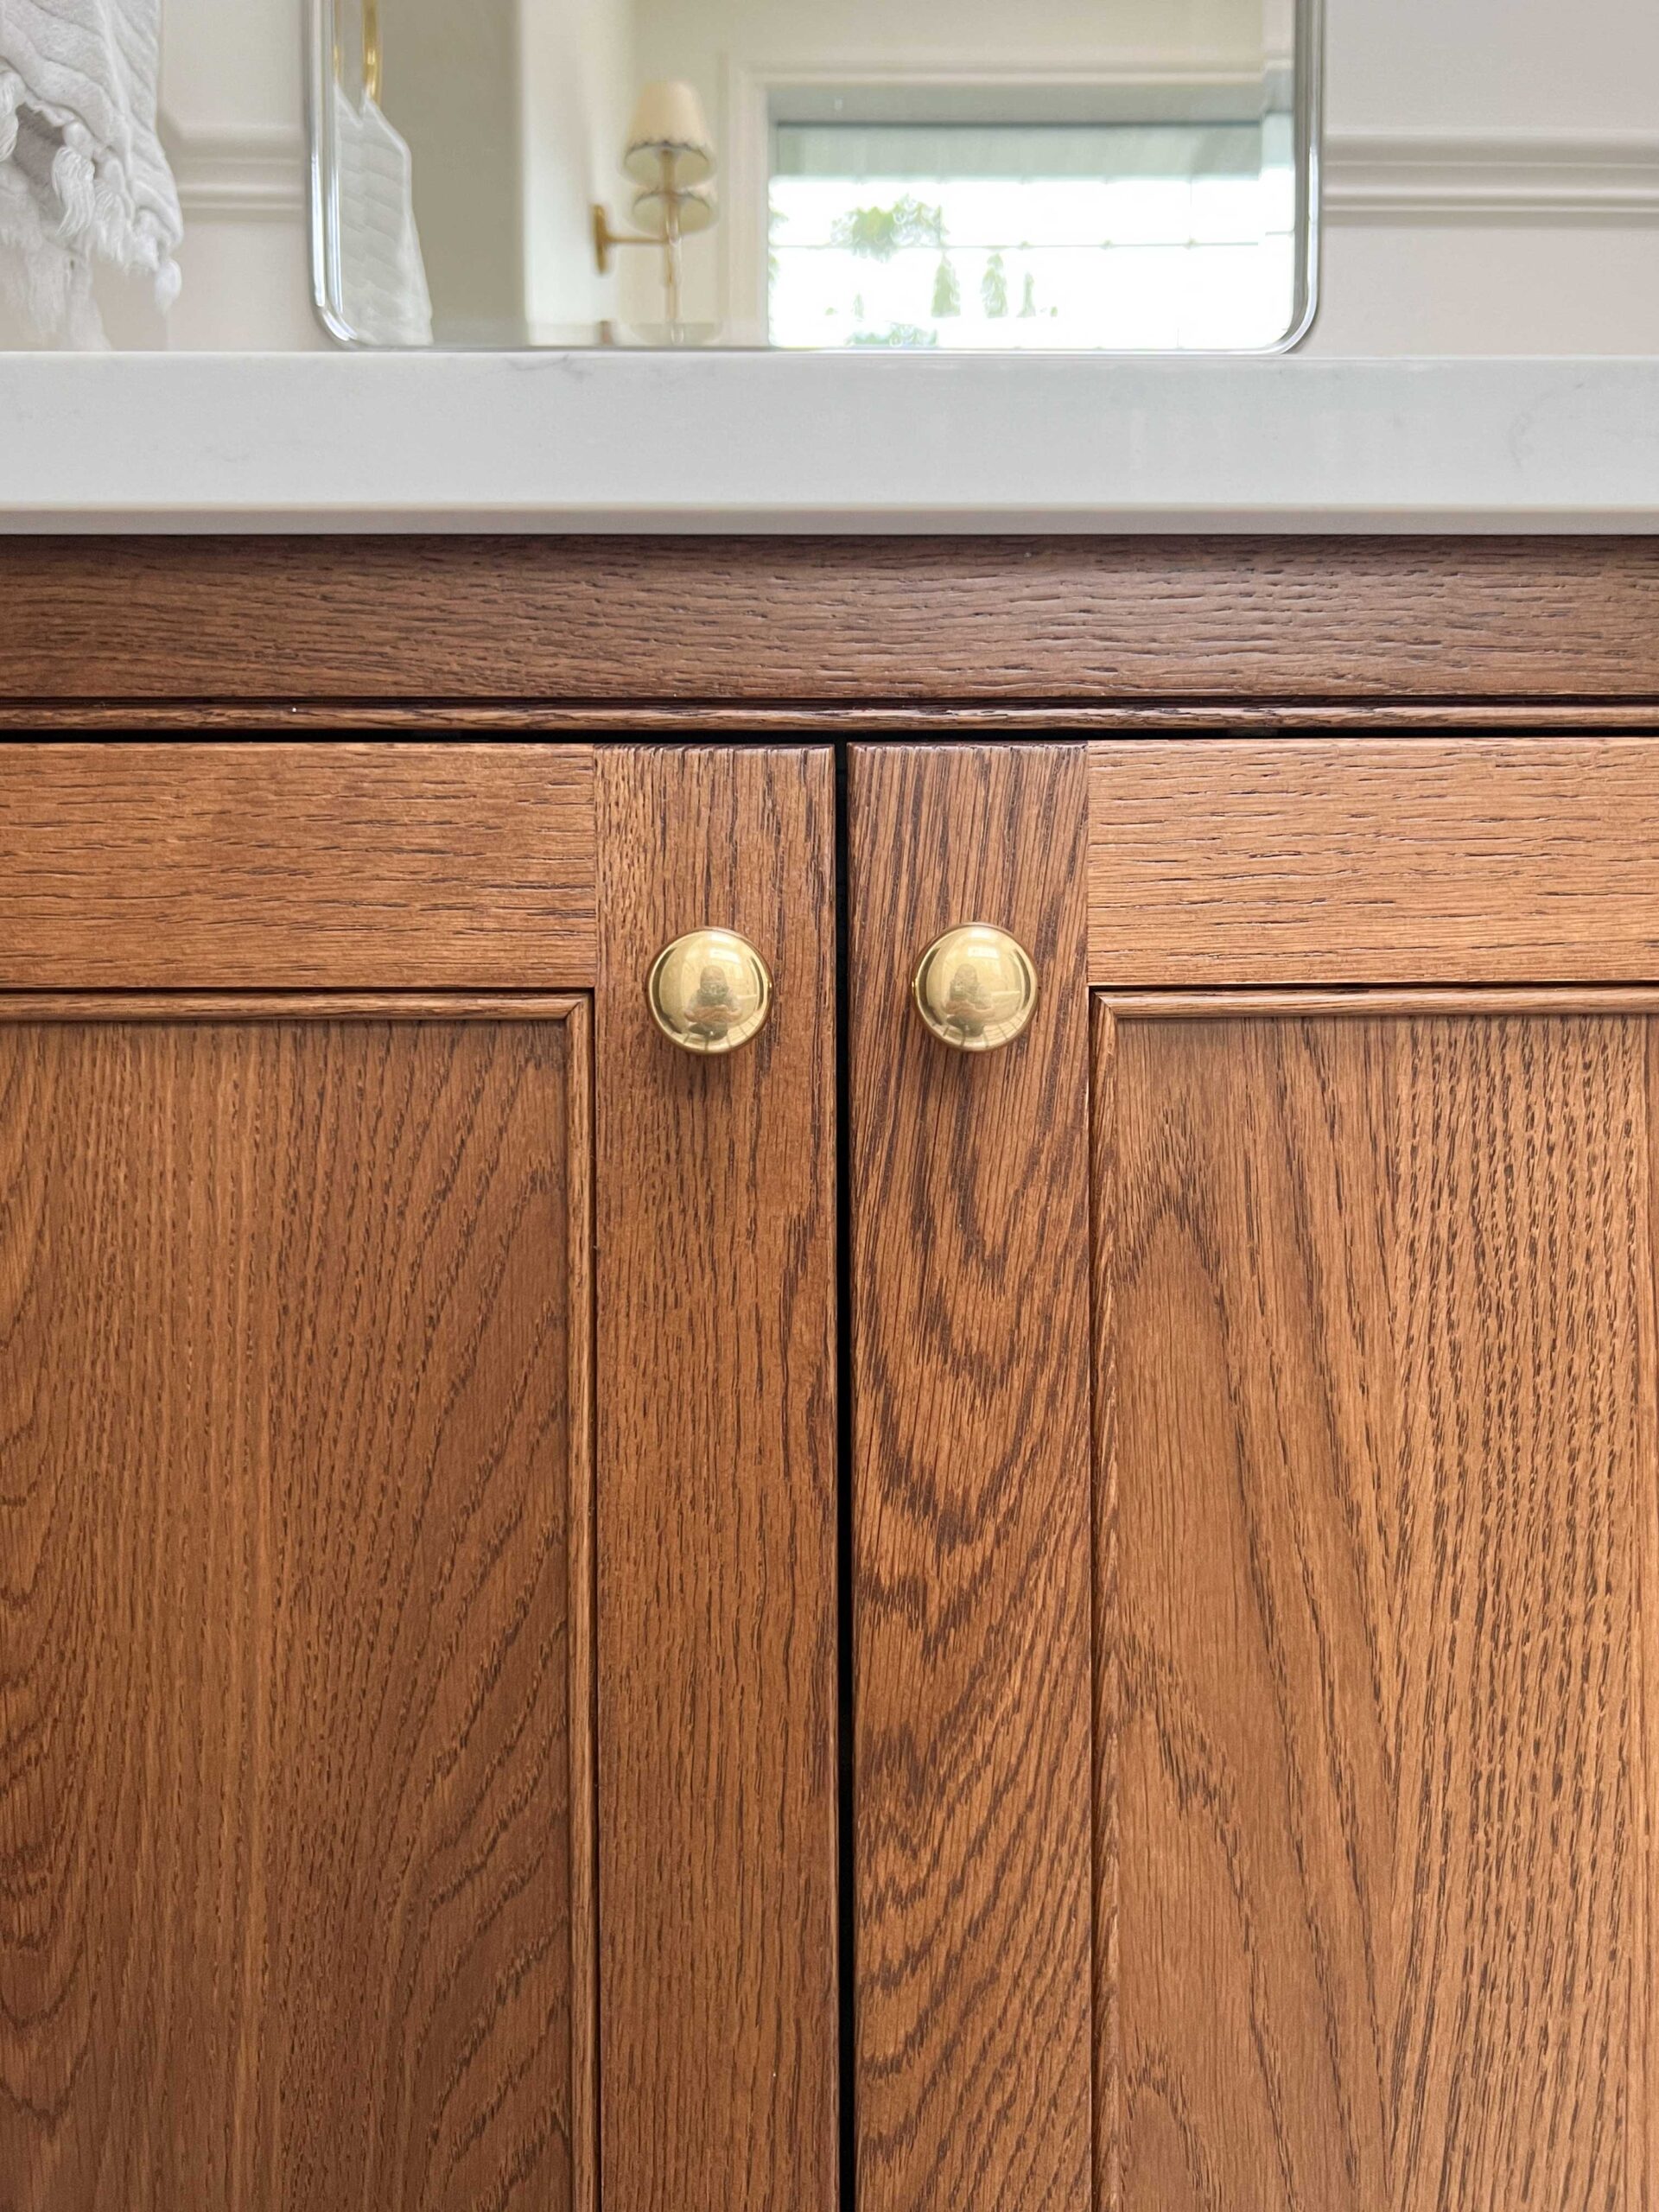
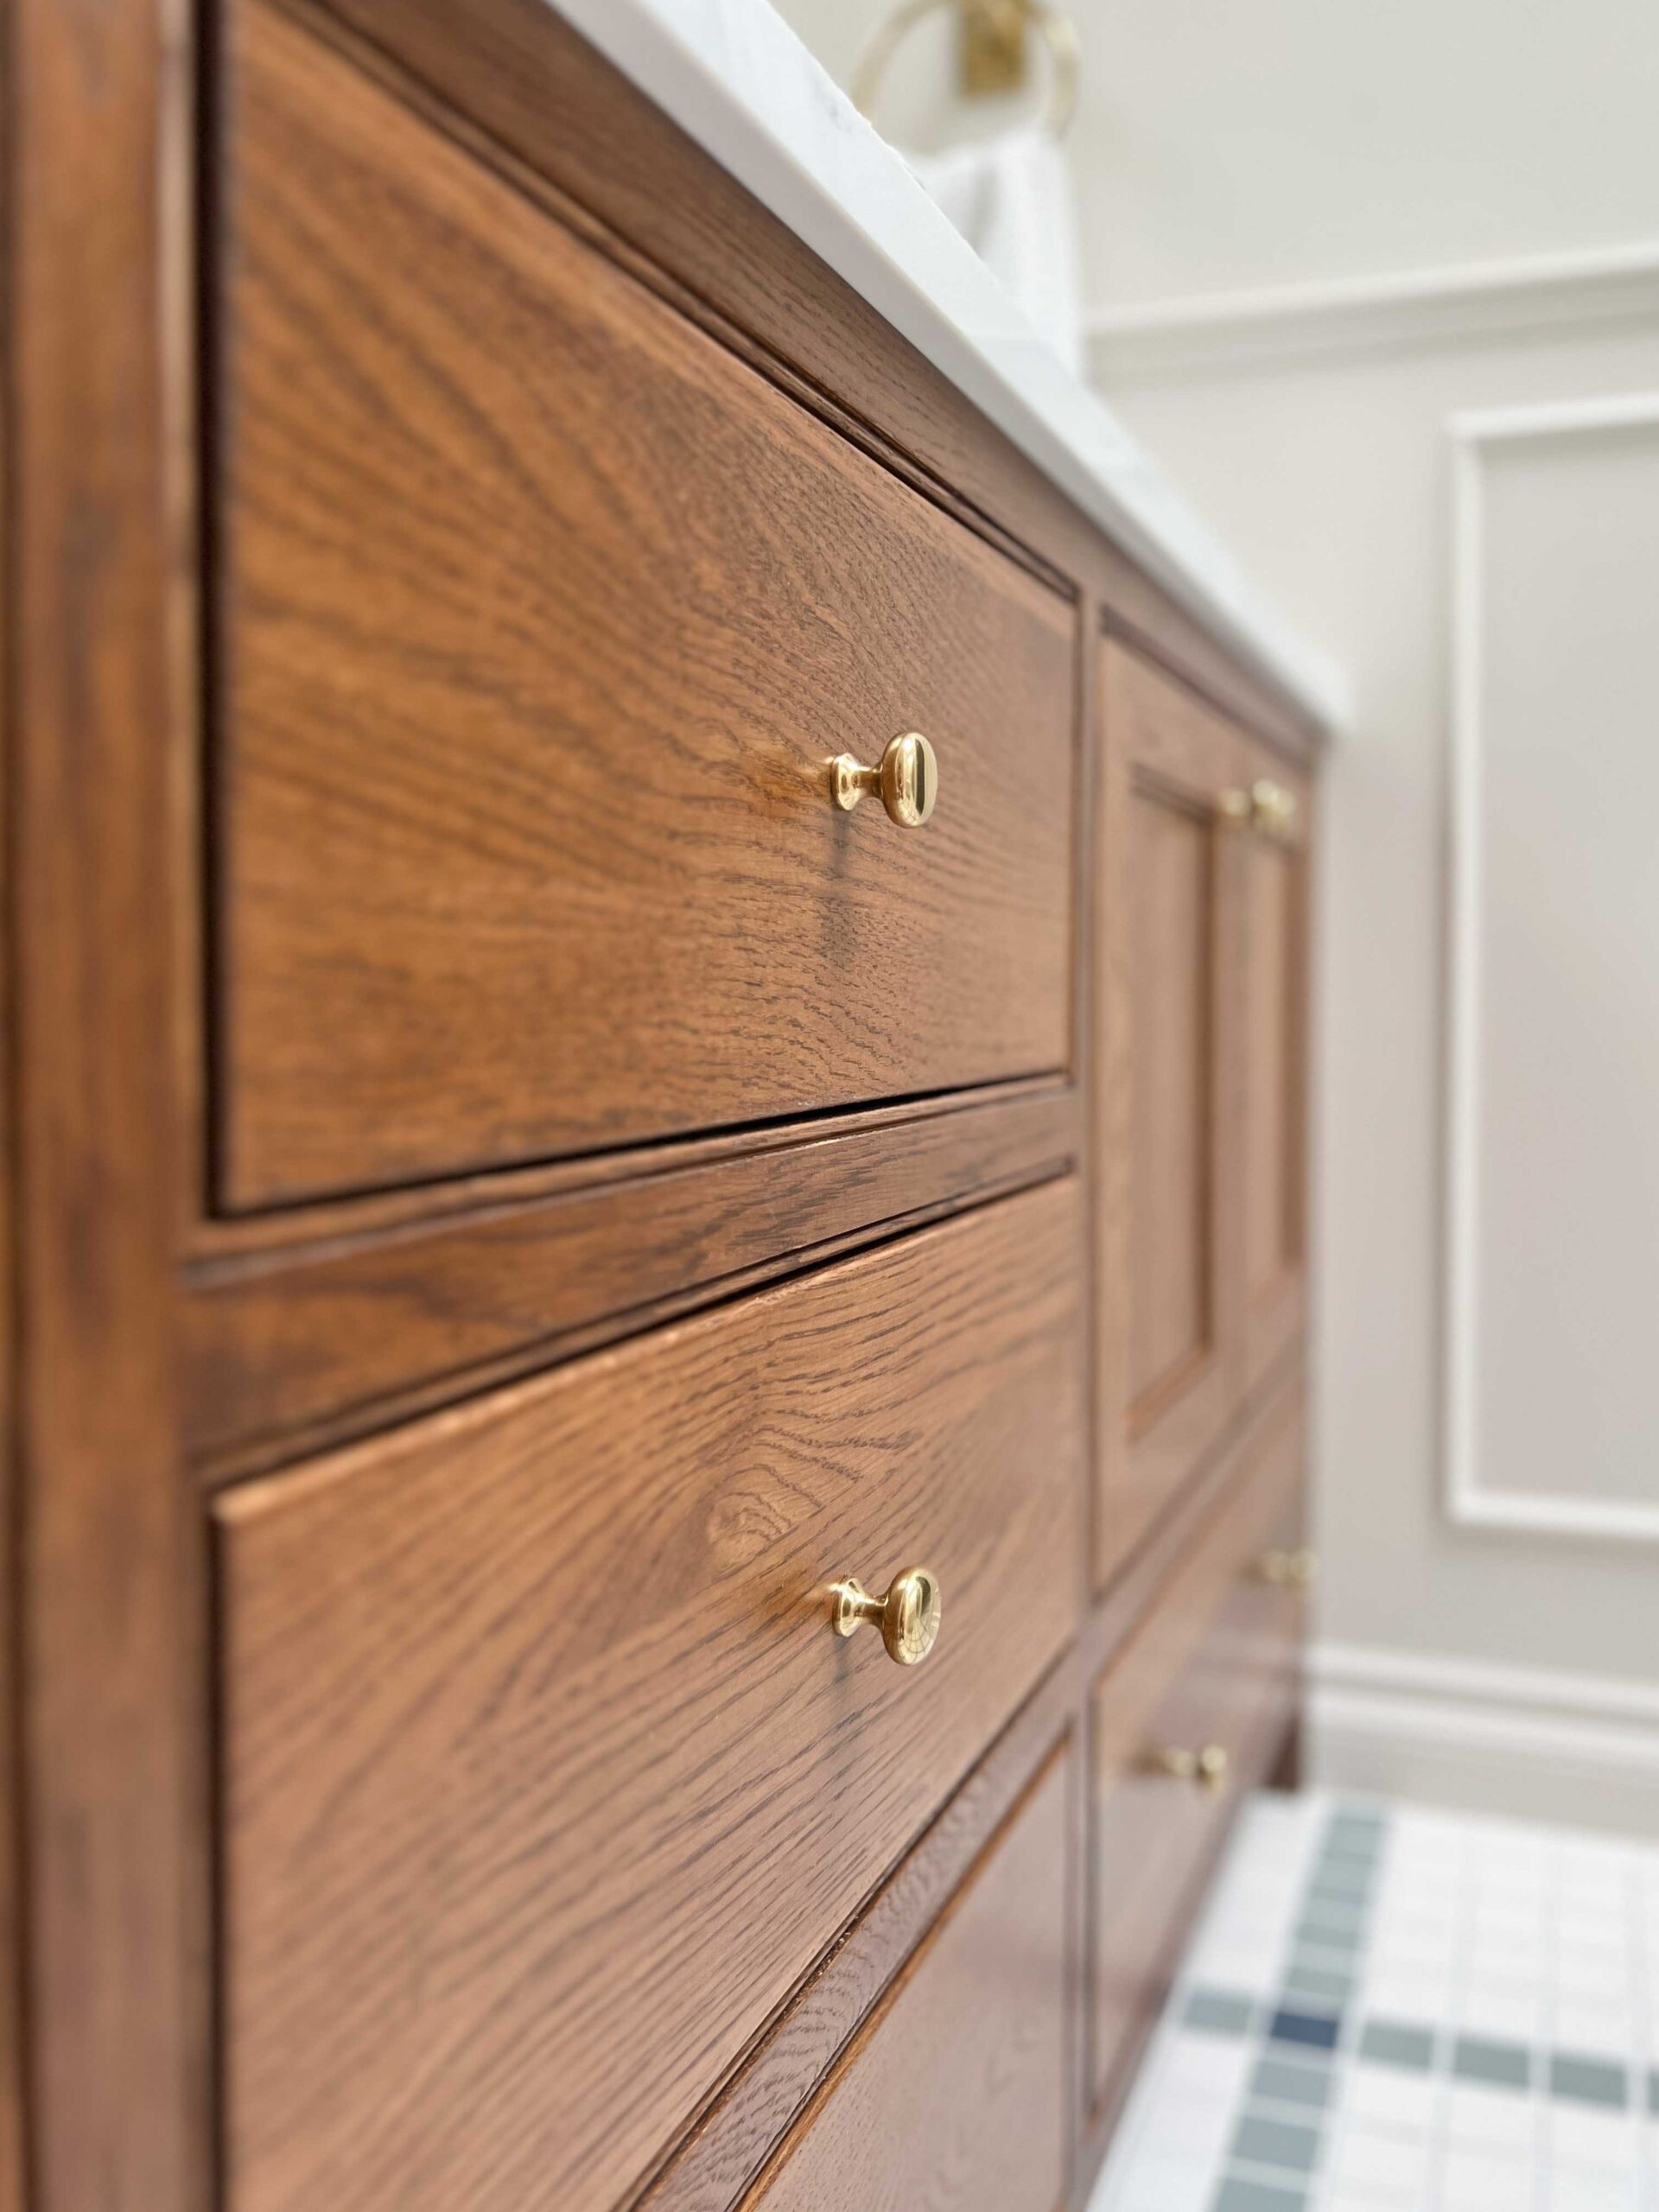
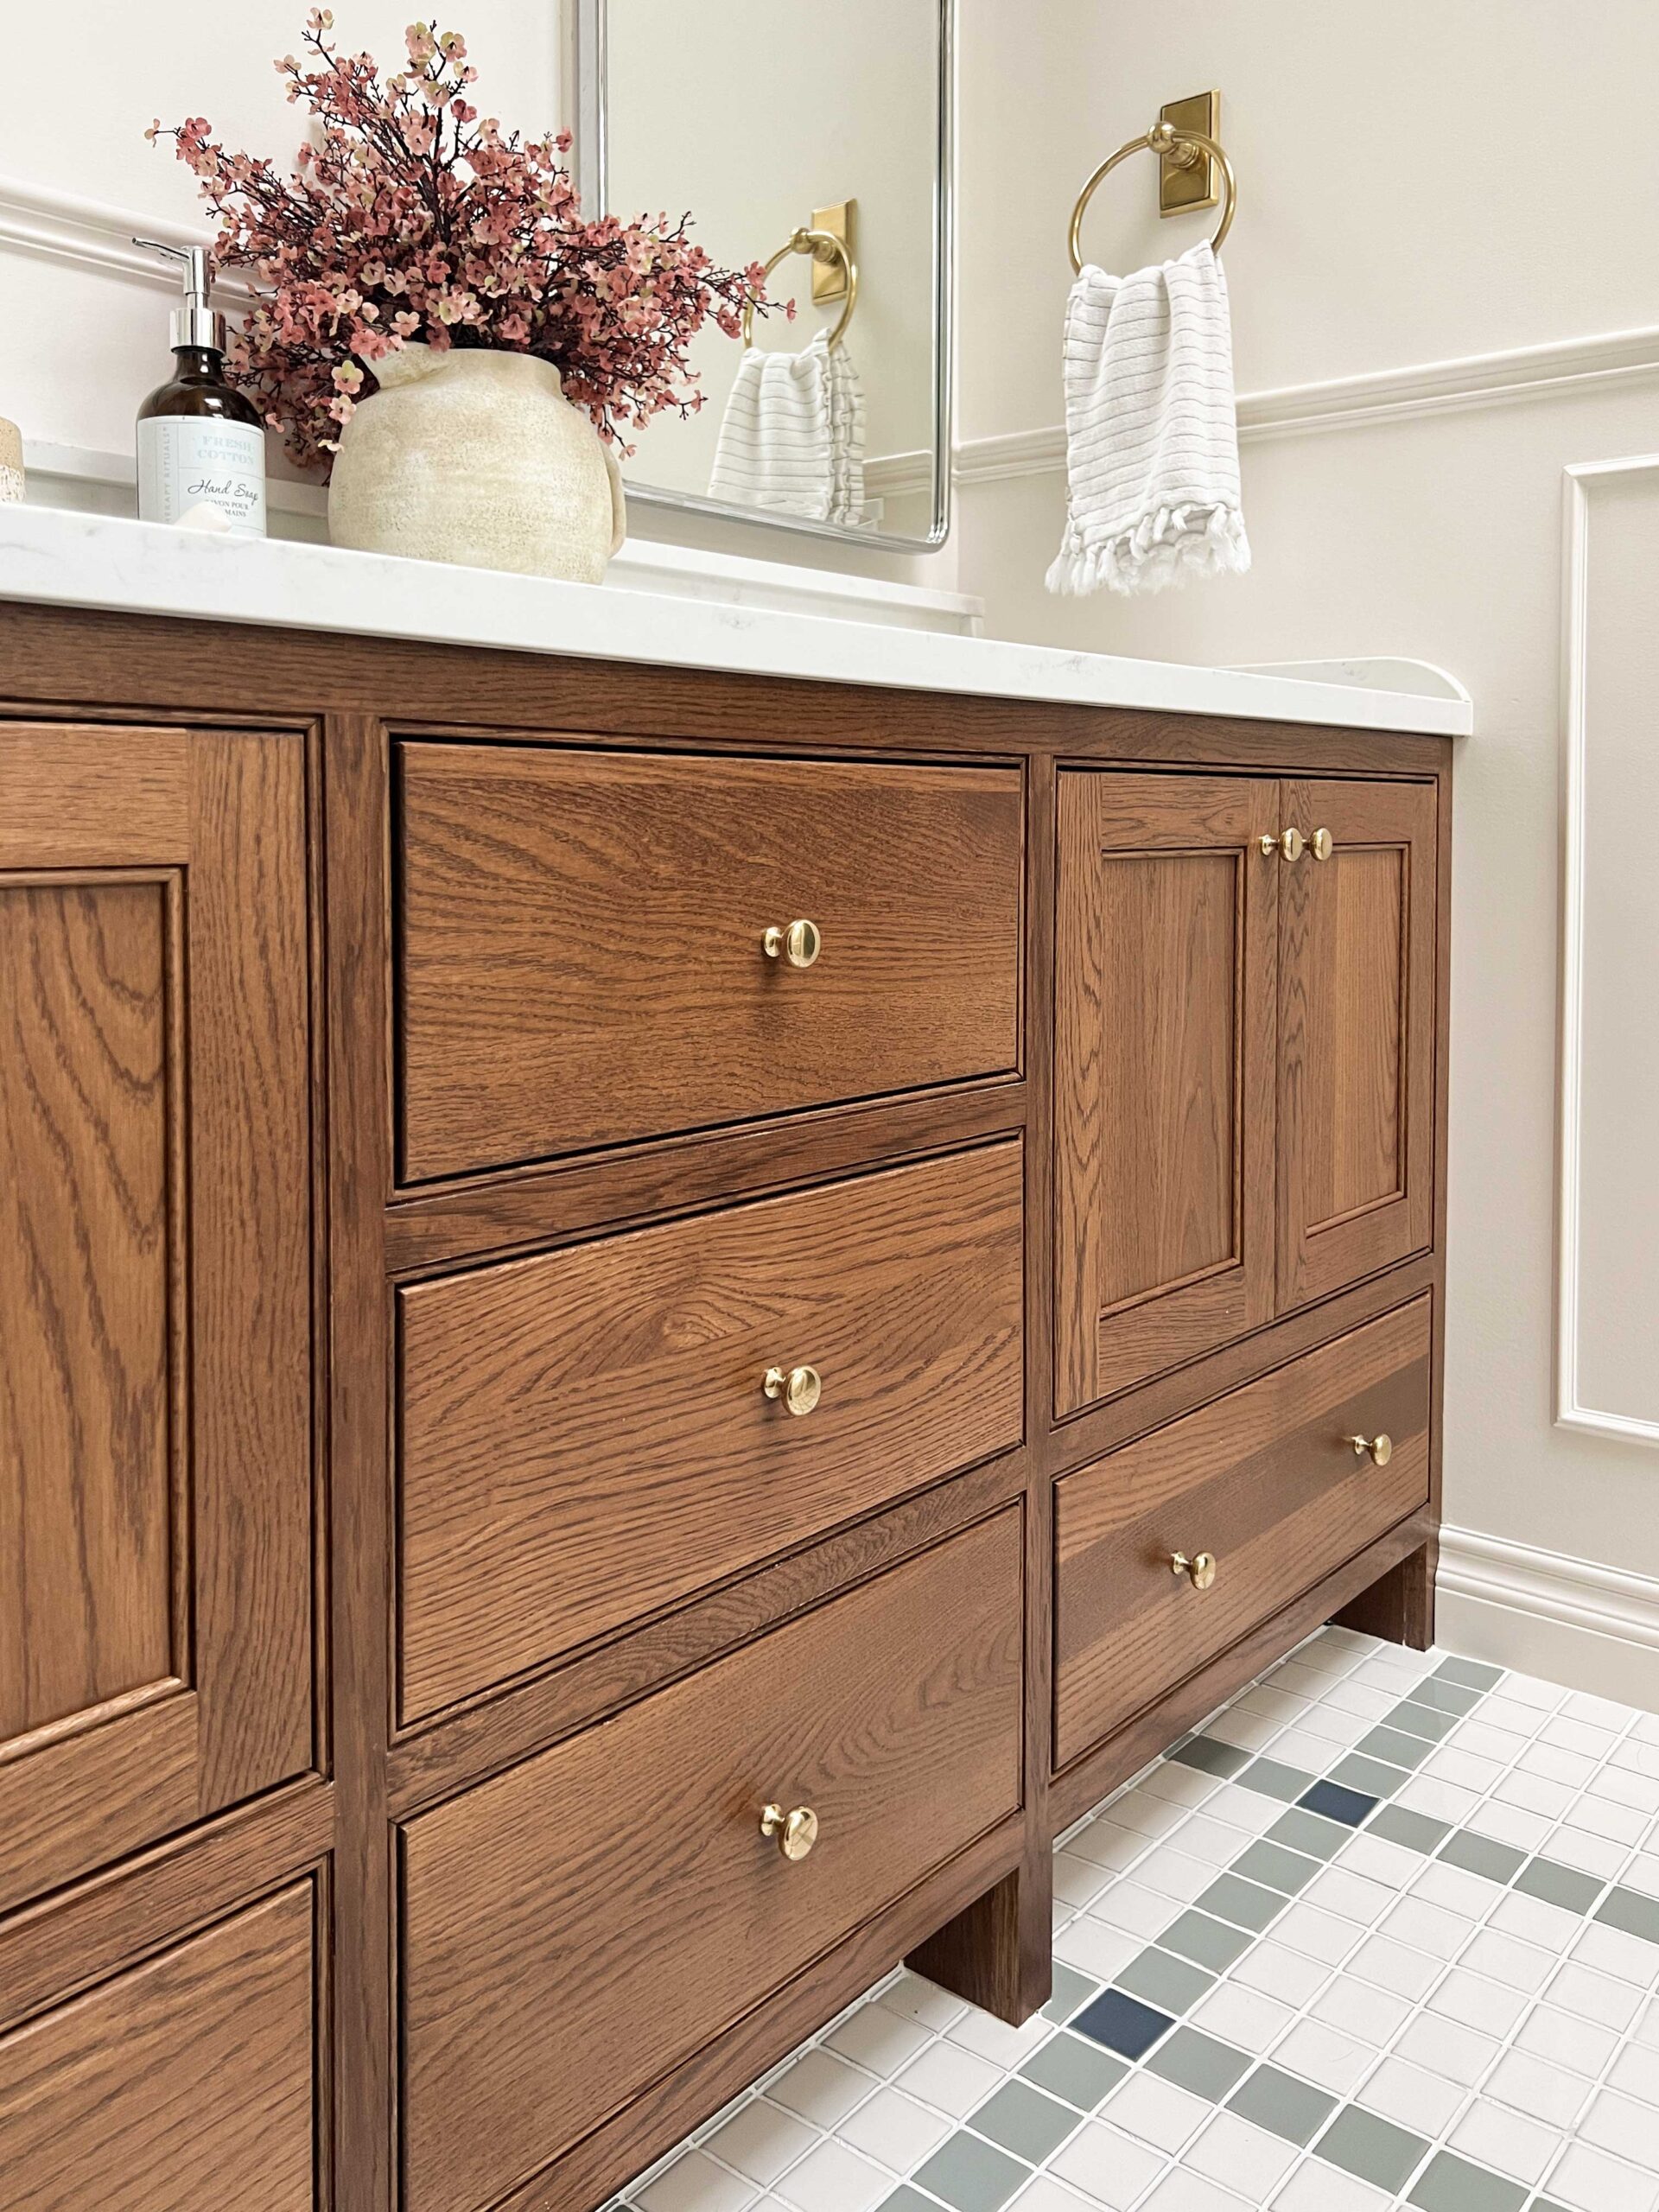
As a lover of all of things interior design, inset cabinetry is something I have ALWAYS loved. Inset cabinets are a design style of cabinets where the door and drawers sit inside a frame and are flush with the frame of the cabinets, instead of sitting on top of the cabinet frame. It is a high-end look that is harder to achieve than overlay cabinets because the measurement and installation techniques have to be very precise.
When I was working on the design of the kitchen in our last house in 2011, I brought a photo from a magazine of inset cabinets to every cabinet maker in town. NO ONE was willing to do inset cabinets. They are a really rare thing where I live. At that time, I gave up my inset cabinet dreams and went with full overlay, which is the most common type of cabinet here.
When looking into custom vanity options for this bathroom design, I remembered hearing about a company called Cabinet Joint. They did high-quality custom pieces with inset cabinets but in a Ready-to-Assemble format, which is custom-made and then shipped to you to assemble and install. I reached out to see if they shipped to Canada and HURRAH! They did! It was not free shipping of course, but even with the cost of shipping it was more than comparable to the cost of a custom cabinet I would have made locally, and it was inset style, which was not something I could not easily find here.
The Design Process
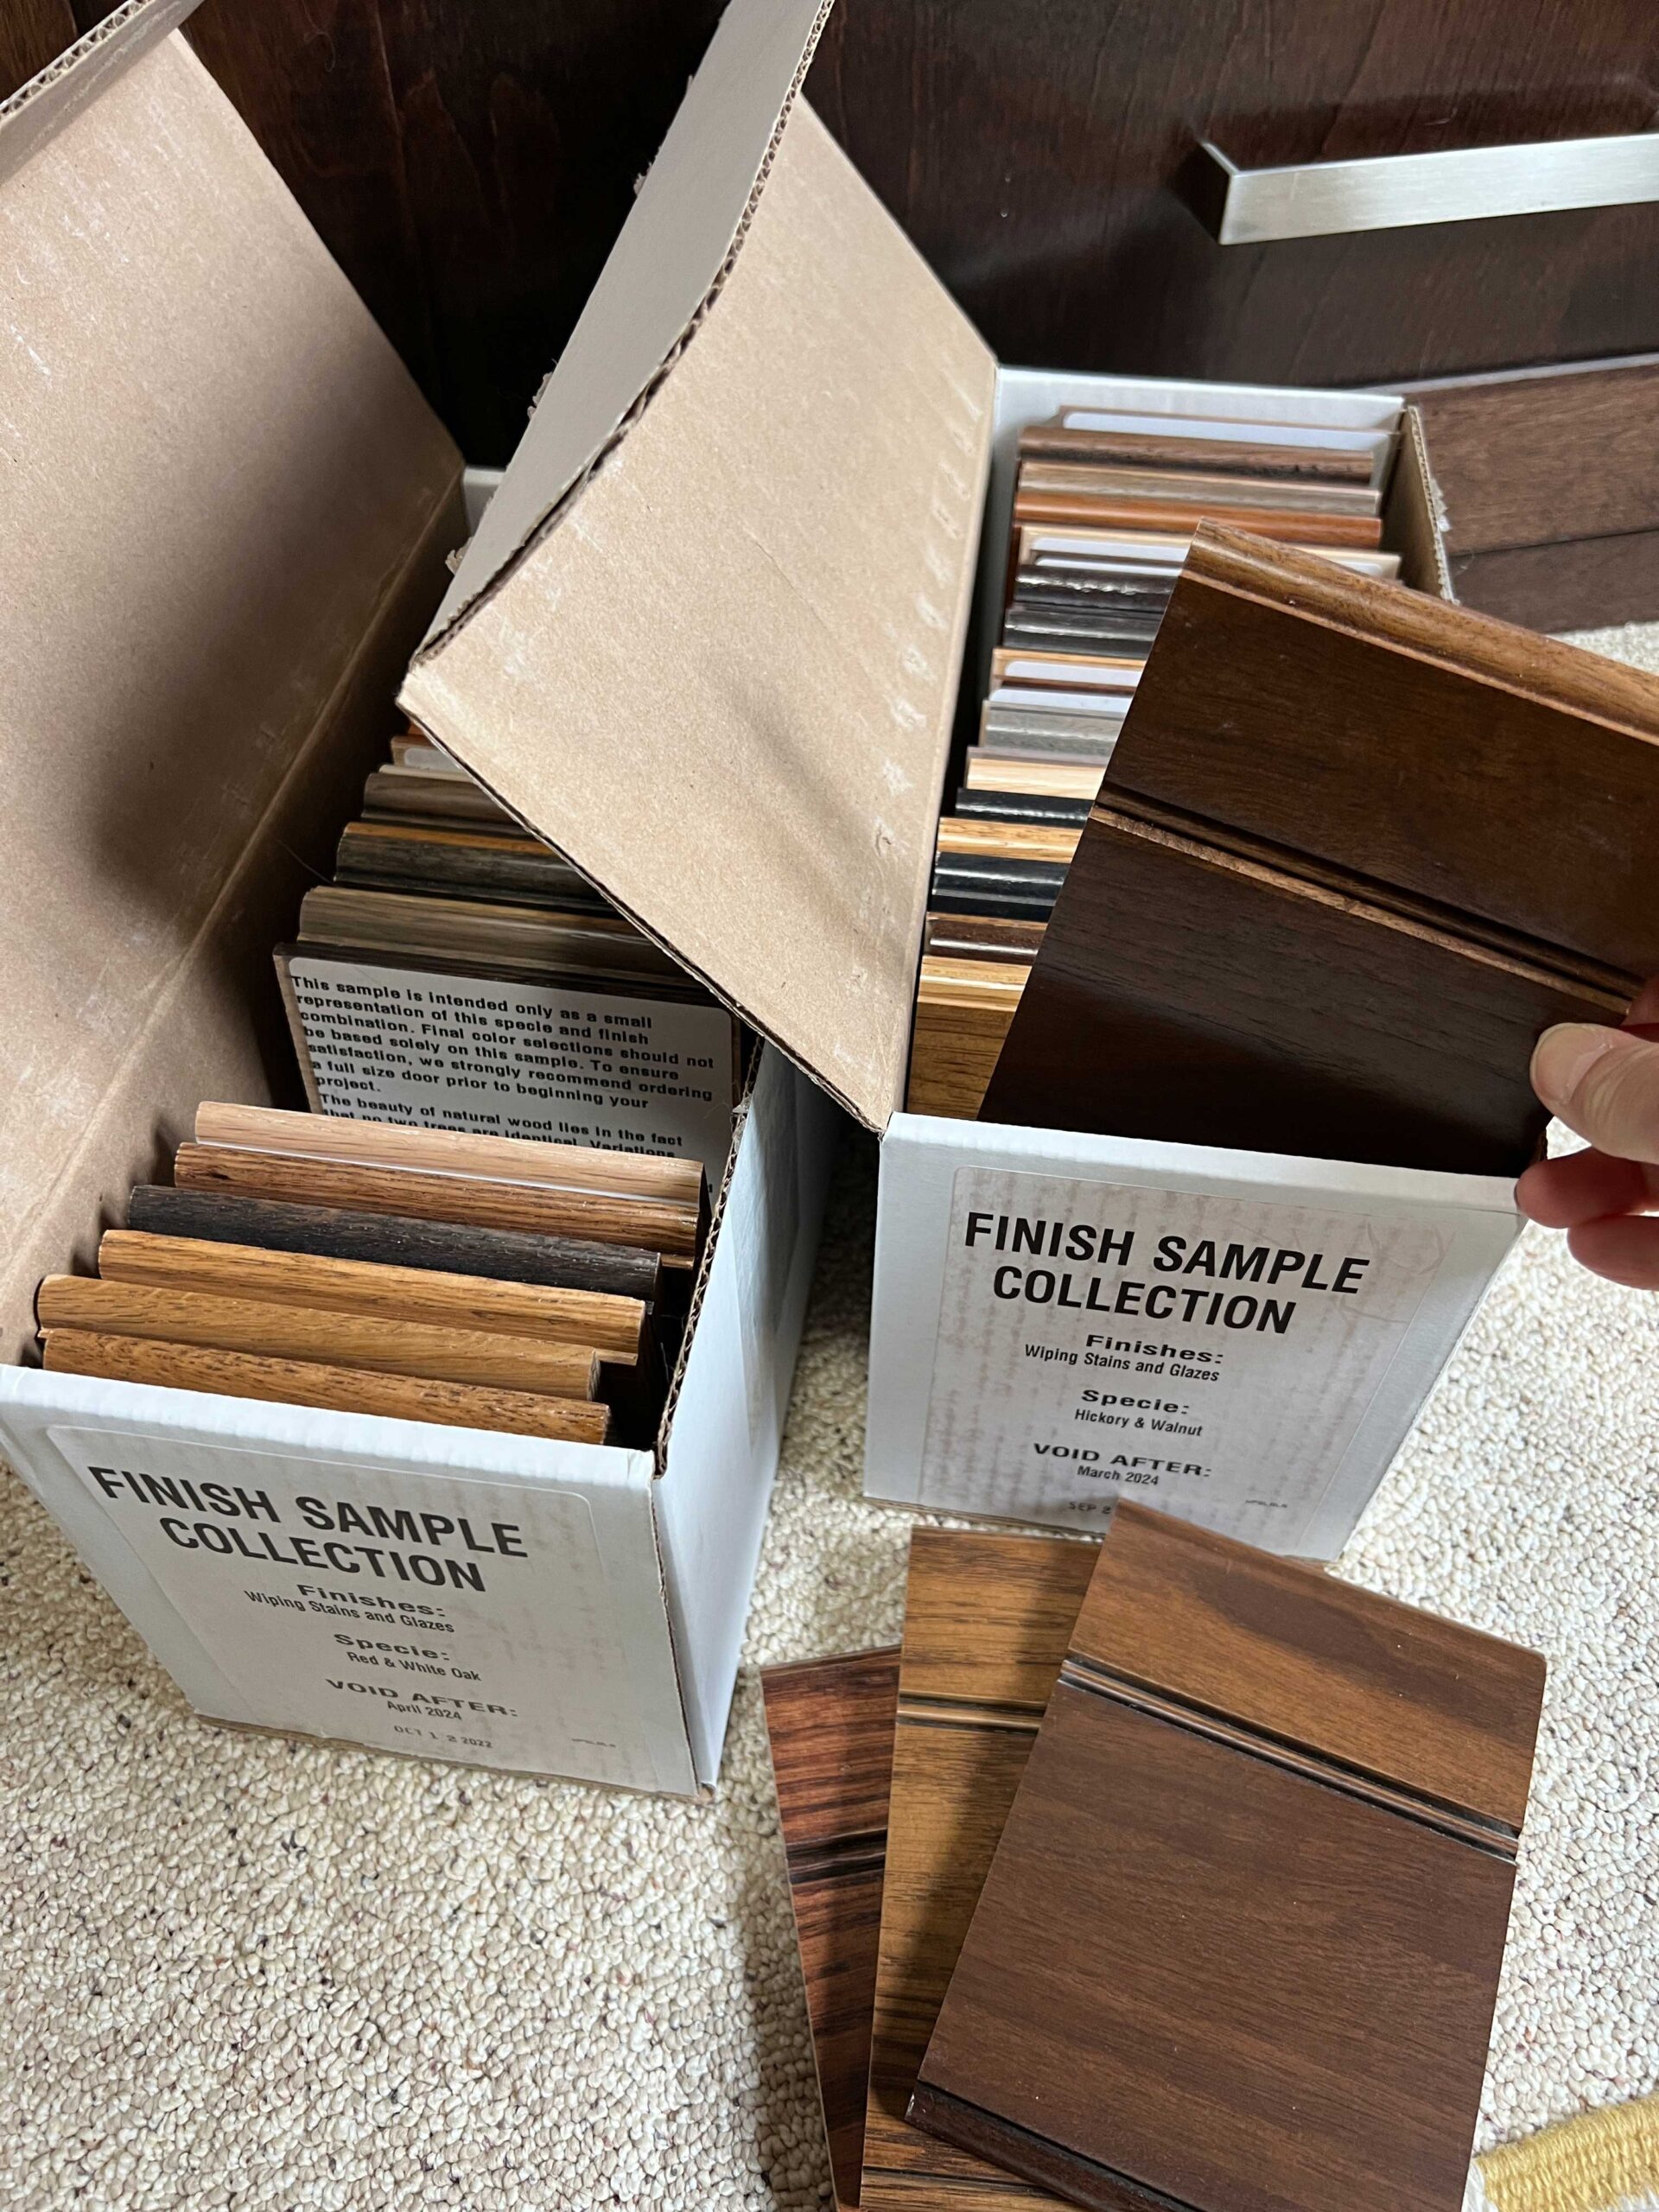
I’ve received a few questions on how the design process works. The first thing I did was order samples. I knew I wanted to have solid wood doors and drawer fronts, but beyond that, I wasn’t sure of the exact colour. Thankfully, Cabinet Joint has really good-sized samples of all their different wood types and stain options that you can order here. I ordered the Oak and Walnut variety packs and after a lot of indecision, I landed on White Oak with a Colonial stain and 15% sheen.
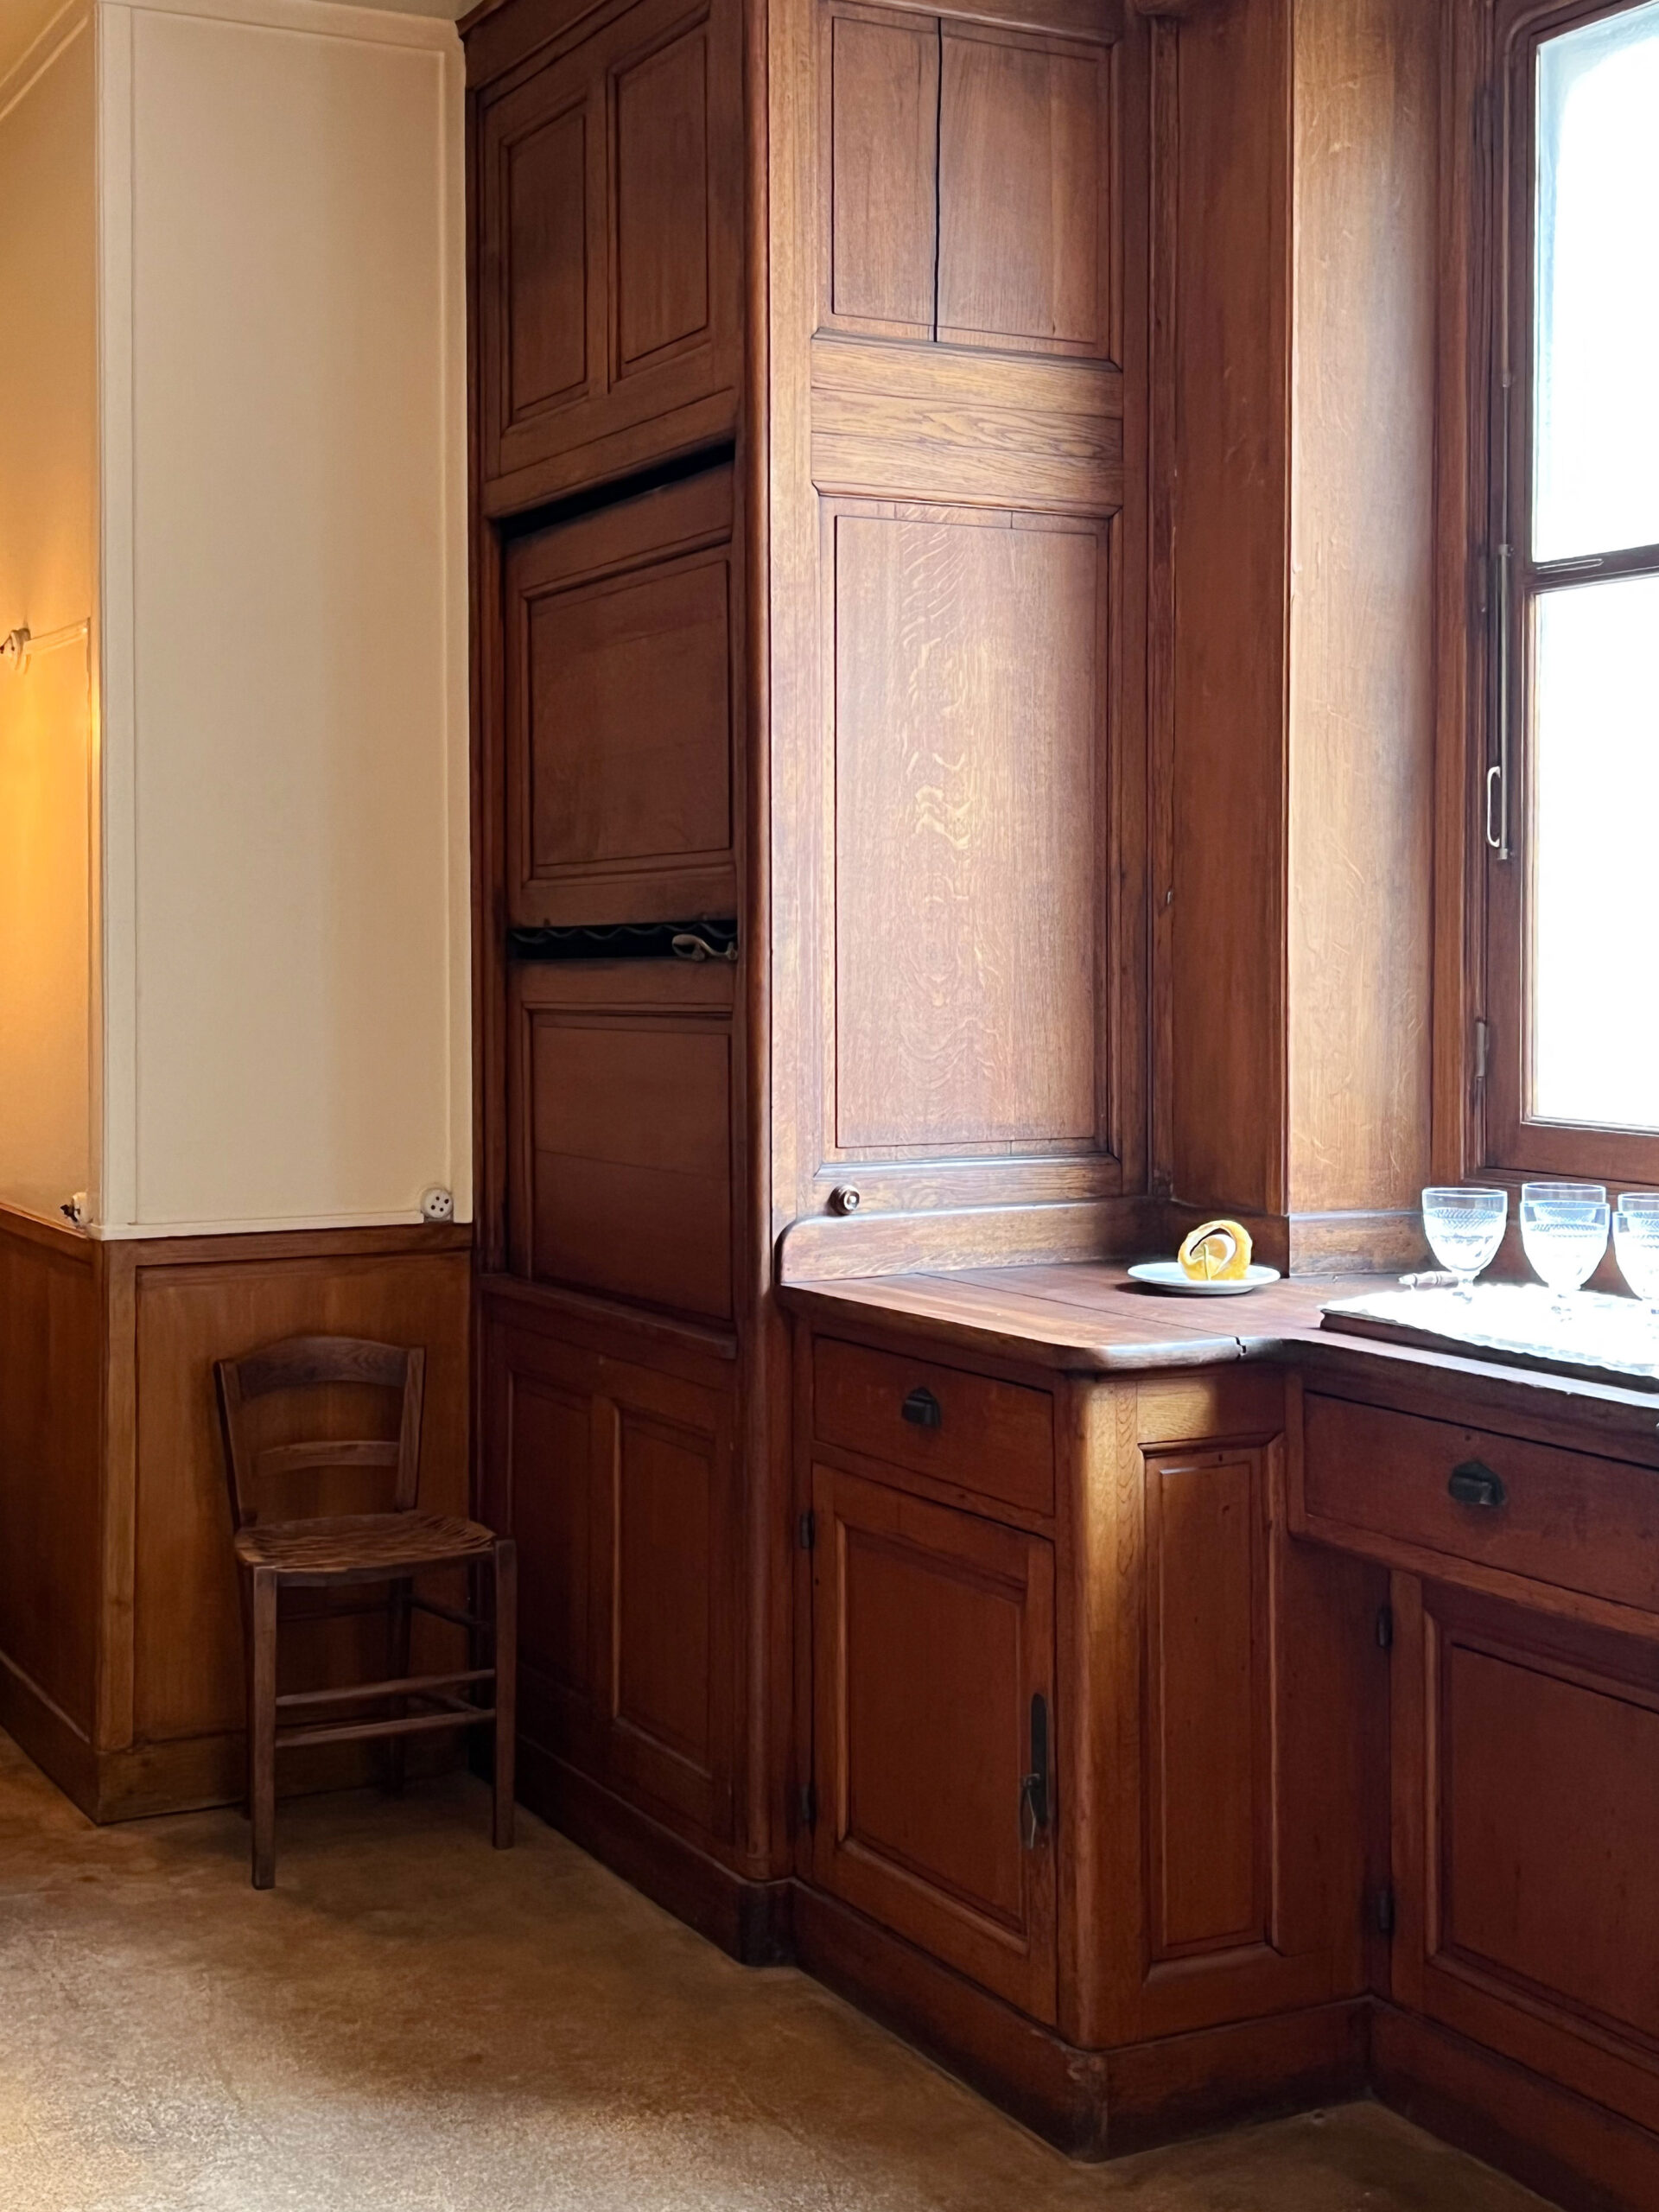
I chose to go with a custom oak vanity because I really wanted to mimic the dark, rich oak panelling and cabinets that I saw when I was on my European vacation last summer since this whole bathroom was inspired by that trip!
I started the design process by filling out the “get a quote” section on Cabinet Joint’s website (I used the “fill out a quote form” option and then went through all the selections). I entered as many details about what I wanted there and Cabinet Joint assigned my quote to a Cabinet Coach, Jim.
Jim gave me a rough quote for my custom oak vanity with the selections that I had made via email. I went back and forth a few times with Jim, requesting changes to the drawer sizes, the cabinet size, the stain, the door style, and the legs. Each time I made things a little different, and Jim patiently updated my quote and answered all of my questions about installation and price differences.

I decided to go with a beaded face frame, which is a little detail that is placed all around the face frame to add a little bit of dimension to that, and then flat front drawer fronts to keep it from being too busy. For the doors, I mimicked the beaded detail from the face frame by choosing the “Madison” door style which also has a beaded detail on it. Then, for the legs, I decided to go with a very straight, almost modern-style leg to keep the whole thing from leaning too traditional.
We went back and forth quite a few times until I was happy at which point I ordered the custom oak vanity and it was put into production!
I started the design process in December. The double vanity was ordered on January 9 and arrived at my doorstep on March 15 which is about a 2 month lead time. If you are planning a custom order, keep in mind that you need to allow enough time to get through the design process and then for the cabinets to actually be made to your specific needs and shipped. Custom means nothing is actually made until the order is put in, which takes a bit of time, so plan accordingly.
The Assembly
Cabinet Joint cabinets are Ready to Assemble which means they are flat-packed pieces of plywood that you need to put together into your cabinet. Cabinet Joint has a whole series of videos on their website which shows you exactly how everything goes together for all types of cabinets, from putting the plywood boxes together to the installation of the drawer slides to installing the cabinet doors and everything in between. All it really requires is some wood glue, a few screws and some finishing nails (and a little basic construction knowledge) to assemble.
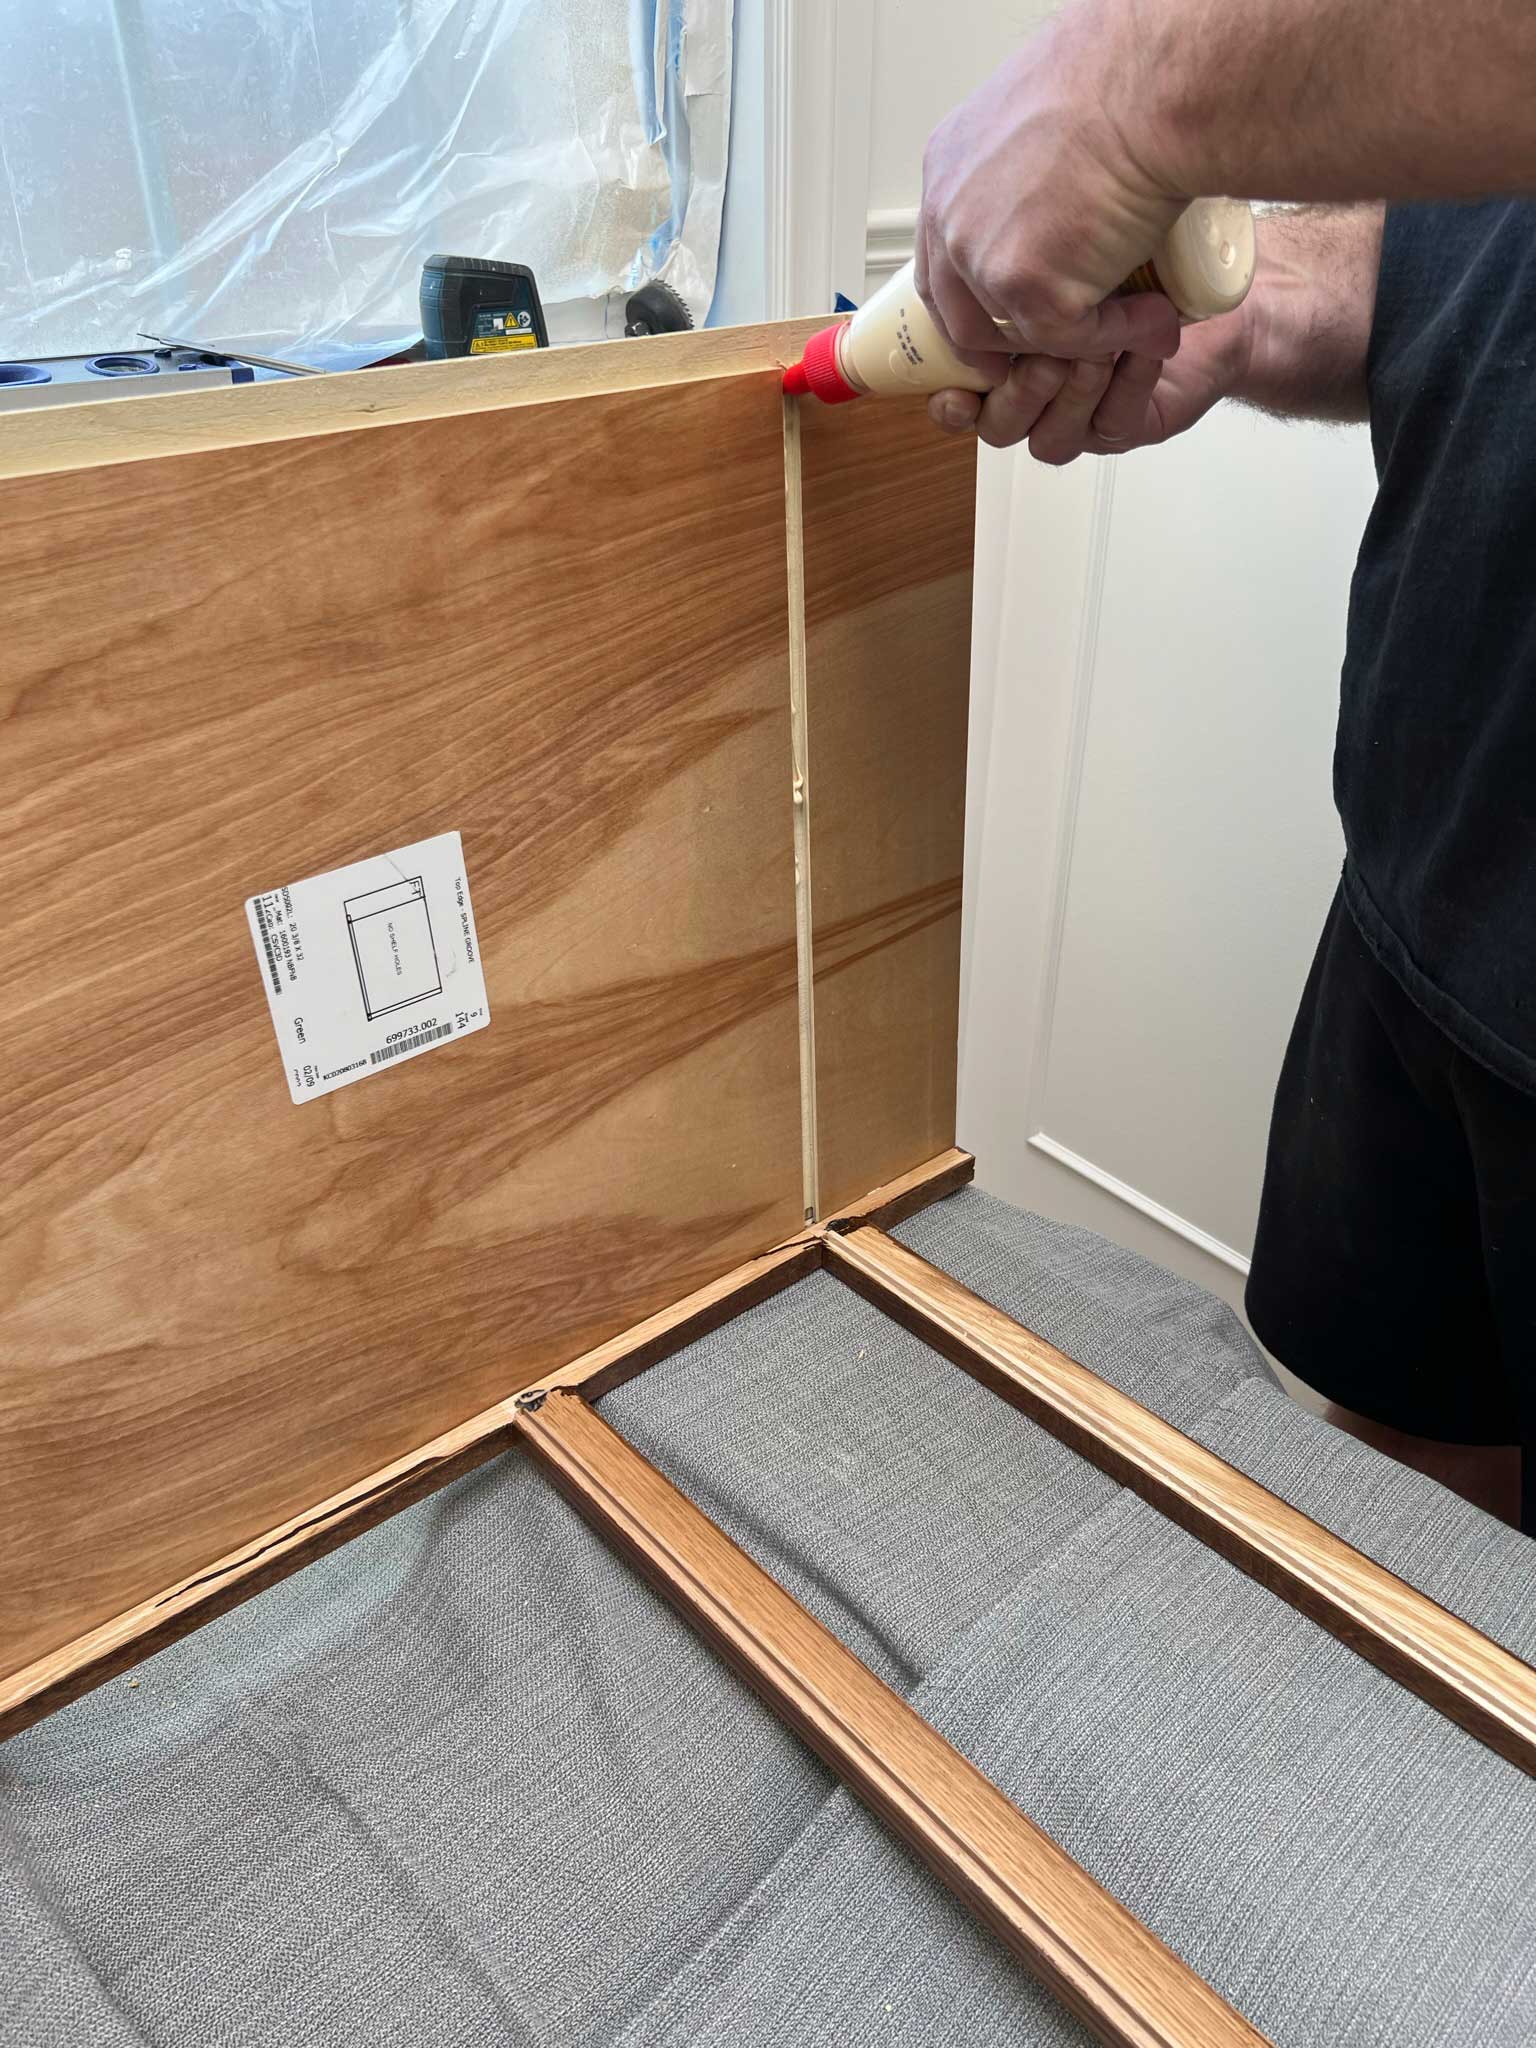
The installation and assembly is a little more complex than say, assembling an Ikea cabinet. For example you need to locate the hinge and drawer slide locations on the cabinet in order to install them. For our cabinet, we had inner partitions that needed to be installed and we needed to mark and locate these yourself. Cabinet Joint does walk you through each of these processes in their videos and gives you very helpful tips and tricks to get it done accurately.

My number one tip here is to determine which videos you need for your cabinet installation and then to watch them ALL before you proceed. We watched each video as we needed them but if we had watched them all first, we would have picked up a few tips and tricks that would have made some of the steps easier.
For example, we watched all of the cabinet assembly videos and we assembled and installed our cabinet before we watched the videos on installing the hardware for the drawers and doors. When we finally got around to installing the doors and drawers, we discovered that they actually recommended installing that hardware on the cabinet before it was installed to make it easier to reach in there. This was not necessary but it was a helpful tip that would have meant I didn’t need to contort myself into weird positions to install the hardware!
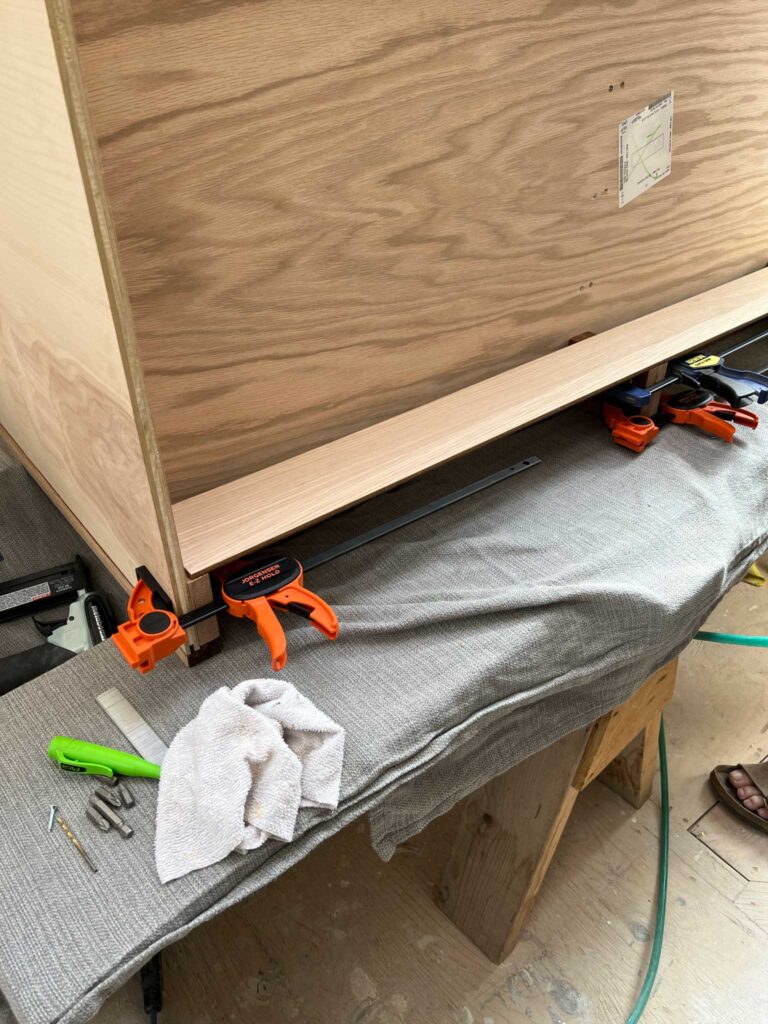
Once assembled, installing the cabinets is the same as with any other type of cabinet, you just find the studs in your wall, level, and screw through the sides or back.
Our Installation was a Little Tricky!
We had QUITE a tricky installation for our bathroom vanity due to the fact that we were fitting it into an alcove. By now you know that we rarely do things the easy way, ha!
When I measured the opening for the cabinet joint, I measured the opening in a few locations and gave Cabinet Joint the smallest dimension so the cabinets that they sent would be sure to fit.
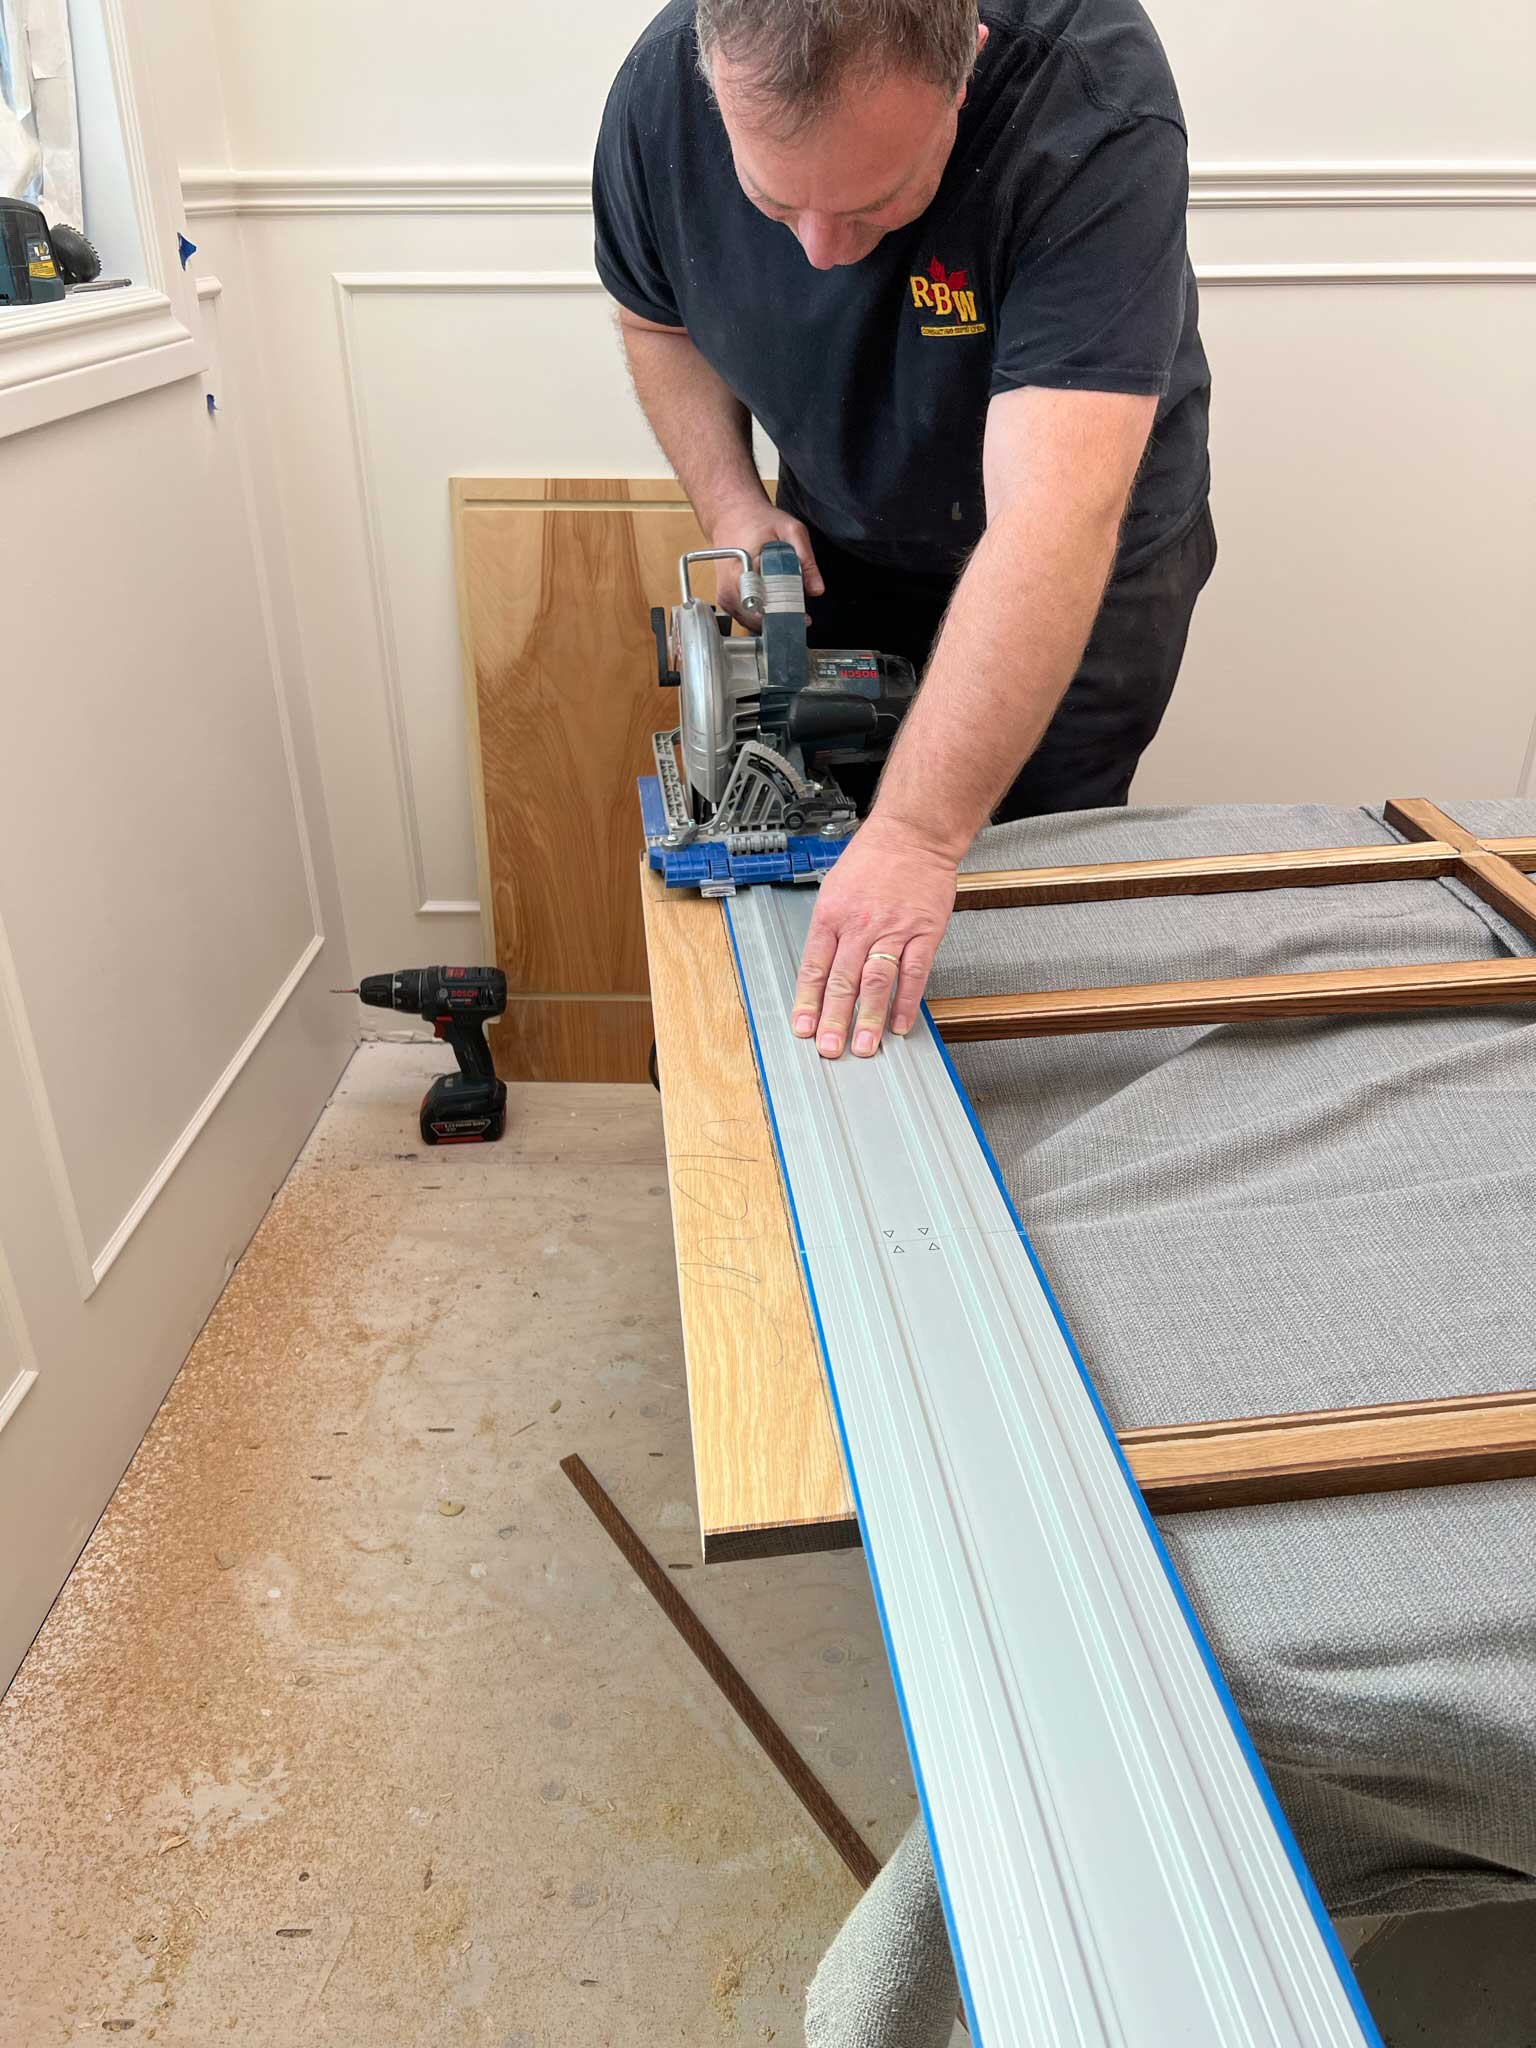
When it came time to install, the face frame had extensions on either side that was all one piece with the face frame that was to be trimmed on-site to fit perfectly into the alcove. We knew we had one chance only to cut and install that perfectly in the alcove opening.
We decided to use a scrap piece of plywood to make a template of the opening and fit it in our alcove before cutting the actual face frame. We measured in a few places and transposed the measurements to the plywood, and trimmed and sanded and trimmed and sanded until we had a really tight fit in the alcove. We were not going to take any chances on cutting that gorgeous oak face frame too small!
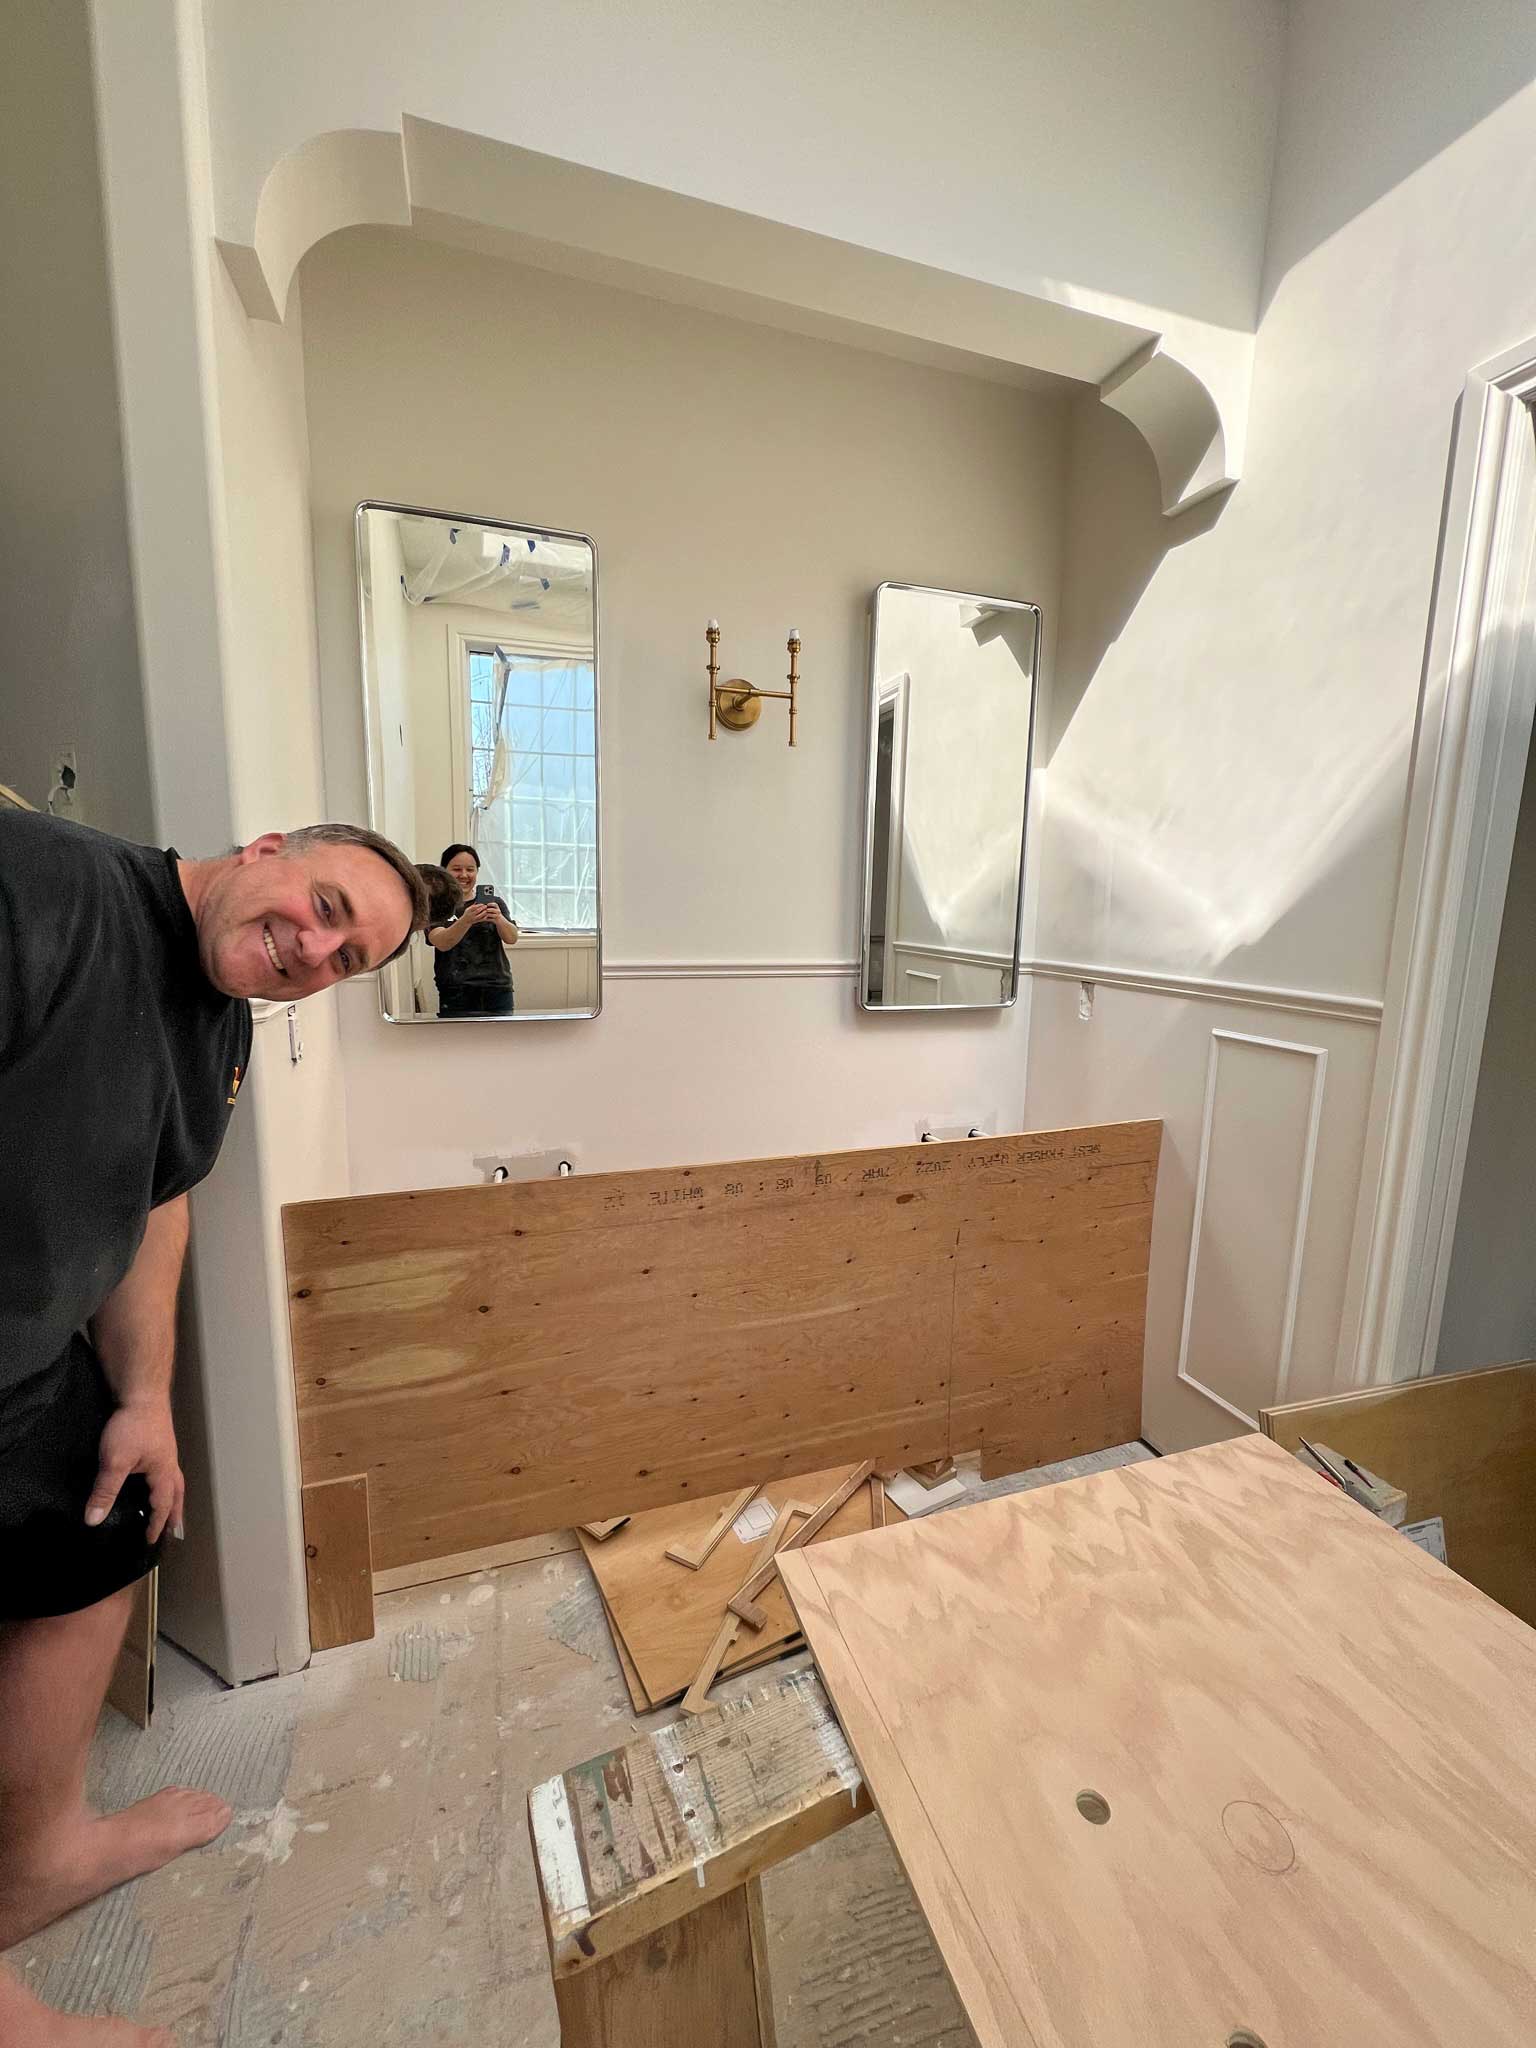
Once we had the plywood fit to size, we cut the face frame to fit by laying the plywood onto the face frame and tracing it. Once it was cut out, we were able to check the fit before using the face frame to assemble the cabinet.

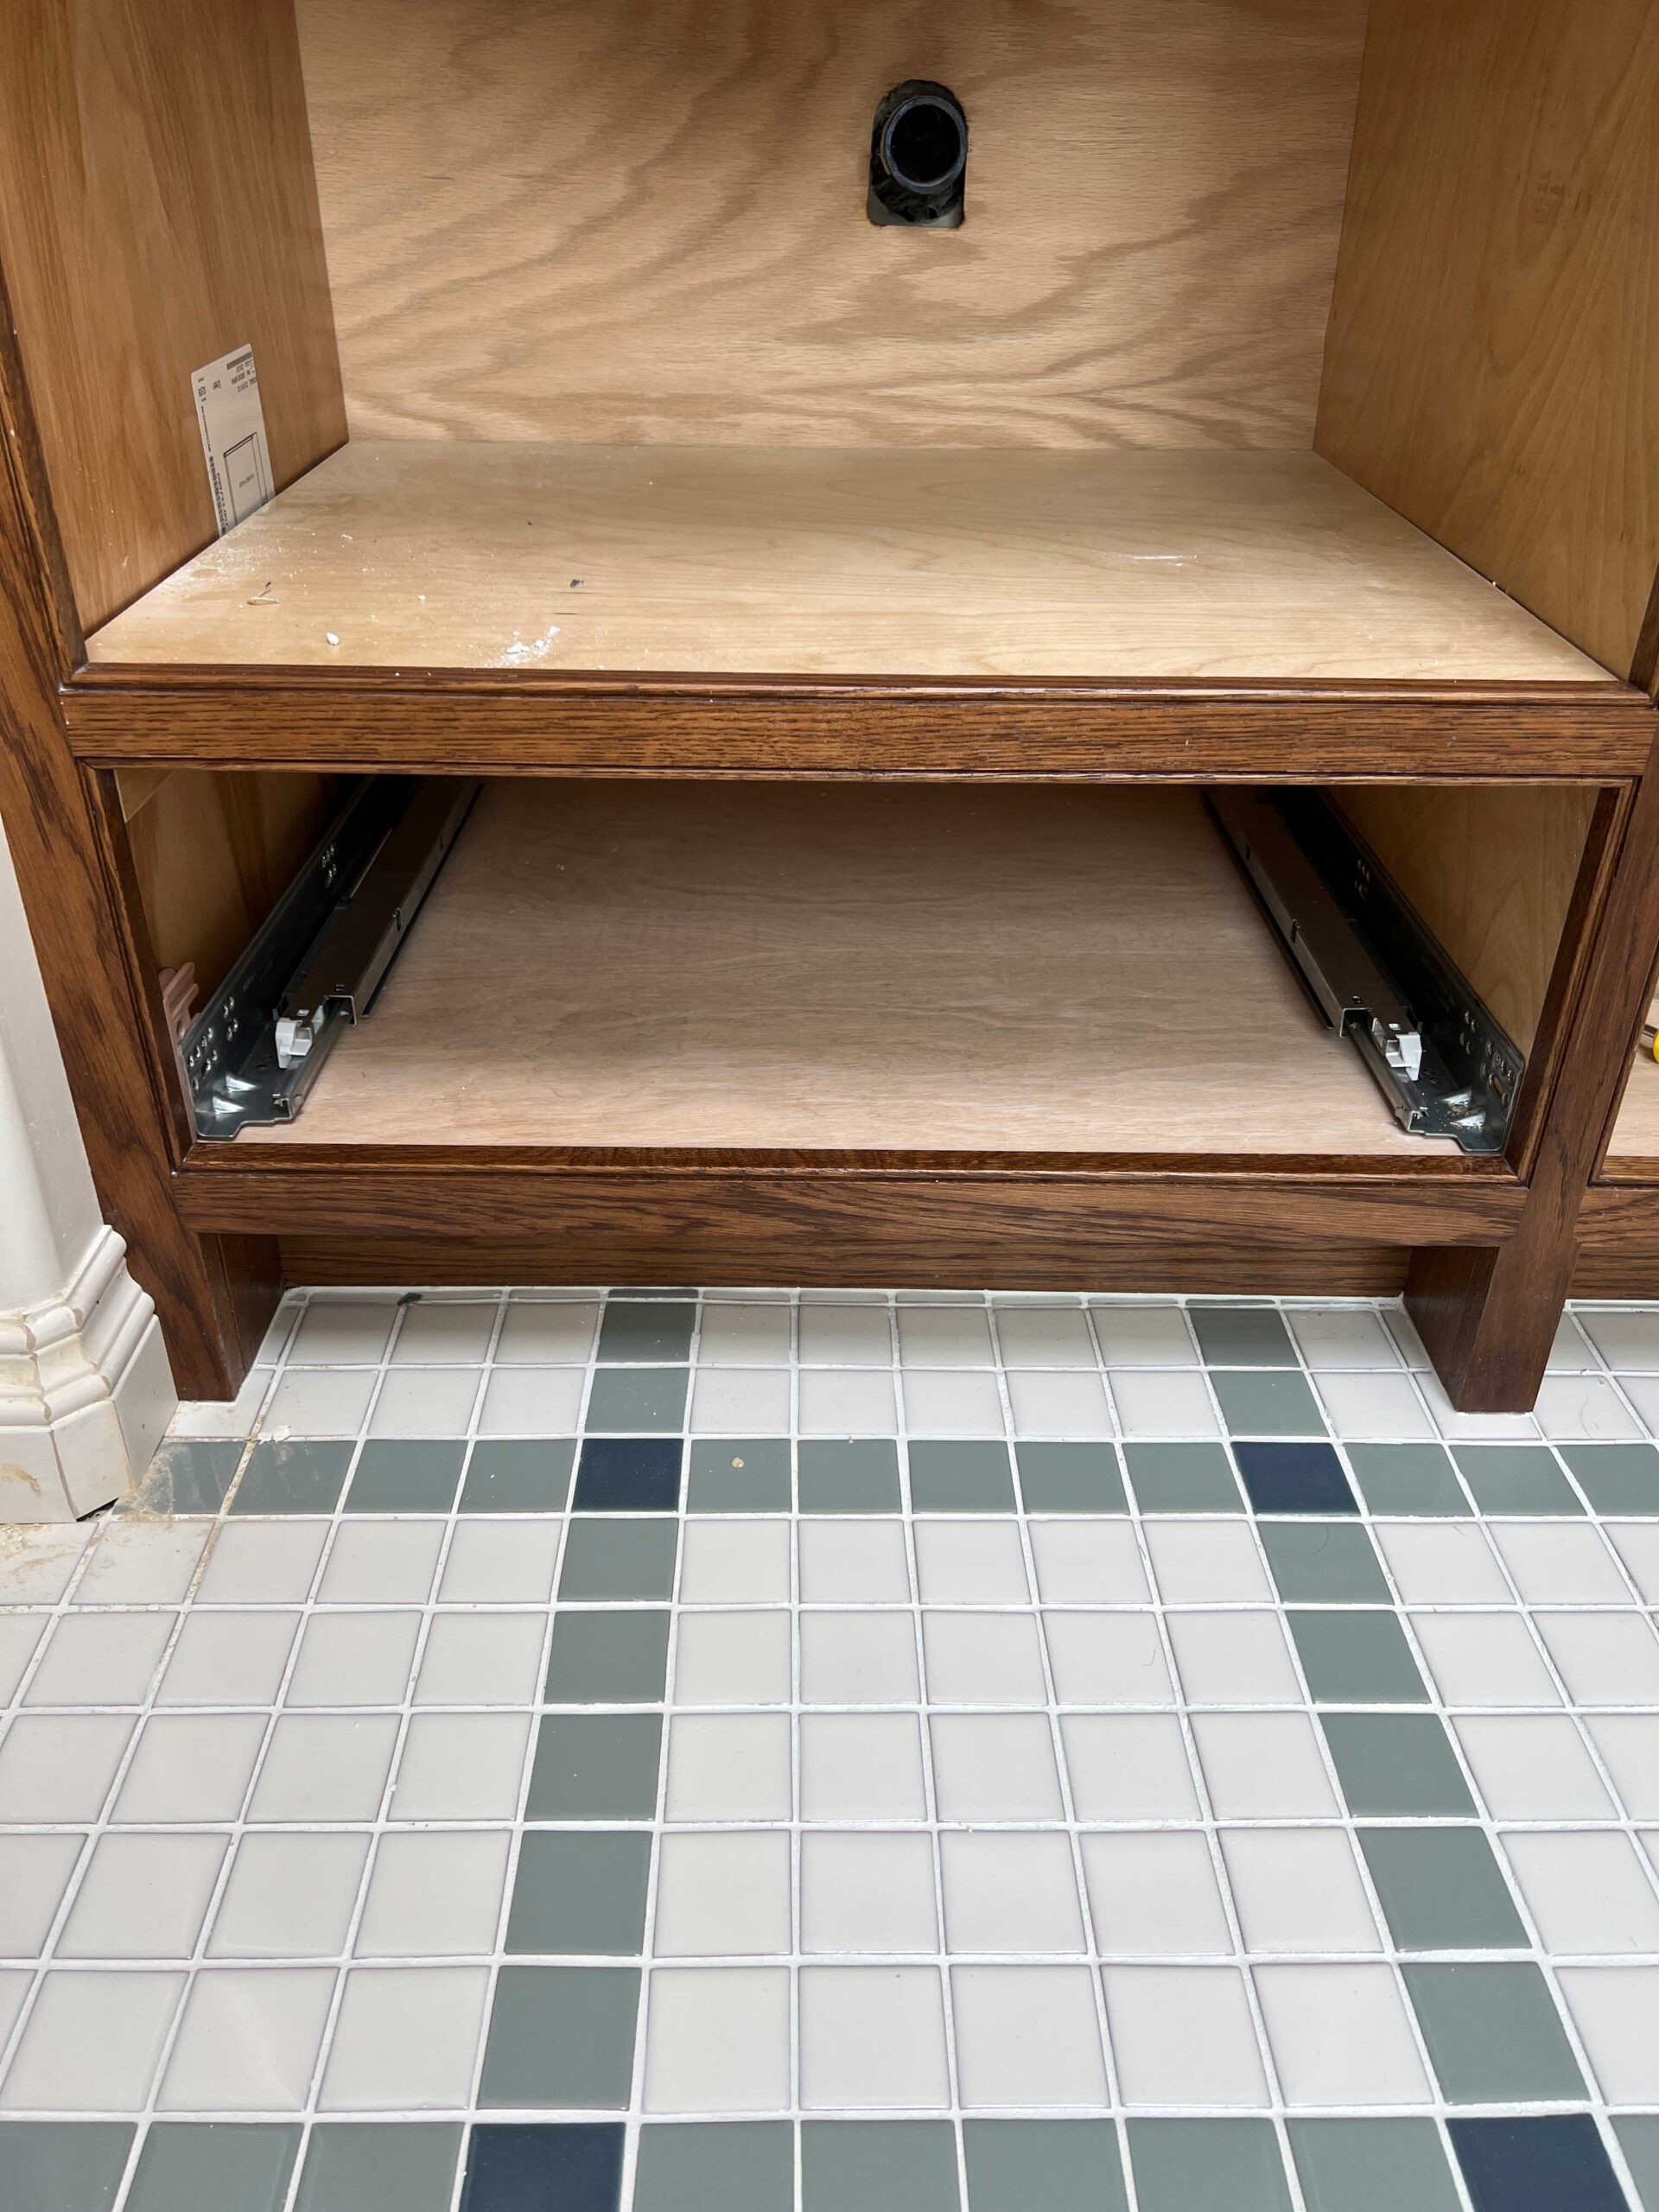
Another thing we did before we assembled the cabinet is cut the holes for the plumbing out of the back piece of the vanity and double-check that fit before assembling.
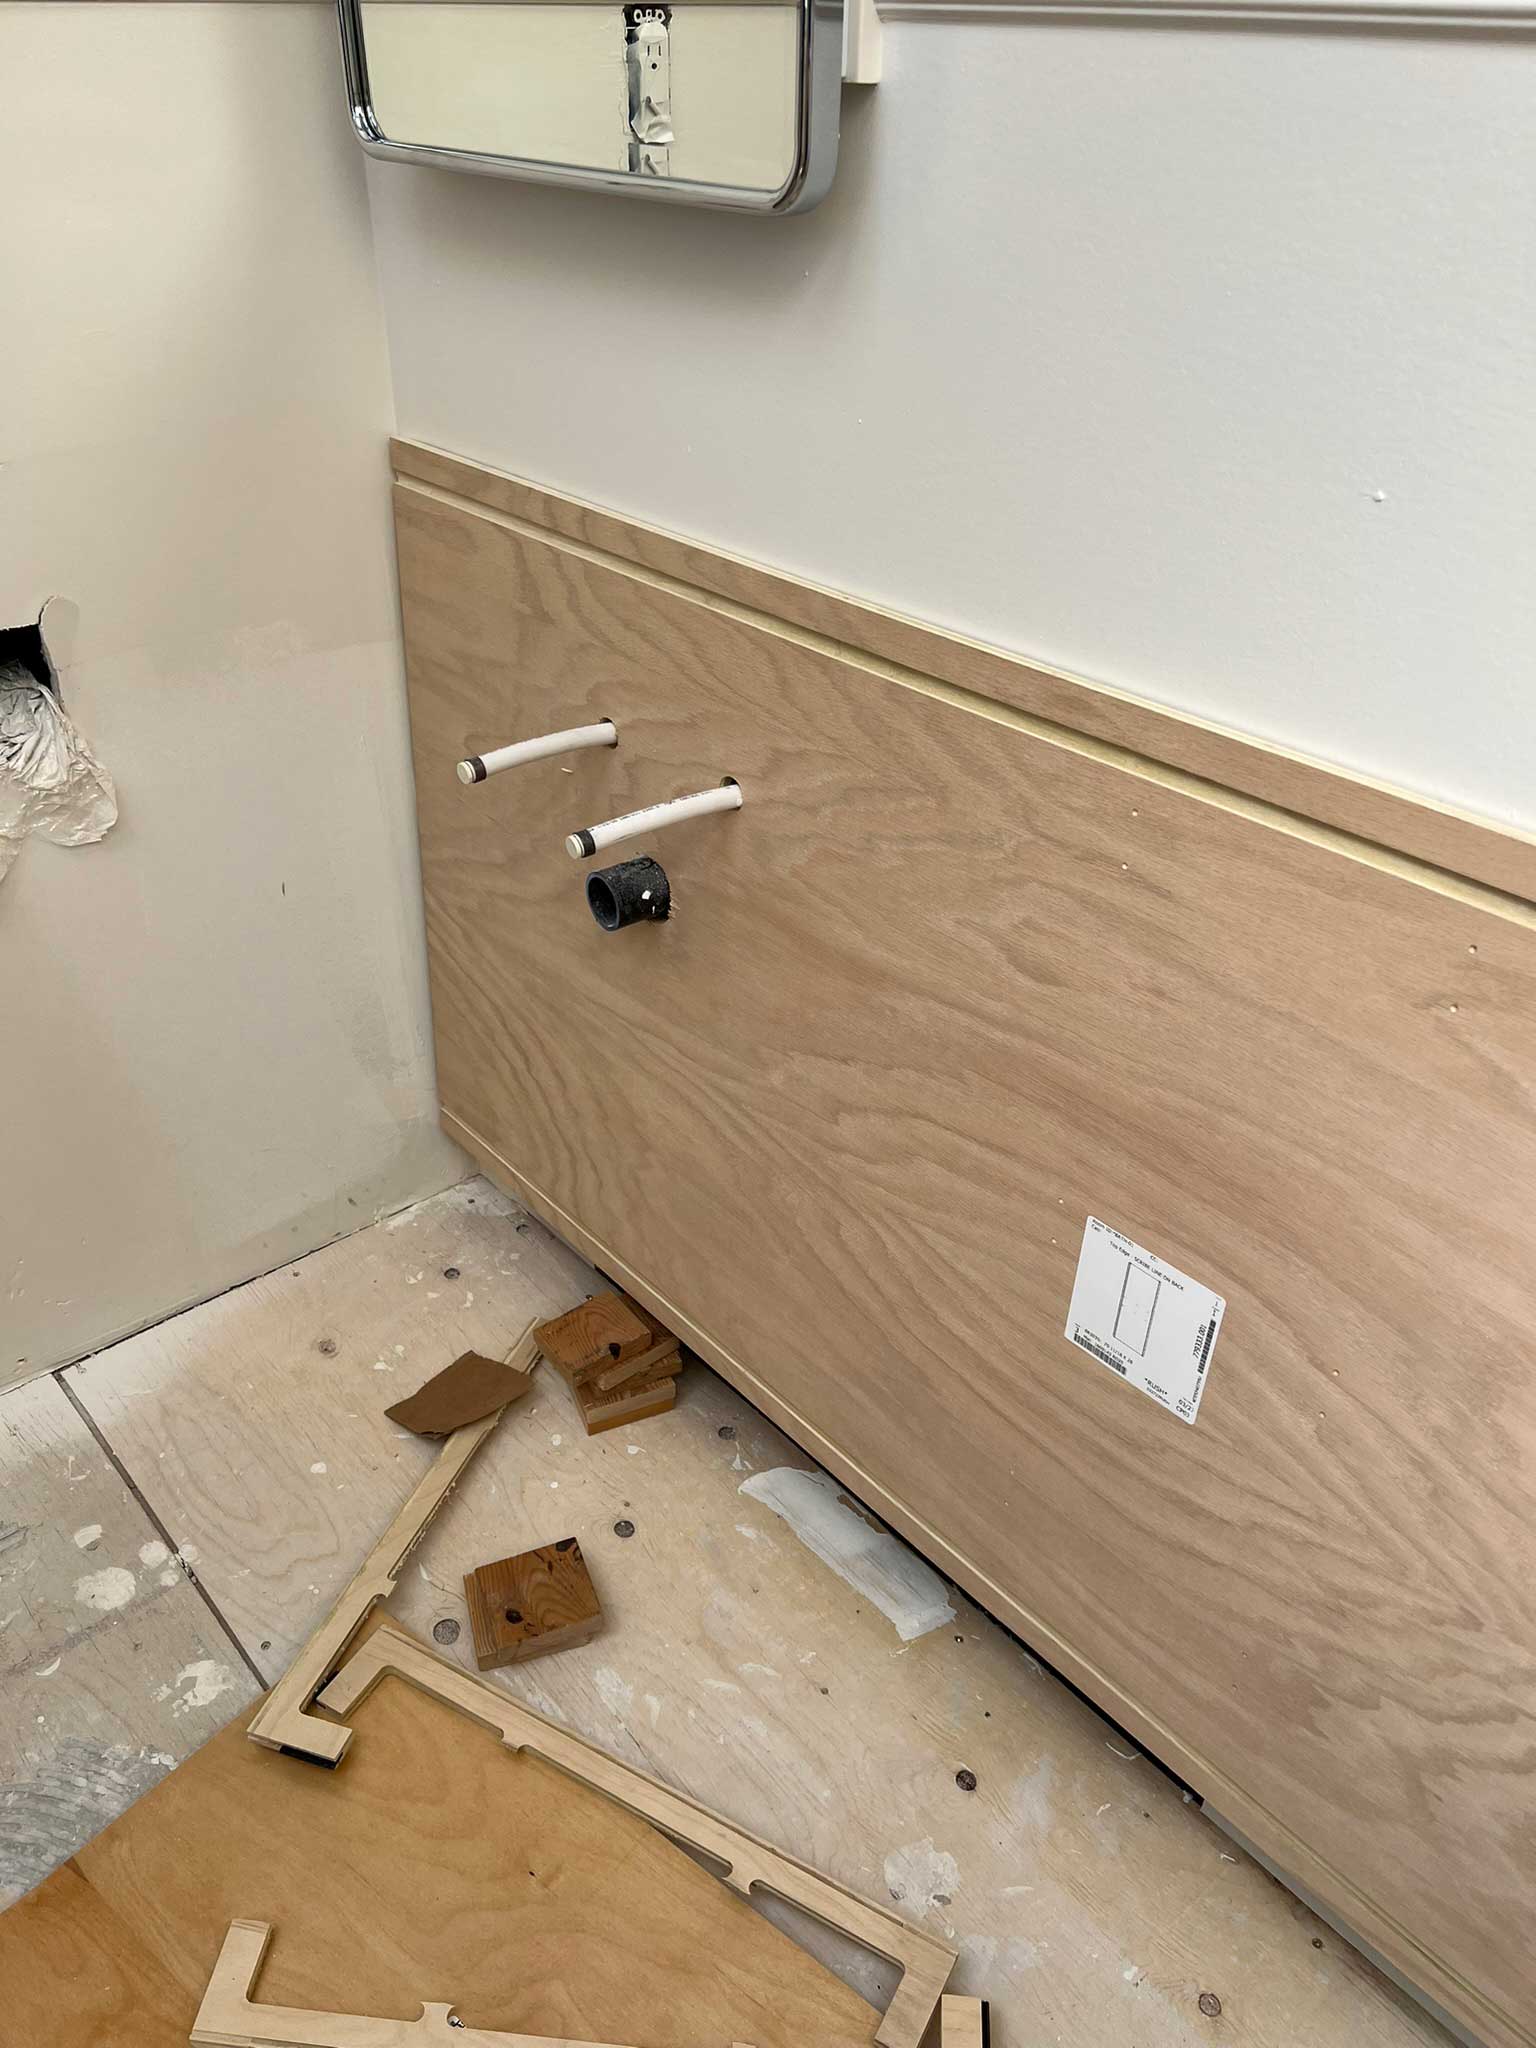
The fit ended up being SO TIGHT we almost couldn’t get it in there, but now that it’s in, we have perfect custom bathroom cabinets vanity fit into the existing opening and we couldn’t be more pleased!
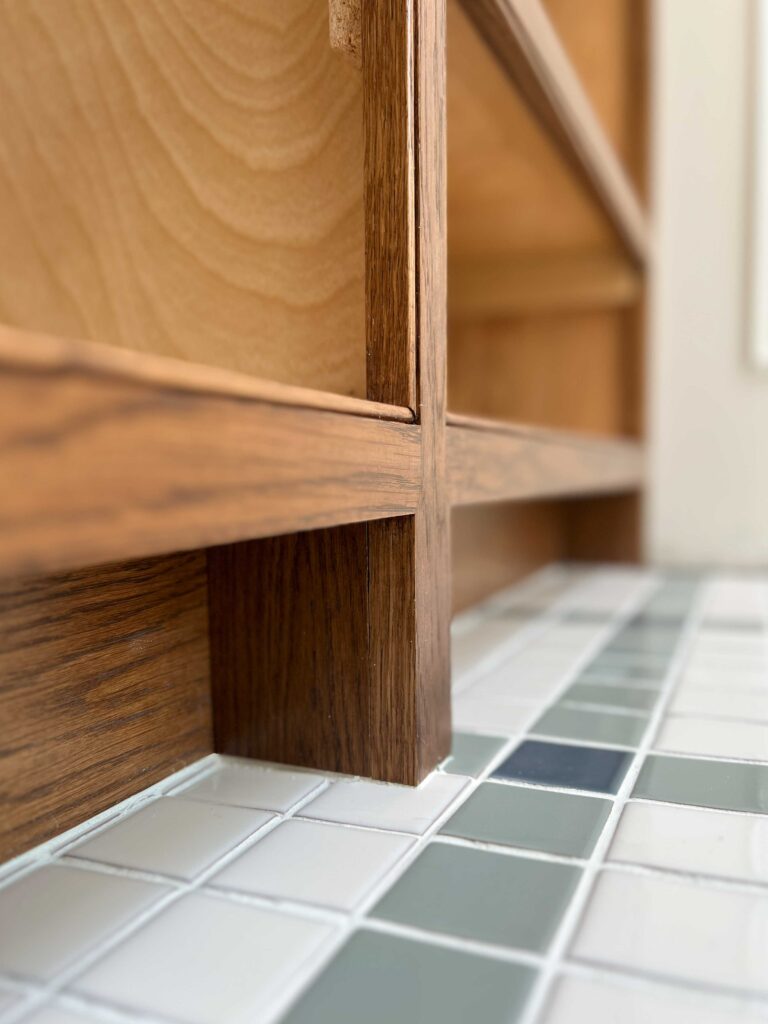
Modifying the Legs
We did decide to do one little modification on the fly. The face frame had extended legs, but they were only the thickness of the face frame (3/4″) and so if we installed the toe kick about 4″ back as per usual, there would have been a little space behind there. I’ve had this type of toe kick in the past and it can be a bit of a pain to clean around and the legs end up getting a little beat up by my aggressive vacuuming techniques!

Since we had cut off quite a few inches from the side of the face frame that we trimmed, we had matching oak scrap pieces that we decided to use to beef up the legs.
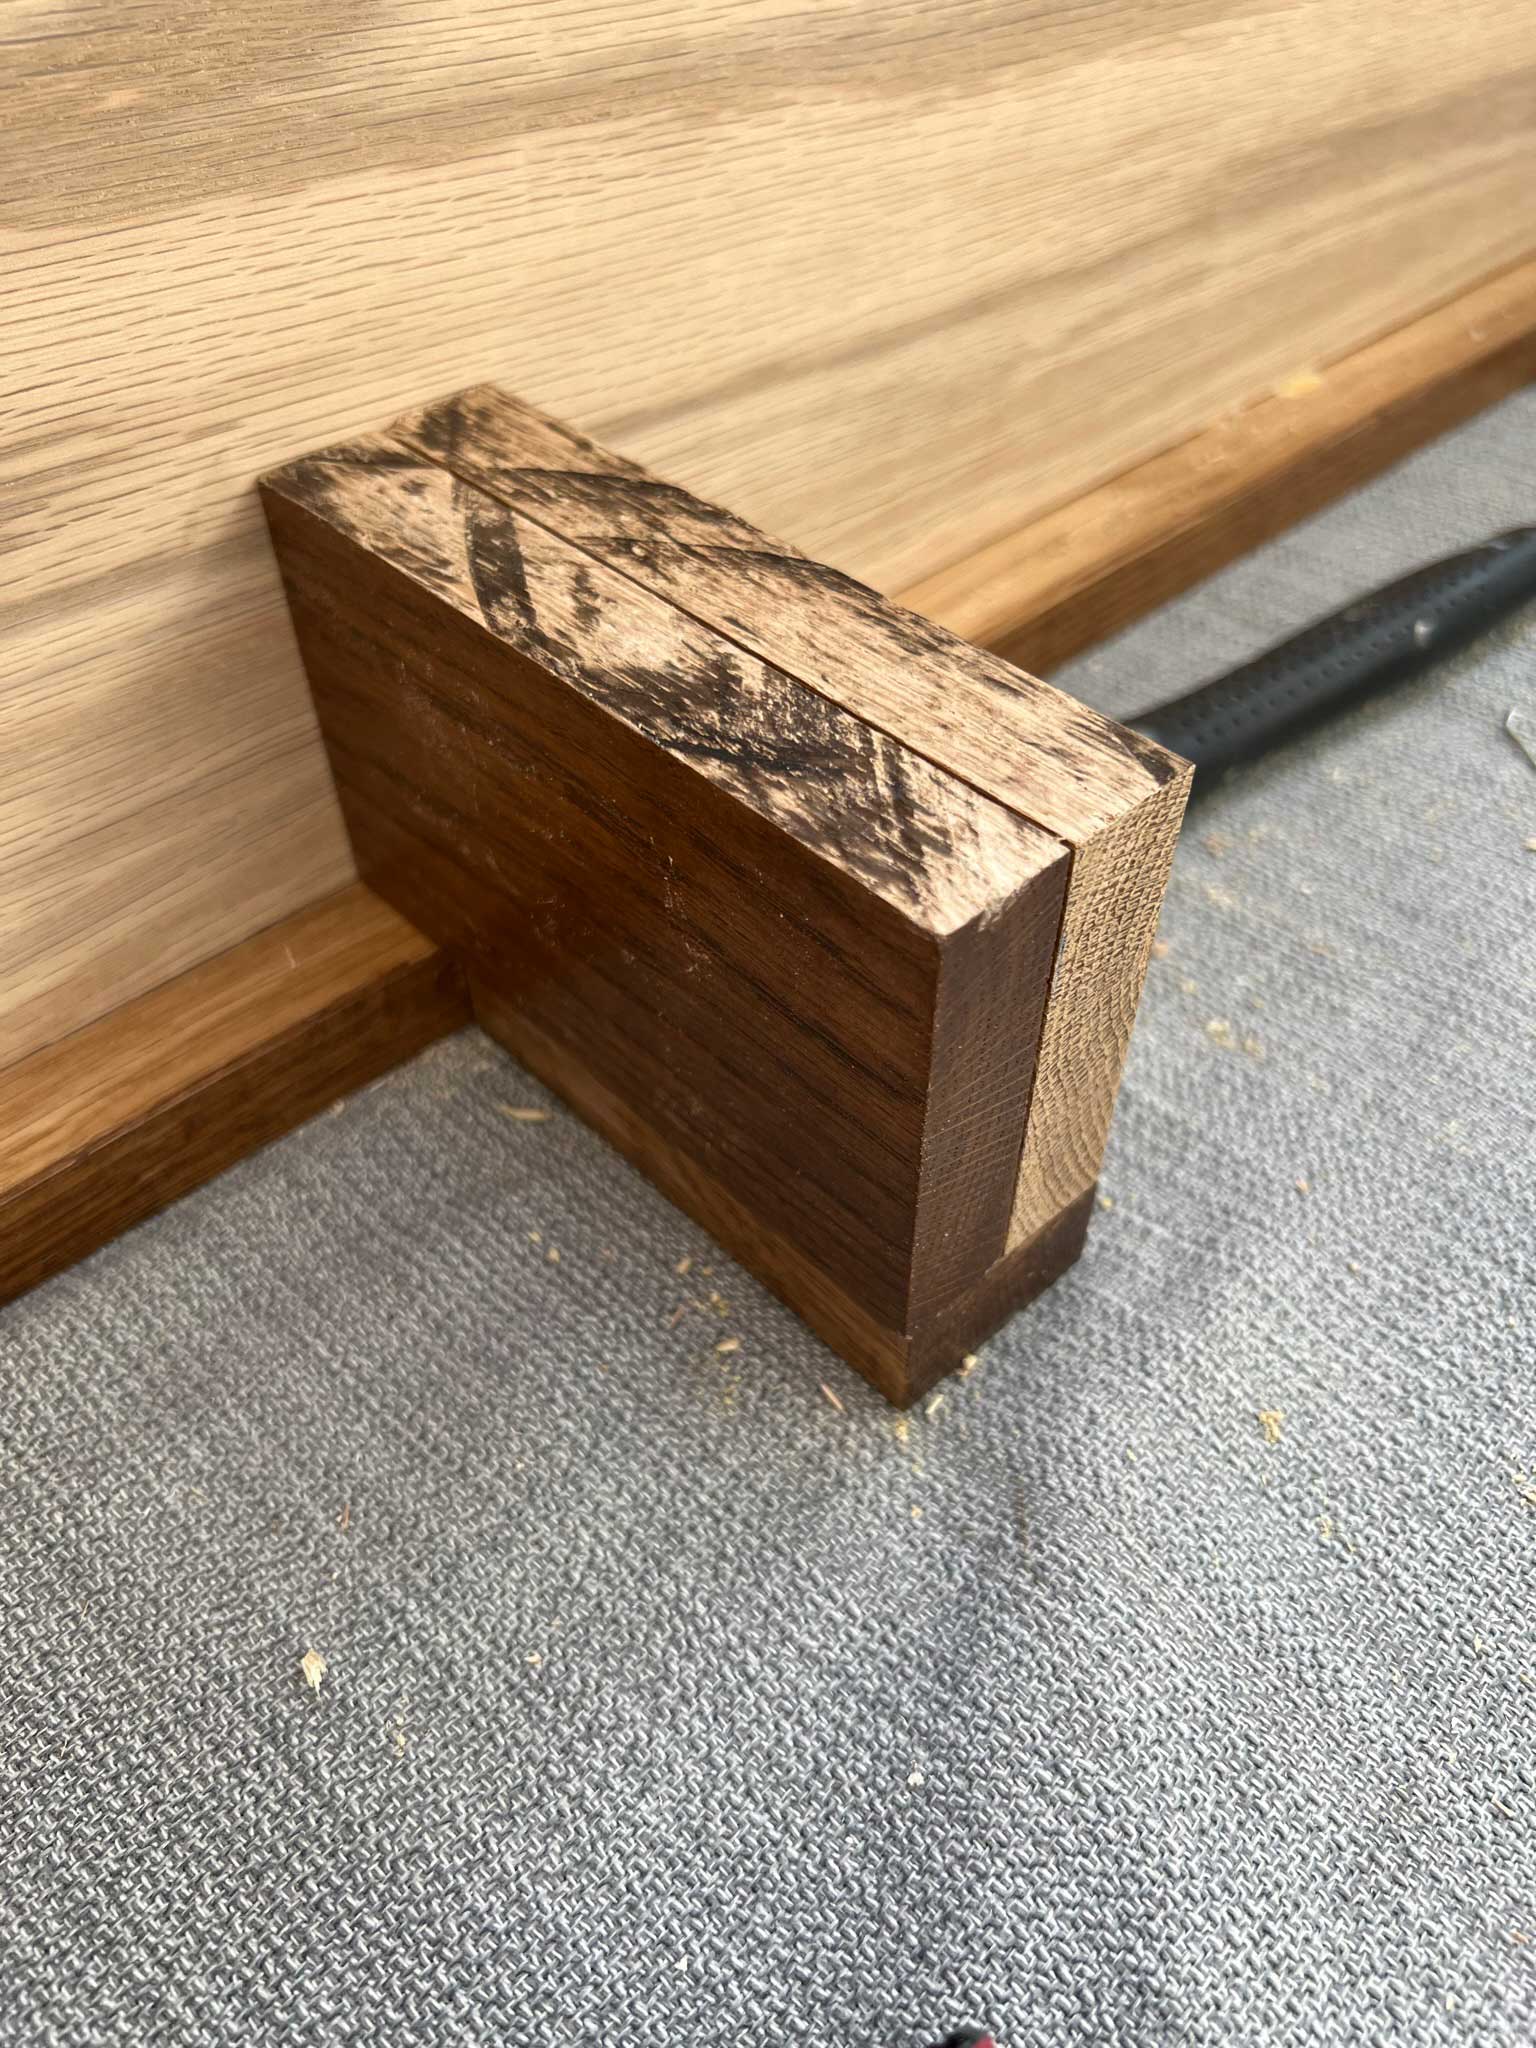
We cut two little blocks for each leg and placed them back to back with the finished side facing out and then glued them in place to the back of each leg. We added a few finish nails wherever they wouldn’t show (from the bottom of the cabinet down into the legs and nailing the legs together at the top. This made the leg look like a 1 – 12″ piece of solid oak and eliminates the gap that would be behind the leg otherwise.
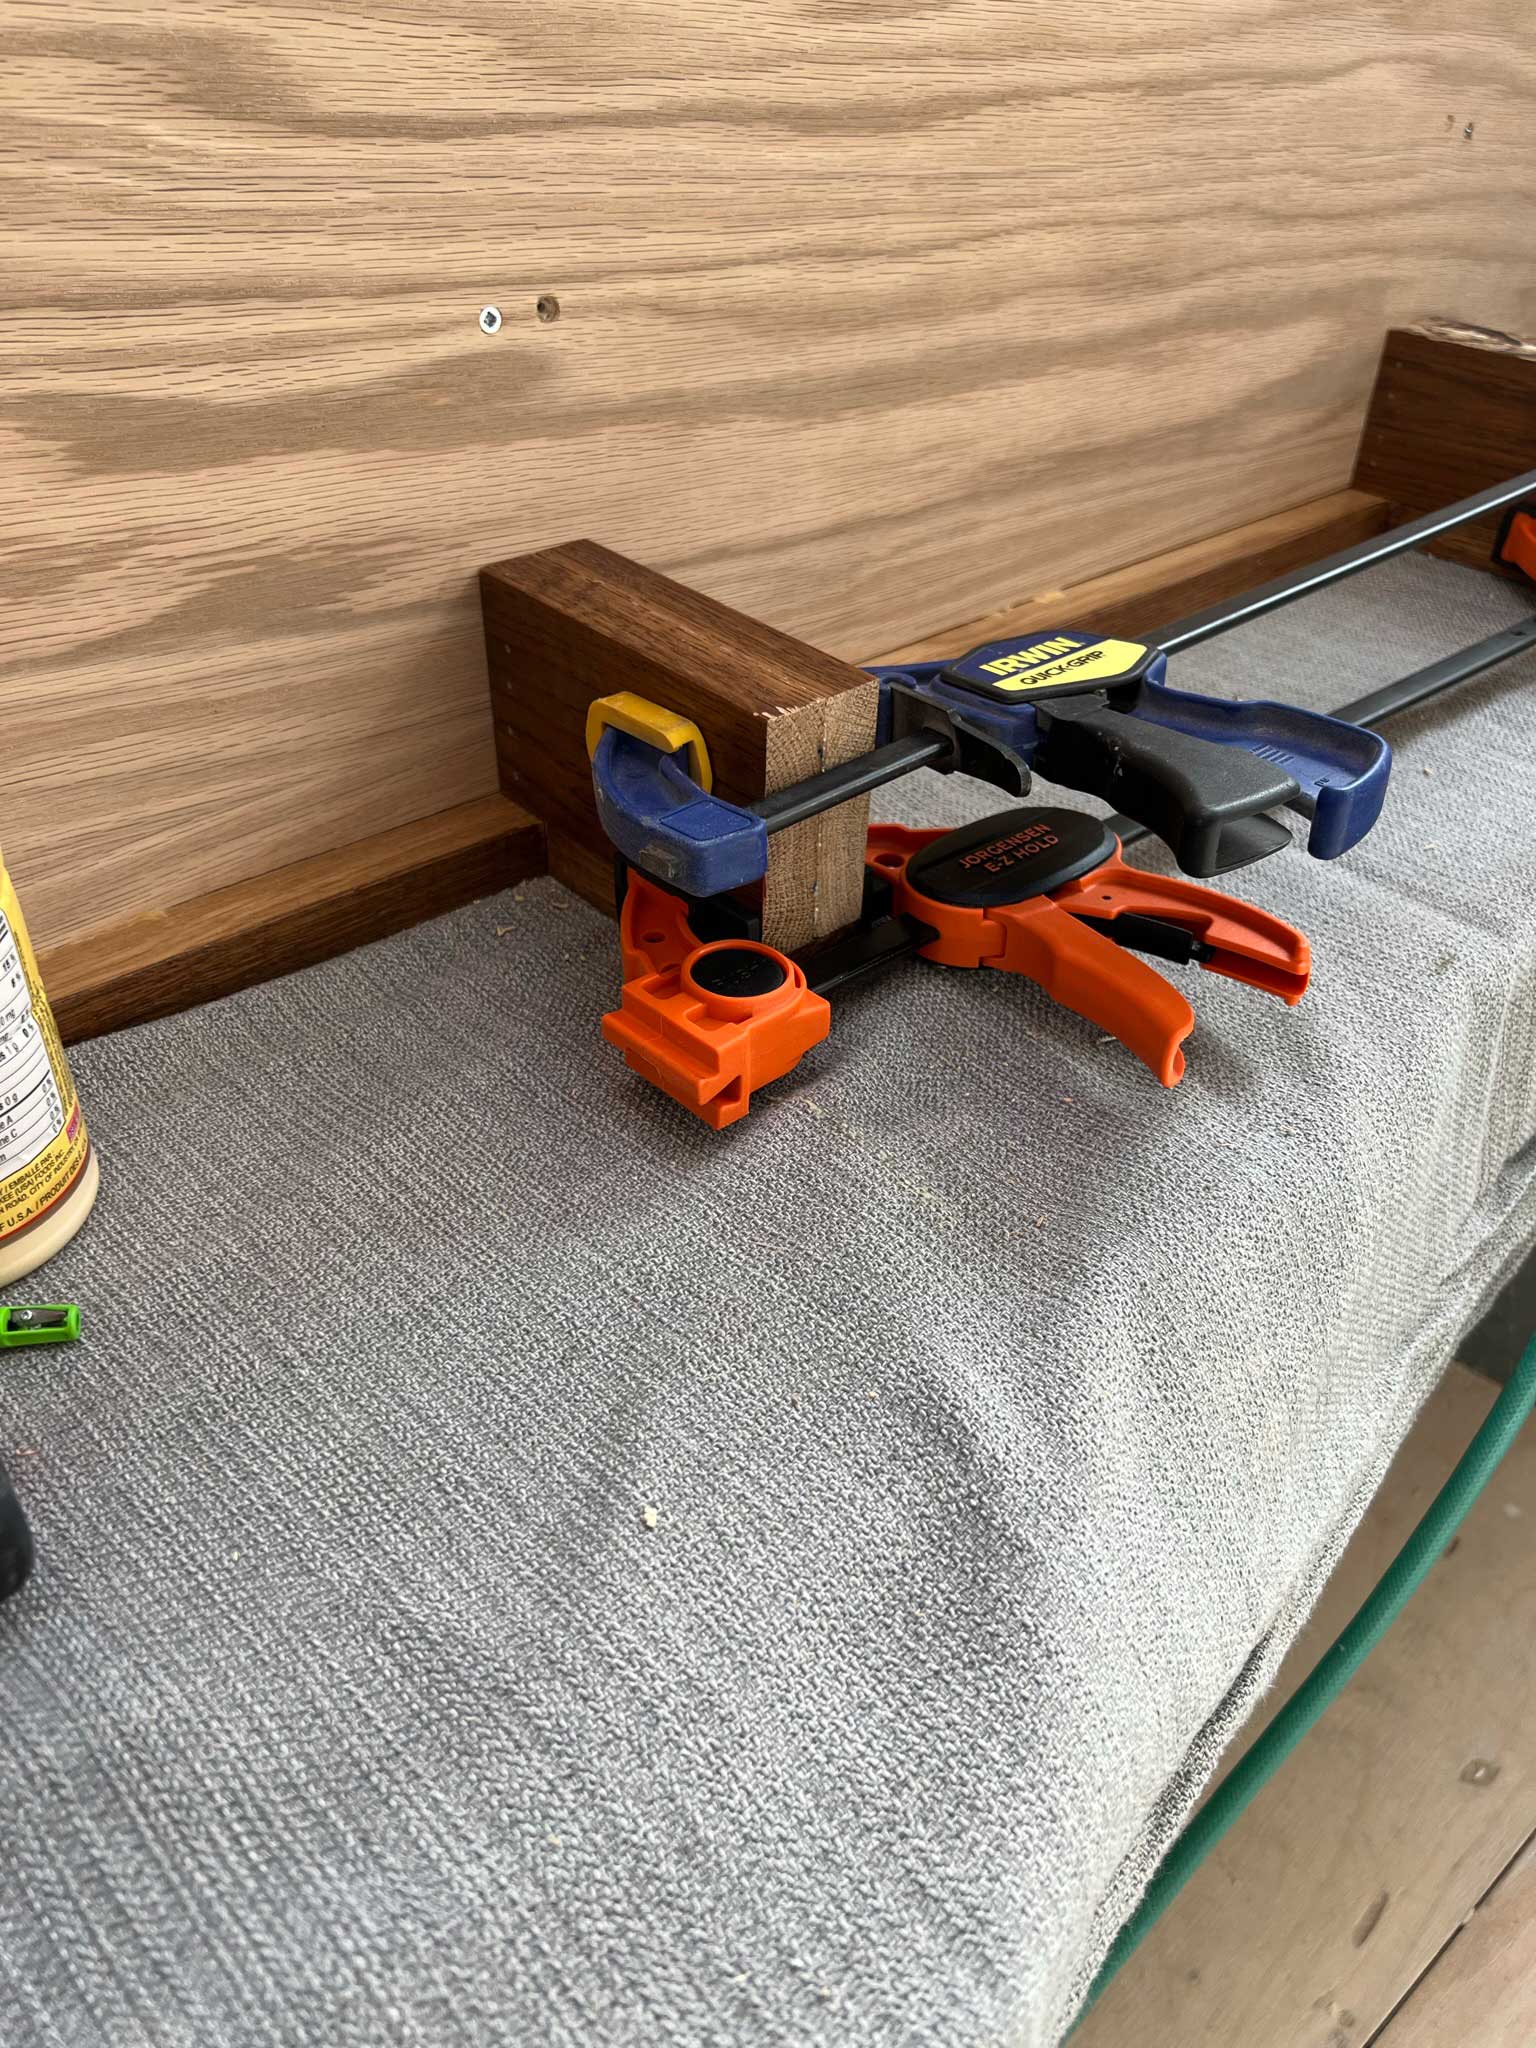
It turned out amazing and I’m so glad we thought to do that! If you are looking to do this with your own cabinet and don’t have scraps to use like we did, I would suggest ordering some additional finished 3/4″ material from Cabinet Joint with your order!
Speaking of legs – we ended up installing this vanity before the tile was installed since we had a countertop templating appointment and the tile wasn’t in yet. We shimmed the cabinet off the floor the exact thickness of the tile + mortar so that when the tile came in, we could slide it right under the legs and it would look like we tiled first. This was a risky move I’ll admit, but it played out perfectly and you would never know that the tile wasn’t installed first!
Installing the Doors and Drawers
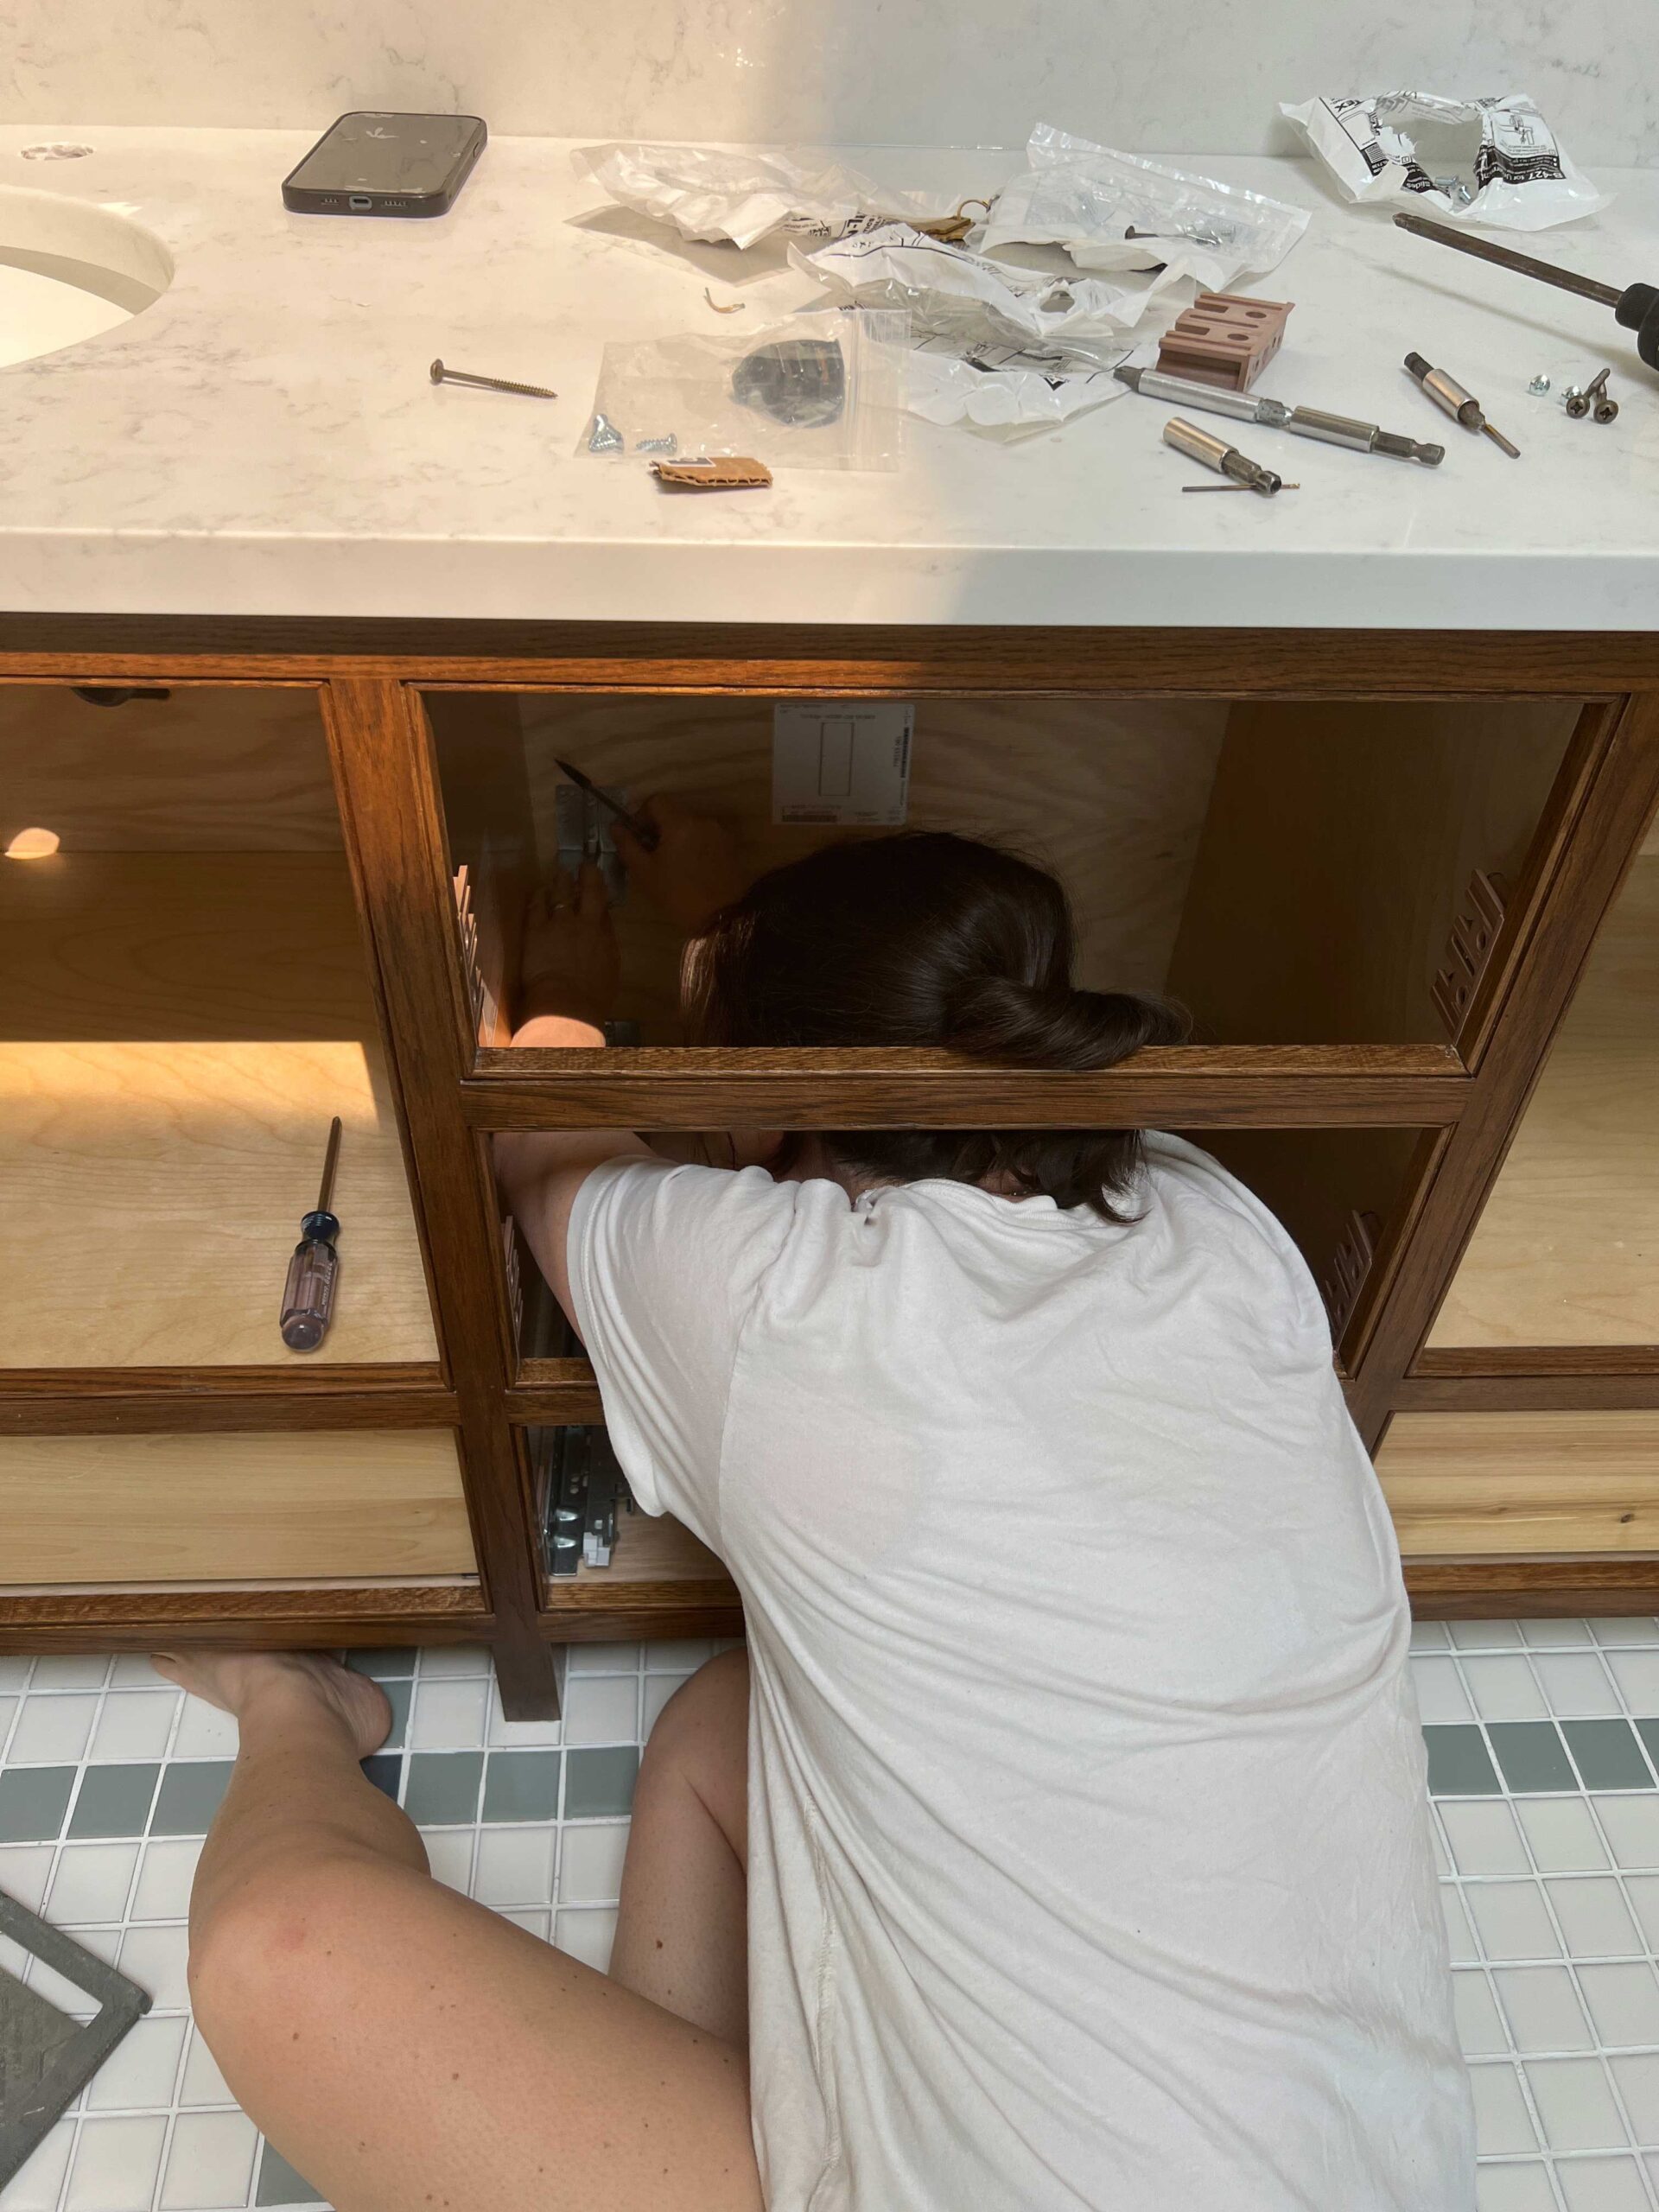
Because inset cabinetry is constructed so precisely with a 3/32″ gap around all the doors and drawers, you would think that installing the doors and drawers would be very difficult. In fact, the hardware that comes with the Cabinet Joint Cabinets are so incredibly adjustable it is actually very easy to install and make that gap exact.
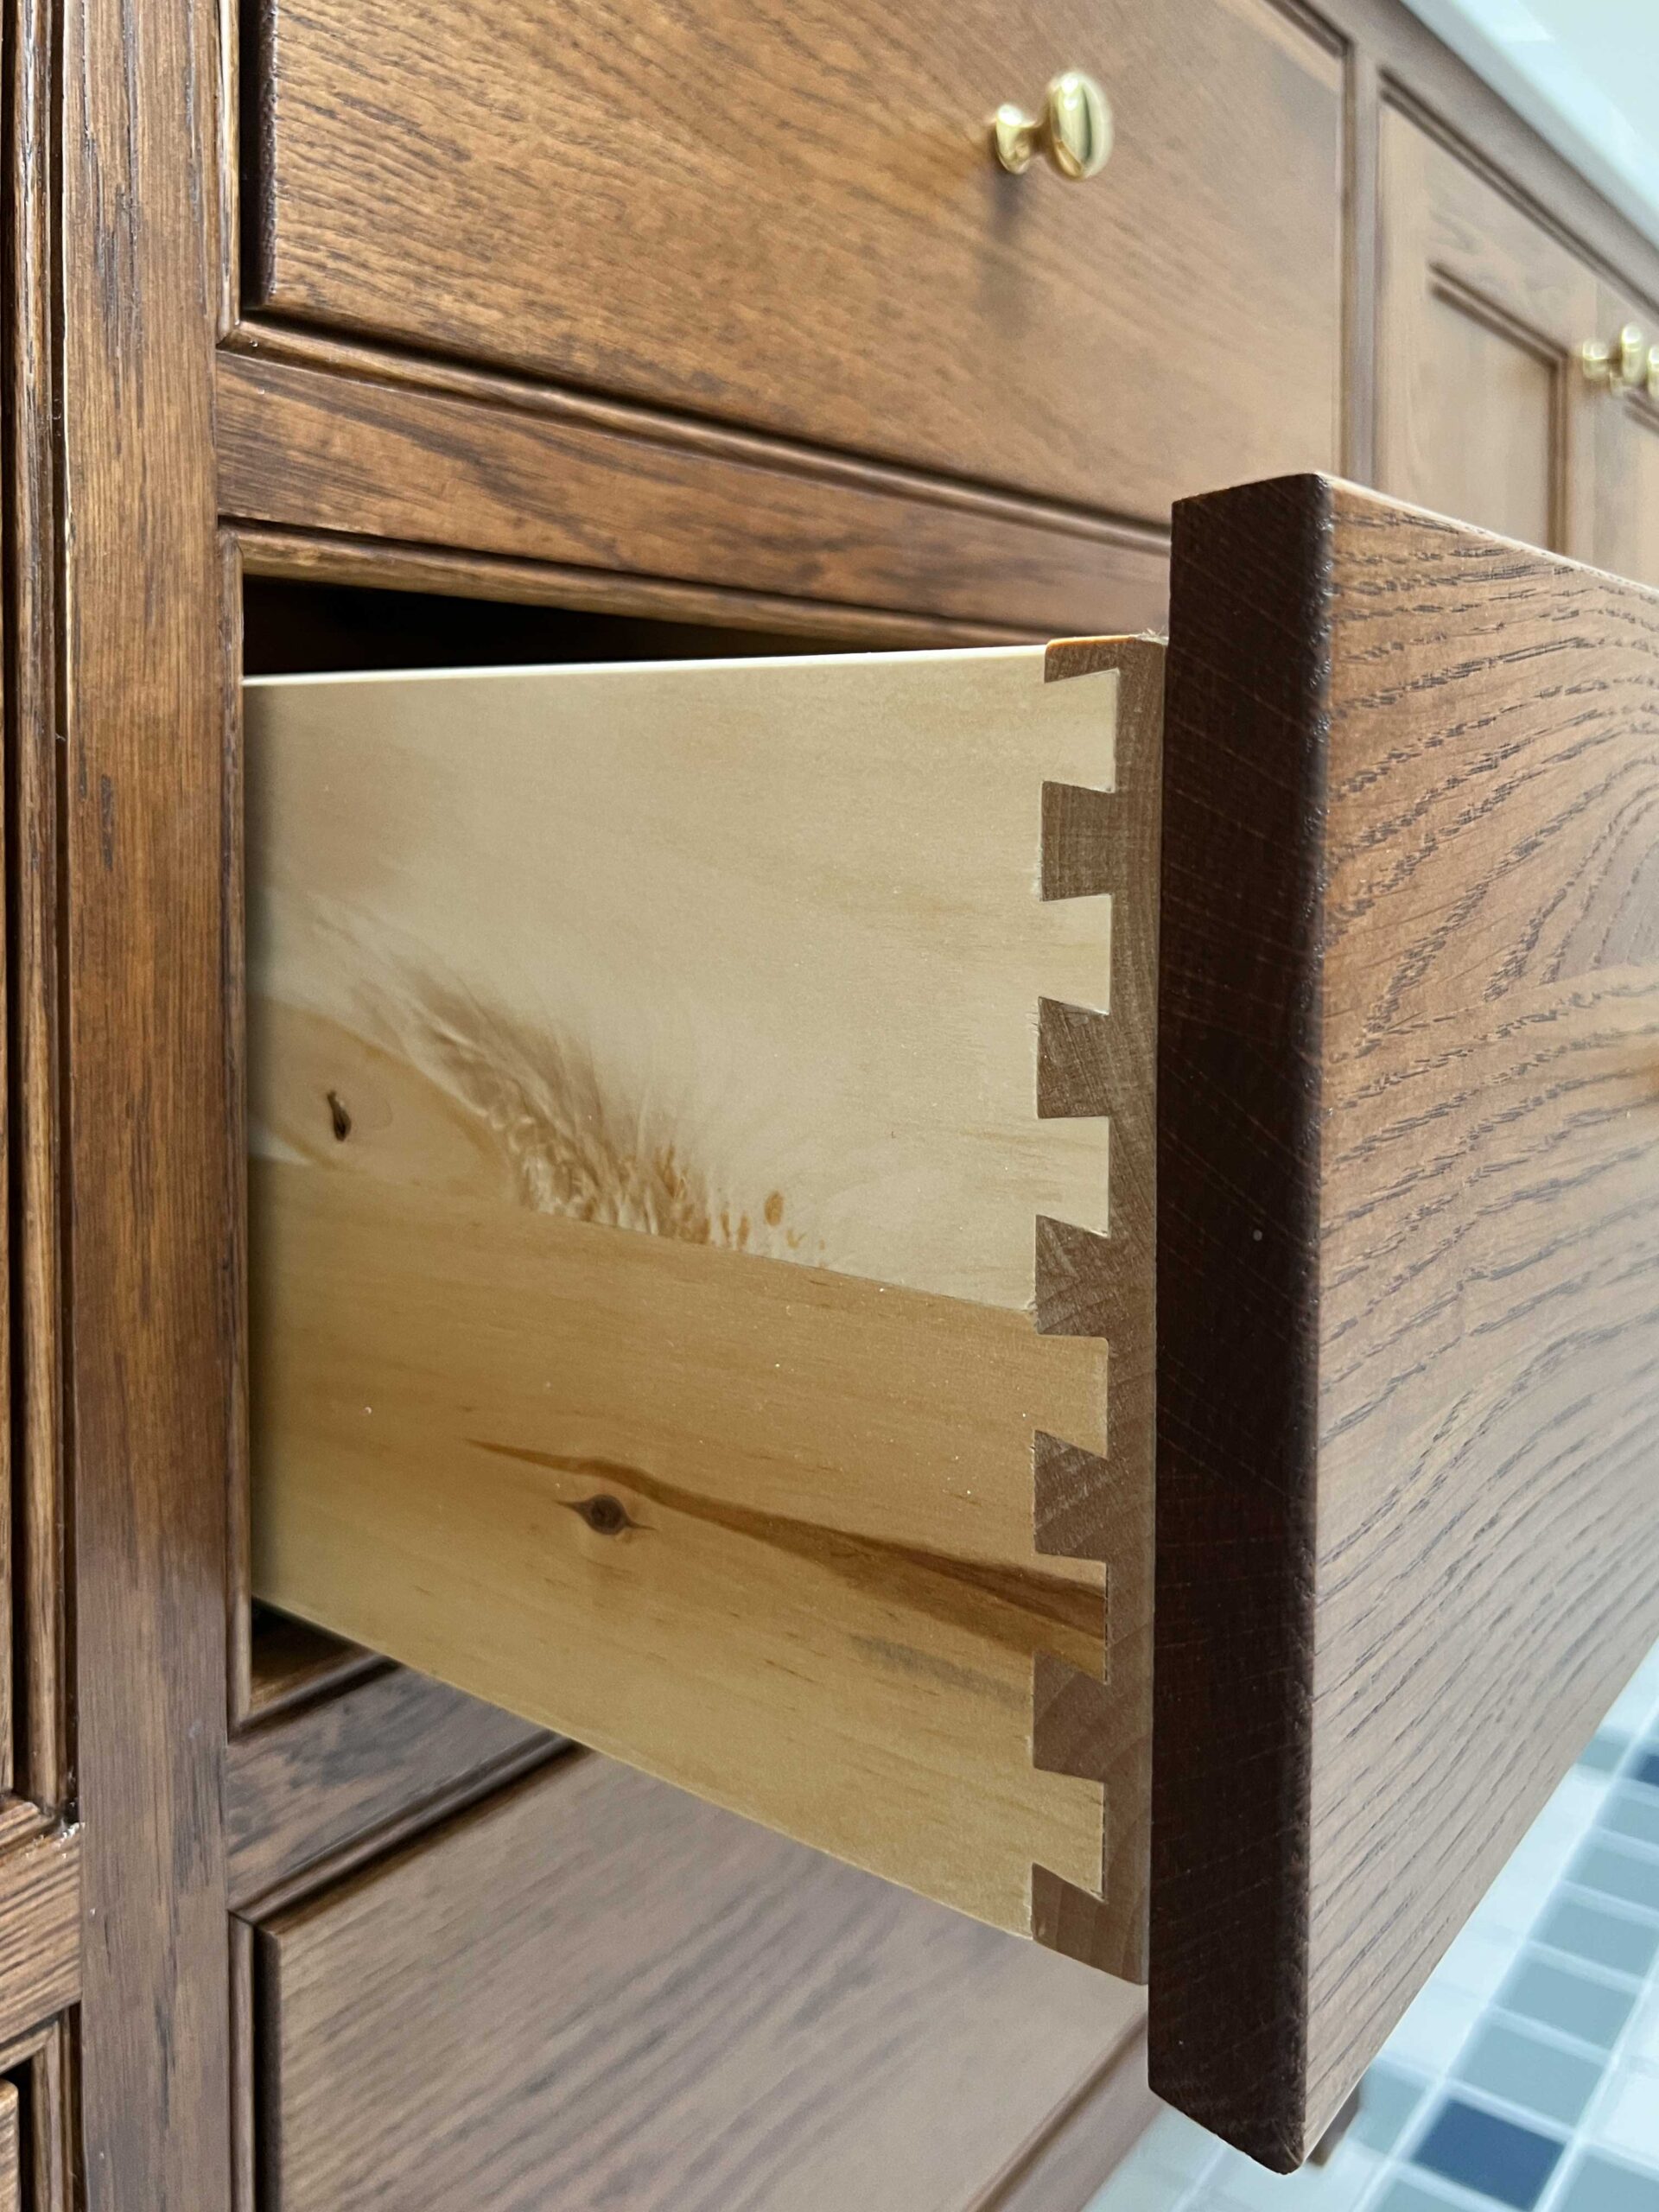
The hardest part about installing the drawer glides is getting the right location on the back of the cabinet. with standard size cabinets, Cabinet Joint actually marks these locations for you with pilot holes so it is extremely easy. For our custom cabinets with custom size drawers, we had to locate that ourselves but it was very simple to figure out. Once installed you can adjust left to right, up and down, in and out, to make that gap exact.
We had a bit more trouble with the door hinges, although I tried to locate them very precisely on the cabinet I ended up not being able to adjust one of the doors enough (I installed the hinges too low). I filled the holes and re-installed one set of hinges – fortunately, it was an easy mistake to fix. Once installed, the doors can also be adjusted quite a bit to make the gap consistent.
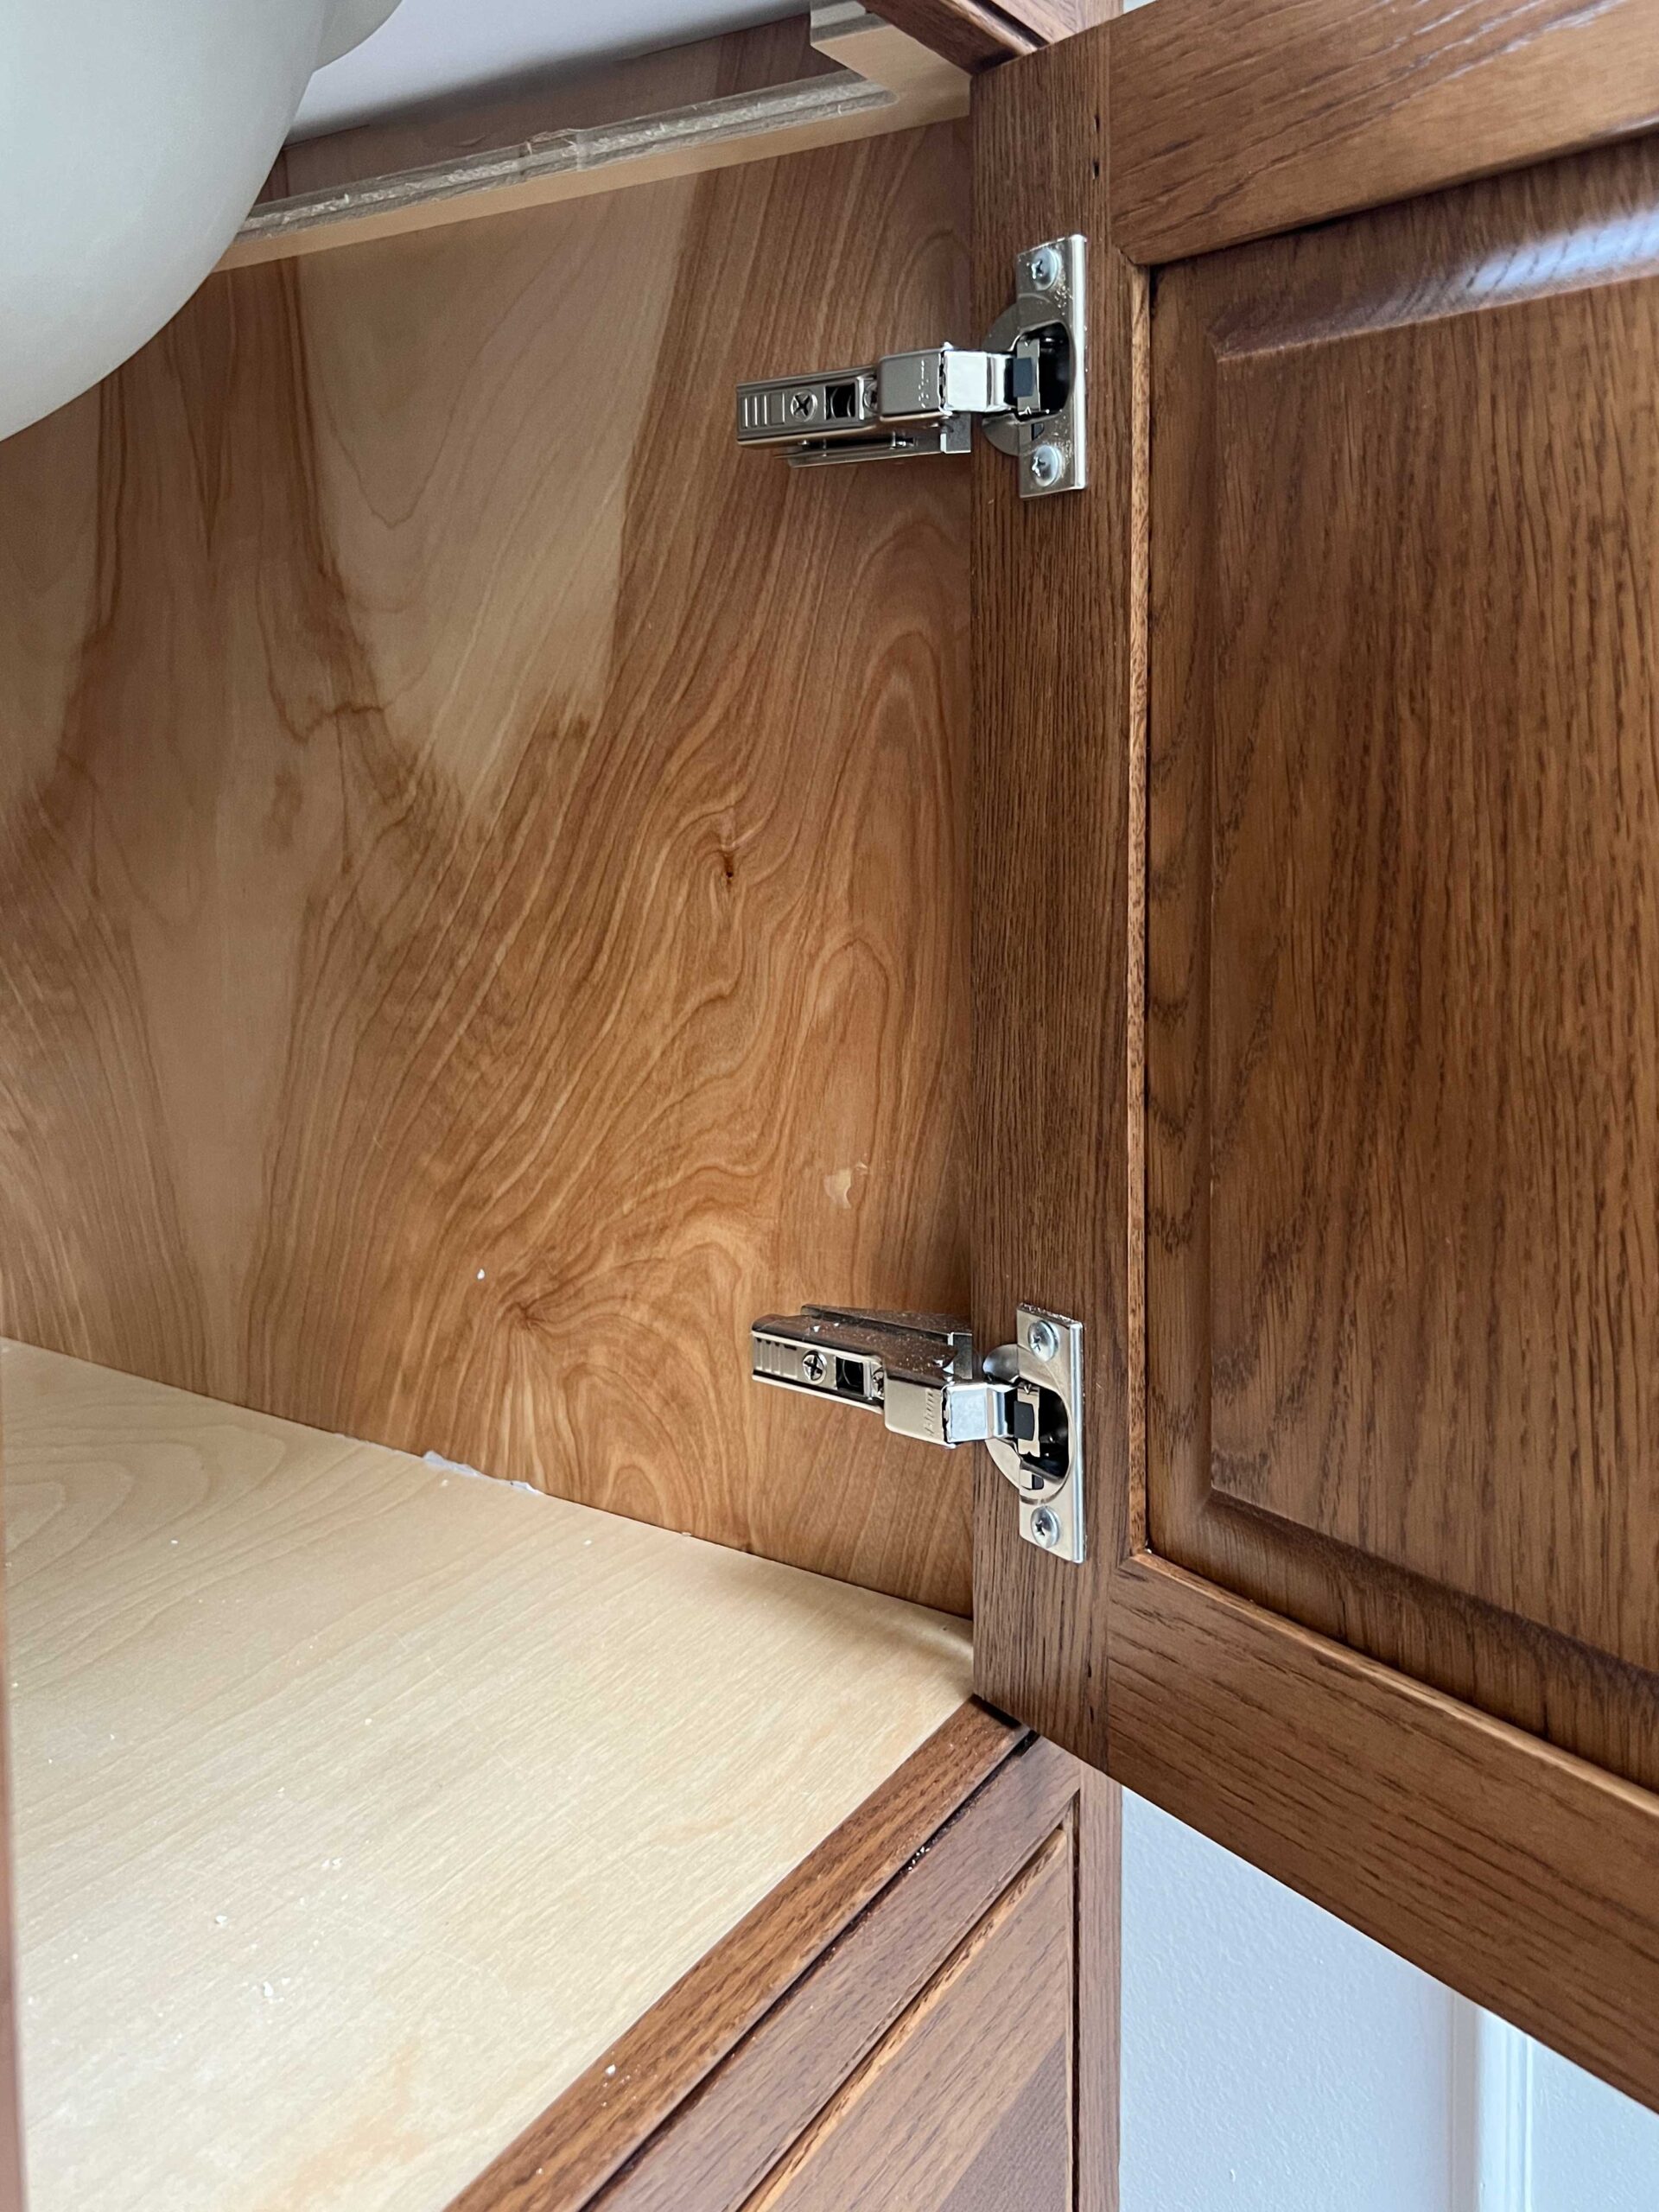
I also messed up the location of one of the interior partitions and ended up having to install different hinges on two of the doors. This could have been avoided had we watched ALL of the videos ahead of time, but we made it work!
The Finish and Quality
The cabinet boxes are made from 1/2″ thick plywood. Pieces that are visible inside the cabinet are all nicely finished. Drawer boxes are also 1/2″ plywood and have dovetail joints. Drawer slides and door hinges are all made by Blum and are soft-close and HIGHLY adjustable. The doors and drawers are 3/4″ solid wood and beautifully finished. Overall the quality of what we received is amazing and I can’t recommend it enough!
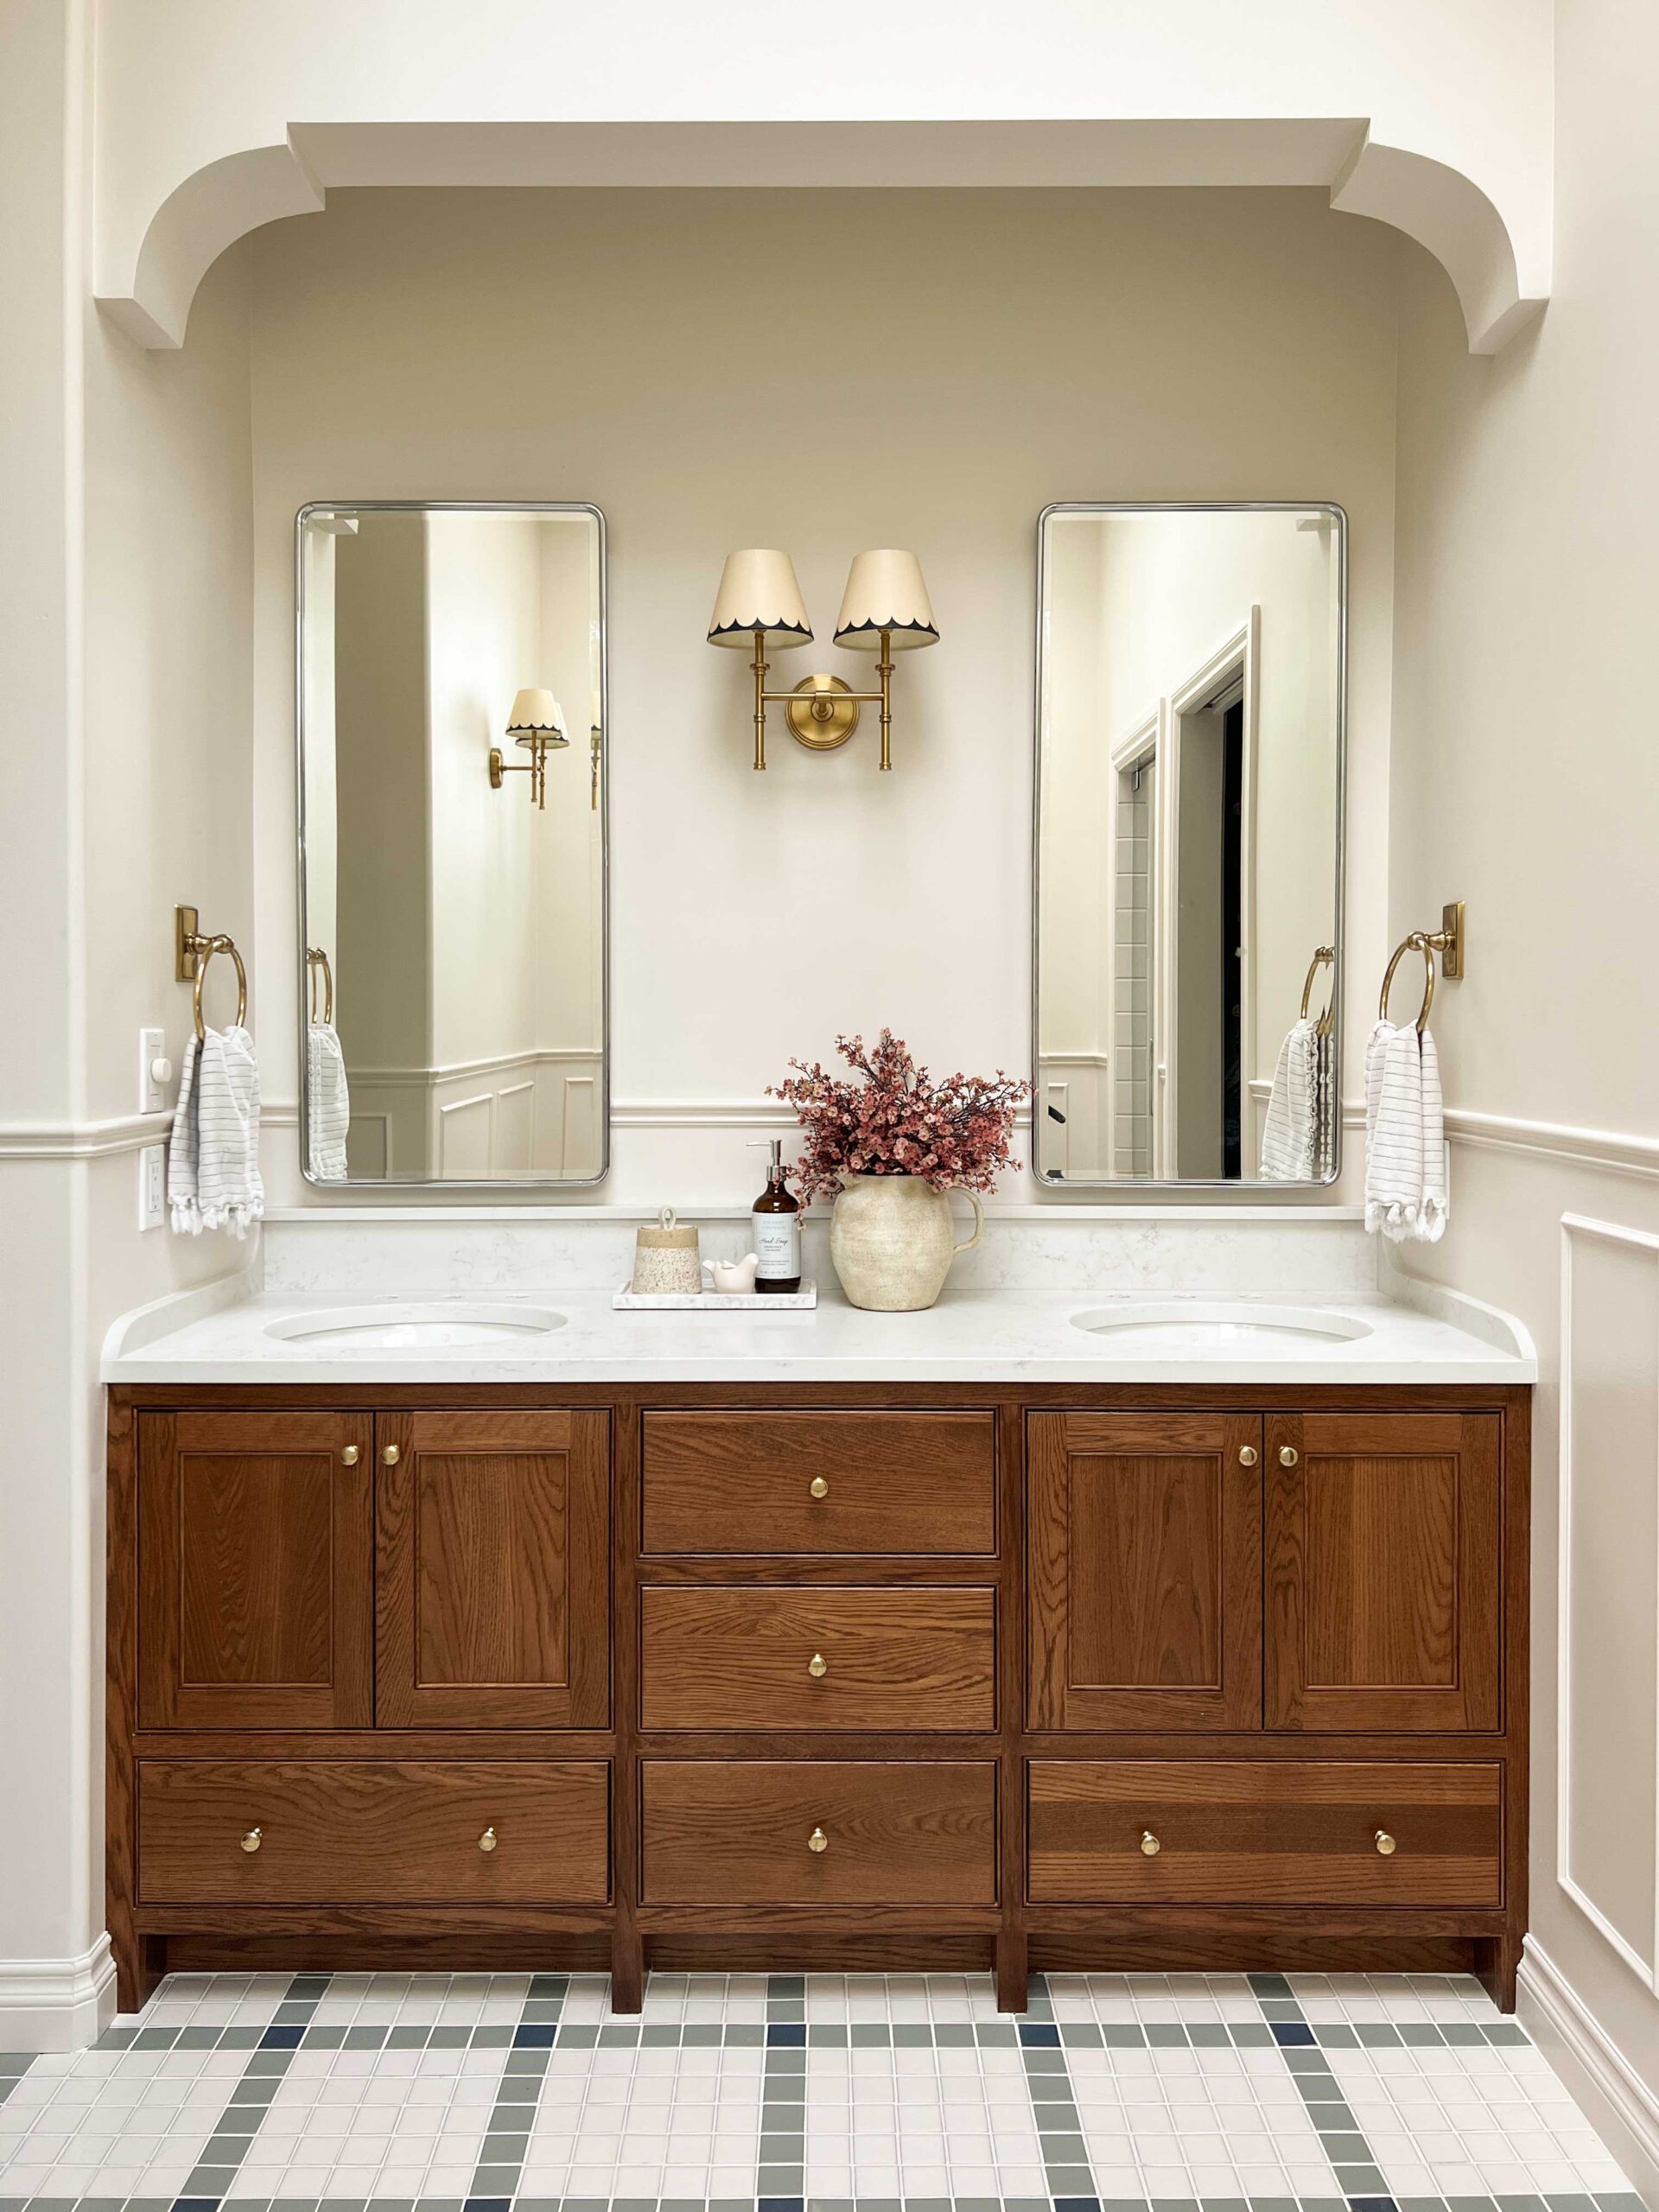
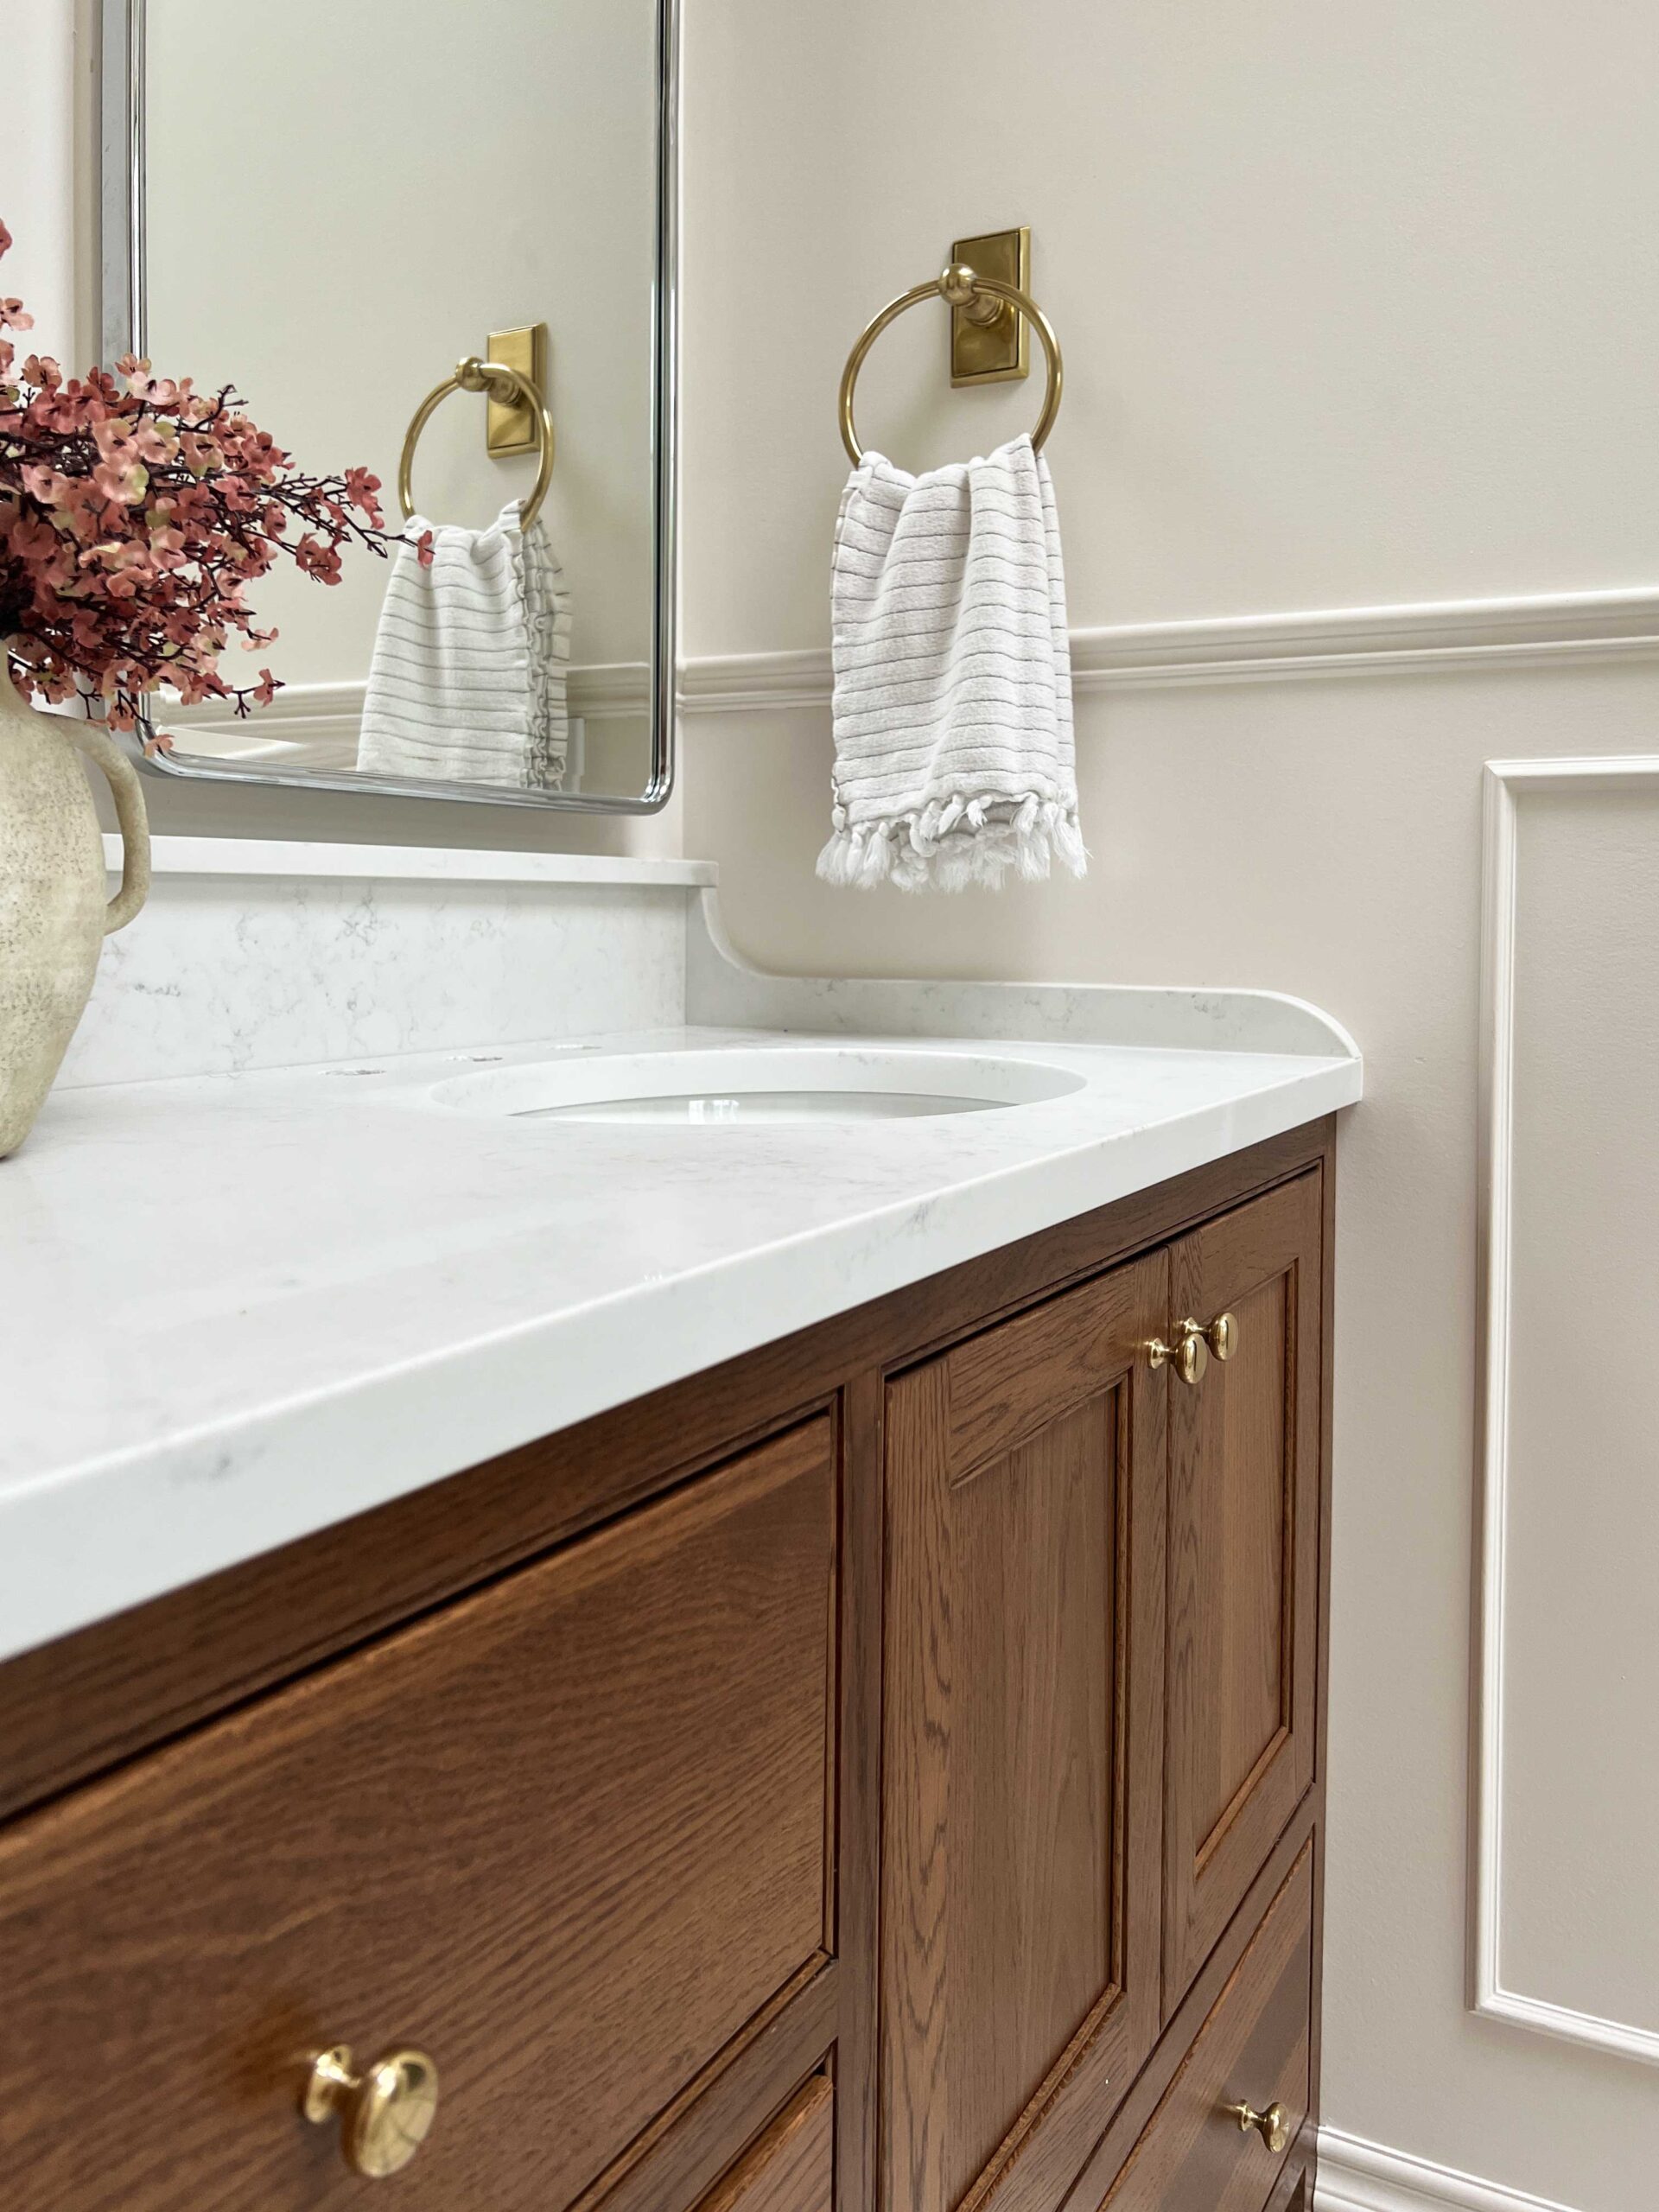
The Final Look
I finished the custom oak vanity off with a custom quartz top that was cut out of a remnant. I added a curved side splash and little top cap detail to make it a little more special and to mimic the look of an old washstand. I finished it off with some beautiful brass knobs from Emtek and I’m just in love with the final look! After years of admiring inset cabinets and thinking I could not have them, I finally have the inset cabinets of my dreams!
All we need now are a few plumbing fixtures and we can put a pin in this bathroom renovation! Stay tuned and sign up for my emails so you don’t miss the reveal!
You Might Also Like:
- The Ensuite Reveal!
- Historic Bathroom Tile Designs using Fireclay
- The Best Primer for Cabinets
- A DIY Kitchen with Ikea Cabinets – the Kitchen Reveal!
- DIY Pull Out Tray for Appliances (Using a Stone Remnant!)
- DIY Pull-Out Cabinet Organization for Hair Tools
- How to DIY Cabinet Filler Strips for a Custom Look
- The Easy Way to Make a Shaker DIY Cabinet Door

….as always, just stunning! Who knew you could live a vanity?! 🥰
Oh, Erin! I love inset too and I’m so thrilled that you got your dream cabs! It looks stunning!!! Of course, I didn’t expect anything less knowing that it is your creation. I’m still so in awe of your confidence and talent with color and pattern! Congrats!!
Thank you so much that is so sweet of you to say!
Thank you so much Grace!
It looks so good Erin!!
Thank you Rifki!
This is beautiful! I’m starting a bathroom remodel project and would love something similar in my home. What dimensions did you use for the sink cabinets and middle drawers?
Hi Kevin! The sink cabinets are 24″ and the middle drawers are 18″. The face frame is about 1 – 1/2″ between the doors and drawers. Hope that helps!
What a beautiful customization! can you update as to the quality one year later? and, about how much was this cabinet at the time?
The quality is fantastic, I have zero things to complain about! The cabinet cost varies highly on where you live, I had to ship to Canada and pay for shipping and duties so I would suggest you request a quote from Cabinet Joint for your project if you would like to know the cost! You can just ask them how much to send me a cabinet just like Erin’s! 🙂
Does the colonial stain feel warm to you at all? I got cherry samples from the cabinet joint and I almost feel like they are too warm for the warm colors, but I’m afraid the darker ones will feel too dark in my space. Wondering about getting a set of Oak samples. If you want to sell yours, let me know! 🤪
Cherry is a naturally red toned wood so oak, especailly white oak, would be less red.
Beautiful! We’re considering using the Cabinet Joint as well. Did you use plain sawn oak? Or a different cut? Thank you!
Yes I think it was the plain sawn. And thank you!
Stunning. Going to do the same with my bathroom (Cabinet Joint inset vanity). Do you have any issues with the inset cabinet due to bathroom humidity?
No we haven’t had any issues!