How to make a DIY Wall Tapestry using Mod Podge
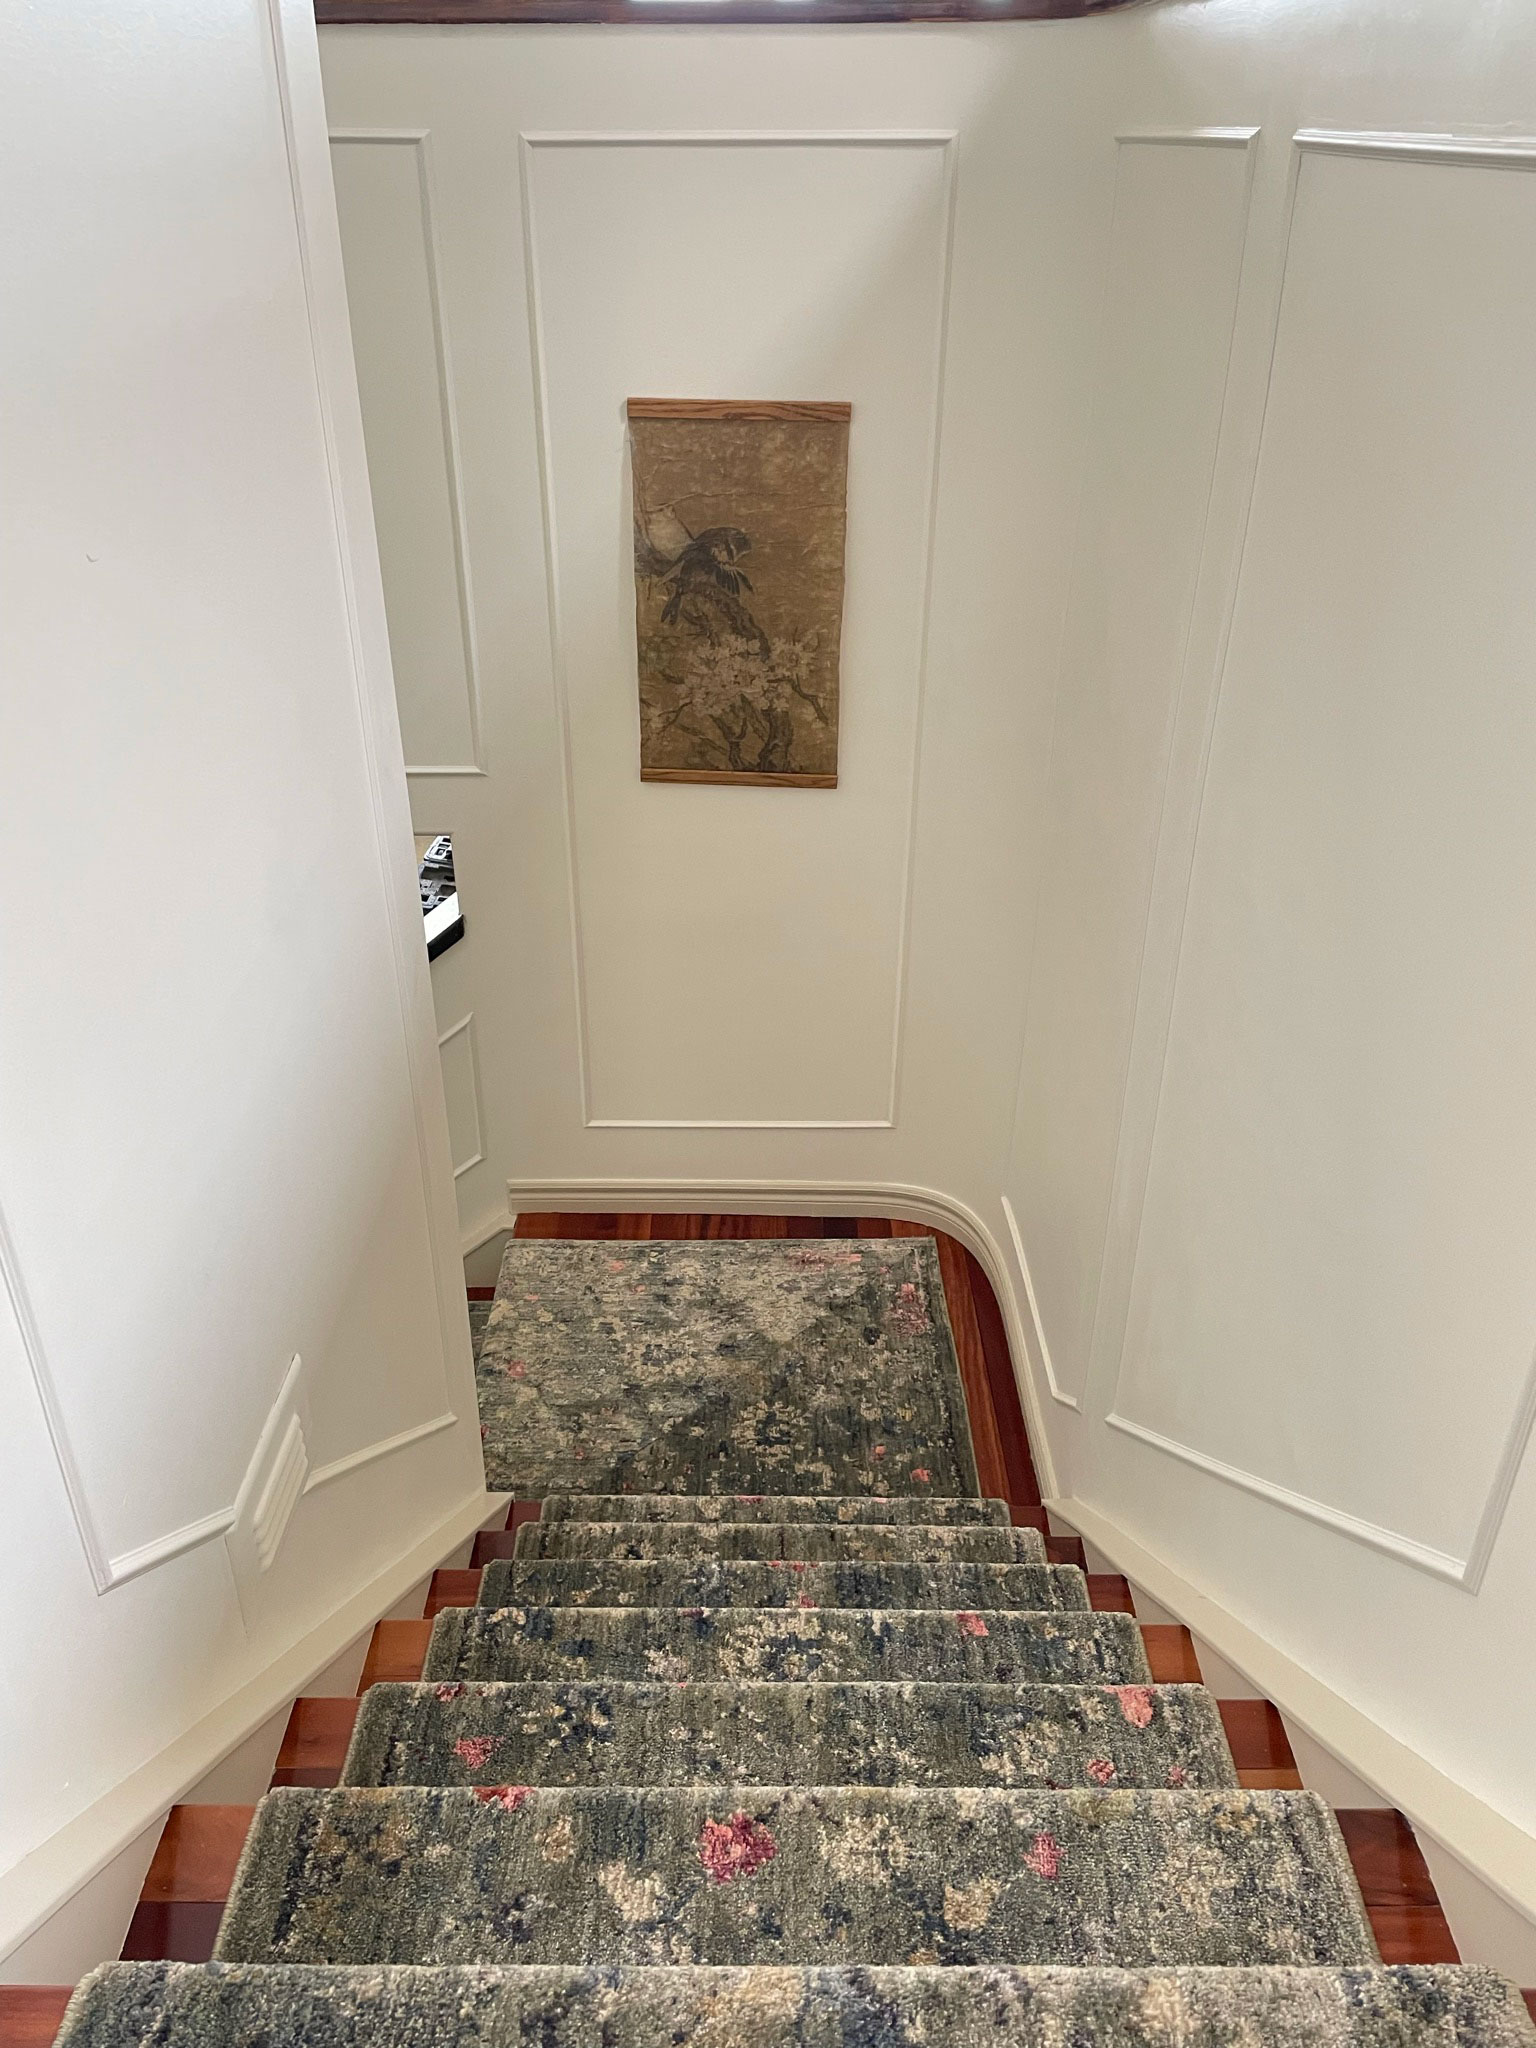
When I was making over my stairwell I really fell in love with this tapestry from Anthropologie. They have so many beautiful tapestries there are they are actually super affordable considering the size! However, the tapestries they make are all a certain size, and I needed something a little bit smaller. So what is a girl to do? Make one, of course! Here is how I made my DIY wall tapestry using Mod Podge, it is such an easy and unique way to get any size of art!

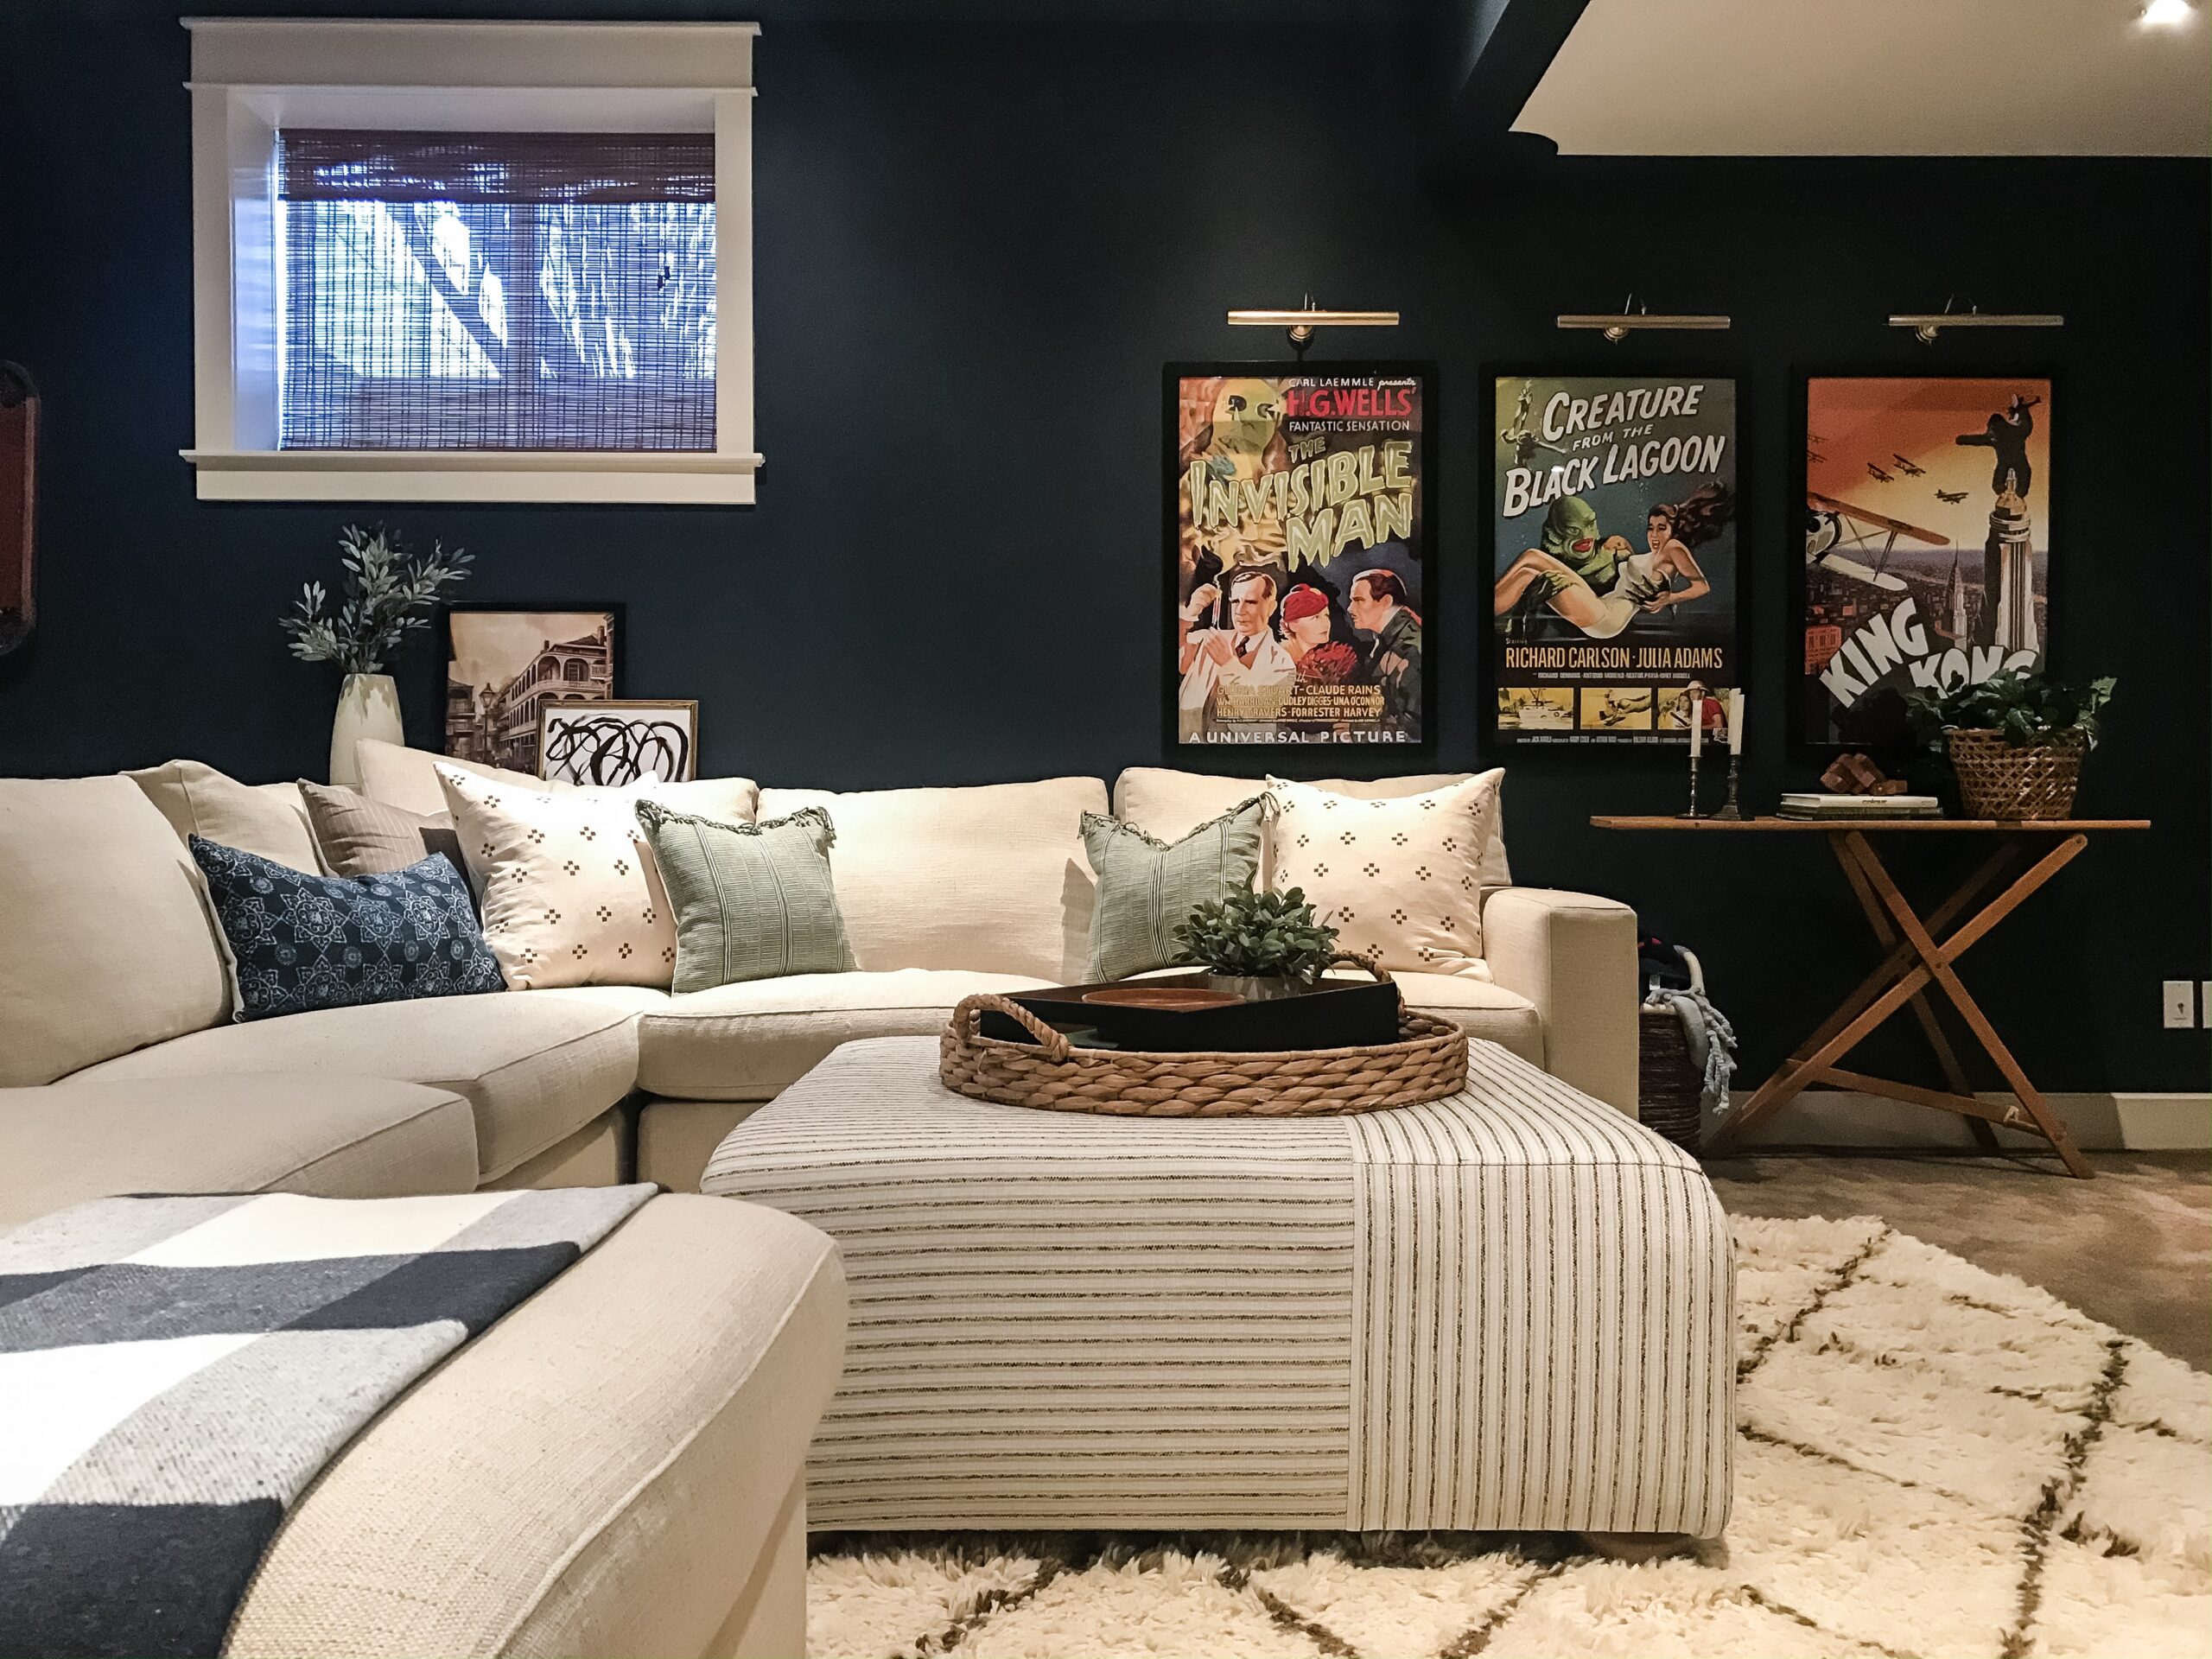
I’m planning on painting my theatre room in the next few weeks and I wanted to change out the art I currently have in there. They are vintage movie posters, and I do like them but I have had them in our media or rec rooms in the last three houses so I felt like I needed a change in my new home. I came up with a little mood board for the space (more on that later) and just felt that something a little more neutral would be better here.
These blank walls are pretty big so I need at least 4 large pieces of large wall art to fill them, so of course I started thinking of budget-friendly and creative ways to get some art up. A great way to do that is by using art from the Public Domain that you download for free. I have a whole post dedicated to affordable art where I talk more about that and this post where I filled a gallery wall of different sizes of art using public domain prints!
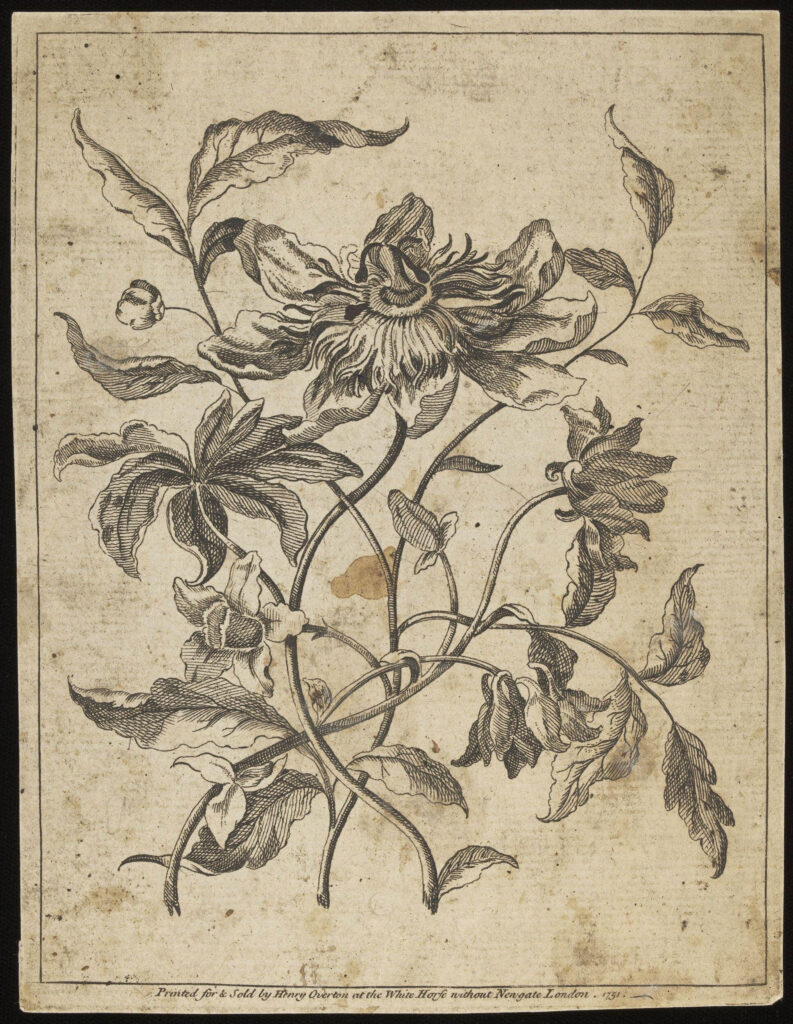
I first found a series of four botanical sketches that I liked and originally I thought that maybe I would just put them in the frames I already had. But I couldn’t help thinking that they would make great wall tapestries, similar to the one I did in my stairwell but on a larger scale.
I decided to give one a try and record the step-by-step instructions this time since I didn’t really document the process all that well the first time. I’m planning on placing my tapestries in a frame, but I’ll also show you how I hung the first one on a wooden frame so you have different options for your own DIY wall hangings! So let’s get to it!
Supplies
This project is pretty straightforward and doesn’t involve a ton of supplies which is why I love it! Here is what you need:
- Art of your choice, printed as an engineering print on regular paper in the size you like (I explain this more, below)
- White fabric – I used scrap fabric I had on hand. You need something fairly sturdy like a canvas or even a thicker drop cloth, I used some blackout fabric that I had leftover but something with a little texture, like a canvas, I think works a bit better.
- Mod Podge (I was approximately 45 years old when I realized it was not called MODGE podge. Anyone else?) I like the matte version for this. Available at your local craft store or Walmart.
- Cheap brush to spread the mod podge
- Frame, wooden dowel or pieces of wood for hanging your DIY wall art
- A clear coat like polyacrylic (or you can also use more mod podge if you don’t have a clear coat on hand)
Choosing the Art and having it printed
First of all, you need to choose the art. Generally, if you take a downloaded piece of art from the public commons that is 8×10″ in real life and blow it up huge, it will not be of the greatest quality. However, that isn’t really the biggest ideal when making a DIY wall tapestry, as the image is going to look crinkled and imperfect anyway.
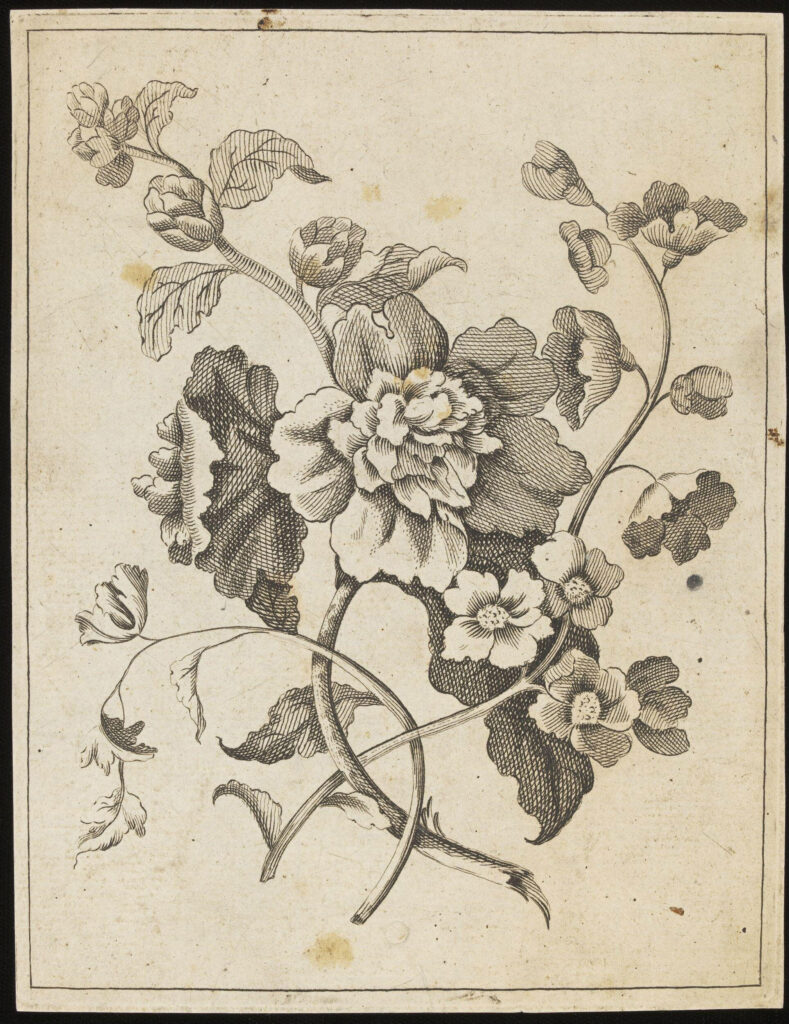
The ones I have done are botanicals because it seems to me that these types of wall tapestries would probably have often been scrolls or sketches. However, there is nothing saying you can’t do this with any piece of art! I think a landscape would work well for this too.
Below are the ones I downloaded. I was looking for a set of 4 that were pretty neutral. I ran this by my family first and my son really likes them because he said they look like tattoos. Okaaaaaay, whatever gets me the stamp of approval I will take! (Click directly on each of these photos to be directed to the Victoria and Albert Musuem where you can download these for FREE!) (Hint: Follow me on Pinterest… on this board I am always adding art I love that is in the public domain!)

The image is going to be reversed when you do the image transfer so if your image has words on it or otherwise can’t be reversed, you will need to manually reverse it to print backwards when you print it. (Just say no to word art though, okay???)
Once you download them, you want to have them printed as Engineering Prints. I have only ever done this at Staples but I am sure it can be done elsewhere too. The Engineering prints are unique because they print on regular paper, not photo paper, which is super important.
If you image is only black and white these are only a few bucks each! If you want colour, they are still really affordable, I think they were around $15 for a 24×36″ size! Even the large sizes are really affordable. Staples does these up to 36×48″, and I’m sure if you wanted a larger size you could find a print shop that would do that for you!
You might have to resize your image to fit the aspect ratio for the size you are printing and make sure you check out how the image will be cropped before you print it and that you are happy with that! For my images, I didn’t do any alterations. I downloaded them, uploaded them to Staples website and printed them. That left me with a border of white around the edge of my 24×36″ print, which is what I wanted – I cut that off and made my art a little smaller than the frame I was using. (More on that later!)

Step-by-Step Tutorial for Making the DIY Wall Tapestry
The tapestry is made using a simple technique that has been around for years: Mod-Podge image transfer. You can transfer an image to almost anything you want. A piece of wood, a rock, the side of your house. (Just kidding about that last one.)
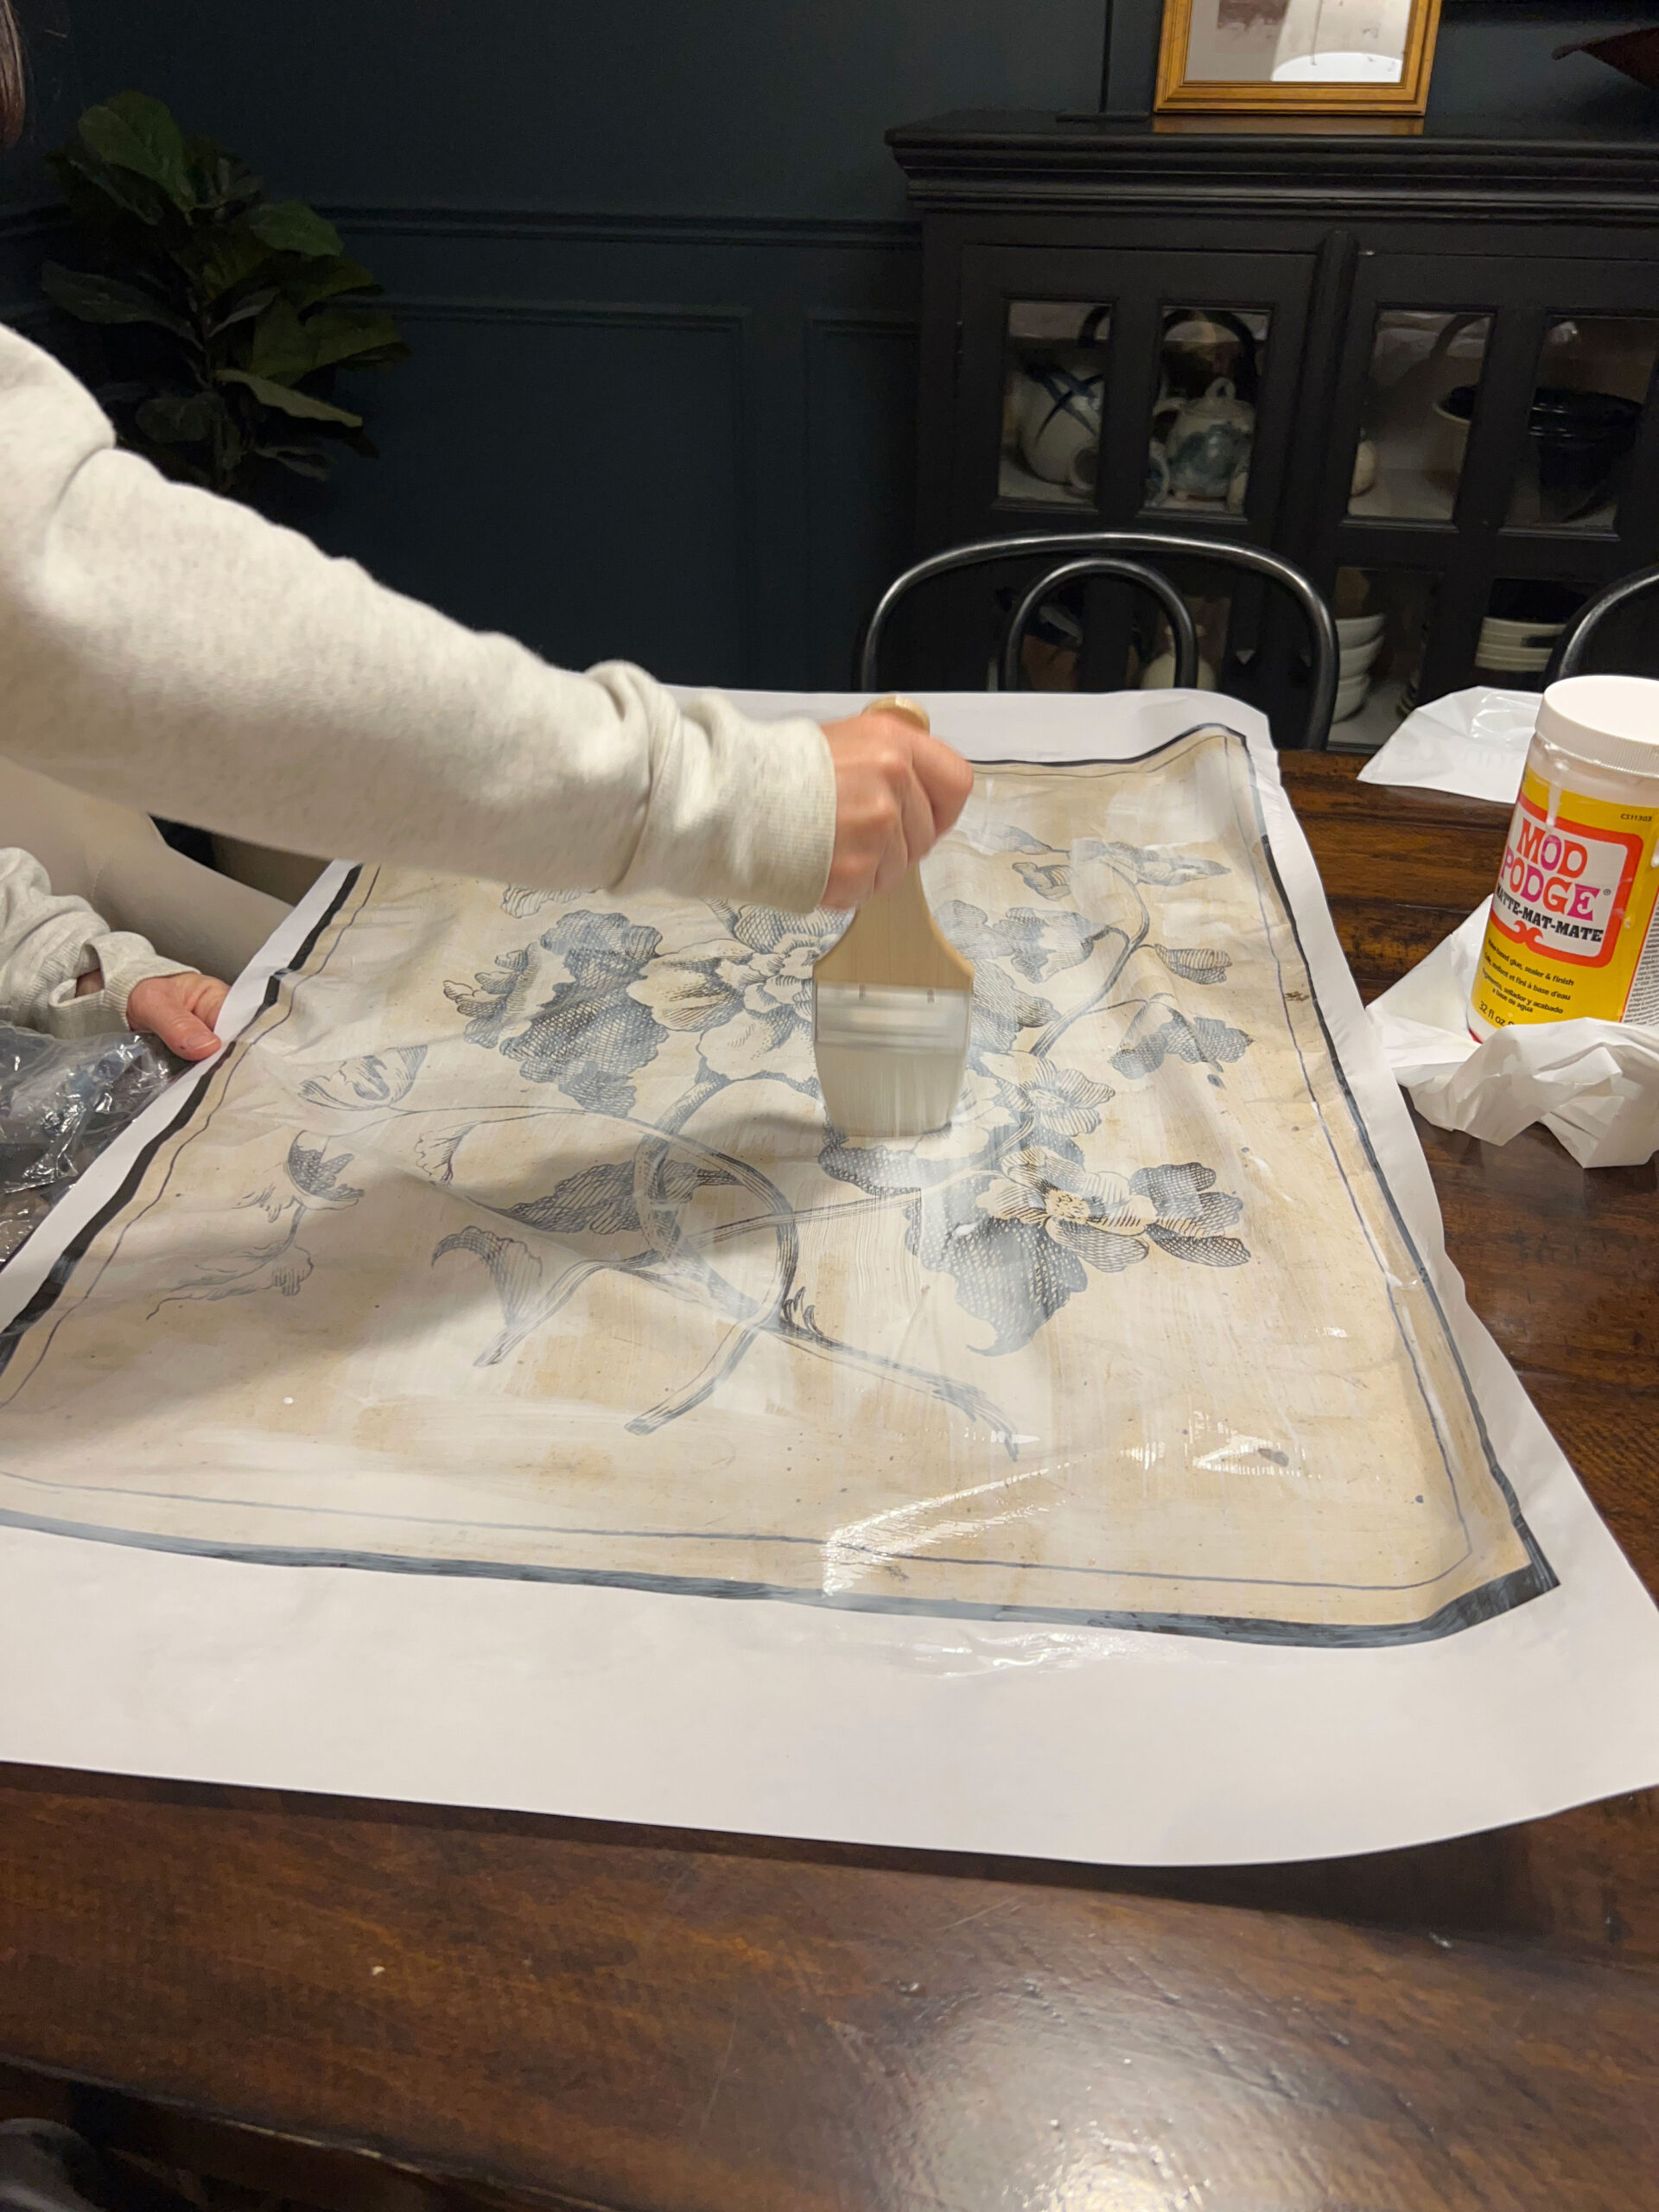
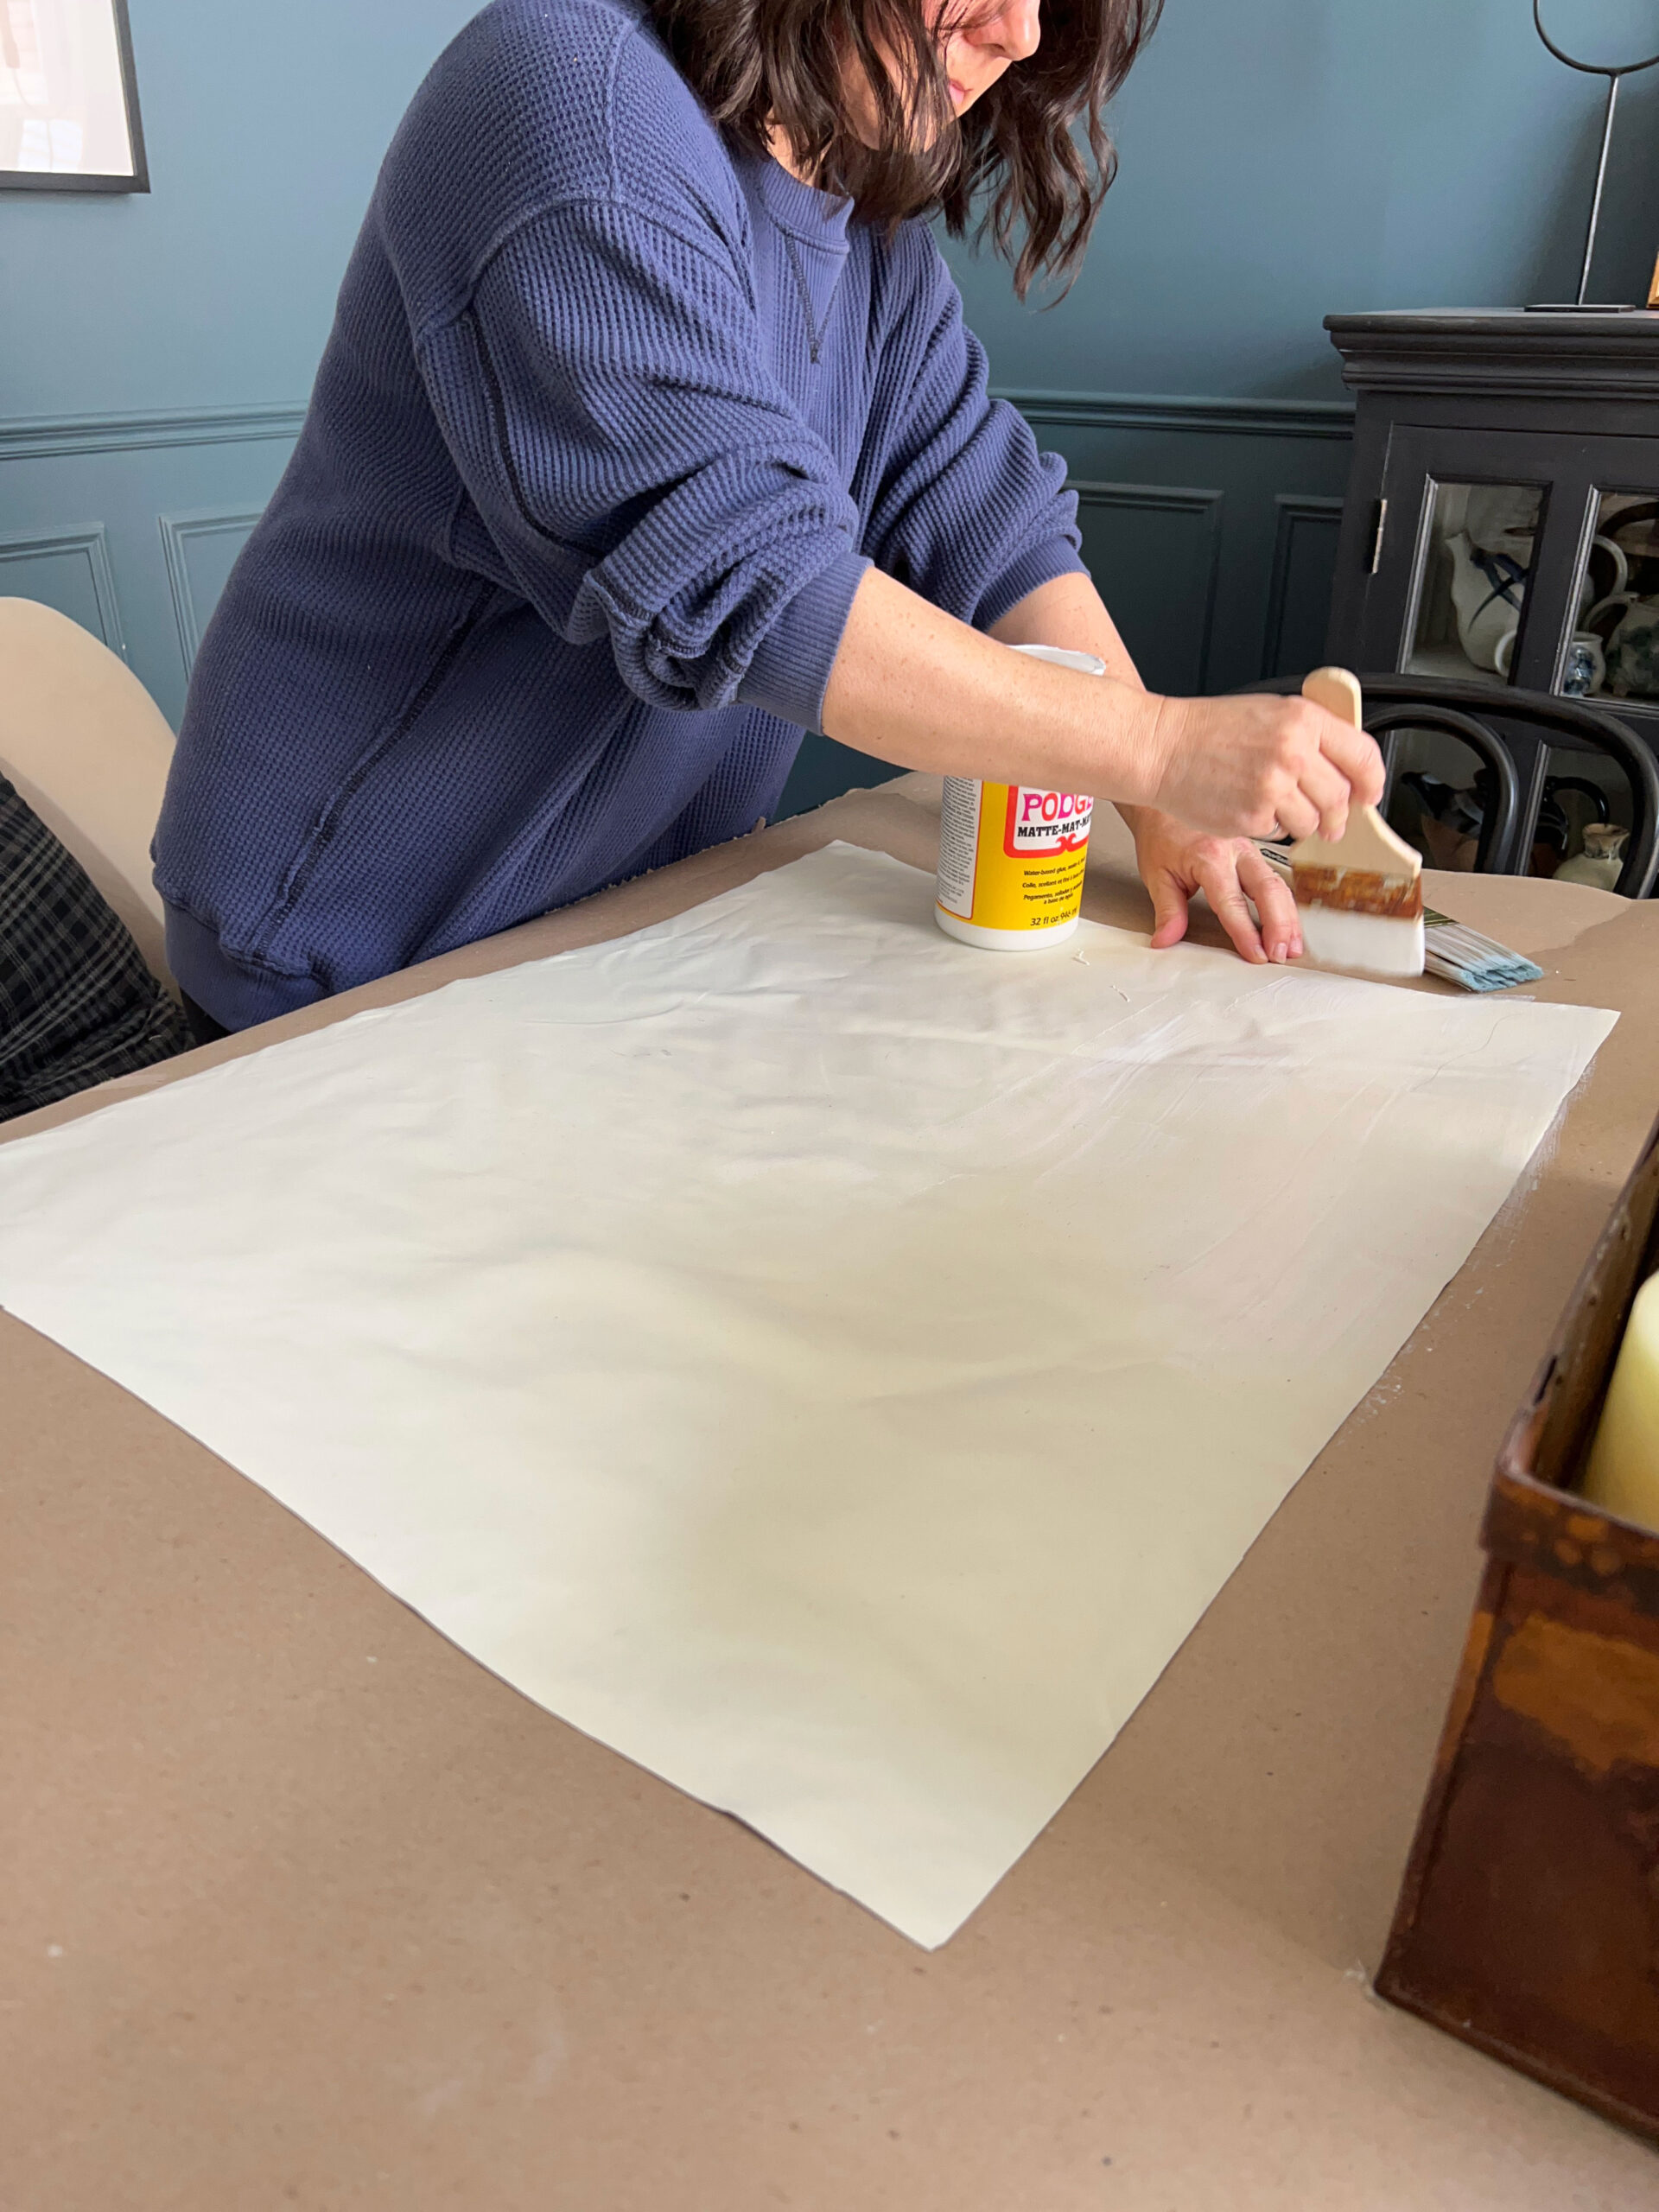
- The first step is to cover your image (the front of it) with Mod Podge and let it dry. Just a nice generous layer using a paintbrush or foam brush. Let that dry.
- Cut a piece of fabric the size of the image you are transferring. As mentioned the fabric works best if it s a bit of a heavier weight. I used canvas material the first time and I think that turned out a little nicer than the leftover blackout fabric I used the second time, but they both worked. I wouldn’t use a lightweight type of fabric for this (Like a white sheet).

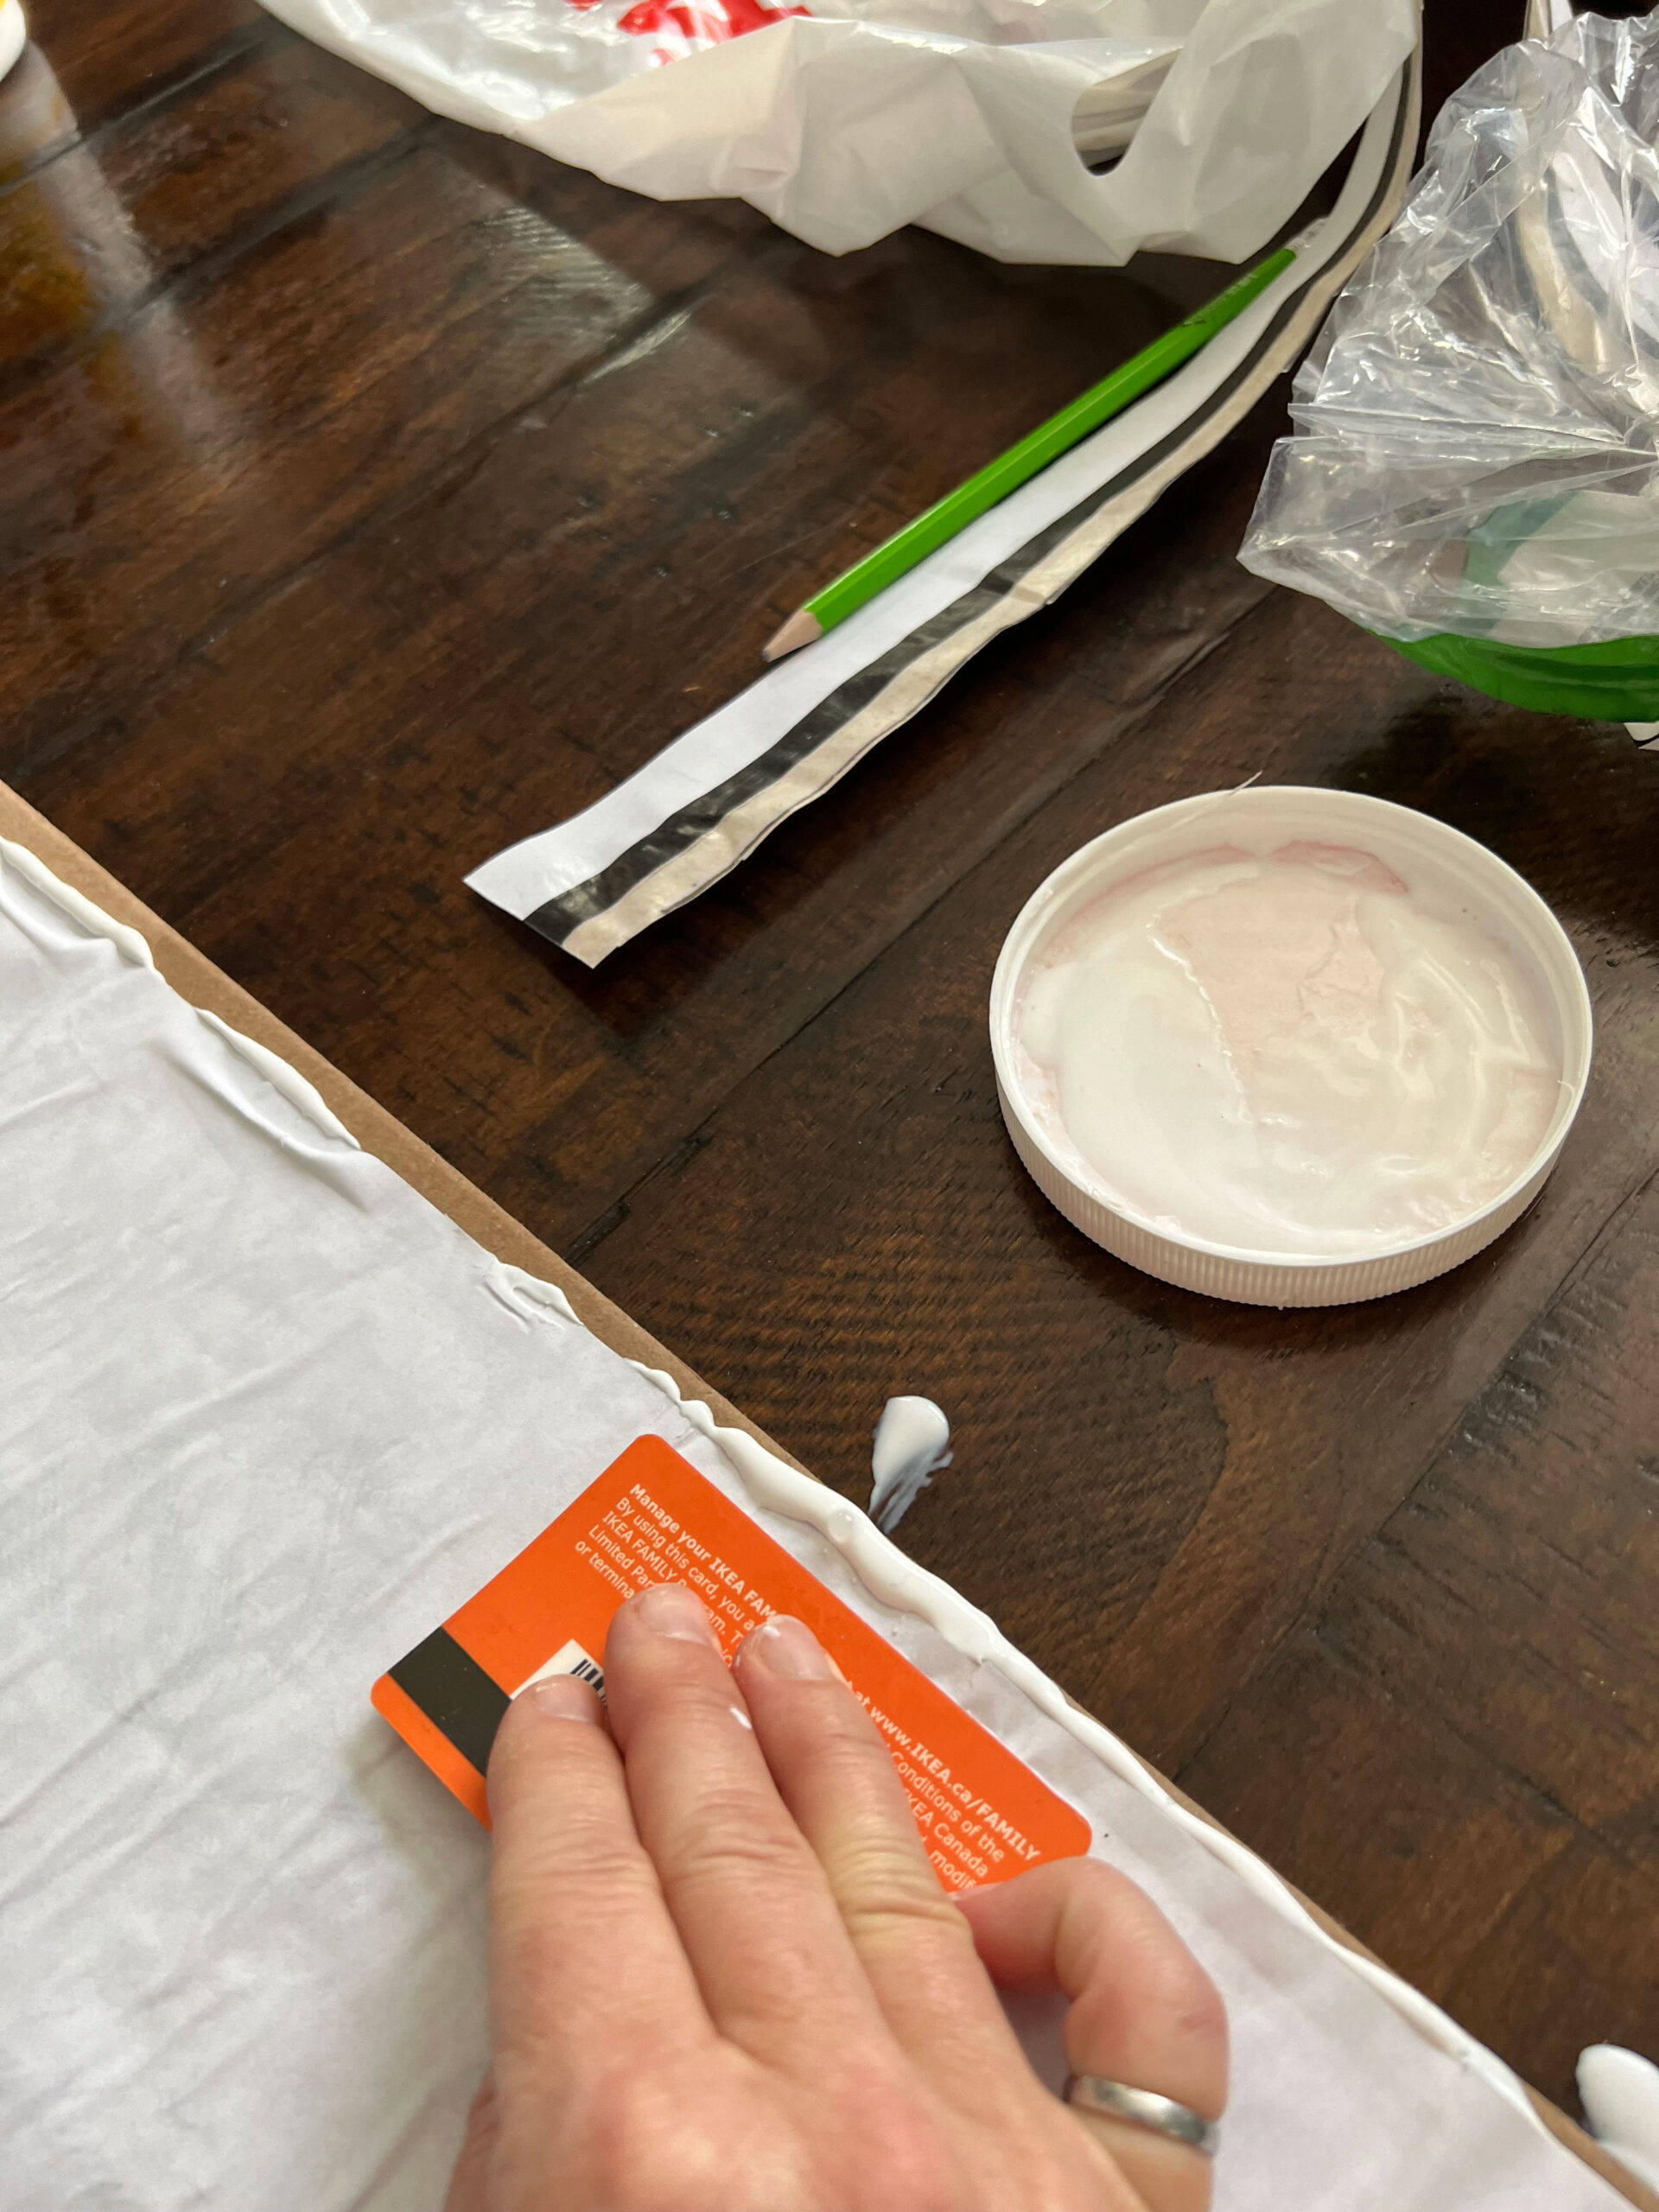
- When the image is dry, take your fabric piece and cover it with a layer of mod podge. You want to cover it well but don’t put it on too thick or you will be squeezing all that mod podge out in a later step and that gets messy and all over your kitchen table. (Ask me how I know that). You want to work as quickly as you can to not give the mod podge time to dry.
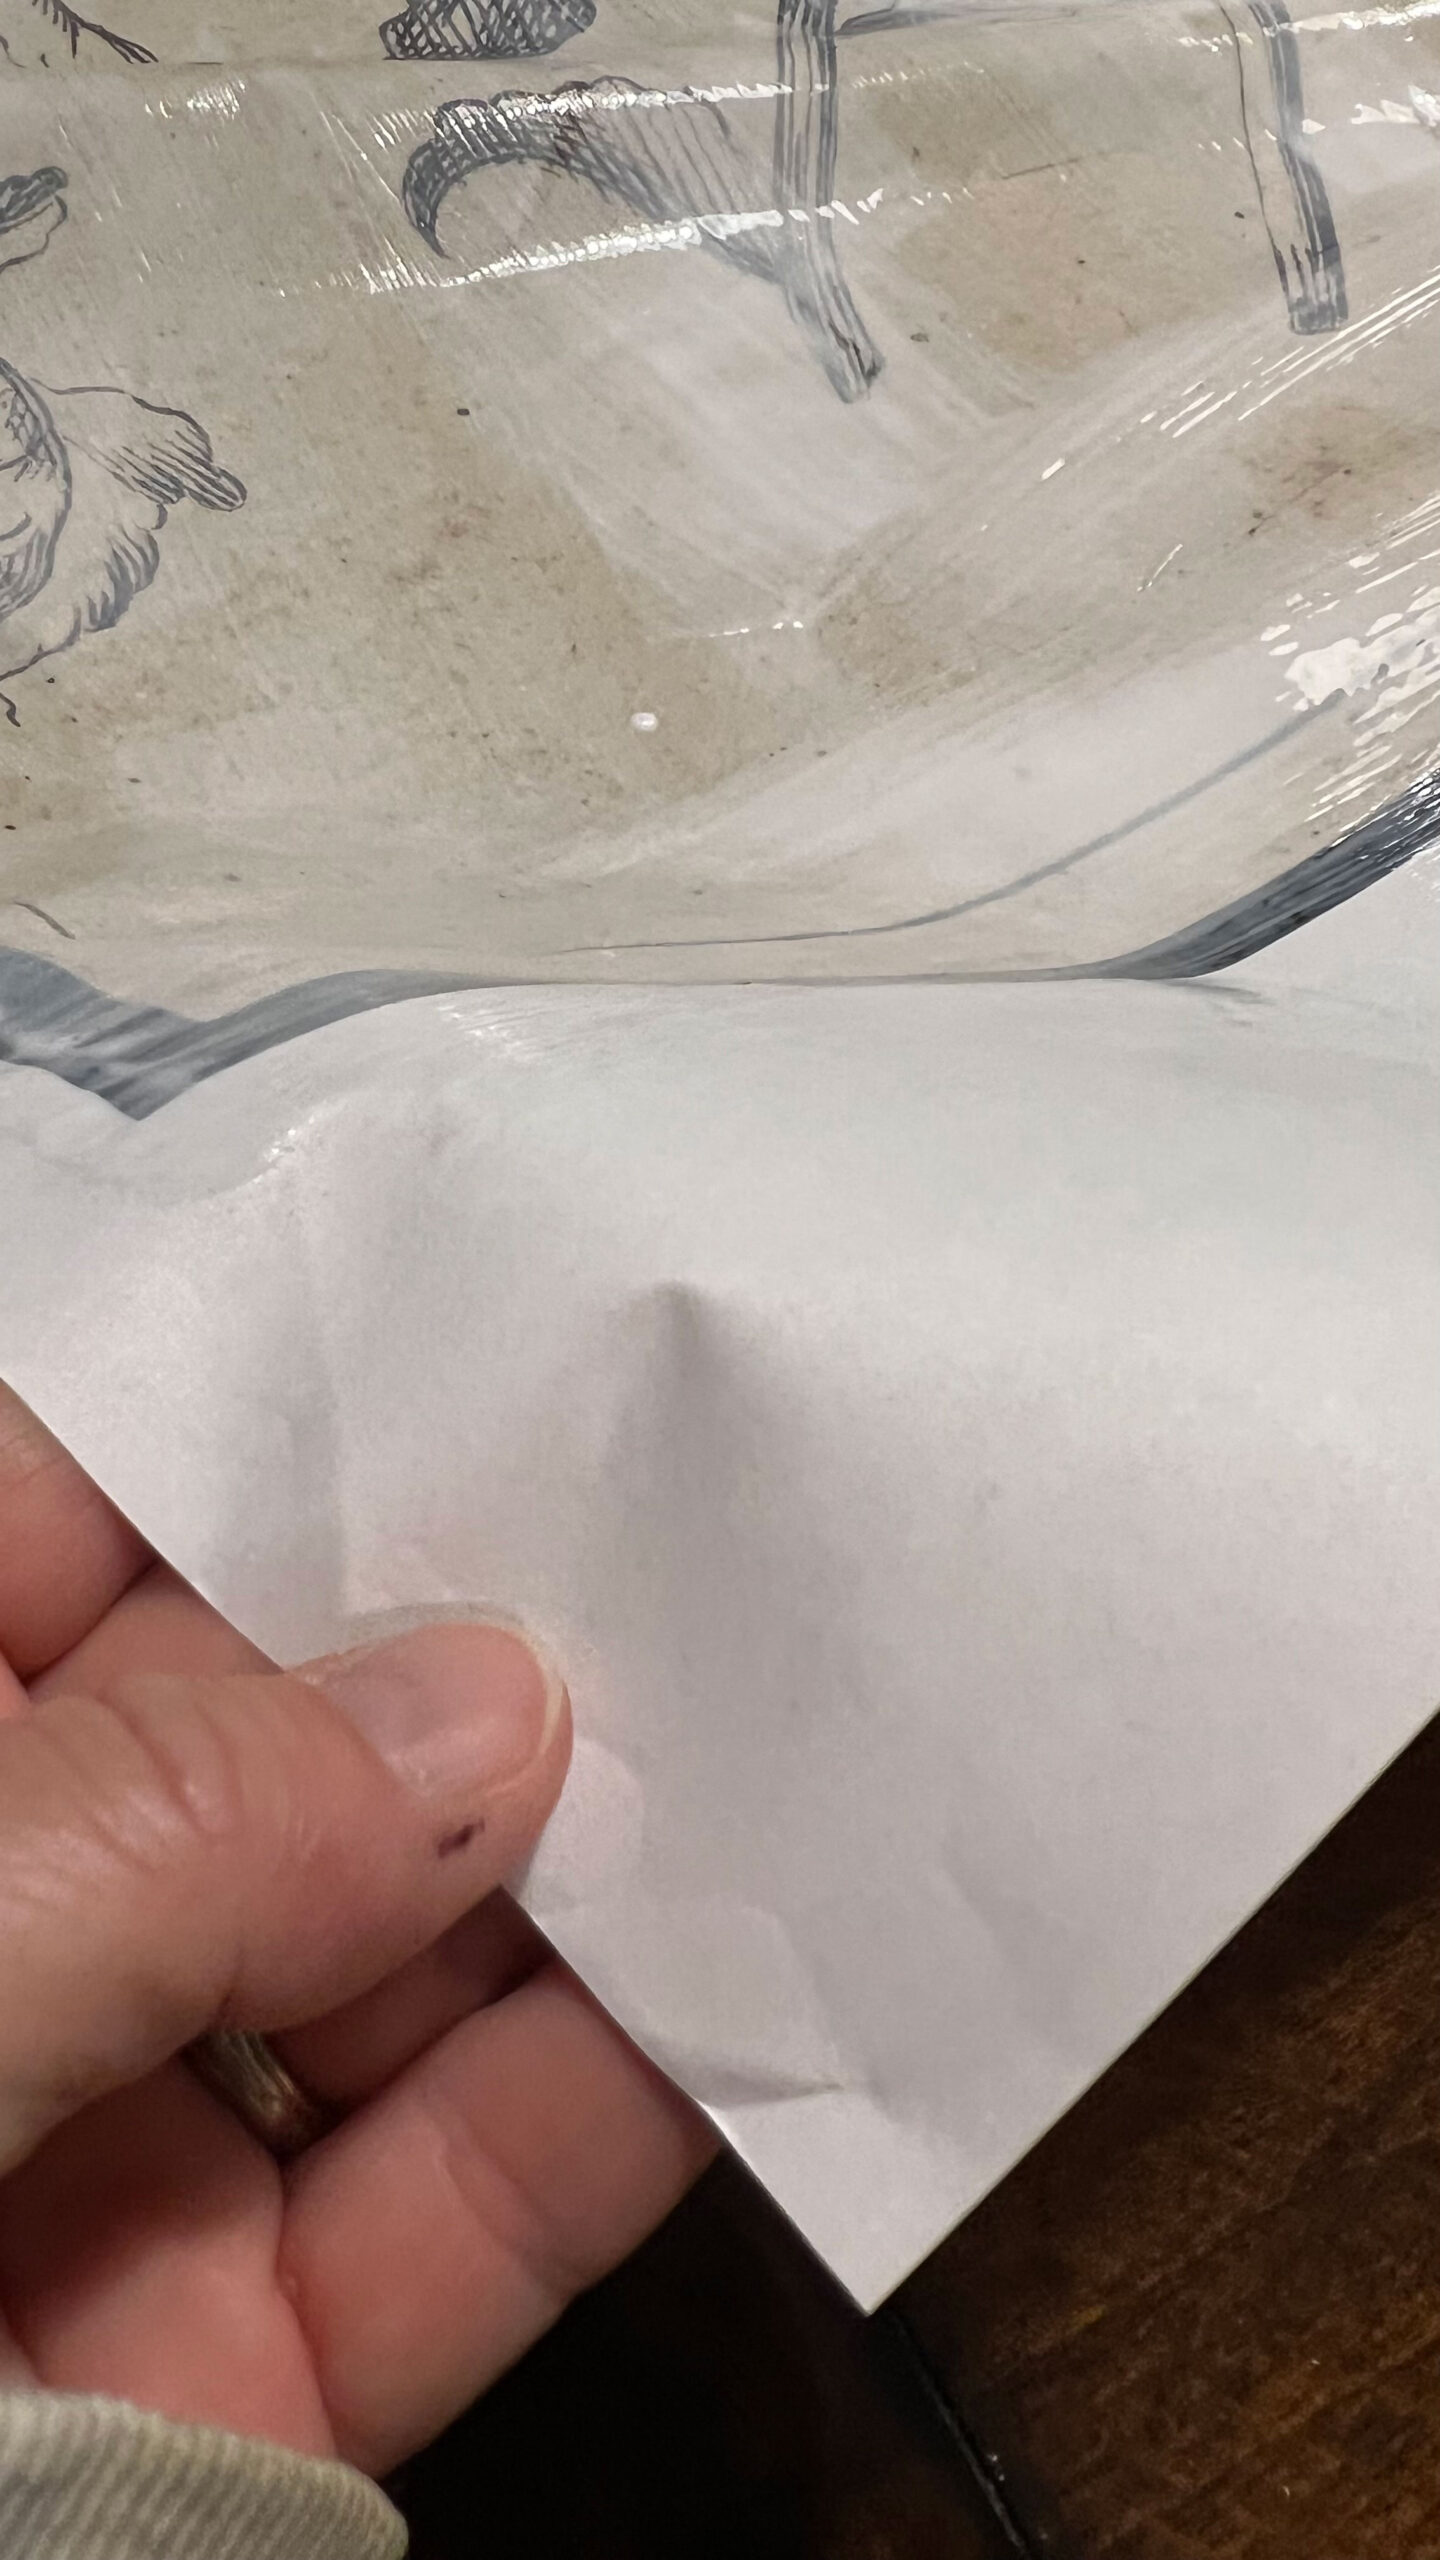
- When the fabric is completely covered, press your image face down onto it.
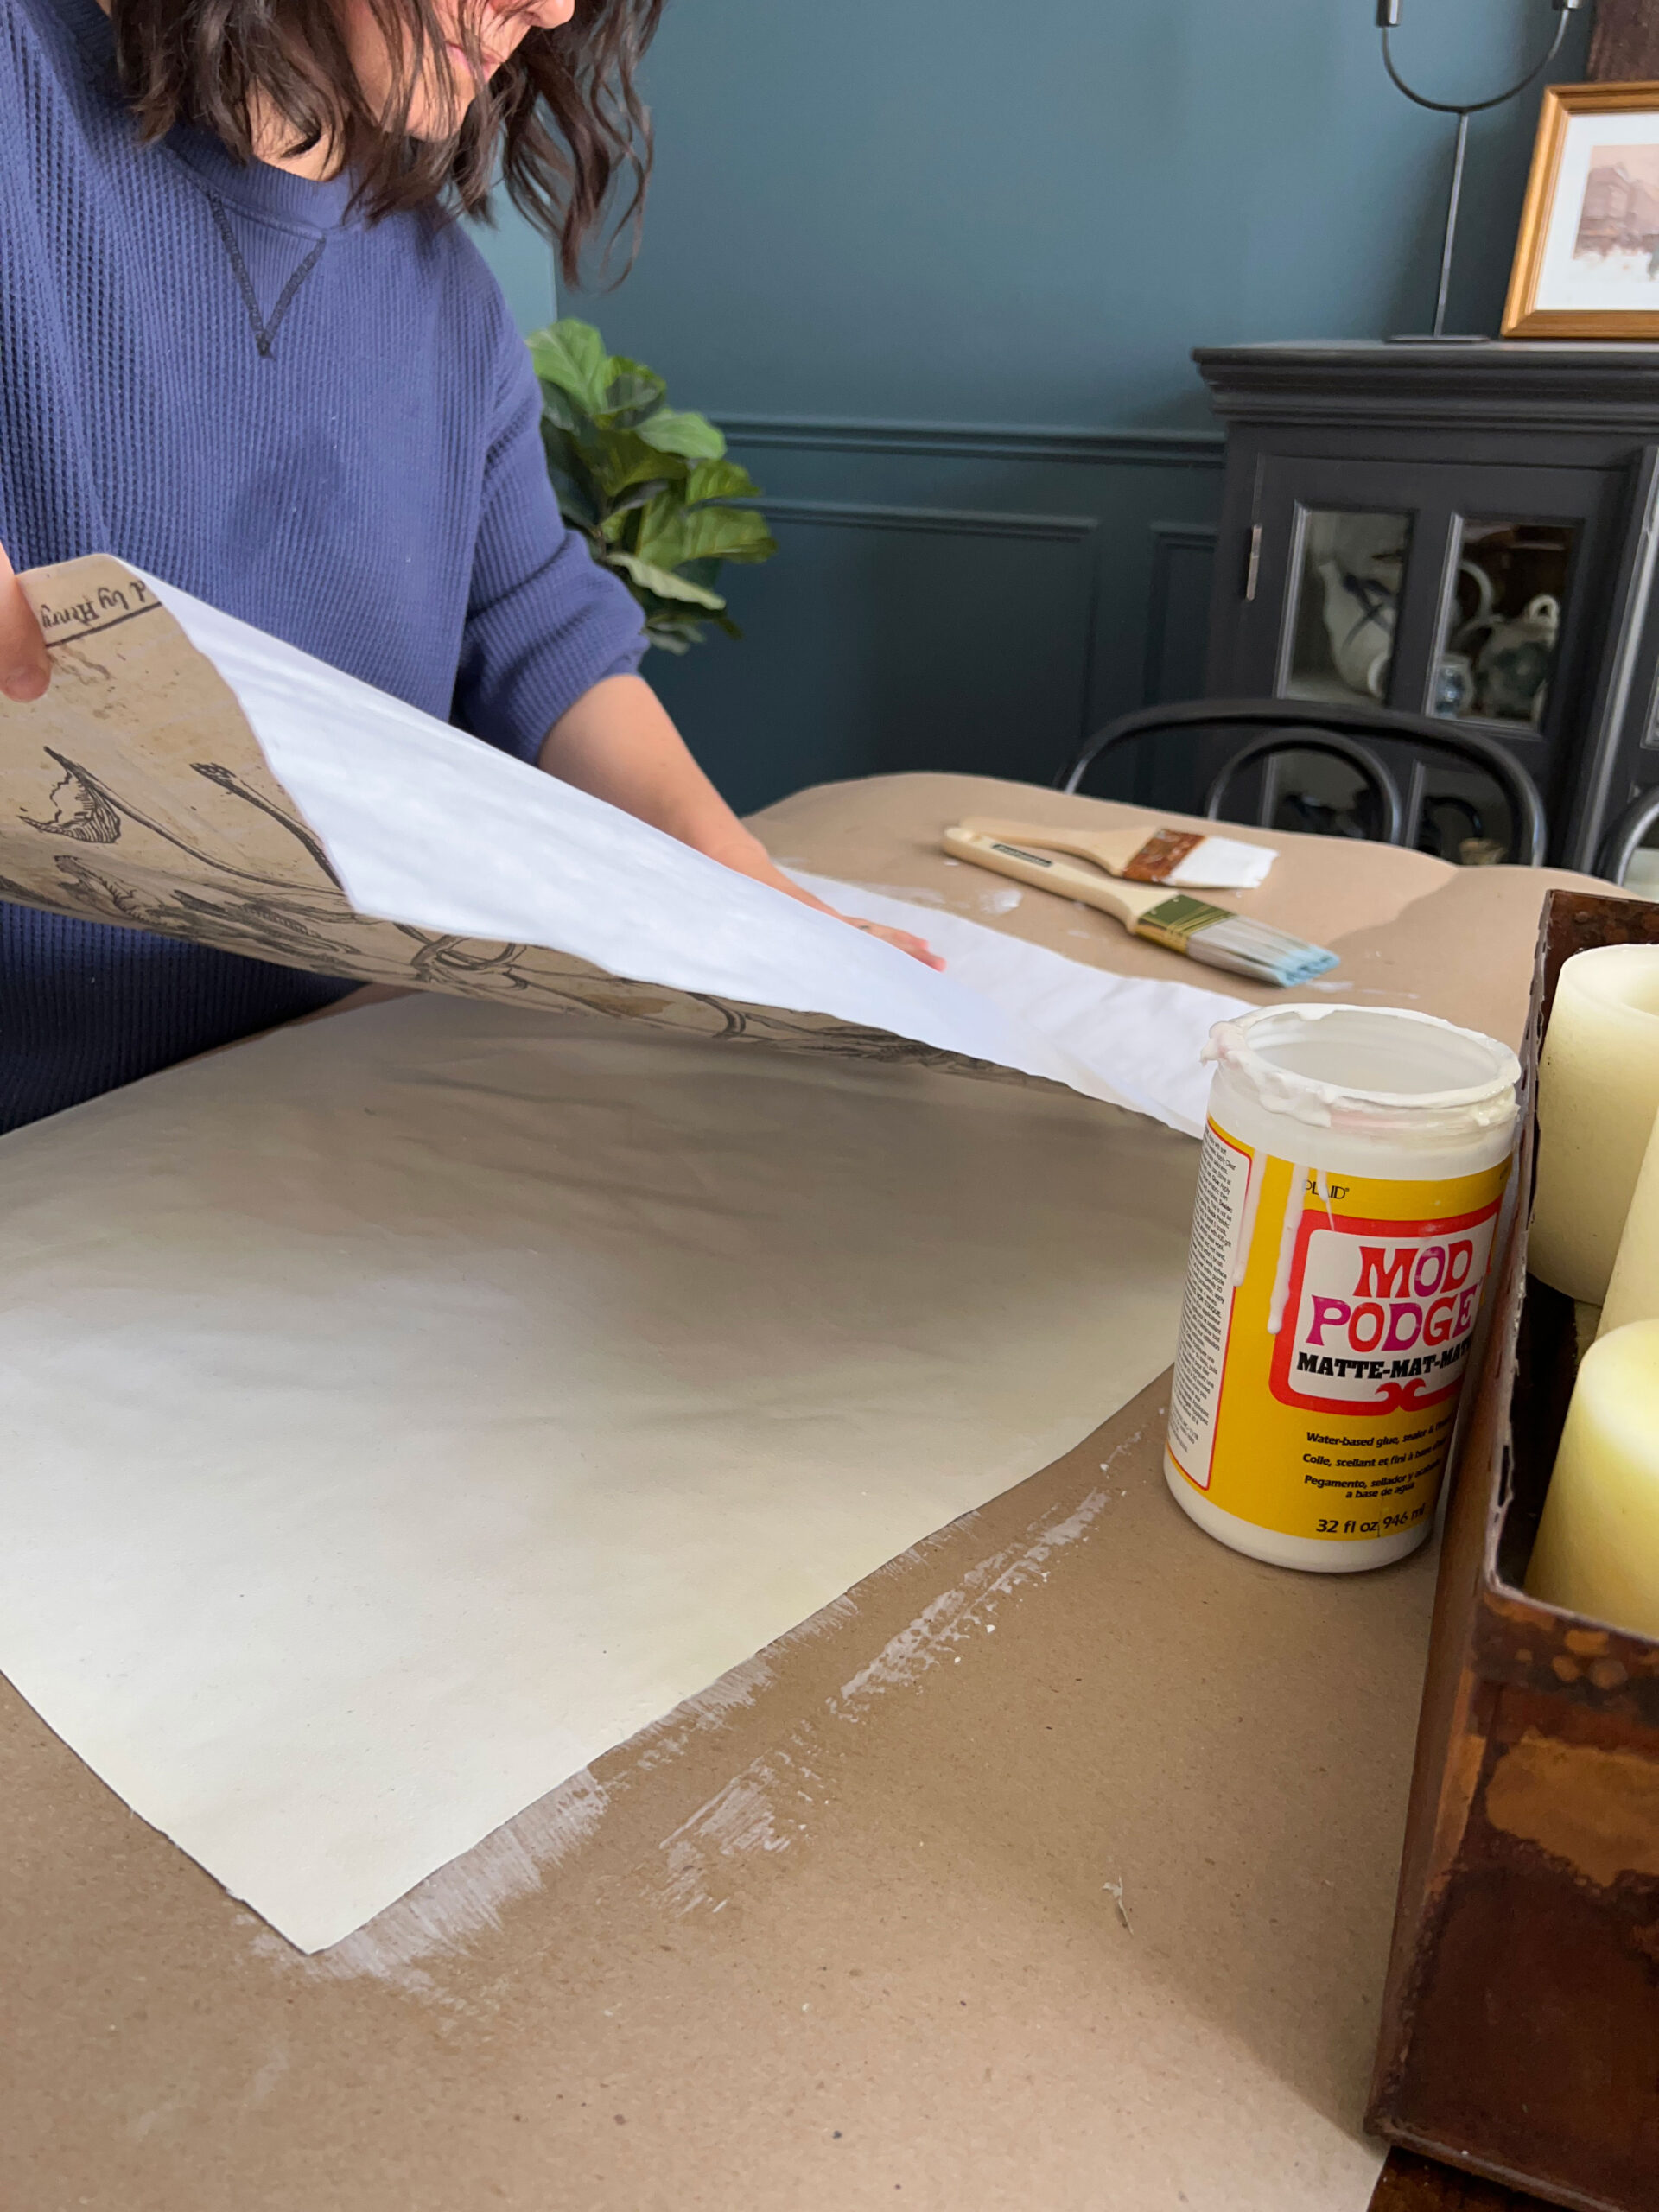
- Smooth the image to the fabric as best as you can with your hands, working out the bubbles. You can also use a flat edge (like a credit card) to work the bubbles out. Start at the center and work your way to the edge of the fabric. Some mod podge is going to squeak out the sides so make sure that you have plastic or cardboard set out to protect your work surface.
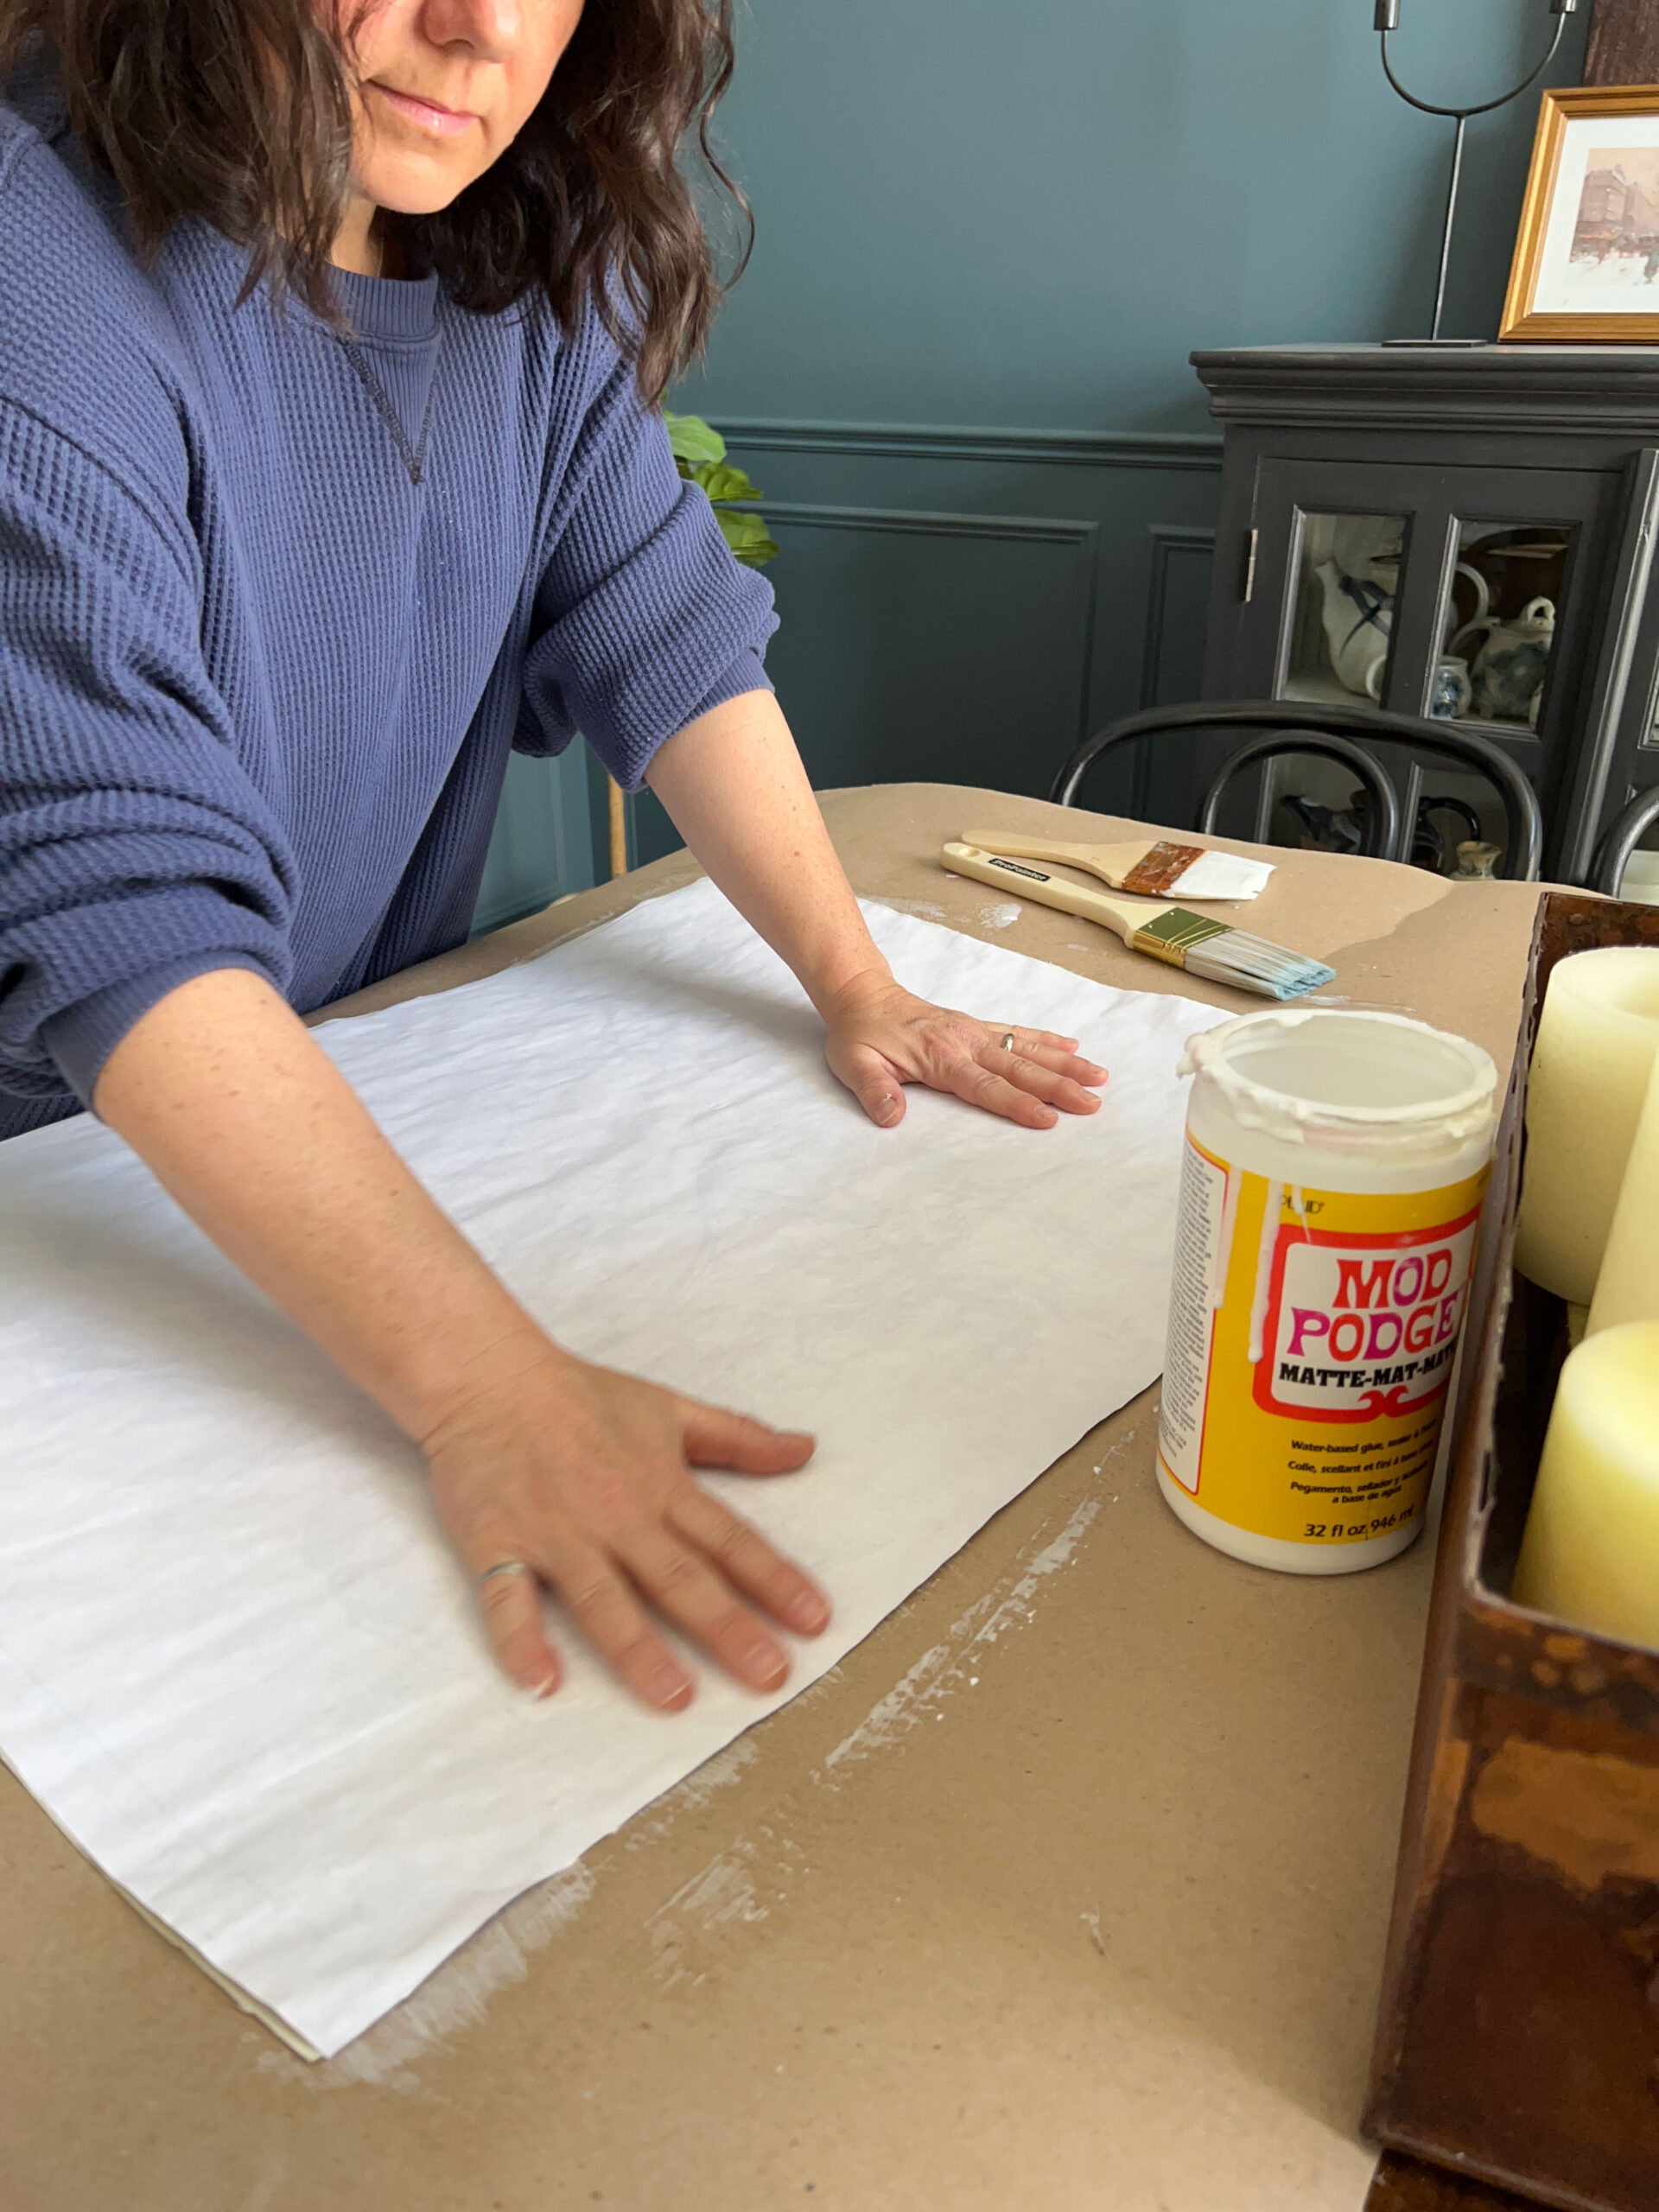
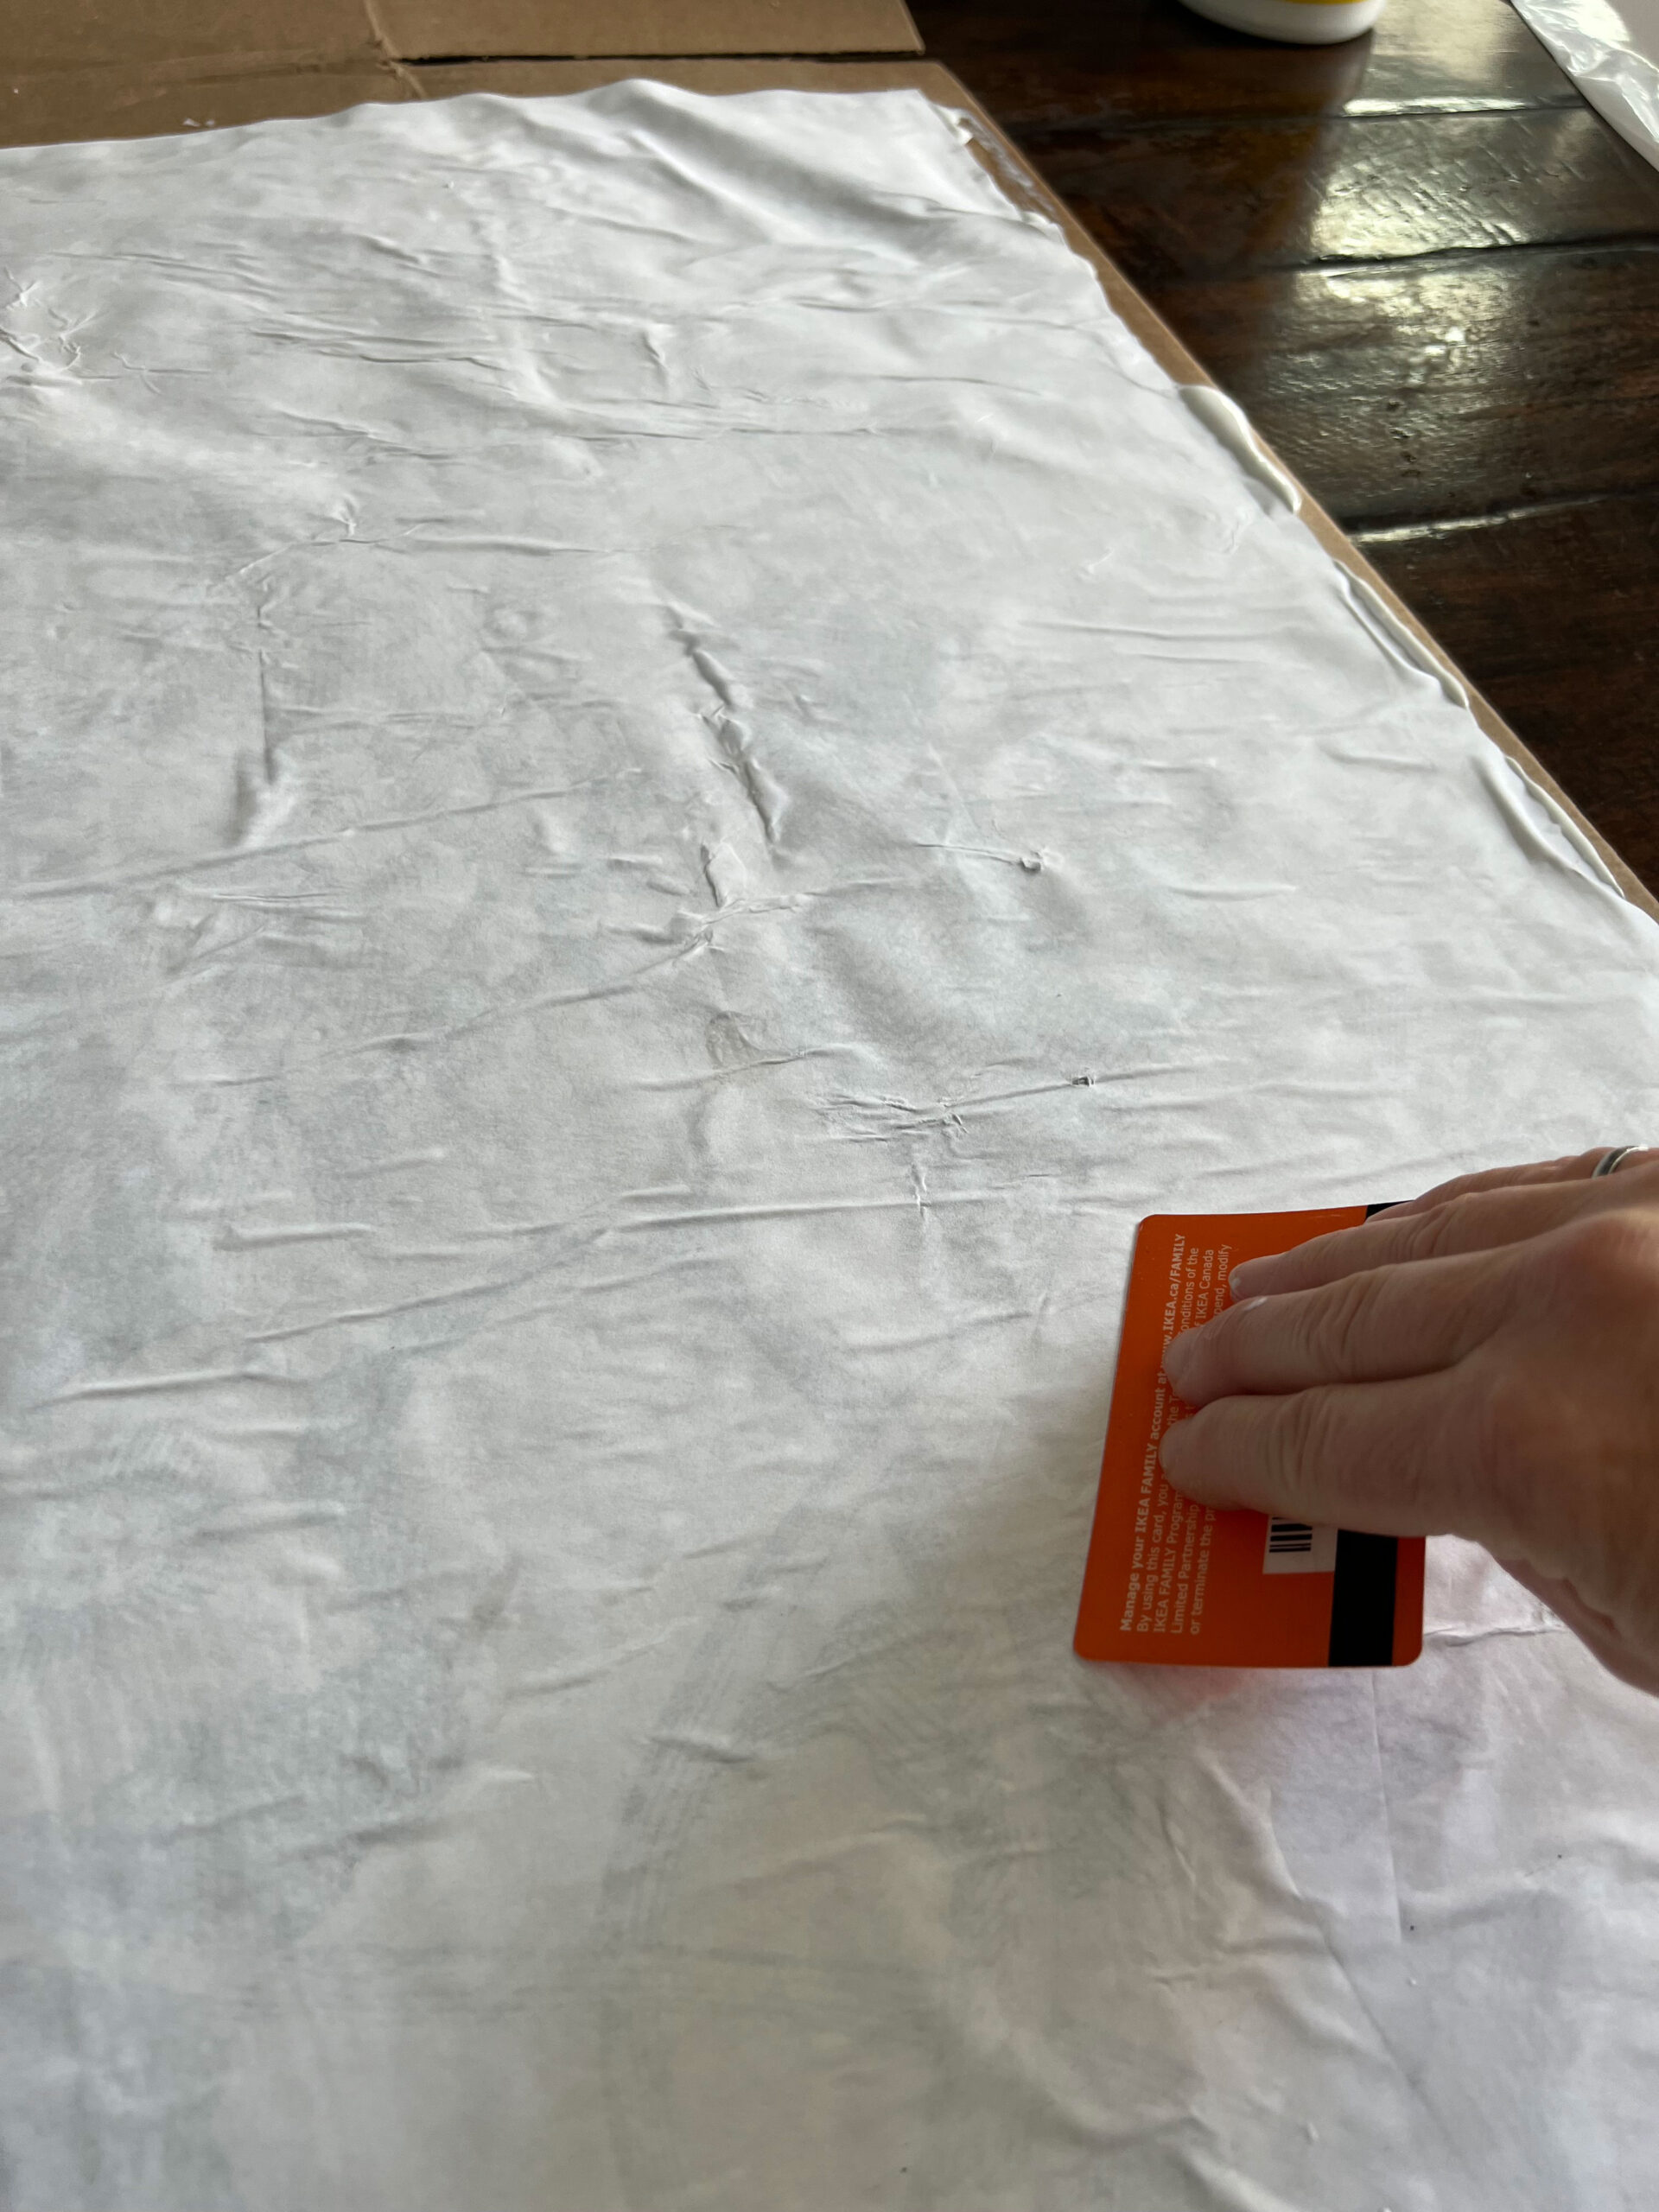
- You want to do your best to make sure that there are no bubbles and that the image and the fabric have good contact. You will end up having wrinkles on the paper, don’t sweat that. They actually add to the charm.
- Once you have worked out all the bubbles, set this aside to fully dry. I left this for a few days before moving on to the next step and I think that helped with the success of the transfer.
- When the paper and the fabric sandwich you made are dry, get a little bowl of water and a paintbrush and wet the paper side. The paper will get wet and soggy and that is why you have to do this with regular paper, and not photo paper!
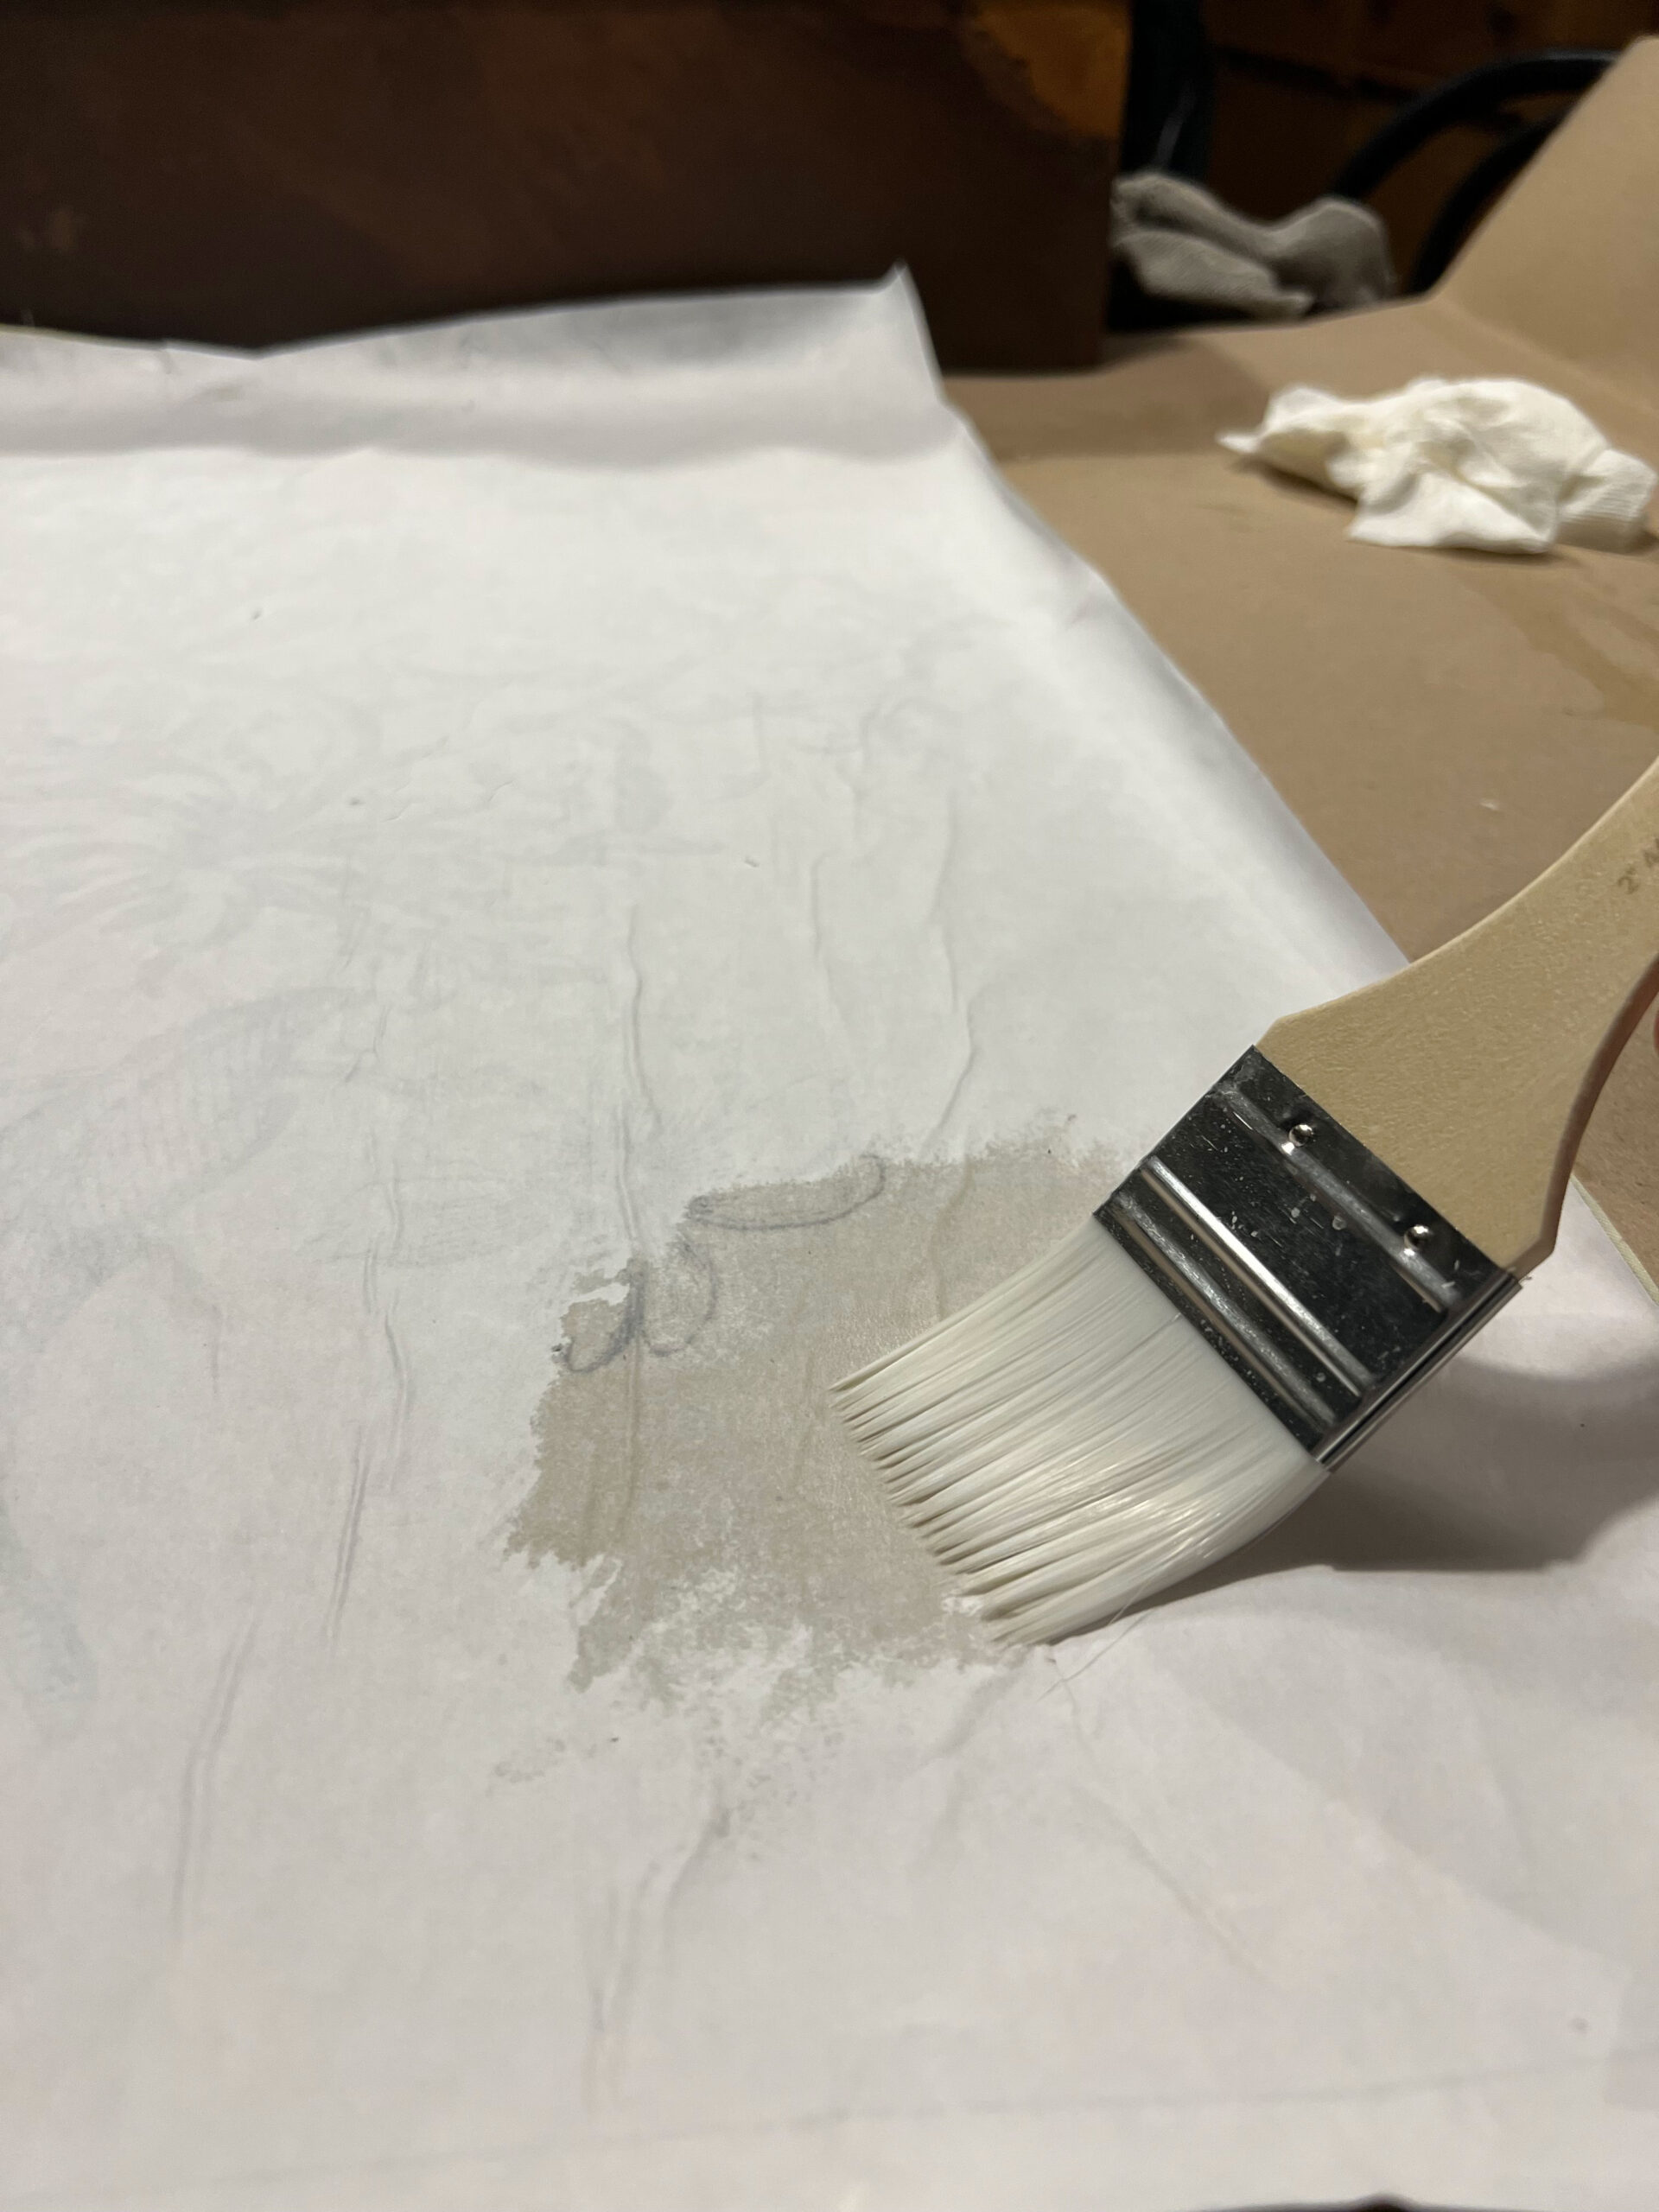
- Once it starts to look wet, you can start to rub off the paper with your fingers. The paper will sort of ball up and peel off in little sections and the image is magically transferred to the fabric! (If you want to see a video tutorial of this, I have a saved highlight in my Instagram Stories). This is both gross and satisfying.
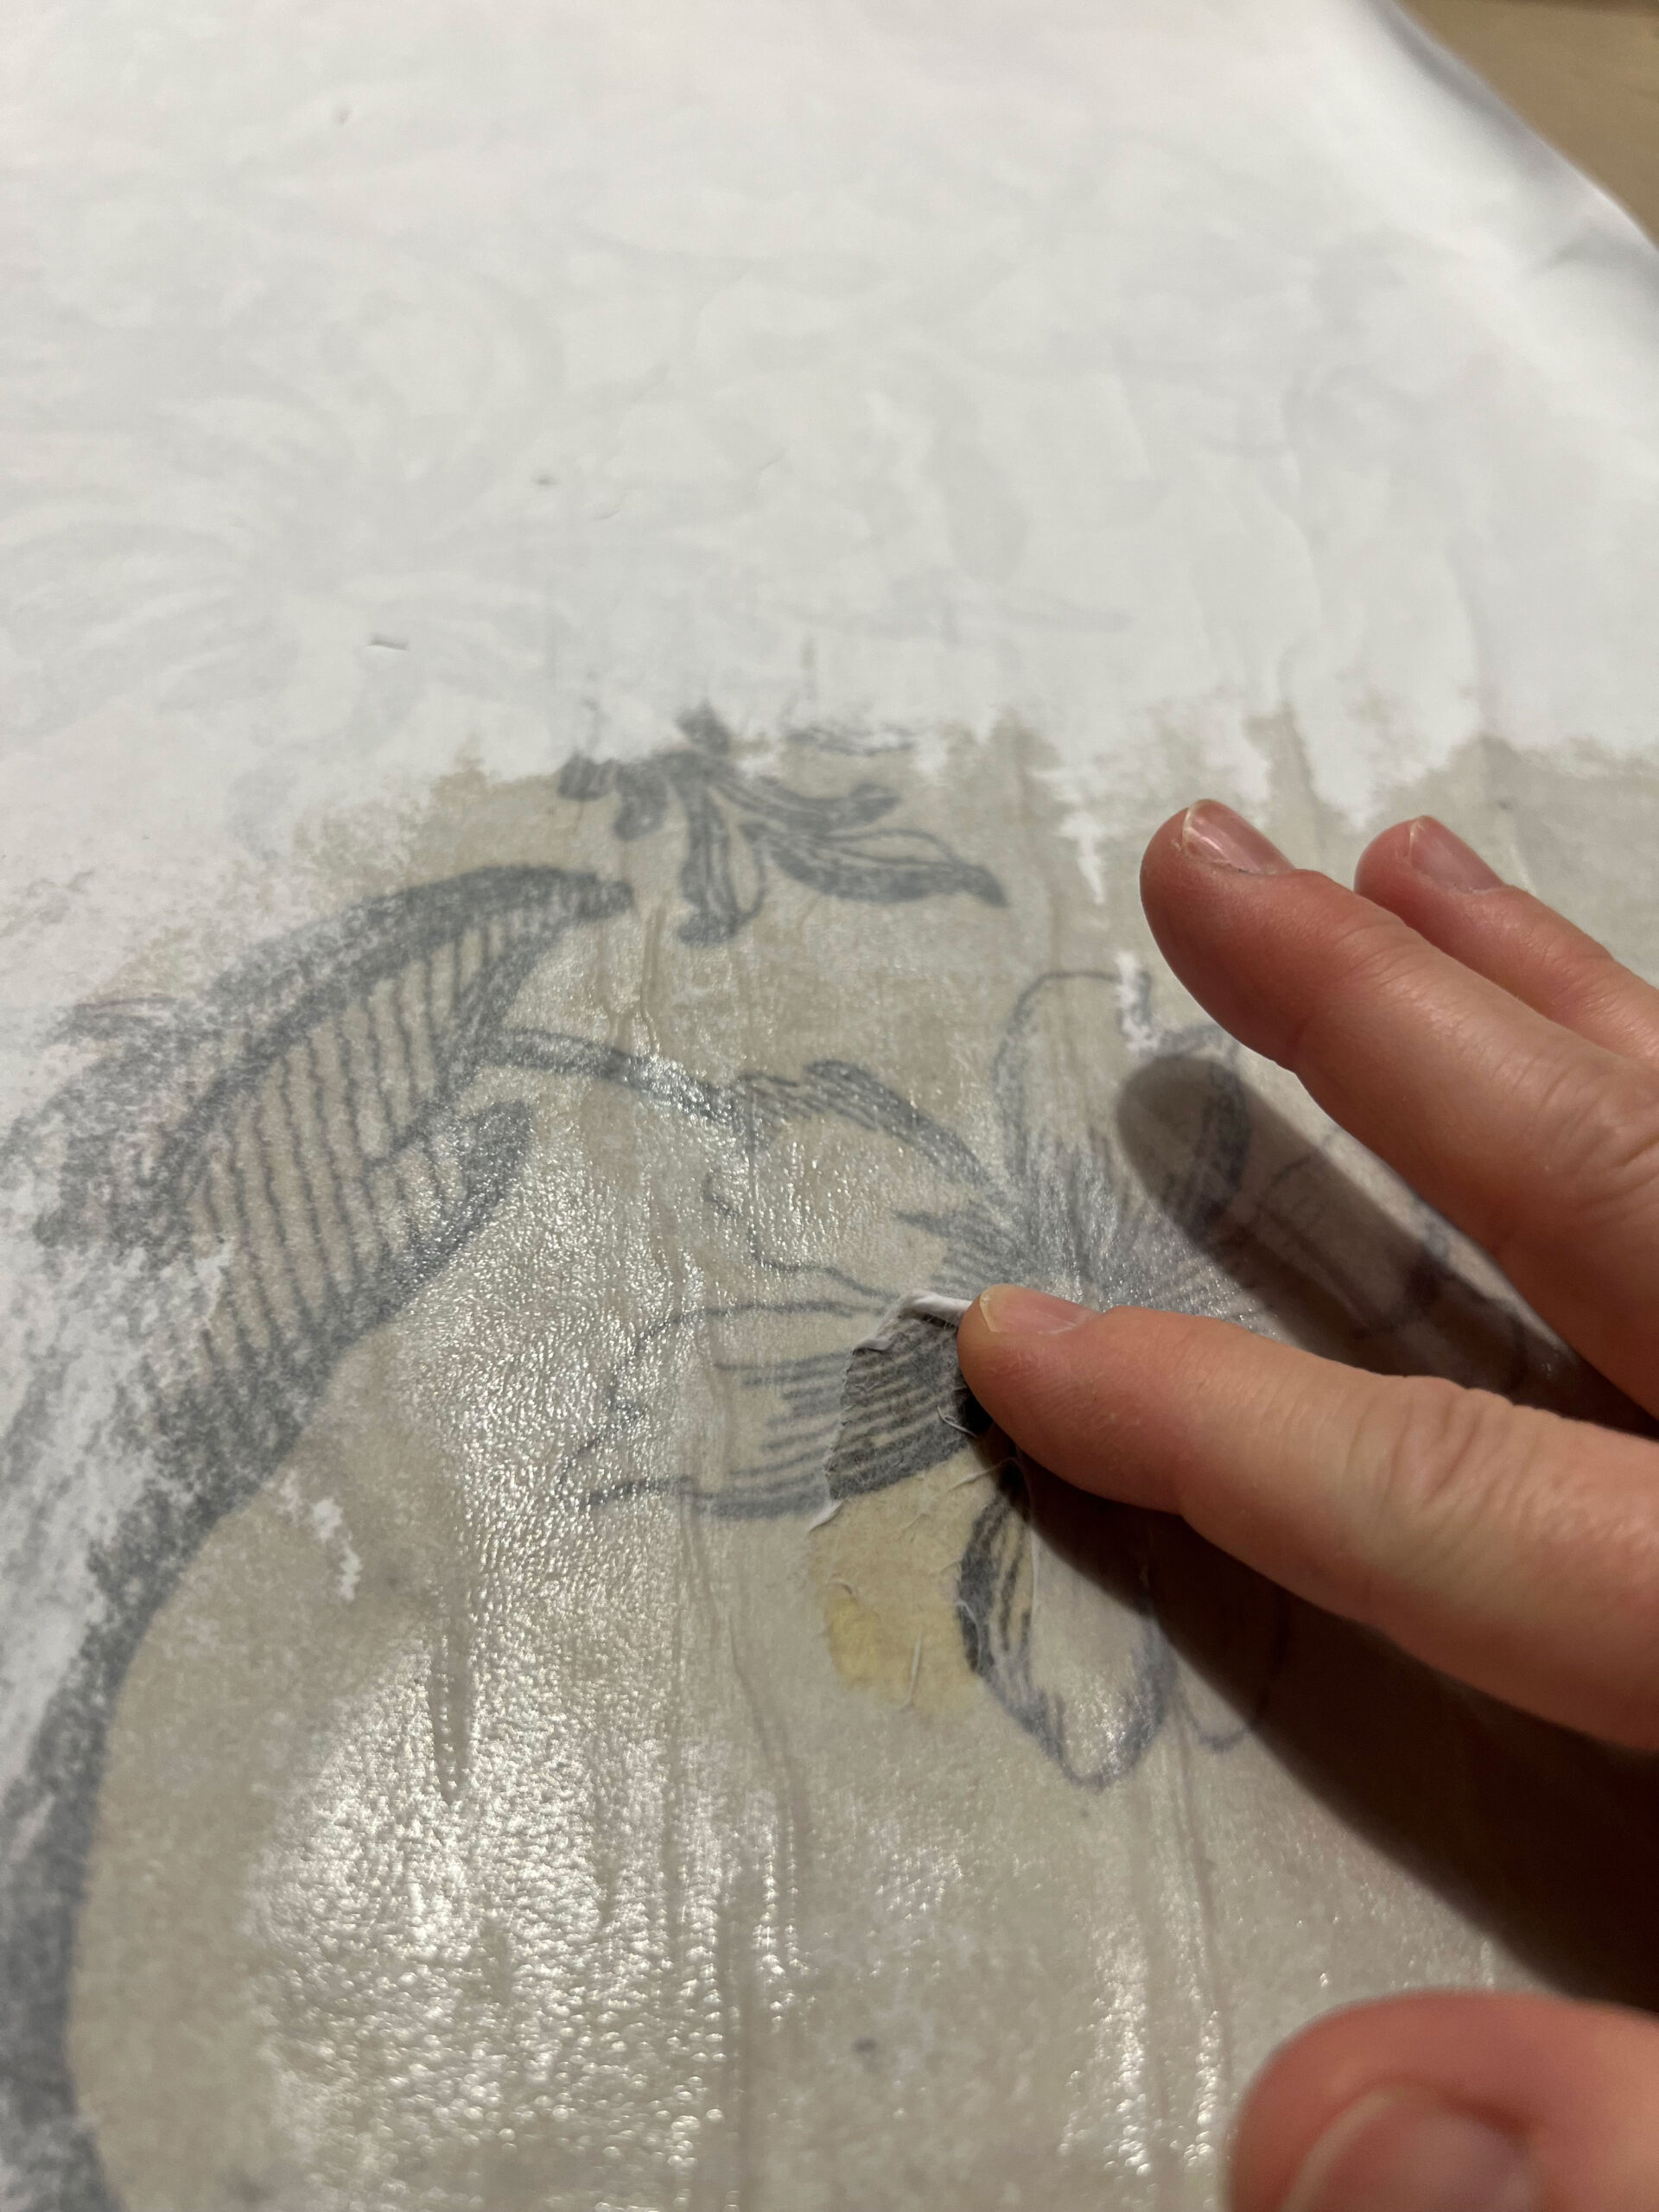
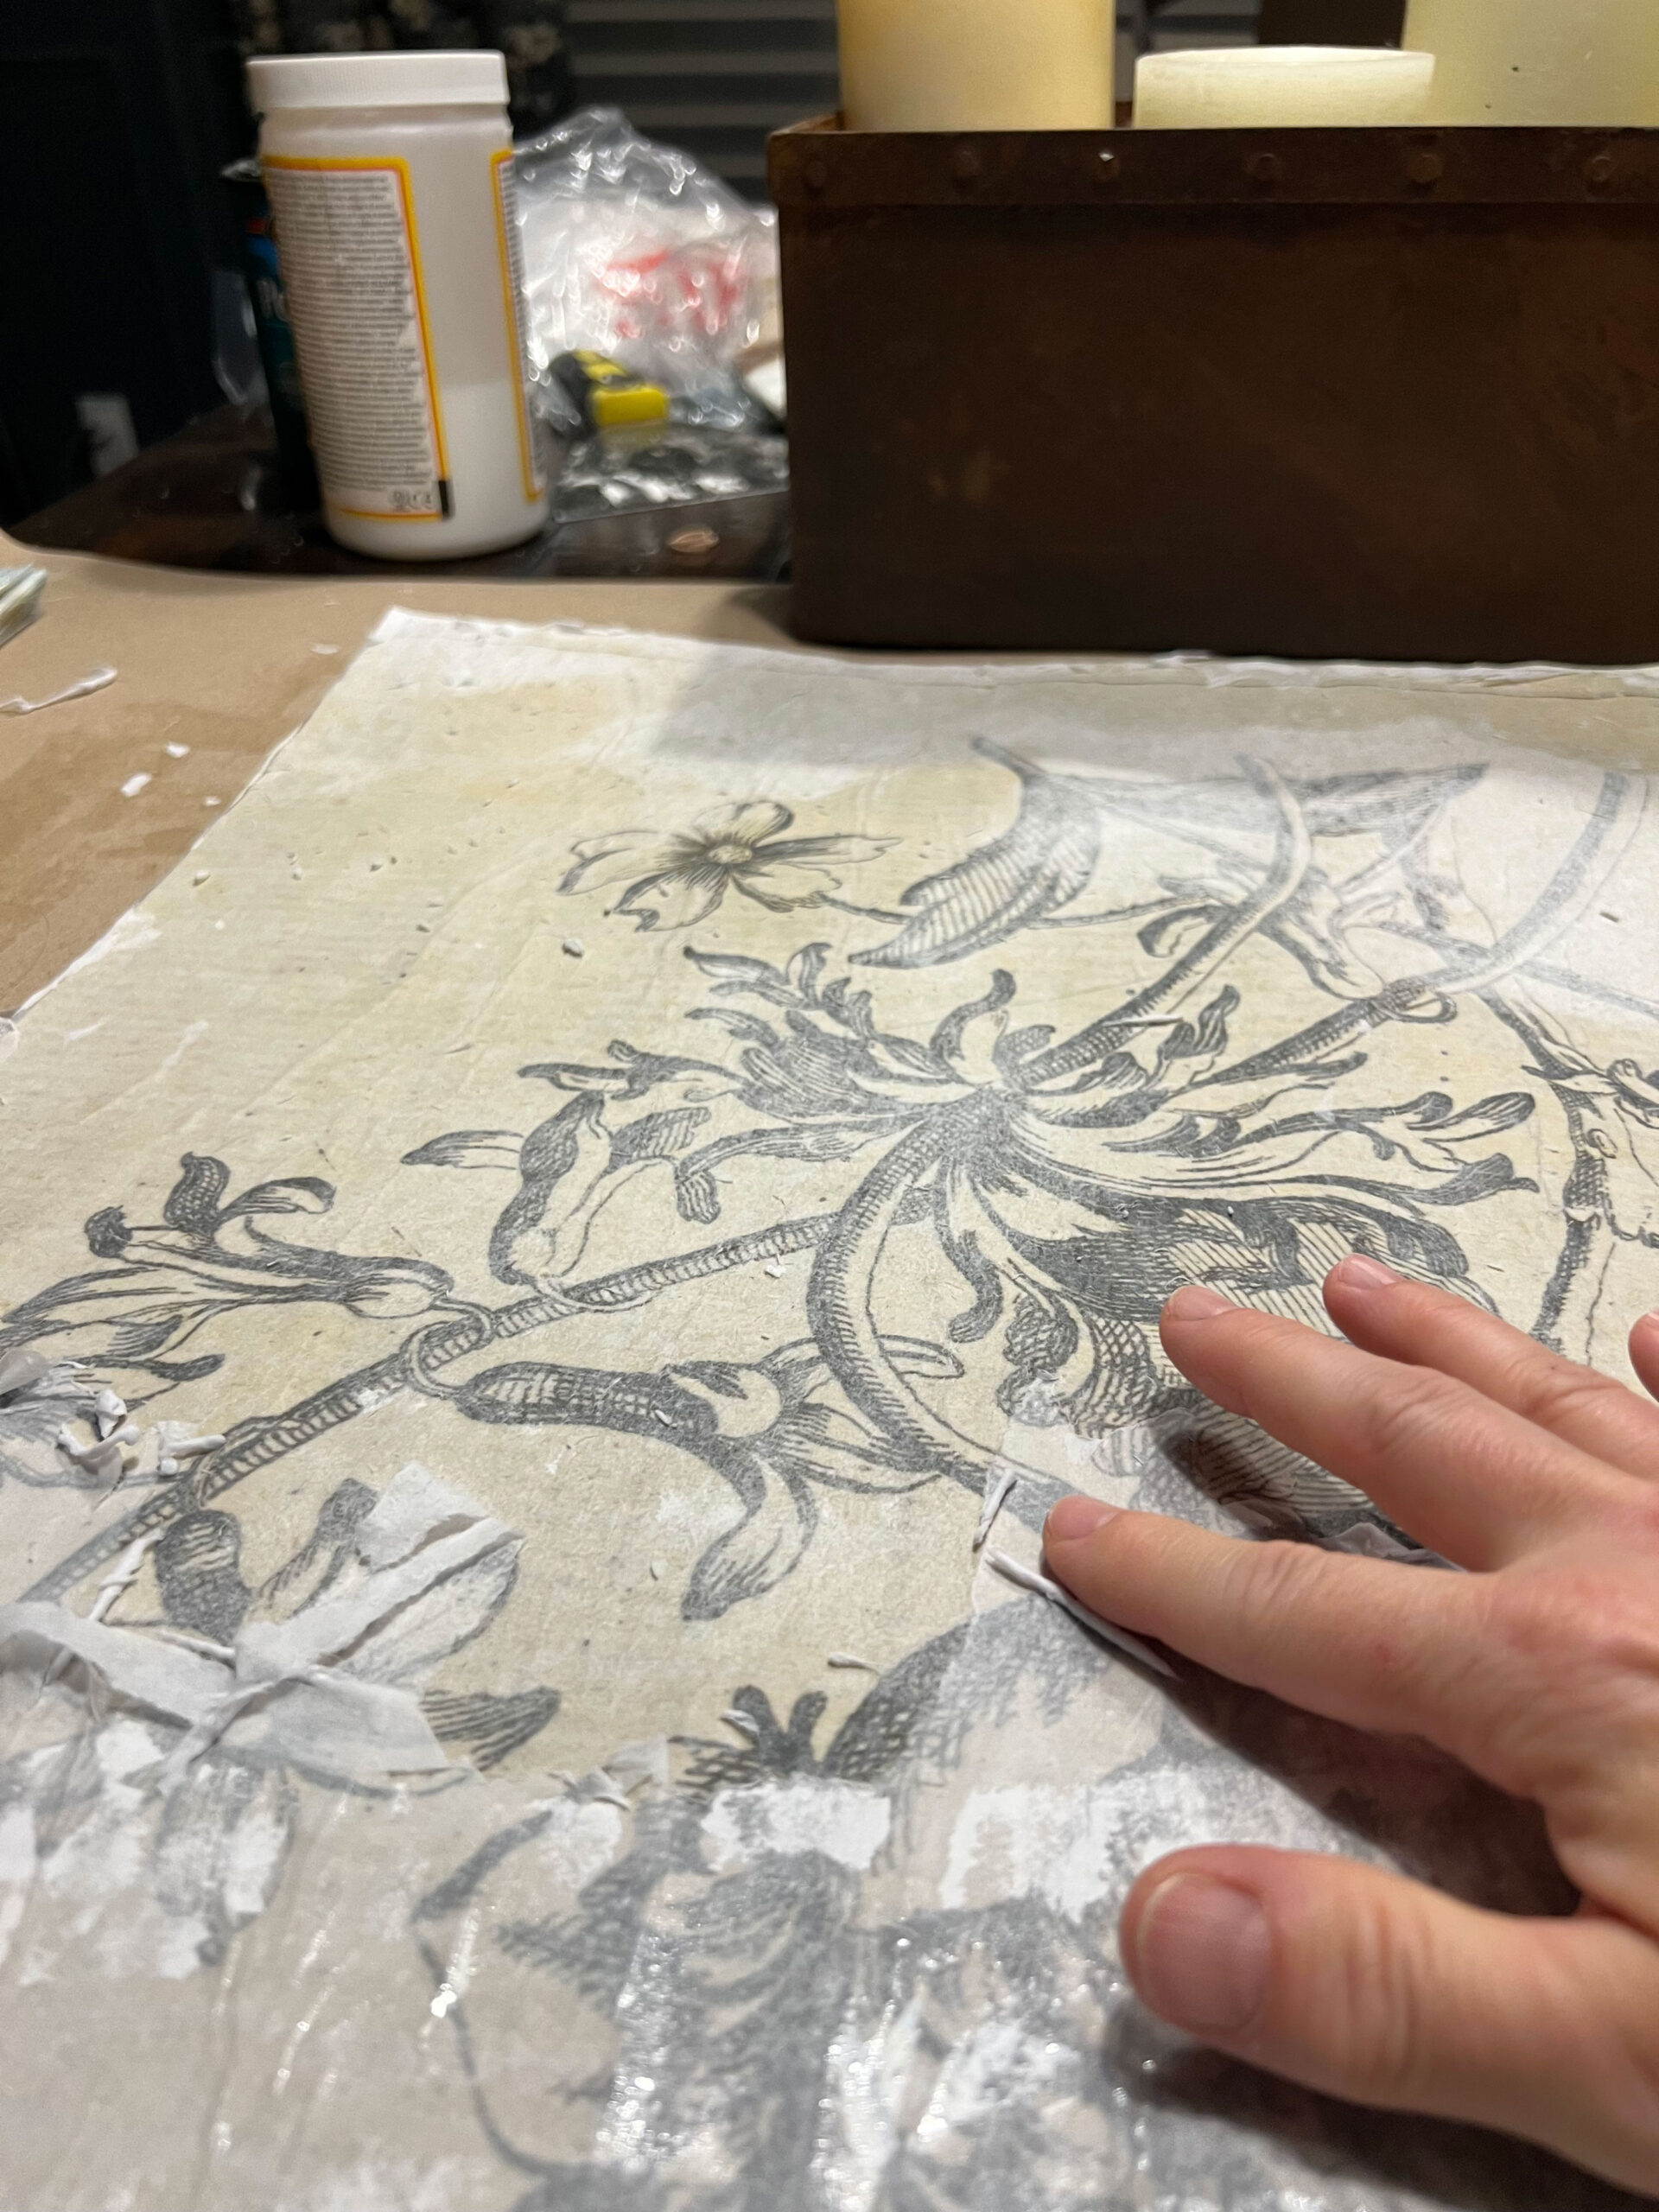
- Keep working on the image until you get all of the paper off. This is going to take a while, especially for a big image, so set it up in front of the TV or with your favourite podcast or audiobook!
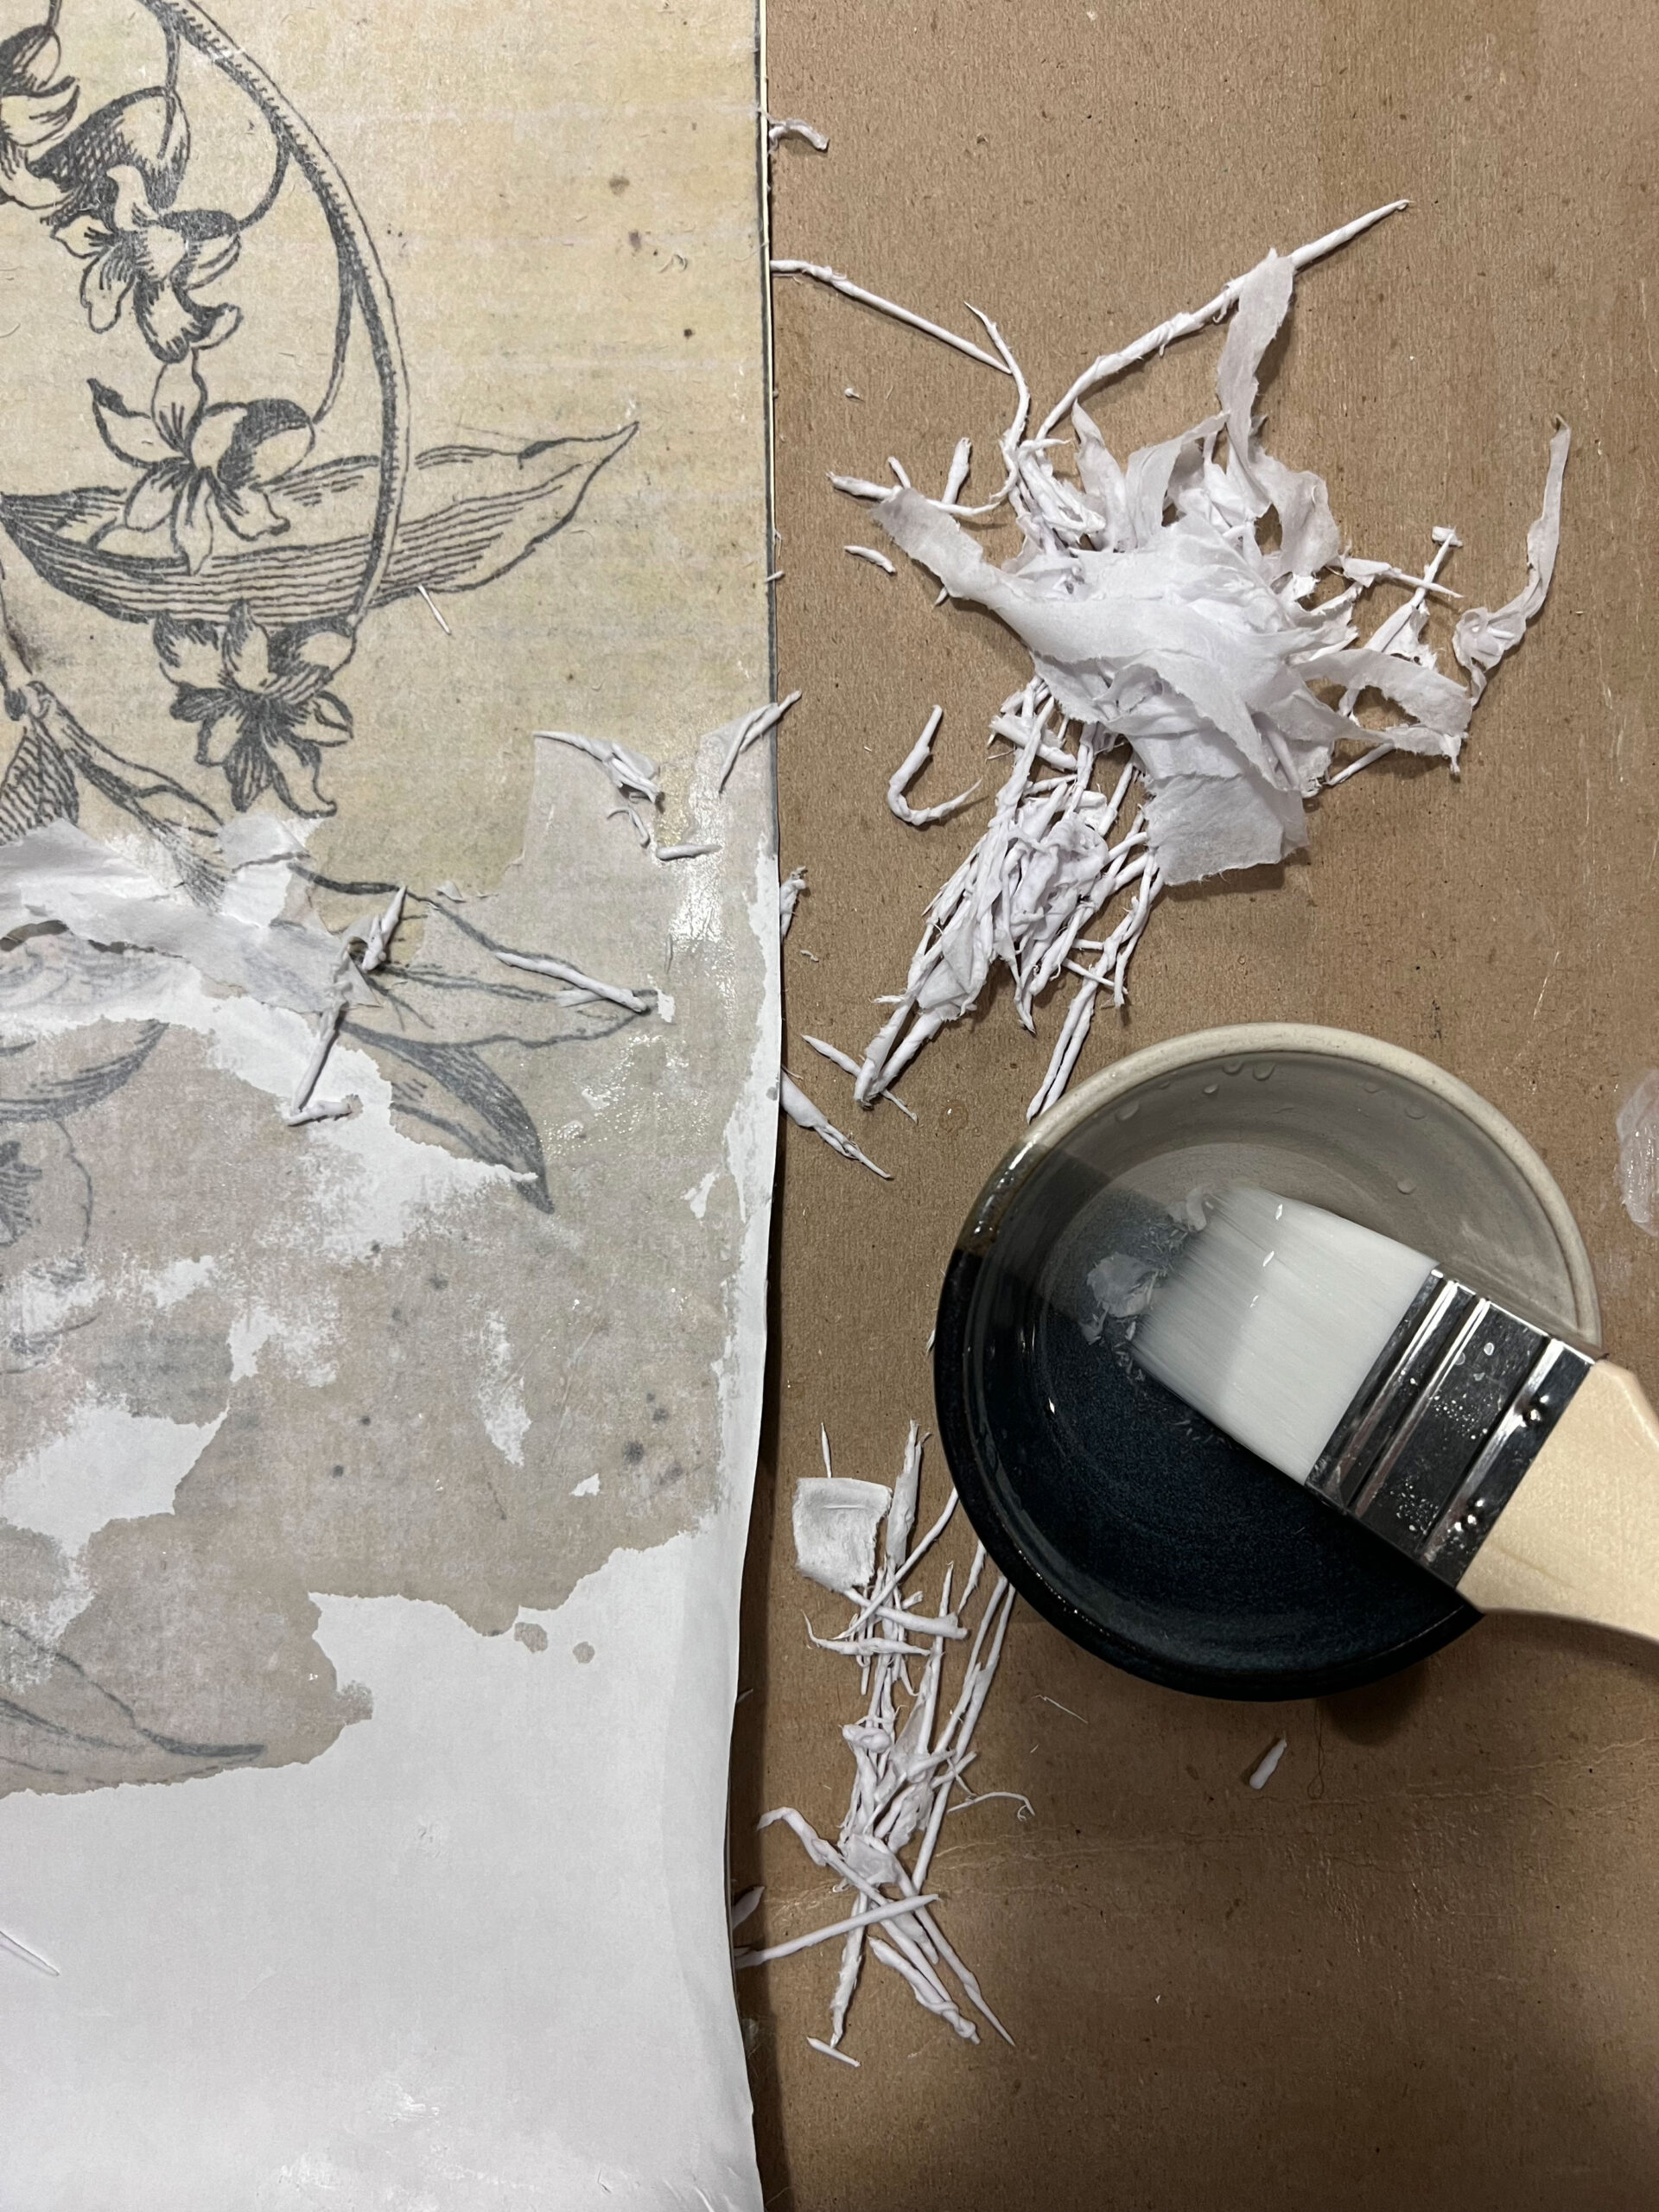
- Once you get all the paper off and it starts to dry you may have what looks like residual paper showing up. You can go over it again with a bit more water and rubbing it again but be cautious to not rub it off too much so that the image comes off.
- If you have any spots where the image rubs off a little, an optional step would be to paint in that little section with some craft paint to match the background colour. These little imperfections don’t bother me (and sort of contribute to the antique look of them, in my opinion) but if you have a dark background and white fabric peeking through, you might want to consider a few touch-ups.
- Once the DIY wall decor is all dry, cover the whole thing in a clear coat. This is not necessary but I found I liked the image better when it was wet than when it was dry, and the clear coat helped enhance the colour and made any residual paper just sort of disappear. I tried a few different clear coats that I had on hand and this matte poly was my favourite. I also tried another coat of mod podge as well as some decoupage medium I had and they all worked fine, I just preferred the less shiny finish of the Poly.
Framing and Hanging your Finished Product
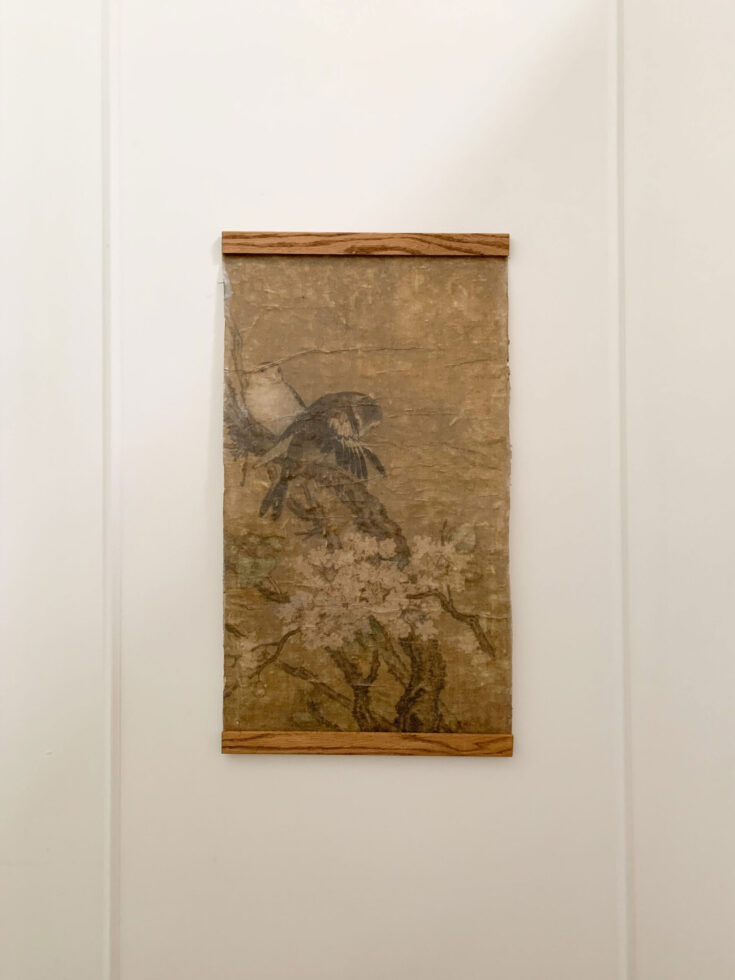
The first time I made this I hung it on the wall the same way they sell the ones at Anthropologie, using a wood dowel or wood strip using a staple gun to attach to the top and bottom, adding a little wood stain to get the desired colour. You can then add a hanging string to hang that from or do what I did, and just add a simple nail-on sawtooth picture hanger to the top piece of wood.

Once I hung it on the wall it did not sit super flat on the wall so I added a little rolled-up piece of painter’s tape to the bottom corners to keep it in place. This works like a charm (and I also do this for all of my art to keep them straight!)
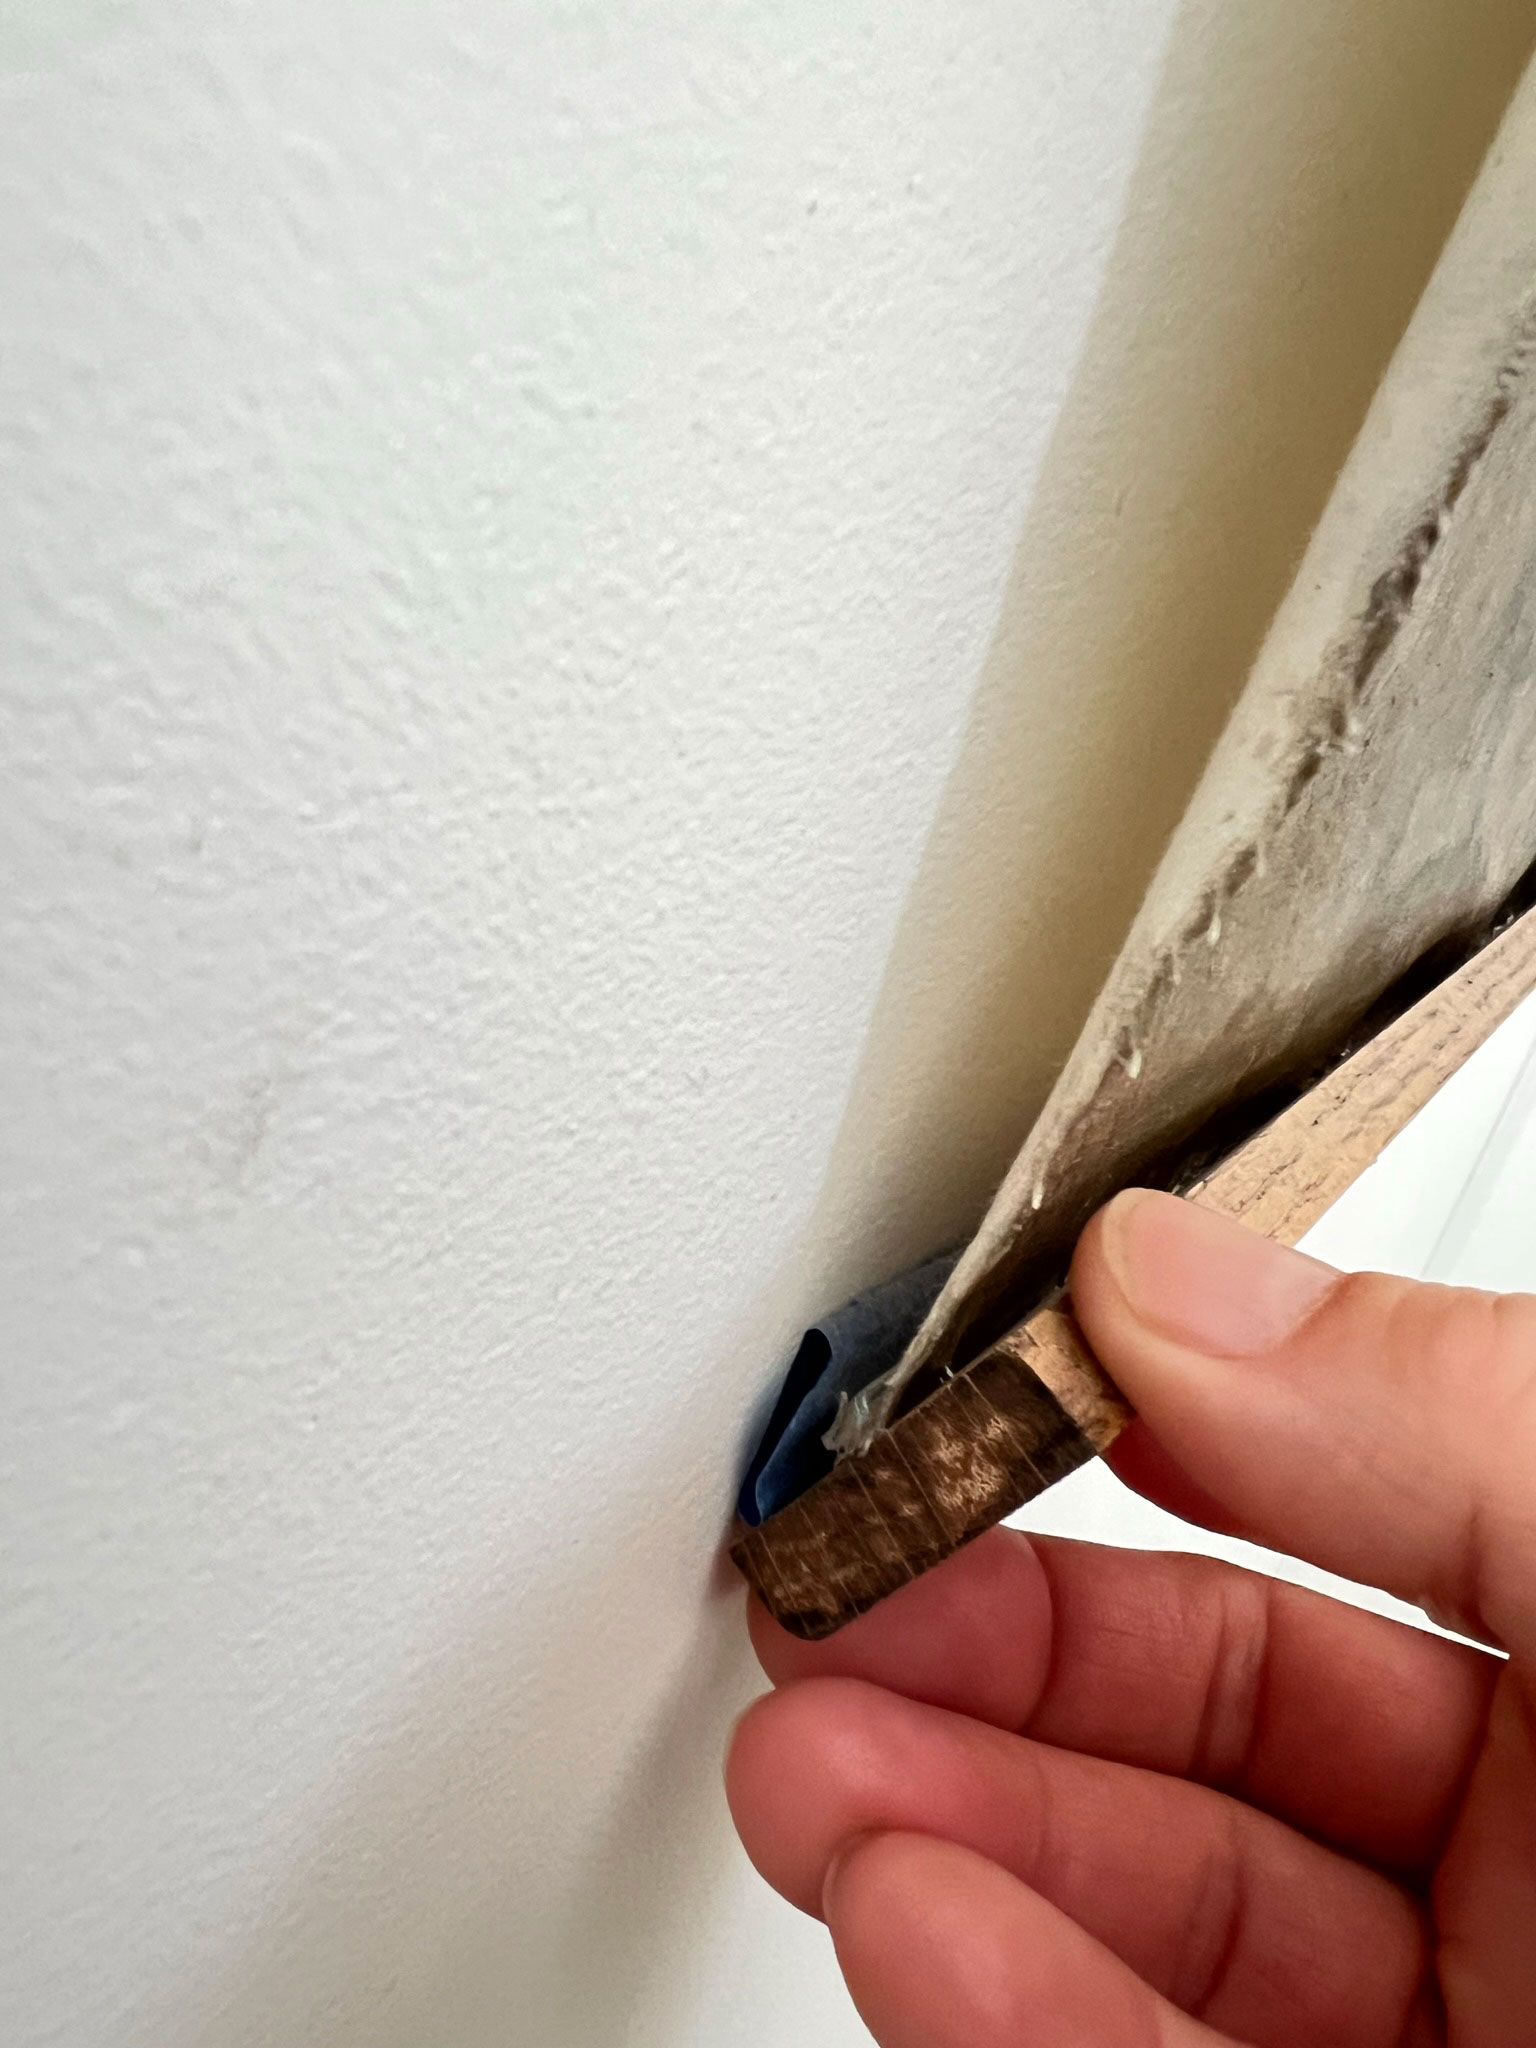
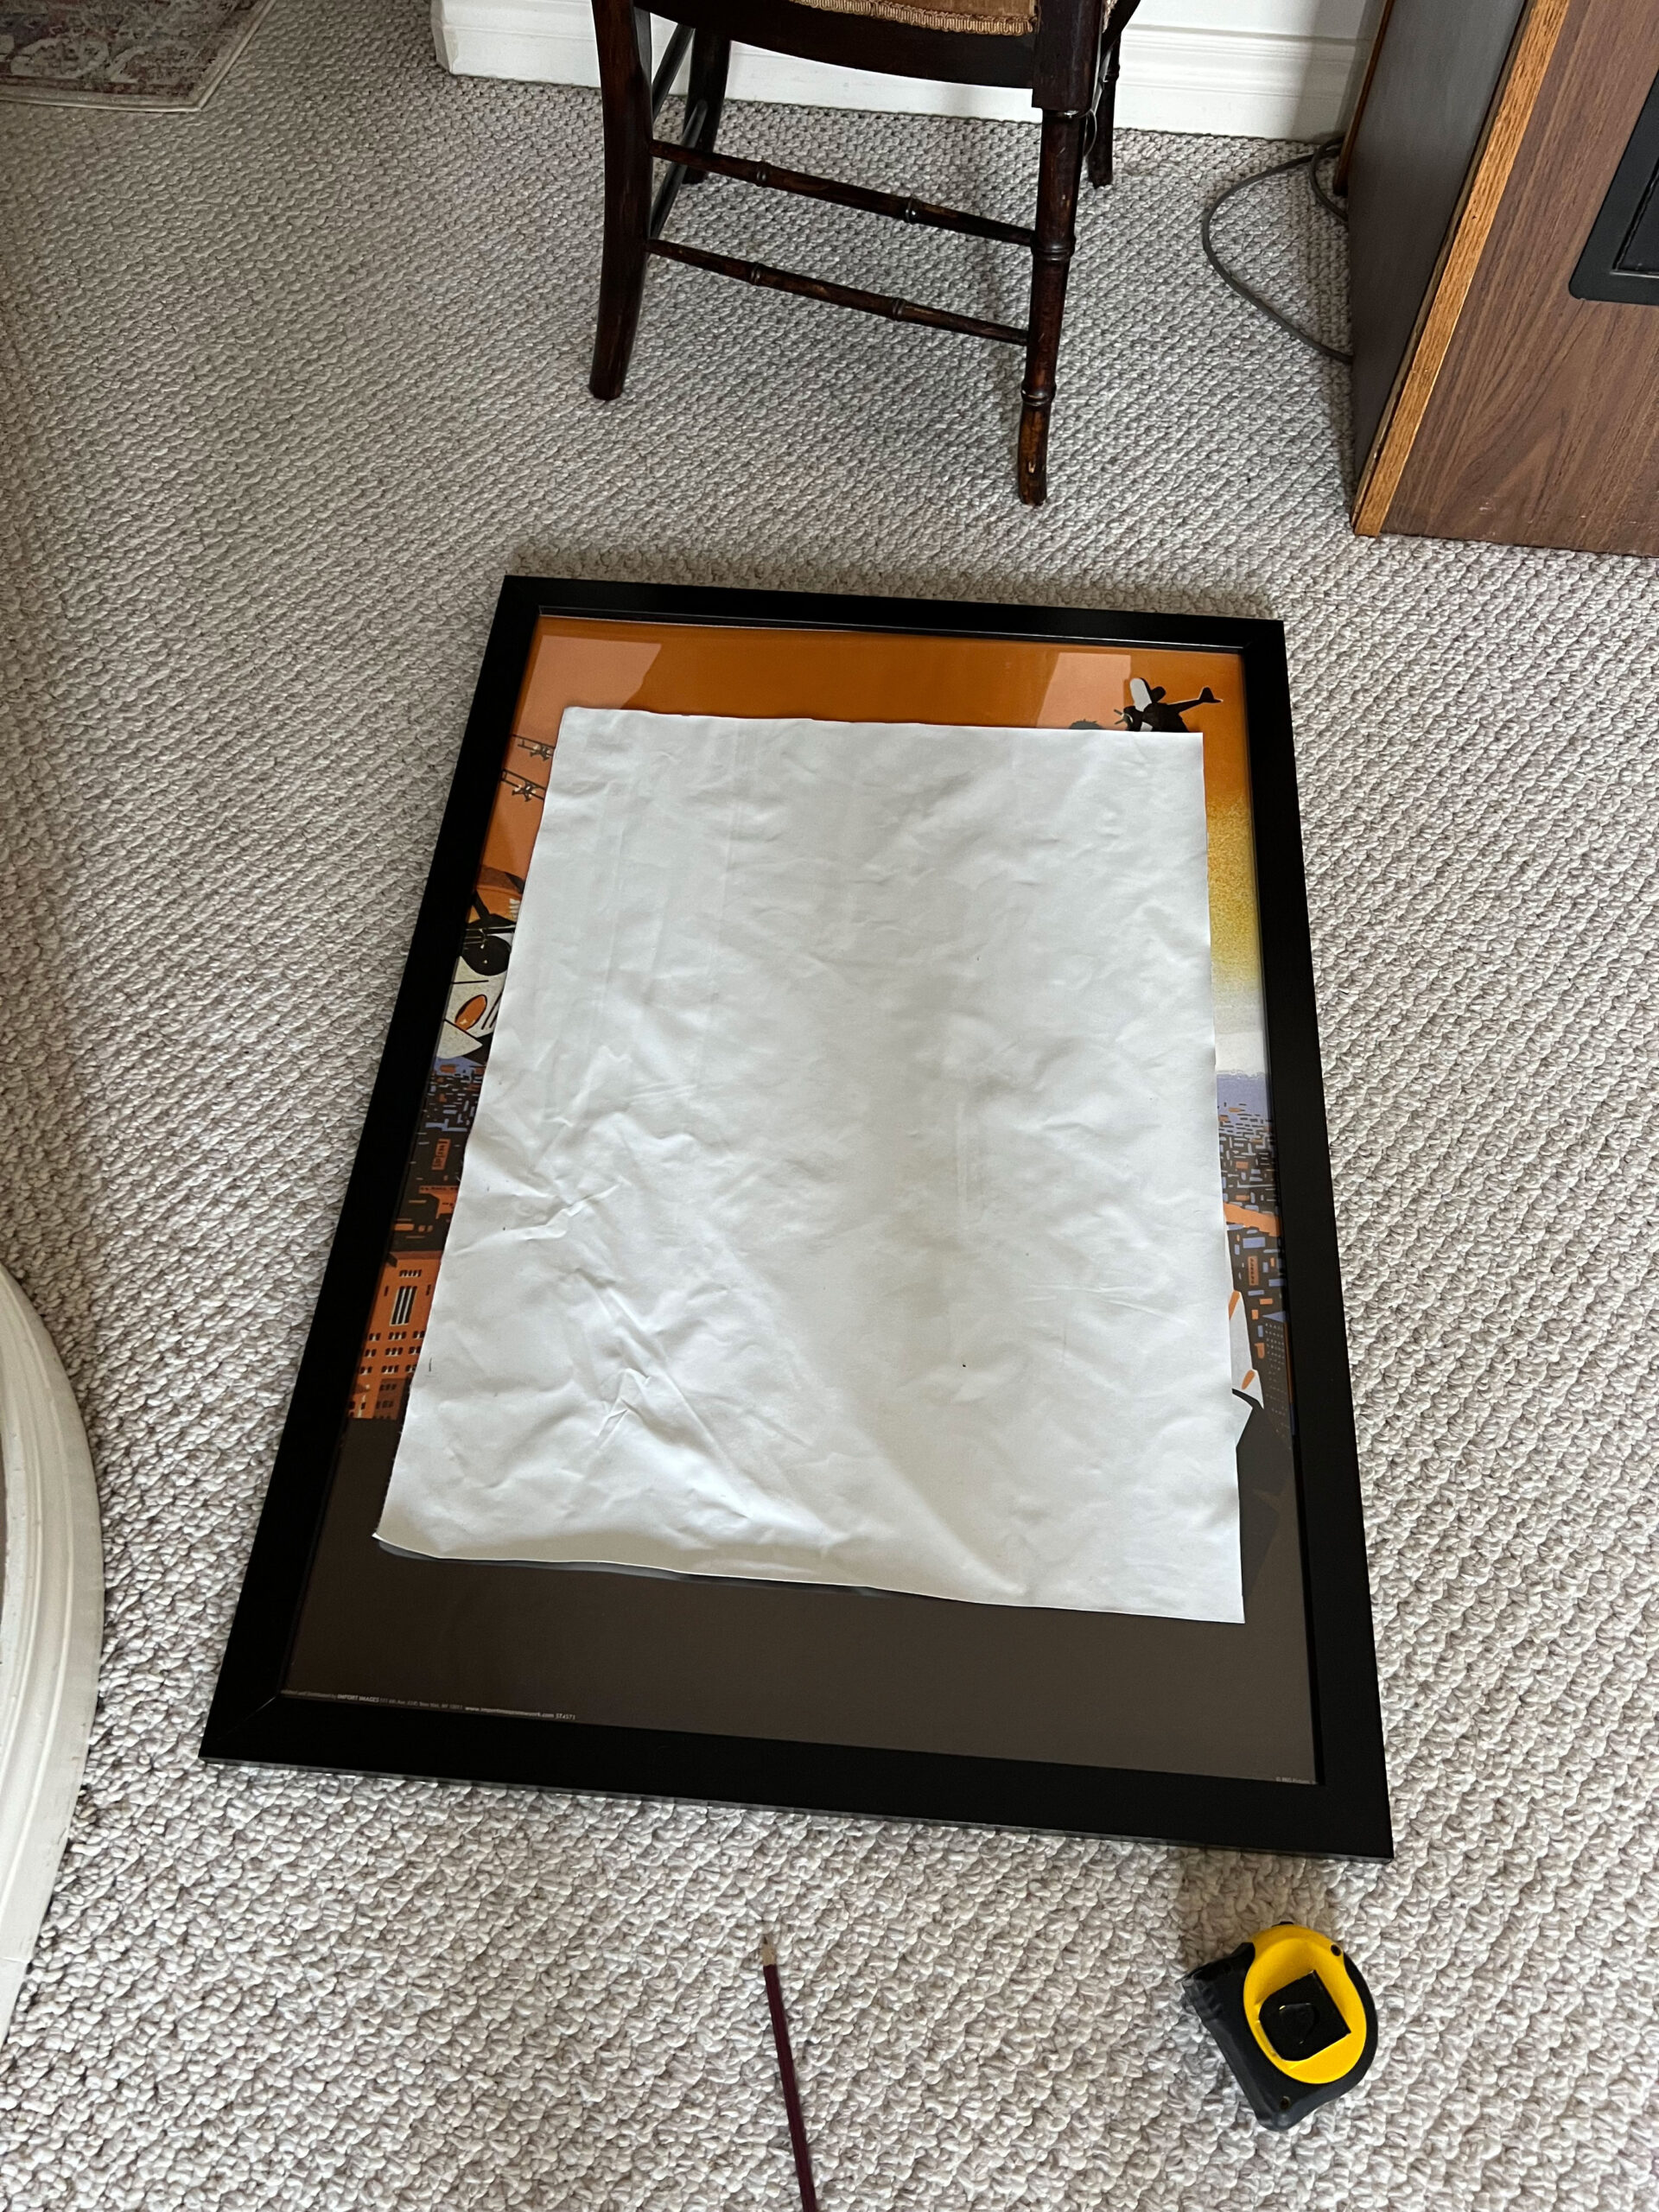
This time I decided I wanted to put the tapestries inside a frame and have them sort of float in there, so I took the old poster frames that I had and spray-painted the backboard of it black.
I then took the tapestry and used a little hot glue to stick the tapestry to the back of the frame.
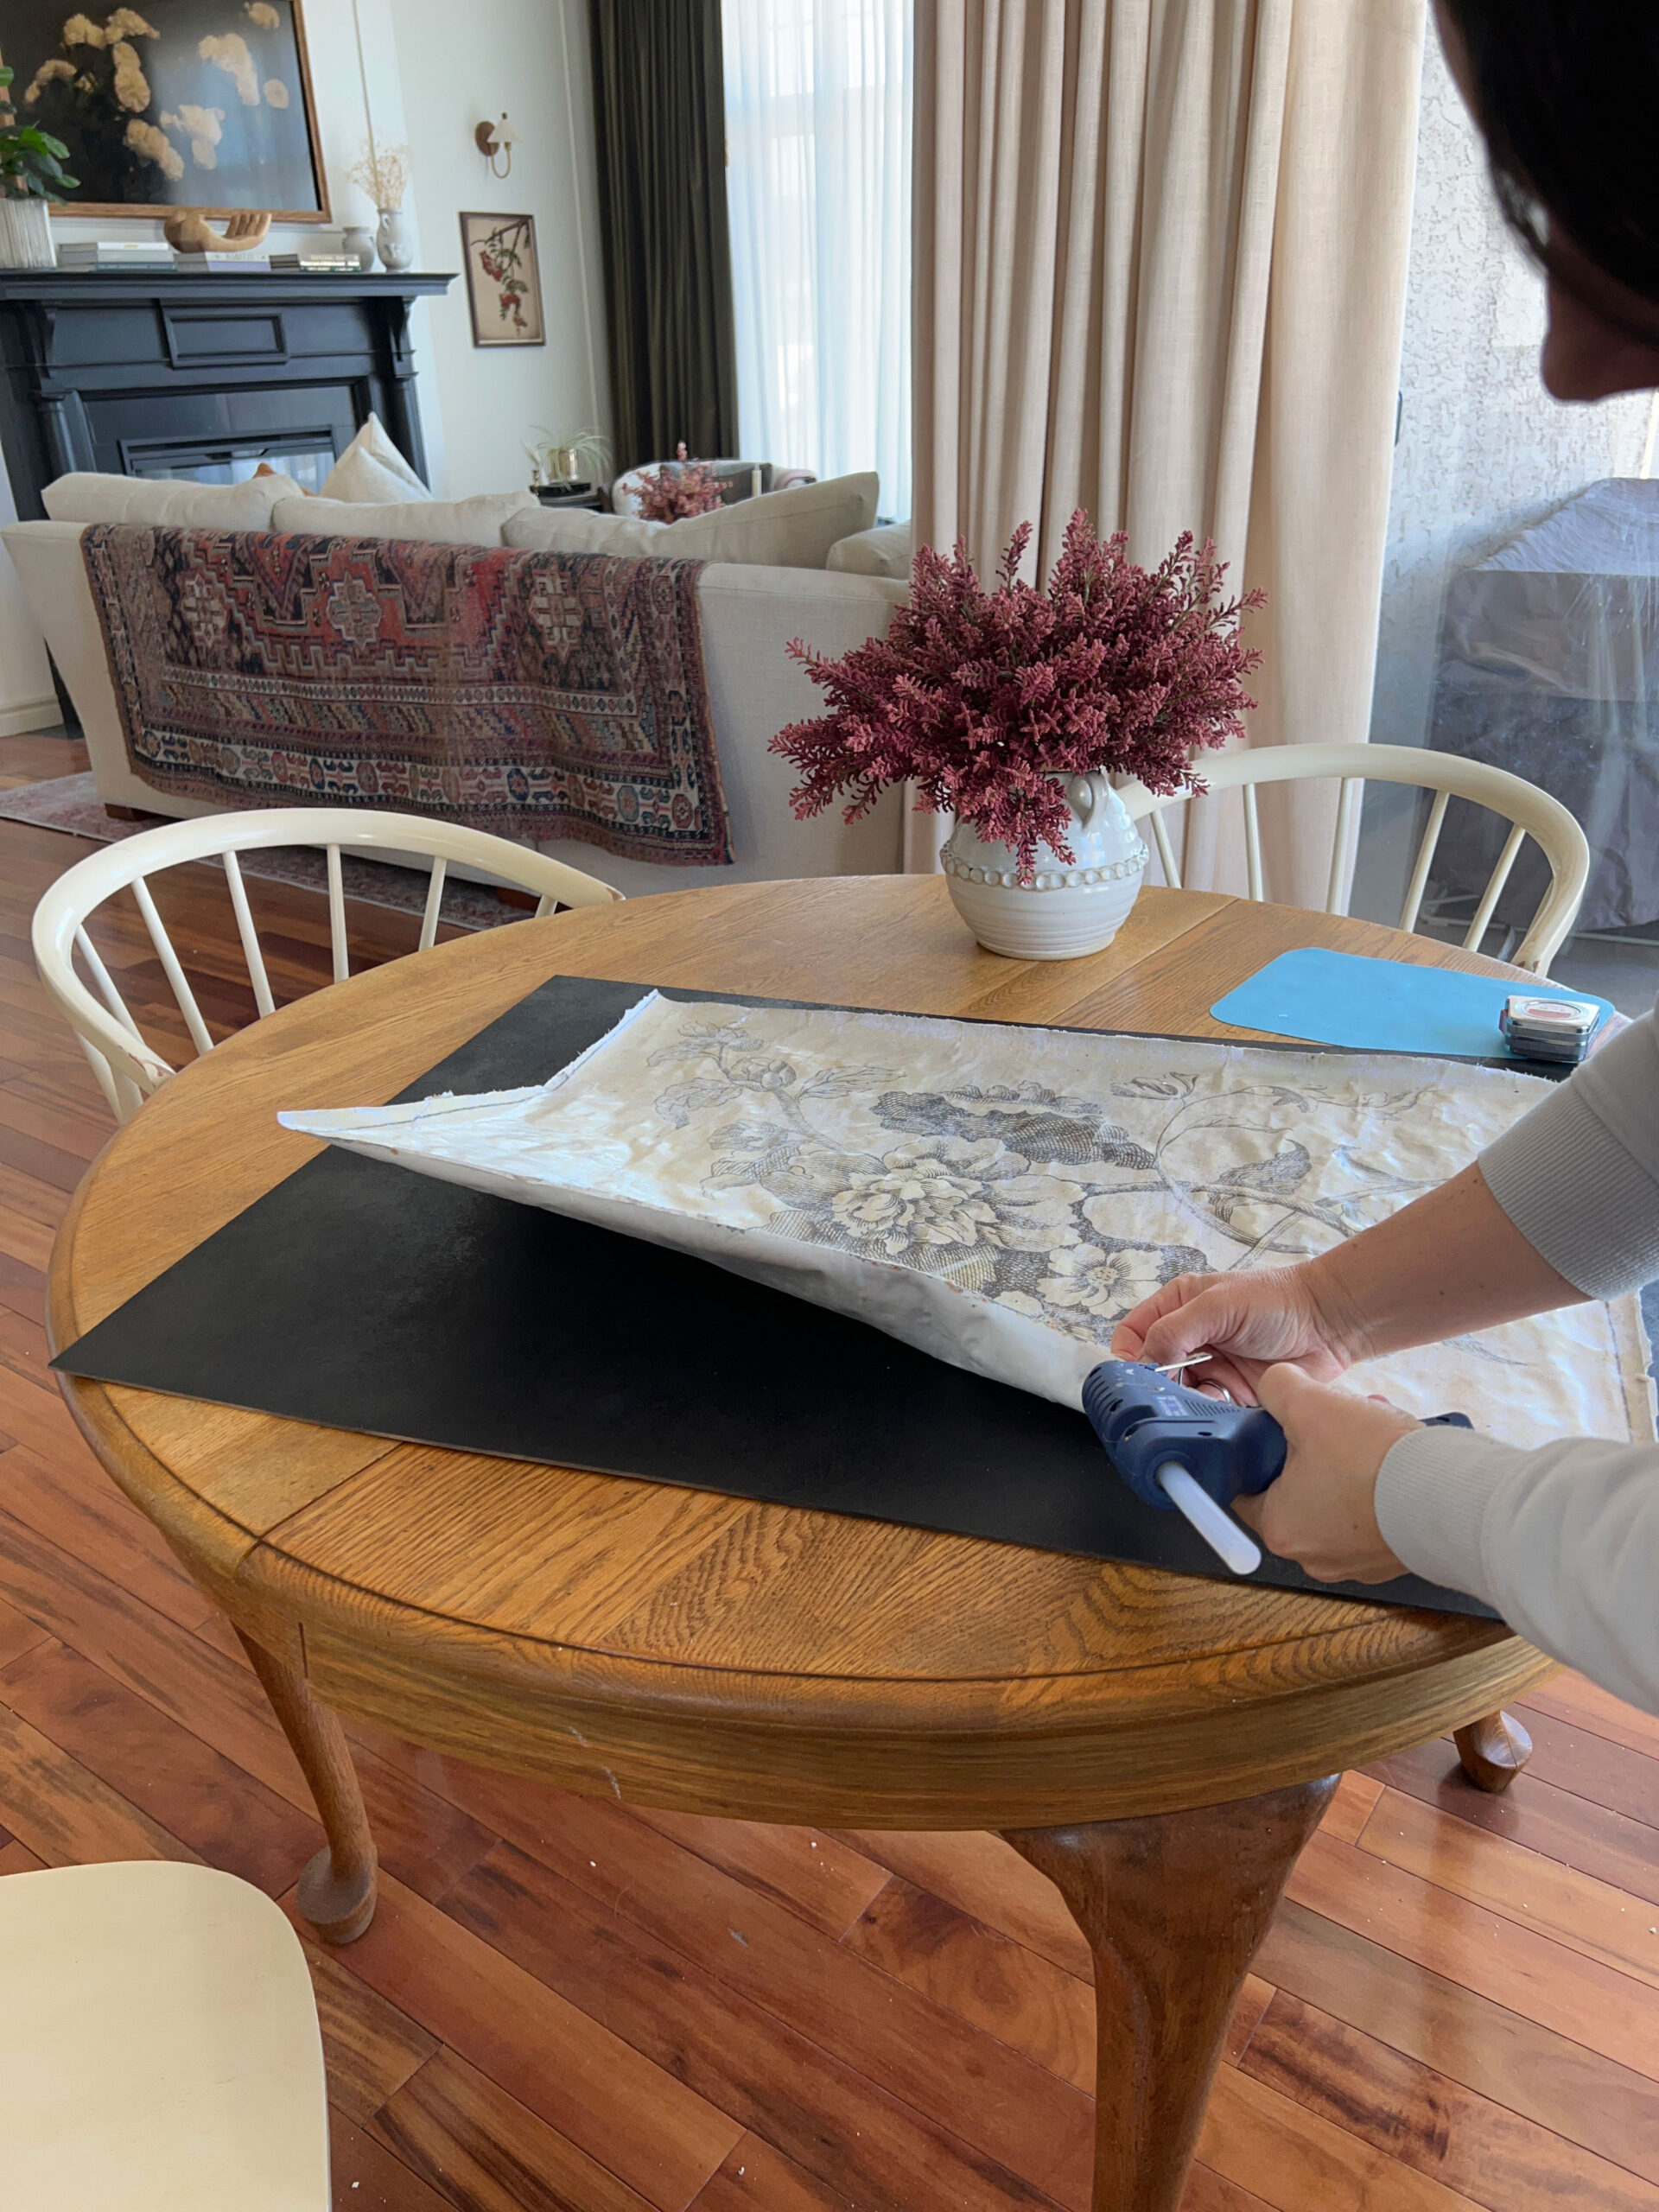
I then reassembled the frame and hung it on the wall as normal!
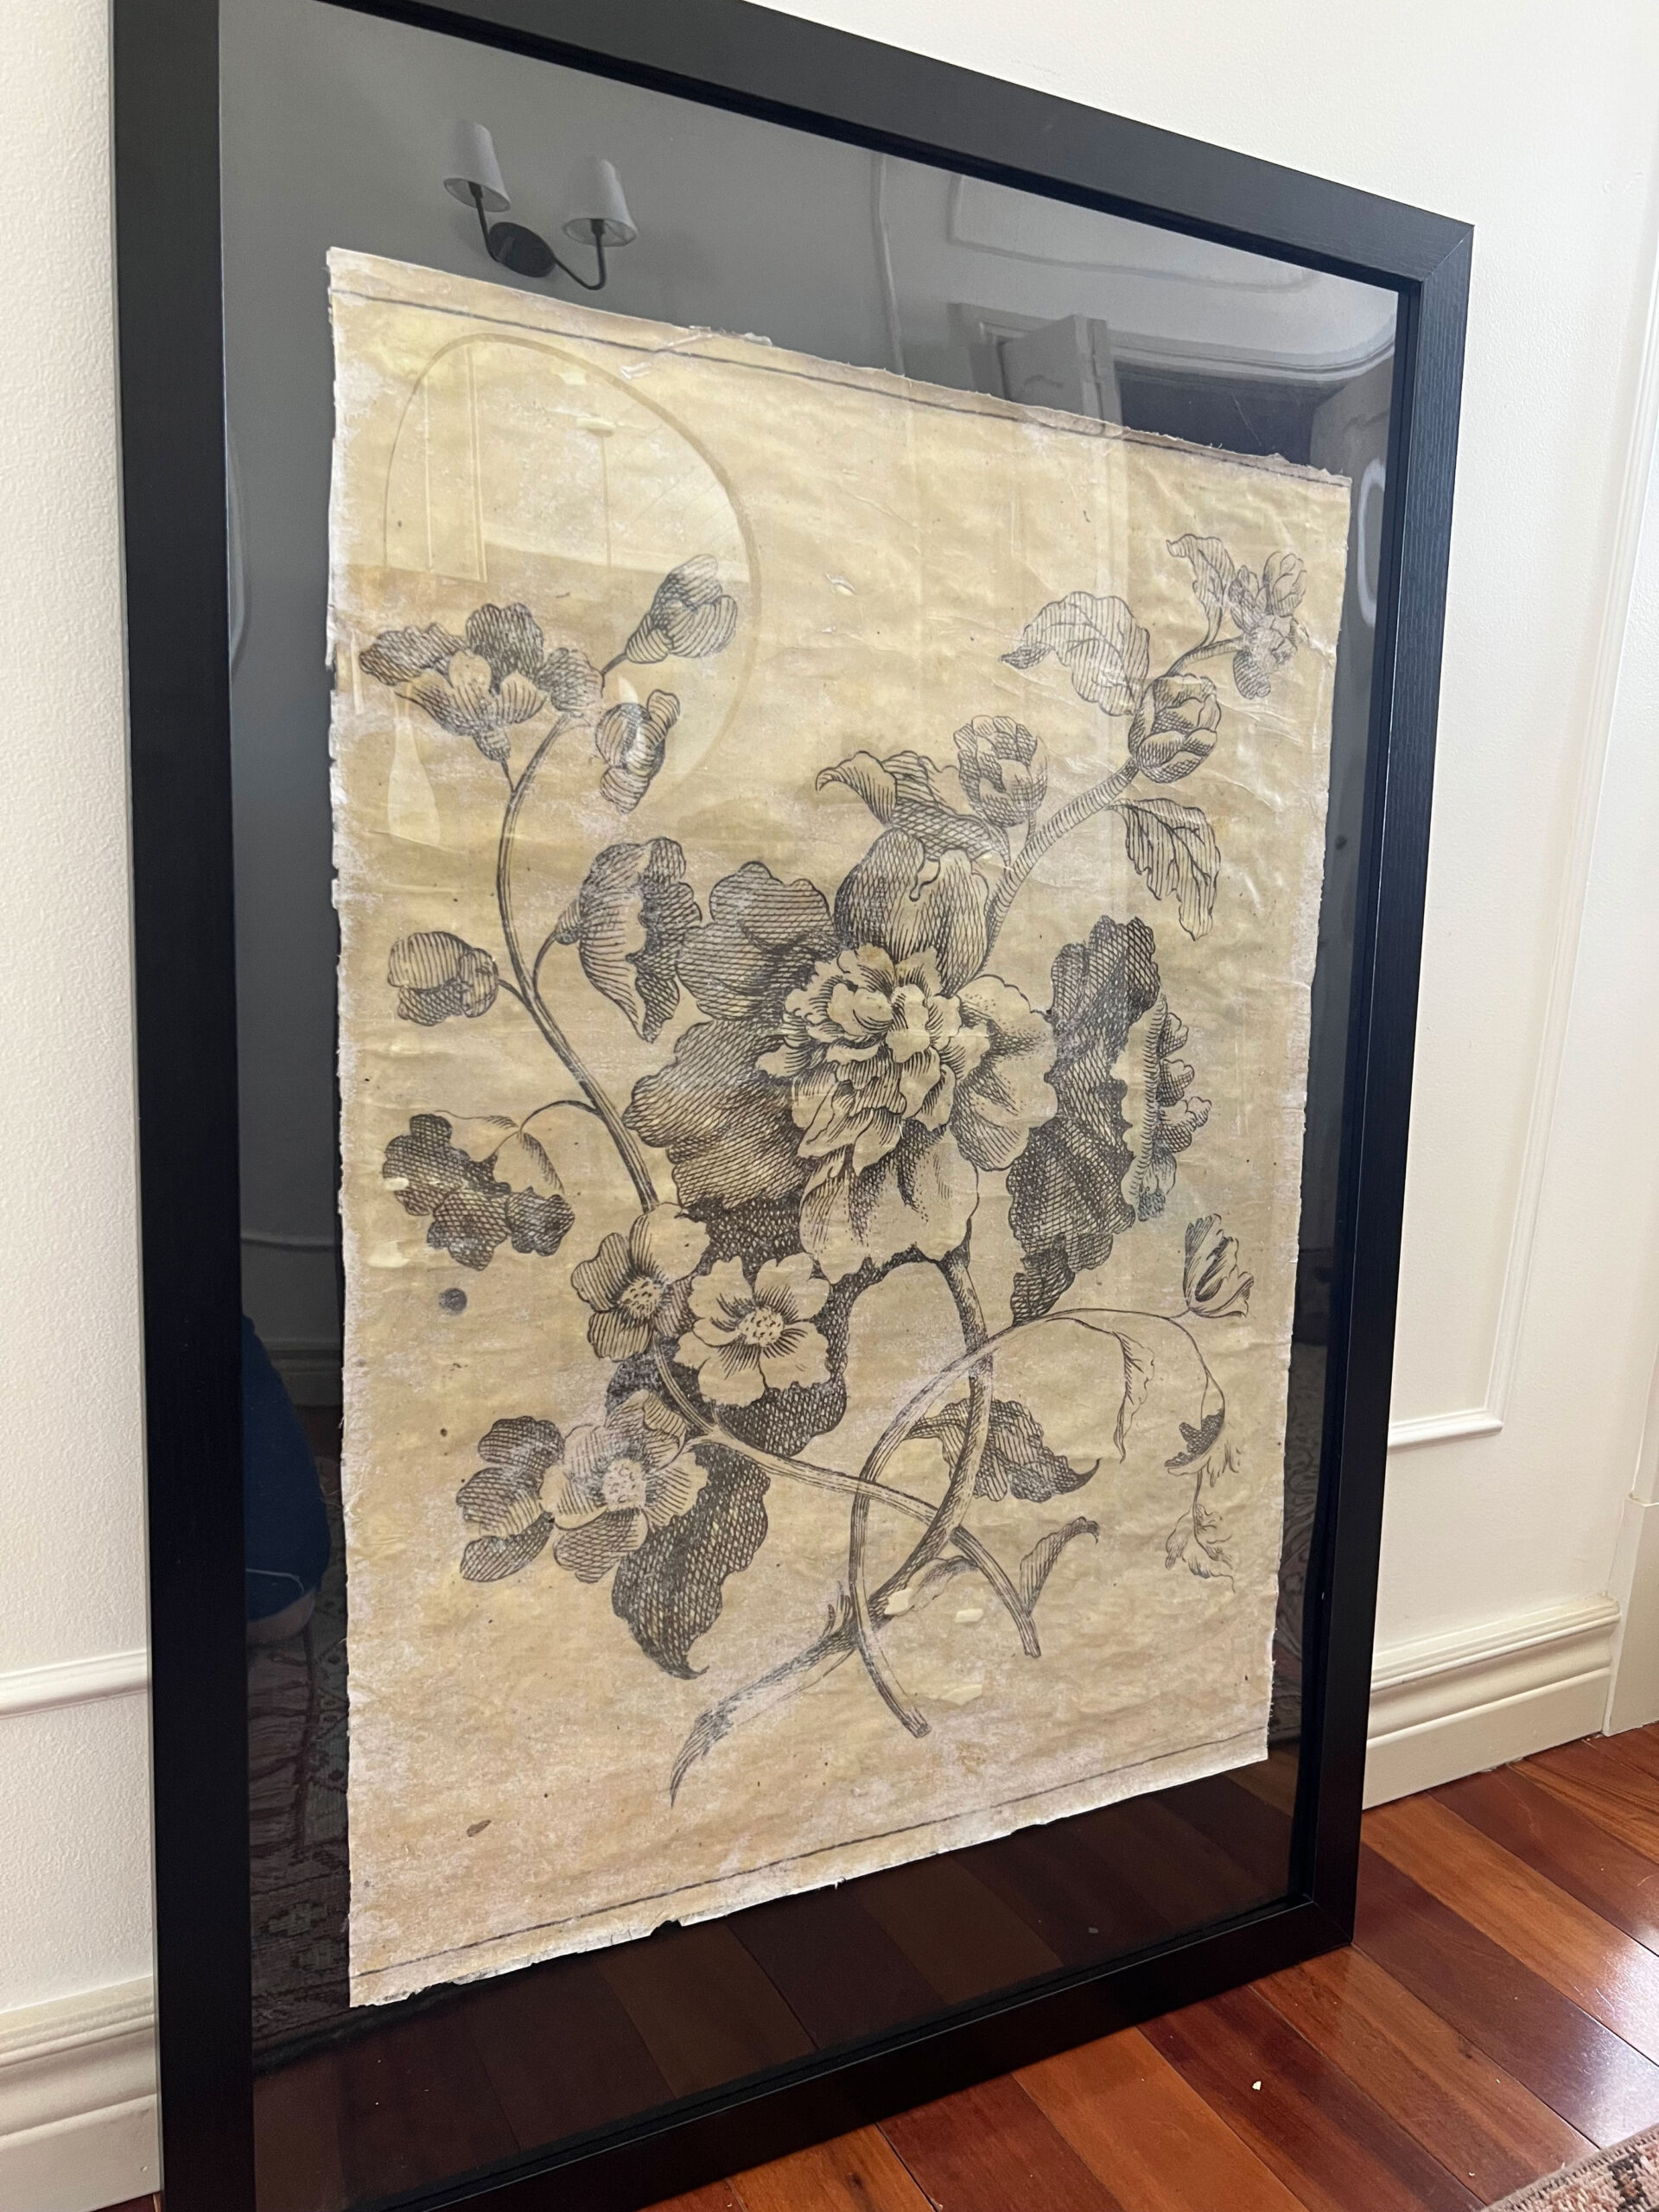
That is all there is to it! This is a great tutorial for obtaining inexpensive art that looks fantastic and unique. The whole process is a piece of cake if you have a little patience. The tapestry I made for our stairwell is one of my favorite things I’ve maybe ever made, so it’s about time I shared it with all of you so you can grab a few craft supplies and your favorite print and get some art up on your own wall!
I wrote out a printable How-To so you can keep it handy when you are working through the steps, click below:
How to Make a Wall Tapestry
How to DIY a wall tapestry with fabric and an inexpensive print!
Materials
- Mod Podge
- Engineering Print
- Fabric or canvas
- Frame or wood strips
- Polycrylic Top Coat
Tools
- Paint Brushes
Instructions
- Print your print of choice to the size you like as an engineering print so it prints out on regular paper. You can also use a home printer to print these.
- Cut your fabric to the same size as your print.
- Spread Mod Podge on the face of the engineering print using the paint brush. Let that dry overnight.
- Spread Mod Podge on the face of the fabric in a thin layer, making sure it's fully covered.
- Press your print face down onto the fabric with the wet Mod Podge. Press it into place and smooth it out with your hands.
- Use a straight edge to work the bubbles out as best as you can. Squeeze any excess Mod Podge out the sides. There will be wrinkles in the paper, this is fine!
- Let the fabric/ paper sandwich dry overnight at least (or longer).
- Once it's fully dry, wet the paper side with water. Once it's saturated it will become slightly mushy and you can roll the paper off with your fingers.
- Continue working the paper off with water until the whole image is uncovered. Once it dries there may be some residual paper so you can re-wet it and keep working at it until you are satisfied.
- Once the tapestry is dry, make sure you wipe any loose paper off with a cloth before applying the top coat.
- Apply a coat of Matte Polycrylic. You can also use another coat of Mod Podge but the polyacrylic is a little less shiny.
- You can frame your tapestry by stapling it to a couple of pieces of wood like a wall hanging or placing inside a frame.
- Enjoy!
You might also like:
- How to Make a DIY Dollar Store Halloween Wreath
- How to Make Printed Art Look Like a Painting
- A Gallery Wall Using Public Domain Art
- Affordable Art
- How to install a DIY Staircase Runner
- 4 DIY Light Fixtures that You Can Make for Your Home!
- DIY Ottoman – How to Make an Upholstered Ottoman
- DIY Halloween Decorations using Dollar Store Supplies
This is so cool Erin!!! I want to try this!
This would be a fun project. I like anything that looks old. Especially art!
Thanks Joannie! Let me know if you do!
Ahh you and me both!
Thanks for all the details, this was way better than The Bachelor final!
Ha ha well now that’s some tough competition I’m glad this post measured up!! Thank you!
Hi Erin! Love this! Did you ever try using the mod podge matte sealer? How does that compare with the Minwax polycrylic?
Hi Alexis! I did try the matte mod podge, yes! For my project I had a fair bit of paper still sort of stuck to the front and the polycrylic really toned that down more than the Mod Podge, but Mod Podge totally works too!
Hello! I love this tutorial, thank you for sharing. Cannot wait to try it! I was wondering where I could find the image for your original tapestry. It’s super cute! Thank you for your time!
I honestly can not remember where I found it, it was a digital download from the public domain but I can not find the original source now, sorry!
I have a poster that I want to transfer to fabric so I
Can hang it or drape it over the back of the couch.
Do I just follow your instructions and that is it? Seems so simple but scary.
I will try it with with a random piece first.
Thanks for your tutorials.
I
I would definitly do a test first, the paper for the poster needs to be like regular paper and not shiny poster paper.
I STILL call it Modge Podge😂
Thanks for the work you put into this tutorial 👍
I mean… it has a nice ring to it!
My husband has wanted a vintage pull down map for years, but they are sooo expensive! I’m hoping this tutorial will be just the thing to make it happen for us! I just mod podged the map I printed from Staples. Fingers crossed the rest goes well!!
That sounds awesome, good luck with your project!
Hi Erin!
This is the DIY I’ve been looking for! Quick question — how did you achieve the colored antique look? It almost looks like the fabric has been soaked in tea or something.
Thank you!
The print that I downloaded was coloured that way!
*Can you use a photo?
You could use anything as long as it’s printed on regular paper and not photo paper.
I wanted this to work so badly, but alas, it did not. I followed the tutorial carefully but the end result was an image that was so faint you could barely see it. In order for the image to be dark enough to see it must be wet. I tried to seal it at the end to darken the image but that didn’t work either. All that effort for nothing.
Oh I’m sorry to hear that! Mine did darken when I sealed it. I’ve done this twice now with similar results, perhaps you could try a different sealer? Sorry it did not work for you.
Ummm… Now that you write it down, I see that it really says ‘Mod Podge’. I’m 63. My mom always said ‘Modge Podge’ so I am saying it, and will probably still say it. But will write it now as it is on the label. Geesh. Thanks!!!!
I’ve also called it “Modge” for years!