The Kitchen Plan!
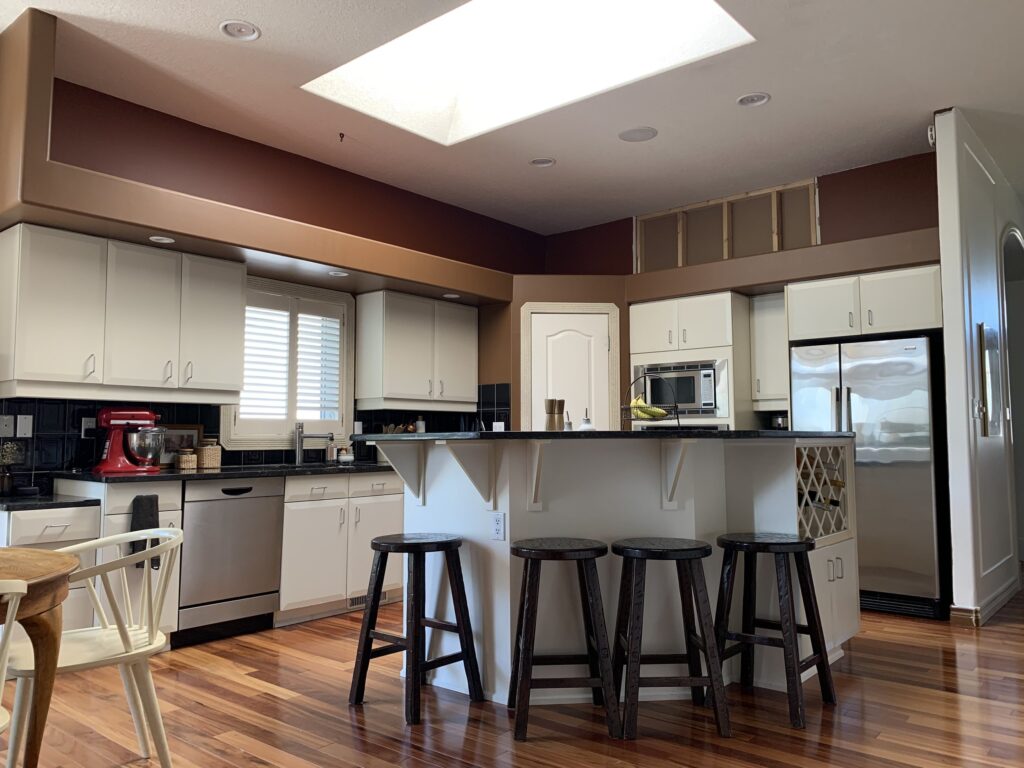
I’ve been talking about our kitchen renovation on and off for months but it’s really been on my mind since the minute we moved in, and it seems like a good time to share our kitchen renovation plan with you! Originally when we viewed this house, we thought that perhaps we could renovate the kitchen by refacing the existing cabinets and squaring off the island, and of course, remove the dry-walled soffits and rework the wall cabinets by extending them to the ceiling or removing them in favour of some open shelving. However, after living here for a while, we realized that the layout of the kitchen really didn’t work for us. I made a list of all the pain points, both visual (I’m looking at you, bulkhead!) and functional and started to brainstorm ways to fix these issues by making layout changes.
This post may contain affiliate links. That means if you purchase anything from these links I earn a small commission, at no extra cost to you! This helps support my blog, so thank you!
The main issue we had with the kitchen is the lack of counter space, particularly in the island. The island’s counter space is mainly taken up by the stovetop. We find when we come home from grocery shopping, or pull food from the fridge, the island is the place that we naturally put things and we end up piling things right on top of the stove. I end up doing a lot of my cooking and chopping in the little triangle next to the range top and it just wasn’t enough.
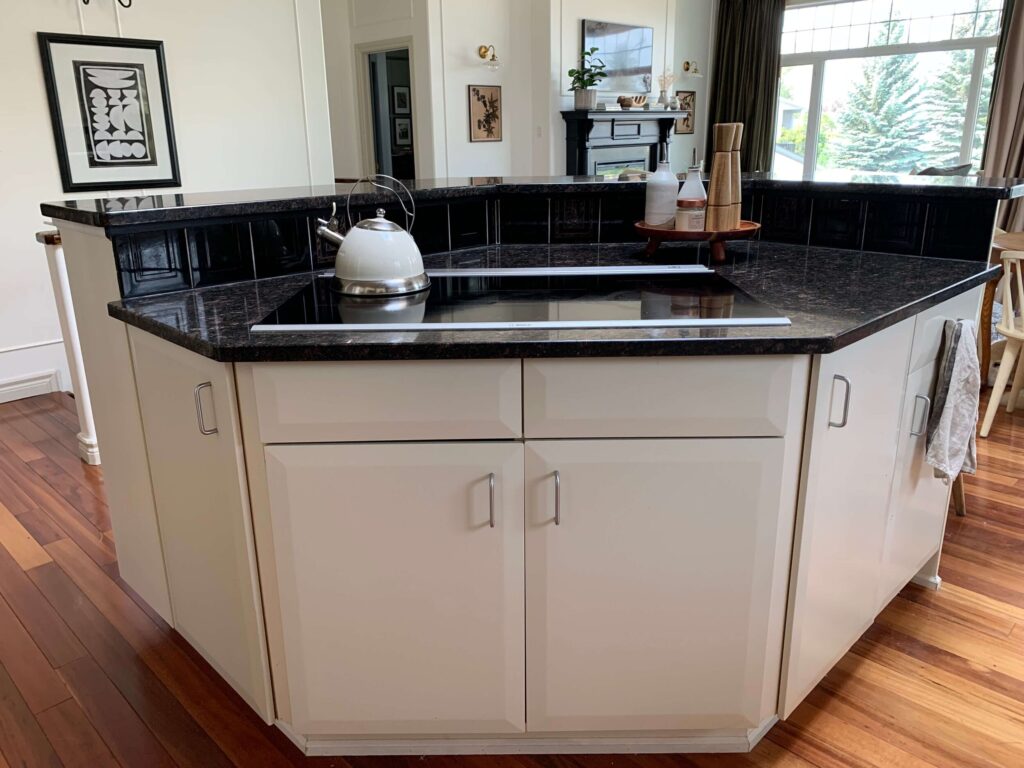
I tried a few different island configurations where we kept our existing appliances and left the stove in the island, but no matter what we did there just wasn’t enough counter space, particularly on the island which seemed like the natural spot to work. In order to increase counter space, it would be best to combine the stove and the oven into an all-in-one unit. Once I decided to do that, basically none of the existing cabinetry would work and we started looking at a complete overhaul.
This decision didn’t come lightly, especially considering that it is much more than we had originally planned to do when we were considering this renovation and bought this house. However, I realized that refacing the cabinetry and redoing the island was going to cost almost as much as a new kitchen, as all we would really be saving would be some of the perimeter cabinet boxes, which have almost no drawers. Then, I would be left with countertops I didn’t love and a layout that didn’t really work after spending all that money. So it made sense to just start fresh with a new layout and end up with something much more functional, and beautiful!
The Layout
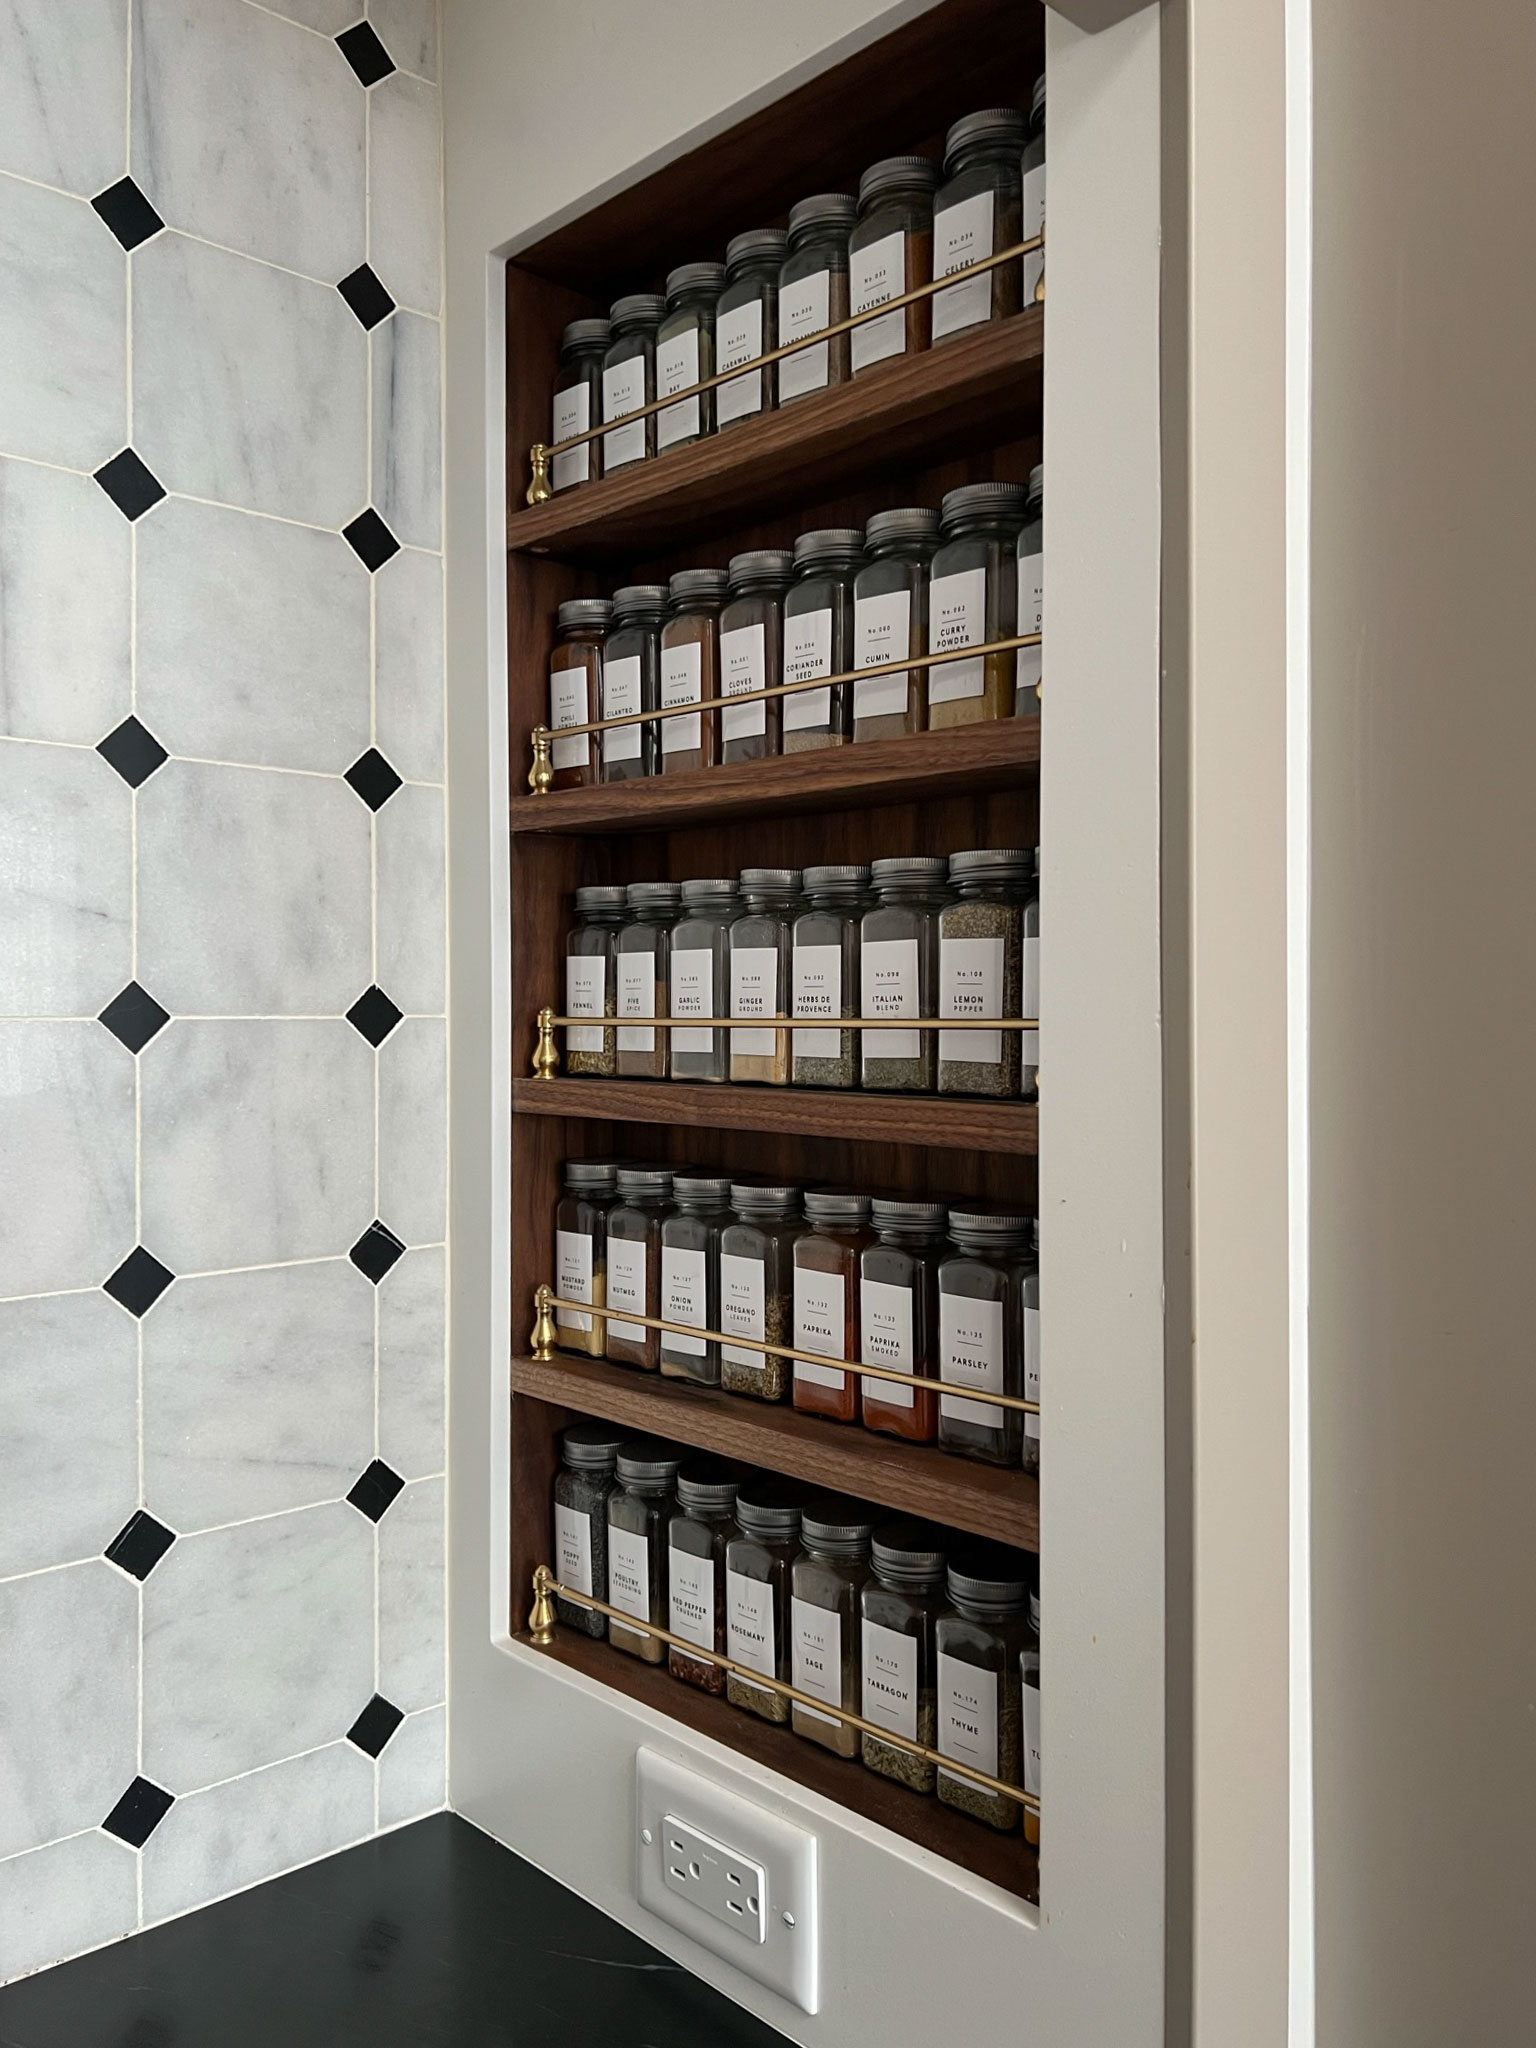
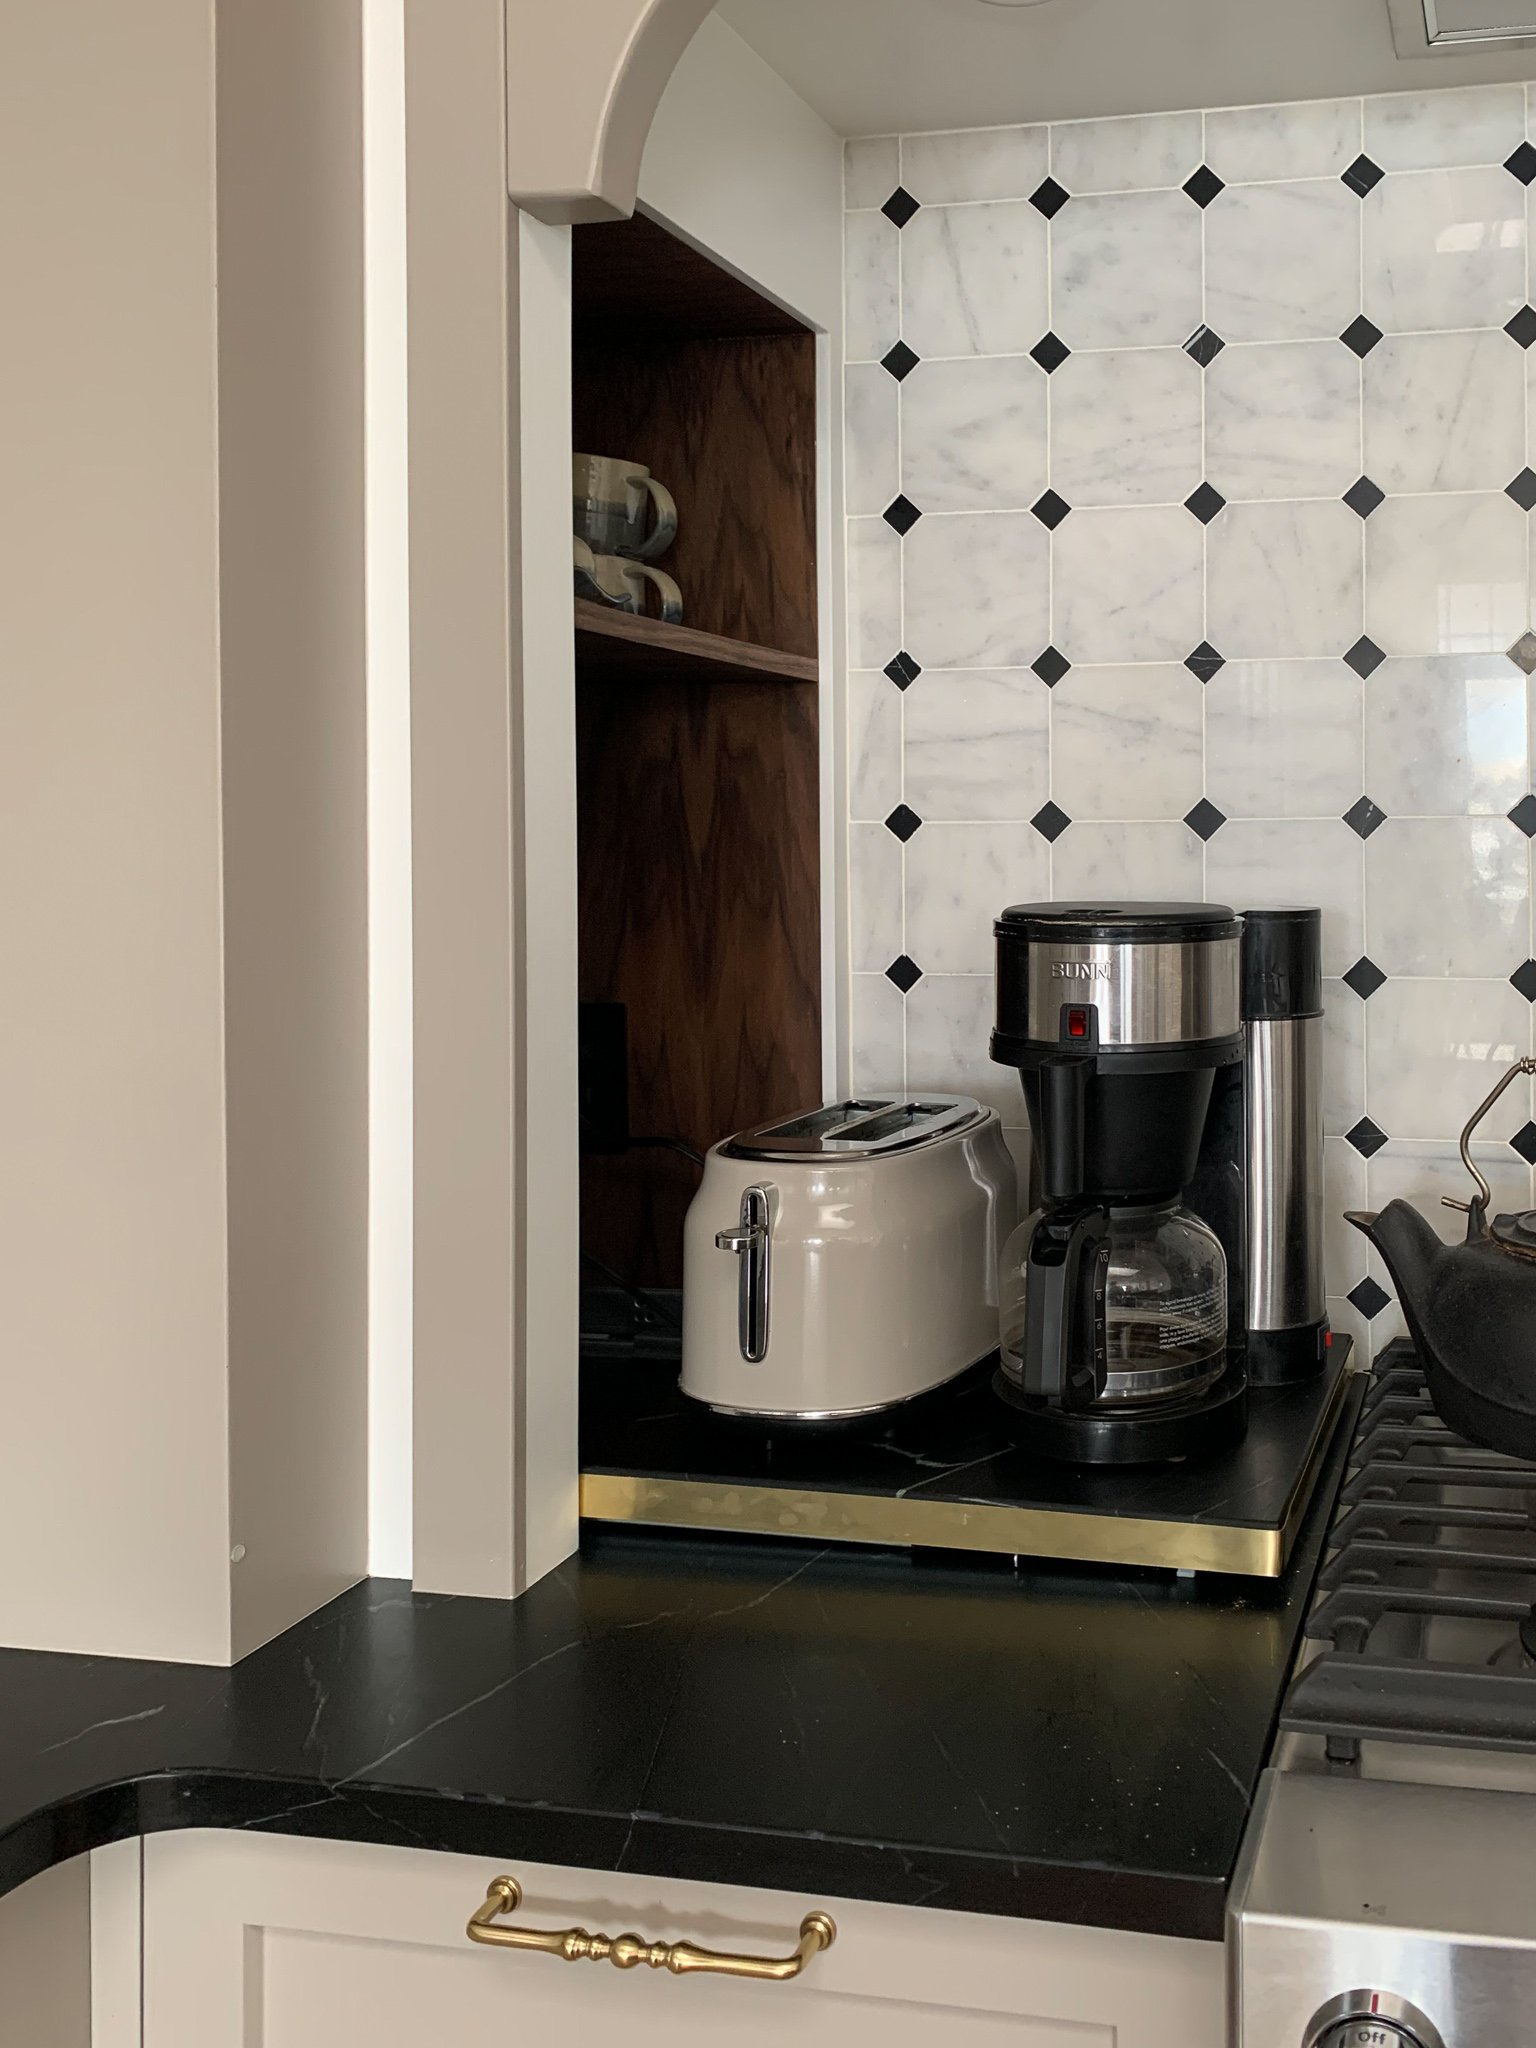
The first thing to consider in any kitchen renovation plan is layout. So let’s talk layout! In my last house, I had a walk-through pantry that encompassed a little bit of countertop where I kept small appliances (the coffee maker and toaster) which I LOVED. I really wanted to find a way to hide that stuff, particularly my coffee maker which I am extremely attached to! (It is this BUNN that makes a full hot delicious pot in 3 minutes flat, but it is not cute.) I started looking into an appliance garage, but according to code here in Alberta, you can not have a plugin inside of a cabinet unless it has a switch on the door which shuts off the power to the plugin when the door is closed. The problem is, my beloved BUNN is so beloved because it has a hot water reservoir so it needs to stay ON at all times, or my coffee takes 20 minutes instead of 3. Clearly, that’s not acceptable. So a switch that shuts it off when the cabinet was closed was not going to work. I couldn’t even legally put it inside the corner walk-in pantry.
It was a real problem! I was starting to think that I would just have to look at my ugly coffee maker, or get a new one that was cuter but probably had less than delicious coffee that took many more minutes, and feeling like my coffee addiction might be something I needed to seek help for. That’s just when inspiration struck! I saw this kitchen which belongs to none other than the amazing Jean Stoffer in their showroom and noticed a little detail…. A cubby! What if I built a little cubby like that in my corner, it could be open so it would meet code requirements and have plenty of venting, the coffee maker that I’m so attached to could live inside there, accessible, plugged in, but HIDDEN. YES. I think we will even add a sliding shelf so pulling it in and out of the cubby will be a breeze. Wouldn’t it be cute lined in wood, with a matching shallow spice rack cubby on the opposite side of the stove?
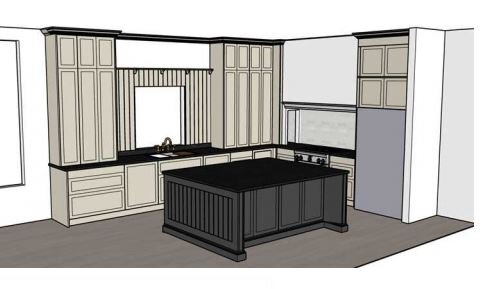
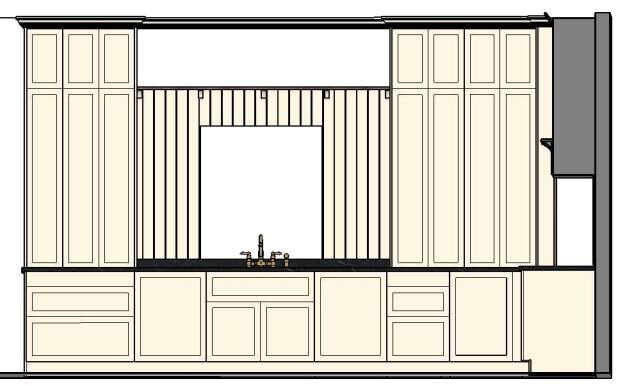
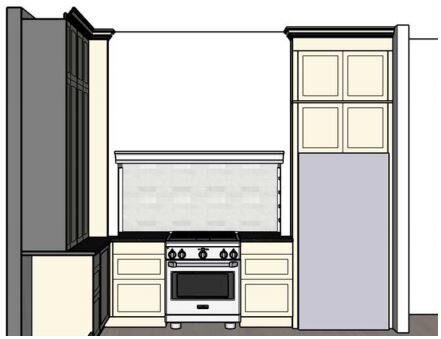
Once I decided to do a little cubby back there, the rest of the design mostly fell in place. Because we would no longer have the corner pantry (which I am not sad about – that corner pantry door is always open, the pantry is always a mess, and stuff gets lost at the back of the deep corner) I decided to add countertop hutch-style cupboards on either side of the sink, all the way to the ceiling to make up for the pantry space I would be losing. I realize that the space near the ceiling would be difficult to access, but I thought I could put seldom-used stuff way up high and it eliminates the dust and grease trap that exists on the top of cabinets. Although the countertop hutch plan will eat up the counter space, we will be gaining so much on the giant island which is a much more useful and central location to work on any way.
I should note that it took many iterations of this layout and I went back and forth a LOT with Katie from House with Home, who helped me with my kitchen plan and drew this for me in Sketchup. Katie helps clients customize their Ikea kitchens and she is a whiz at it – she knows Ikea’s inventory like the back of her hand and it was her idea to do the tall countertop hutch cabinets. I could not have planned this kitchen without her help and input and it was SO HELPFUL to have it all sketched for me to scale so I could visualize what it would look like! I’m no cabinet expert, and it is always nice to get a second set of eyes, and ideas on your plans. If you are considering an Ikea kitchen I highly recommend Katie to help with the planning!
So that’s the gist of the layout changes, everything else is staying where it is. I’m still not exactly sure how the details for the stove nook or the cubby will look as I haven’t flushed that out yet, but I’m excited to DIY some ideas to make this kitchen look high-end! So without further ado… the new kitchen layout! (Sketchup Renderings by Katherine Decker at House with Home)
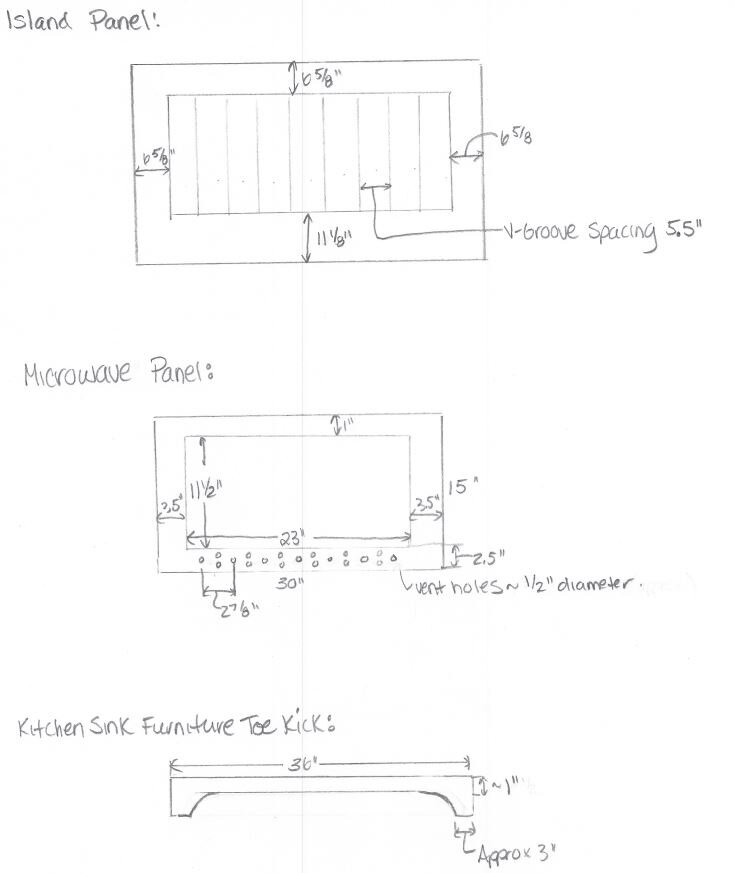
Did I mention we are going with IKEA cabinets? When planning this renovation, I found a cabinet company that specializes in doors for Ikea cabinetry, and they are customizing a lot of details for me, including the paint colour! So many Ikea cabinet front companies have a set palette of paint colours to choose from OR you can get unfinished cabinets and DIY them yourself. Since I OBVIOUSLY want to customize my colour I was looking at a DIY option which I was not really looking forward to (painting all the cabinets is a huge job and no matter how good of a job you do, you really can’t replicate a lacquered paint finish done in a factory). I was so excited to find AllStyle Retrofit, which does custom fronts for Ikea cabinets in any Benjamin Moore colour you choose! Not only that, as I started to work with them I realized that many of the details that I was planning on DIY’ing (custom end panels, toe kick cutouts, microwave cover panel) they would happily create for me and paint it in their factory finish!
Not only is that a huge time saver, but it’s also going to result in a much more professional and durable end product. They are located in Canada out of Ontario, so not only am I supporting a Canadian company I also do not have to pay high shipping and duty that would have been attached to many other Ikea cabinet front companies located in the US. So far, working with AllStyle’s designer has been fantastic, and I’m so excited to make this Ikea kitchen look custom with the help of AllStyle!
Design Details
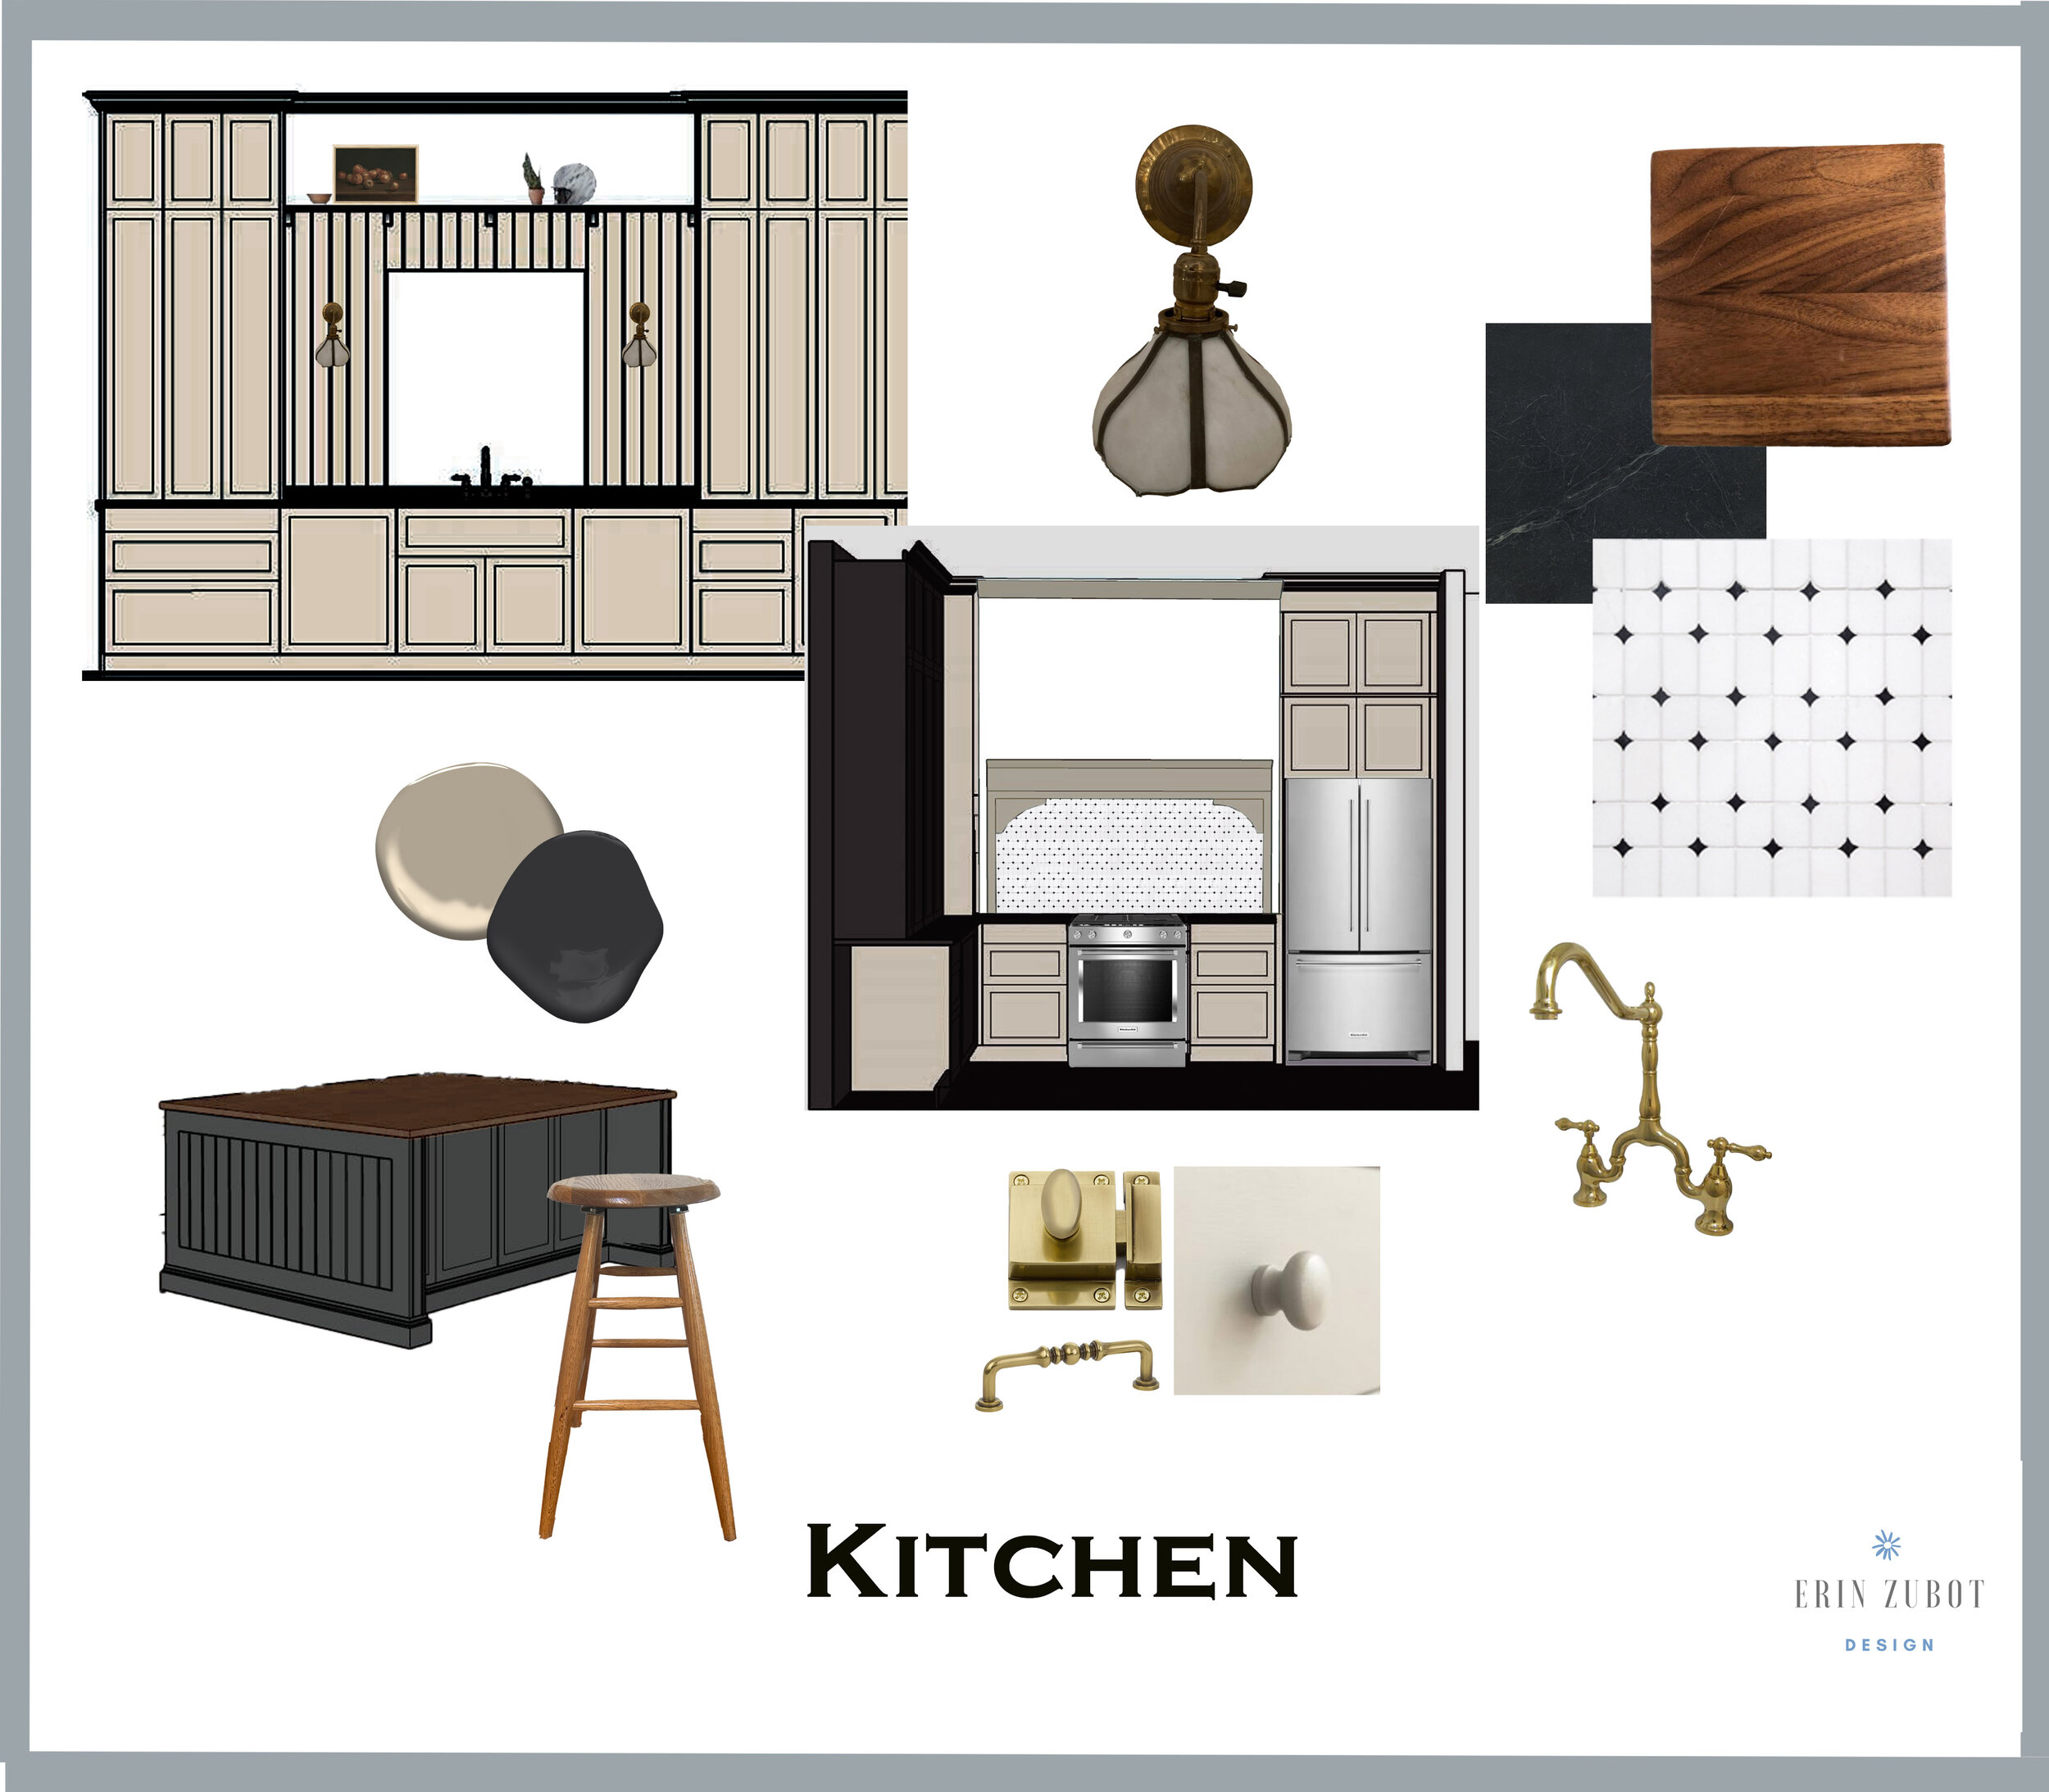
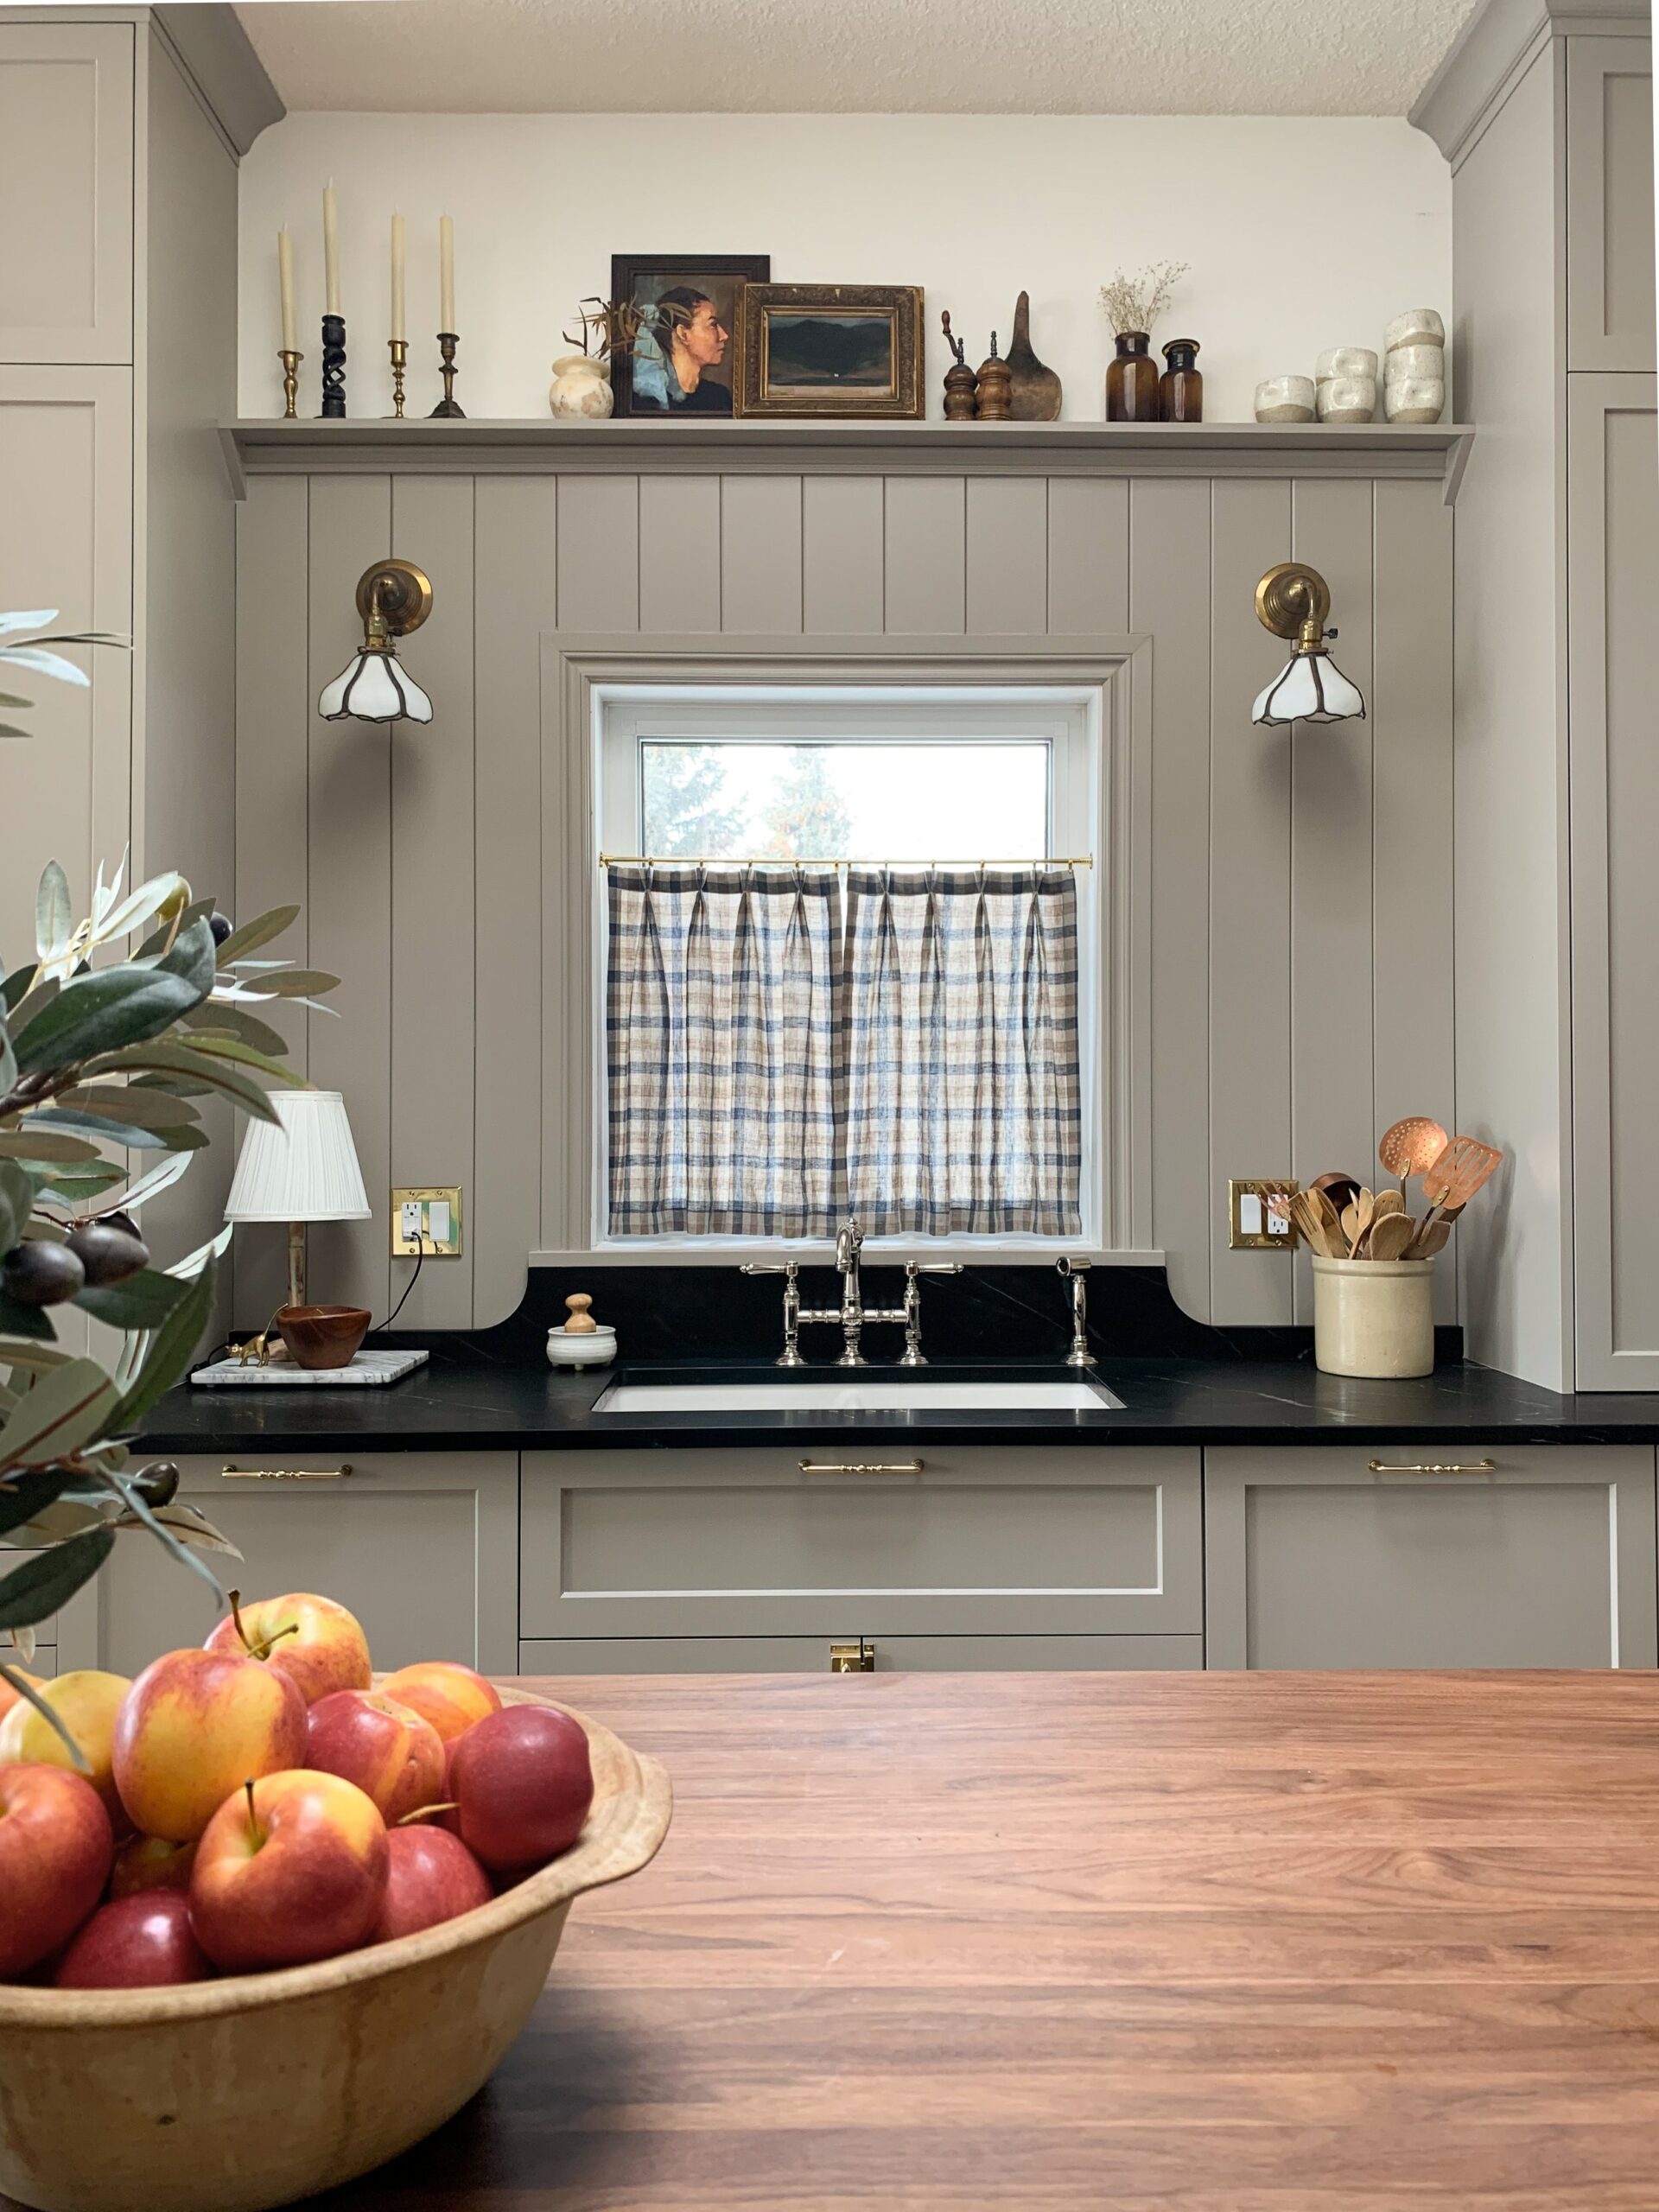
Now for the design stuff! I wrote a detailed blog post about my design process and planning for a kitchen renovation is no different! I have so many kitchens pinned but my hands down number one favourite I keep coming back to is this one below by Whittney Parkinson. It is neutral but not white, it’s varied enough to be super interesting and there isn’t a darn thing I don’t love about it. I think this kitchen is my biggest inspiration, I’m going to go with a similar colour palette (beige outer cabinets with black counters and black island) but on the island, I’m considering butcher block! I even love the way the top drawers have painted knobs and the bottom has brass pulls, I think I will incorporate that detail as well.
Instead of a ton of tile in the window area, I’m going to add some vertical tongue and groove paneling that ends somewhere above the window. I may top that with a little shelf, I’m undecided on that one but I would love to have a place to display all my kitchen-y things and maybe a little art. I’ve found endless inspiration from DEVOL Kitchens.
The stove “nook” design is still in flux, but here are a few nooks that I’m highly inspired by. I don’t think my hood with be exactly like any of these, I will take inspiration from a few different sources and come up with something unique (I hope) but there is some amazing inspiration out there!
I could continue the tongue and groove onto the hood and keep things simple like this kitchen from Redesign Home, but I also love the simplicity of this hood by Sabbe Interiors, with just a simple shelf and what appears to just be a drywalled finish:
I love the idea of a combination of drywall and moulding like this one from The Kitchen Think:
I love the shape of this one by Jessica Helgerson. That tile trim detail is so good!
Not a hood vent, but I am inspired by the shape of this opening framing this little nook, by Anna Braund.
Considering my dining room has a very similar arch, this would fit right in in my home and I would be crazy not to consider something like this from from Island Architects . I love the combination of tongue and groove and the arch together!
I put together a little mood board with the layout and some of the finishes I’m considering and now that its all in one place…. hold me back! I want to start demo STAT!
How to Plan for a Kitchen Renovation
As you may know if you follow me on Instagram, I’ve been working on the kitchen plan for a few months now. If you are wondering about how to plan for a kitchen renovation of this magnitude, this is the process I’ve followed to date, and the design process I plan to follow as the project moves forward. I will focus on design in this post, as construction scheduling is a whole different ball game!
Layout! Before paint colours and countertops are considered, the most important thing to consider is the layout. In my case I considered the location of the major appliances/ sink first and filled in the rest with cabinetry. I made sure I only had drawers on the lowers as much as possible (my current kitchen has only one big drawer and I hate digging something out of the back of a big cabinet!). Before we finalized the layout we actually went through the plan and labeled every drawer and cupboard with what we think we will put in each cabinet, to make sure we have the right size drawers where we want them. Appliances need to be chosen or ordered at this point (including the sink!) so that the layout takes into consideration the sizes of those items, and you know how long they will take to arrive. This part I have finalized!
Once I sorted out the layout, it was time to choose the cabinetry. I needed to decide on a door style and colour. I had in mind a colour palette but before I ordered my cabinets, I got a door sample from AllStyle and also swatched all types of colours in my actual kitchen. I painted the colour on one of my doors because paint on a door and paint on a paper sample look quite different! I’ve also finalized that choice and the cabinet doors were ordered. The company I am using takes 6 – 8 weeks from order to delivery, but all cabinet companies have different time lines, so be aware of that and plan accordingly! My cabinet doors have been ordered, CHECK! (But we still have to make a giant Ikea run for the boxes!)
Currently, we are sorting out our electrical plan. We need to decide where we want a light, a switch for the garburator, a plug in, etc. We want a very clear plan to give the electrician to quote, and need to know what light fixtures we need to source. (Or in my case, you buy a pair of vintage sconces first and them add them to the electrical plan later!!)
Next, I will source my remaining materials like sinks and plumbing fixtures, countertops, lighting, carpentry items (tongue and groove, corbels, etc. that I plan to add) and any other little details that I may need to order and can not find locally. Even if I plan to pick something up locally, I will often check stock and even buy the materials just to be sure its available when I need it. I will select my countertops at this time too (I’ve already received a few quotes!) If there are any special considerations we need to know about for the counters we end up with (such as additional support for extra thick stone) I want to know about that before we start constructing and I want to know what the countertop fabricator’s timeline is as well (how much lead time they need before we call them to template, and then how long after that until install). I will secure a quote, pick the slab and be ready to call them for templating armed with that information.
Once all the materials are here (in particular the critical-path items like the cabinet frames), we are ready to demo. We will not start unless we are sure we will not be delayed by something not arriving on time. We can live without a sconce, for example, but we can not live without a faucet or sink! In all my projects, I prefer to have all the planning and all materials on site before starting for that extra peace of mind!
The next step is to demo and hope all goes smoothly! There are always unexpected things that come up during any project, but the more you can plan and find out in advance, the smoother the construction will go, that I guarantee.
So there you have it, maybe the first kitchen ever to be designed around a coffee maker. I am super excited about all the details, but I’m also a little nervous! I know that we can do it, but I fear that with our full time jobs and living through it, it may drag out a bit and test our DIY stamina! Stay tuned!!! Nervous breakdowns are fun to watch.
Love how you broke that down. It’s going to be exciting! Lots of takeout and slow cooker meals in your future (can you prestock the freezer?!) the biggest thing is having somewhere with water for dishes. We used the bathtub which was the actual worst. Laundry room didn’t exist yet. Get something temp set up if needed!! Cant wait to follow along!
Thank you so much Annet! We have a little wet bar in the basement, the sink is tiny but it will do the job for sure!! Prestocking the freezer is a great idea, I think I’ll start doubling my meals and freezing one!
You are soooo organized ERIN. I’m sure your kitchen will be awesome and that you will have special “Erin touches” to it. Can’t wait to see the finished project!
Great job bookending this starting and ending with the coffee maker 🙂
Hi, there! I found you on IG and had to follow through to the blog – your kitchen is fantastic! Do you mind sharing how you figured out the kitchen "hutches"? We’re trying to do the same in our IKEA build and I just can’t get it right! Thank you!