How to Update Your Kitchen Without Painting Cabinets!
My mom has a kitchen that was built in the early 2000s and it is very nice, but it’s about 20 years old now and it’s starting to look a little dated. I had a little tile left over from my bathroom renovation, and I asked her if she would like me to redo her backsplash. She was thrilled with the idea! That idea snowballed a little and I asked her if she wanted a whole kitchen refresh. She agreed but with one stipulation – no paint! So I came up with a few ideas on how to update her kitchen without painting cabinets!
This post may contain affiliate links. That means if you purchase anything from these links I earn a small commission, at no extra cost to you! This helps support my blog, so thank you!
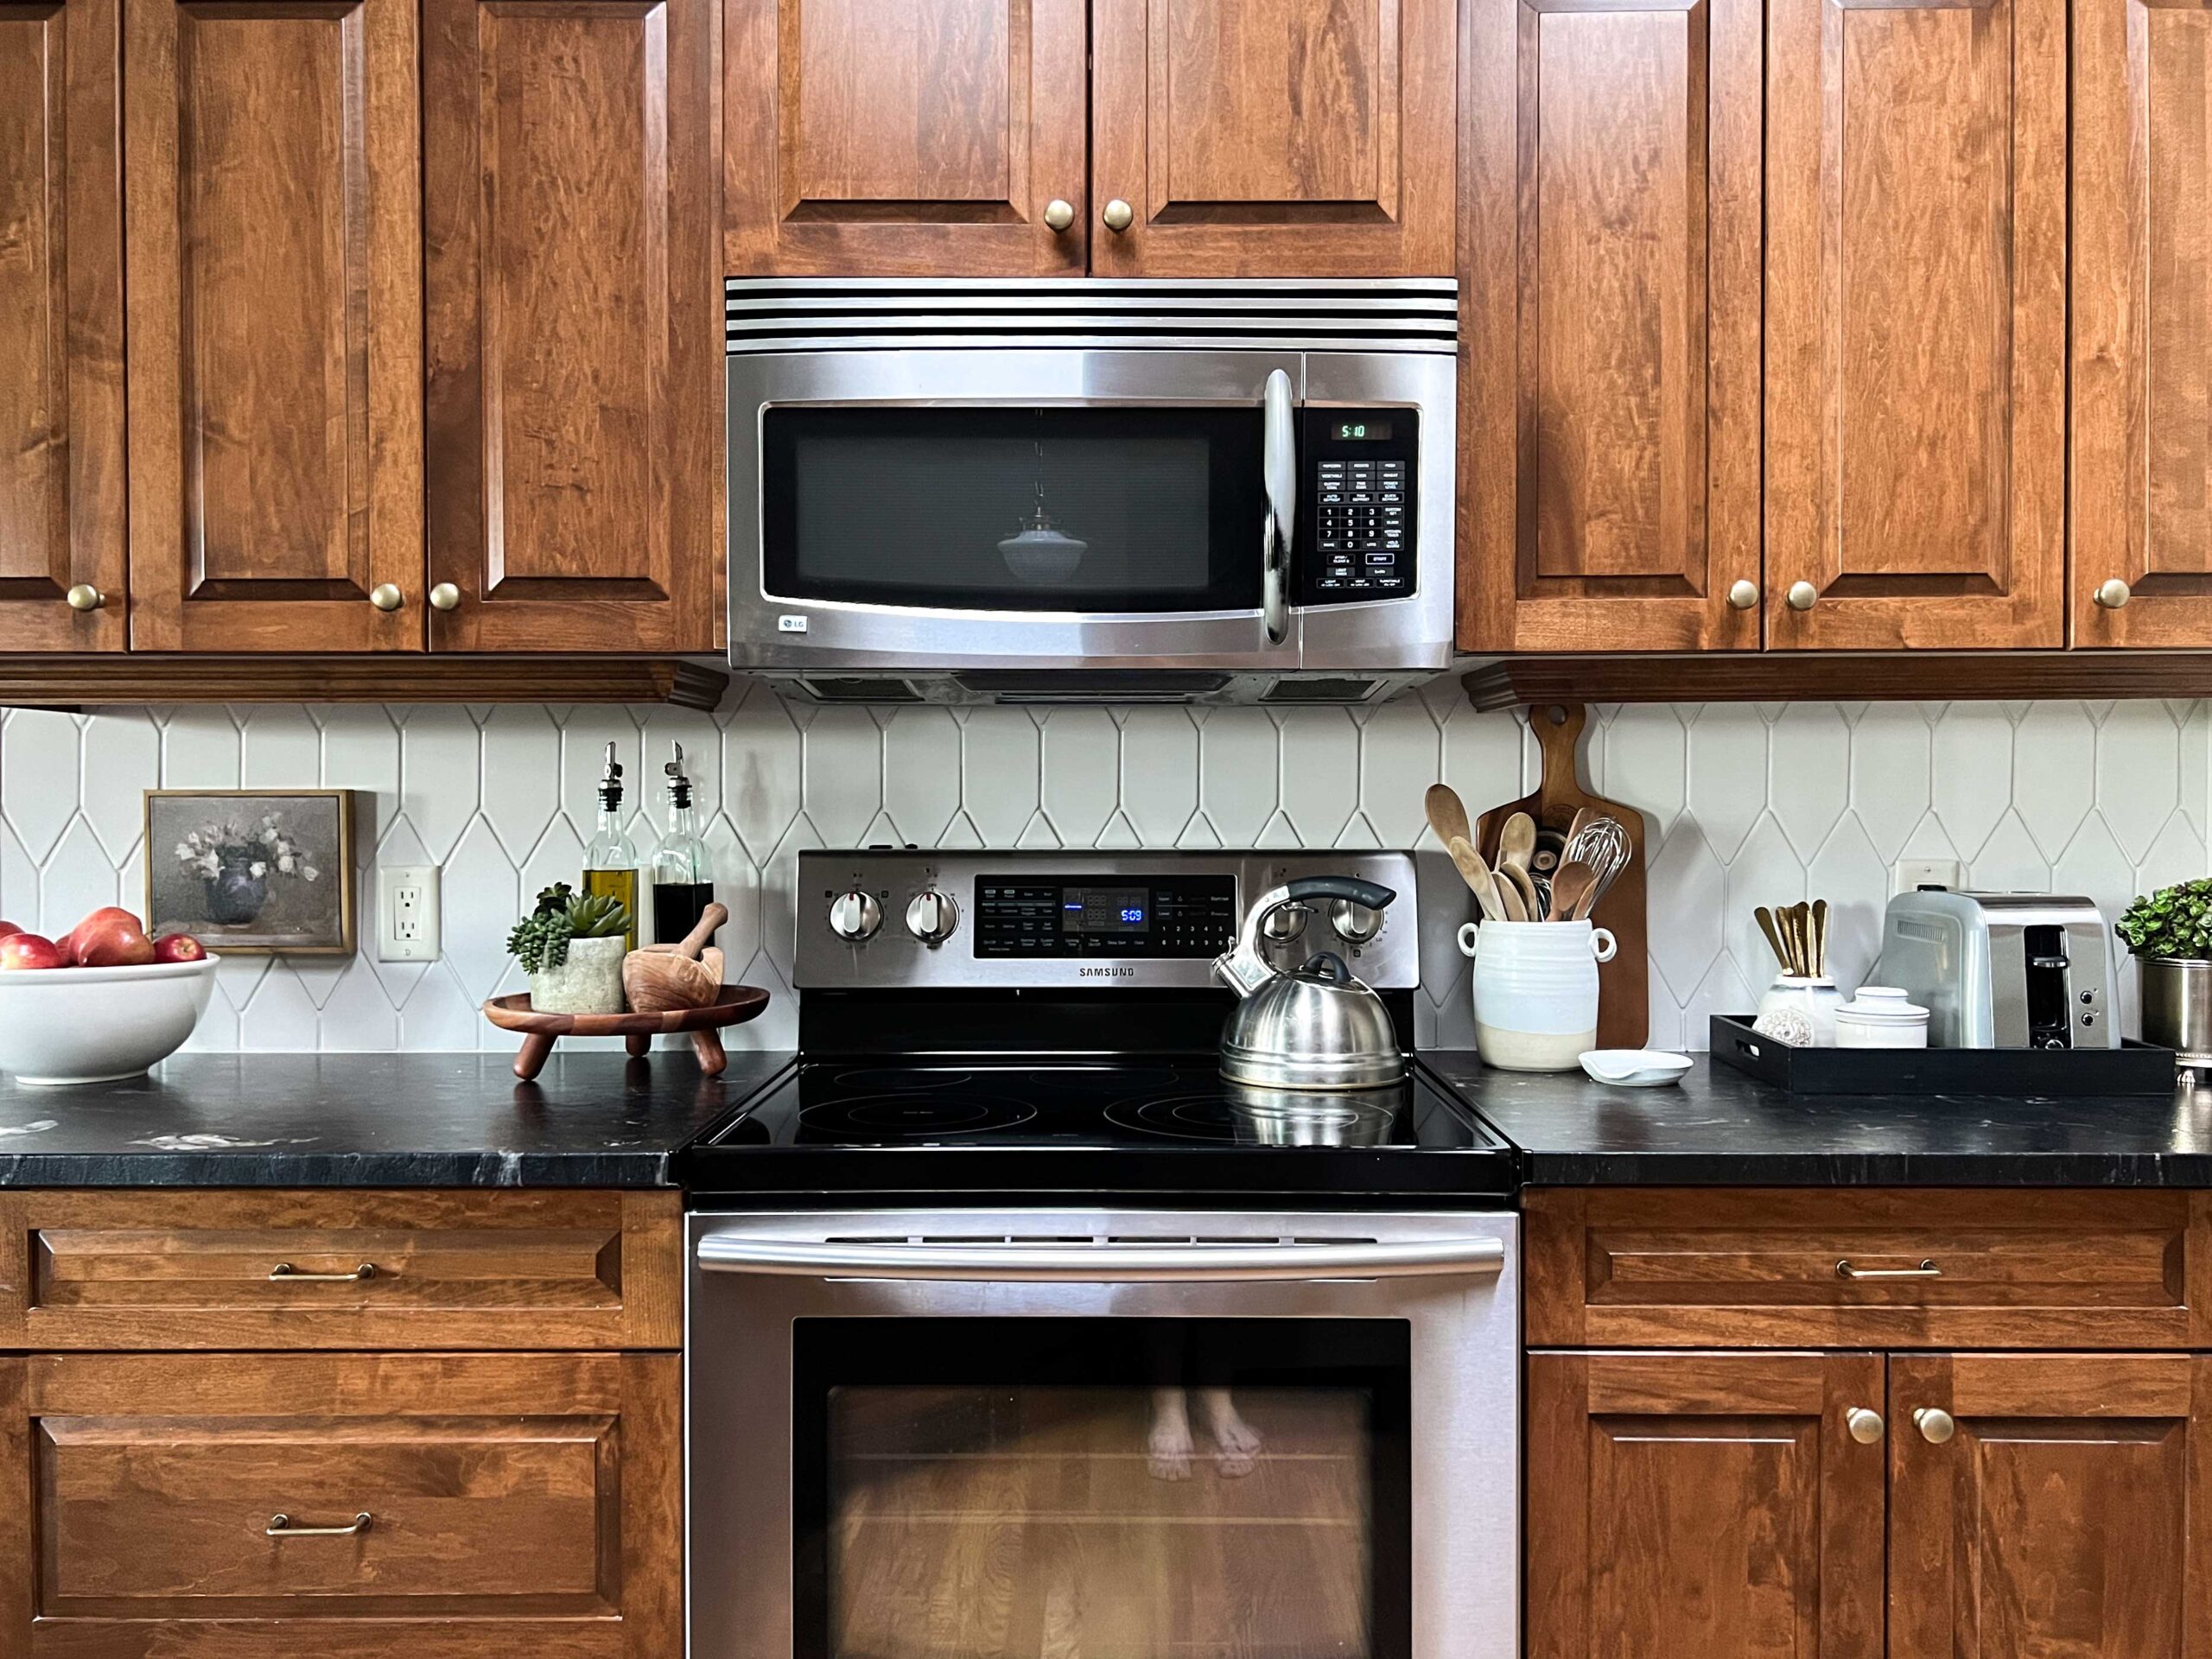
Table of Contents
- Why Not to Paint
- Update #1 – New Backsplash
- Update #2 – Lighting
- Update #3 – Cabinet Hardware
- Update #4 – Soft Close
- Update # 5 – Styling
- Update #6 – Paint the Pantry
- Update #7 – New Stools
- The Results, a Budget Breakdown and Sources
- Other ideas for Updating a Kitchen without Painting Kitchen Cabinets
- You Might Also Like:
Why Not to Paint
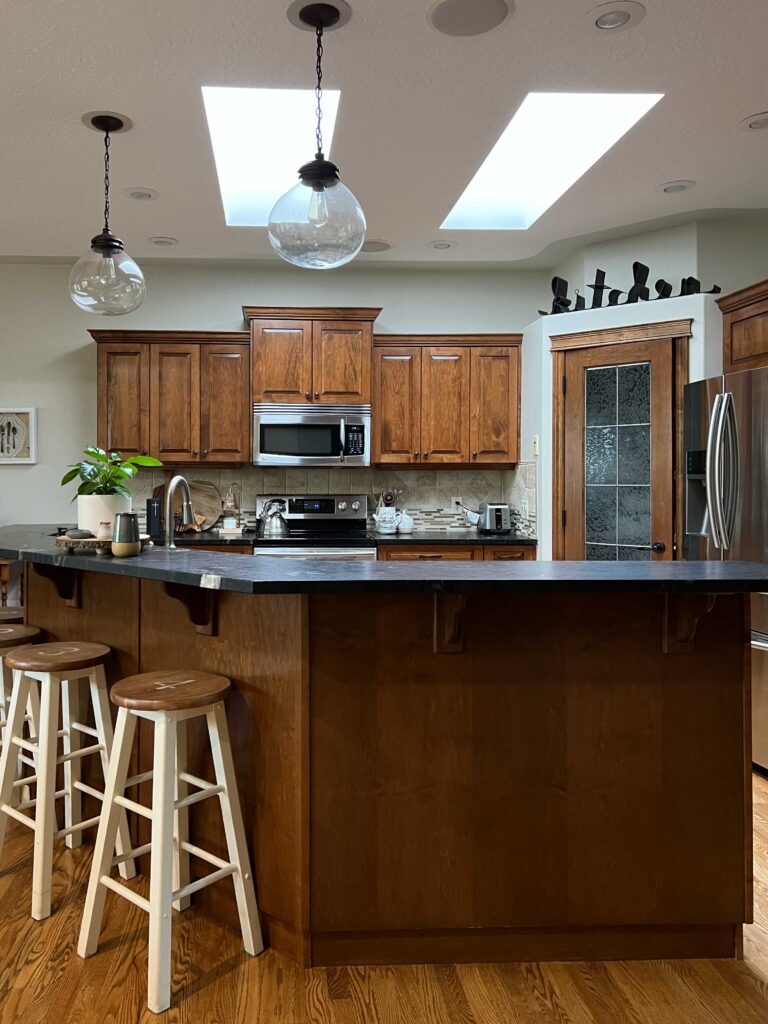
Don’t get me wrong, when I first spoke with my mom about this refresh the first thing out of my mouth was “How about a fresh coat of paint”? However, she didn’t want the wood cabinets painted. I suggested just painting the uppers, just painting the island, different colors, and anything I could think of to break up some of the wood. (And I still feel that painting at least some of the old kitchen cabinets would have looked great.)
The existing wood cabinets were nice and in good condition and they were a nice wood tone. Unlike some wood cabinets that can have an orange tone, these were a nice deep brown. She said she worried about the durability of painted cabinets.
(Although you know I would have done it right, and she knows that too, after I painted her laundry room cabinets!)
I respected her opinion and told her we could give the kitchen a whole new look without painting, just with a few fresh little updates without getting into a big project. Here is what we did!
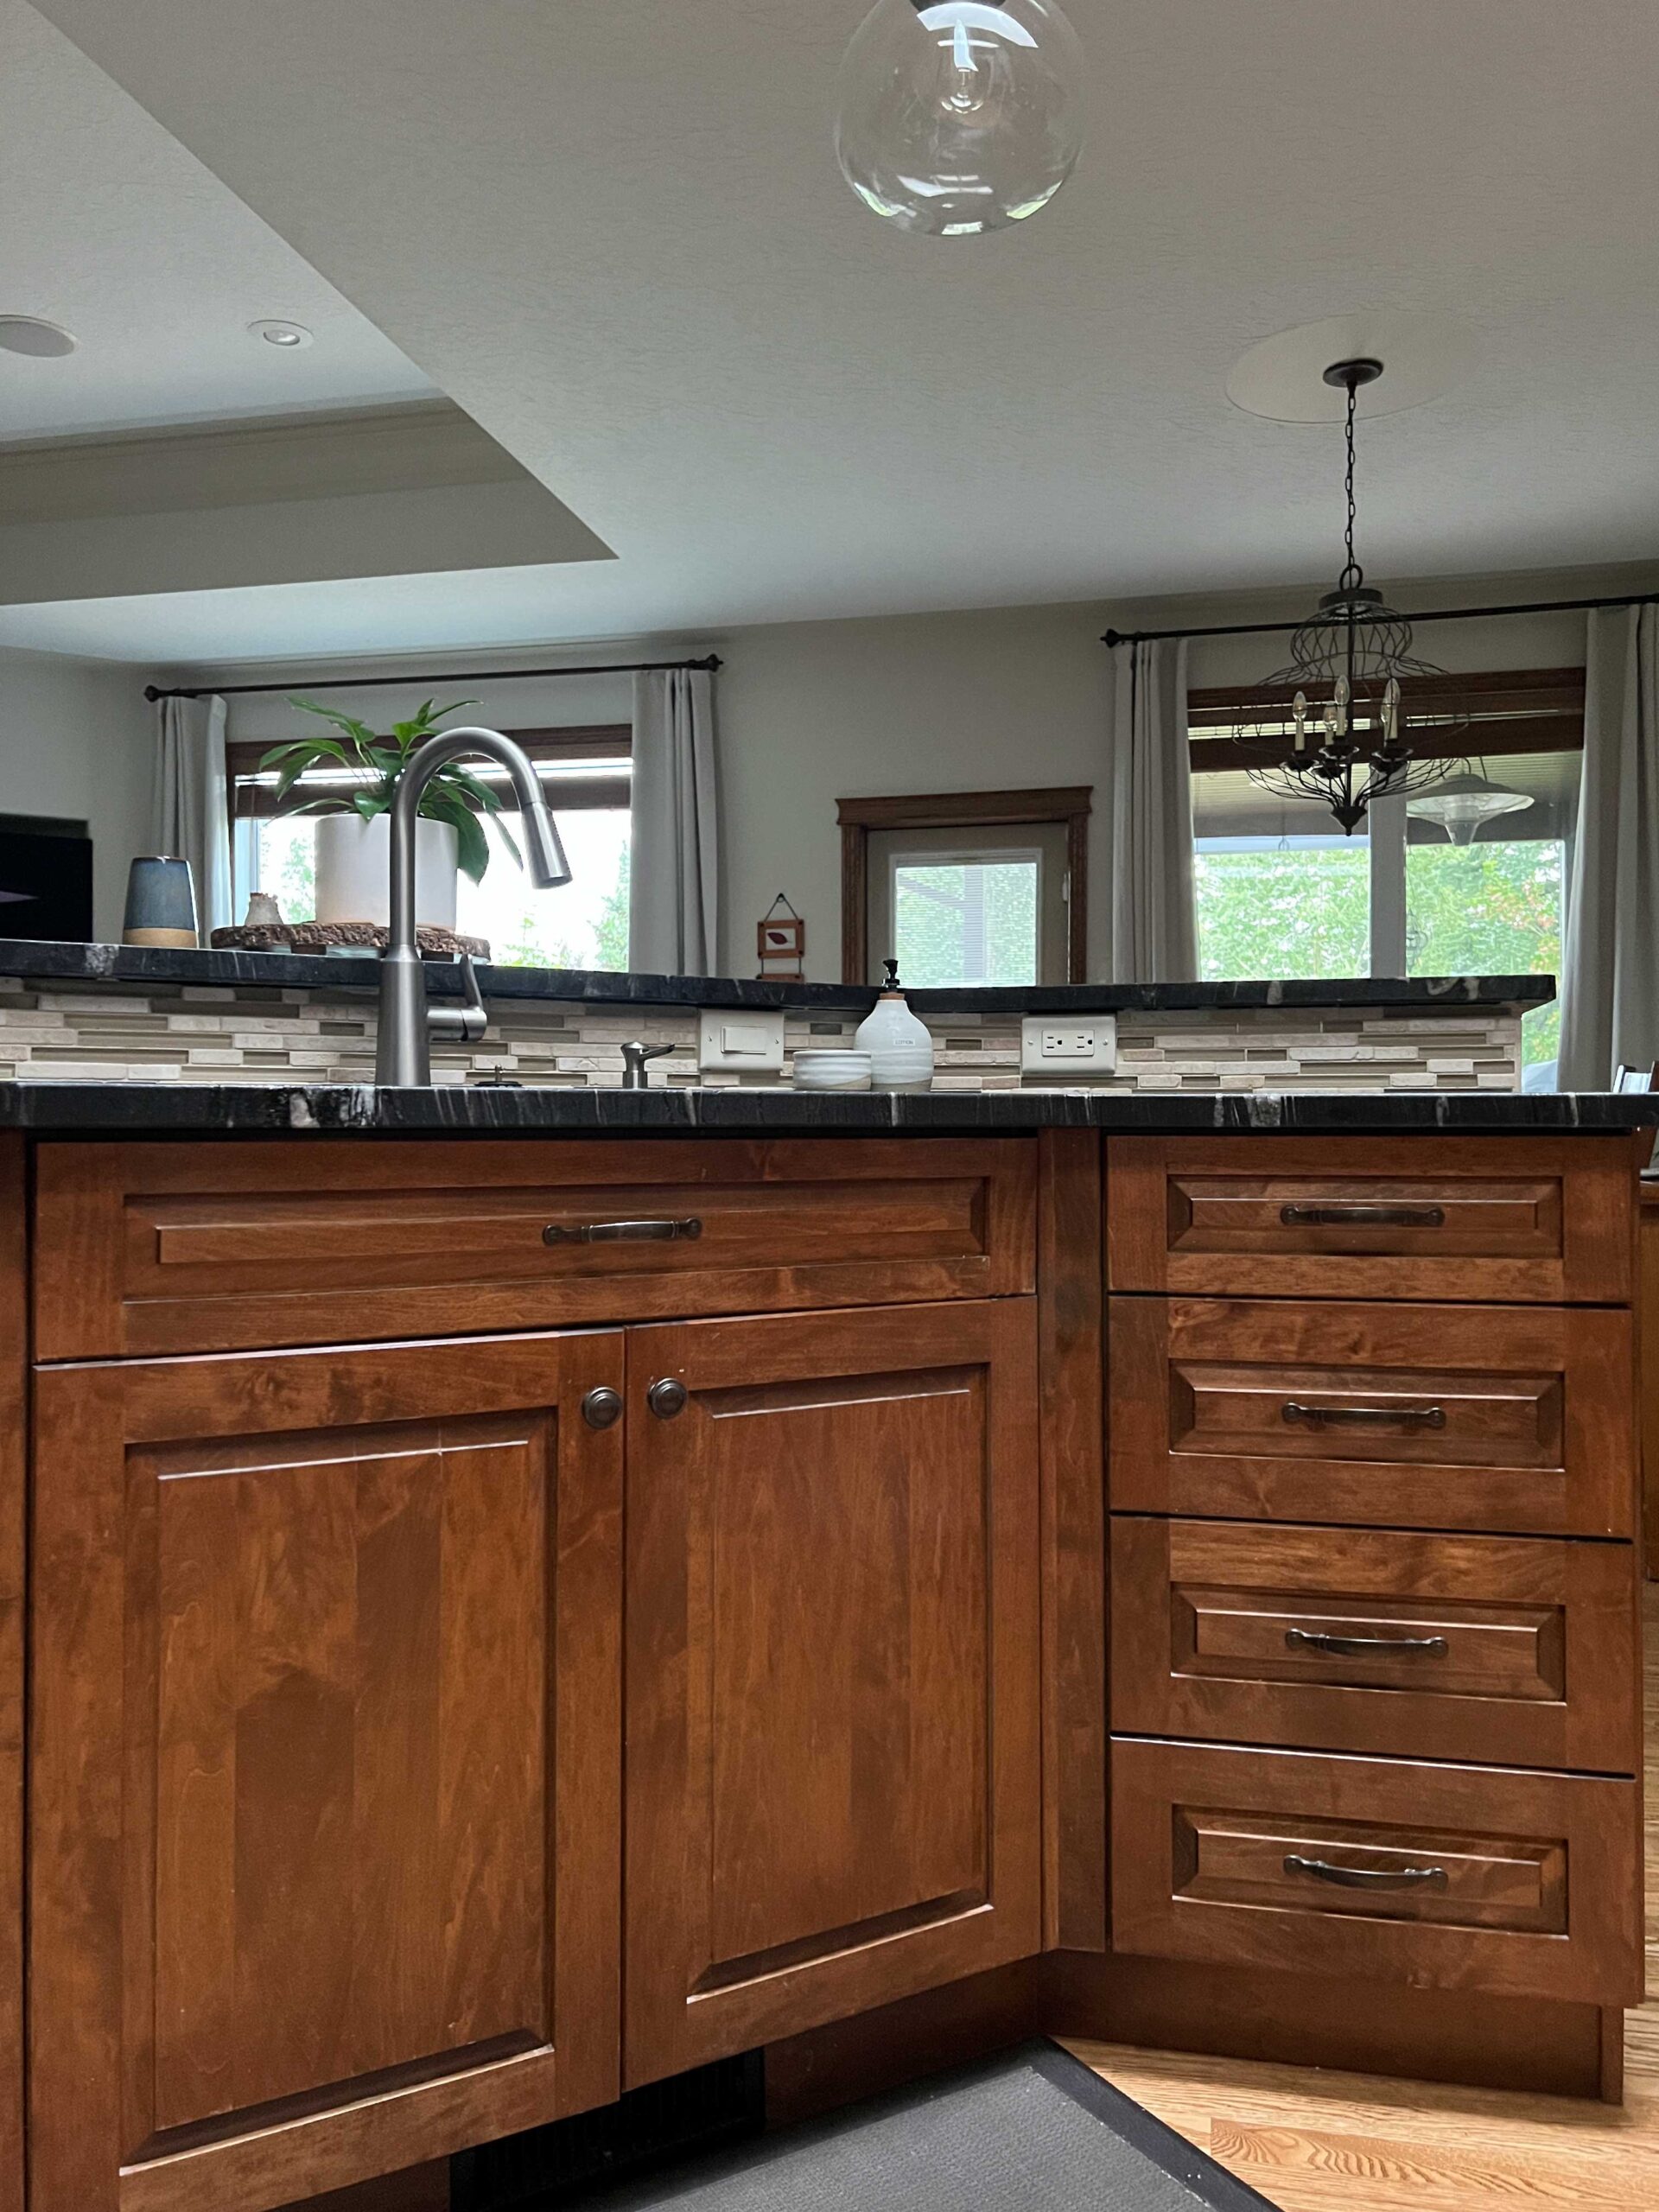
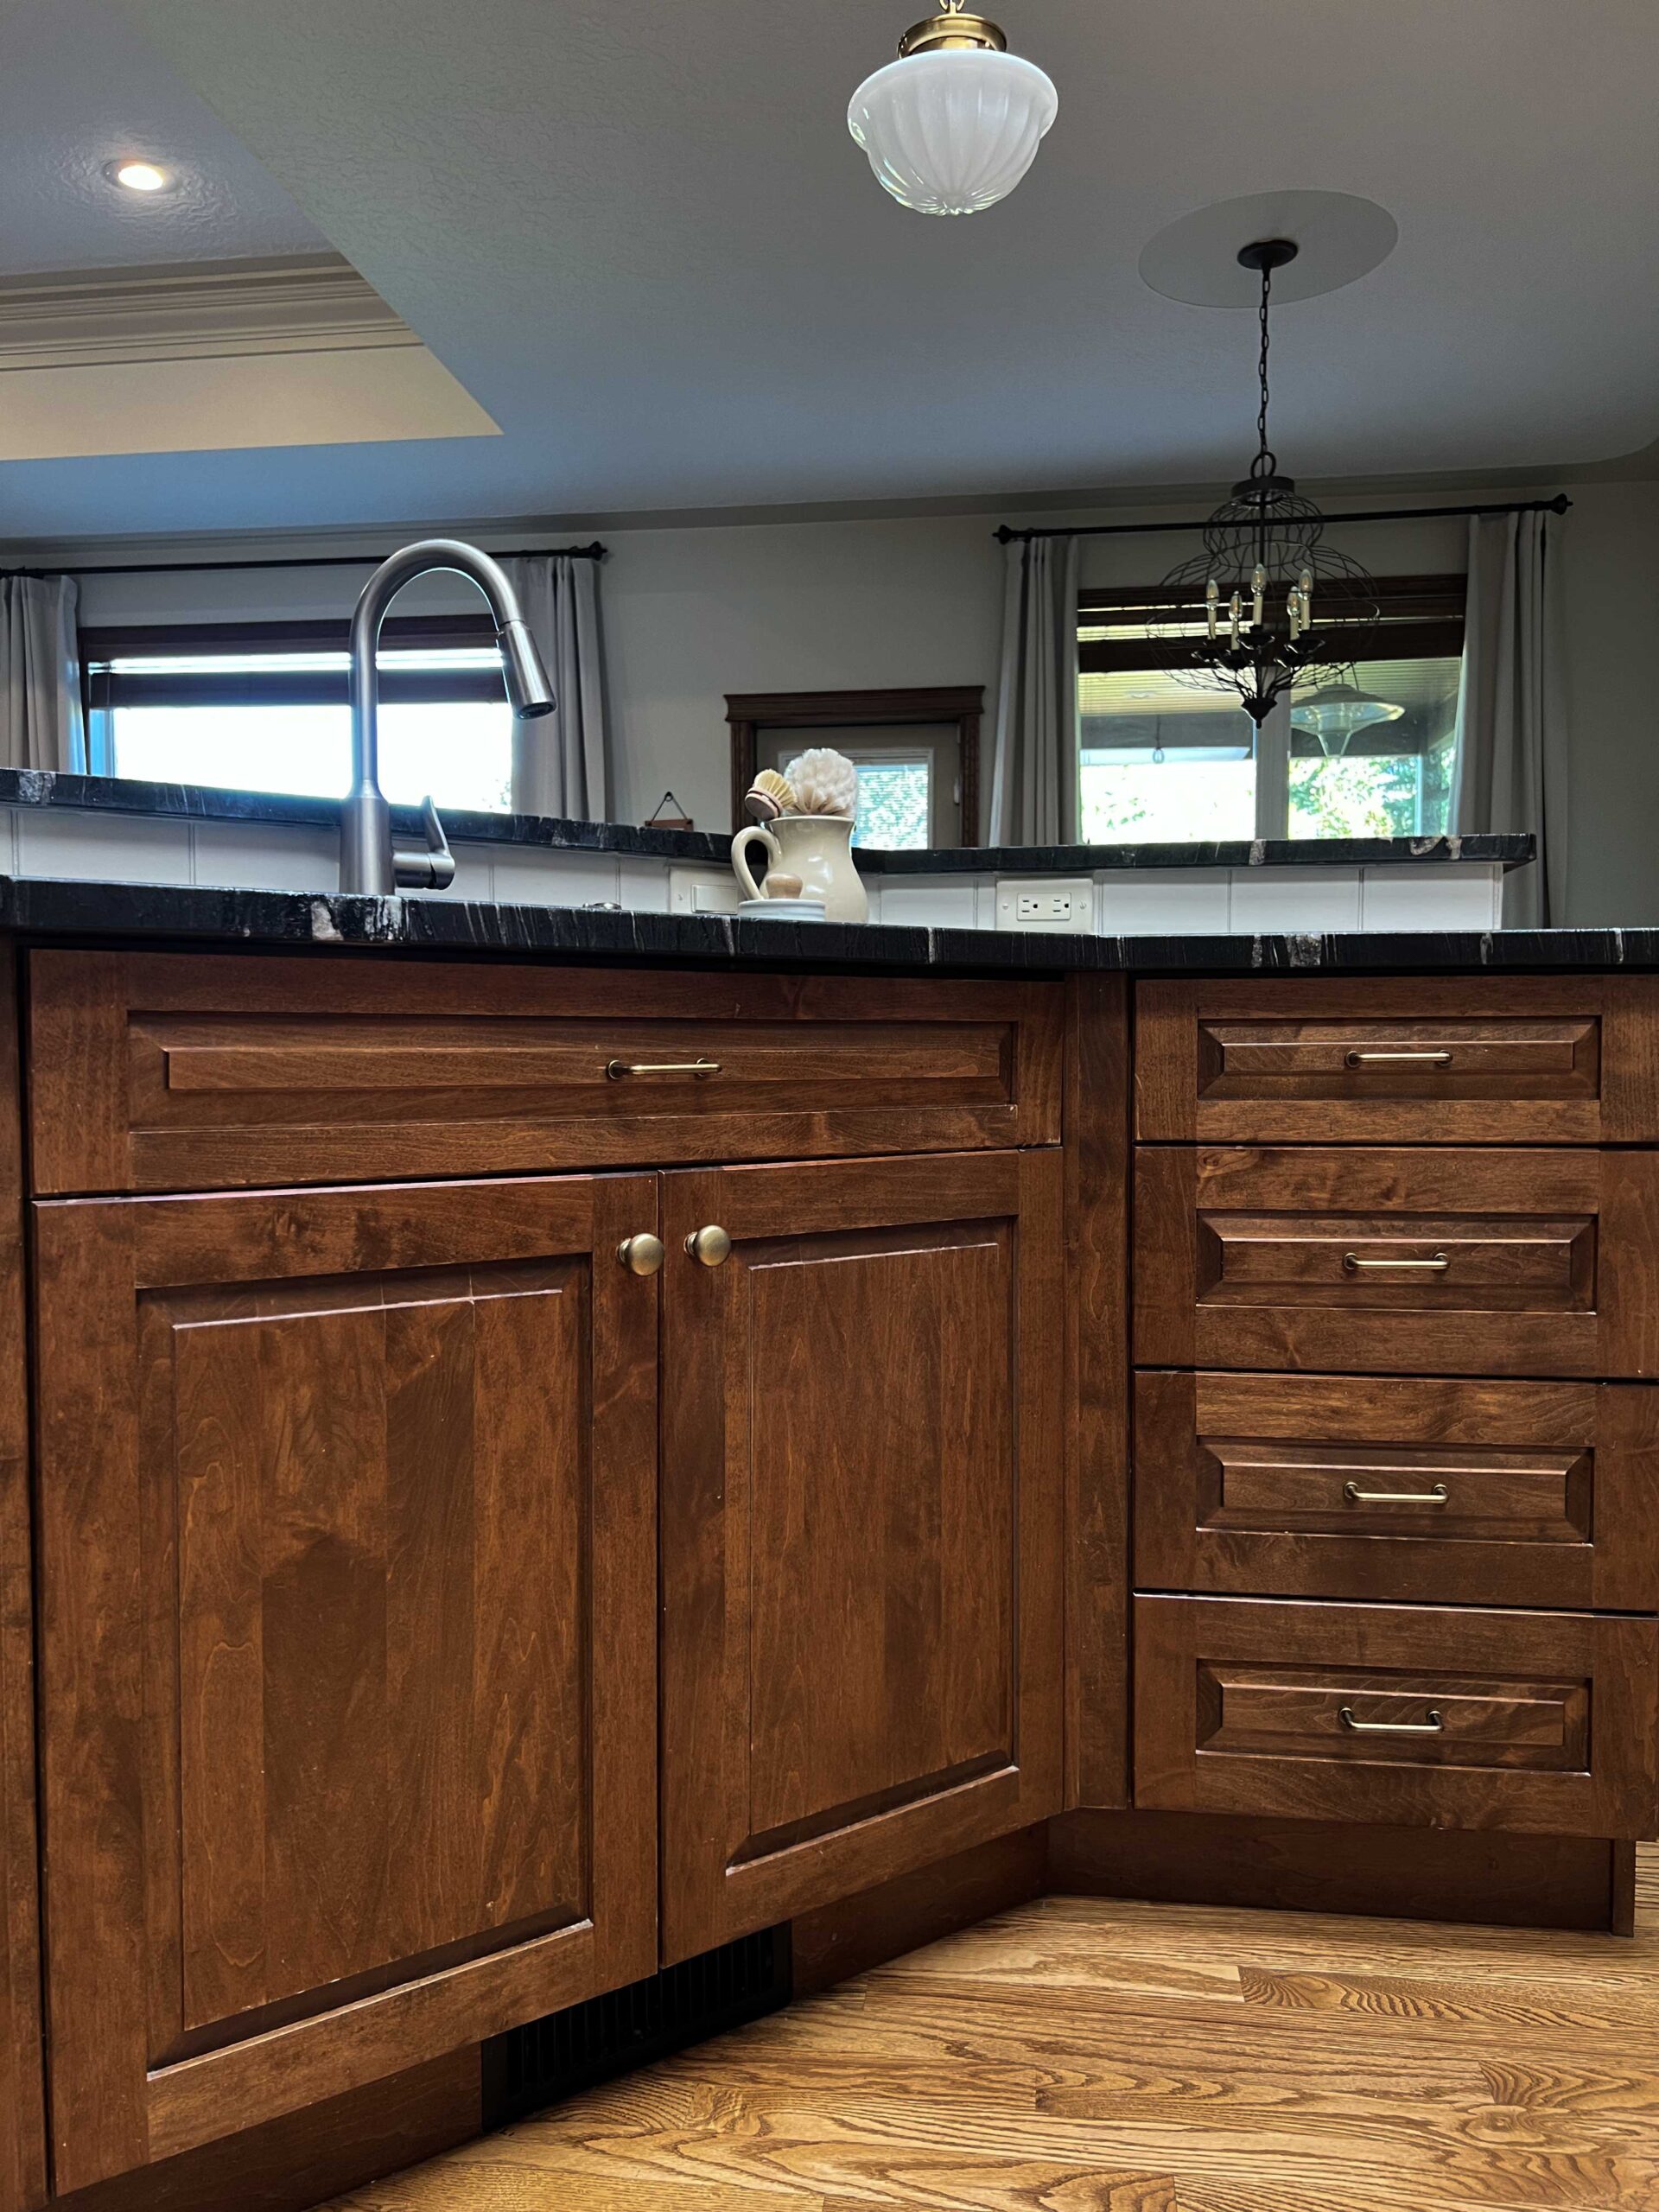
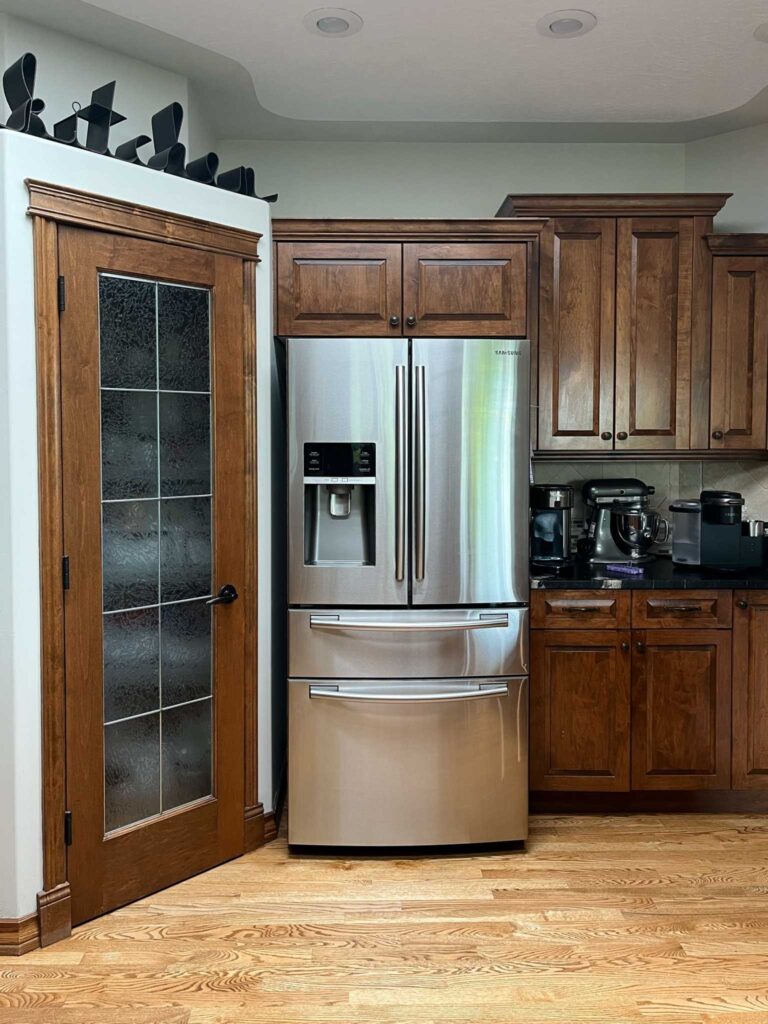
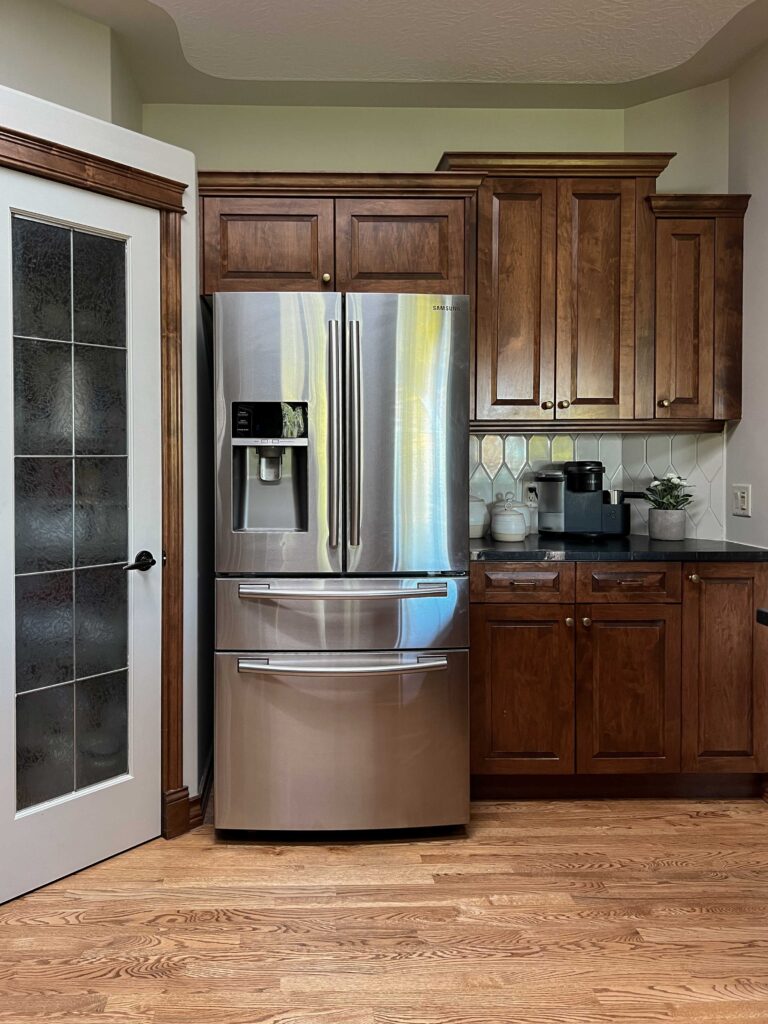
Update #1 – New Backsplash
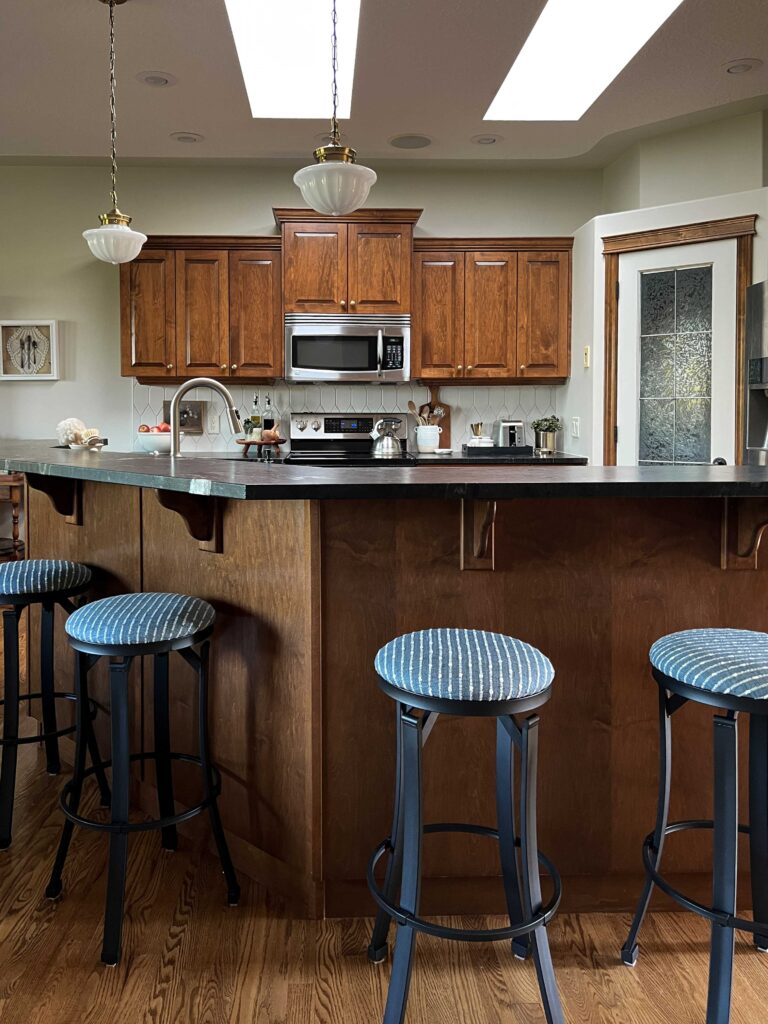
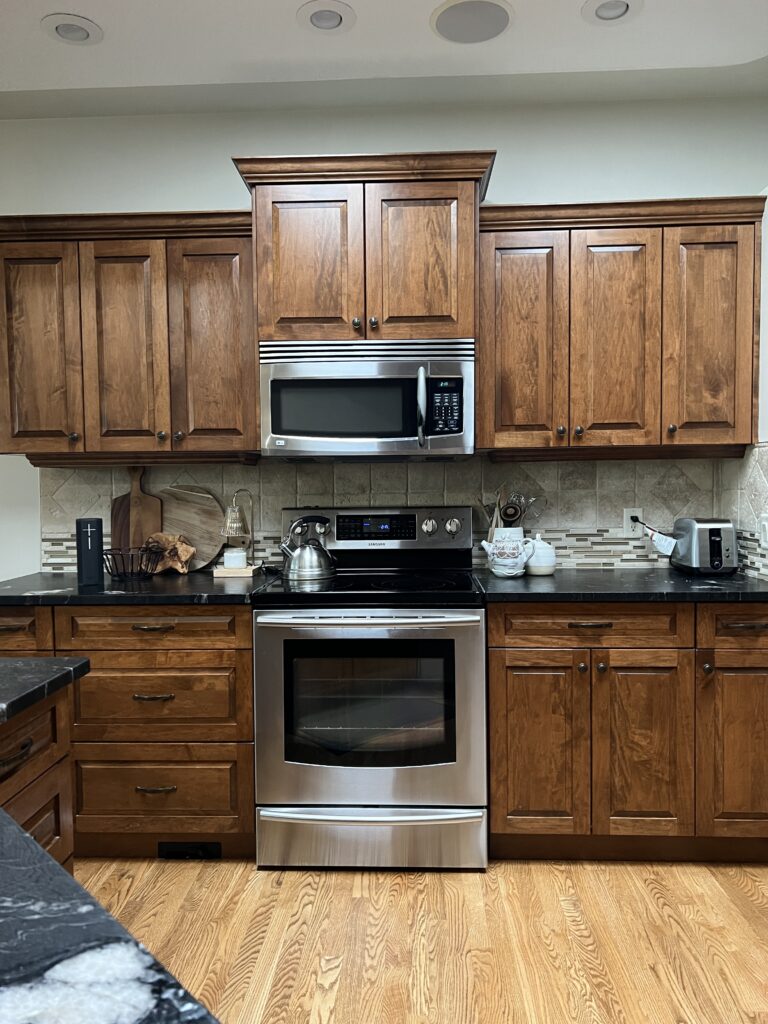
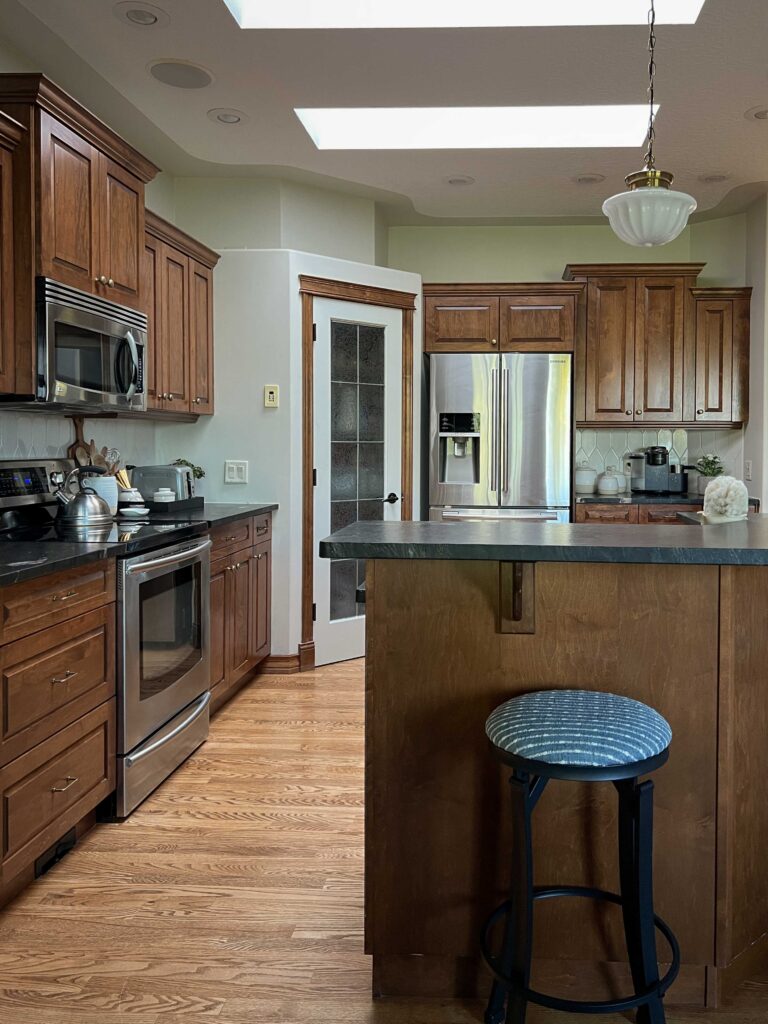
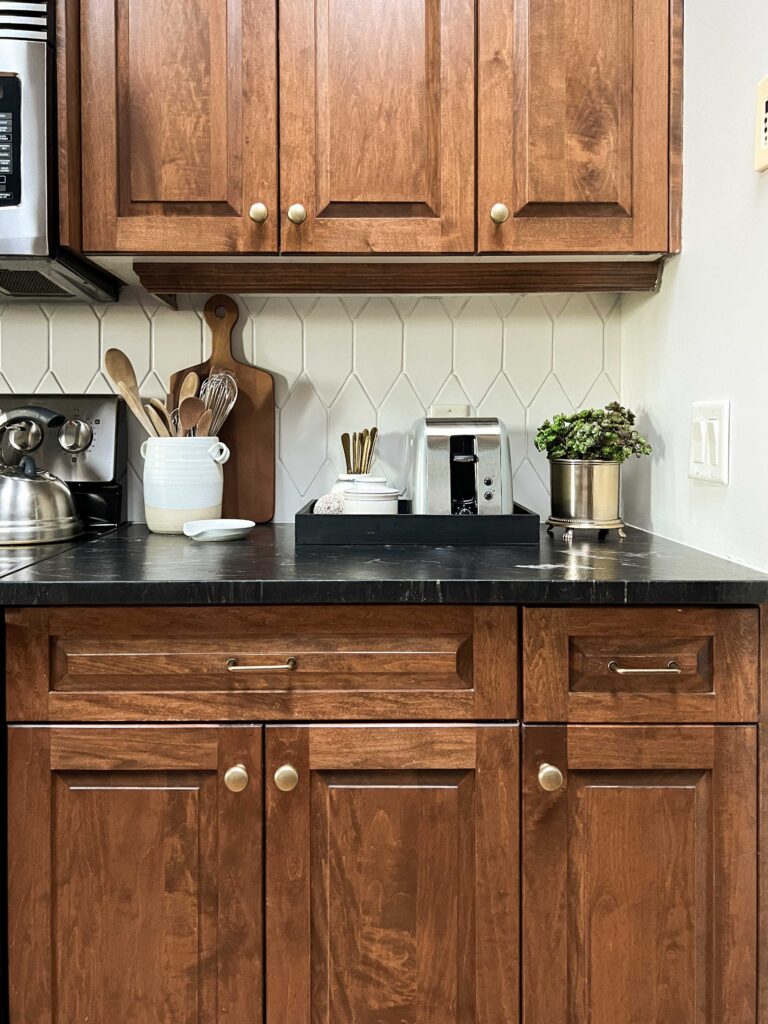
The first thing that was dating my Mom’s kitchen was the backsplash. It was travertine and glass tile and made up of a few different shapes. Overall, it did not compliment the black countertops or the deep wood cabinets. We decided to knock it out and replace it with some clean more modern-style white tiles to add some contrast and to lighten things up.
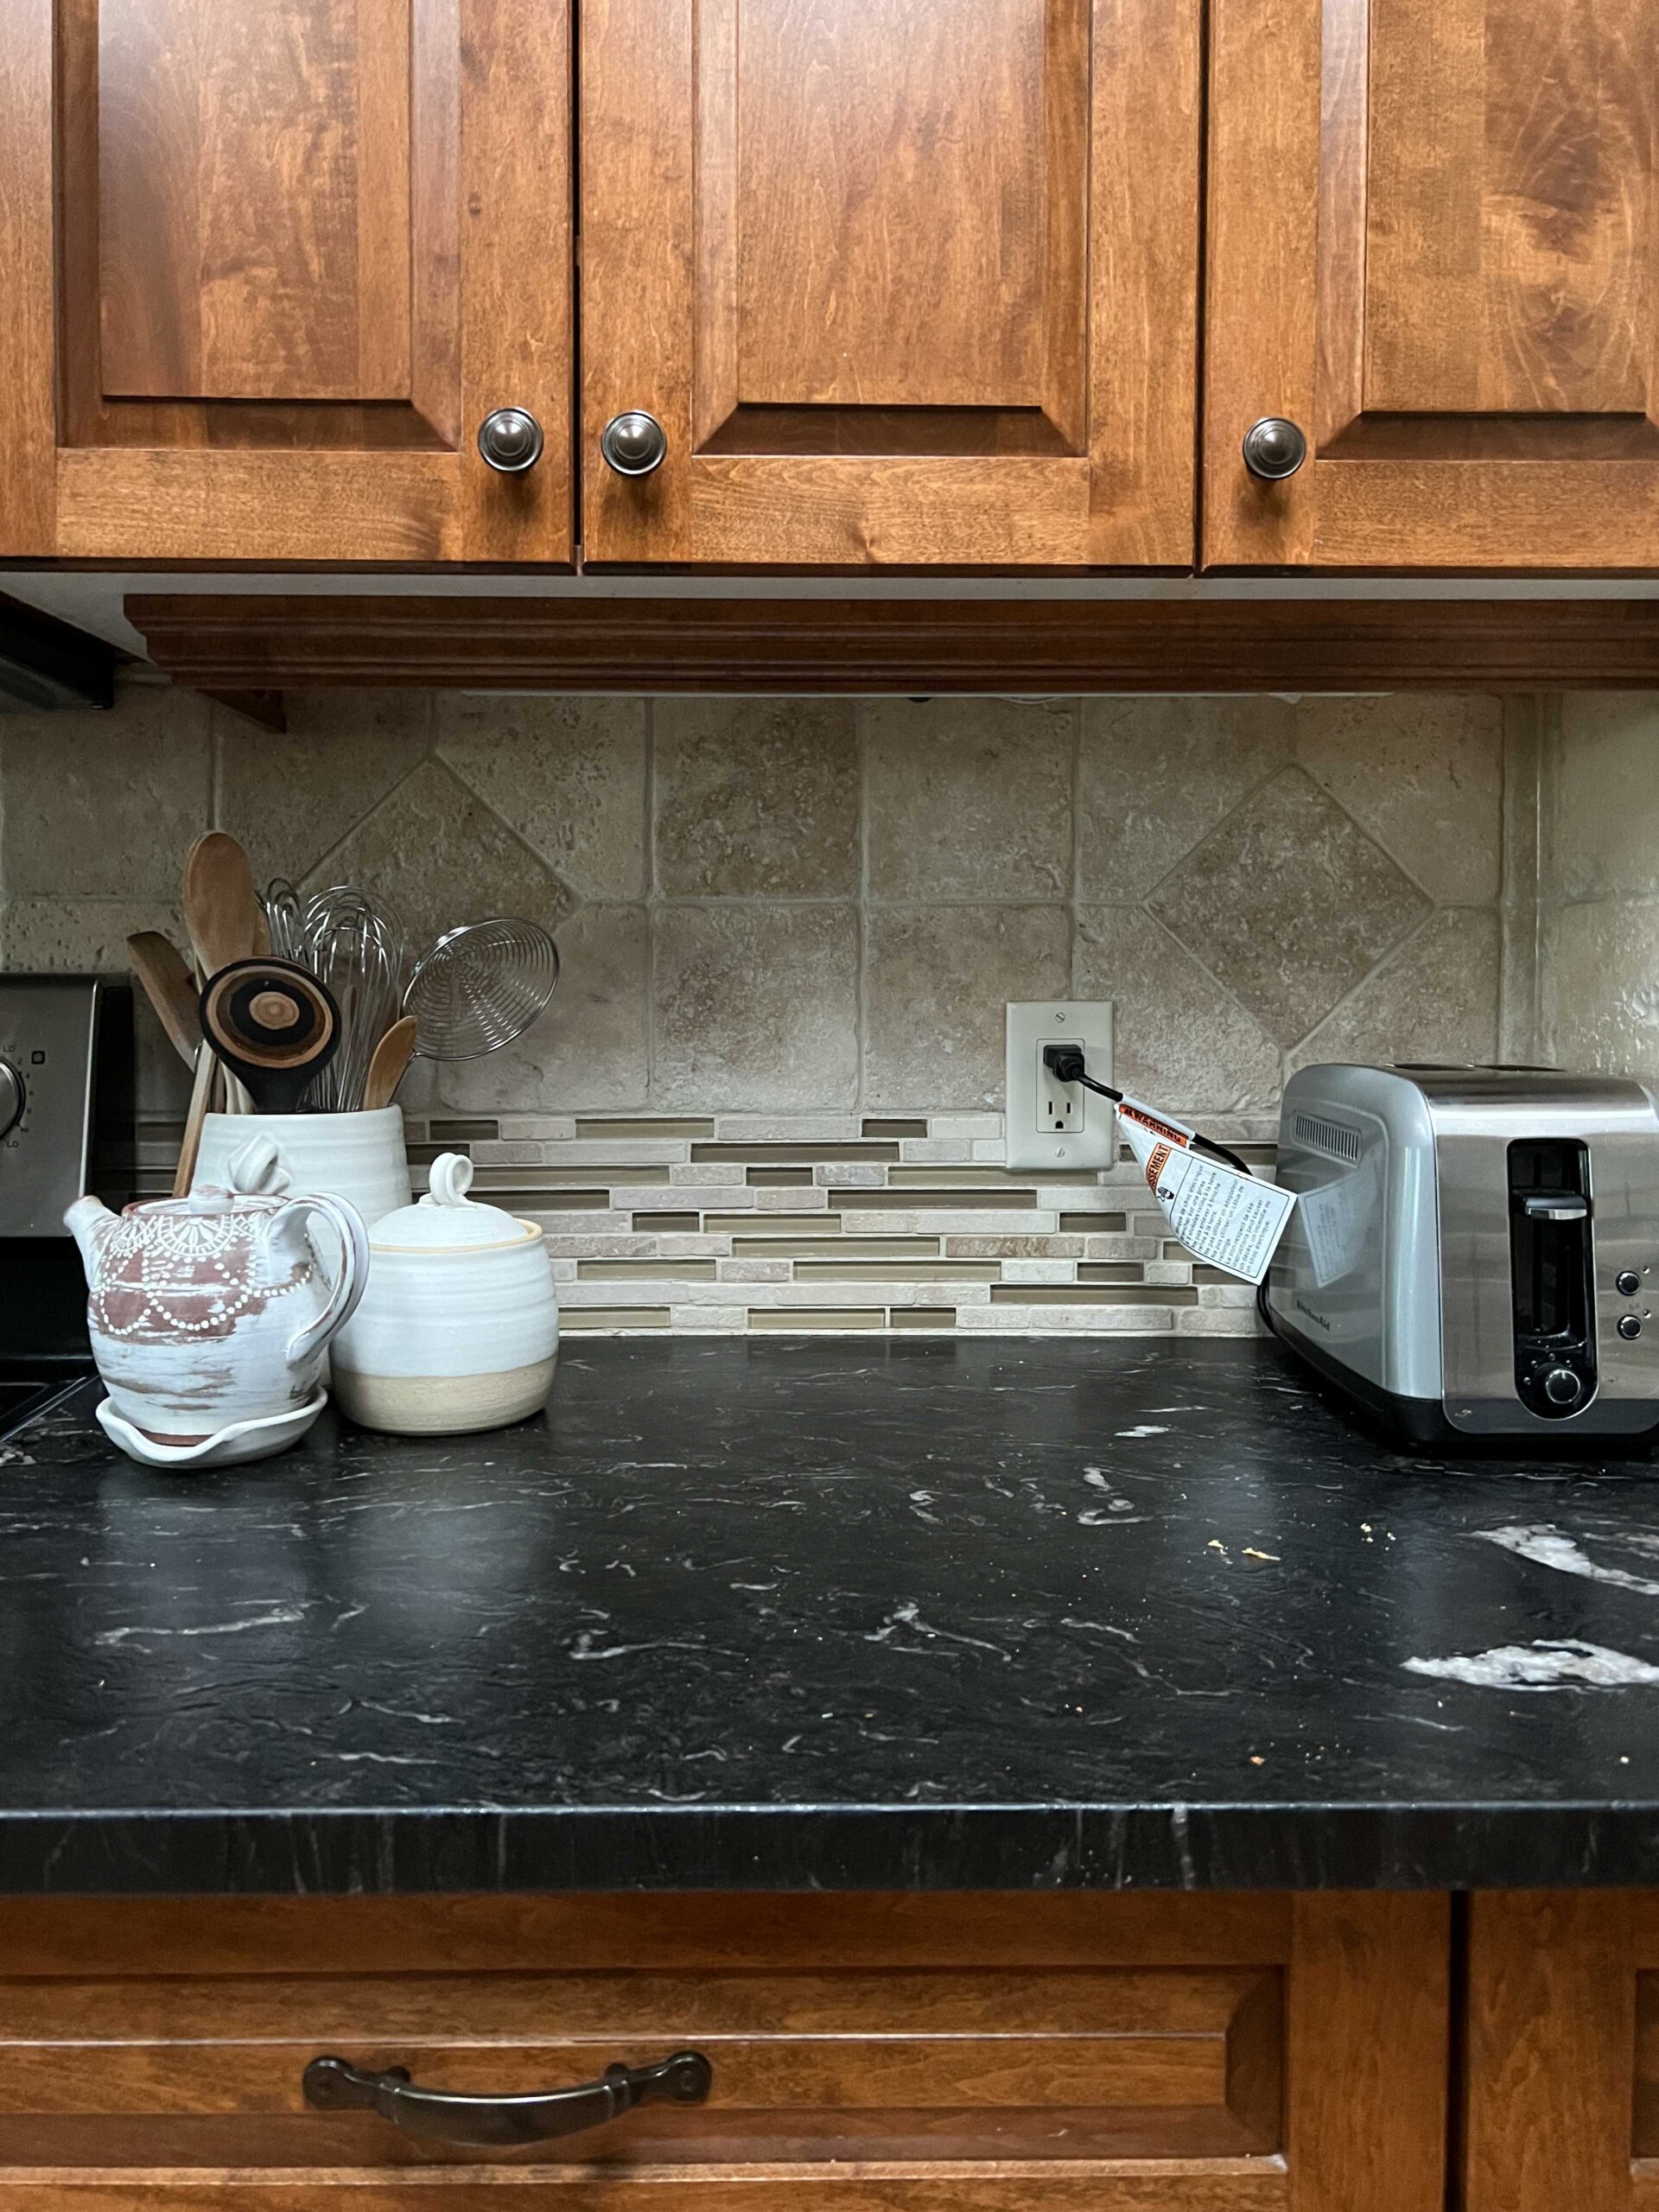
I think if you have dark wood cabinets, the best way to compliment them is to contrast them with a lot of white or light colours. A simple white tile like subway tile is always a classic choice. My mom’s counters just did not go well with that beige backsplash!

I wrote all about replacing the backsplash in this post. If you want to update your kitchen, a new backsplash can be done cheaply and is a great place to start for a fresh look. I can’t believe the end result, the big difference that the backsplash made is incredible!
Update #2 – Lighting
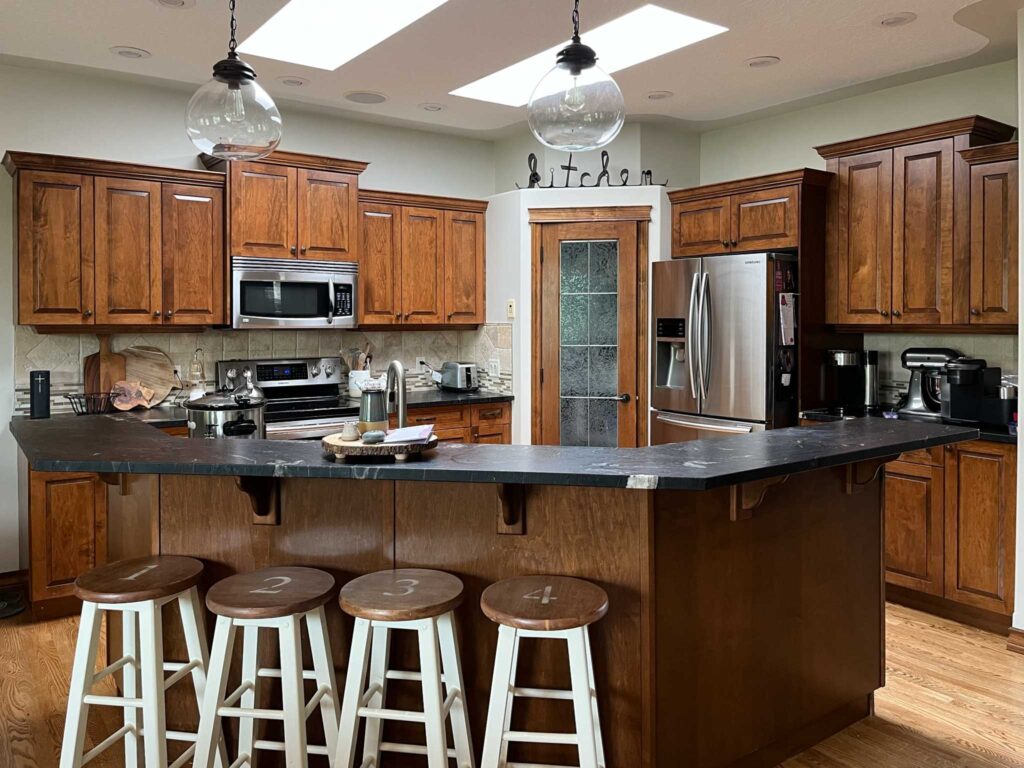
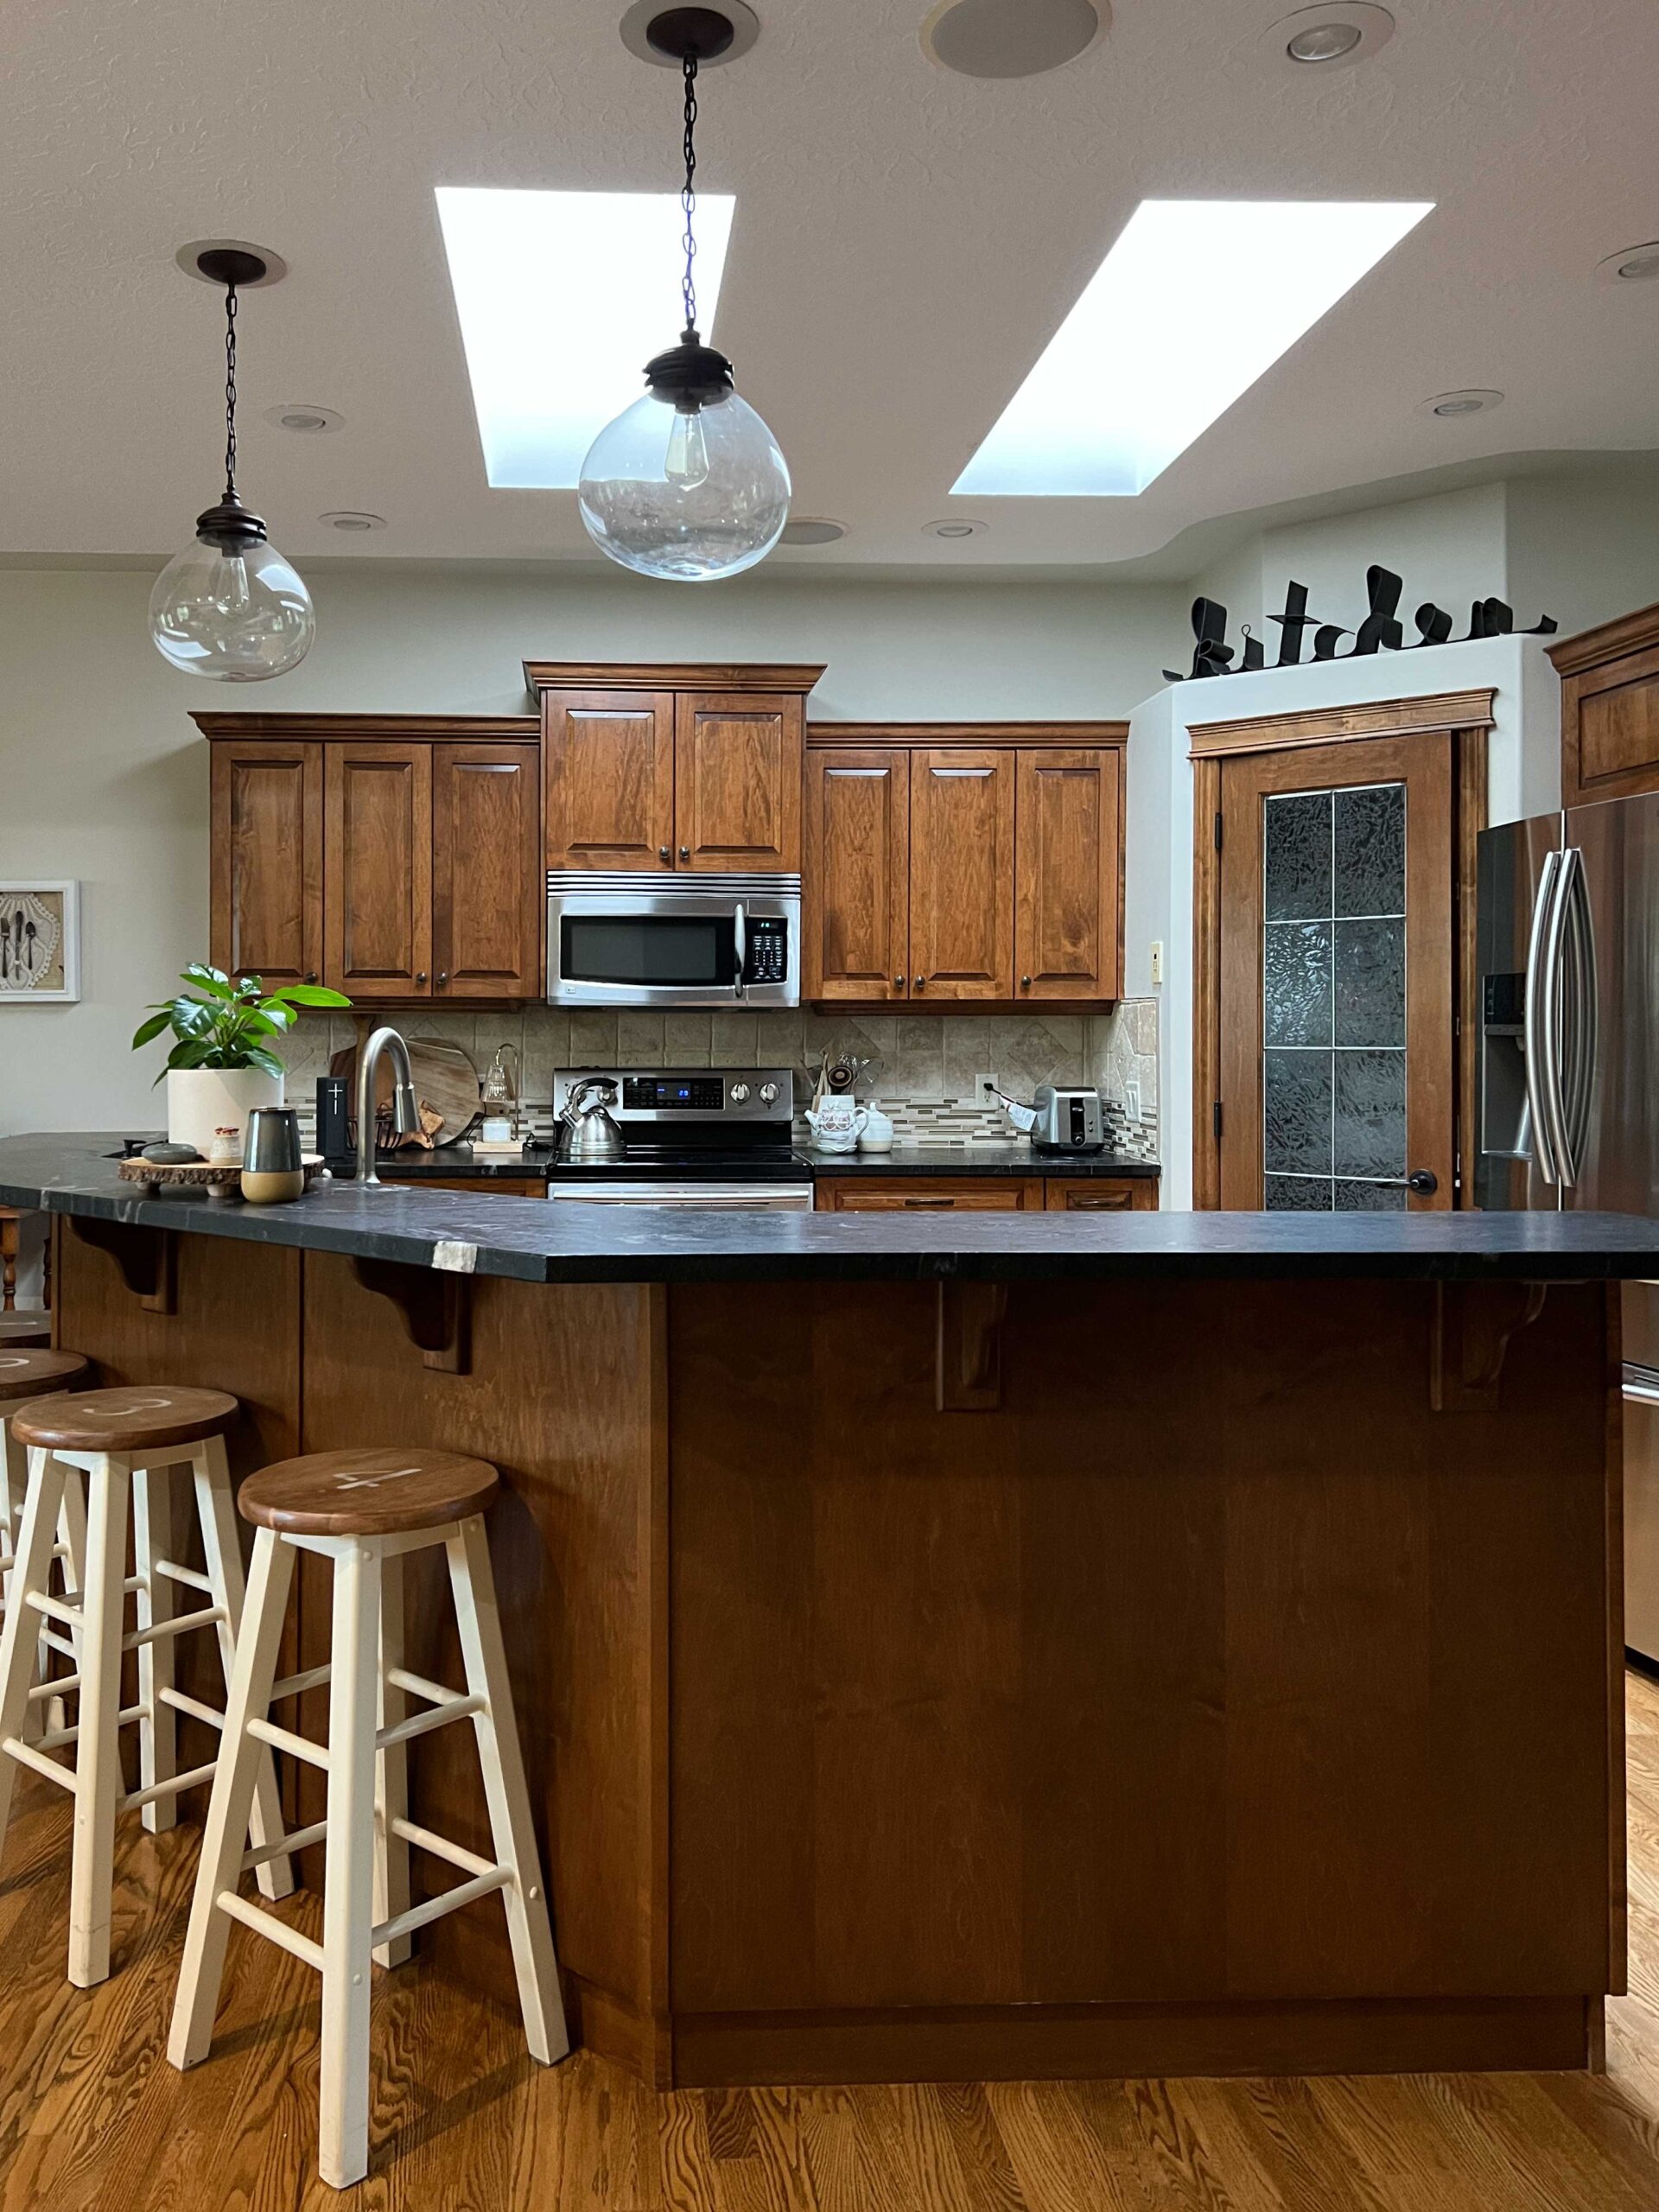
My mom’s pendant lights weren’t bad but as I mentioned in Step #1, adding large doses of white was the name of the game so I asked her if we could replace her pendants with new light fixtures with white shades. It turns out that she was tired of trying to keep the clear glass clean on her old fixtures and agreed to this immediately!
The new fixtures were also really affordable finds from Amazon. They made a big impact to the overall look in the kitchen design and tied in the white of the backsplash.

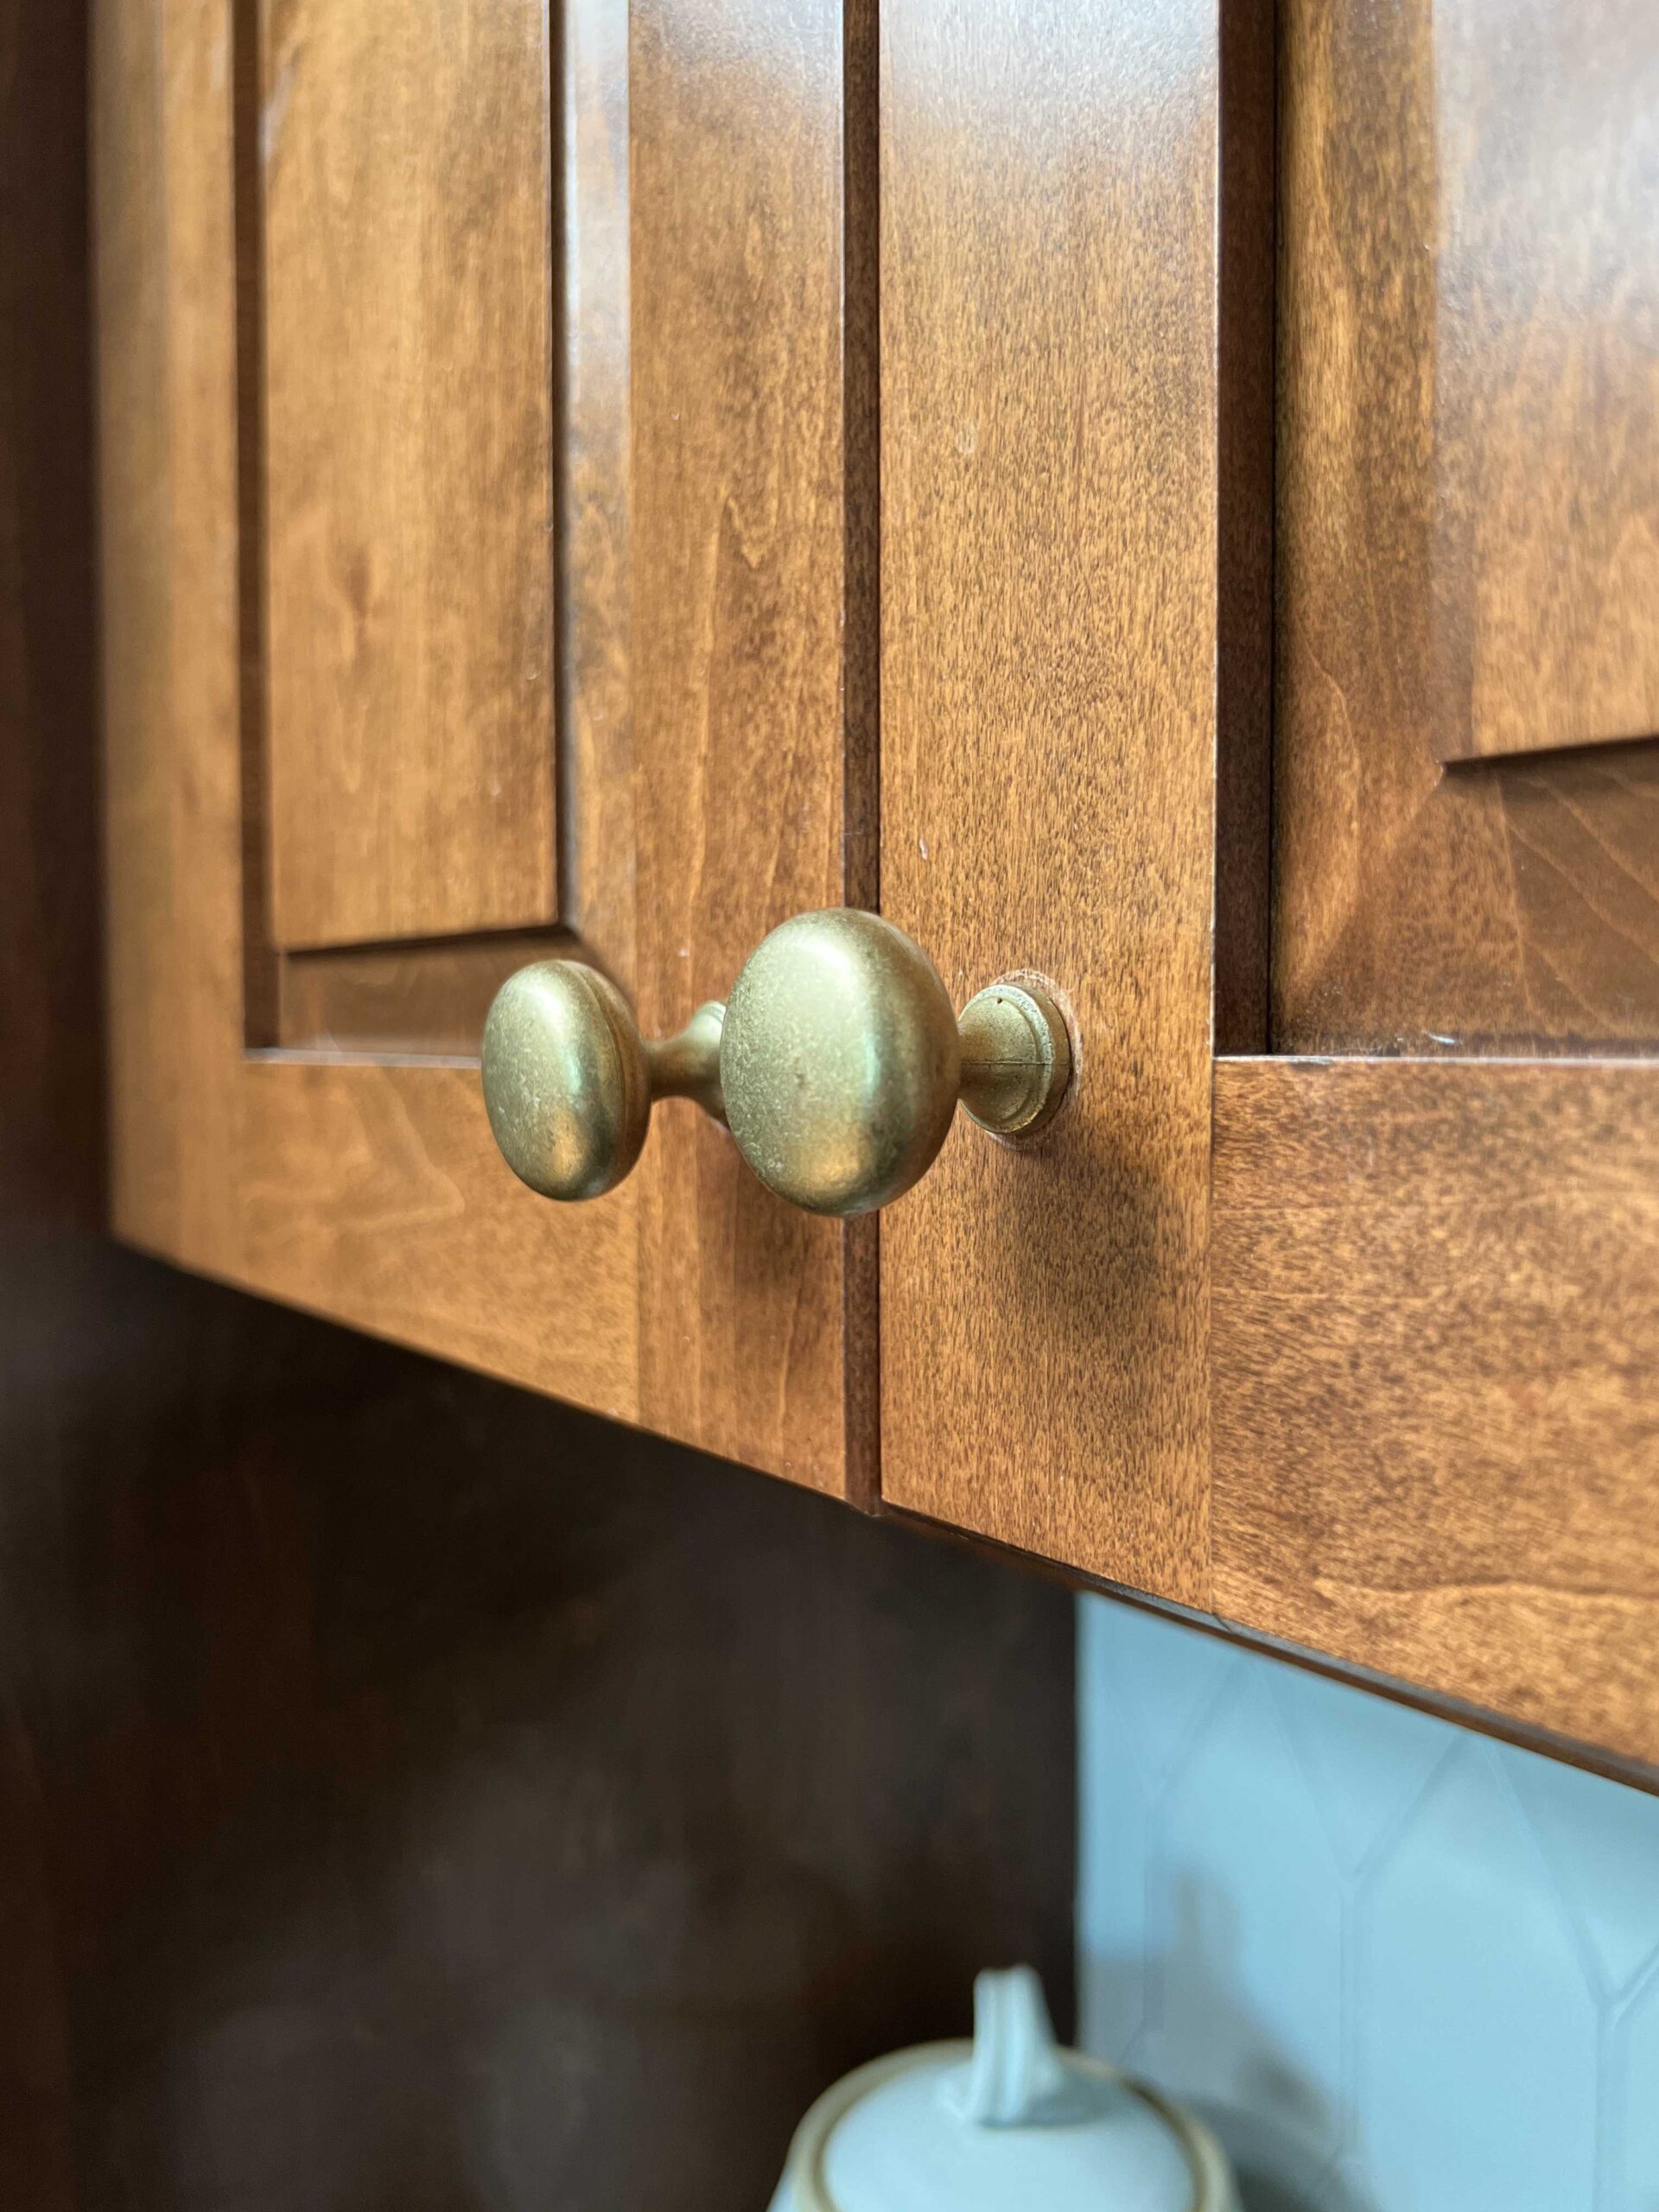
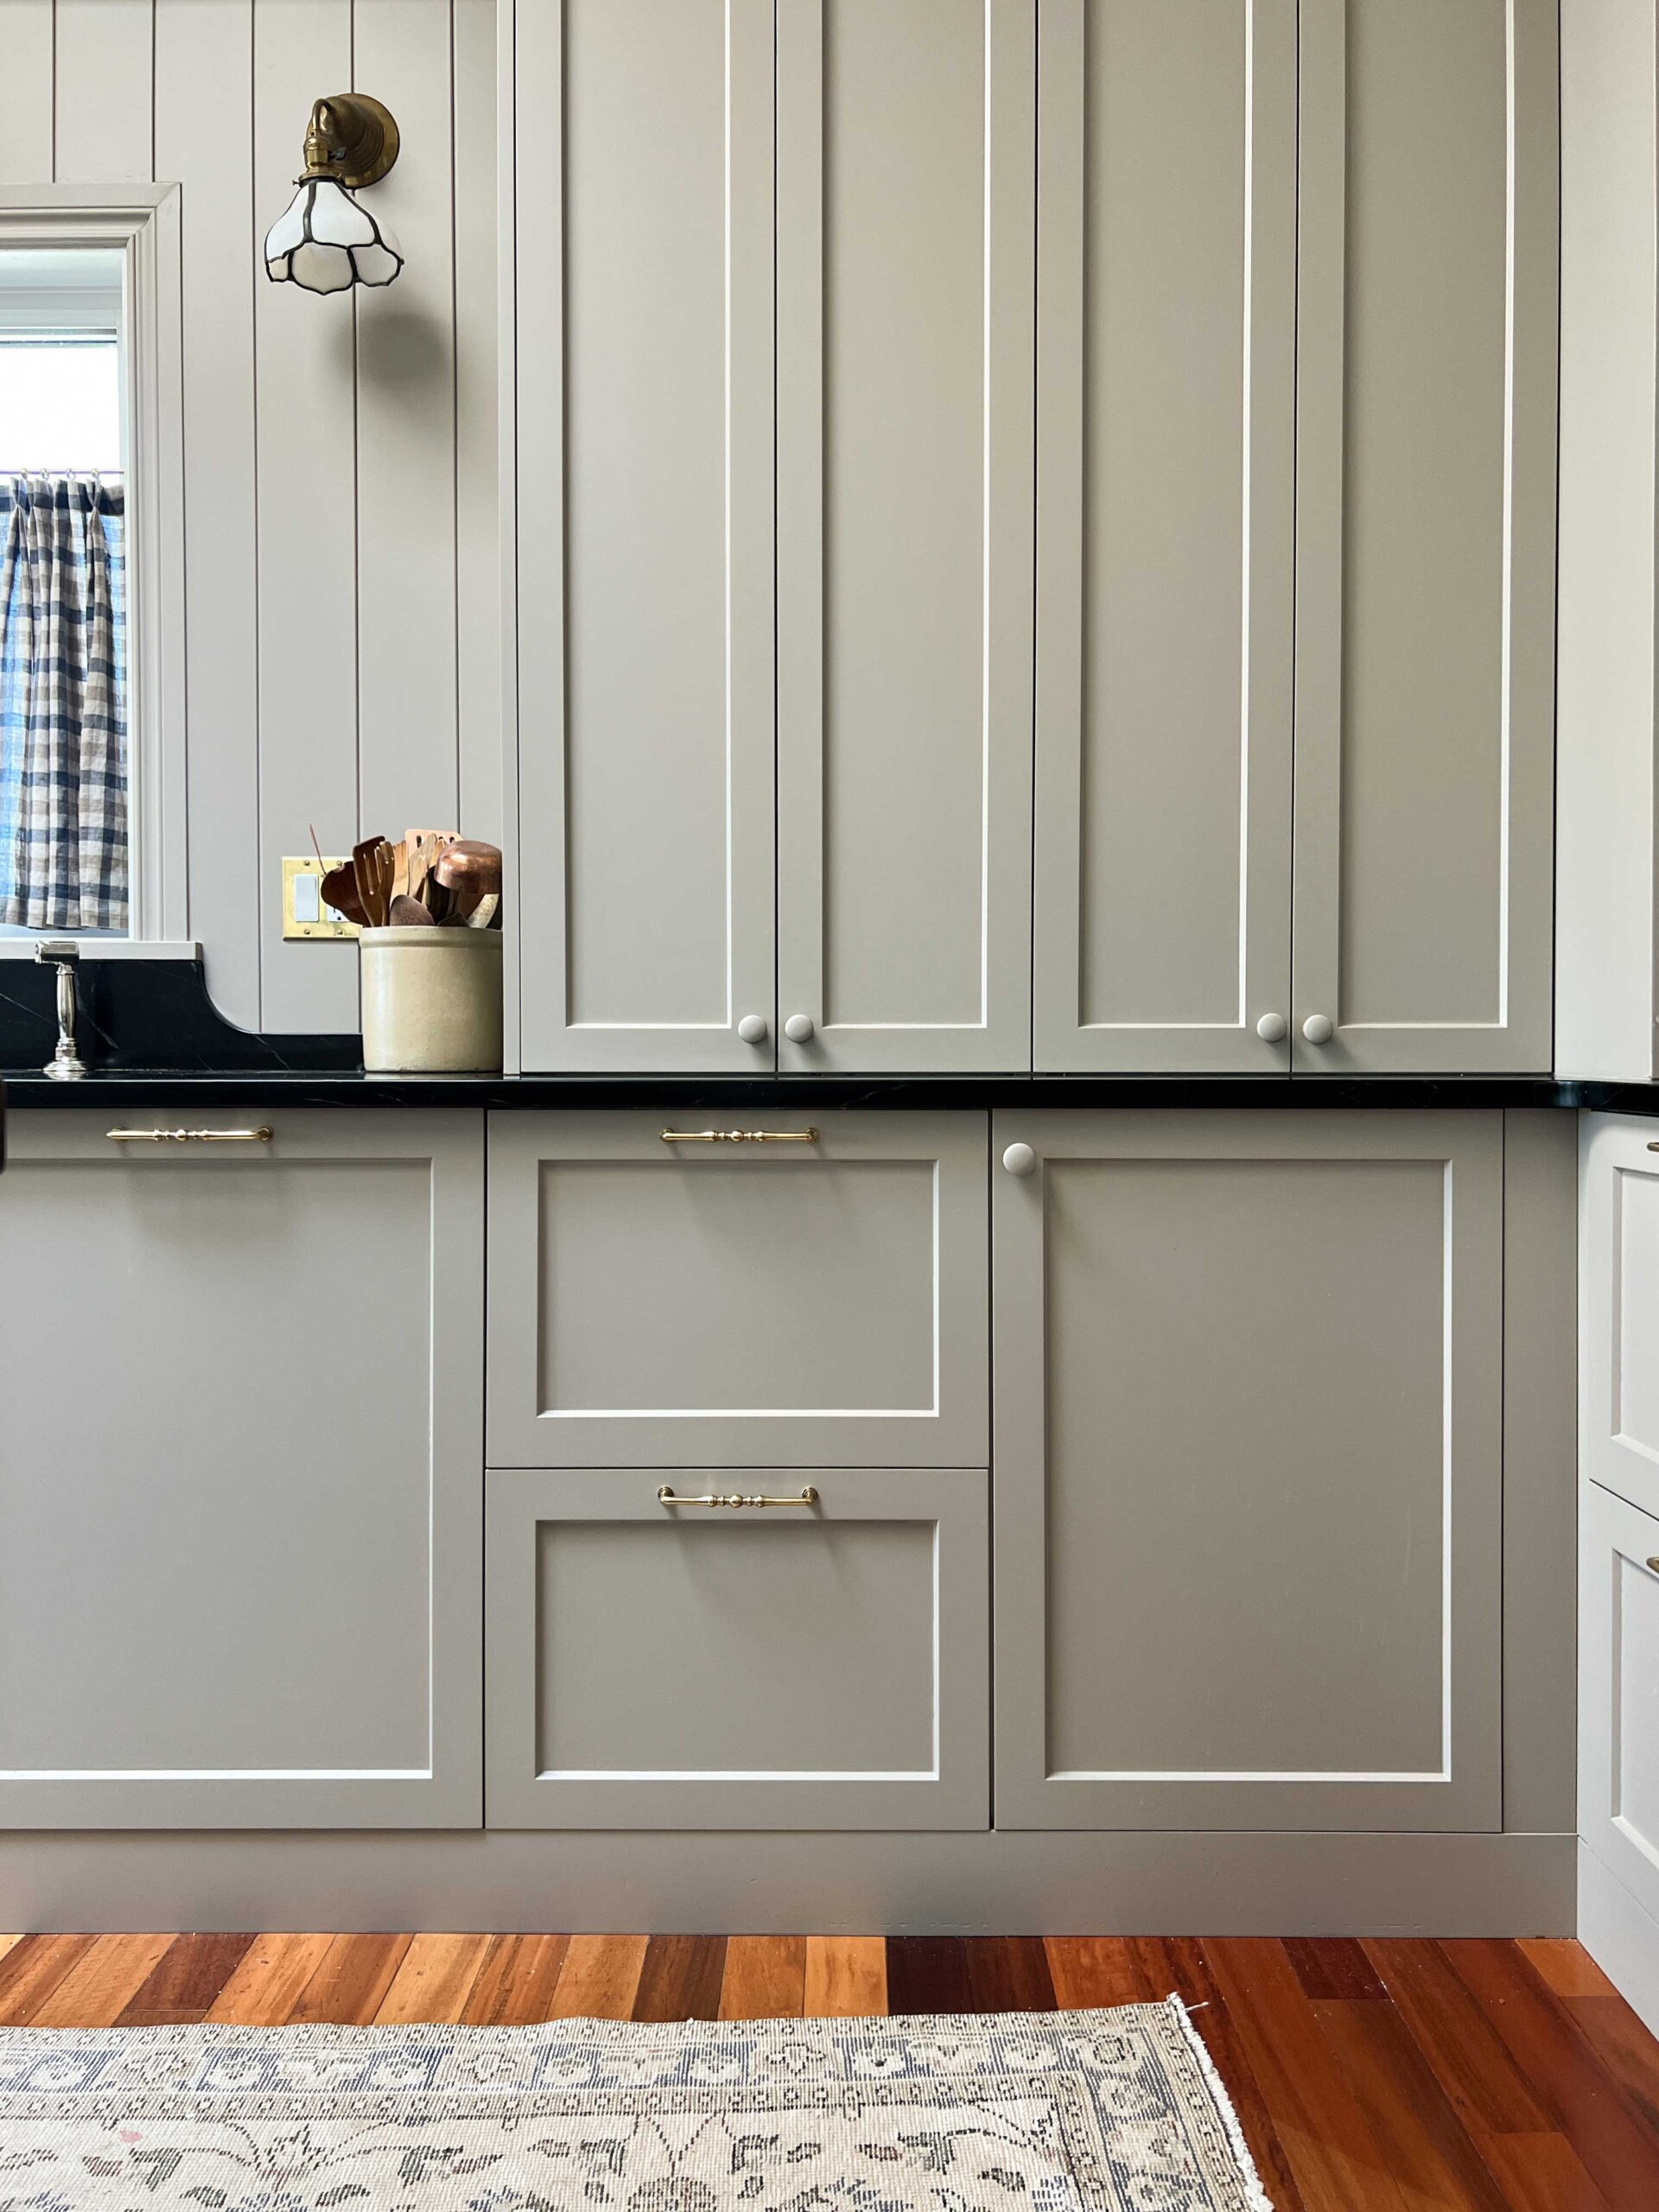
Update #3 – Cabinet Hardware
Kitchen hardware makes such a difference to the look and feel of the kitchen! We found these pulls from Amazon and paired them with these knobs from Battle Creek Hardware. Changing the hardware was not a lot of work and really gave the old cabinets new life.
If you are looking to update kitchen cabinets, try new hardware first! I can’t believe the difference new cabinet pulls and knobs made. We tried out a few different hardware samples and ended up with pulls from Amazon and Knobs (generously gifted!) from Battle Creek Hardware!
I like warm metals like brass, gold and copper with wood cabinets. Cool-toned metals like stainless steel and chrome are not going to complement wood as well, in my opinion.
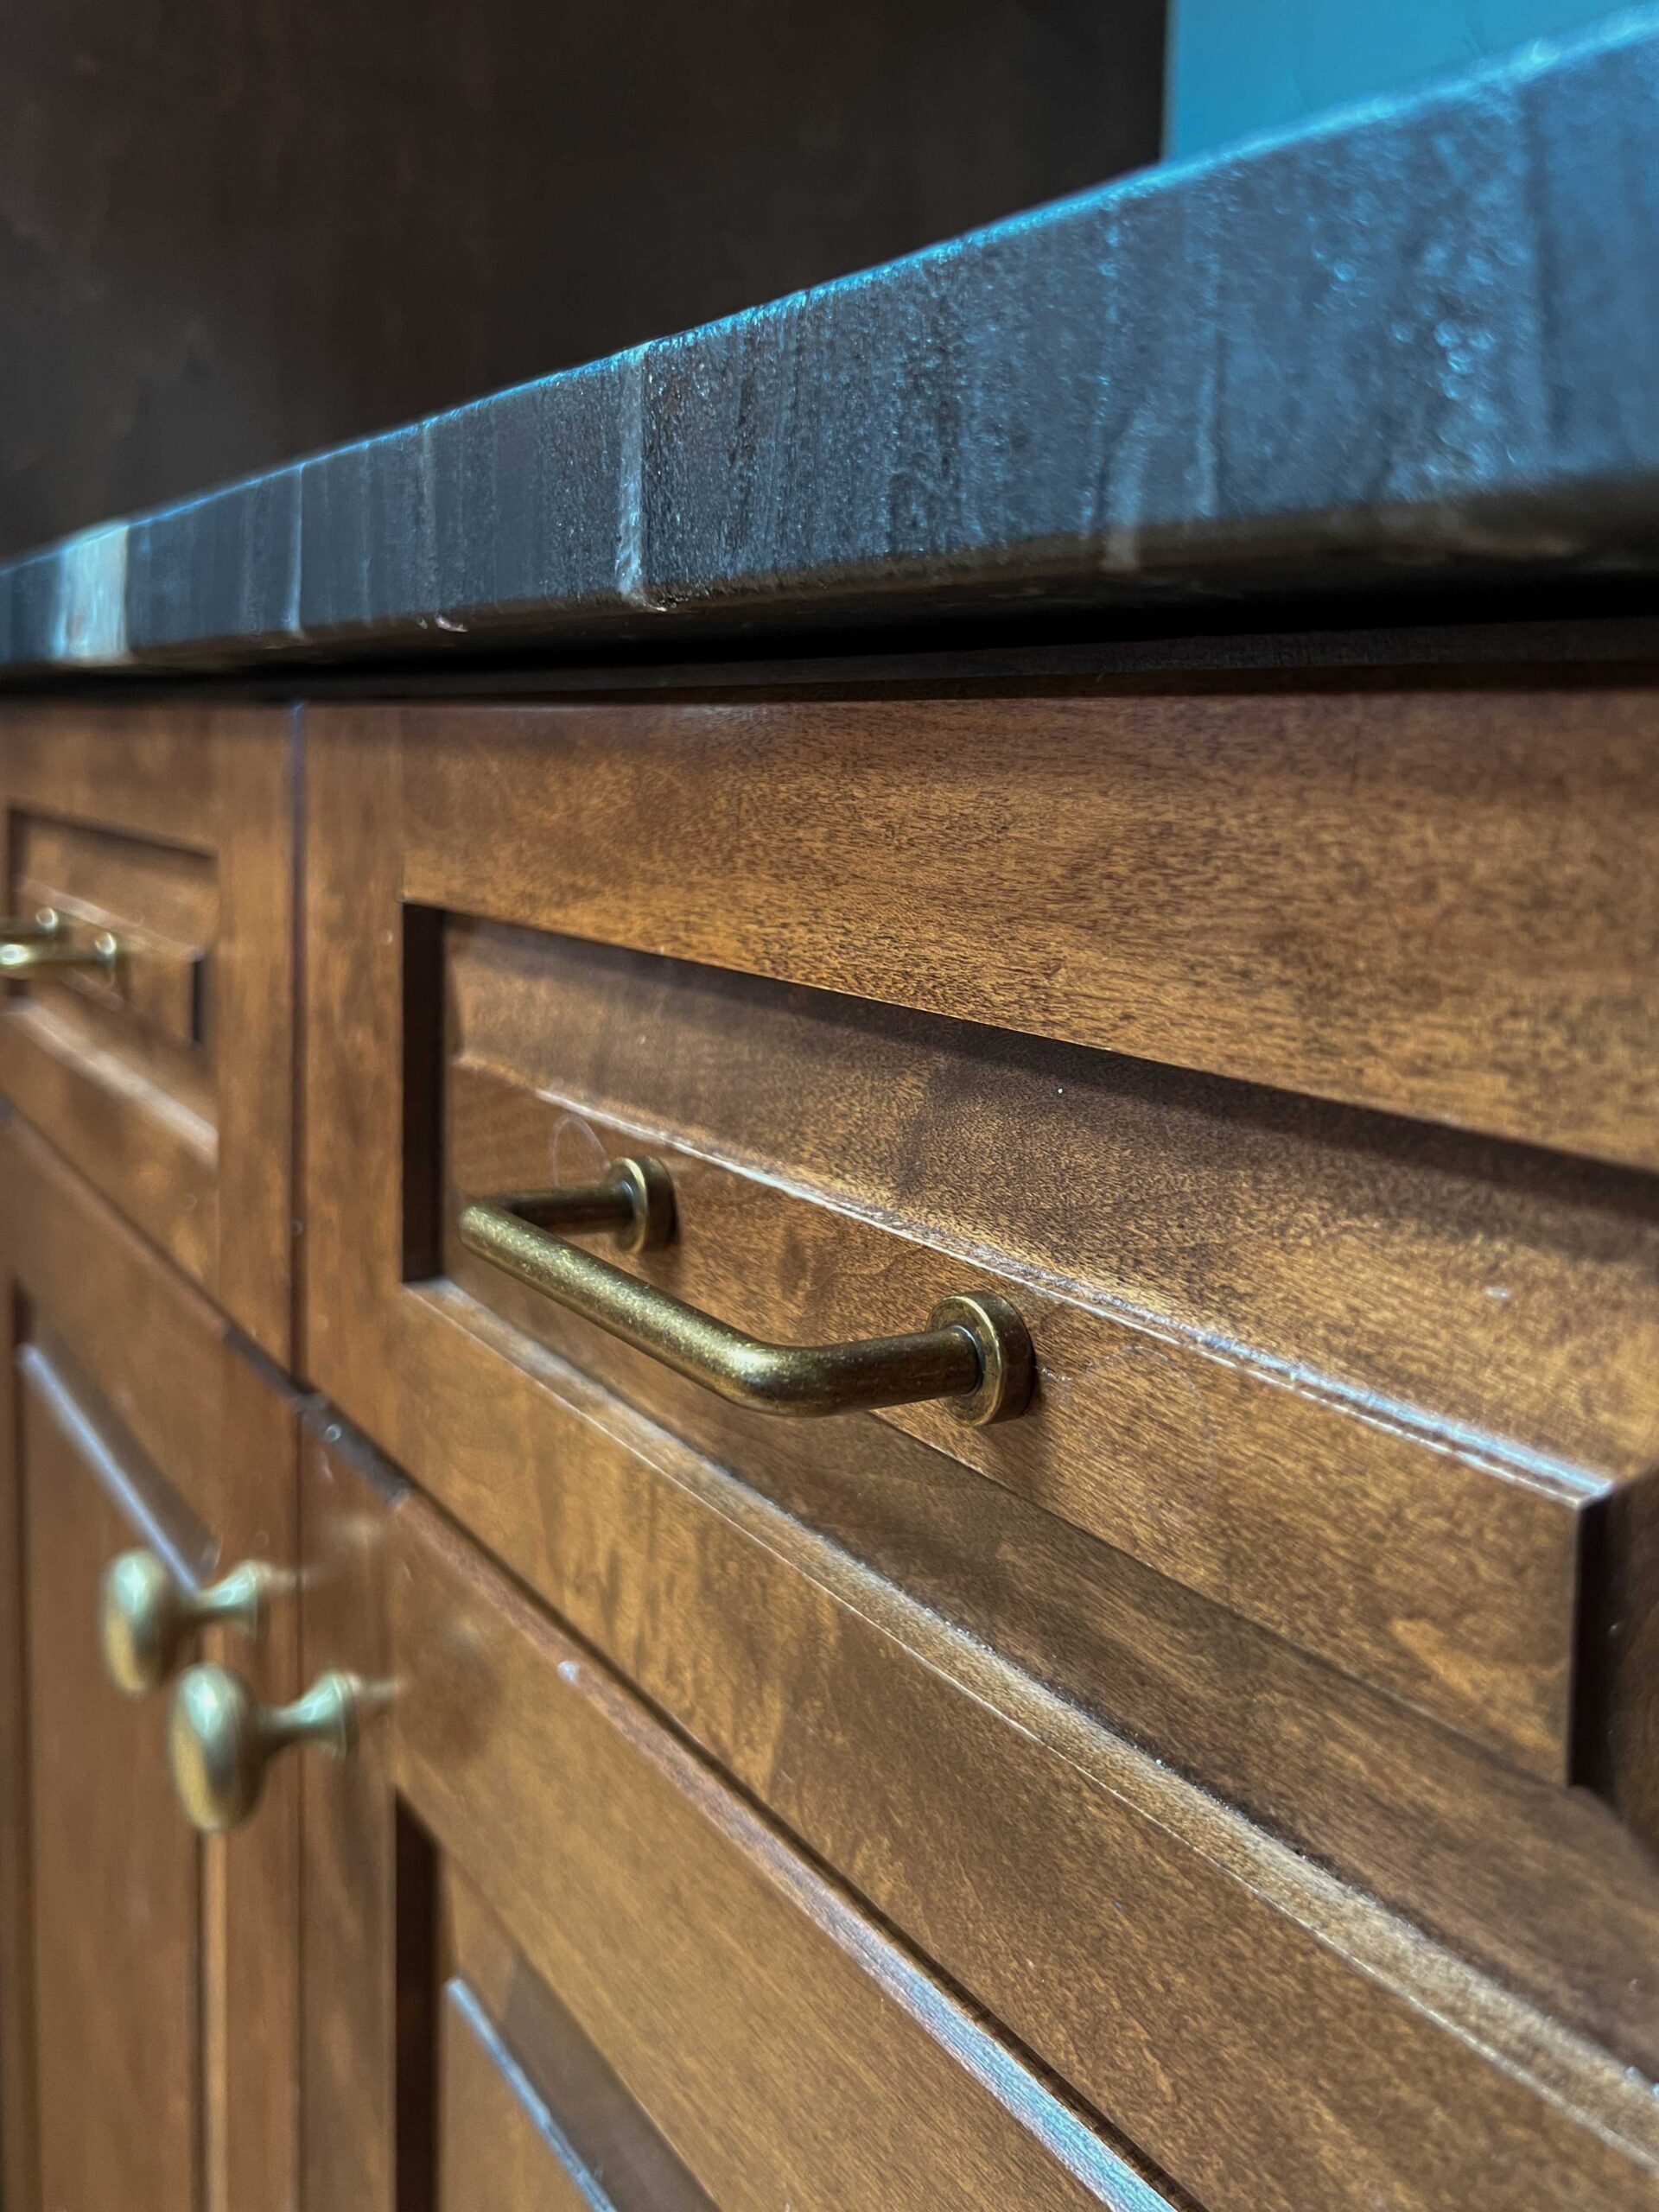
If you are not painting, you will need to pay attention to the hole spacing of your existing cabinets and be sure to order hardware that works with the existing holes.
I wrote a whole post about cabinet hardware, so be sure to check that out here!
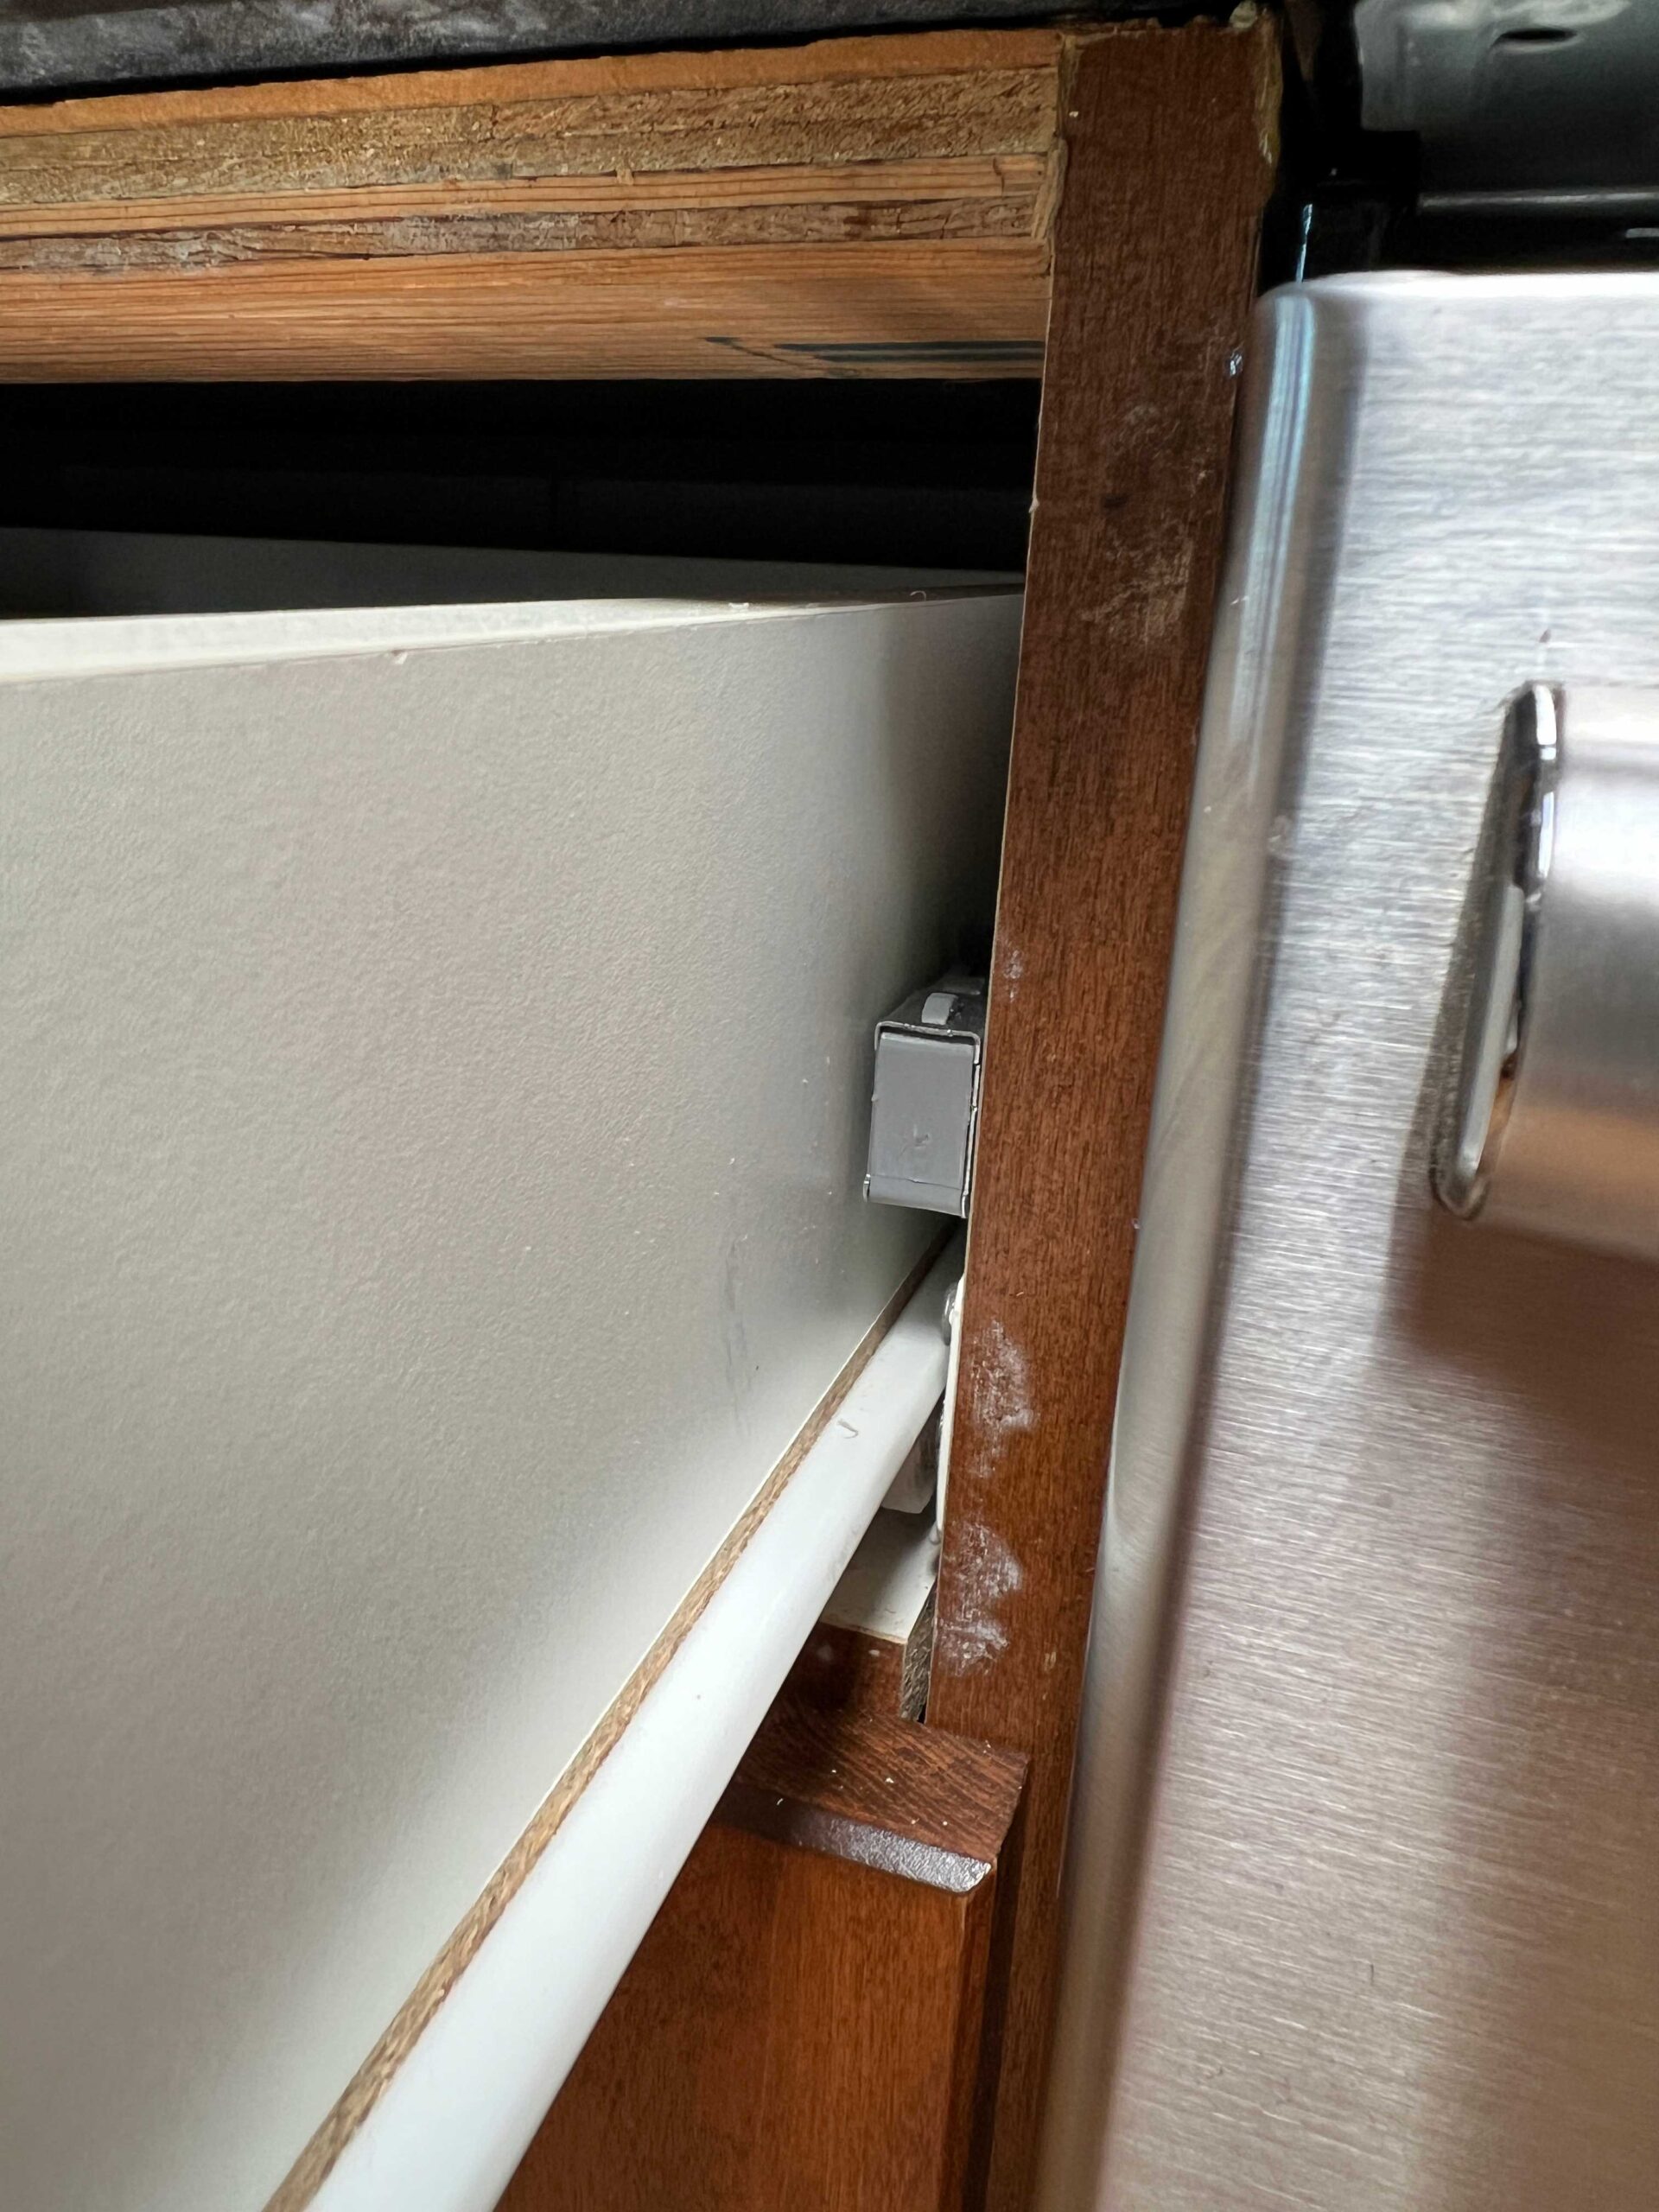
Update #4 – Soft Close
This is an update you can’t see but that you can certainly feel. My mom’s cabinet doors had standard hinges that slammed when shut, and we bought this very simple device that turns an old cabinet door with whatever hinges into a soft-close door. This went a long way toward giving my mom’s kitchen a high-end, more custom feel.
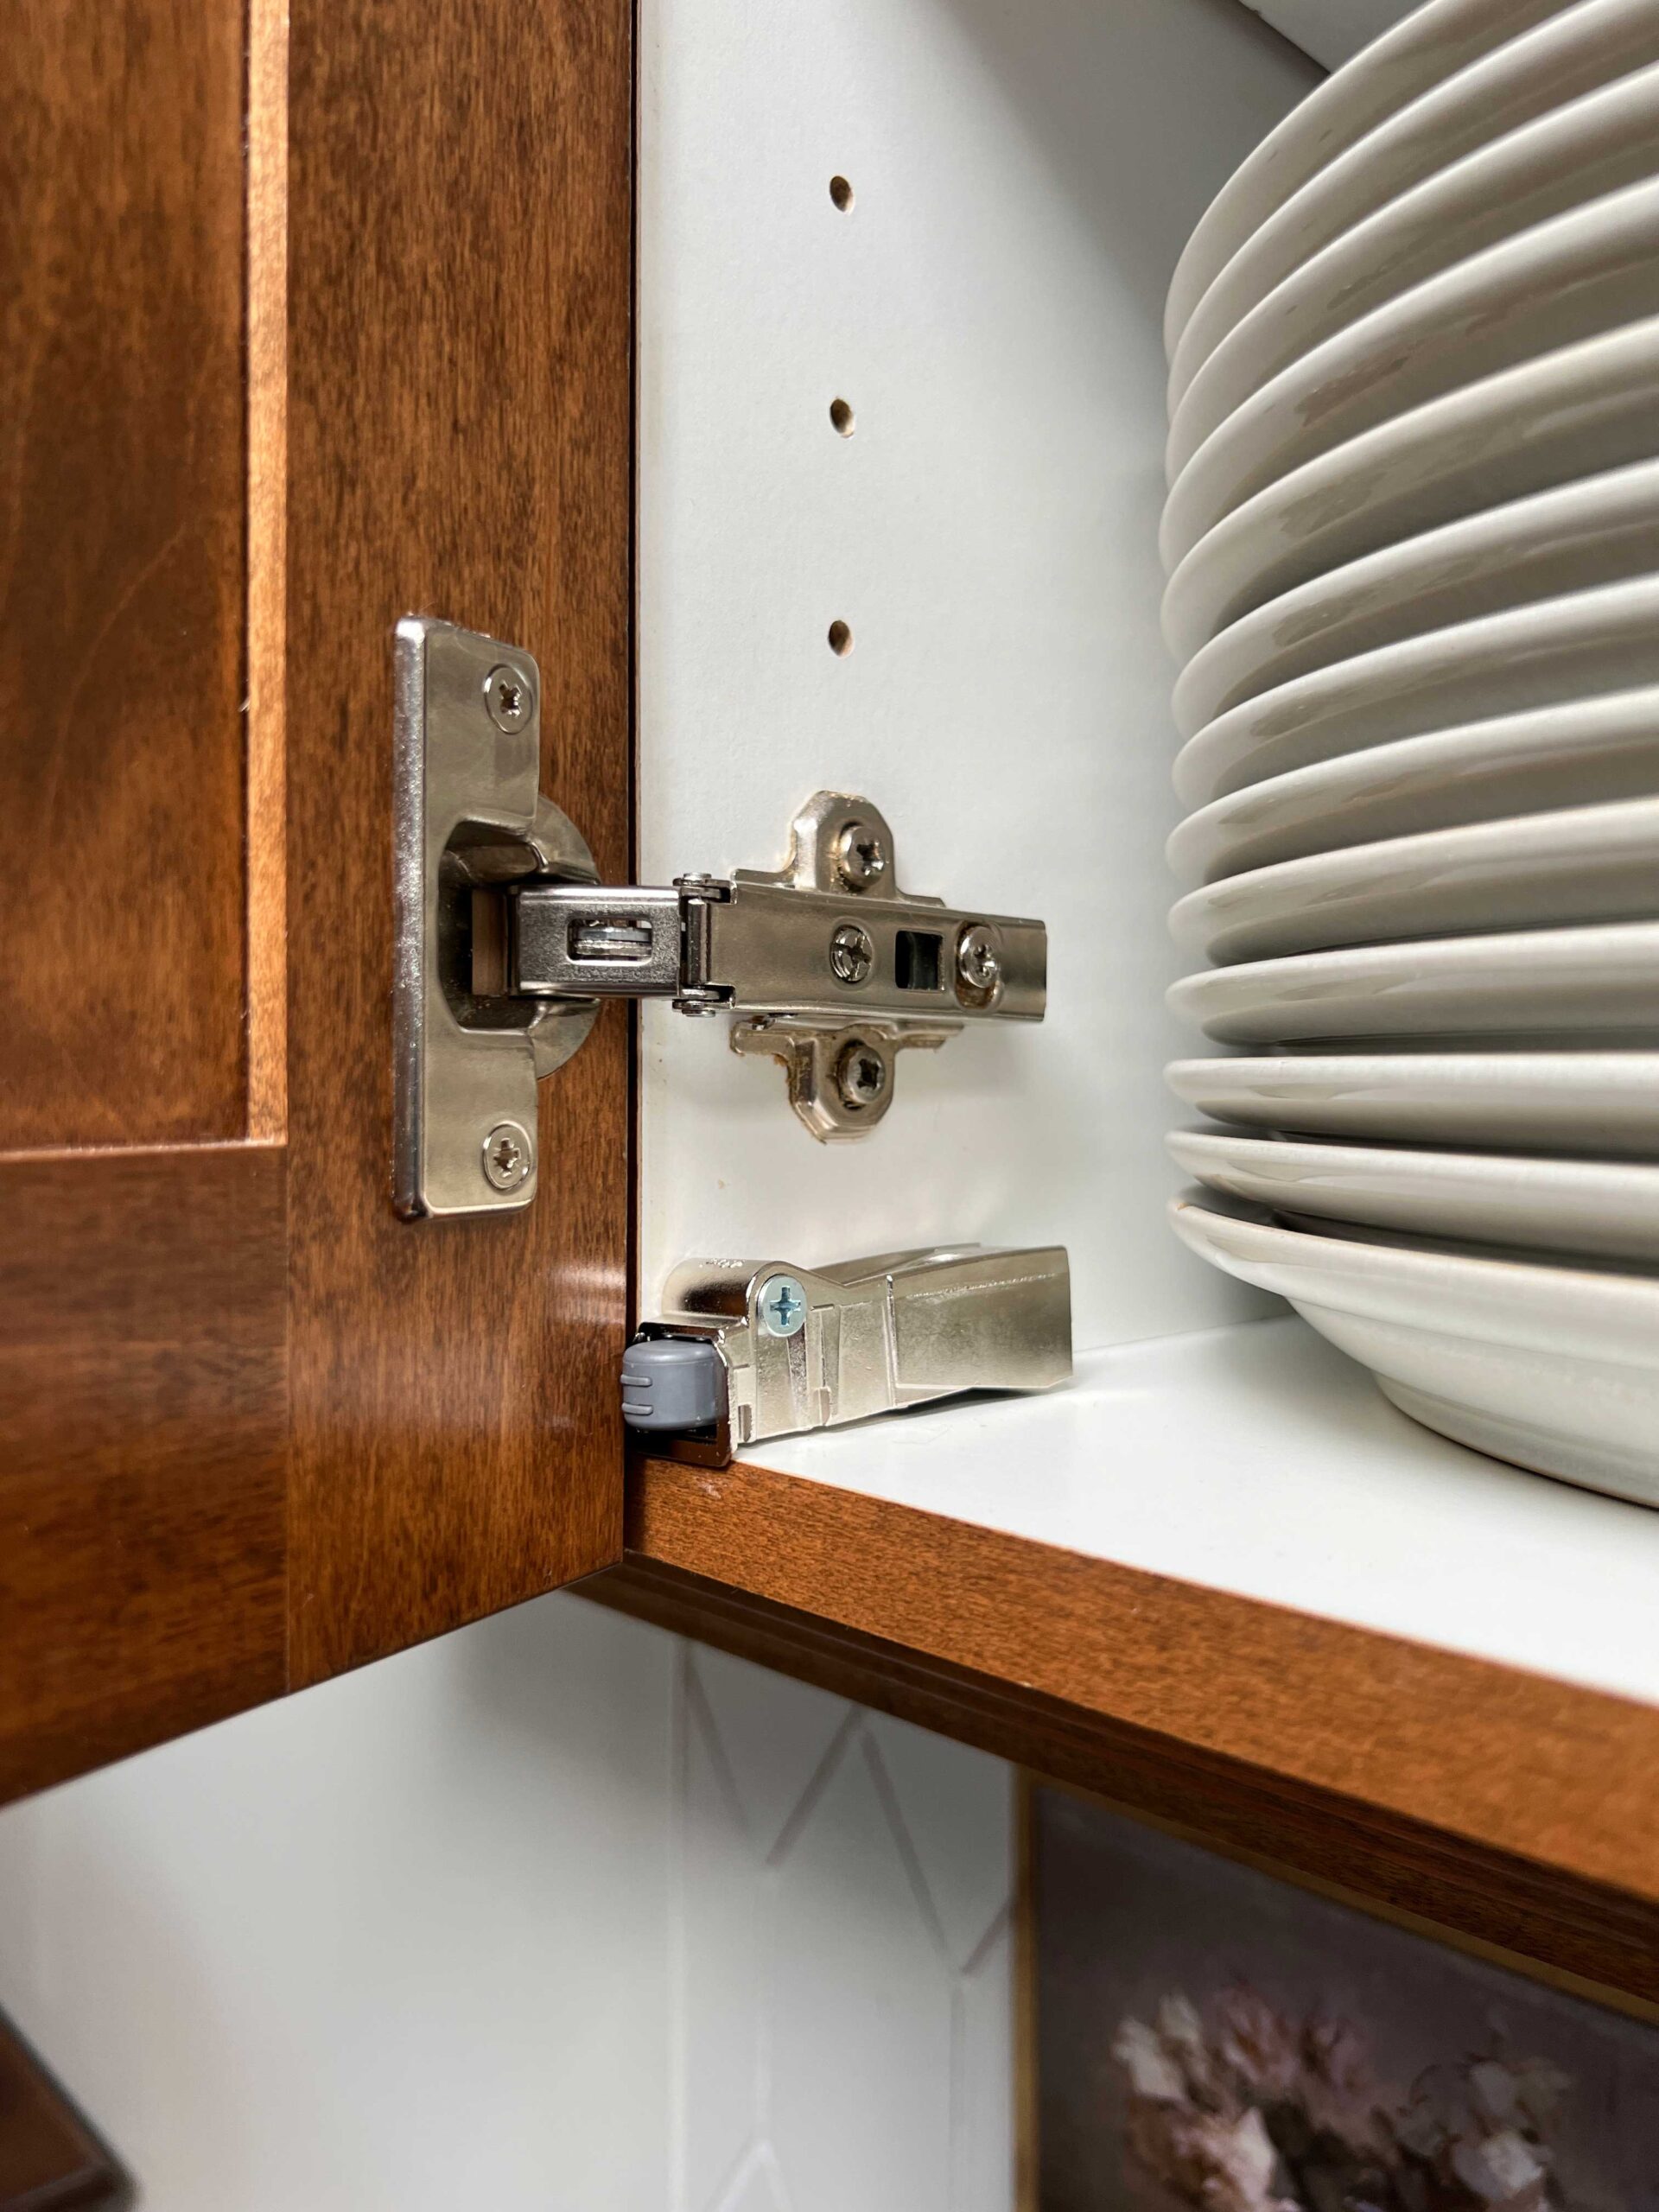
We also added soft close drawer adapters to the bottom drawers. Game changer!
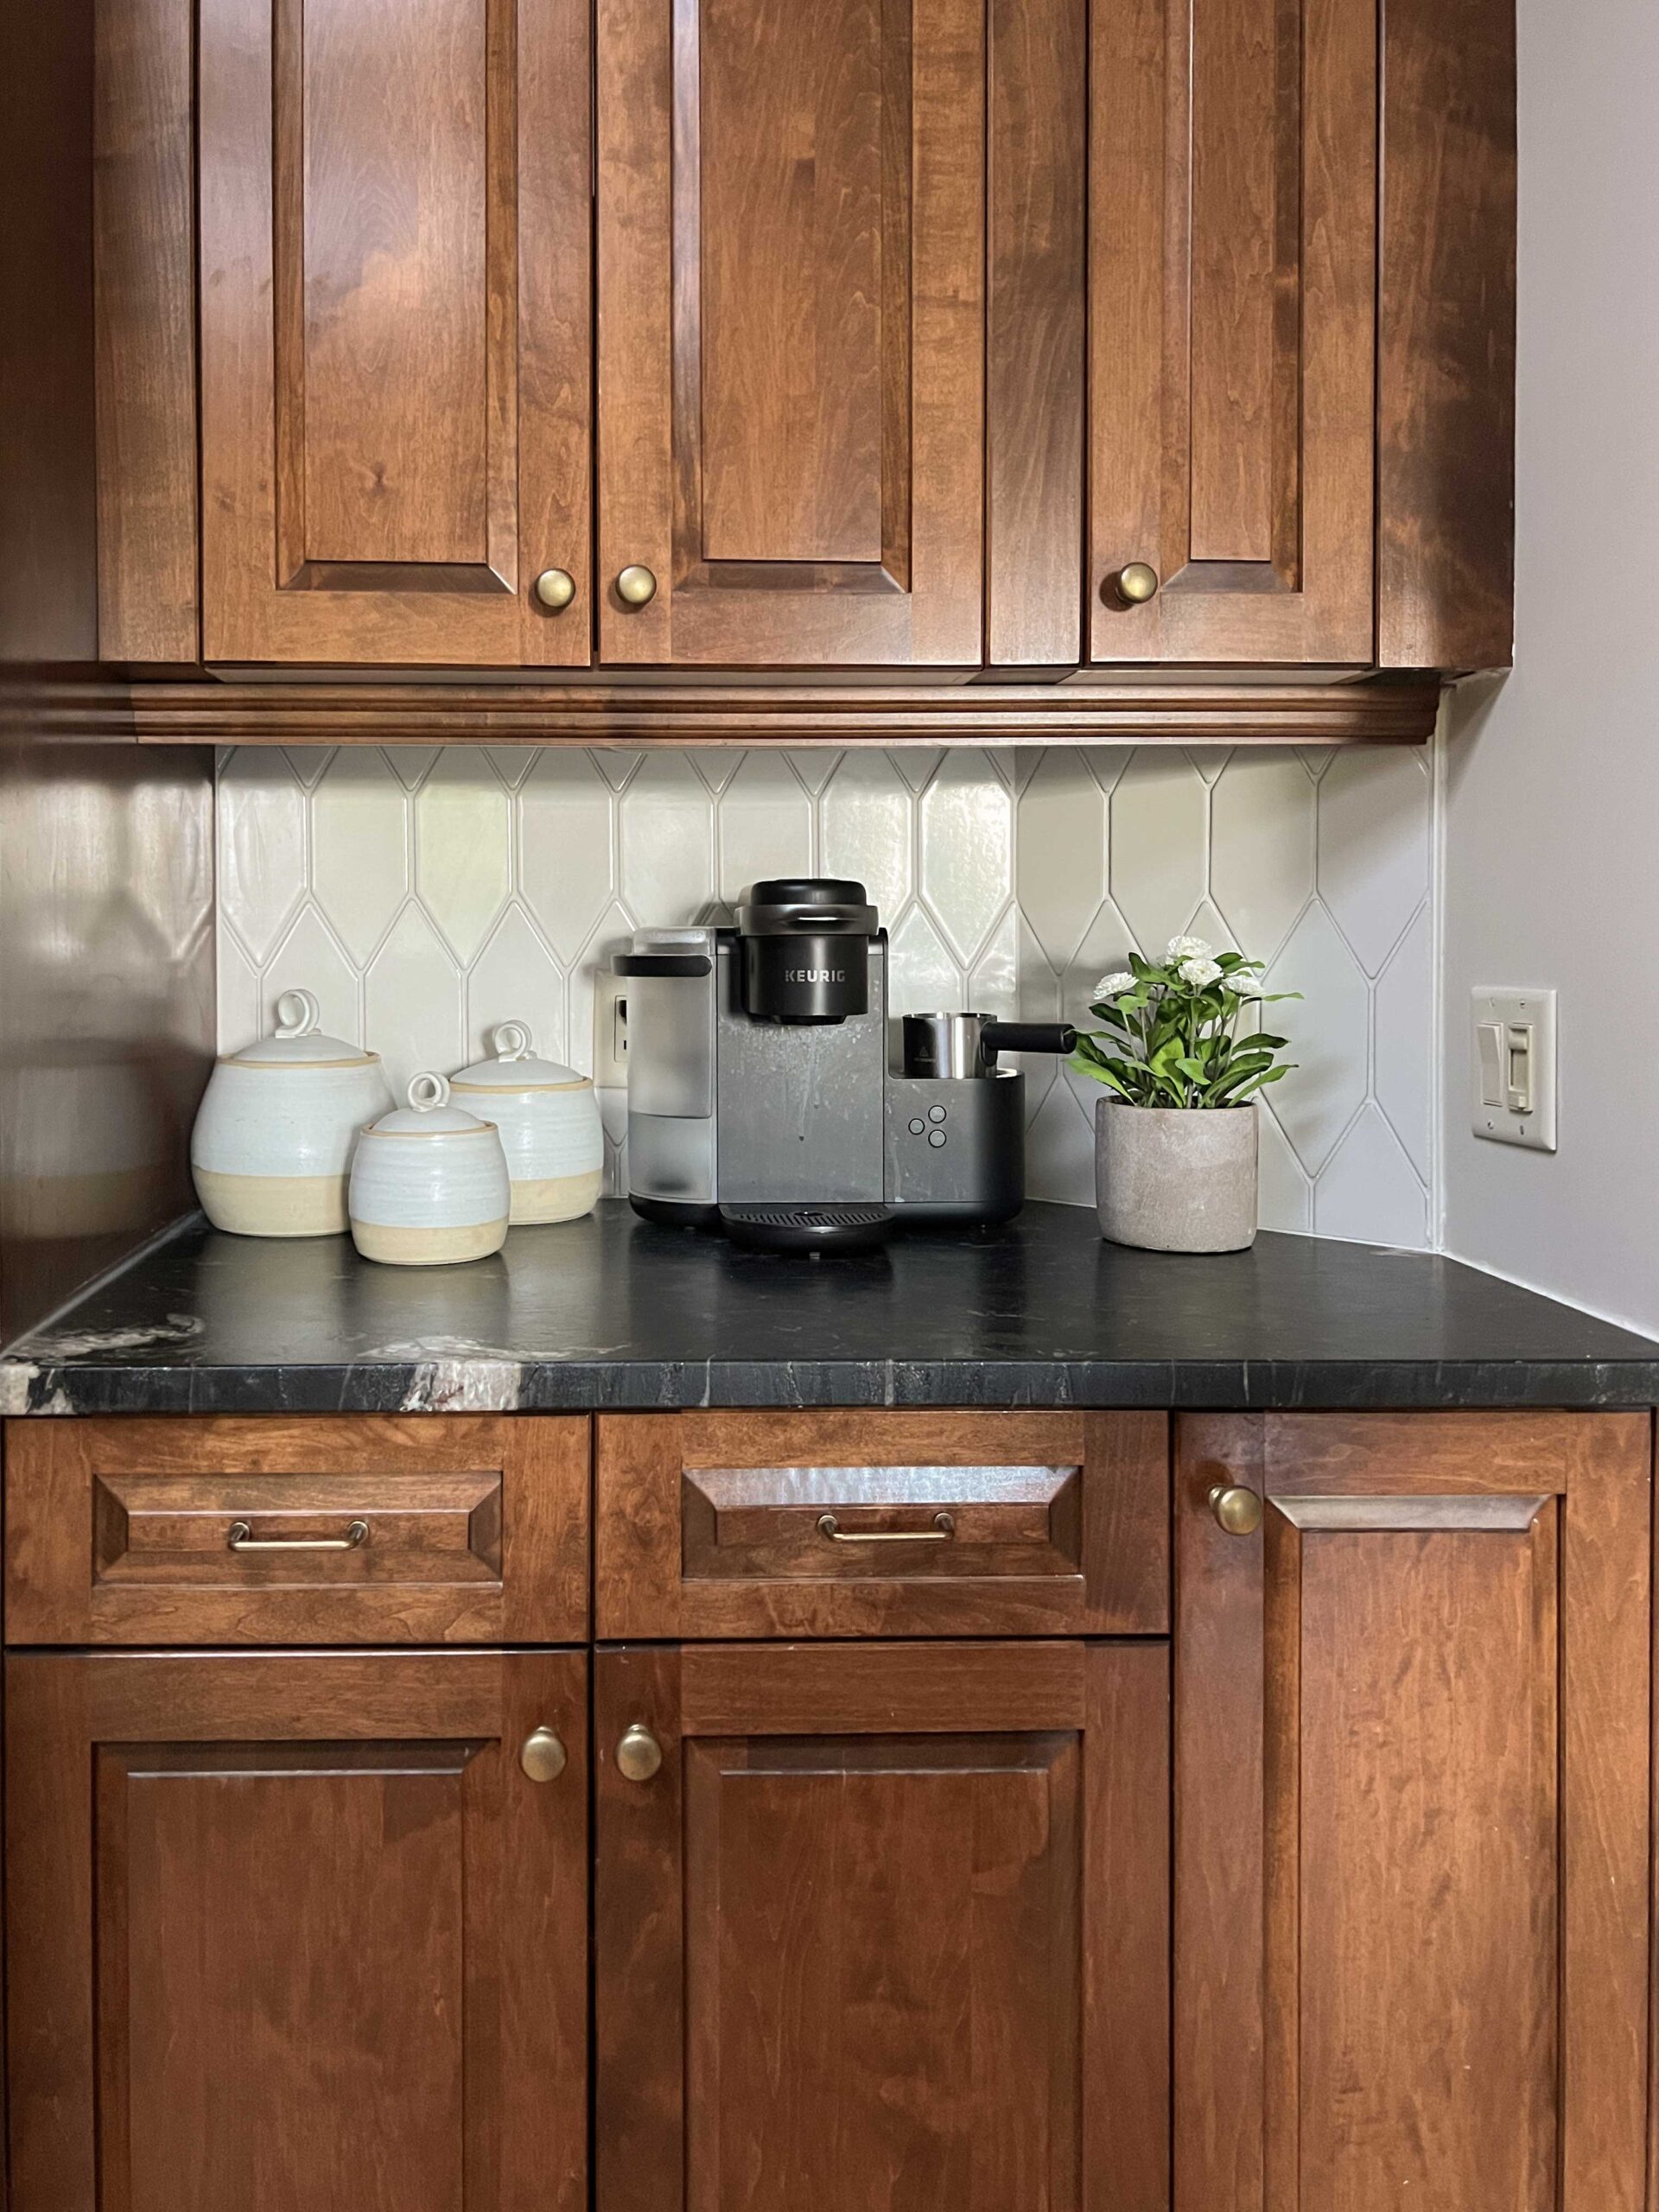
Update # 5 – Styling
Never underestimate the power of some fresh styling and new accessories! That is such an easy way to update any space and give it a fresh, clean look.
I didn’t want to remove function from her kitchen, so I made sure to use functional styling pieces and things she already had. She had a few different zones in her kitchen, like a coffee area and toaster area and a spot next to the stove, so I thought about functional styling in each of those spaces.
To the right of the stove, I took her existing toaster, put it in a tray and added a piece of pottery with some butter knives and a butter keeper.
Styling hack – if you have clutter, corralling it on a tray is always a good idea. It makes things look intentional and collected rather than cluttered! Keeping the things on the tray related (butter, butter knives, and a toaster) makes it feel intentional.

In the coffee area, we removed the excess appliances and left only one coffee maker, and brought in some canisters to store coffee and tea. My sister made them for her, but these and these are similar.
To the left of the stove, I added a raised wood pedestal with some functional decor pieces that she already owned like oil and vinegar, as well as a little plant.
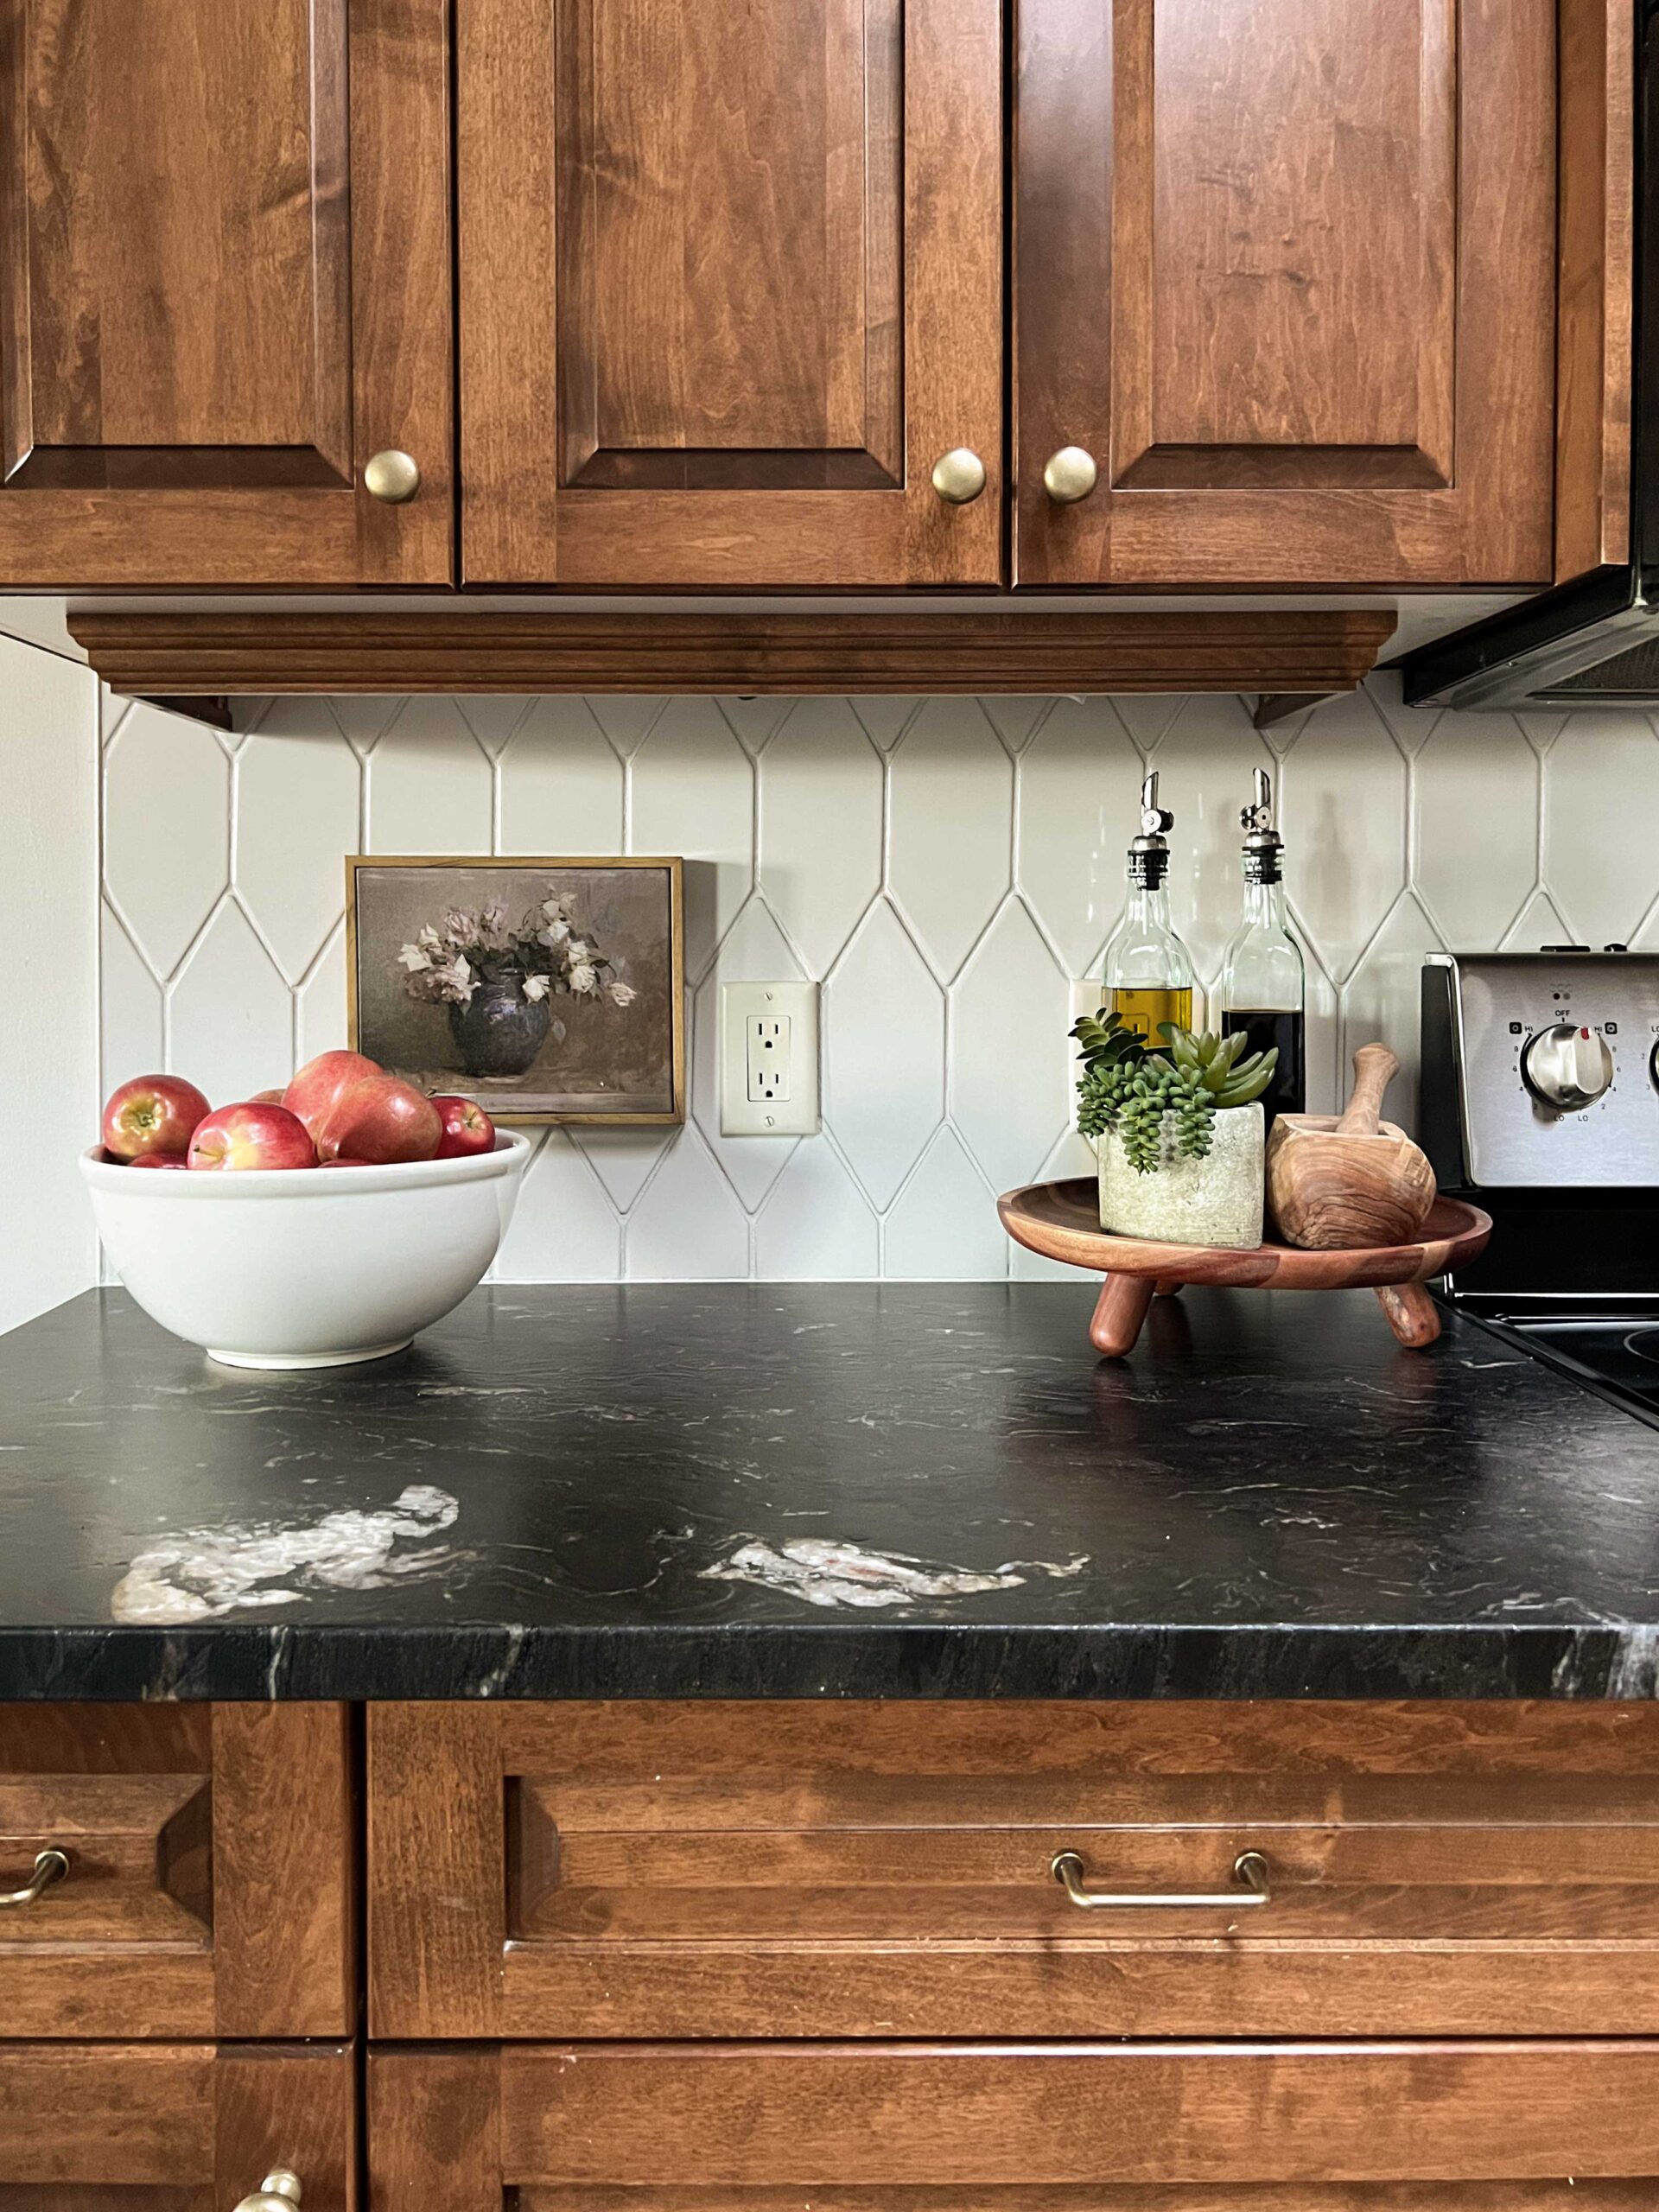
We also brought it a little art piece hung with a command strip on the tile, and a large bowl for fruit here that used to be my Grandma’s!
I would encourage you to shop your house before buying anything new – my mom had almost all of this stuff in her cupboards already. Shopping your house and moving things around is such an inexpensive way to get a new look in any room you are working on.
Update #6 – Paint the Pantry
The biggest problem in my mom’s kitchen was that there was just so much wood and brown tones. The floor, the cabinets, the pantry door, and the backsplash were all brown. Although she didn’t want the cabinets painted, she agreed to a new coat of paint on the pantry door to break up all the wood a little. I just painted it the wall color which is Benjamin Moore Olympic Mountains.
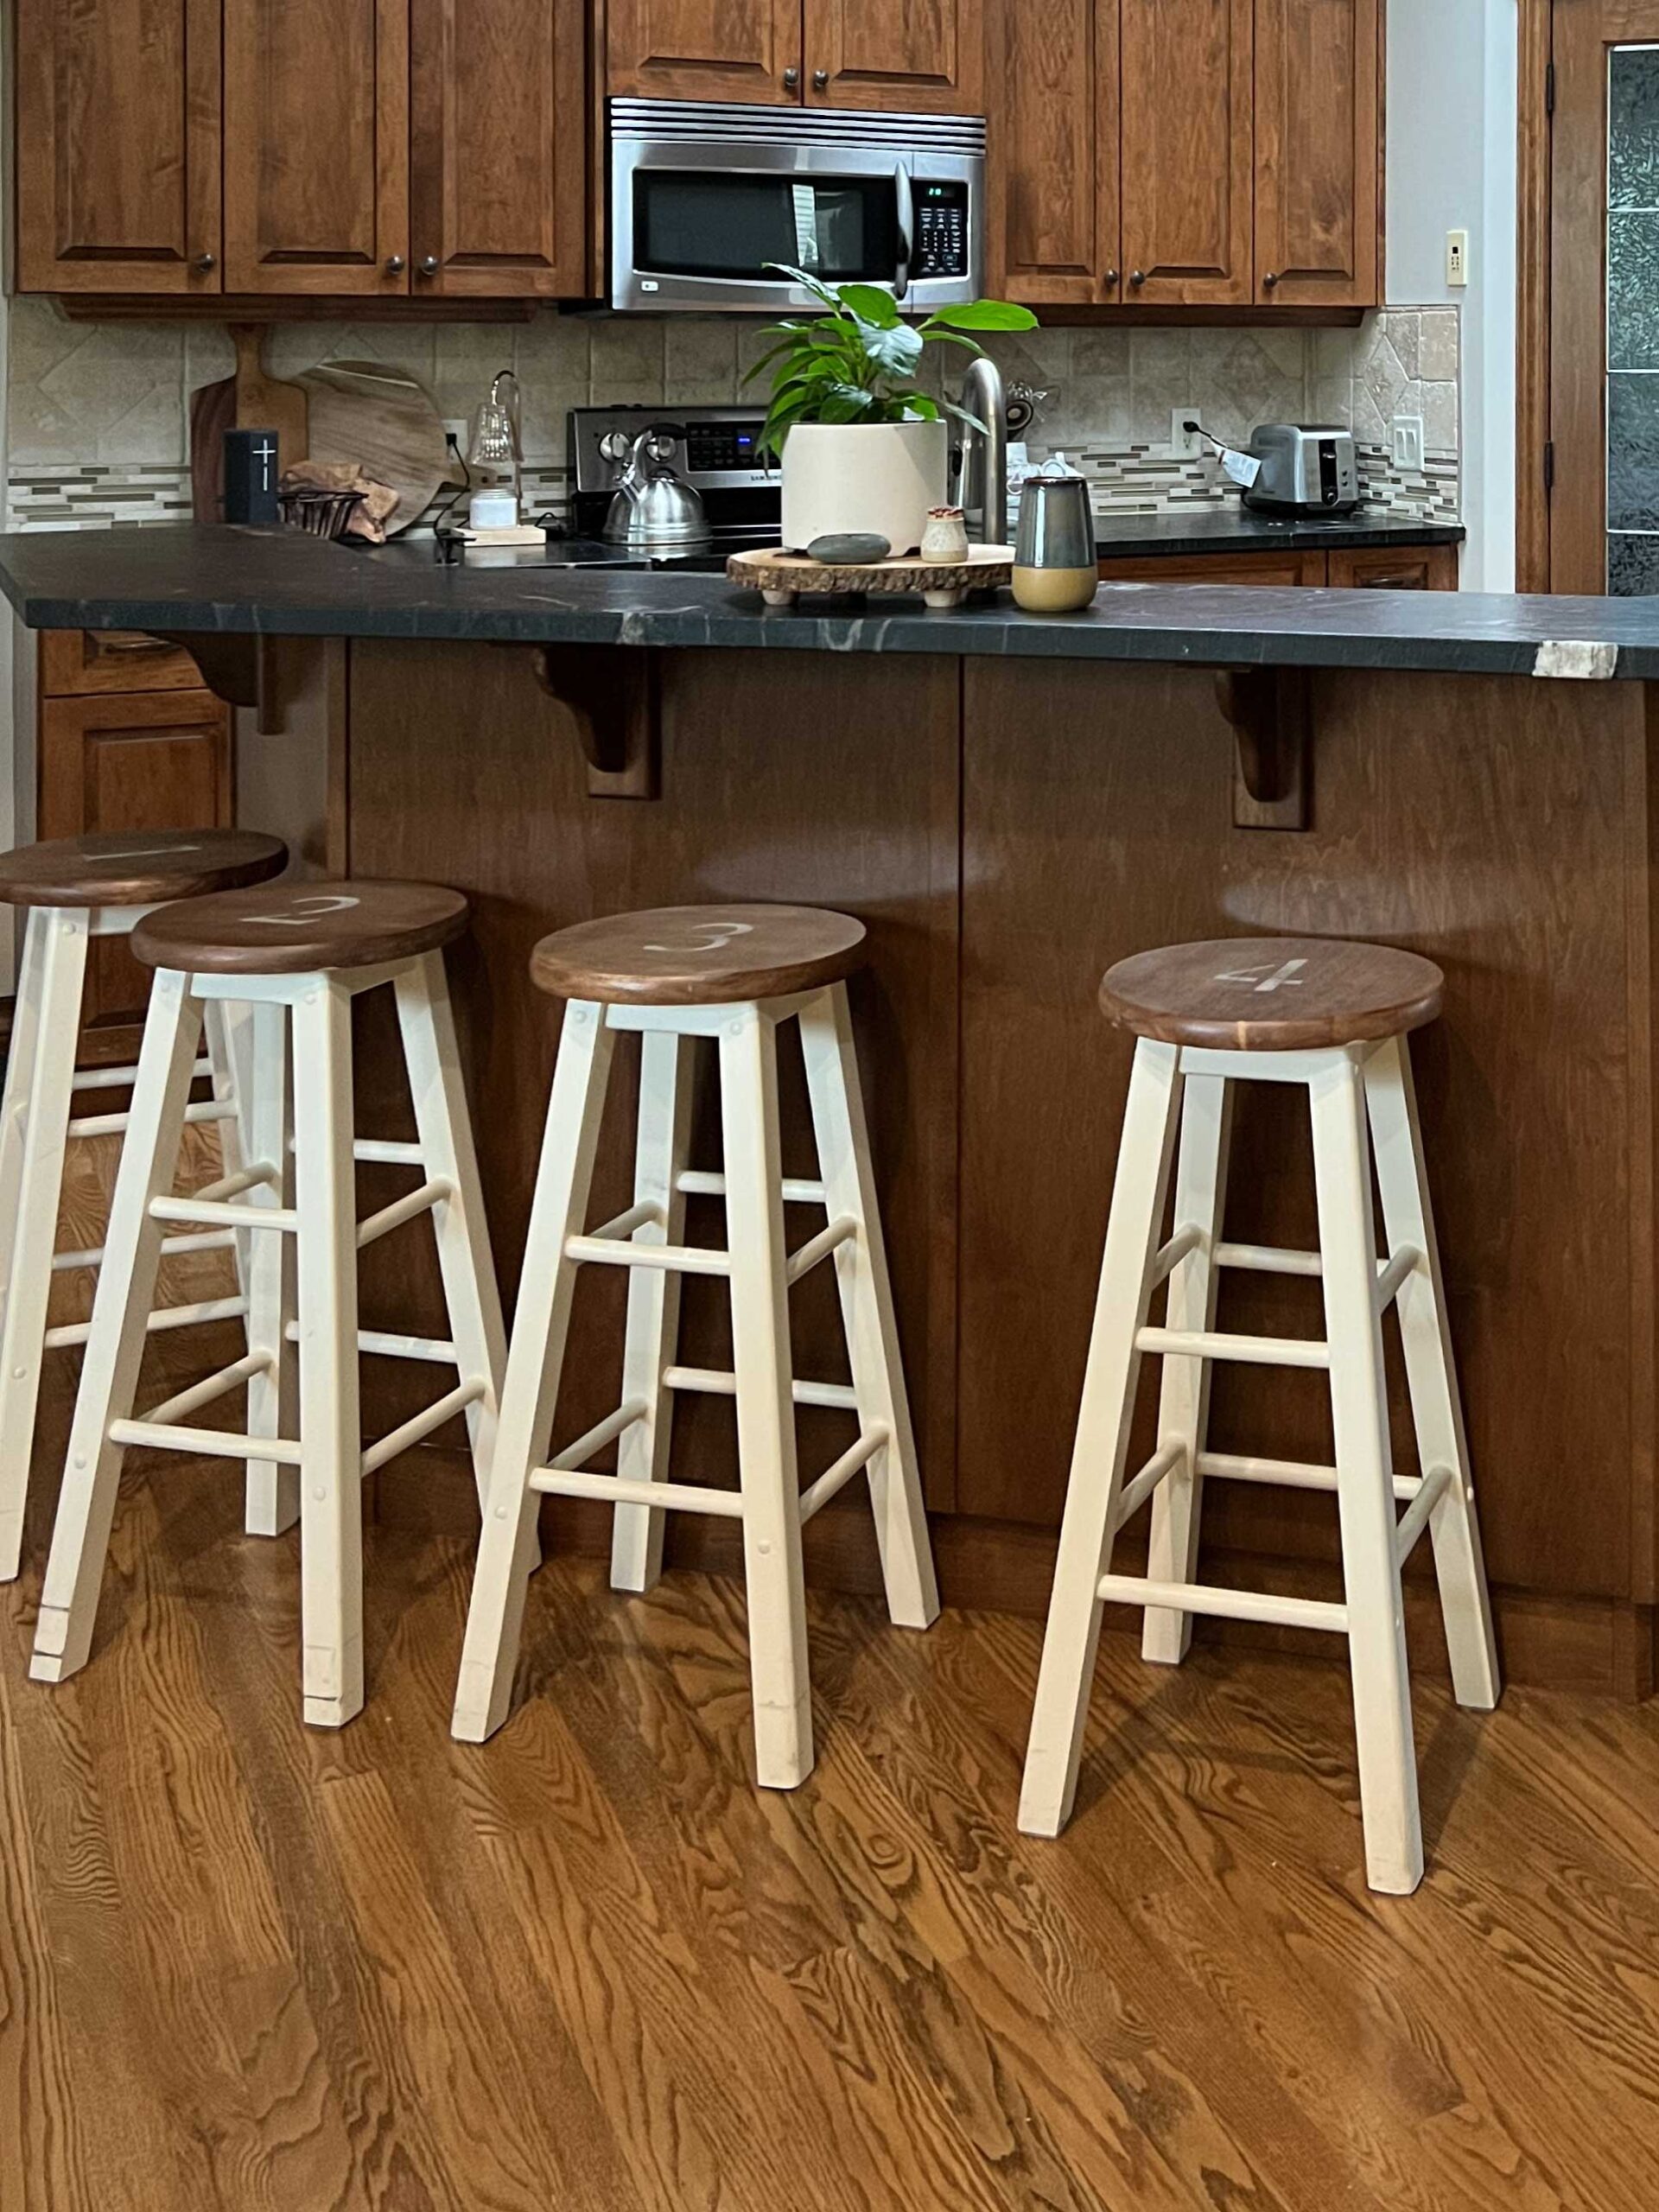
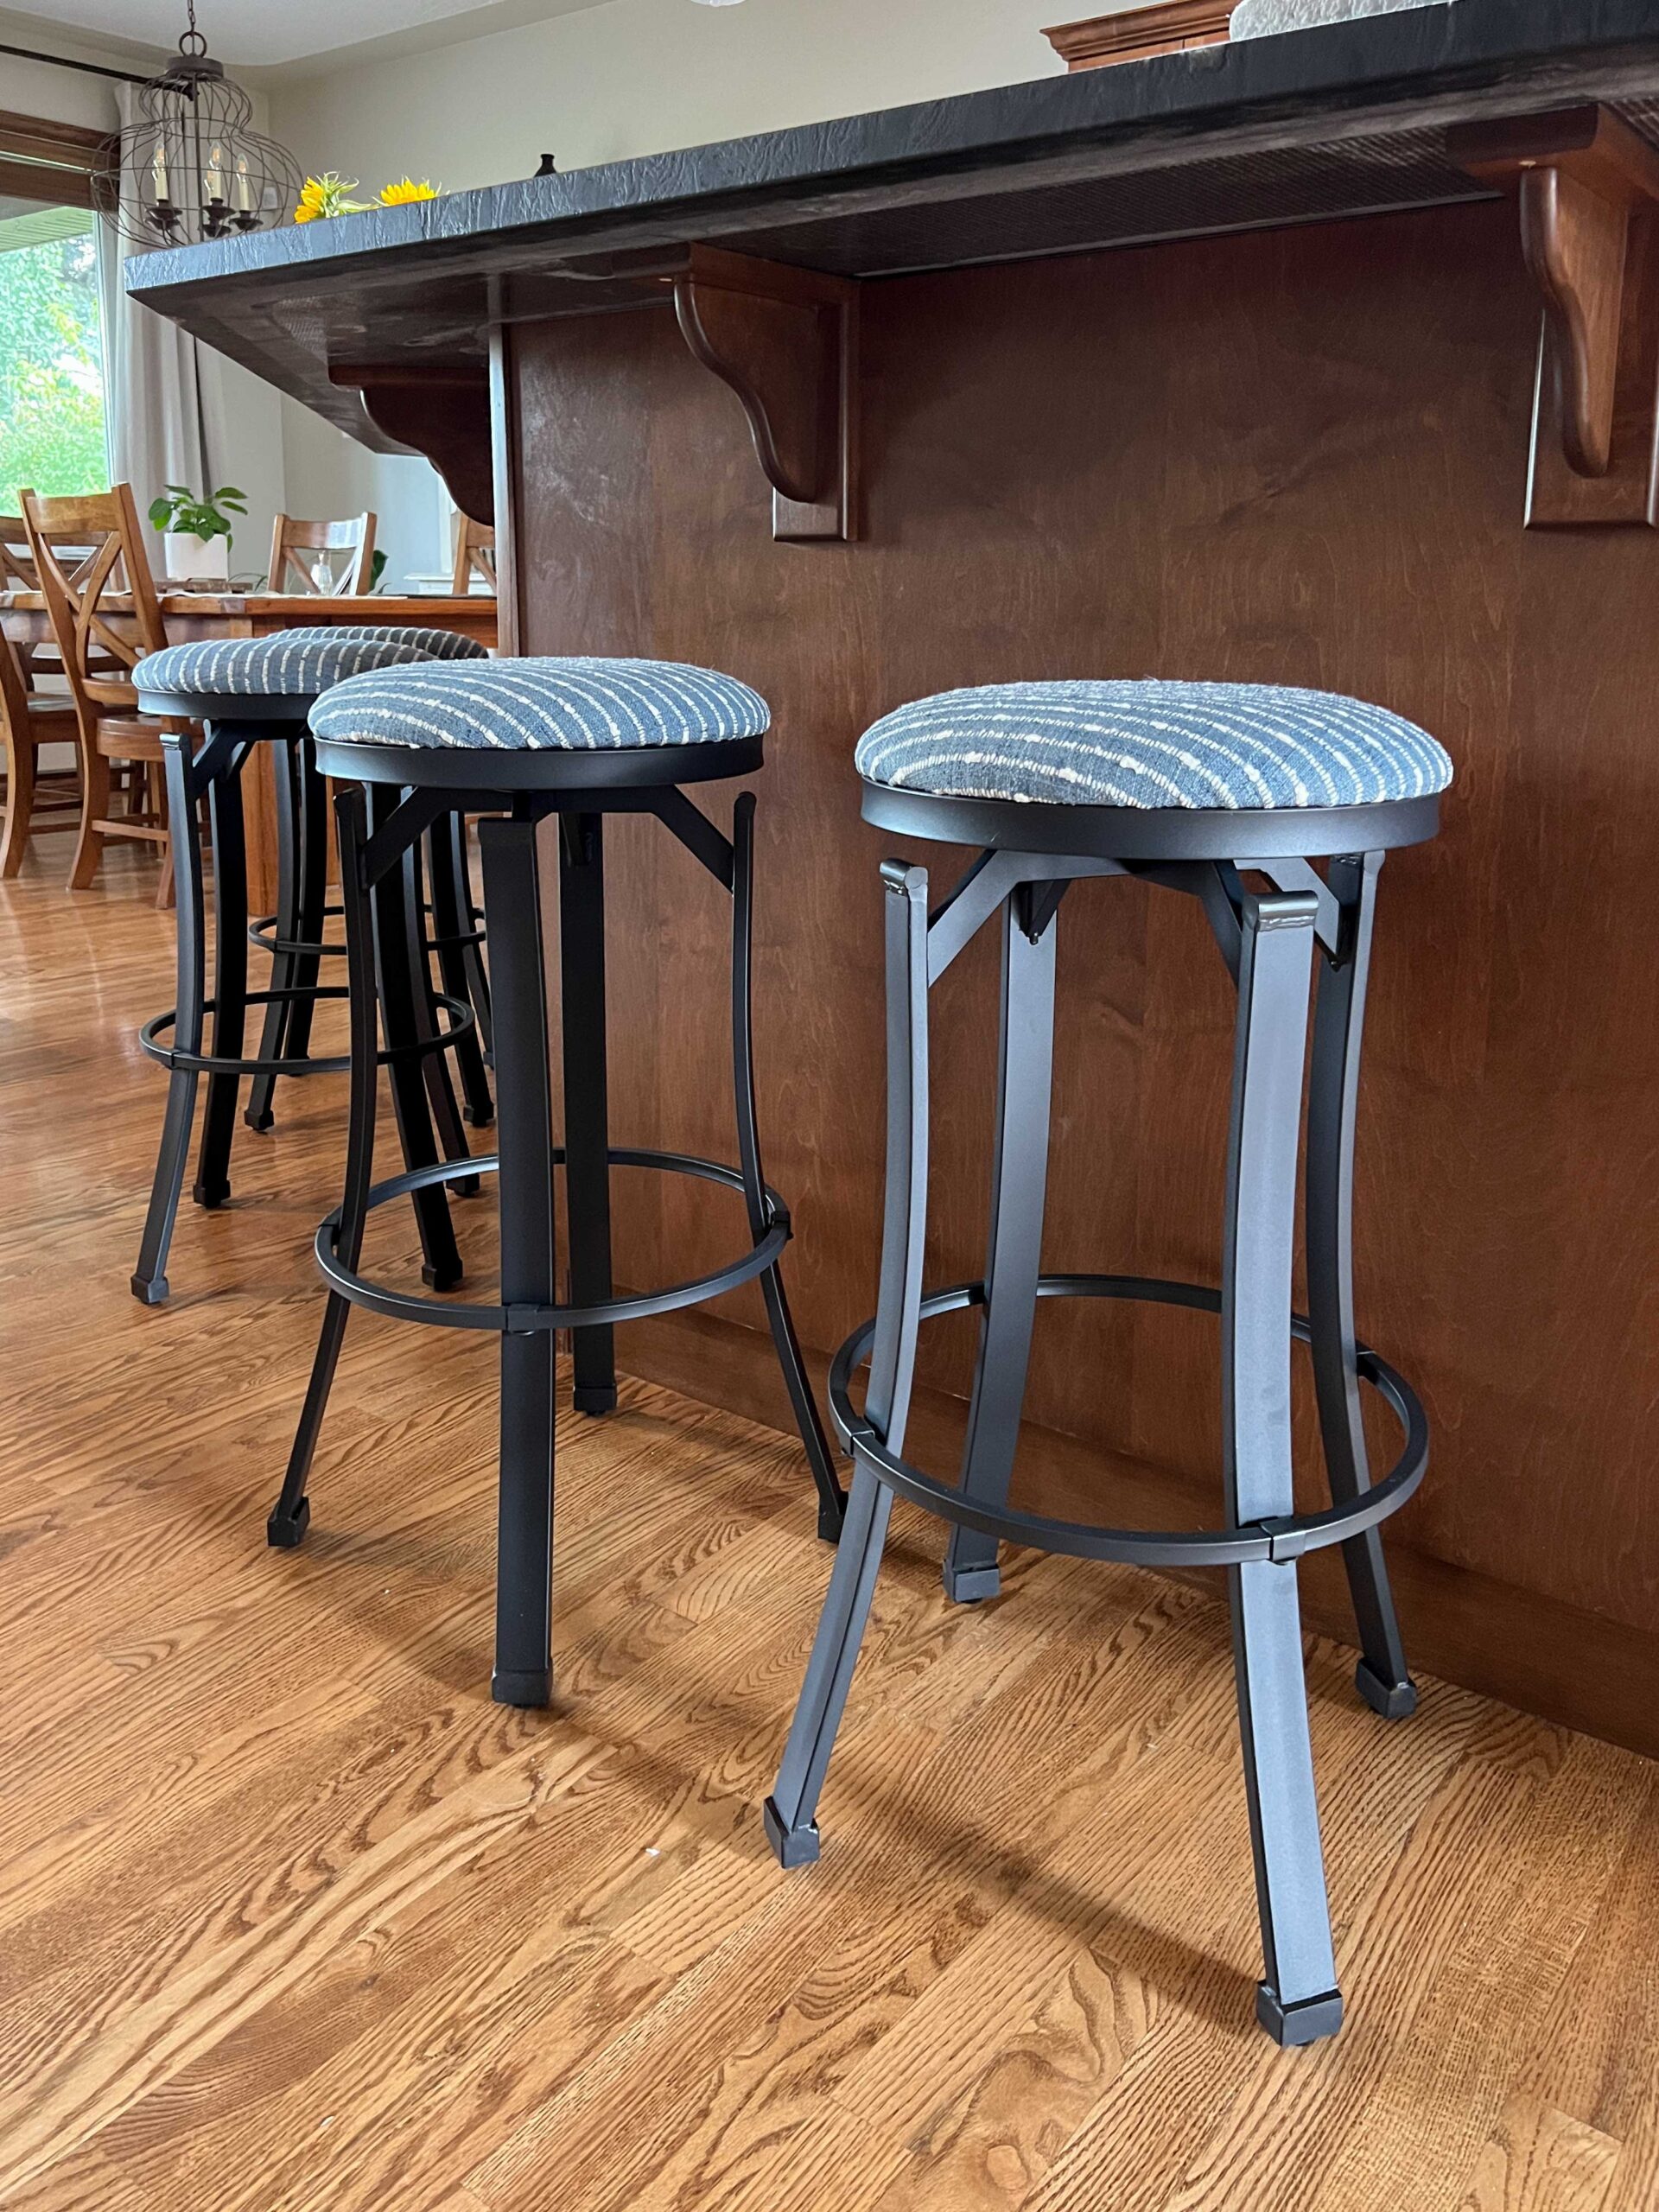
Update #7 – New Stools
My mom has had the same stools since I was in high school. I’m not going to tell you how long ago that was…. but let’s just say it was a long long long time ago. I shopped around for some inexpensive stools we could customize and wrote all about adding new fabric to the stool seats here.
Changing up the barstools gave the back of the island a fresh new look and helped tie the space into the adjacent living room, which has this blue rug. If you have a spot in your kitchen for seating, look at updating the stools!
The Results, a Budget Breakdown and Sources
Here are the results of my mom’s little kitchen makeover! I think the small changes we did went a long way. The best part of this makeover was how inexpensive it was. Let’s break it down:
- Tile – Leftover from my bathroom Reno – Free Exact Tile – Similar – Similar
- Tile Supplies (grout, mortar, spacers, etc) – $260
- Hardware – Knobs $190 (gifted), Pulls $141
- Paint for pantry door $35 – Benjamin Moore Olympic Mountains
- Soft Close Door Dampers $191
- Soft Close Drawer Dampers $286
- Pendants $200
- Stools $273
- Stool Fabric $57
- Accessories Butter Keeper, Art, Butter knives(similar), Dish Brush, Dish Brush (long) – $132
Total : $1,575
Before and After Shots:


Sources:
Sources for the things we bought are listed above, and here are a few links for some similar items for things she already had:

Other ideas for Updating a Kitchen without Painting Kitchen Cabinets
- Paint the Walls – My mom’s wall colour was pretty nice and once we changed out the backsplash, complemented the wood tone well. However, depending on the wall colour, that is the first thing you should look at. If your walls are beige or brown or yellow – paint them! Choosing a light colour with the tiniest bit of warmth will help your wood tones look their best! The colour on my mom’s walls is Olympic Mountains by Benjamin Moore. Any warm white is a good choice for wood cabinets.
- Update the back of the Island, or Peninsula – I had thrown around the idea of updating the back of her kitchen island with some moulding to give it a little more visual interest. At the end of the day, doing that was a little more than my mom wanted out of this makeover but it’s a great idea if you want a modern look!
- Move or Remove Cabinets – Depending on your kitchen’s layout, there may also be an opportunity to remove or move around some of the existing kitchen cabinets. Removing some cabinets or replacing them with open shelving is something I have seen done quite a bit, and it can really update the overall look of your cabinets. Sometimes the layout of the cabinets themselves is the most dated thing about the cabinetry. Have a look at modern kitchens and how the cabinets are laid out, and see if you can modernize them a bit. Moving (or removing) upper cabinets is really a simple thing, all one needs to do is find the screws holding them in place and remove them. My mom’s cabinets to the right of her fridge are all a different height, and if these cabinets were replaced with some shelving that would go a long way towards updating the layout.
- Remove Angles – If you have any angled cabinets or corner cabinets, consider removing those entirely or replacing with shelving. Angled cabinets was something that was done alot in the 80’s, 90’s and 00’s but nowadays, cabinets generally are more streamlined. A larger renovation for my mom’s kitchen might involve replacing the entire island with a rectangular one.
- Refresh the Wood Cabinets – If you have oak kitchen cabinets with a lot of orange tones in them, you can gel stain overtop to darken and richen the color and that would change the look of your kitchen cabinets considerably. If you don’t want to gel stain and change the colour, but your cabinets are looking tired and worn, consider a product like Restore-a-Finish which is a really easy wipe-on solution to restore the shine and depth of the existing finish.
Great job Erin!!! I love the new backsplash!
Great update! I like to see the big changes, and the small, quick updates too. What a talented family you have – between your mom’s amazing sewing skills, your sister’s beautiful pottery and your vision, creativity and ability to diy EVERYTHING!
Thank you Joannie!
Aww thank you so much Leslie you are so sweet for saying so!
The new black barstools look nice with the black countertops! Overall, a very nice update for minimal cost!
Thank you Cynthia!
Lovely kitchen. Her cupboards are so pretty and classic and it looked fine before but the simple updates really make it shine. So your sister is a potter? Wow, you have a creative family. Your mom too?
Thank you so much! My sister is a potter and my mom is great at sewing, I’m lucky to have such a talented family!
Nice update without doing anything too severe or permanent, which mom obviously wasn’t ready for. The old pendant lights were so much nicer than the new ones, however, as the new ones look really outdated and tired. I’m thinking perhaps the before and after photos were accidentally mislabeled?! Otherwise it looks good.
My mom did not like the clear glass that always looked dirty so we found the white more traditional classic style ones for her. I’m sorry you don’t like them, but she does!
Do you happen to remember what color grout you used? Thank you! -Crystal [email protected]
I am pretty sure it was Avalanche by Mapei.
I love this kitchen update! I have been toying with updating my kitchen but mine looks a little more dated than your mother’s. I have been floored by the cost of countertops. Changing out my countertops would cost about $10K. (includes tile removal) Are your mother’s countertops granite?
Hi Virginia! Yes they are granite, she was lucky that they are pretty nice because countertops are very expensive! Good luck on your update, hopefully you can find an affordable option!
Hi! Do you know what the color is on the wall? Thanks!
I’m sorry I don’t!