
DIY Pinch Pleat Curtains
Have you ever lusted over those gorgeous custom curtains with perfectly tailored pleats, and thought that it was a high-end look something you could never afford to do? Yeah, me too. It turns out, if you are willing to do a little modifying, you can turn that off-the-rack pair of Ikea curtains (or any other off-the-rack curtain, for that matter!) into pinch pleat beauties. I’ve put together this tutorial on how you can create your own DIY Pinch Pleat Curtains (which also happens to be an Ikea curtain hack!) in your own home using inexpensive curtain panels! For this version, no sewing machine is required, so it’s an easy method to obtain the most beautiful pinch pleat curtains.
This post may contain affiliate links. That means if you purchase anything from these links I earn a small commission, at no extra cost to you! This helps support my blog, so thank you!
What are Pinch Pleat Curtains?
What are pinch pleat drapes? Basically, they are curtains that are sewn and bunched at the top creating more forced fullness in the curtain itself. When a non-pleated curtain is spread its full width, it would be flat. With a pleated curtain, the pleats force a bit of a fold even if it were to be pulled the whole width. It is very nice to use with curtains that are drawn regularly for this reason as it keeps the fold somewhat regular. With the resurgence in popularity of more traditional design, traditional pinch pleats are becoming more popular and coming back in style, in a big way.
How to DIY a Pinch Pleat Curtain
Materials:
The Curtains:
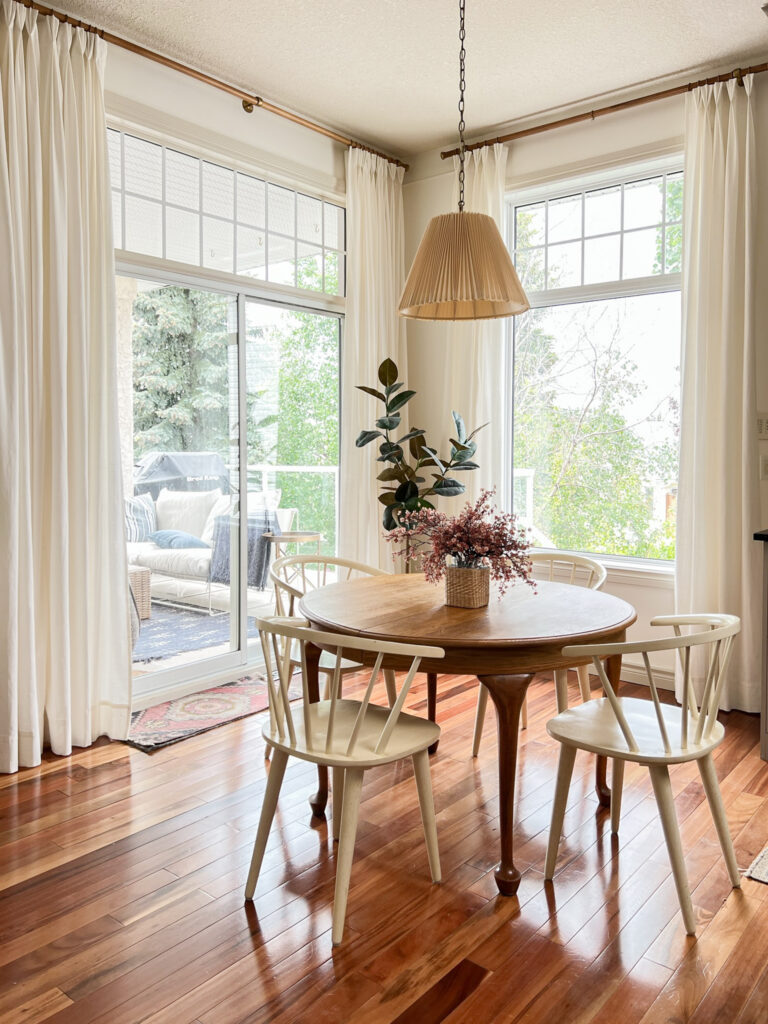
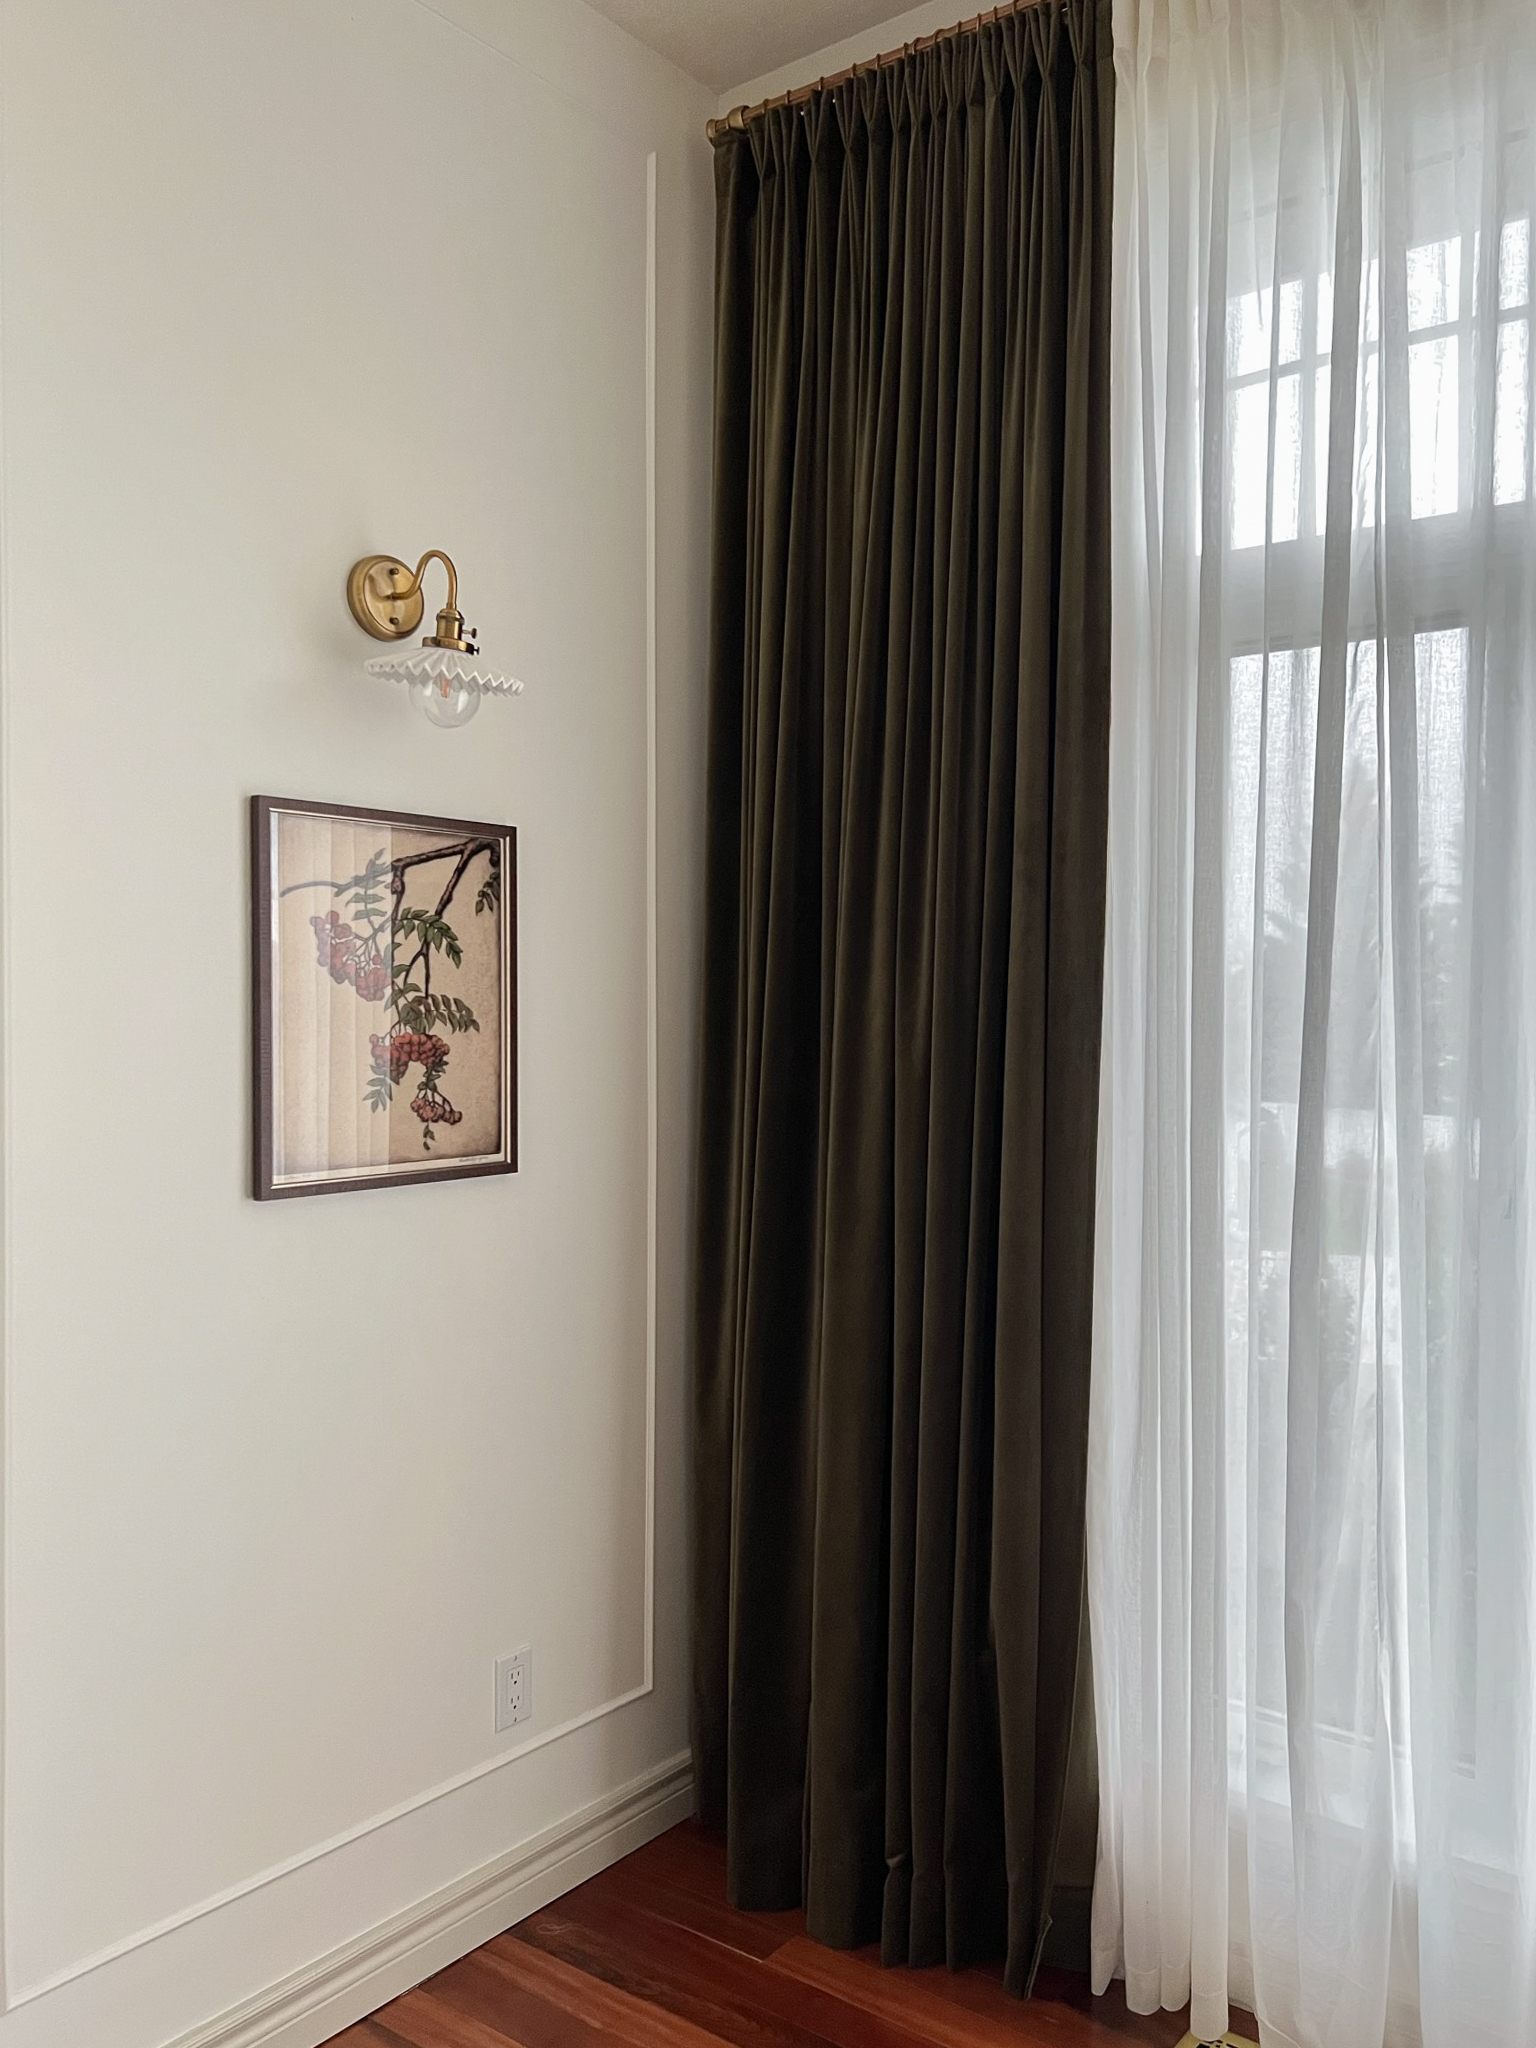
First of all, in order to create your DIY pinch pleat curtains, you are going to need drapery panels that come with pinch pleat tape already attached. The ones I used in my Dining Nook are the Ikea Ritva’s, which I have used many, many times before due to their nice texture, great weight and good value. The ones I used in my Living Room are the Ikea Sanela in Olive Green (which is a colour they don’t currently have but they have several other pretty colours). The important thing to note is that most Ikea curtains come with pleating tape at the top, which are like little pockets to insert the drapery hooks into, which is what makes this Ikea curtain hack extra easy.
Ikea is not the only place you can get curtains with pleating tape already attached. I’ve also found that most of the curtains at H&M also have the pleating tape attached, like these ones that I basically designed my Guest Room around!
If you have a pair of curtains (or are making some yourself! Click here to find out how!) then you can always add the pleating tape to the curtain by sewing it on to the top of the curtain. You just have to know how to sew in a straight line to do that. However, this is supposed to be a no-sew tutorial on how to make your own DIY pinch pleat curtains, so for the remainder of this post, I’ll assume you have some curtains with the pleating tape attached, or you have already made your own using this tutorial!
The Hooks
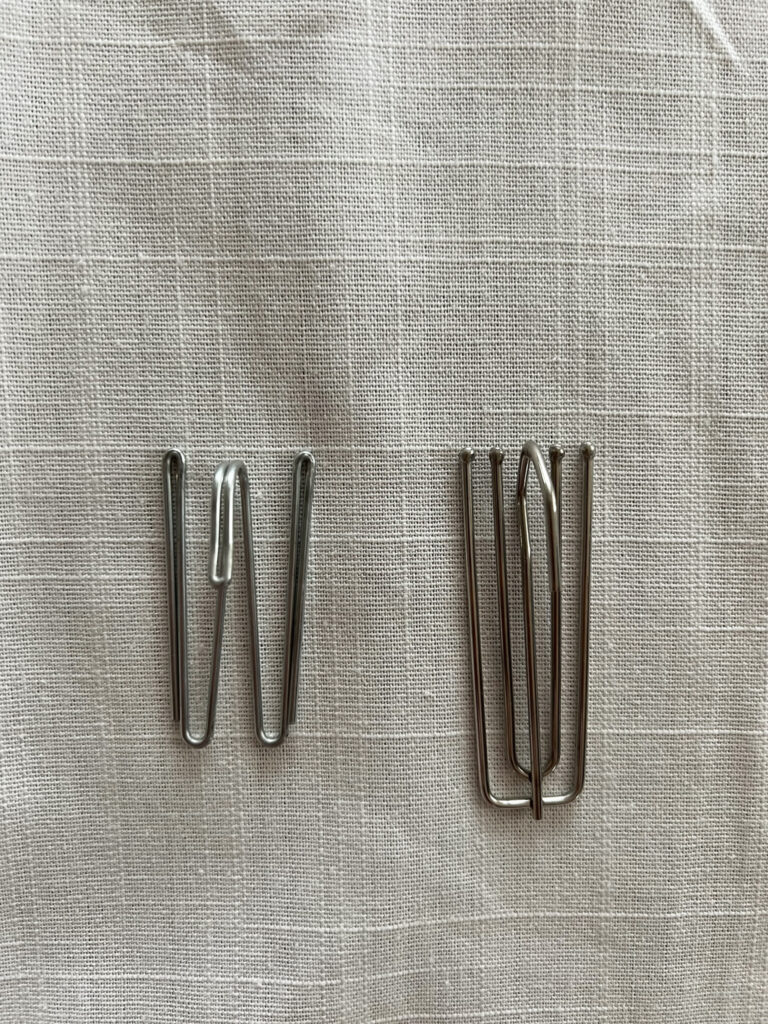
The hooks that Ikea sells are great if you want a single pleat, or fold, as it has two prongs (the material between the prongs creates the pleat). This is great for a casual look and I’ve used those hooks myself many times. But if you are interested in the triple pleats for a different look, you are going to need hooks that have 4 prongs (so that there are 3 folds of material between the prongs.)
These are readily available on Amazon or at most fabric and sewing stores.
How to Add the Pleating Hooks
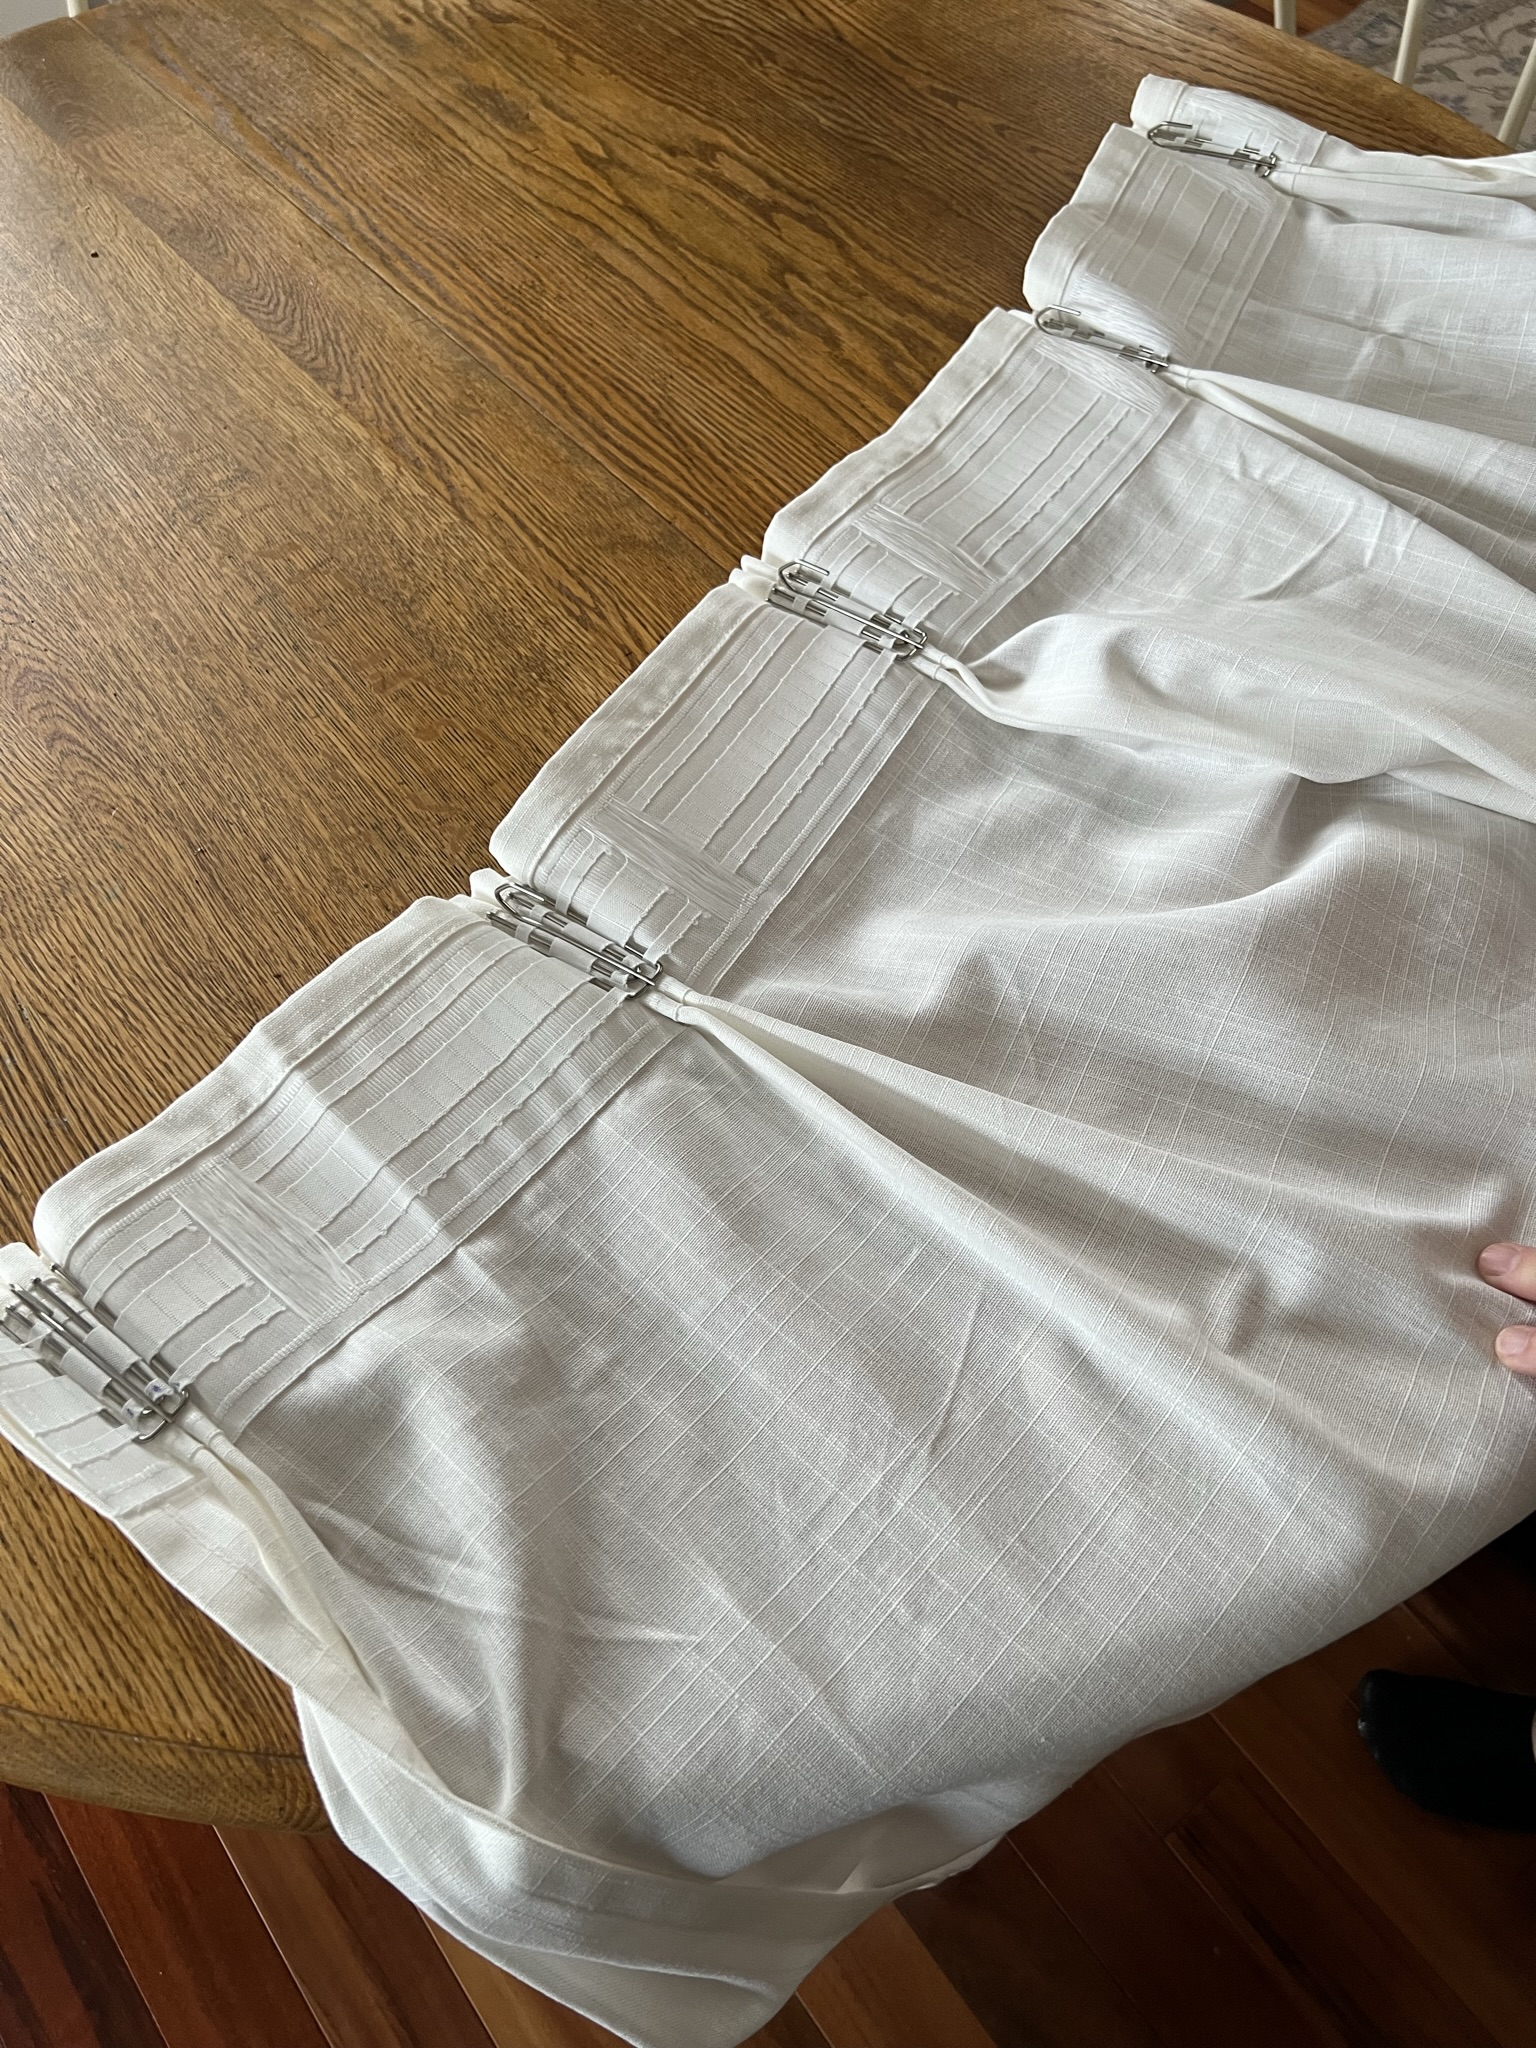
The next step is a tad finicky but once you get the hang of it, it’s not that bad! In order to create your DIY pinch pleated curtains, you will need to add the hooks to the pleater tape creating folds between each of the prongs. Here is a step-by-step:
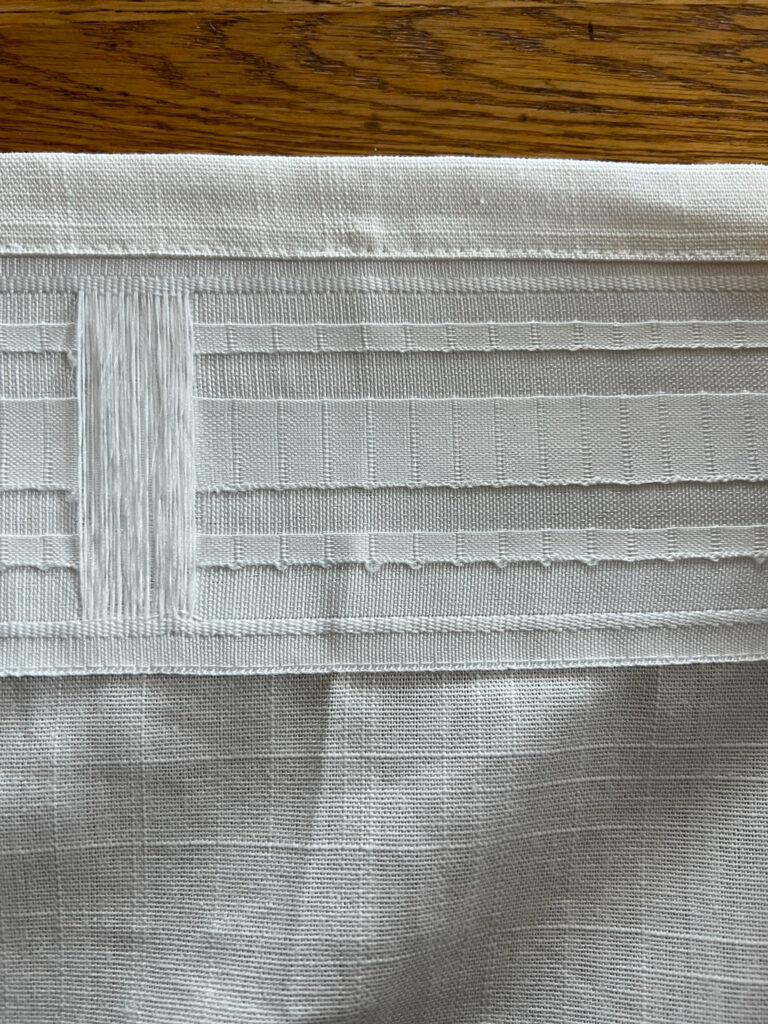
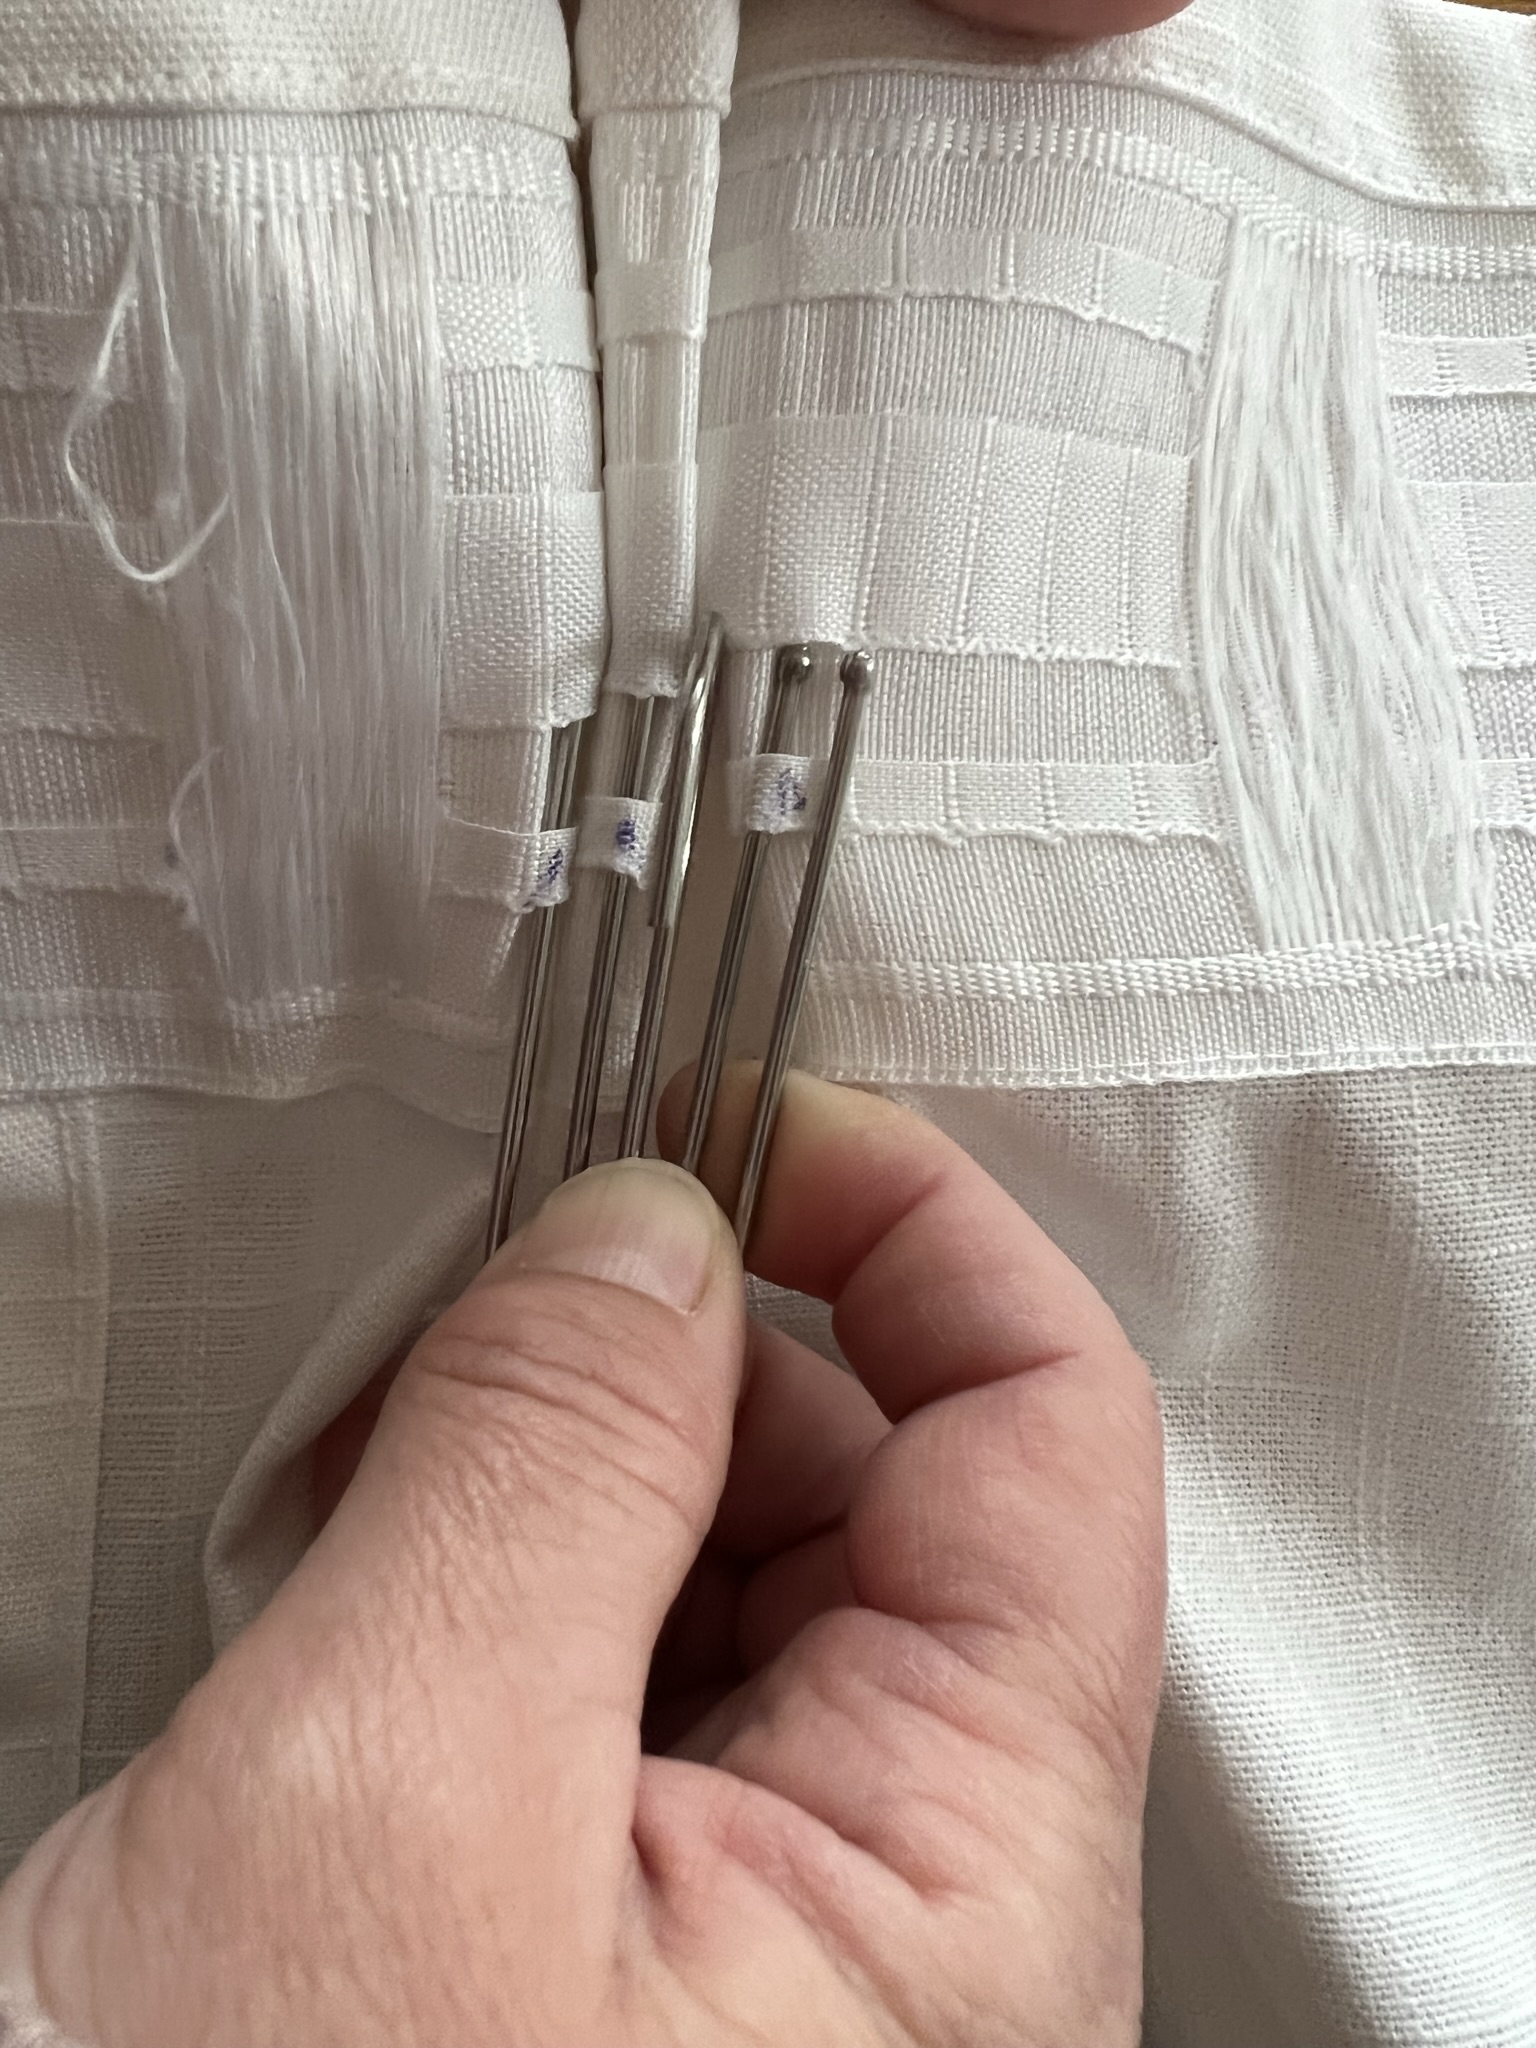
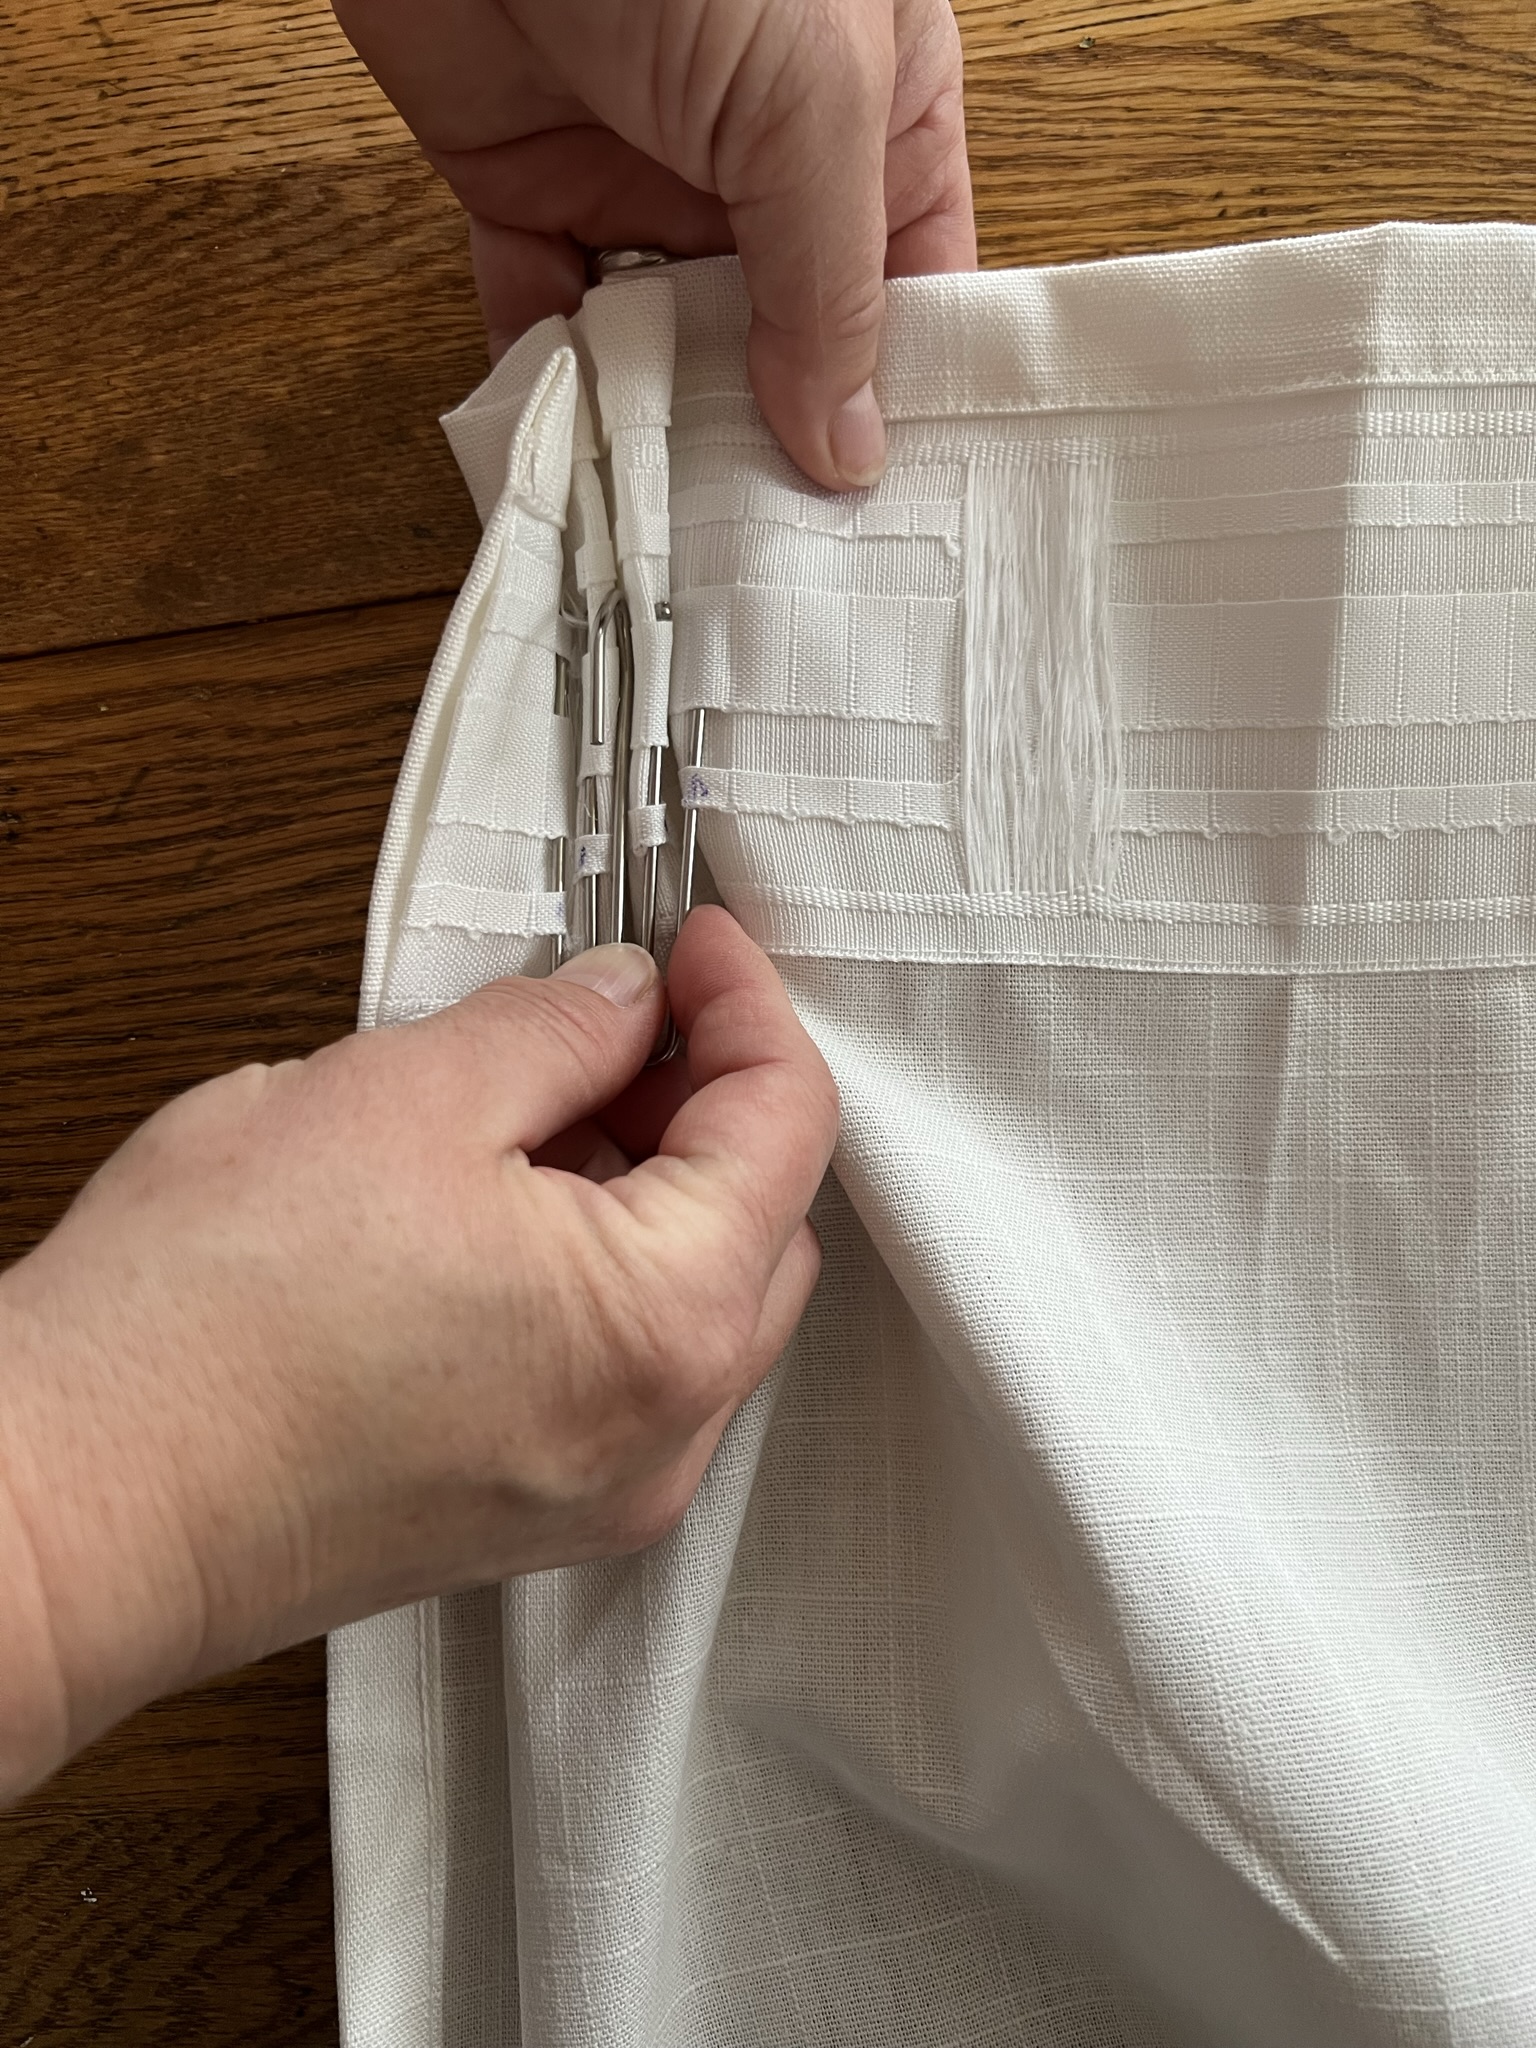
- Insert one prong of the pleat hooks near one edge of the curtain through the loops on the pleater tape. I like to leave about 2” from the edge before starting the first pleat.
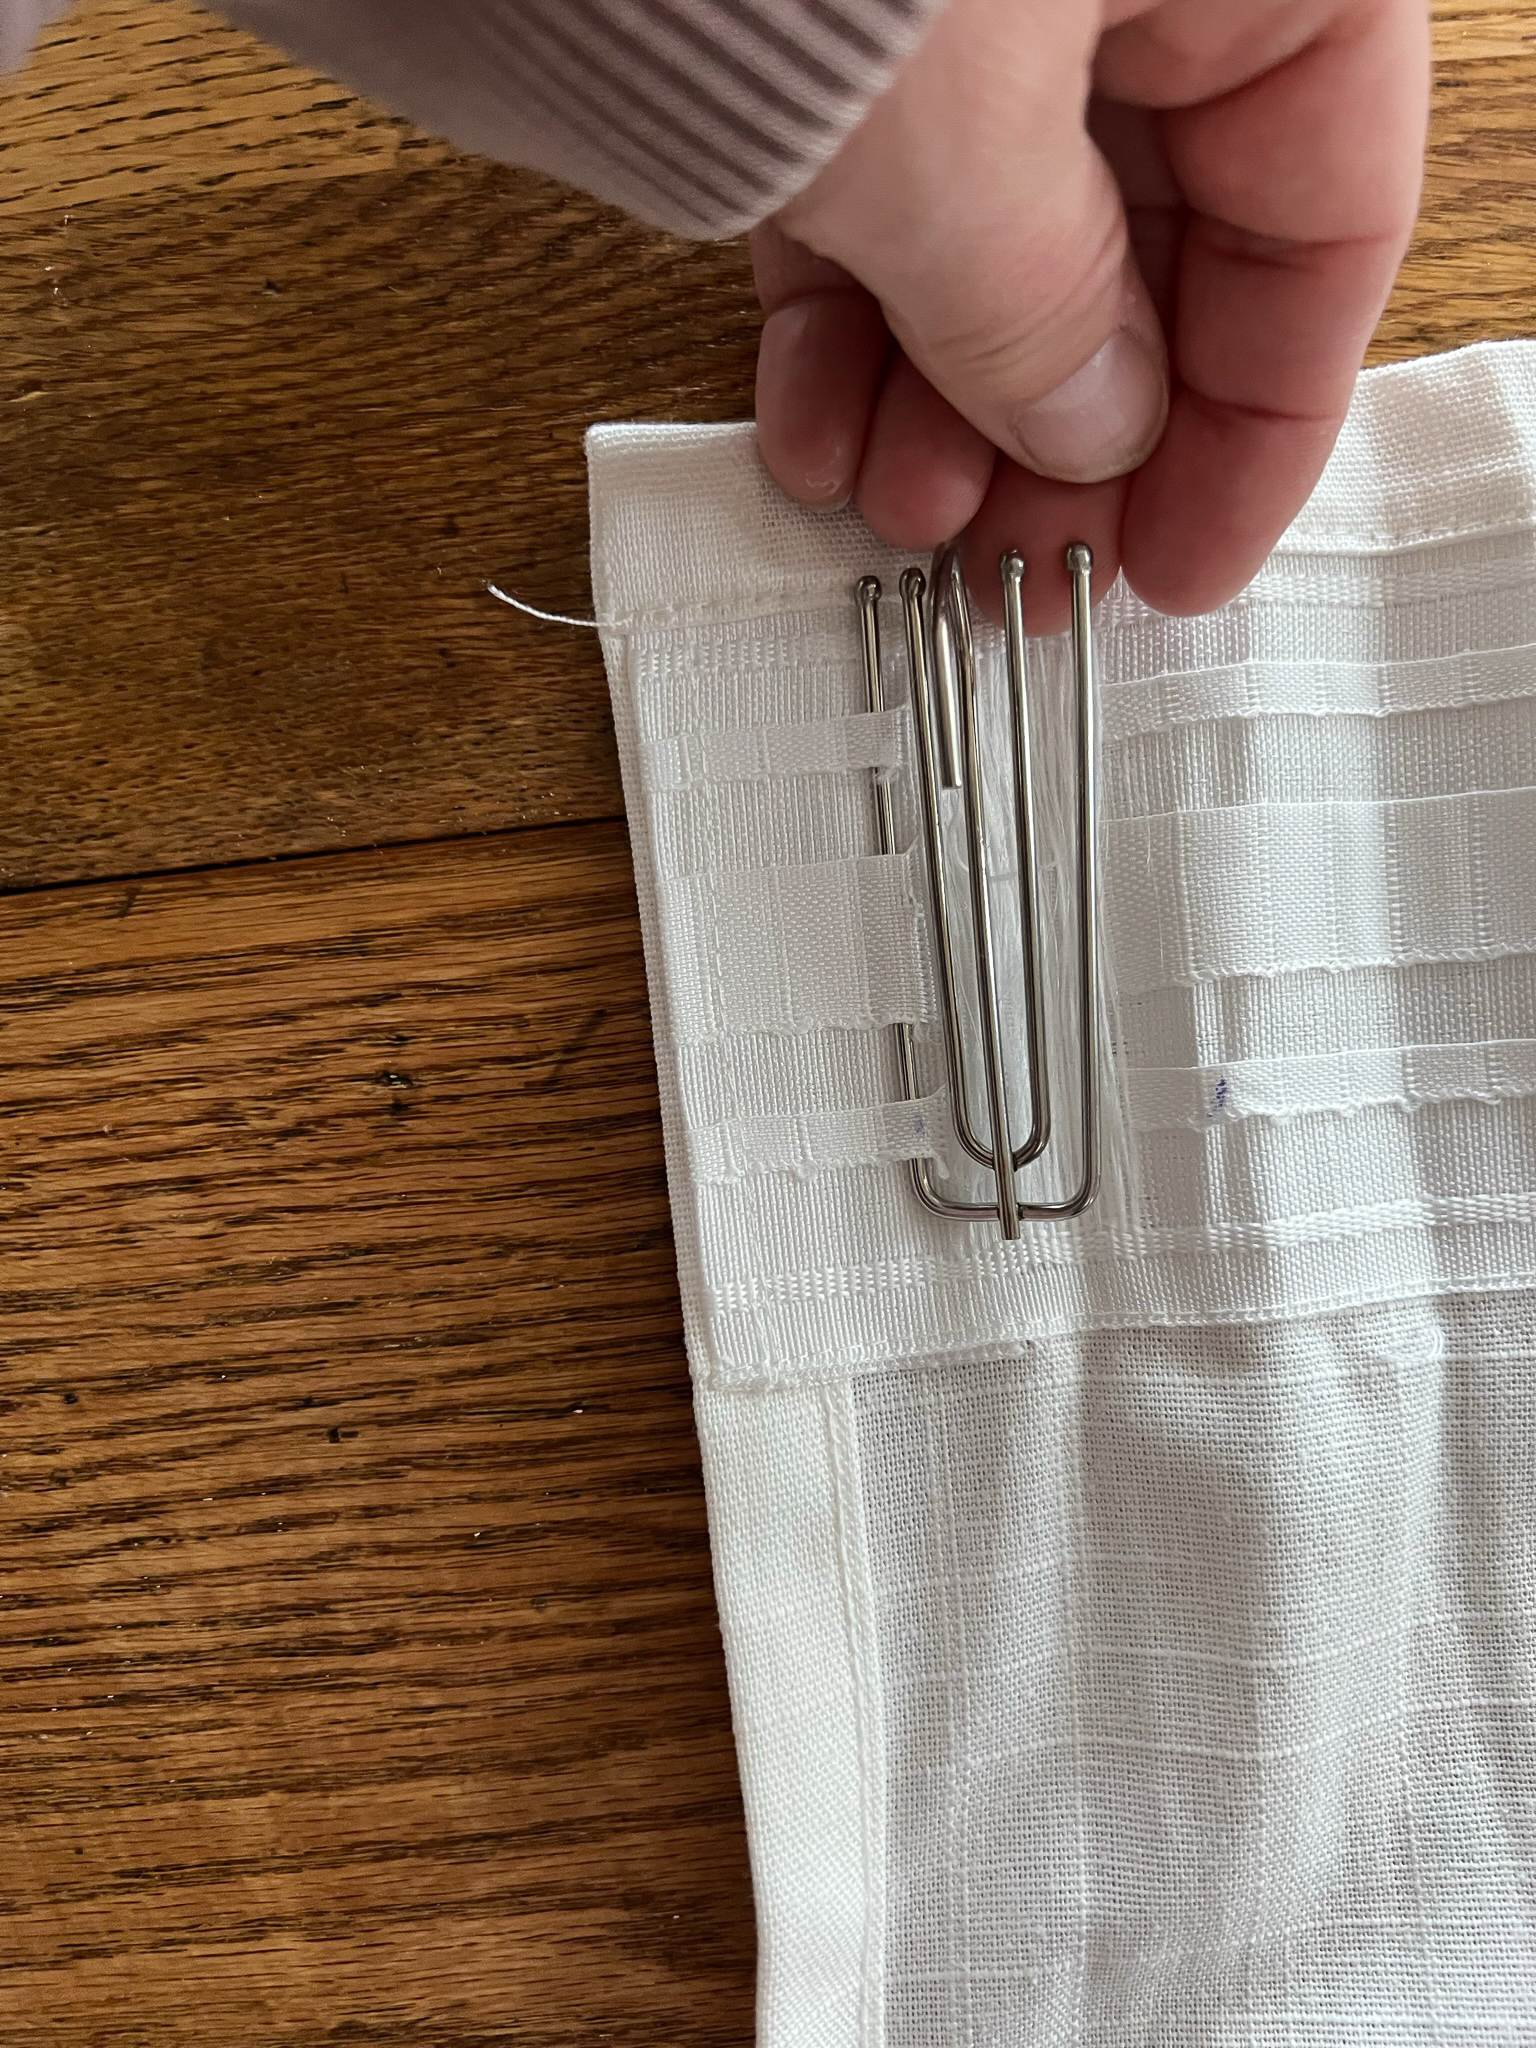
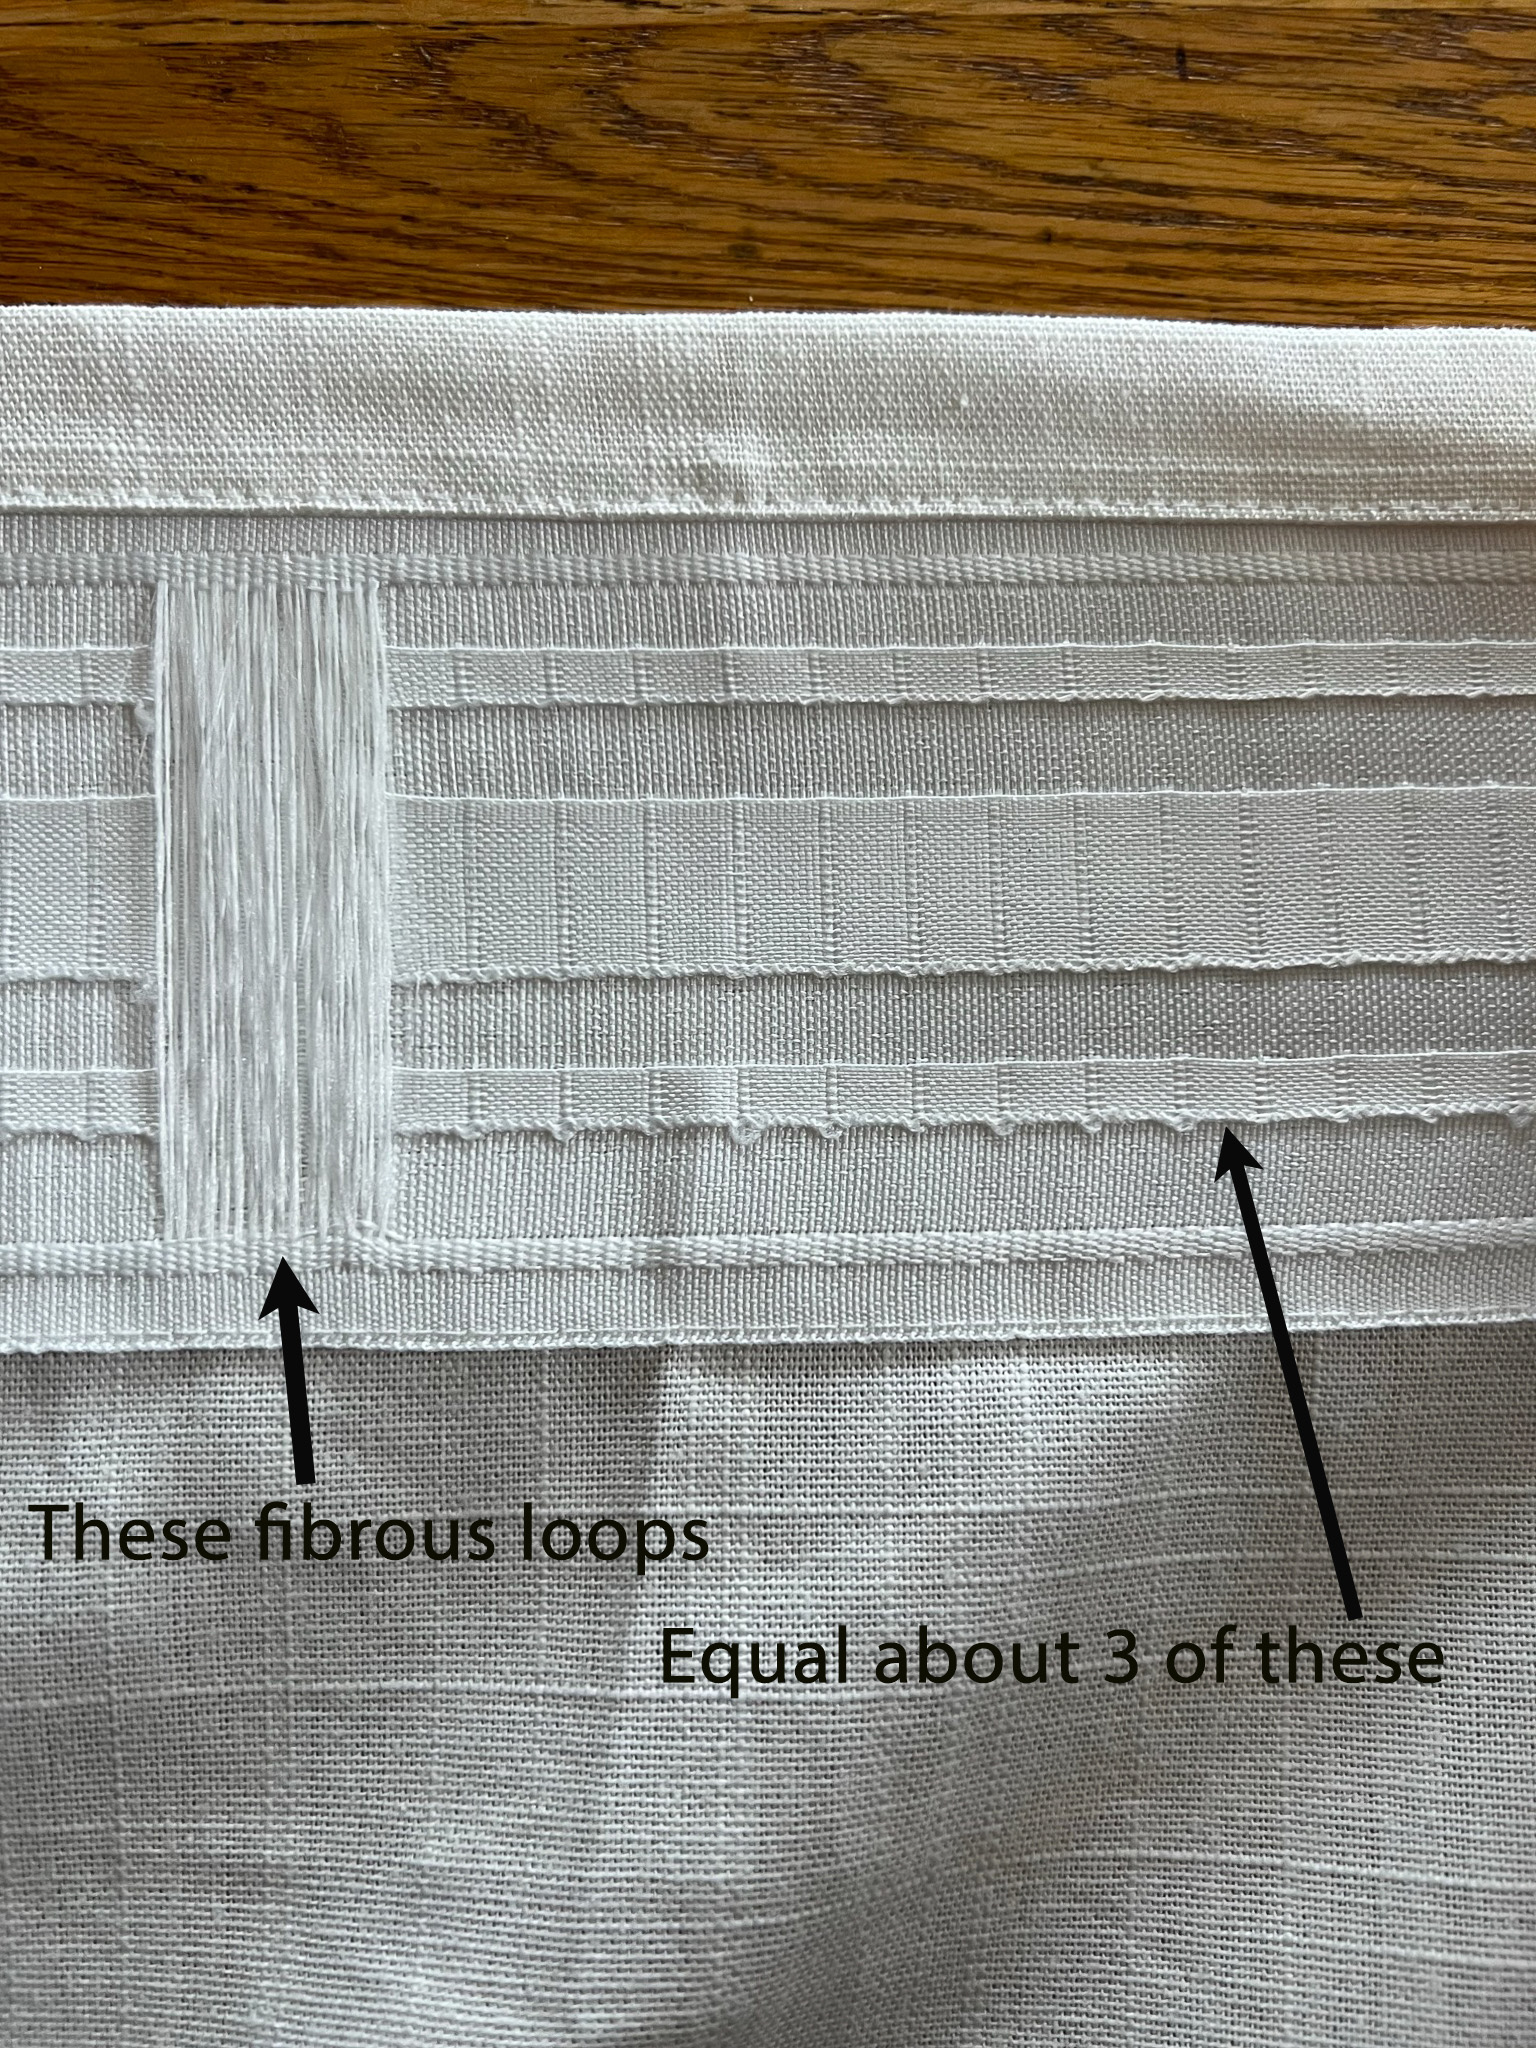
- Count over 5 spaces to the next set of loops for the second prong. (On some pleating tape types, there are fibrous loops that are meant to be an alternative hanging method which you will have to skip over. I assume that there would have been 3 of the smaller loops in that area when I’m counting over my 5 spots. If my second prong lands on one of those fibrous loops, I will adjust my starting point a little or just skip over to the next available one. You can’t tell in the end if the spacing is off a little here and there, I promise!)
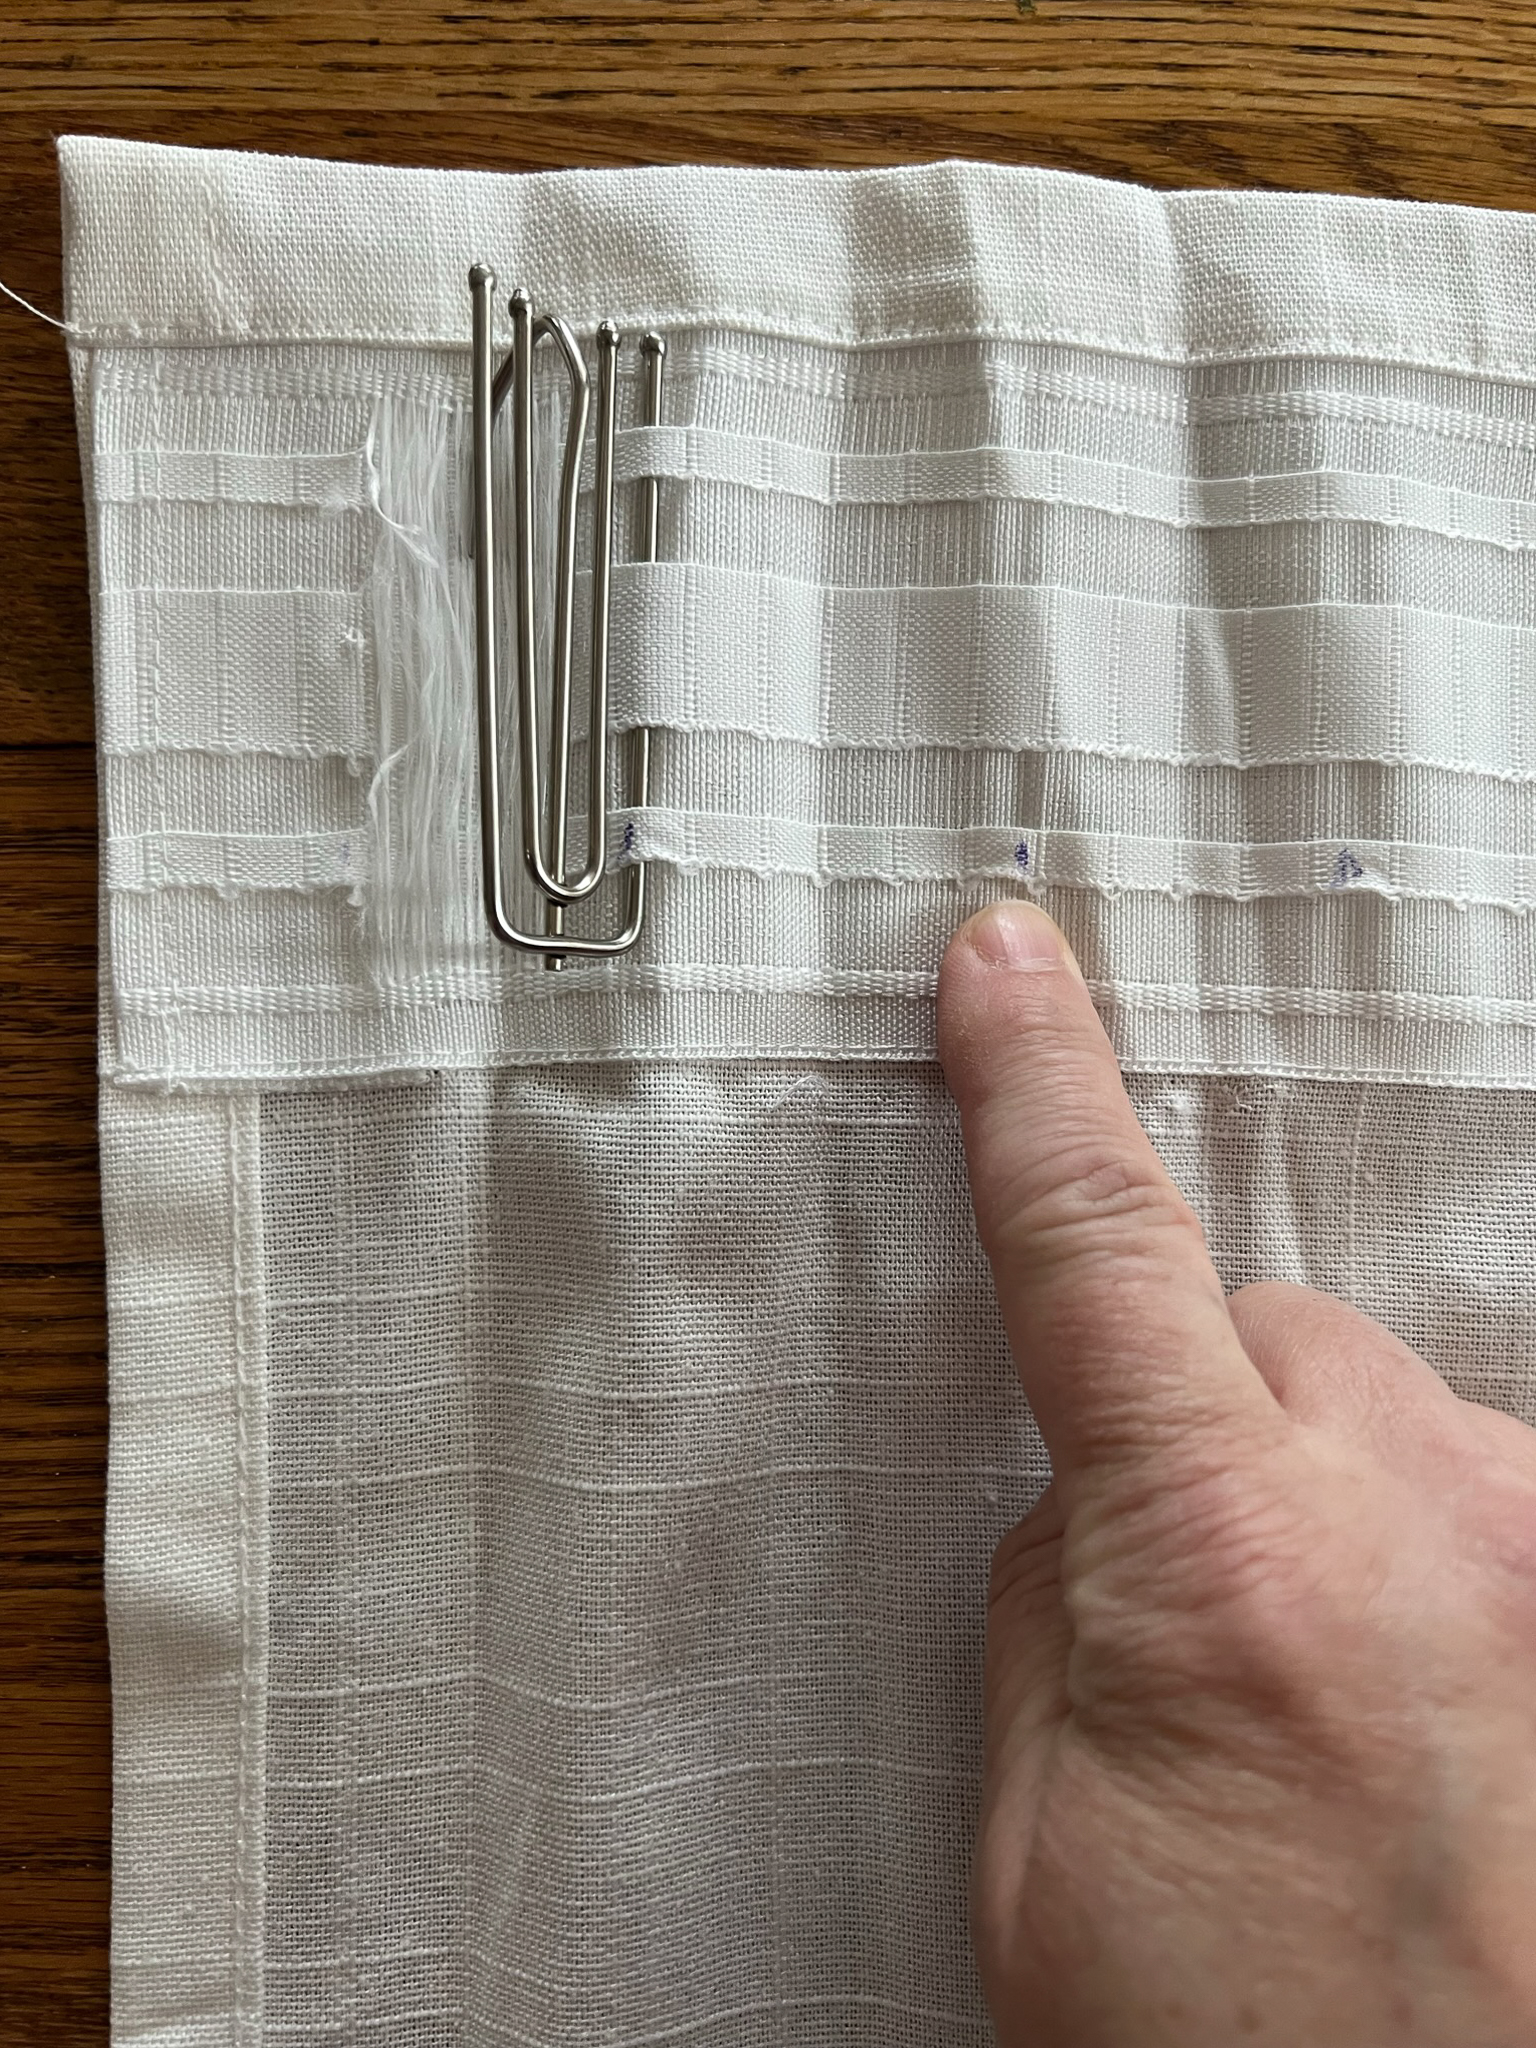
- Insert the second prong 5 spots over. Then repeat for the third prong on the pleat hook – count 5 spots over and insert another prong. Repeat for the 4th prong. It can be tricky to manipulate all those prongs into the proper holes but keep at it, it can be done! Make sure when you are done inserting all the prongs that they are in all the available loops for that spot.

- You’ve created your first pleat!! Now, you are going to repeat this on the other side of the curtain, starting from 1 – 2” from the edge and inserting the first prong. Count over 5 spaces for the second prong, etc.
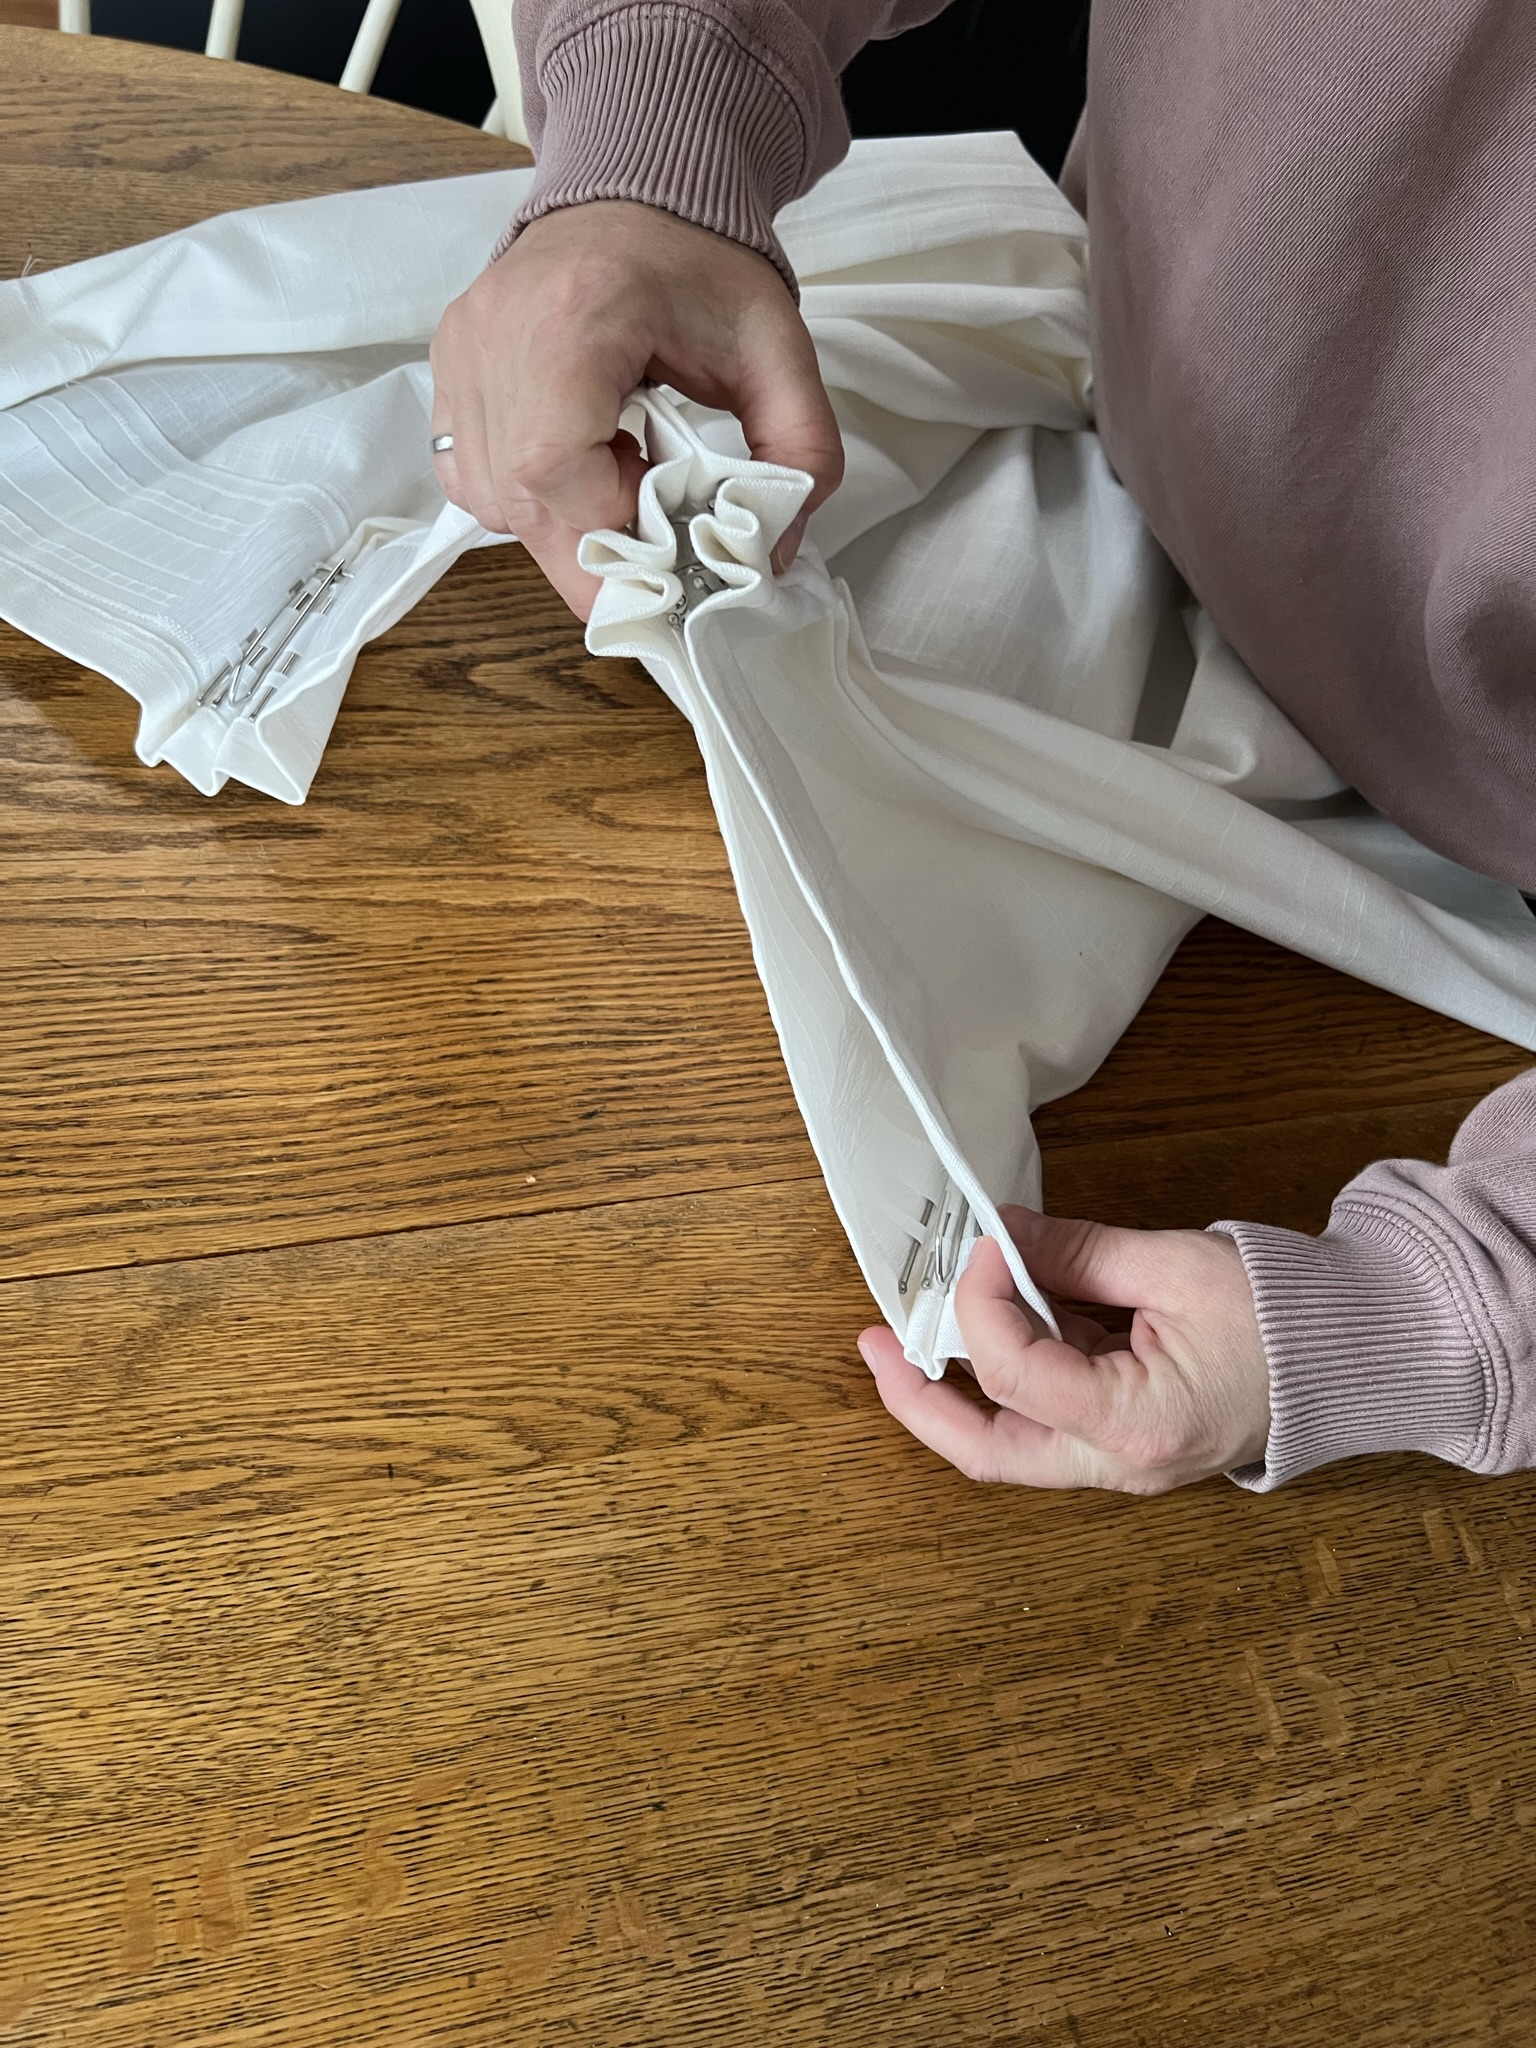
- In order to get the pleats to be even, for an odd number of pleats, you either have to do a little math or you can do what I do and cheat a little. I add one pleat to either end first, and then I fold the curtain in half to find the center. I then add a pleat at the halfway point. I count over two or three of the loops to add the third prong, then count back towards the middle 5 spaces to add the second prong, and so forth so that the middle pleat is located more or less in the middle of the curtain panel, working out from the center of the hooks this time instead of from one end to the other.
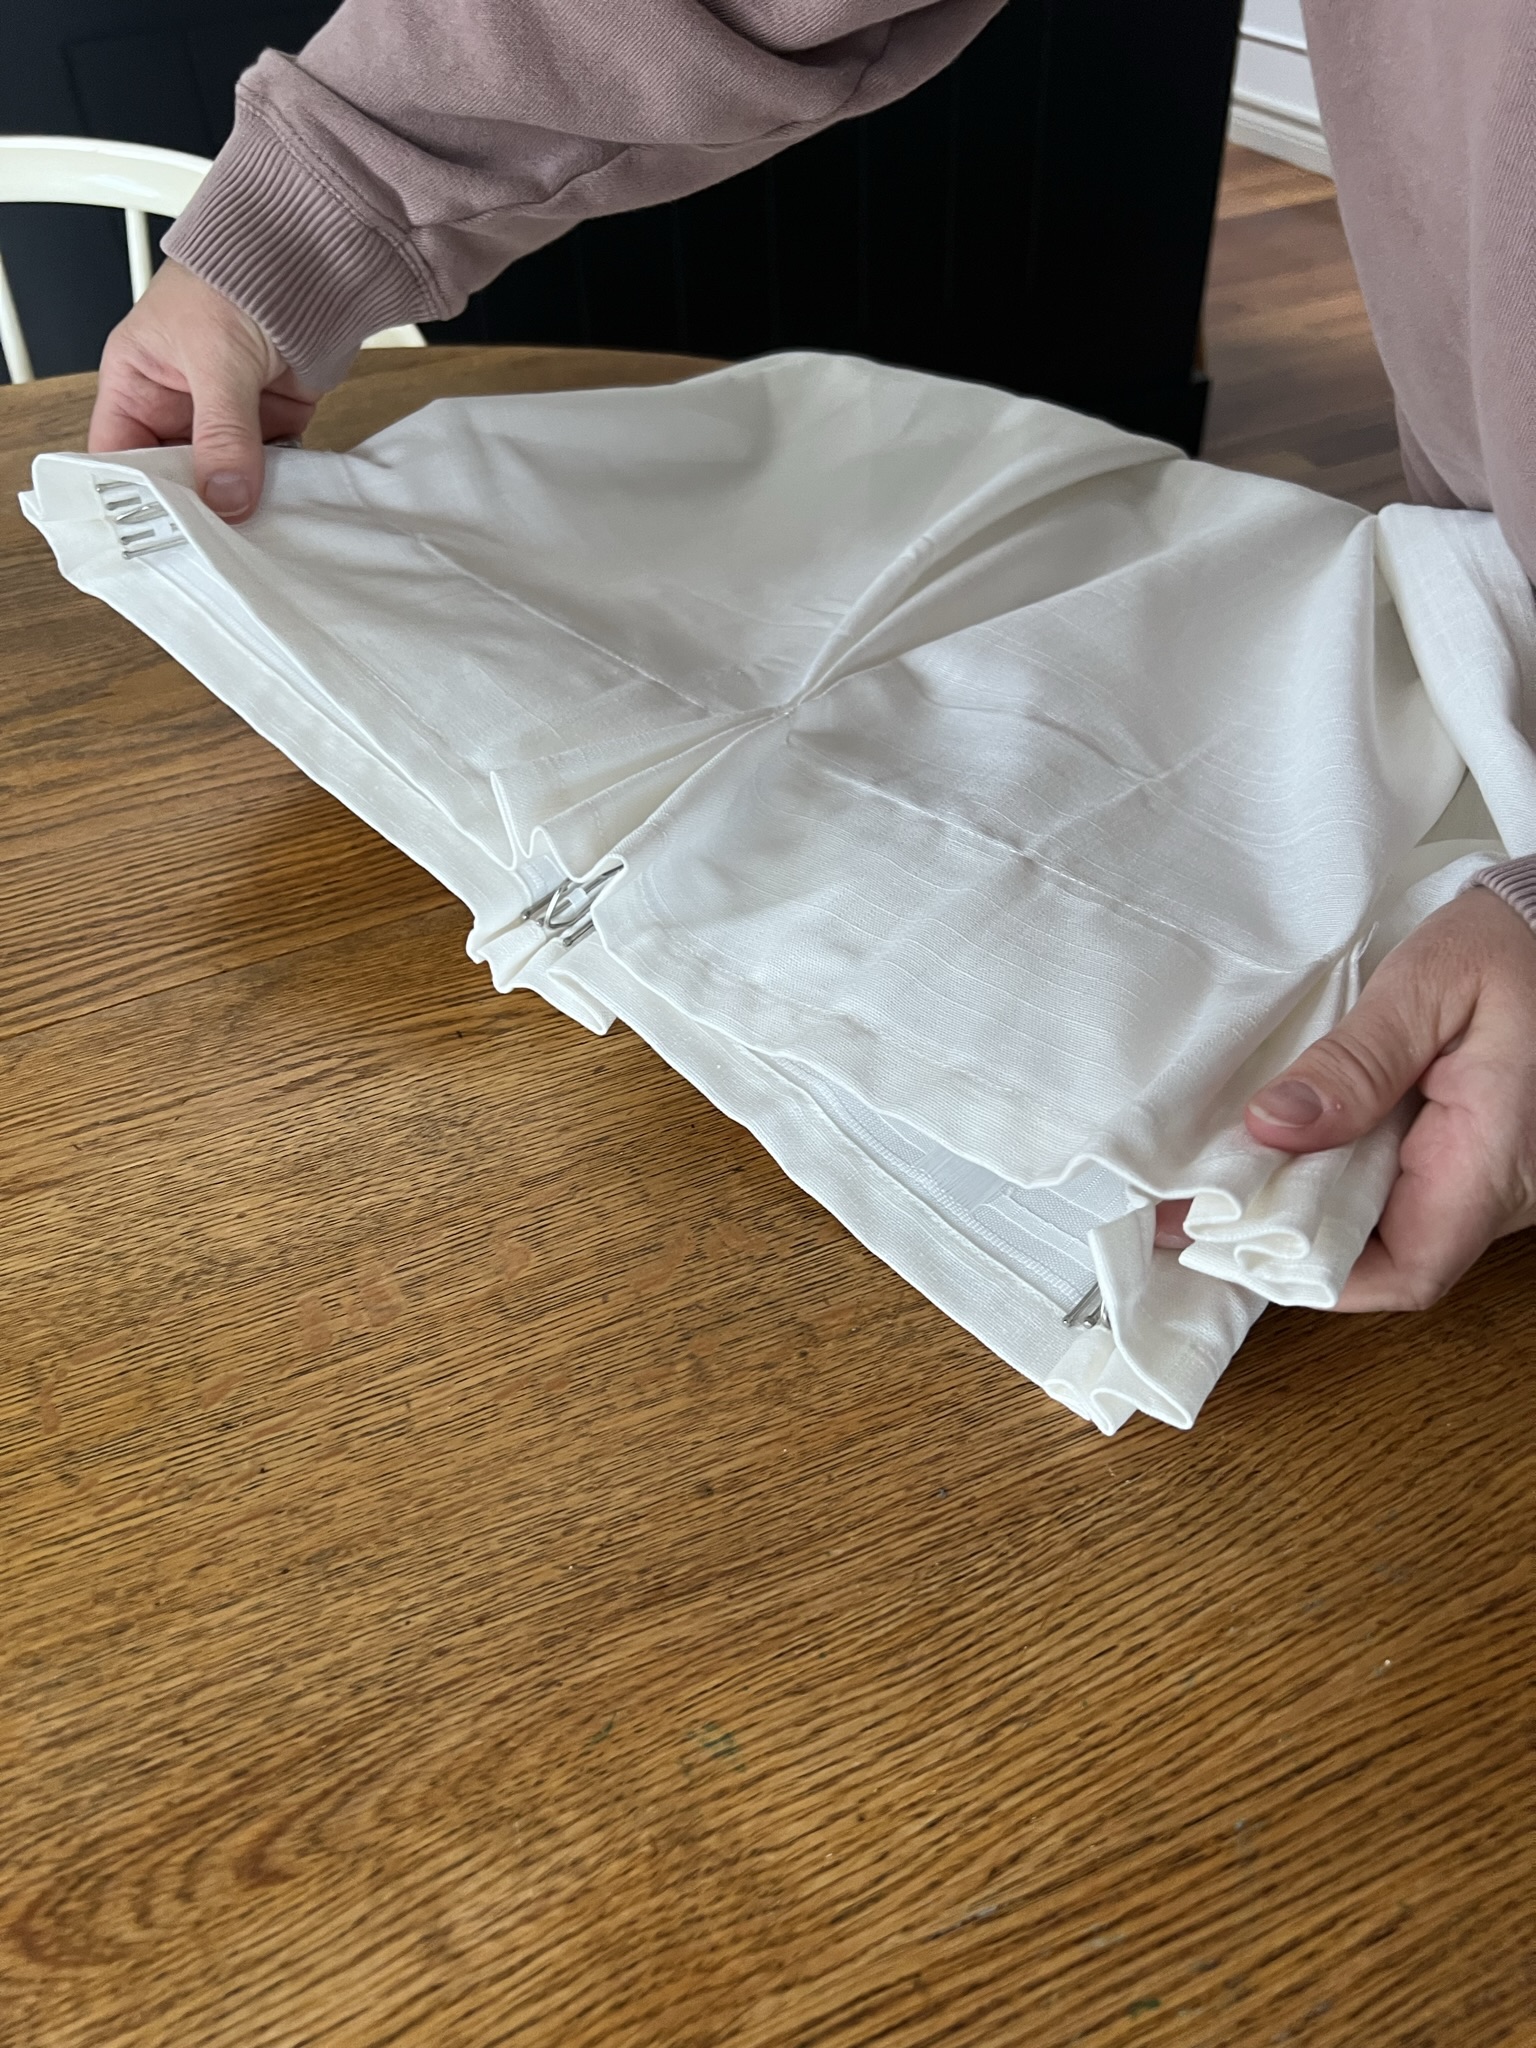
- I fold again between the two hook locations (the end and the middle one) and I add a pleat there, repeating on both sides. This results in 5 pleats for a standard 50” or so wide curtain, which is about right. When you find the pleat location, that will be the center of the pleat, so you will be adding the second and third prongs first to get the pleat locations right, just as you did for the middle pleat.
- If you want more pleats (or less, or have a different size of the curtain) you could also measure the pleat locations to lay them out more precisely. But as I said, I’ve done this quite a few times and it’s really not noticeable if it’s off a little on some pleats.
- If I need to put a prong in a location where one of the fibrous back tabs is, I either just use the next adjacent tab, or if that results in too big or too small of a pleat, I will adjust my starting point a little bit. I promise you will not be able to tell when you are done. (If you DIY’ed these curtains using pleating tape you sewed on yourself, you won’t have this problem as the pleating tape you buy at the fabric store doesn’t have those fibrous back tabs.)
How to Add the “Pinch” in the DIY Pinch Pleat Curtains
Ok here is where I lied to you when I said that these are no-sew. You technically could stop right there and they look pretty good, but I found that with only the prongs inserted, they look a tad sloppy. So I think it’s worthwhile to take an extra 5 minutes and add a little stitch to the pleats.
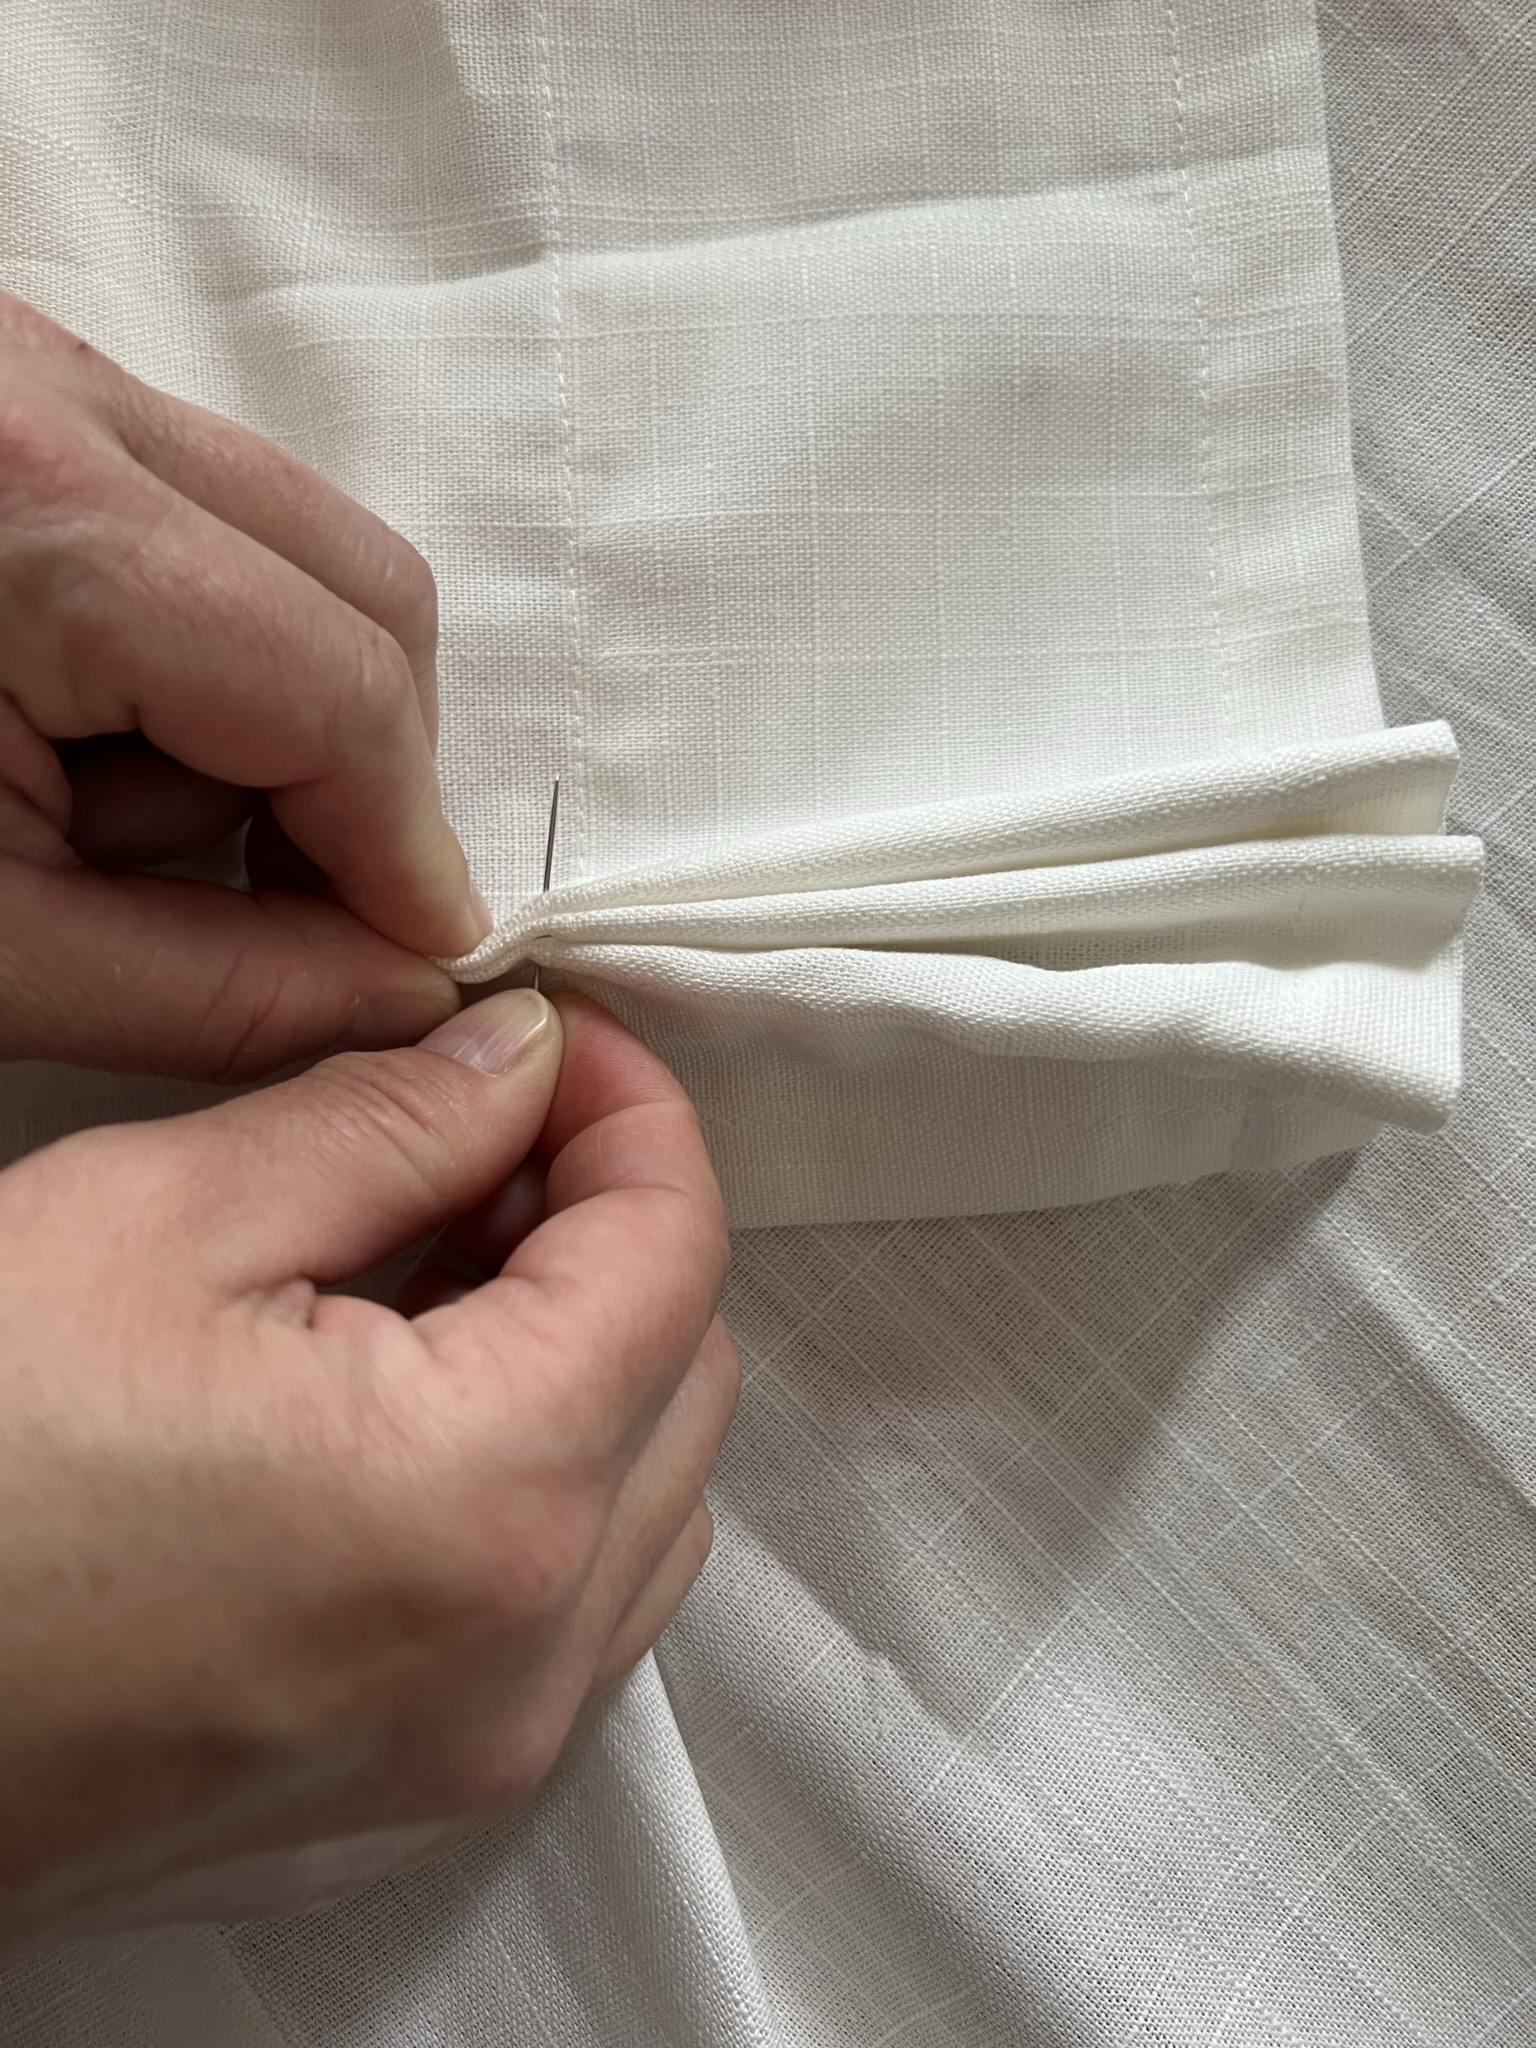
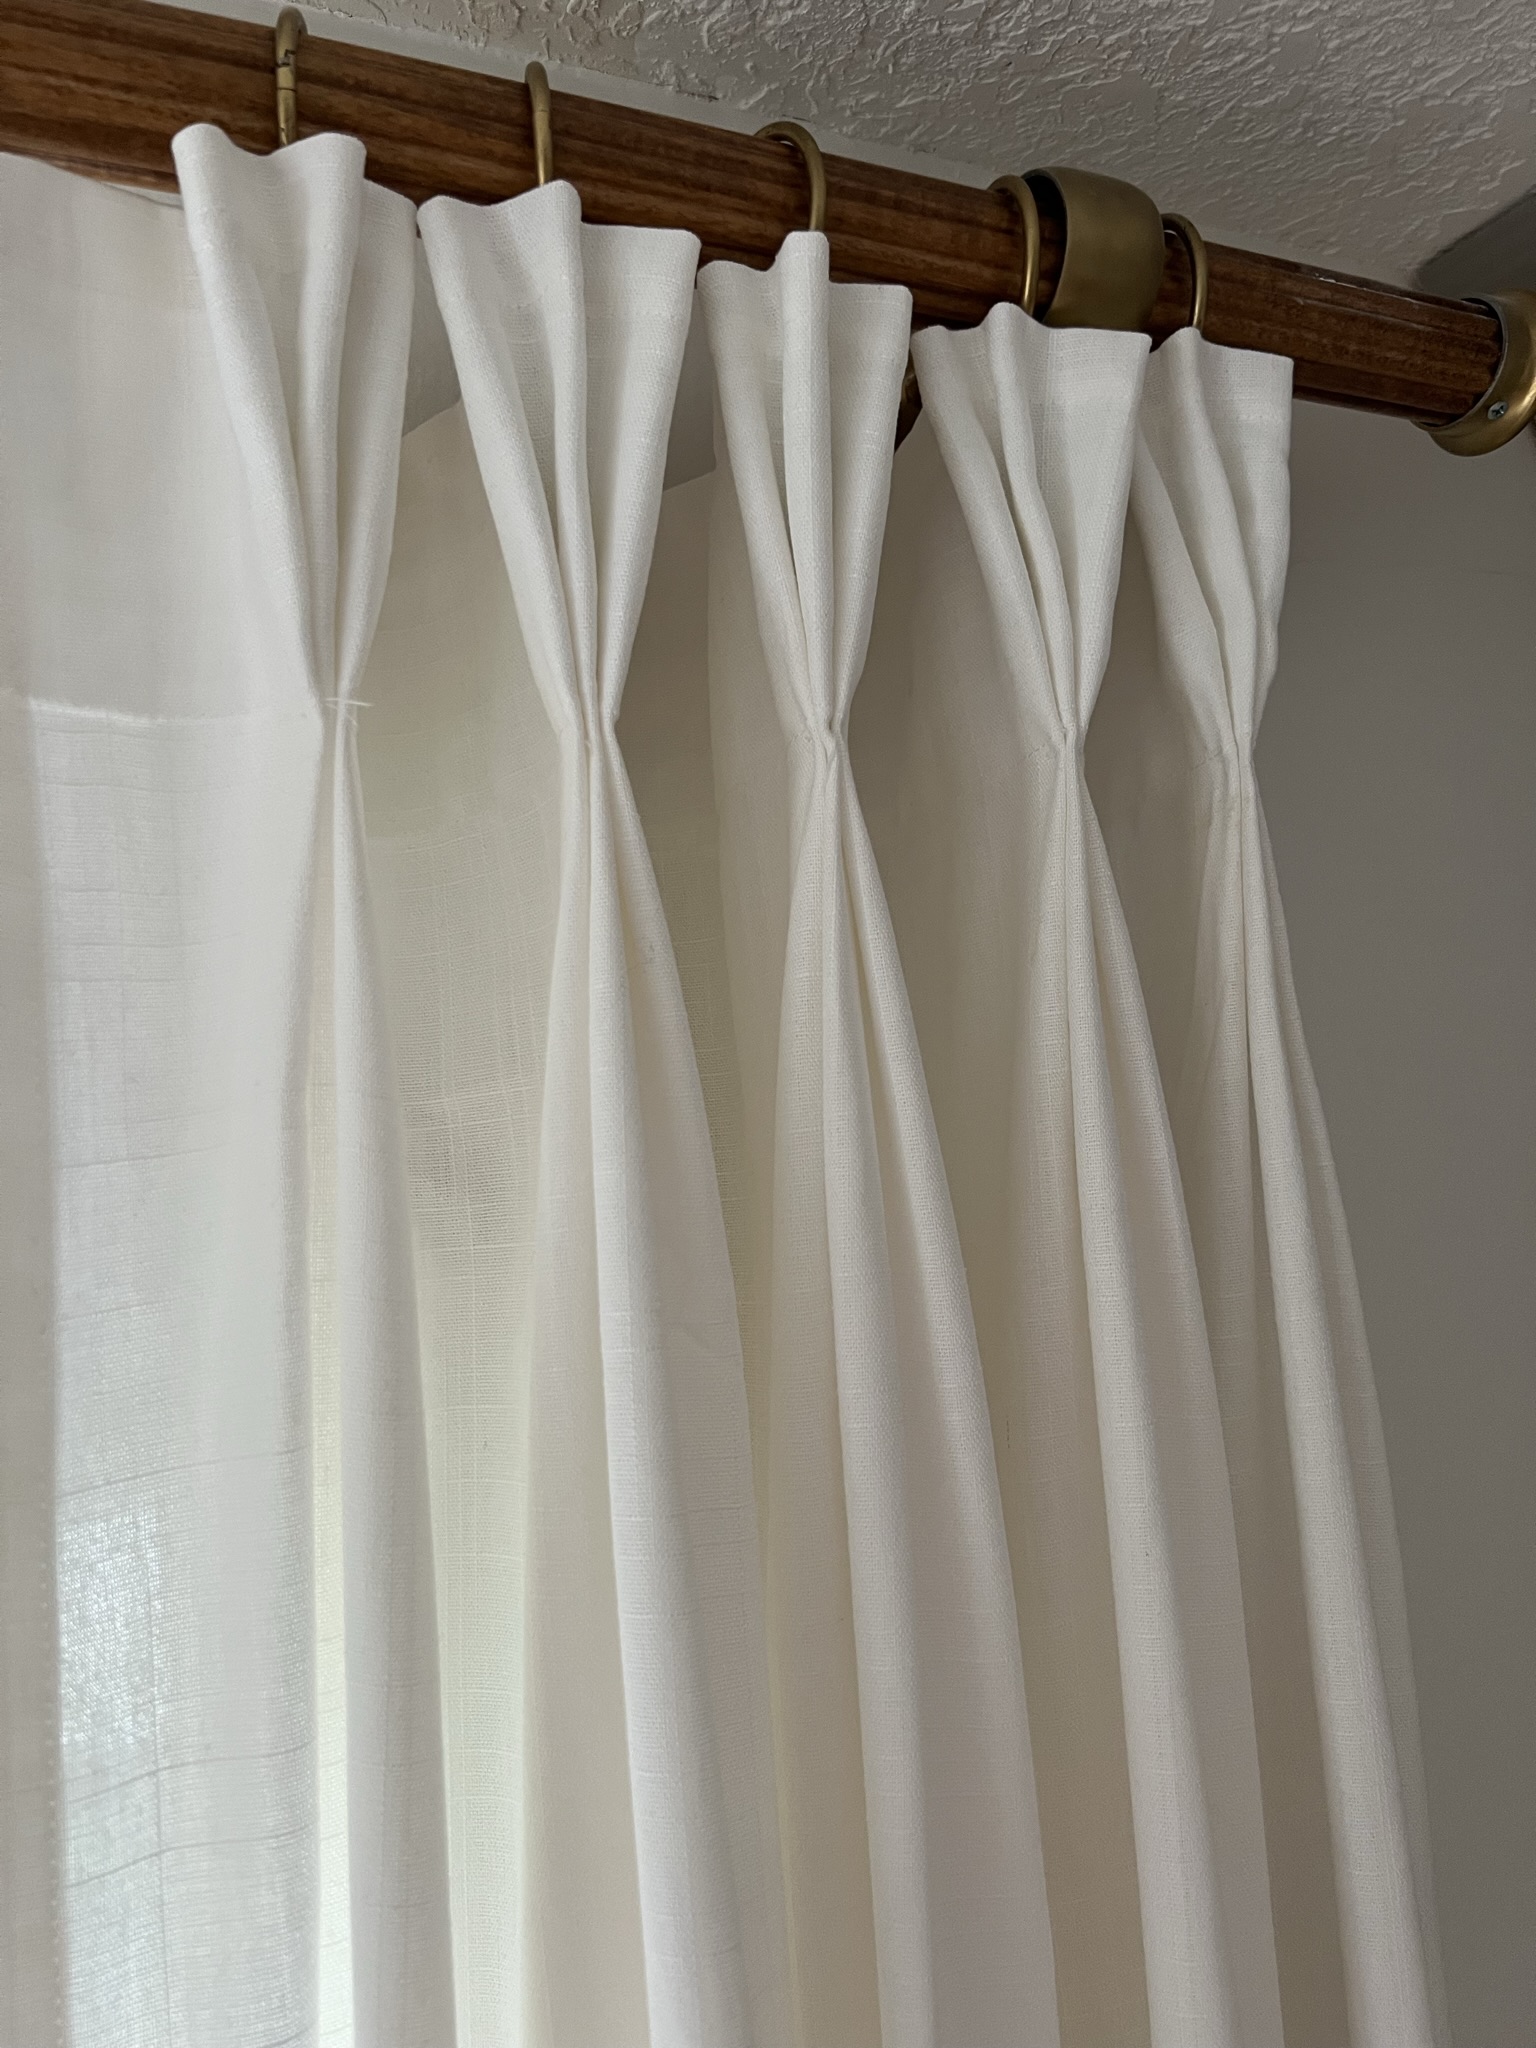
This is just something I do by hand with a needle and thread, if you can sew on a button you can do this. Just add a little stitch (I just go back and forth a few times and tie a knot) just at the base of the pleat, where the pleating tape starts and there is already a seam. This is is the “pinch” that makes it look so tailored, and it’s well worth taking the time to do.

How to Hang your DIY Pinch Pleat Curtains
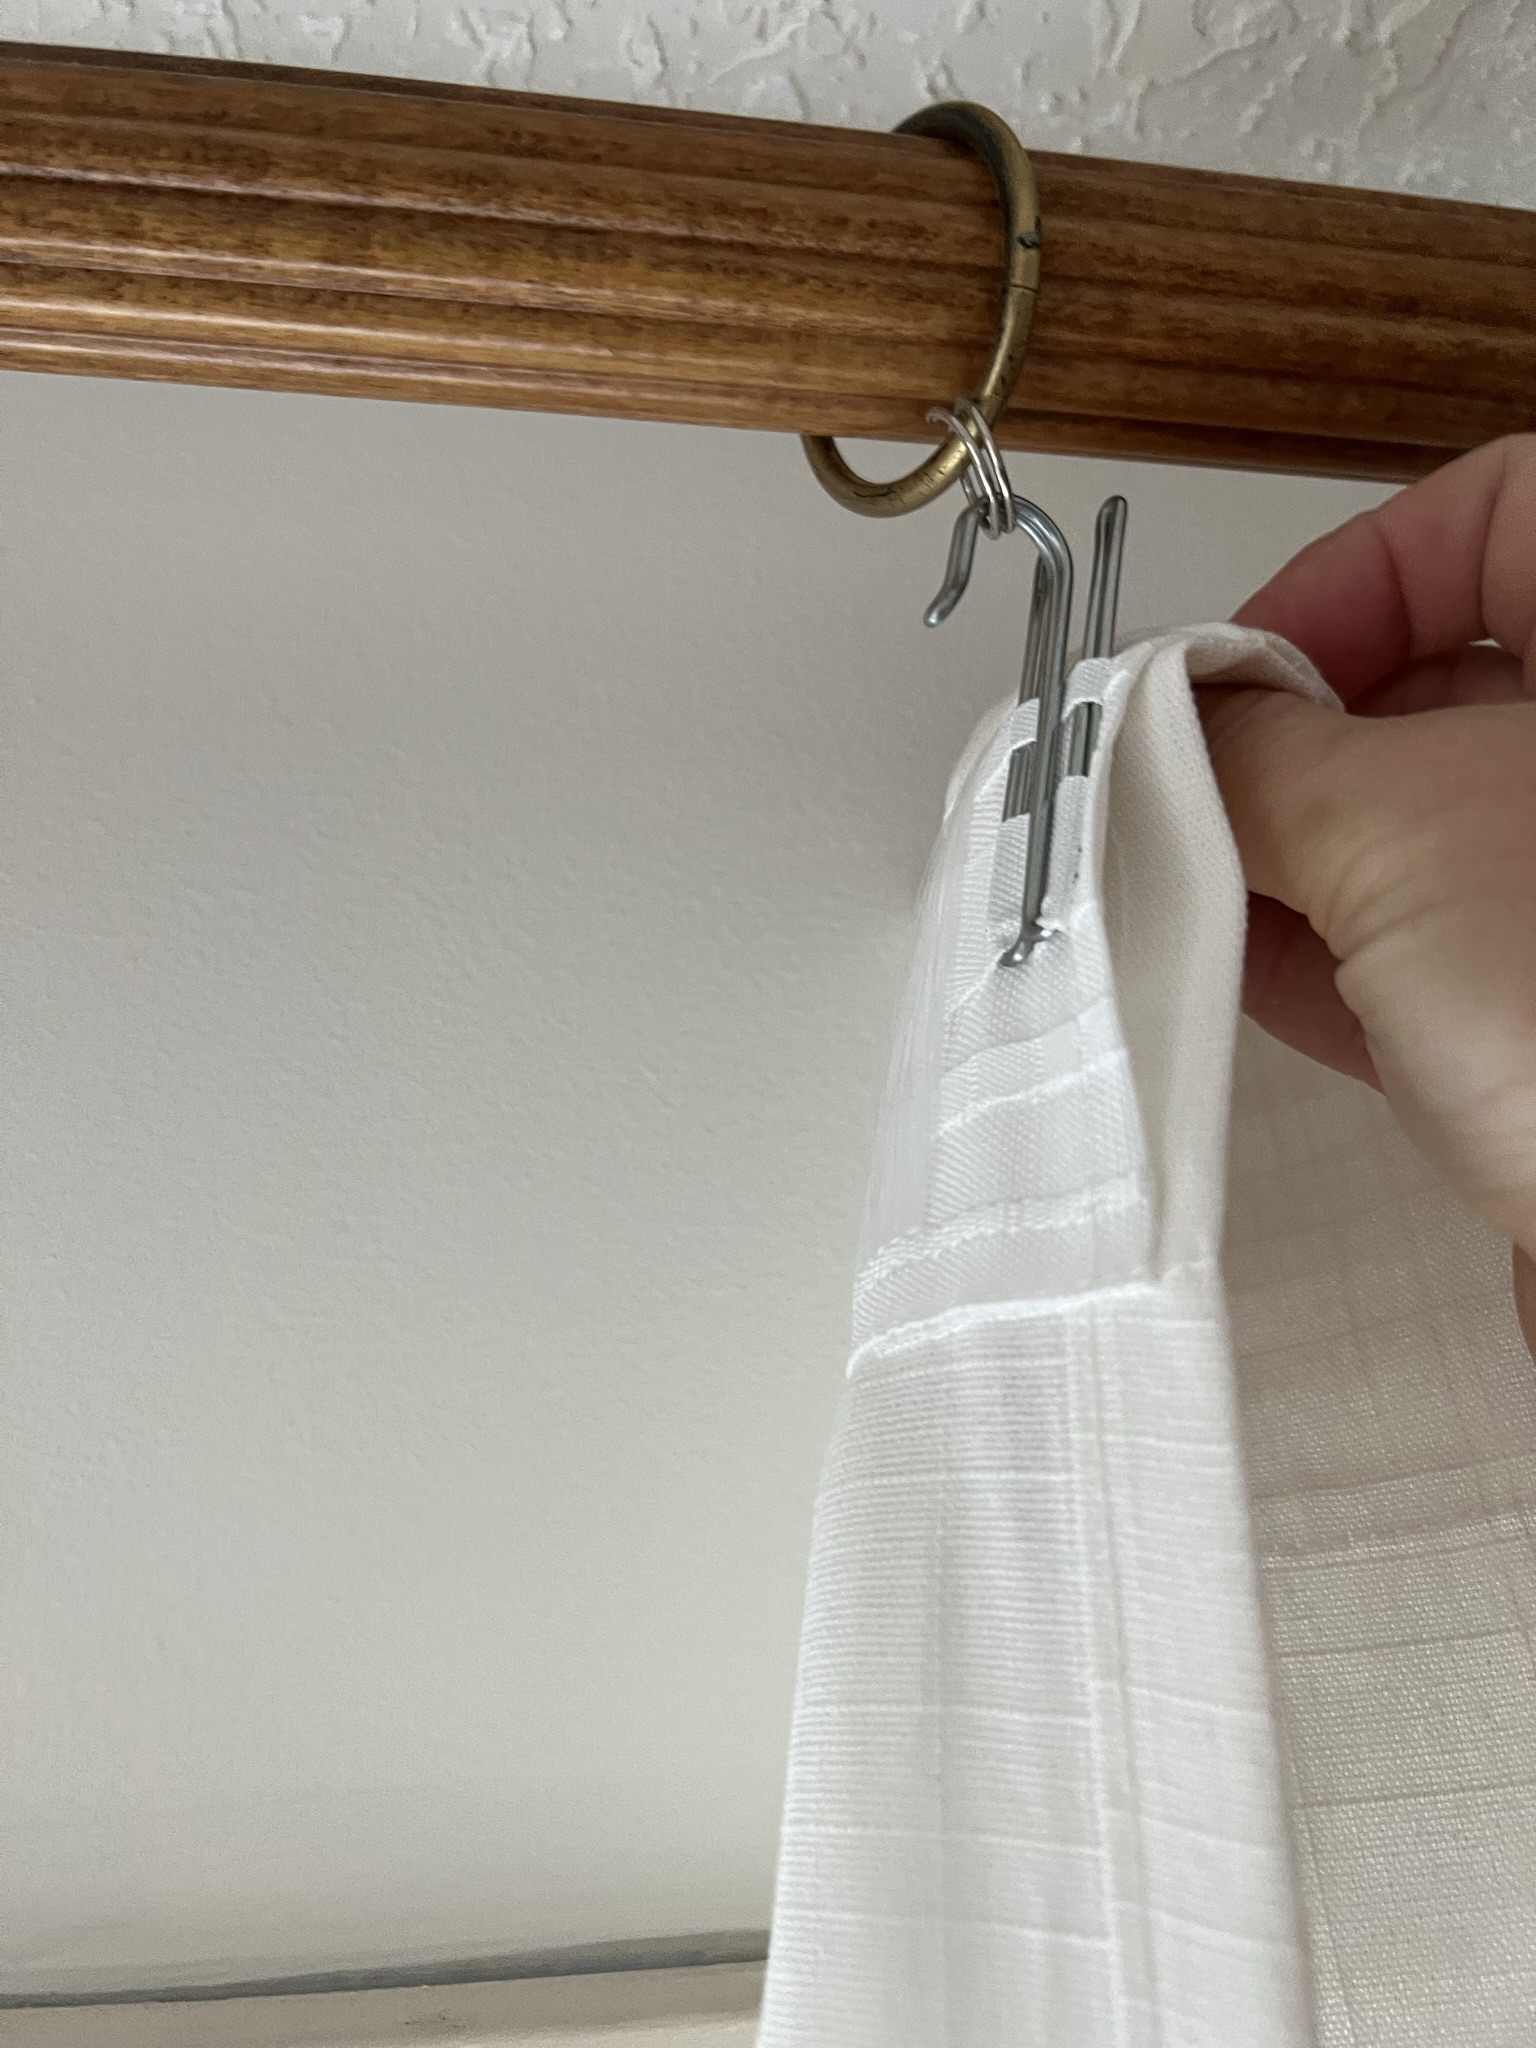
Now that you’ve created these very tailored curtains with a beautiful pinch pleat look, how do you hang them? You really must use drapery rings on your rod for this. I have hung them directly on a ring, but lately, I’ve been preferring rings like this that hold the pinch pleat and rod in the right direction so they hang nicely. Just hook the hooks onto the rings and you are all done!
How to Make your DIY Pinch Pleated Curtains look even Better!
So here are a couple of extra things that I like to do to make any off-the-shelf window treatments look more custom, no matter how I hang them:
- Double them up! Consider the width of your window width when deciding the width of your curtains. Whenever I have a wider window and certainly if I intend to close the curtains regularly, I like to double (or even triple) the panels. The amount of fabric you need is said to be 1.5 – 2x the width of the window. Most store-bought curtains are about 50” so technically, any window wider than 50” needs more than a single set of panels. I honestly think you can’t go wrong with more fabric, that always looks lush! (You can sew them together or even just put them next to each other, you can not really tell if they are not connected.)
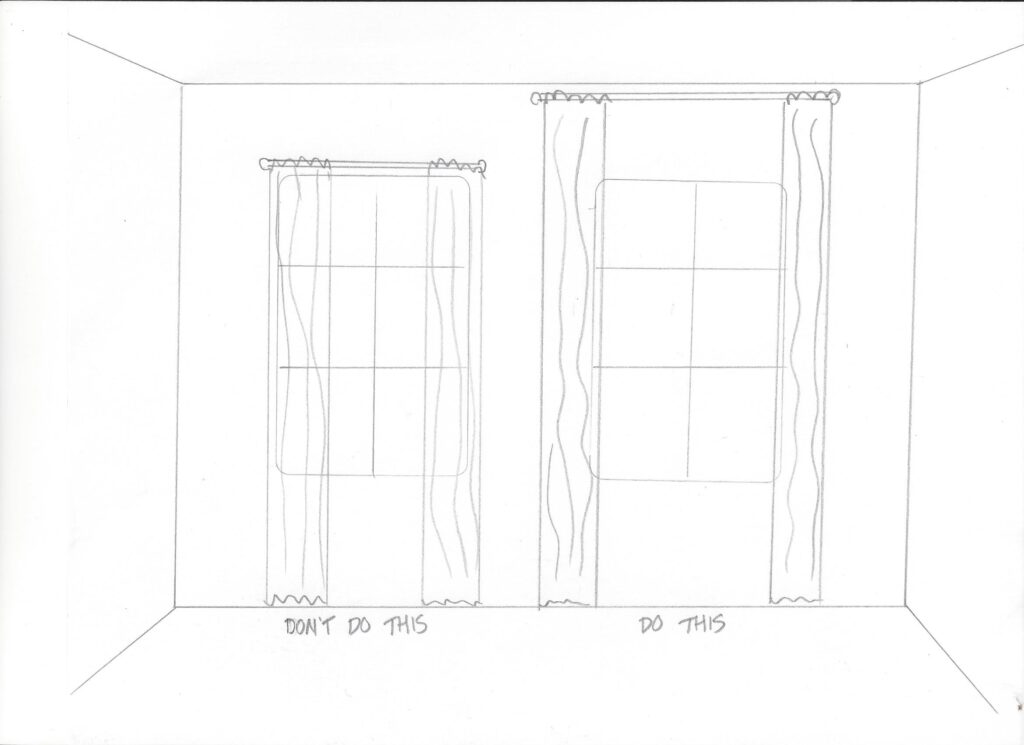
- Hang high and wide! Curtains should not block the window which means when they are open the inside of the curtains should be at the side of the window and all the fabric should be in front of the wall to the side of the windows. In addition, the top of the curtains should be well above the top of the windows, I like to hang them a minimum of 4-6” above the window trim (but if it makes sense I like them to be as close to the ceiling as possible).
- Hem them to fit! Buy them long, and hem them to fit. You can do a bottom hem by sewing or you can use iron-on heat bond hemming tape if you don’t sew. Having curtains that just hit about ½” above the floor can only be achieved by hemming (or hanging curtains just so…. But let’s just say that sometimes off-the-rack curtains are not the most consistent length so hemming them to fit is the best way for them to look like they were made for the space.
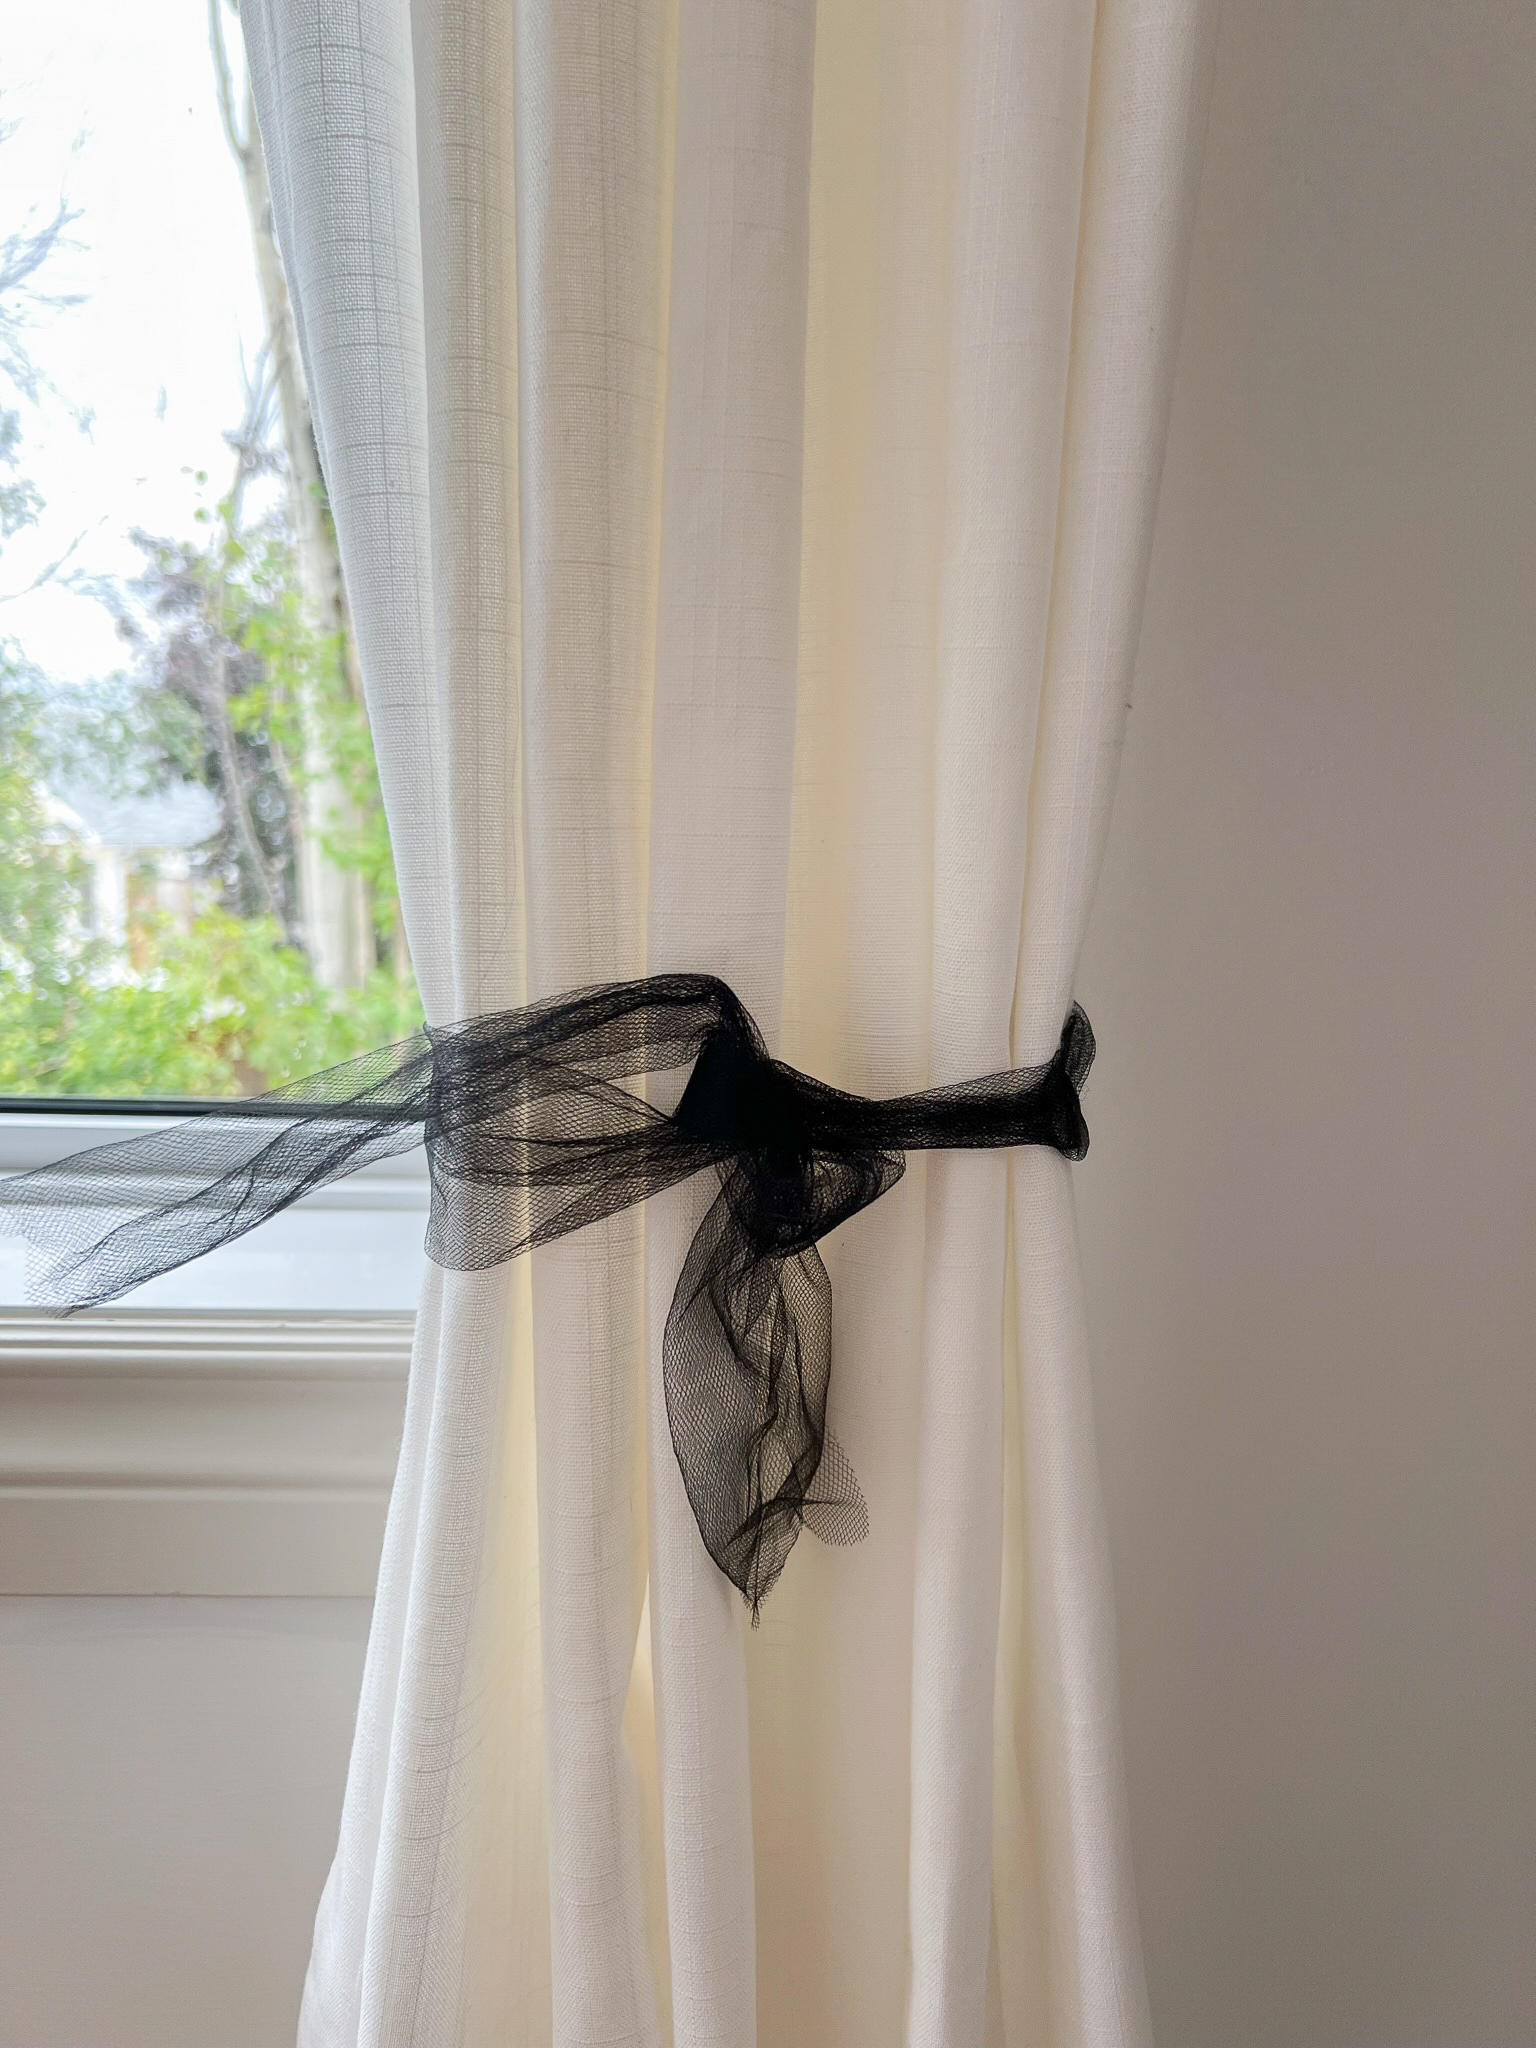
- Train them! No, don’t give them treats and tell them to roll over. What I mean by training is to follow the pleats all the way down and tie them loosely in their pleated shape and leave them like that for a few days. The fabric will be trained to hang in its pleated form and look much more tailored.
That’s it!!! This is a little bit of work to do but I promise it’s so satisfying! I have IKEA and H&M curtains throughout my house and they look much better because of these hacks! Here’s a printable card for you to follow along with, I promise it’s super easy!
How to DIY Your Own Pinch Pleat Curtains

Use off the shelf materials and a few simple supplies to make your curtains look custom!
Materials
- Ikea Curtain Panels (or other curtain panels with pleater tape on the back)
- 4 Prong Curtain Hooks
- Thread that matches your curtain fabric
- Curtain Rings
- Curtain Rod
Tools
- Needle
Instructions
- Insert the first prong of the first hook about 1 - 2" from the edge of one side of the curtain panel into the loops in the pleater tape.
- Count over 5 spaces and insert the next prong of the first hook into the loops of the pleater tape
- Count over 5 more spaces and insert the third prong
- Count over 5 more spaces and insert the last prong.
- Repeat steps 1 - 4, inserting another hook onto the opposite edge of your panel.
- Fold the curtain in half to find the center. This is where the next hook will be centred. Count over about 2 - 3 spaces and insert the third prong of a curtain hook into the loops of the curtain tape.
- Count over 5 spaces back toward the center to find the location of the 2nd prong, and insert it.
- Repeat for the last two prongs, counting over 5 spaces each time.
- Fold the curtain from the end to the middle, to find the mid-point between the end hook and the middle hook, and repeat steps 6,7, and 8 to insert another hook there.
- Repeat step 9 for the opposite side.
- For a standard width panel, you will be finished at this point. If you have wider panels or want more hooks, continue to fold together to find the mid-point between hooks and inserting more hooks.
- Stich by hand a small stitch at the base of the pleats to create the pinch.
- Hang your curtain from the hooks on to rings on the curtain rod.
- Admire your fancy curtains!!
Notes
Note: If you want your spacing to be more or less, you can also measure and mark where you would like the pleats to be and space the hooks that way.
Shop this Post


I appreciate the suggestion of sewing the bottom. It makes it look much better! I’m a sewing novice, but I think I can handle that. Do I need to use a special type of thread? Or will any do?
I just use regular all purpose thread!
Do you iron or steam the curtains at any point in this process?
Yes I do, at the end for my curtains but you can do it anytime you need to depending on the fabric.
Should you hem the curtains before or after creating the pleats?
Hi McKenzie! It doesn’t really matter what order you do those in. Good luck!
Love your tutorial. Thanks so much. Just took mine down to wash for the first time in seven years, as I have been dreading taking out the hooks and having to re-pleat. Will give the pleat stitch a try! It looks great. I’m wondering if the stitch you used is horizontal to the ceiling (by going through the pleat *-^-.^-^-* – OR did you do a vertical stitch |^^^|? Or maybe it doesn’t matter.
I do like the stitch as it may help hold the pleats together so I not as much work the NEXT TIME I wash them. Which, now that I think k of it- I may do a more substantial stitch to hold. The top pleat bit is hidden by the existing cornice boards in our old house! Thanks!
I just did a very small stitch in one side and out the other, I don’t think the the position matters that much! Happy pleating!
Wow! Thank you for the phenomenal step-by-step tutorial!! One question- what is the width of one Ritva curtain panel once pleating is finished? (Trying to determine my stackback dimensions before hanging rod.) Thanks so much!
They are around 35″ depending on how many pleats you do! Happy pleating!
Thank you for this very helpful webpage! Much appreciated!
What a great tutorial, thank you! I want to install mine on a track, as it’s a bay window and I’m going to do them straight across. Do I still use the same hooks for tracks or do I need to do anything differently? Also, I found all IKEA drapes are 98″ and I need longer. Do you know any other reasonable priced brands that do about 105-107″ tall? Thanks, your pleats looks great.
I would double check that the hooks work with your track, sometimes the track “loops” are quite small so it depends on the track you purchase. You can always sew the pleats and use a single drapery hook to hang them. Ikea used to sell up to 118″ but they have those less and less! I know that H&M often sells long ones up to 118″ and also there is always Amazon! I have several long drapes that are semi custom from Two Pages as well but that is a bit more money. Good luck on your project!
Great tutorial, Erin! When I recently went fabric shopping (MSP/St. Paul, MN) I was surprised at the lack of fabric options as many stores have closed in the last couple years. Using Ikea drapes is genius. Where else can one find a great quality and quantity of fabric, the seams already sewn, and the pleater tape attached for a great price!? Now I’m going to study your café curtain tutorial and create something awesome for my kitchen window. Thanks for sharing your skills!
I’m so glad it was helpful Kim! We also have no more fabric stores where I live, they have all closed!
Hi, thanks so much for the information! May sound silly, but do you stitch on the outside of the pleat or the inside pleat towards the window?
There are no silly questions! I stich on the outside, it’s a very small stich so it does not show.
Amazing tutorial! I am curious if you pleat the inner curtain as well as the outer curtain when you double up? Thanks!
In my living room both the outer curtain and the inner curtain are pleated, but I don’t think you necessarily have to do it that way!
Where did you get those curtain rods? They are beautiful!
I made them! https://erinzubotdesign.com/diy-dowel-curtain-rod-with-gold-brackets-and-end-caps/
If you are doing 2 to 3 panels per side, do you connect them with the hooks or leave them separate on their own set of hooks?
Thank you so much for this tutorial! The pins came without any instructions at all and I have been struggling for 2 days to get the right spacing and arrangement! Figured out how to do a single pleat on my own but the spacing was still off, and I wanted a triple + pinch anyway! So this is absolutely perfect and so easy to follow! Can’t wait to get home from work and re-try it!
So glad it was helpful!
Its up to you. What I usually do is sew or iron-fuse the panels together first and then treat them like one big wide curtain.